SECURECOM Door Master 300 User manual

Door Master 300
1EN
D
Do
oo
or
r
M
Ma
as
st
te
er
r
3
30
00
0
Mobile App-based WIFI/Bluetooth remote control
for controlling gates, garage doors, barrier gates
User Manual v1.0

Door Master 300
2EN
Table of Content
1. General information ........................................................................................................ 3
1.1 Benefits ..................................................................................................................... 3
1.2 Operation .................................................................................................................. 3
2. Connection ...................................................................................................................... 4
3. Settings ............................................................................................................................ 4
3.1 Setting the device WIFI connection using PC software .............................................. 5
3.2 Setting up the WIFI connection with smartphone (alternative mode) ....................... 5
3.3 Special features, signals and setting .......................................................................... 7
3.3.1 Gate position monitoring .................................................................................... 7
3.3.2 Alert when gate was left open ............................................................................. 7
3.3.3 Automatic gate opening ...................................................................................... 7
4. Status indicators .............................................................................................................. 8
5. Reset to factory default ................................................................................................... 8
6. Smartphone app installation and usage ........................................................................... 9
6.1 Starting the application and initial settings ................................................................ 9
6.2 Details and usage of the application ........................................................................ 10
7. Management via WEB, password setting, restricting user rights ................................... 11
7.1 Device protection with password ............................................................................ 12
7.2 Setting and restricting smartphone users ................................................................ 12
8. Technical Specifications ................................................................................................. 13
9. Content of the package .................................................................................................. 13

Door Master 300
3EN
1. General information
Door Master 300 is an advanced gate or garage door control device, operating with WIFI
connection over Internet or direct command sending through Bluetooth, providing the
following functions:
Remote controlling of gate or garage door for up to 300 users, via PULOWARE app
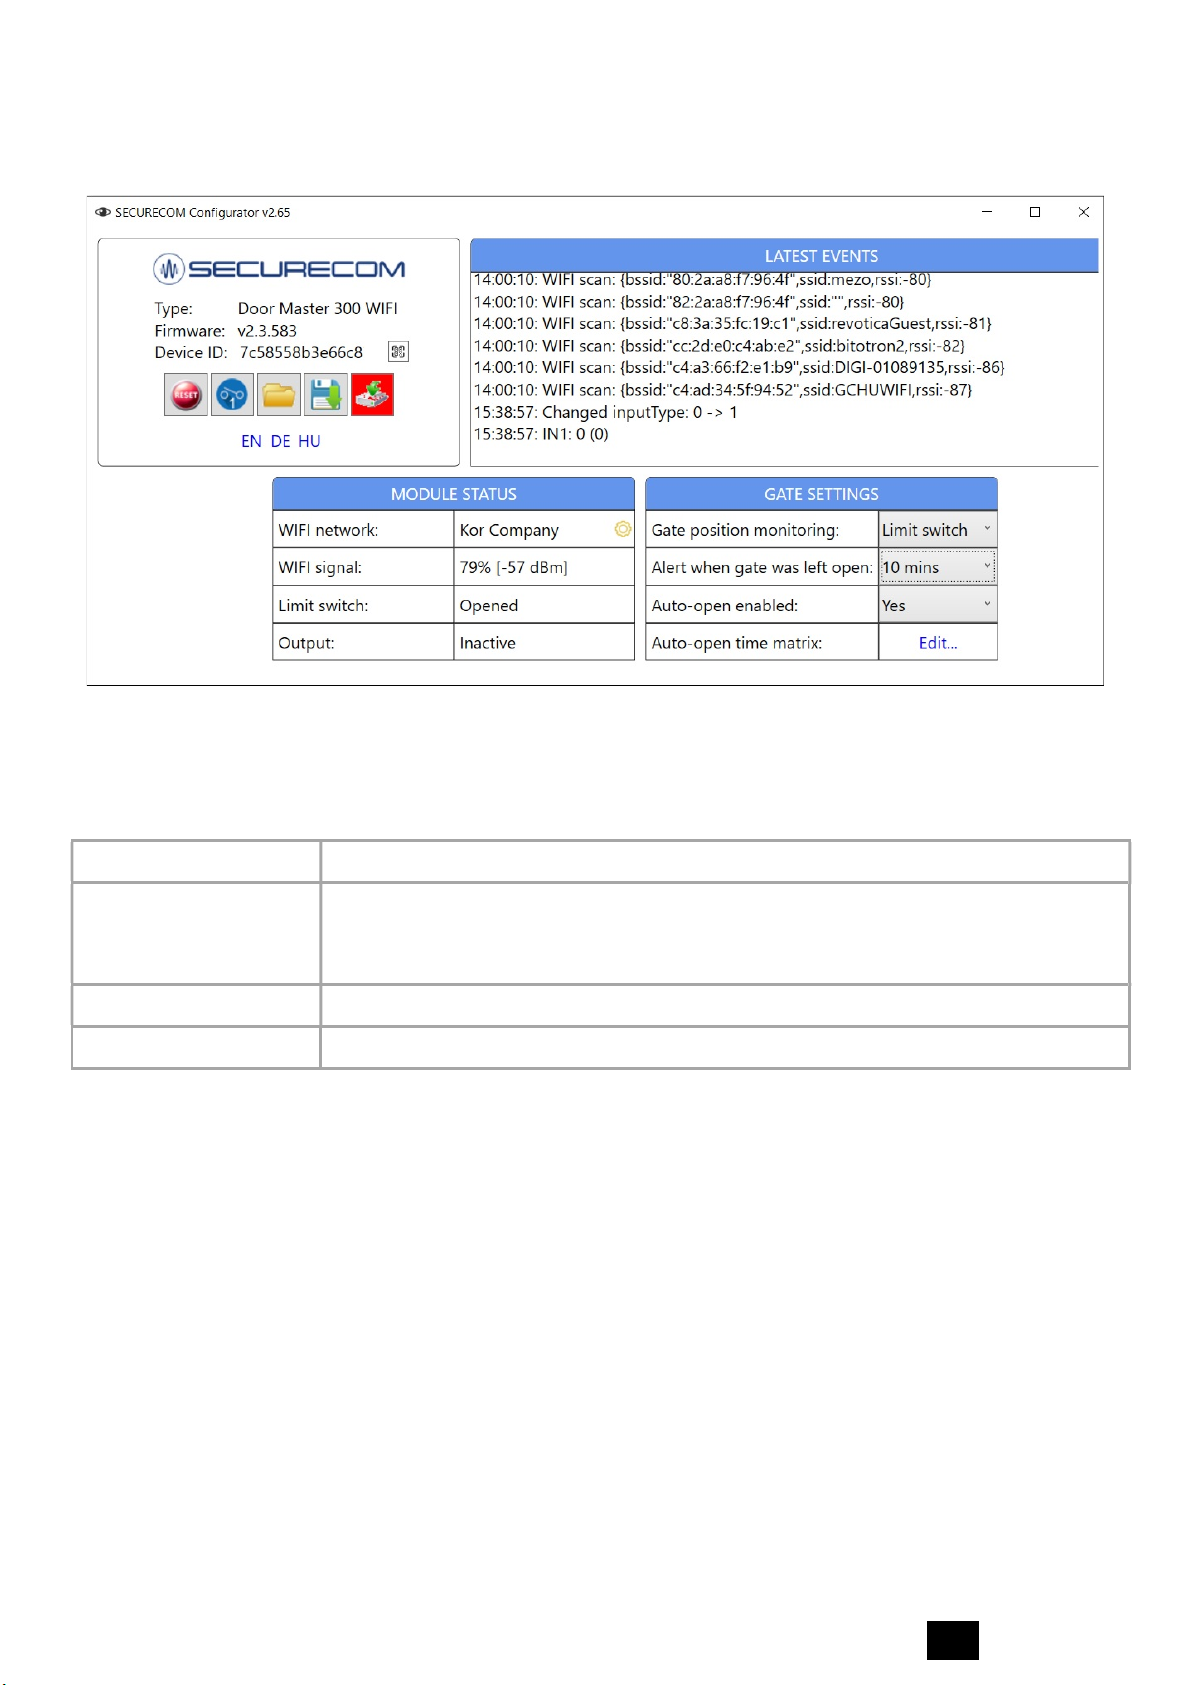
Signaling the OPEN or CLOSED status on the smartphone application
Signaling the opening and closing by “push notification”
Setting an alarm in case the gate is left open too long
Scheduled automatic opening periods can be set (e.g. Mo-Fri/08-17)
Backup Bluetooth connection for local control in case of internet failure
The Door Master 300 remote control communicates through the internet, therefore for its
operation it is necessary to have continuous Internet connection on both device and the
smartphone. If the connection from smartphone to the device through Internet is lost, then
the application will force the command sending from smartphone to the device through
Bluetooth, thus providing an uninterruptible controlling of the gate. The connection and
communication is encrypted with the AES-128 encoding.
1.1 Benefits
Simple smartphone app, replacing a remote control with unlimited distance
Simple, fast setup (no router settings)
Control and status monitoring in one
Programmable alarming and automatic operation features
Users can be managed remotely via the website (add, delete, restrict)
Activity event log available from your phone or web page
Settings of device can be changed remotely via web page
1.2 Operation
When the device is controlled from the PULOWARE mobile app, it closes the output contact
for 1 second and sends the dry contact signal to the connected "open/close" input of any
gate drive controller. The gate status information (OPENED or CLOSED) is gathered from the
magnetic door contact, that must be installed in the appropriate position and connected to
device input. When any user opens or closes the door, the device can send a notification to
all users or only for specified users, showing the position of the garage door and who
opened or closed it.

Door Master 300
4EN
2. Connection
3. Settings
The device needs to be set up and connected to a local network that provides Internet
connection. Device can only connect to a 2.4GHz network!! The 5Ghz cannot be used.
All settings can be made with the SecurecomConfigurator software, which is downloadable
from this link: http://puloware.com/public/SecurecomConfiguratorSetup.exe
The software needs to be installed on Windows based PC. Run the software and connect
the device with the PC using an USB cable. The software will automatically offer the
appropriate COM port.

Door Master 300
5EN
3.1 Setting the device WIFI connection using PC software
1. The WIFI network selection can be reached with "gear" icon, marked on the image
2. Scan button will load the list of WIFI networks which the device can reach
3. After selecting the network, put the appropriate password in the "password" field
4. Use the SAVE button to restart the device with the entered settings
If the settings are correct (the password is right for the selected WIFI network) and the
selected network has access to Internet, the device will instantly connect to appropriate
server and display the "online" status with green LED blinking.
3.2 Setting up the WIFI connection with smartphone (alternative mode)
This method should be used when it is not possible to configure the device using the PC
software. To setup the DM300 device with smartphone, its webpage must be accessed. The
SET/RESET button is used to force the device into “HOTSPOT” mode. Alternate blinking of
green and red light are displaying that the mode is active, and an own WIFI network is
emitted with name SECURECOM DEVICE. You must connect to this network with a WIFI
capable smartphone or computer, then the device webpage that shows settings can be
accessed with a web browser. (It is important to keep the mobile data connection of the
phone switched off!).

Door Master 300
6EN
Access to the device configuration WEB page and set up the Internet connection
a. Apply a short press to the SET RESET button, the status indicator LED will start blinking
alternately green and red. (DO NOT hold down the button for long time, this may delete
all settings of device!)
b. With your smartphone (or PC), find the SECURECOM DEVICE name among the list of
available WIFI networks, and connect to that network.
IMPORTANT: turn of mobile data on your phone before starting the browser, otherwise
the operating system will connect the browser to internet through mobile network!
c. After connecting to WIFI network, start the browser and open the web page wifisetup.eu
That page is displayed by the Door Master 300 and presents all available settings:
a b. c.
Two separate networks can be set at the settings page, their SSID (name) and the appropriate
password. These connections are redundant, used as backup for each other. When connection
to server fails through one WIFI connection, the device will switch to the other. There is no
"priority", and the connection through any of the two will be held as long as it provides
connection to the server. When it fails, the device will switch to the other.
SCAN button will list the available networks, where the desired network can be selected
If the desired network is not listed (for example, in case of hidden network), you can press the
EDIT button and enter manually the SSID (name) of the WIFI network
TEST button will initiate the connection to the selected network with entered password. If the
password is correct and there is a DHCP server in the network, device will gain an IP address
and it will be shown in the third field.
SAVE button should be used to save settings and restart the device with the entered settings
After the device has restarted and connected (displayed with green LED blinking), you can turn
back on the mobile data connection in your phone.

Door Master 300
7EN
3.3 Special features, signals and setting
Besides controlling of gate with smartphone app, device provides some special features
that should be enabled and set with the configurator software.
3.3.1 Gate position monitoring
The magnetic door contact provided with the device should be installed on the gate and
connected to device. This way, the status of the gate becomes visible in the application.
Also, when the status is changing (opening/closing) a push notification can be sent to
selected smartphones. The status changing events are also visible in the event list. This way
it is possible to review all previous events with the gate, even if the opening/closing was not
initiated with PULOWARE application (for example, it the gate was opened manually).
3.3.2 Alert when gate was left open
Warning notification will be send in case the gate is left opened for longer time than set.
During the automatic open mode this signal is disabled.
3.3.3 Automatic gate opening
This function allows to schedule when should the gate stay opened. After enabling the
auto-open feature you can manage the preferable time in the time matrix. During the
selected time, the control of output is continuously ON, thus preventing the gate automatic
closing.
The green squares show the preferable time when should the gate be open. The selection
is changed by clicking on the preferred block.

Door Master 300
8EN
If any parameter value was changed, the "download" icon becomes red, signaling that it is
necessary to download the new settings to the device. Clicking on the icon will send all
settings as visible on screen to the device.
4. Status indicators
LED on the bottom side of the device shows the status of the connection to the WIFI network.
Continuous red No settings (factory default)
Blinking red
C
onnection in progress
Wrong WIFI settings (cannot connect)
No Internet connection for selected WIFI
Blinking green NORMAL operation, WIFI and internet connection stable
Alternate green/red
HOTSPOT mode, setup in progress
If the device is blinking red for long time, the device settings should be checked. If the LED light
is changing from green to red from time to time, the connection is failing and either the WIFI
signal level is poor, or the Internet provider (router connection to Internet) is faulty.
5. Reset to factory default
If it is required to reset all settings in Door Master 300 and delete it from all assigned
smartphones and accounts in PULOWARE server, this operation can be performed only while
the device is in NORMAL status, connected to the server (blinking green LED).
To reset, hold down the SET/RESET button pressed for approximately 30 seconds. When the
button is pressed and held, the red/green status LEDs will start rapidly blinking and after a
while it will turn off. When the defaulting procedure is finished, red LED will turn continuously
ON. After that release the SET/RESET button. If the operation was canceled (the button
released before the procedure finished), the device must be put to NORMAL status (green led
blinking) before repeating the defaulting procedure.

Door Master 300
9EN
6. Smartphone app installation and usage
Users can download the PULOWARE app to their devices from Google Play or App
Store, matching the platform to their smartphone. After starting the application, the setup
wizard asks for entering the operator (user) name, then the Device identifier number of the
Door Master 300 unit to be controlled, and finally the relevant password. The device
identifier number is the 16 alphanumeric character code on the sticker on the bottom of
the device, which is the unique identifier of the unit in the system. There is no password for
a new device, this can be set in a separate account on the IoT server interface.
6.1 Starting the application and initial settings
1. Download the PULOWARE application from the store supported by your phone.
2. Start the application, and enter the relevant data
Green navigation pointers are showing the proceeding direction. Application requires a given
User name and the Device ID. The Device ID can be found on the back of device and also on
the enclosed Quick manual. This 16 characters long ID can be read also as QR code. For that,
you must tap the blue icon with form of a QR code to open the reader and after that present
the Device ID QR to the smartphone camera.
By default, there is no password for devices so leave the password field empty when a new
device is assigned. A device password can be added, changed or deleted on the puloware.com
web site, after the device is added to the users account. If a password was once assigned to a
device, it cannot be added to any account or smartphone app without that password.

Door Master 300
10EN
6.2 Details and usage of the application
Home screen
Devices bar with all added PULOWARE compatible devices
All devices are reachable scrolling this area horizontally
When a desired device name is visible, click on it and the
screen below will show that device status and options.
Displaying the status of selected gate
Last controlling time and users name
Gate controlling button. It should be pressed for at least
two seconds while the yellow circle closes around the
button. After that the command will be sent, and after that
a green checkmark will show the successful command
receipt to the device.
Settings screen
Bin icon for deleting the device form the application
The gate openers unique identifier + QR code
Gate name, editable with the pencil icon on side
Position of the device in the Device bar in Home screen
Gate status sensor usage ( the installation of provided door
contact is recommended)
Gate type selection (type of animation showed on home
screen)
Sending the Push notifications of specific type of events To
enable the sending of the named event type to your phone
in the moment of event happening, push the slider to right
The slider is showing with the green color If the notification
sending for the named event type is enabled.

Door Master 300
11EN
7. Management via WEB, password setting, restricting user rights
All additional features of the Door Master 300 are available via www.puloware.com WEB
site. To login the portal a registration is required. When a new account is opened, only the
demo devices are available, so a device must be added to the account using the
+ ADD DEVICE button. Selecting a desired device from the list of added devices to the
opened account (on the left side of page) will show the device status, settings and events
on the right side of the screen:
The design of the screen is identical to the SecurecomConfigurator.exe software screen,
with all the status and settings fields that are available for that device as described in
paragraph 3 [Settings].

Door Master 300
12EN
7.1 Device protection with password
By default, there is no password for devices. Therefore, when you are adding to the
smartphone or to PULOWARE account a device that was not previously added anywhere
or a device that was reset to factory default, leave the "password" field EMPTY! To
imptove the security and prevent assigning of the device to unauthorized account or
smartphone, set up a password to the device in dialog that is opened when you click on the
little padlock next to the Device name. When a password is added to a device, it can not be
added to an account or smartphone without it ( it must be entered together with the device
ID, in the "password" field). Adding or changing the password will not affect the accounts or
applications where it was already added. To remove the device from smartphone, use the
feature described in next selection. To delete a forgotten password, device must be reset to
factory default as described in paragraph 5 [Reset to factory default].
7.2 Setting and restricting smartphone users
When a device is assigned to some smartphone in the installed PULOWARE app, basically all
features are allowed. If needed, some features can be restricted or disabled. Also, it is
possible to remove the device from some smartphone on the same platform.
A smartphone user is identified by the phone type and the user name that was entered
during the app installation. Using the three checkboxes in the same row with the phone, it
is possible to:
1. Disable the application so the user cannot control the device from that smartphone
2. Restrict the access to the event list in the app for that smartphone
3. Restrict the PUSH notification sending to the smartphone
Also, a device can be completely removed from the smartphone with the little red X that is
displayed when a mouse is above the end of some row (as shown in picture above).

Door Master 300
13EN
8. Technical Specifications
Supply voltage 9-24V AC or DC
Maximal consumption 100mA
Operating frequency 2.4 GHz, IEEE 802.11 b/g/n
Relay contact switching max. 2A @ max. 60V
Operating temperature -40…+85°C
Dimensions 77x73x21mm
Ingress protection IP40 (protective box required for outdoor installation)
9. Content of the package
• Door Master 300 WIFI device
• Door contact sensor (reed relay + magnet + screws)
• USB cable
• Warranty card + quick setting manual
Table of contents
Other SECURECOM Remote Control manuals
Popular Remote Control manuals by other brands

Cardin Elettronica
Cardin Elettronica S449 Series manual

Flying Industry Development
Flying Industry Development S1XB-DC06 quick guide

Dakea
Dakea AMC100 installation manual

ICP DAS USA
ICP DAS USA WP-83 Series quick start guide

Resolution Products
Resolution Products RE100 quick start guide

Cervis
Cervis TM70 user manual