Securikey MINI VAULT/FR series How to use

www.securikey.co.uk I 1
MINI VAULT/FR
OPERATION & INSTALLATION GUIDE
SERIAL NUMBER:
DATE OF PURCHASE:
MODEL PURCHASED:
E
N
1
4
4
5
0
-
s
2
S2

2I www.securikey.co.uk
We recommend that you read the entire manual carefully. If you have purchased an electronic
safe then registration is a condition of ongoing support.
What have you received?
Please check carefully that you have received
the following items. If not, please contact your
supplier.
• 2 keys, only if your safe is equipped with
a key lock.
• 1 battery (the battery could already be fitted
by the factory), only if your safe is equipped
with an electronic lock.
• Fixing set.
• A shelf and shelf supports, if your safe is
equipped with a removable shelf.
• Motion sensitive light.
What can you store in this safe?
• Jewellery.
• Cash.
• Credit cards, cheques.
• Passport, driving licence, birth certificates.
• Insurance documents etc.
Please note that this product is not designed
to protect computer media. Depending on
where you locate your safe, it may be subject
to humidity. Stamps and other delicate items
should therefore be stored in an airtight
container before being put in the safe.
Opening and closing the safe.
Please check that the safe works correctly before installing it or securing items inside.
Closing:
• Ensure that the bolts are not protruding
(the bolts are the metal pins which
protrude from the side of the door and thus
secure the safe). If necessary, turn the key
clockwise to retract the bolts.
• Gently push the door shut. Now turn the
key anti-clockwise until it stops.
• Now remove the key from the keyhole and
store it safely away from the safe.
Note we recommend that the spare key is not
kept in the safe.
Opening:
• Insert one of the keys supplied in the
keyhole. Note: the key only fits the keyhole
in one position: do not force it!
• Turn the key clockwise until it stops. Do
this gently. The door can now be opened by
pulling the key or handle towards you.
• The handle is fixed and designed to assist
with opening the door it does not retract
the bolts.
• With the bolts retracted the keys cannot be
removed.
KEY LOCK

www.securikey.co.uk I 3
Battery Installation/Replacement.
Important: For indoor use only.
Battery Low Voltage: 5.2 ± 0.2V. The display
will alert low battery when battery voltage
reaches 5.2±0.2V. Please replace the battery
immediately.
Battery Replacement Instructions:
One 9V alkaline battery is installed in the Battery
Management compartment in the bottom of the
EntryPad.
• To replace/install the battery, follow these
steps:
– Release the latch of the battery
compartment, by pulling lever downward,
see Fig. 2.
– Pull out the battery compartment from the
bottom of the Entry Pad, see Fig. 3.
– Take out the battery and replace with a
new 9V alkaline battery (Duracell
and Energizer brands are recommended).
The battery compartment will receive the
battery, orienting the positive and
negative terminals correctly, see Fig.4.
– Put the battery compartment back into the
entry pad. Push up the latch of the battery
compartment until it snaps closed,
see Fig 1.
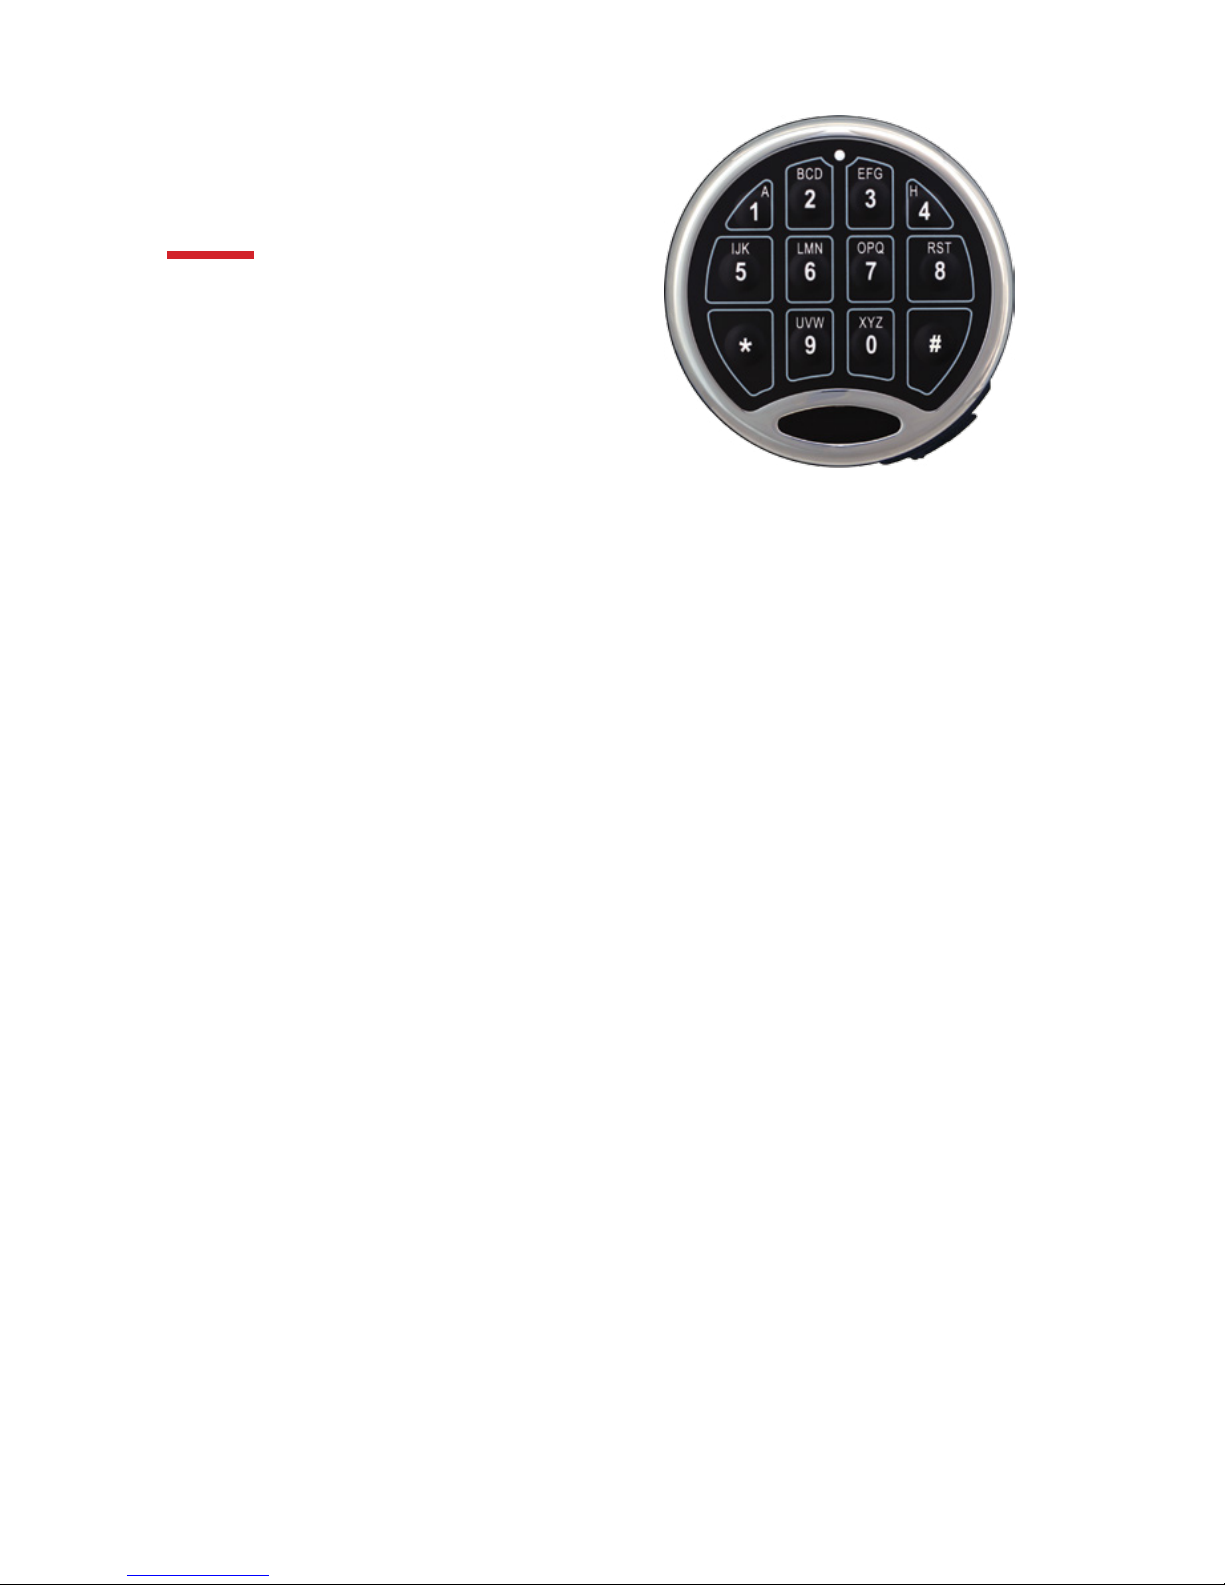
DIGITAL ENTRY PAD
4I www.securikey.co.uk
Functionality and Operation.
Features:
1. Manufacturer default code is 1-2-3-4-5-6
Function of Code
a) Unlock safe lock system
b) Change code
Operation
The lock when first used will be set to its default code 1-2-3-4-5-6. Enter the 6 digit code, each entry
will be accompanied with a beep and a final single beep when the correct code is used. Multiple (3)
beeps at the end of the code indicates incorrect code. Once the correct code has been entered move
the handle from a horizontal to downward vertical position and gently pull to gain access.
Wrong Entry Penalty
Entry of four (4) consecutive invalid codes results in a 5-minute penalty time period.
a) The unit beeps at 5 second intervals indicating that it is still in the penalty time period.
b) While the system is in penalty time, the entry pad buttons remain unresponsive.
Pressing buttons during penalty will not restart or lengthen the penalty time period.
It will continue to count through the 5 minute penalty time period.
c) While the system is in penalty time, removal of the batteries will interrupt the
penalty time countdown. Upon reinstallation of the batteries, the entry pad continues
to count down until the 5 minute penalty time period expires.
Standby Status
In order to conserve battery power, the system will revert to standby status if there is no
key press within 10 seconds. Standby status is indicated by two short beeps.
Automatic Re-lock
The safe lock system automatically relocks after 6 seconds of being opened by
a valid code.
Low Battery Alert
a) Repeated beeping (8 beeps) during an unlock operation indicates that the battery is
low and needs immediate replacement.
b) The manufacturer recommends the use of a 9-Volt standard alkaline battery (Duracell or
Energizer brands are recommended) replaced annually.
DIGITAL ENTRY PAD

www.securikey.co.uk I 5
Programming.
User Programming Instructions.
1. Always perform these operations with the safe lock unlocked and the safe door open.
2. Before closing the door, make sure all the program changes are correct.
3. The system will not allow the user code to be set to six zeros.
Changing Code
a) Enter “0” six times. A single beep will sound, indicating the entry is valid and the system is
awaiting the code change.
b) Next, enter the existing six (6) digit code. A single beep will sound, indicating the entry
is valid.
c) Enter the new six (6) digit code. Two beeps will sound, indicating the entry is valid.
d) Re-enter the new six (6) digit code. One beep will sound, indicating the codes entered in
steps c and d are the same and the code changing process is successful.
e) If three beeps sound, the code change process has been unsuccessful. The existing code
is still valid. Repeat steps a to d.
Note:
a) Test the new code at least 3 times before closing the door to make sure the code has
been programmed correctly.
b) The system will revert to standby status if there is no key press within 10 seconds.
Standby status is indicated by two short beeps.
c) Do not forget to register your safe (page 11).
SPECIFICATIONS::
Power Supply: DC 9V Power Supply Range: DC 4.5V-12V
Standby Current : <50μA Active Current: <20mA
Battery Low Voltage: 5.2±0.2V Working Temperature: 0:~ +49°C
Working Humidity (max): <90% Code Length: 6 Digits
Mechanical System Life Span: >100,000 Cycles
DIGITAL ENTRY PAD

6I www.securikey.co.uk
The Securikey ‘Mini Vault‘ series of safes are designed to be
positioned and secured to either floor and/or wall.
Please read all instructions before commencing installation!
Location:
The decision on where to site and install your safe should take into consideration its concealment and
make possible attack methods more difficult. Where possible site the safe so as to restrict access to
the bottom, sides and top. When fixing a safe to the floor up and against a wall, any obstacles such as
skirting board should be removed so there is no gap between the back of the safe and the wall.
Select a good, sound, level wall and/or floor to which to install your safe, ensuring that no services
such as gas/water pipes will be interfered with.
The safe must be anchored to the floor or to the wall (preferably both) and there are fixing holes
provided for this purpose in the base and back of the safe. The type of fixing bolt to be used depends
on the structure to which the safe is to be anchored. The safe is supplied with commonly used
concrete anchor bolts. Should it be necessary to affix to structures where other types of fixing are
better suited, it will be necessary to buy specific fixing bolts, which can normally be found in any
hardware store.
Anchoring procedure:
• Place the Mini Vault in the desired location and check that full access to the safe will be possible
when installed. Noting the white operation and serial number sticker on top left side
• Using the safe as a template, mark the fixing position on the surface to be drilled.
• Using a 10mm concrete bit, drill holes to a depth of 75mm.
• Remove the dust from the hole using a vacuum cleaner.
• Reposition the safe and insert the fixing bolts through the safe body and tighten as necessary.
In order to fulfil requirements of the EN Certification your safe must be anchored to a concrete floor or
concrete wall with a minimum of 2 fixings.
INSTALLING YOUR MINI VAULT
INSURANCE CERTIFICATION
This certification confirms that the products listed below
are designed to provide overnight cash cover of
£4,000 (x 10 valuables)
Provided the unit is installed in accordance with our instructions
Jeremy Cassady, Managing Director
MINI VAULT
MINI VAULT FR
Tested and approved to EN14450-S2
www.securikey.co.uk I 7
INSURANCE CERTIFICATION
This certification confirms that the products listed below
are designed to provide overnight cash cover of
£4,000 (x 10 valuables)
Provided the unit is installed in accordance with our instructions
Jeremy Cassady,
Managing Director
MINI VAULT
MINI VAULT FR
Tested and approved to EN14450-S2
Springlakes Industrial Estate, Deadbrook Lane,
Aldershot, Hampshire, GU12 4UH
www.securikey.co.uk
This cash rating certificate is designed as a guide only and as with all safe
manufacturers we advise you consult your insurer to ensure their full approval
of location and suitability for the goods insured by them.

8I www.securikey.co.uk
• When closing the door, there should never be anything between the door and the safe
(eg a paper clip). The bolts must be fully retracted.
• Do not fill the safe to such an extent that it is hard to close the door. The locking mechanism
could then seize up as a result of pressure on the inner plate.
• Ensure that the key in the door does not hit a wall when opening. This can cause the key to snap,
and can damage the mechanism. The use of a distorted key can damage the lock.
• If you find that the lock becomes harder to open or stiffer, never use oil or graphite powder to
‘lubricate’ the lock. This can make the tumblers sticky, which could prevent the lock from
opening at all. Your supplier can advise you on the correct cleaning product to use.
• The outside of your safe can be cleaned with a slightly damp cloth. Never use chemical
cleaning agents.
• Always use new 9V Alkaline batteries.
Although your safe has been manufactured with the greatest care, a fault may nevertheless occur,
such as:
• The locking mechanism does not work.
• You cannot open your safe.
• Faulty lock.
• You lose your key.
• You forget your code for a digital lock.
The most important rule is not to try and force anything. The locking mechanism in particular is made
of precision components which can be damaged.
MAINTENANCE
TROUBLESHOOTING

www.securikey.co.uk I 9
1. All claims under the warranty must be accompanied by proof of purchase.
2. Claims under the warranty must be made to the dealer from which the unit was purchased.
3. The warranty applies only to the initial purchaser and is not transferable.
4. The warranty does not apply in the event of damage or faults which are the result of:
a) Accidents, misuse, wear and tear, neglect, wilful damage, fire or malicious attack.
b) Incorrect installation and/or use in a manner which conflicts with the relevant legal, technical
and/or safety standards.
c) An unauthorised modification.
d) Repairs carried out by anyone other than an authorised dealer or the manufacturer.
e) Negligent transportation without appropriate packaging or protection.
f) The incorrect programming of numerical, combination and/or electronic locks.
5. No claim will be accepted under this warranty involving losses occurring in transit.
6. Batteries and faults caused by incorrect insertion or use of batteries with the wrong voltage are
excluded from the warranty.
7. The warranty gives no right to reimbursement of any loss apart from the replacement or repair
of the faulty parts. The manufacturer cannot be held liable for any consequential loss or any
other consequences caused by or connected with the products supplied by it, including loss
or damage to items stored in it by theft, fire, water ingress, condensation, chemical attack or
other means.
8. The costs of shipping, packing and shipping insurance will always be borne by the customer.
9. Only the manufacturer may amend the conditions of this warranty.
10. Repairs or site visits that are not covered under this warranty will be chargeable. Please first
clarify with your dealer whether your claim is covered by warranty.
In the unlikely event of a fault developing, please contact your supplier.
STANDARD 12 MONTH WARRANTY TERMS

10 I www.securikey.co.uk
This registration process is specifically designed for consumers who have purchased a Digital keypad
safe. While we are happy to assist consumers who have purchased a key locking unit, they will not
need to complete the registration form, but instead use our website to increase the standard
12 month warranty to 24 months.
Why Register
Once the digital safe has been installed and you are happy with its operation and the code change
process, it is time to register the unit with Securikey. This registration will ensure that should you
have any difficulty in operation, forget your code or struggle to program the lock, we can always get
you in. Each safe is programmed with a default code 1-2-3-4-5-6 and has a hidden master code held
by us in a secure database (every safe is different).
Familiarity
The lock inside the safe door and the safe body each have a white sticker bearing the same 20 digit
serial code, this ties the 2 items together. Included in the plastic bag with this set of instructions you
will have seen a blue label for your use with the same 20 digit number :
Example
Completion of Registration Card
On the page opposite you will see a registration card forming part of the cover. Cut along the line
indicated and complete the details with whatever you feel appropriate. Attach the blue sticker, if it
has not already been done, to the registration card (noting the serial number on the front cover of
these instructions in the space provided).
Place the card in a plain envelope, apply appropriate postage and return to the address indicated in
Aldershot.
While we will not acknowledge receipt of registration, you can contact us to receive confirmation.
Should you require any future assistance in operation, code change or the use of the Mastercode then
a phone call armed with the appropriate serial number and your personal details including security
question response will be required.
NB. It is possible to change the Mastercode from that held on our database but we will not be able
to assist you in operation or override should you choose to do this.
DIGITAL SAFE REGISTRATION & SUPPORT PROCESS
0 2 4 0 8 7 83 4 5 6 1 2 6 4 0 9 4000 67 27
REGISTER YOUR PRODUCT
To ensure we can provide you with an override code in the case of lockout it is important that you
register your details upon purchase. The override code will only be released to an authorised owner/
supplier once security checks have been completed to our full satisfaction.
SERIAL NUMBER*:
PLEASE COMPLETE ALL SECTIONS IN CAPS:
Title: Forename (s):
Surname:
Date of Birth (d/m/y): Town of Birth:
Company Name:
Job Title:
Date of Incorporation:
Registered Office Address:
Security Question: Mother’s Maiden Name:
✂
NOTES FROM SUPPORT CONVERSATIONS
WITH SECURIKEY

PLEASE RETURN TO:
SECURIKEY LIMITED
PO BOX 18
ALDERSHOT
HAMPSHIRE
GU12 4SL
The registration card should be posted within a secure envelope, i.e Sellotape across opening.
Under no circumstances should it be returned in its present form, without covering your personal data.
Quality Assurance to ISO9001
Table of contents
Other Securikey Safe manuals


