manuals.online logo
Brands
  1. Home
  2. •
  3. Brands
  4. •
  5. Security People
  6. •
  7. Door Lock
  8. •
  9. Security People Digilock User manual

Security People Digilock User manual

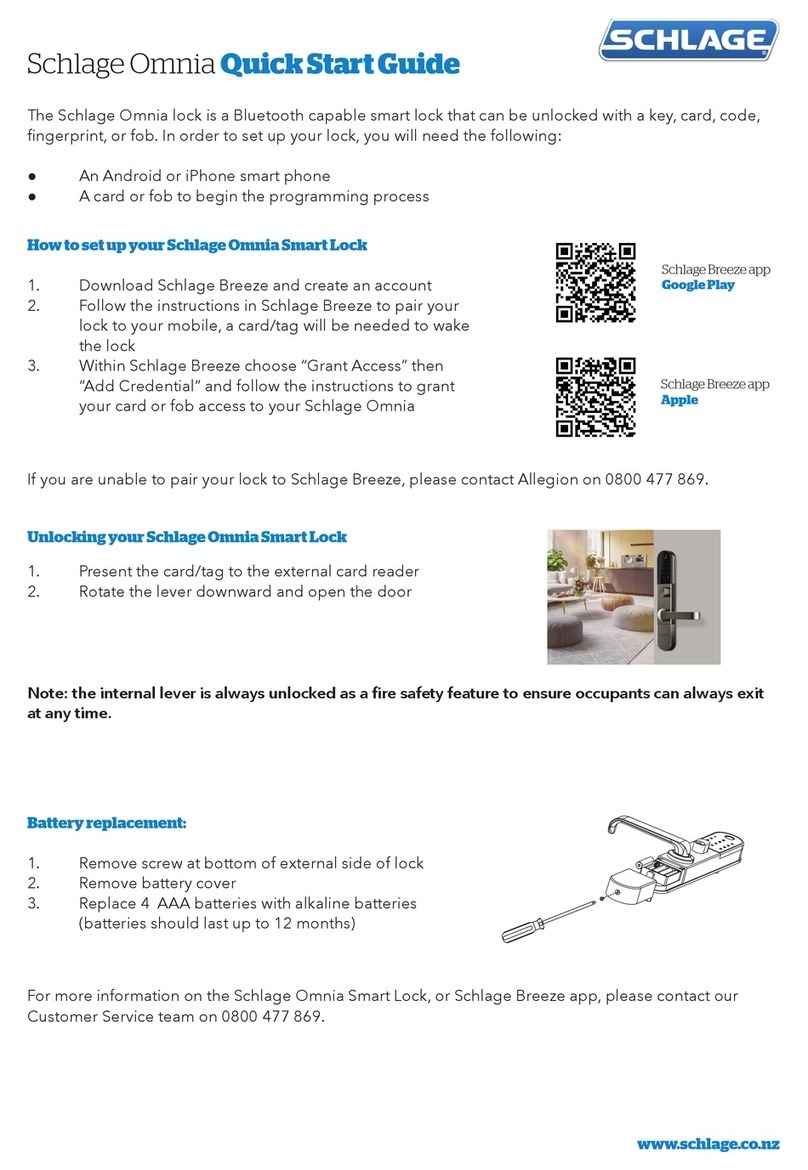
Digilock Installation Instructions
Standard Body
Surface Mount w/Pull Handle
Step 1
Place the plastic ring (C) onto the front unit (e).
NOTE: Do not touch the rear unit connector pins (male connector) against
any metal or other conductive surfaces. This may short the batteries and
cause damage to the lock.
Step 2
Place the pin extender (d) on the connected pins of the rear unit
(f).
Before Beginning Installation
Before Installing Digilock your door must be prepped with a
strike plate (figure a) and lock mounting holes (figure b).
NOTE: If you require a strike plate(s) please contact your Digilock
reseller or visit www.digilock.com for a list of distributors.
NOTE: If you require a template to drill the lock mounting holes or to
install strike plates please visit www.digilock.com or contact Digilock
Customer Support at (707) 766-6000.
Figure A Figure B
Step 3
Place the split lock washers (b) on the phillips head screws (a)
and Place the phillips head screws (a) through the holes on the
rear unit (f) as shown below.
NOTE: Do not touch the rear unit connector pins (male connector) against
any metal or other conductive surfaces. This may short the pins and cause
damage to the lock.
Included Components:
(C)
1 - PLASTIC RING
(D)
1 - PIN
EXTENDER
(E)
1 - Front Unit
(F)
1 - Rear Unit
(A)
2 - PHILLIPS HEAD
SCREWS
(B)
2 - SPLIT LOCK
WASHERS
TOOLS REQUIRED:
Phillips head
screw driver
Warning: Do not use an electric screw driver unless equipped with a torque
adjuster, which must be set on a low torque setting. Otherwise, damage may be
caused to the lock.
Assured Lock Tool and Supply
Phone: (888) 318-8940 or (941) 795-6960
Fax: (941) 761-9293
For Additional Product and/or
Product Information
Contact Digilock or your Digilock Reseller.
Step 4
Locate the three lock mounting holes on the door.
Step 5
Place the mounting screw posts of the Digilock front unit (E)
through the lock mounting holes on the front of the door.
Step 6
While holding the front unit (e) against the front of the door,
bring the rear unit (f) against the rear face of the door, aligning
the screws of the rear unit with the mounting screw posts from
the front unit.
NOTE: Do not touch the rear unit connector pins (male connector) against
any metal or other conductive surfaces. This may short the pins and cause
damage to the lock.
Step 7
Slide the front unit (e) and rear unit (f) together making sure
that the pins of the rear unit connector align with the pins of
the front unit connector and hand tighten the mounting screws
NOTE: An audible triple beep and three flashes of the LED indicates that
the lock was connected properly. If you do not hear this beep, remove the
front unit, press the “C” button on the keypad and reconnect the front
and rear units.
Step 8
Test the operation several times while the door is open. Close
the door and test the unit again. Make sure there is no binding
between the bolt and the door’s strike plate and/or frame.
To lock and unlock enter:
c K
NOTE: If during operation of the lock, the lock emits 10 rapid beeps and
10 flashes of the LED, it is an indicator that the bolt of the lock is bind-
ing with the door’s strike plate and/or frame. If this occurs, the door
and/or strike plate may need to be aligned or adjusted.
Popular Door Lock manuals by other brands

Assa Abloy Yale YDM3109A user manual

Assa Abloy

Assa Abloy Yale YDM3109A user manual

Kwikset Smartcode 914 Installation and user guide

Kwikset

Kwikset Smartcode 914 Installation and user guide

Securemme DSMART instruction manual

Securemme

Securemme DSMART instruction manual

Gainsborough Z5R Series installation instructions

Gainsborough

Gainsborough Z5R Series installation instructions

Assa Abloy Yale PAS3621 quick start guide

Assa Abloy

Assa Abloy Yale PAS3621 quick start guide

Lockwood Digital Deadbolt user guide

Lockwood

Lockwood Digital Deadbolt user guide

Mandelli TG BOLT Assembly instructions

Mandelli

Mandelli TG BOLT Assembly instructions

Yale Smart Latch 2 installation guide

Yale

Yale Smart Latch 2 installation guide

KFV GENIUS B quick reference

KFV

KFV GENIUS B quick reference

Assa Abloy mFlipLock standard Assembly and operating instructions

Assa Abloy

Assa Abloy mFlipLock standard Assembly and operating instructions

Itec iHTL instruction manual

Itec

Itec iHTL instruction manual

Igloohome OE1 Installer/user guide

Igloohome

Igloohome OE1 Installer/user guide

Bauma BM600 installation manual

Bauma

Bauma BM600 installation manual

SDC Z7800 Series installation instructions

SDC

SDC Z7800 Series installation instructions

Kaba Ilco 790/79 Series Rework Installation Sheet

Kaba

Kaba Ilco 790/79 Series Rework Installation Sheet

urmet domus 1083/12 Configuration guide

urmet domus

urmet domus 1083/12 Configuration guide

Dormakaba Saffire LX installation instructions

Dormakaba

Dormakaba Saffire LX installation instructions

DOM ENiQ EasyFlex Booklet

DOM

DOM ENiQ EasyFlex Booklet

manuals.online logo
manuals.online logoBrands
  • About & Mission
  • Contact us
  • Privacy Policy
  • Terms and Conditions

Copyright 2025 Manuals.Online. All Rights Reserved.