manuals.online logo
Brands
  1. Home
  2. •
  3. Brands
  4. •
  5. Kwikset
  6. •
  7. Door Lock
  8. •
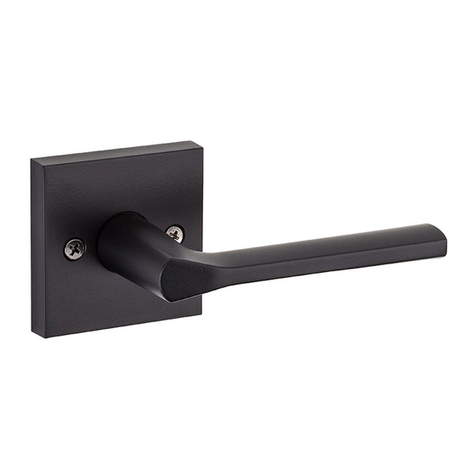
  9. Kwikset Vancouver Handleset User manual

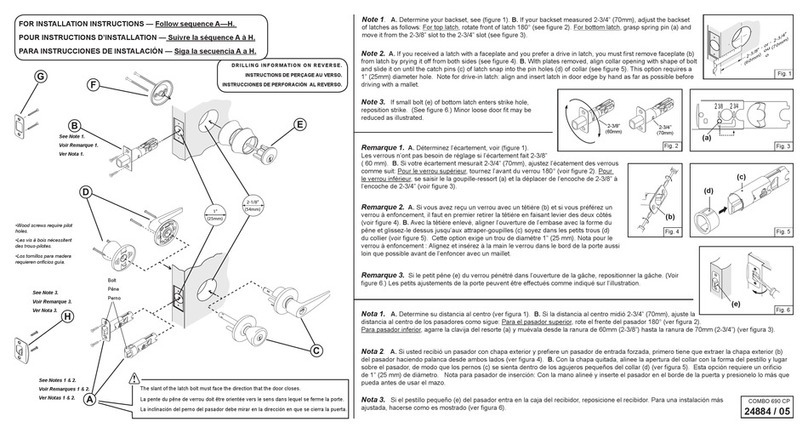
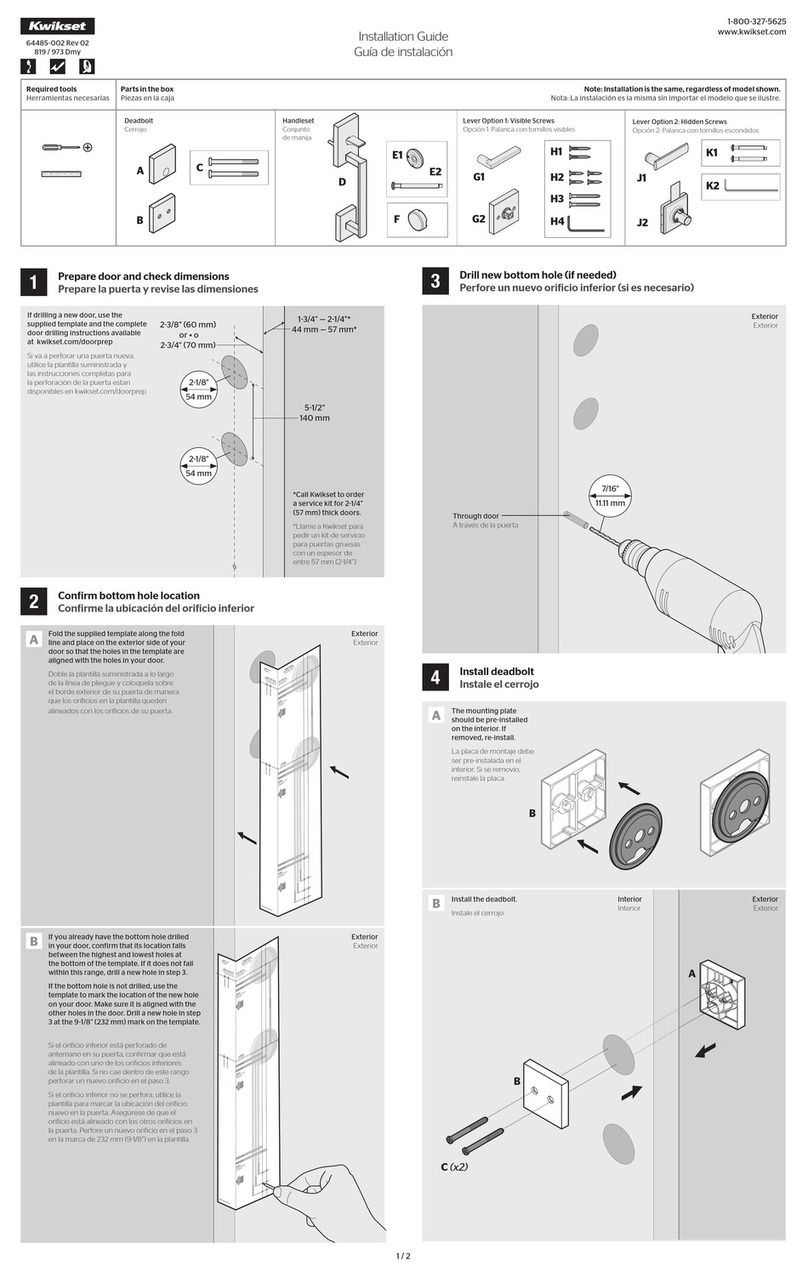
Kwikset Vancouver Handleset User manual

1 / 2
A
B
C
23/8" (60 mm)
or • ou
23/4" (70 mm)
13/4" — 21/4"*
44 mm — 57 mm*
51/2"
140 mm
21/8"
54 mm
21/8"
54 mm
1"
25 mm
1"
25 mm
*Call Kwikset to order a service kit
for 21/4” (57 mm) thick doors.
*Llame a Kwikset para ordenar un kit
de servicio para puertas gruesas con
un espesor de entre 57 mm (21/4”).
B B3 B4 C1
If the latch holes are centered in the door hole,
no adjustment is required. Proceed to step 4.
If the latch holes are NOT centered, adjust
latch. See “Latch Adjustment” (step 3C)
Si los oriicios del pestillo están centrados en el oriicio de la
puerta, no se requiere ningún ajuste. Continúe con el paso 4.
Si los oriicios del pestillo NO están centrados, ajuste
el pestillo. Consulte “Ajuste de pestañas” (paso 3C)
Hold the latch in front of the door hole, with
the latch case lush against the door edge.
Sostenga el pestillo en frente del oriicio
de la puerta, con la cubierta del pestillo
al ras con el borde de la puerta.
Latch Adjustment (only if needed)
Ajuste del pestillo (si es necesario)
Rotate the front of the latch to extend it.
Gire el pestillo frontal para alargar.
B2B1
E2
Hold the latch in front of the door hole, with
the latch face lush against the door edge.
Sostenga el pestillo frente al oriicio de la puerta, con la
cara del pestillo alineada contra el borde de la puerta.
If the latch holes are centered in the door hole, no
adjustment is required. Proceed to step 6.
If the latch holes are NOT centered, adjust latch.
See “Latch Adjustment” (step 5D).
Si los oriicios del pestillo están centrados en el oriicio de la
puerta, no se requiere ningún ajuste. Continúe con el paso 6.
Si los oriicios del pestillo NO están centrados, ajuste el
pestillo. Consulte “Ajuste de la cerradura” (paso 5D).
Latch Adjustment (only if needed)
Ajuste de pestillo (solo si es necesario)
Move the pin to extend the latch.
Mueva el pasador para
extender el pestillo.
A
C
D
B
Install the latch face on the BOTTOM latch.
Instale la cara inferior del pestillo.
Install handleset
Instale el conjunto de manija
7
J1
J2
K
N
Handleset
Conjunto
de manija
EXTERIOR torque blade
curve faces up and
goes UNDER the latch.
La curva de la cuchilla de
torsión EXTERIOR está
orientada hacia arriba y
pasa BAJO el pestillo.
A
Insert the spindle THROUGH the
semicircular hole in the bottom latch.
Inserte el eje A TRAVÉS del oriicio
semicircular en el cierre inferior.
B
If adjustment is required, pull and rotate the spindle.
Si el ajuste es necesario, tire y gire el husillo.
180°
Insert the adjustable throughbolt THROUGH
the bottom hole in the door.
Inserte el perno ajustable a TRAVÉS del oriicio inferior de la puerta.
C
Post is adjustable and
can be moved to any
position within the slot.
El poste es ajustable
y se puede mover a
cualquier posición
dentro de la ranura.
Press the latch
bolt to insert
the spindle.
Presione el perno
para insertar
el husillo.
Keys
Llaves
Installation Guide
Guía de instalación
Parts in the box: Exterior
Piezas en la caja : exterior
Required tools
Herramientas necesarias
If drilling a new door, use the supplied template
and the complete door drilling instructions
available at kwikset.com/doorprep
Si va a perforar una puerta nueva, utilice
la plantilla suministrada y las instrucciones
completas para la perforación de la puerta
disponibles en kwikset.com/doorprep
Interior Deadbolt
Cerrojo interior
Fasteners and accessories
Tornillos y accesorios
AF
18003275625
www.kwikset.com
67961001 Rev 01
971 LEP
Latches and strikes
Pestillos y placas
D1 D2 D3 D4 E1D
G
L3
M
H1
H2 H3
Lever
Palanca
Parts in the box: Interior
Piezas en la caja: interior
L1
L2
Fasteners and accessories
Tornillos y accesorios
Extend the top latch
Extienda el perno del pestillo superior
2
Adjust the backset of the top latch (if needed)
Ajuste la distancia al centro del pestillo superior (si es necesario)
3
Prepare door and check dimensions
Prepare la puerta y revise las dimensiones
1
Latch case
Cubierta
del pestillo
Install the top latch
Instale el pestillo superior
4
Door edge
NOT chiseled
Borde de la puerta
NO cincelado
Door edge
chiseled
Borde de la
puerta cincelado
or
ou
Top hole
El oriicio
superior
Install plate
Instale la placa
Top hole
El oriicio
superior
Wood block
Bloque de
madera
Extend latch bolt
Extienda el perno
de pestillo
Install plate
Instale la placa
L2 (x2)
D
D
D
D
D1
D2/D3
D4
Install drive-in collar
Instale el collar de entrada
or
ou
Centered
Centrado
Not centered
No centrado
180°
Make sure the curve is on
the bottom of the latch.
Asegurarse de que la curva este
en la parte inferior del pestillo.
Make sure the curve
is on the bottom
of the latch.
Asegurarse de que la
curva este en la parte
inferior del pestillo.
Make sure the curve
is on the bottom
of the latch.
Asegurarse de que la
curva este en la parte
inferior del pestillo.
Use a screwdriver to retract the latch bolt.
Use un destornillador para retraer el perno de cierre.
Ensure plate snaps into place.
Pull plate to test for tight it.
Asegúrese de que la placa trasera esta en su lugar.
Tire de la placa para comprobar un ajuste apretado.
2 tabs
2 lengüetas
2 tabs
2 lengüetas
Ensure plate snaps into place.
Pull plate to test for tight it.
Asegúrese de que la placa trasera esta en su lugar.
Tire de la placa para comprobar un ajuste apretado.
D
L2
actual size
tamaño real
Prepare the bottom latch
Prepare el pestillo inferior
5
Install the bottom latch
Instale el pestillo inferior
6
Slant of latch bolt faces door frame
Inclinación del pestillo del cerrojo de
las caras del marco de la puerta.
Slant of latch bolt faces door frame
Inclinación del pestillo del cerrojo
de las caras del marco de la puerta.
Wood block
Bloque de
madera
Door frame
Marco de la puerta
Door frame
Marco de la puerta
Centered
Centrado
Not centered
No centrado
B
B
B4
L2 (x2)
or
ou
Door edge NOT
chiseled
Borde de la puerta
NO cincelado
Door edge
chiseled
Borde de la
puerta cincelado
or
ou
Door edge
NOT chiseled
Borde de la puerta
NO cincelado
Door edge
chiseled
Borde de la
puerta cincelado
Ensure faceplate and
backplate snap together.
Asegúrese de que la
placa frontal y la placa
posterior encajen entre sí.
Install the backplate and rectangular faceplate.
Instale la placa posterior y la placa frontal rectangular.
Install the drive-in collar.
Instale el collar de entrada.
B
B
B1
B2/B3
L2
actual size
tamaño real
N
door edge
borde de la puerta
spindle
husillo
exterior
exterior
exterior torque
blade
Paleta de torsión
exterior
adjustable
throughbolt
el perno ajustable
2 / 2
Make sure the interior turnpiece is vertical.
Asegúrese de que la pieza interior esté vertical.
Make sure latch bolt
is fully extended.
Asegúrese de que
el pestillo esté
completamente
extendido.
Interior
interior
Push up on lever base while tightening screws
to keep latch horizontal and centered.
Empuje hacia arriba la base de la palanca
mientras aprieta los tornillos para mantener
el pestillo horizontal y centrado.
Secure bottom screws irst.
Asegure primero los
tornillos inferiores.
A
B
A1
A
FIRST, insert the spindle through the
semicircular hole in the bottom latch.
THEN, insert the torque blade
into the D-shaped hole.
PRIMERO, inserte el husillo a través del
oriicio semicircular en el cierre inferior.
ENTONCES, inserte la paleta de torsión a a
través del oriicio en forma de D en el pestillo.
K
J2
Secure handleset
Fije el conjunto de manija
12
Fully tighten the screw and
snap on the screw cover.
Apriete completamente el tornillo
y la tapa del tornillo.
Tighten the pre-
installed set screw.
Apriete el tornillo
preinstalado.
Fully tighten
the set screw using
the short end of
the allen wrench.
Apriete
completamente el
tornillo de ijación
con el extremo corto
de la llave Allen.
clockwise
horario
C
M
180°
Torque blade
Paleta de torsión
D-shaped hole
Oriicio en
forma de D
Interior
interior
M
Use the allen
wrench to lift
the torque
blade to guide
it through the
D-shaped hole.
Use la llave allen
para levantar la
hoja de torsión y
guiarla a través
del oriicio en
forma de D.
©2019 Spectrum Brands, Inc.
WARNING: This Manufacturer advises that no lock can provide complete security by itself. This lock may be defeated by
forcible or technical means, or evaded by entry elsewhere on the property. No lock can substitute for caution, awareness of
your environment, and common sense. Builder’s hardware is available in multiple performance grades to suit the application.
In order to enhance security and reduce risk, you should consult a qualiied locksmith or other security professional.
ADVERTENCIA: El fabricante se permite informar que ningún bloqueo solo puede ofrecer una seguridad completa.
Este bloqueo puede ser puesto fuera por la fuerza o por medios técnicos o evitarse mediante el uso de otra entrada
en la propiedad. Sin bloqueo puede reemplazar el seguimiento de su entorno y el sentido común. Diferentes
grados de materiales de instalación están disponibles para diferentes aplicaciones. Con el in de aumentar la
seguridad y reducir el riesgo, usted debe consultar a un cerrajero caliicado u otro profesional de la seguridad.
F
clockwise
horario
Install exterior handleset according to the
instructions that came with the exterior parts.
Instale el conjunto de manija exterior de acuerdo con
las instrucciones que vienen con las piezas exteriores.
A
B
Close the door and test the handleset operation. If the latch is loose in the strike,
adjust the strike tab so it grips the latch bolt better when the door is closed.
Cierre la puerta y pruebe el funcionamiento del conjunto de manija. Si el pestillo queda
suelto en la cerradura tipo hembra, ajuste la lengueta de la cerradura tipo hembra para
que sujete mejor el perno de retención cuando la puerta se encuentre cerrada.
tab
lengueta
Make sure the hole
for the top strike is
drilled at minimum of
1” (25 mm) deep.
Asegúrese de que el oriicio
en el marco de la puerta
para la placa superior se
perfora un mínimo de 25
mm (1 “) de profundidad.
Longer screws install
closest to door jamb.
Los tornillos más largos se instalan
más cerca de la jamba.
E1/
E2
C1/
C2
The longer screws, P1 (3”/76mm), must
be used to maintain highest security.
Los tornillos más largos, P1 (3 “/ 76 mm), deben
utilizarse para mantener la máxima seguridad.
H1 (2x)
H3 (2x)
H2 (2x)
A
B
C
Install strikes
Instale las placas
C1/ C2
A
L3 (x2)
M
Install interior trim
Installe el escudo completo
9
If handing adjustment is required, remove and
rotate the chassis.
Si se requiere ajuste de la orientación
de la puerta, retire y gire el chasis.
13
H1
H2
H3
actual size
tamaño real
Install lever
Instale la palanca
11
Secure interior trim
Fije el escudo completo
10
L3
actual size
tamaño real
Keep
parallel.
Mantienes
paralelo.
G (x2)
G
J2
J1
Secure handleset
Fije el conjunto de manija
8
Secure the handleset with the washer and screw.
Fije el conjunto de manija con la arandela y el tornillo.
J2
actual size
tamaño real
spindle
husillo

Other Kwikset Door Lock manuals

Kwikset Kevo User manual

Kwikset

Kwikset Kevo User manual

Kwikset 69926-001 User manual

Kwikset

Kwikset 69926-001 User manual

Kwikset CP/BP 49726 / 02 User manual

Kwikset

Kwikset CP/BP 49726 / 02 User manual

Kwikset 62892-002 User manual

Kwikset

Kwikset 62892-002 User manual

Kwikset 62822 / 01 User manual

Kwikset

Kwikset 62822 / 01 User manual

Kwikset Powerbolt2 User manual

Kwikset

Kwikset Powerbolt2 User manual

Kwikset 816 User manual

Kwikset

Kwikset 816 User manual

Kwikset Camino Pull User manual

Kwikset

Kwikset Camino Pull User manual

Kwikset 62873 User manual

Kwikset

Kwikset 62873 User manual

Kwikset 159 User manual

Kwikset

Kwikset 159 User manual

Kwikset Signature Series User manual

Kwikset

Kwikset Signature Series User manual

Kwikset Combo 690 CP User manual

Kwikset

Kwikset Combo 690 CP User manual

Kwikset 914CZigBee C4 User manual

Kwikset

Kwikset 914CZigBee C4 User manual

Kwikset 62873/01 User manual

Kwikset

Kwikset 62873/01 User manual

Kwikset Kevo User manual

Kwikset

Kwikset Kevo User manual

Kwikset Kevo User manual

Kwikset

Kwikset Kevo User manual

Kwikset 907 15 SMT User manual

Kwikset

Kwikset 907 15 SMT User manual

Kwikset 506KNL 3 User manual

Kwikset

Kwikset 506KNL 3 User manual

Kwikset SmartCode 9270CNT-514S User manual

Kwikset

Kwikset SmartCode 9270CNT-514S User manual

Kwikset Smartcode 888 User manual

Kwikset

Kwikset Smartcode 888 User manual

Kwikset 44594/01 User manual

Kwikset

Kwikset 44594/01 User manual

Kwikset 720PSK RDT 15 CP User manual

Kwikset

Kwikset 720PSK RDT 15 CP User manual

Kwikset Kevo User manual

Kwikset

Kwikset Kevo User manual

Kwikset Premis Installation guide

Kwikset

Kwikset Premis Installation guide

Popular Door Lock manuals by other brands

eTIGER ES-DL02 manual

eTIGER

eTIGER ES-DL02 manual

Bewator K44 Duo Installation & user manual

Bewator

Bewator K44 Duo Installation & user manual

TCS LLNSP installation manual

TCS

TCS LLNSP installation manual

alpro AL110 instructions

alpro

alpro AL110 instructions

Lockly FLEX TOUCH PRO installation guide

Lockly

Lockly FLEX TOUCH PRO installation guide

Baldwin Estate installation guide

Baldwin

Baldwin Estate installation guide

KOCOM KDL-7100SK user manual

KOCOM

KOCOM KDL-7100SK user manual

Assa Abloy Effeff 309 Installation and fitting instructions

Assa Abloy

Assa Abloy Effeff 309 Installation and fitting instructions

Yeeka 1507 IoT Lock Operation manual

Yeeka

Yeeka 1507 IoT Lock Operation manual

Home Controls AUASL3BX installation guide

Home Controls

Home Controls AUASL3BX installation guide

Samsung SHS-P718 user manual

Samsung

Samsung SHS-P718 user manual

Salto Ei45 Series installation guide

Salto

Salto Ei45 Series installation guide

Assa Abloy HES 9400 Series Installation template

Assa Abloy

Assa Abloy HES 9400 Series Installation template

Igloohome Push-Pull Mortise Installer/user guide

Igloohome

Igloohome Push-Pull Mortise Installer/user guide

Dormakaba AUDITCON 2 Series installation instructions

Dormakaba

Dormakaba AUDITCON 2 Series installation instructions

SMONET SMUS-GS002 manual

SMONET

SMONET SMUS-GS002 manual

danalock V3 BT HK SCANDI manual

danalock

danalock V3 BT HK SCANDI manual

DORTRONICS SYSTEMS 1107 D Series Mounting instructions

DORTRONICS SYSTEMS

DORTRONICS SYSTEMS 1107 D Series Mounting instructions

manuals.online logo
manuals.online logoBrands
  • About & Mission
  • Contact us
  • Privacy Policy
  • Terms and Conditions

Copyright 2025 Manuals.Online. All Rights Reserved.