Seeed Sensecap LoRaWAN User manual

User Guide (Tech Document)
© 2008-2019 Seeed Technology Co., Ltd. All rights reserved. www.seeed.cc
2/ 49
Table of Contents
Table of Contents ......................................................................................................................................... 2
1Product Introduction.............................................................................................................................. 4
2Add Gateway to User’s TTN Server ..................................................................................................... 6
Gateway Network Configuration ................................................................................................7
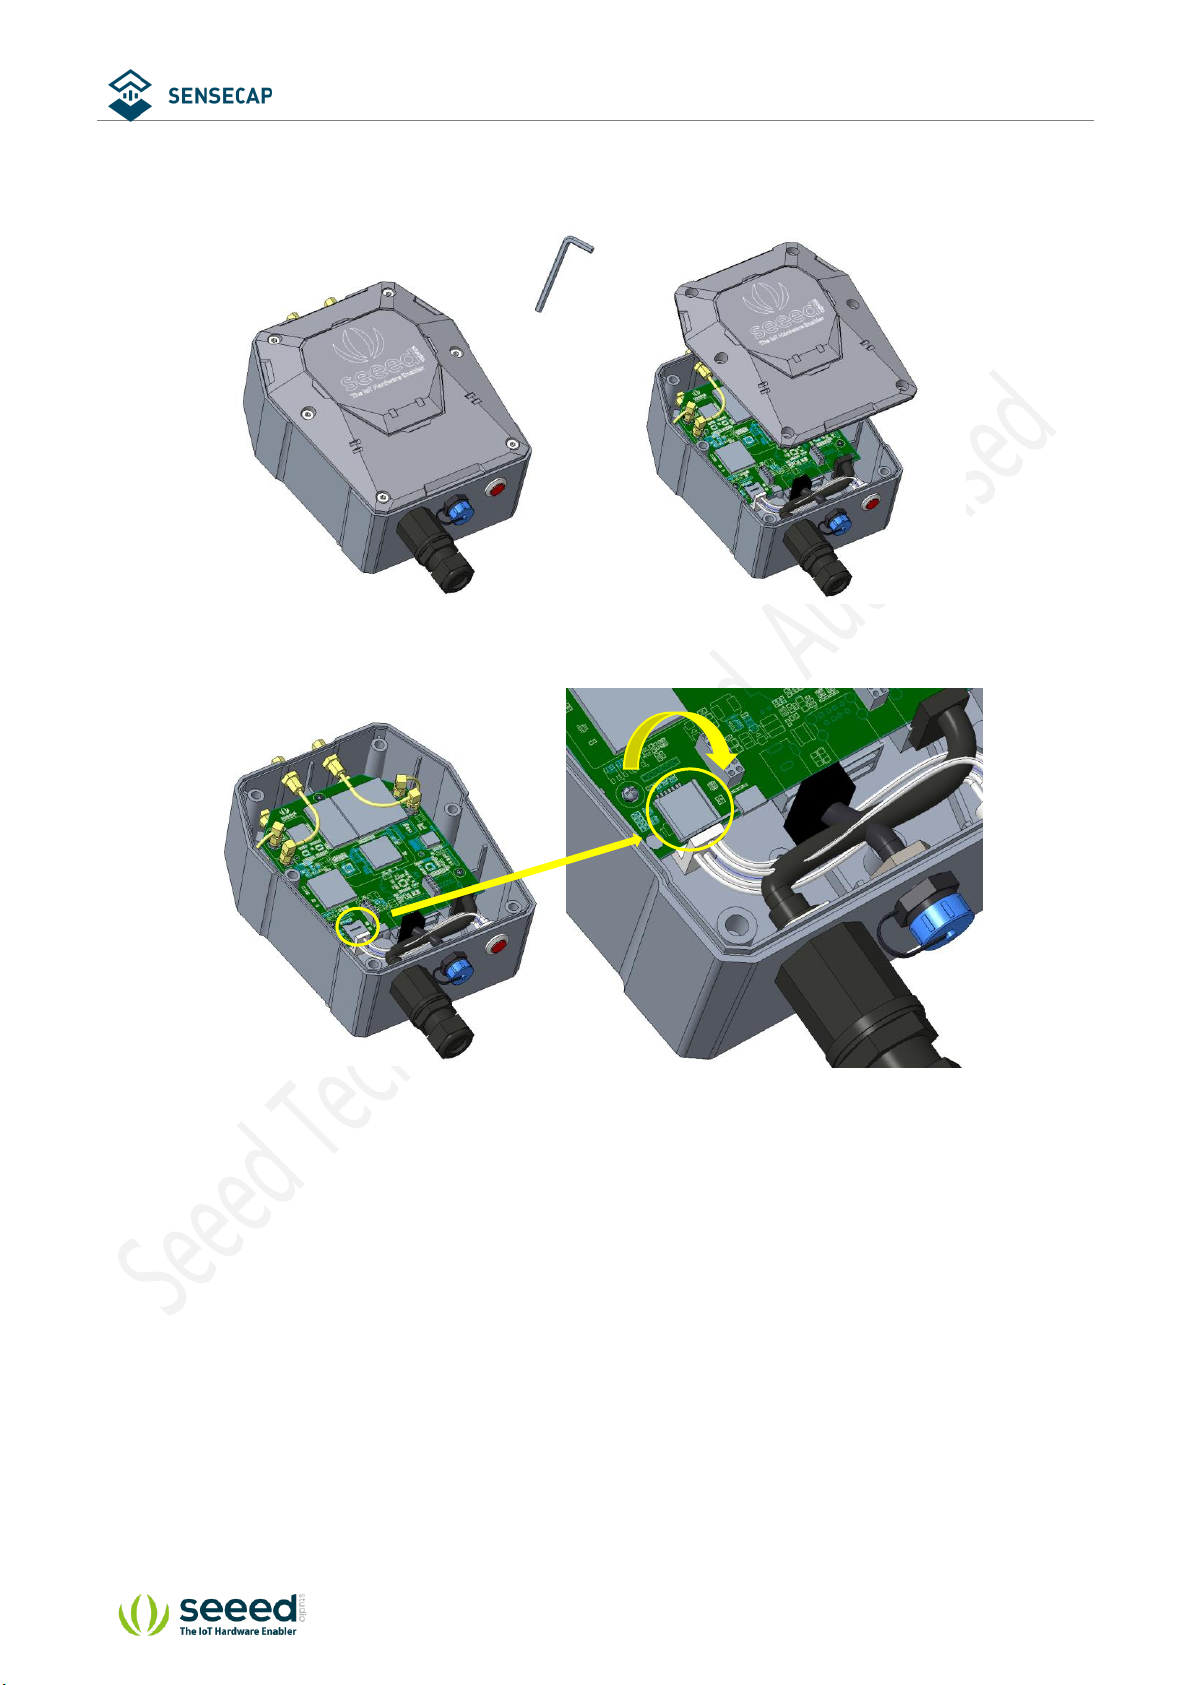
2.1.1 Installing Antenna............................................................................................................7
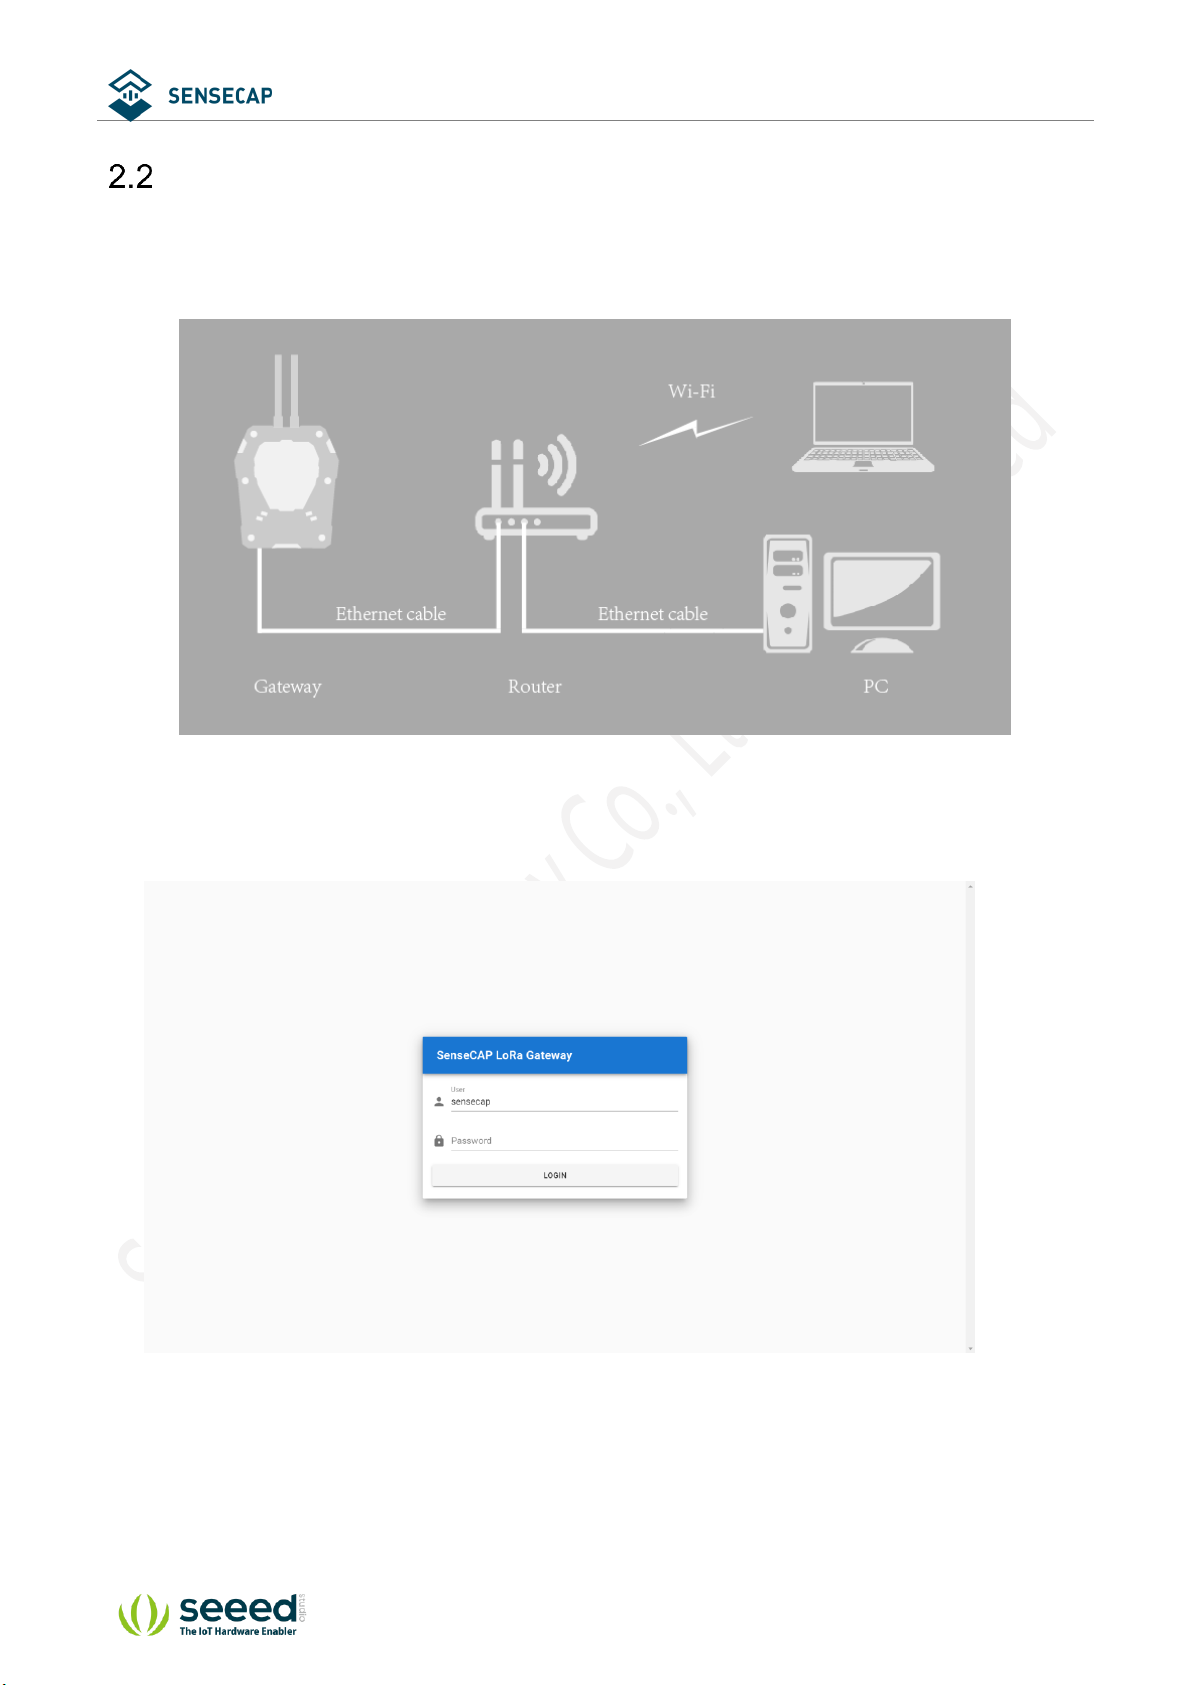
2.1.2 Connecting to the Internet............................................................................................... 7
2.1.3 Connecting to Power Cable ............................................................................................8
2.1.4 The Function of the Red LED ......................................................................................... 9
Setting the Gateway Service Address .....................................................................................10
Gateway Registration on TTN..................................................................................................13
3Add Sensor Node to User’s TTN Server ............................................................................................15
Get Node’s EUI and Key.......................................................................................................... 15
Add Application and AppEUI....................................................................................................16
Sensor Node Registration on TTN........................................................................................... 18
Connect the Node to TTN ........................................................................................................19
3.4.1 Power on ....................................................................................................................... 19
3.4.2 Sensor Node Working Status........................................................................................ 20
3.4.3 Checking Sensor Node Connection to the TTN ...........................................................20
4Connect to the Standard LoRaWAN Gateway ...................................................................................22
Node Frequency Plans ............................................................................................................ 22
A Standard LoRaWAN Gateway Configuration Example ........................................................24
4.2.1 Radio Settings...............................................................................................................24
4.2.2 Channel Settings........................................................................................................... 25
4.2.3 Power on ....................................................................................................................... 26
4.2.4 Sensor Node Working Status........................................................................................ 27
4.2.5 Checking Data Upload .................................................................................................. 28
Modify Node's EUI, KEY, and Duty..........................................................................................29
5Decoding .............................................................................................................................................33
Packet Parsing.........................................................................................................................34
Exception..................................................................................................................................37
6Device Installation...............................................................................................................................39
Part List .................................................................................................................................... 40
6.1.1 Gateway Part List.......................................................................................................... 40
6.1.2 Sensor Node Part List................................................................................................... 41
6.1.3 Other Accessories & Tool List .......................................................................................41
Gateway Installation.................................................................................................................42
6.2.1 Gateway Installation Methods....................................................................................... 42
6.2.2 Installation Precautions.................................................................................................44
6.2.3 Installing Fiberglass LoRa Antenna .............................................................................. 45
6.2.4 Installing Ground Cable ................................................................................................46

User Guide (Tech Document)
© 2008-2019 Seeed Technology Co., Ltd. All rights reserved. www.seeed.cc
3/ 49
Installing Sensor Node.............................................................................................................47
6.3.1 Installing the Sensor Node Bracket .............................................................................. 47
6.3.2 Installing Sensor Nodes ................................................................................................48
6.3.3 Dos and Don’ts in Installing Sensor Probes .................................................................49

User Guide (Tech Document)
© 2008-2019 Seeed Technology Co., Ltd. All rights reserved. www.seeed.cc
4/ 49
1 Product Introduction
SenseCAP is an industrial wireless sensor network that integrates easy-to-deploy hardware and data API
services, enabling low-power, long-distance environmental data collection. SenseCAP includes several
versions, such as LoRaWAN, LoRaPP, etc.
SenseCAP LoRaWAN version products include LoRaWAN Gateways and Sensor Nodes. Based on the
LoRaWAN protocol, it can realize one-to-many, long-distance networking and bilateral communication.
The LoRaWAN Gateway supports Ethernet and 4G. The Sensor Node is powered by a high-capacity
battery that lasts up to 3 years (if uploading data once every hour). It also supports hot-swap, making it
easy for maintenance and upgrading.
Main Features:
⚫Gateway: High-performance Cortex A8 1GHz processor
⚫Gateway uses multiple methods to connect to the Internet: 4G and Ethernet
⚫Gateway supports third-party TTN account and server
⚫Sensors support LoRaWAN v1.0.2 protocol and are suitable for standard LoRaWAN Gateway
⚫Super long-distance communication: 10km in the line-of-sight scenario, 2km in the urban scenario
⚫Industrial protection rating IP66-rated enclosure, suitable for the outdoor environment at -40℃~70℃
⚫Easy-to-deploy, enabling people without engineering background to install the devices quickly

User Guide (Tech Document)
© 2008-2019 Seeed Technology Co., Ltd. All rights reserved. www.seeed.cc
6/ 49
2 Add Gateway to User’s TTN Server
The SenseCAP LoRaWAN Gateway supports connecting to the user's own The Things Network account
and server.
Learn more about TTN: https://www.thethingsnetwork.org/docs/

User Guide (Tech Document)
© 2008-2019 Seeed Technology Co., Ltd. All rights reserved. www.seeed.cc
7/ 49
Gateway Network Configuration
2.1.1 Installing Antenna
Screw clockwise to install the 4G and LoRa antennas onto the gateway.
2.1.2 Connecting to the Internet
There are two ways to connect to the Internet. Choose the one that works for you.
(1) Connecting to Ethernet Cable
Unscrew to open the protection cap, plug the Ethernet cable through the cap and then into the Ethernet
port. Screw to fasten this part.

User Guide (Tech Document)
© 2008-2019 Seeed Technology Co., Ltd. All rights reserved. www.seeed.cc
8/ 49
(2) Connecting to 4G
Use the hex key (included in the package) to unscrew the 6 screws and open the lid.
Swipe downward to open the SIM card socket, insert the Micro SIM card and swipe upward to lock the
SIM card socket. Make sure it is installed correctly and close the lid with the screws.
2.1.3 Connecting to Power Cable
Unscrew to take off the power cap, plug in the extension cord and screw to fasten it onto the gateway. The
other end of the extension cord is connected to the power adapter.

User Guide (Tech Document)
© 2008-2019 Seeed Technology Co., Ltd. All rights reserved. www.seeed.cc
9/ 49
Notice: Make sure all antennas are correctly installed before powering on the gateway. Please note
the device should be POWERED OFF when installing the antenna, or the antenna circuits might be
damaged.
2.1.4 The Function of the Red LED

User Guide (Tech Document)
© 2008-2019 Seeed Technology Co., Ltd. All rights reserved. www.seeed.cc
10 / 49
Setting the Gateway Service Address
Prepare a router, and the network connection is shown in the figure:
(1) Check the IP of "sensecap" in the background of the router.
(2) Enter IP in the browser: IP:8000
If the IP is 192.168.1.1, enter 192.168.1.1:8000
(3) User: sensecap
Password: sensecap!!!
(4) LoRa→Use Seeed’s Server→Off Button

User Guide (Tech Document)
© 2008-2019 Seeed Technology Co., Ltd. All rights reserved. www.seeed.cc
11 / 49
(5)
① Server Address: Please input your Server Address.
Refer to the table or website: https://www.thethingsnetwork.org/docs/gateways/packet-forwarder/semtech-
udp.html#router-addresses
Router address
Region
router.eu.thethings.network
EU 433 and EU 863-870
router.us.thethings.network
US 902-928
router.cn.thethings.network
China 470-510 and 779-787
router.as.thethings.network
Southeast Asia 923 MHz

User Guide (Tech Document)
© 2008-2019 Seeed Technology Co., Ltd. All rights reserved. www.seeed.cc
12 / 49
router.as1.thethings.network
Southeast Asia 920-923 MHz
router.as2.thethings.network
Southeast Asia 923-925 MHz
router.kr.thethings.network
Korea 920-923 MHz
router.jp.thethings.network
Japan 923-925 MHz (with EIRP cap according to
Japanese regulations)
thethings.meshed.com.au
Australia 915-928 MHz
as923.thethings.meshed.com.au
Australia (Southeast Asia 923MHz frequency plan)
ttn.opennetworkinfrastructure.org
Switzerland (EU 433 and EU 863-870)
②Uplink / Downlink Port (default): 1700
(6) APPLY.

User Guide (Tech Document)
© 2008-2019 Seeed Technology Co., Ltd. All rights reserved. www.seeed.cc
13 / 49
Gateway Registration on TTN
TTN website: https://www.thethingsnetwork.org
(1) Follow the instruction to create your account, and access “Console”.
(2) Register Gateway
①Gateway EUI: View the labels on the gateway.
Select ‘I’m using the legacy packet forwarder’.
②Frequency Plan: View the labels on the gateway.
③Router: Select the router that is right for you.

User Guide (Tech Document)
© 2008-2019 Seeed Technology Co., Ltd. All rights reserved. www.seeed.cc
15 / 49
3 Add Sensor Node to User’s TTN Server
Get Node’s EUI and Key
(1) DeviceEUI and DeviceCode is on the SenseCAP product label.
(2) SenseCAP sensor device’s AppEUI and AppKey have been flash into the device by Seeed. Use HTTP
API to retrieve App EUI and App Key. You can use browser to issue an HTTP GET request.
Curl:
https://sensecap.seeed.cc/makerapi/device/view_device_info?nodeEui=2CF7F12014700297&deviceCode=34B
F25920A4EFBF4
In the API, replace the DeviceEUI and deviceCode with your own DeviceEUI and DeviceCode
respectively. And you will get the following response.
{
"code": "0",
"data": {
"nodeEui": "2CF7F12014700297",
"deviceCode": "34BF25920A4EFBF4",
"lorawanInformation": {
"dev_eui": "2CF7F12014700297",
"app_eui": "8000000000000006",
"app_key": "6FD0EF47CBC6E00F1921A08C2E94E8E5"
}
},
"time": 0.019
}

User Guide (Tech Document)
© 2008-2019 Seeed Technology Co., Ltd. All rights reserved. www.seeed.cc
16 / 49
Add Application and AppEUI
(1) TTN console → Application → Add application
(2)
①Application ID: Enter a unique name.
②Description: Enter a description.
③Handler registration: Select the same handler as the gateway router.
④Add application.
(3)

User Guide (Tech Document)
© 2008-2019 Seeed Technology Co., Ltd. All rights reserved. www.seeed.cc
18 / 49
Sensor Node Registration on TTN
(1) Application → Devices → register device
(2)
①Device ID: Enter a unique name.
②Device EUI: Enter the node’s Device EUI that you got in the 3.1 step.
③App Key: Enter the node’s App Key that you got in the previous step.
④App EUI: Select the node’s App EUI.
⑤Register.

User Guide (Tech Document)
© 2008-2019 Seeed Technology Co., Ltd. All rights reserved. www.seeed.cc
19 / 49
Connect the Node to TTN
3.4.1 Power on
The power switch is hidden inside the device. Open the device and turn on the power before installing the
sensors. Here is the step-by-step instruction:
1) Loosen the Sensor Probe by turning the cap counterclockwise. Use the white cap opener to make this
process easier. The image below uses TH Sensor as an example and applies to all other SenseCAP
sensors.
2) After opening the device, turn the switch to “ON”, and the LED on the lower right corner will flash,
indicating that the power is on. Wait for about 10 seconds, then the LED will flash quickly for 2 seconds,
indicating that the device is connected to the network.
3) After the device is connected to the network, connect the Sensor Probe back with the Sensor Node
Controller by turning it clockwise. Please note that the labels on both parts should be aligned as shown
in the image below, otherwise the two parts will not be attached to function properly and data will not
be uploaded.

User Guide (Tech Document)
© 2008-2019 Seeed Technology Co., Ltd. All rights reserved. www.seeed.cc
20 / 49
3.4.2 Sensor Node Working Status
You can refer to the LED indicator for the Sensor Node for its working status. Please see the status
explanations in the image below:
3.4.3 Checking Sensor Node Connection to the TTN
(1) On the Device Overview page, Status turns green.
Table of contents
Other Seeed Accessories manuals

Seeed
Seeed Grove Moisture Sensor User manual

Seeed
Seeed Grove User manual

Seeed
Seeed Grove 101020031 User manual

Seeed
Seeed Grove User manual

Seeed
Seeed Grove User manual

Seeed
Seeed SYH24A1 User manual

Seeed
Seeed Grove User manual

Seeed
Seeed Grove - I2C User manual

Seeed
Seeed Sensecap S-EC-01 User manual

Seeed
Seeed Grove 101020005 User manual
Popular Accessories manuals by other brands

Azbil
Azbil K1G Series user manual

NuImage Awnings
NuImage Awnings 4100 series Assembly instructions

Outdoor Revolution
Outdoor Revolution Compactalite Pro Integra 375 Hex instructions

ESTEBAN
ESTEBAN WOOD & LIGHT EDITION Use Instructions Leaflet

Dometic
Dometic ACX3 Series Short Operating Manual

Omron
Omron E3MC - datasheet