SEFRAM 9822 User manual

SEFRAM 9822-9822B
Data Logger Hygro-thermometer
Instruction Manual
32, rue Edouard Martel
BP55
F42009 –Saint Étienne Cedex 2
E-mail: sales@sefram.fr
Tel : 04 77 59 01 01
Fax : 04 77 57 23 23
Web : www.sefram.fr

Data Logger Hygro-thermometer
1
CONTENTS
TITLE PAGE
1. General Description….…………………………………………………….……………..1
2. Safety Information………………………………………………………………………...1
3. Features…………………………………………………………………………………….1
4. Specifications……………………………………………………………………………...2
5. Symbol Definition & Button Location…………......................................................3
6. Button Instructions ………………………….…………………...................................5
6.1 Power ON/OFF Button…………………………………….....................................5
6.2 Backlight Button………………….......................................................................5
6.3 Data-Hold Button……….....................................................................................5
6.4 REC Button…..…………………..........................................................................5
6.5 MEM Button…..………………….........................................................................5
6.6 RECALL Saved Reading Button……………………..........................................5
6.7 MAX/MIN/AVG Button…………………...............................................................6
6.8 Selecting DP/WB Temperature…………………………........................................6
6.9 SETUP Button………………………………………...…………………..................6
7. Operating Instructions…………………………………………...........………………...6
7.1 Setup Options……………………………………..................................................6
7.2 Menu Item………………………………………………………...............................6
7.3 Menu Description………………………………………………..............................8
7.3.1 Set Bluetooth ON/OFF………..…...……………………..............................8
7.3.2 Select Thermocouple Type…………..…………………..............................9
7.3.3 Set Unit ………………….………………………………...............................9
7.3.4 Setting Interval Time For Data Storing.………………...............................9
7.3.5 Set Offset To Compensate For Probe Errors.…………............................9
7.3.6 Set Alarm Point .…………………………………..…...…………..................9
7.3.7 Set Auto Power Off Time.…..……..……………….………........................10
7.3.8 Set System Clock.…………...…………….………....................................10
7.4 Clearing Data Logger Records.……..……………….......................................11
7.5 Clearing Instant Read-out Memory.…..…………….………............................11
7.6 Connecting To a Computer.…………….….…………......................................11
8. Power & Bluetooth Adapter Preparation……….……………………………...........11
8.1 Battery Replacement………………..……………………………………….............11
8.2 Bluetooth Adapter Installation…….…..…………………………………….............12
9. Maintenance.….….………..……………………………………………………...…..…12
10. Connection Between Probe & Main Unit……………….…………………...…..…12
11. Testlink SE-522 Software…………..…………………………….…….....................13

Data Logger Hygro-thermometer
2
1. GENERAL DESCRIPTION
Thank you for choosing our Data Logger Hygro Thermometer. To ensure the safety and the best
performance of this instrument, we recommend you to read and follow the manual carefully before
operation.
Data can be stored in the meter or directly saved on a computer through PC interface. Recorded
data can be further processed on a computer.
2. SAFETY INFORMATION
Read the following safety information carefully before attempting to operate or service the meter.
Use the meter only as specified in this manual; otherwise, the protection provided by the meter
may be impaired.
ENVIRONMENT CONDITIONS
Altitude up to 2000 meters
Relative humidity: 90% max
Operation ambient temperature: 0°C to 50°C
MAINTENANCE & CLEARING
Repairs or servicing not covered in this manual should only be performed by qualified
personnel.
Periodically wipe the case with a dry cloth. Do not use abrasives or solvents on this instrument.
SAFETY SYMBOLS
Comply with EMC
When servicing, use only specified replacement parts.
3. FEATURES
Interchangeable digital probes
Dew point and Wet bulb measurement
Support K, J, E, T, N, R, S type thermocouple
Temperature and humidity alarm function
Fast response and sampling rate
32000 data logger records each channel
Instant recall function
Wirelessly connect to PC or mobile device via Bluetooth Adapter
iOS and Android APP available to download from APP store
USB PC interface with Windows software included
Adjustable auto power off timer

Data Logger Hygro-thermometer
3
4. SPECIFICATIONS
4-1 Probe: RP-33
Sensor type: Semi-Conductor humidity and temperature sensor
Relative humidity range: 0 to 100%RH
Temperature range: -20°C to 60°C (-4°F to 140°F) (253K to 333K)
Dew point temperature range: -50°C to 60°C (-58°F to 140°F) (223K to 333K)
Wet bulb temperature range: -20°C to 60°C (-4°F to 140°F) (253K to 333K)
Resolution: 0.1%RH, 0.1°C, 0.1°F, 0.1K
Accuracy: [at 23°C(73.4°F)]
10%RH to 90%RH ±2.5%RH
<10%RH,>90%RH ±5.0%RH
-20 to 60°C (-4 to 140°F) ±0.8°C (±1.5°F)
Response time: Humidity: 60 sec. In slowly moving air
(@t90) Temperature: 20 sec. in slowly moving air (T1)
Sensor hysteresis: < 1.5%RH with excursion of 90 % to 10 % to 90%
Temperature coefficient: 0.1 x (specified accuracy) per 1°C [ < 23°C(73.4°F) or > 23°C(73.4°F)]
4-2 Thermocouple
Measurement range:
K: -200°C ~1372°C (-328°F ~ 2501°F) (73K ~ 1645K)
J: -200°C~1000°C (-328°F ~ 1832°F) (73K ~ 1273K)
E: -200°C~750°C (-328°F ~ 1382°F) (73K ~ 1023K)
T: -200°C~400°C (-328 °F ~ 752°F) (73K ~ 673K)
N: -200°C ~1300°C(-328°F ~ 2372°F) (73K ~ 1573K)
R, S: 0°C ~1767°C(32°F ~ 3212°F) (273K ~ 2004K)
Resolution:
K-,J-,E-,T-,N-,R-,S-type
0.1°C < 600°C / 0.1°F < 1000°F / 0.1K < 873K,
1°C ≧600°C / 1°F ≧1000°F / 1K ≧873K
Accuracy:
[at 25°C(77°F)±5°C]
K-,J-,E-,T-,N-type: ±(0.1% of reading+0.7°C)
±(0.1% of reading+1.3°F)
below -100°C(-148°F)
±(0.5% of reading +0.7°C)
±(0.5% of reading +1.3°F)
R- and S-type: ±(0.2% of reading+1.4°C)
±(0.2% of reading+2.5°F)
Temperature coefficient:
0.01% of reading + 0.05°C(0.0028°F) per °C [<18°C(64°F) or
>28°C(82°F)]
Sample rate:
2 time per second
Battery type:
UM-4 or AAA 1.5V battery x 4
Battery lifetime:
Bluetooth OFF: Approx. 100 hours (alkaline battery)
Bluetooth ON:Approx. 30 hours (alkaline battery)
Operation temperature:
0°C to 50°C (32°F to 122°F)
Operation humidity:
10 to 90%RH (no condensing)

Data Logger Hygro-thermometer
4
Storage temperature:
-20°C to 60°C (-4°F to 140°F)
Storage humidity:
10 to 75%RH
Dimensions/ Weight:
Meter: 187mm(L) × 75mm(W) × 29mm(H) / Approx. 330g
Probe(RP-33): 16mm Diameter x 98mm(L)
Standard Accessories:
Instruction manual, battery 1.5V AAA x 4 pcs, Windows
software, micro USB cable, K type bead probe, carrying
case.
5. SYMBOL DEFINITION & BUTTON LOCATION
: Battery condition indicator
: Minimum indicator
: Maximum indicator
: Average indicator
:Setup option indicator
: Auto Power Off enabled indicator
: Recording data logger indicator
: Memory full indicator
: Memory group indicator
: Recall Memory group reading indicator
: Thermocouple type
: Relative Humidity reading
: Temperature reading
: Temperature channel
: Temperature/Humidity alarm indicator
: Hi Temperature alarm indicator
: Lo Temperature alarm indicator
:Compensate for probe errors
: Temperature measurement units
: Data hold indication
: Bluetooth indicator (Connecting mode)
: Bluetooth indicator
(Standby/Pairing mode)

Data Logger Hygro-thermometer
5
○,1Sensor Probe
○,10 RECALL Saved Reading Button
○,2Thermocouple Input
○,11 MEM Button (Set 100 Memory)
○,3Display Screen
○,12 SETUP Button
○,4Power ON/OFF Button
○,13 USB Interface
○,5Back Light Button
○,14 BluetoothAdapter
○,6MAX MIN AVG Button
○,15 Bluetooth Compartment
○,7DATA HOLD Button
○,16 Tilt Stand
○,8DP/WB Button
○,17 Battery Compartment
○,9REC Button

Data Logger Hygro-thermometer
6
6. BUTTON INSTRUCTIONS
6.1 Power ON/OFF Button:
Press the button to turn on the meter. Press and hold button for 3 seconds to turn off.
6.2 Backlight Button:
Press to turn on the LCD backlight. This makes it easier to read in dark environment. Press
again to turn off backlight. The backlight will be automatically turned off after 30 seconds to
save battery power.
6.3 Data-Hold Button :
Press button to freeze the data shown on the LCD screen. Press it again to exit Data-Hold
mode.
Note: When the unit is in the Data-Hold mode, , , , and buttons are disabled.
6.4 REC Button:
Press button to start recording data. The “ ” symbol will display on the screen. To stop
recording, press button again.
Note: During recording period, most of the buttons are disabled, such as the , . All
settings must be made before starting the data logger function.
Note: When the memory is full (32,000 recorders), “ ” symbol will blink on the LCD screen.
The data logger stops.
Note: When battery power is low ( “ ” symbol lights up on the screen), data logger cannot be
started. If the battery is running low during data logging, it will stop recording automatically.
6.5 MEM Button:
Press button to save readings on the LCD screen. The “ ”symbol lights up on the
screen for 2 seconds. Press the button again to store next group readings.
The store readings on the LCD screen for 00~99 group.
6.6 RECALL Saved Reading Button:
Press the button to recall saved readings. The “”symbol lights up on the
screen.
Note: When the meter is during connection section, this function is disabled.
Press the , , , or button to select MEM group. The LCD shows
“hour:minute:second ”on the screen for 2 seconds, and then shows the readings.
Press or button to exit RECALL mode.
Data Logger Hygro-thermometer
7
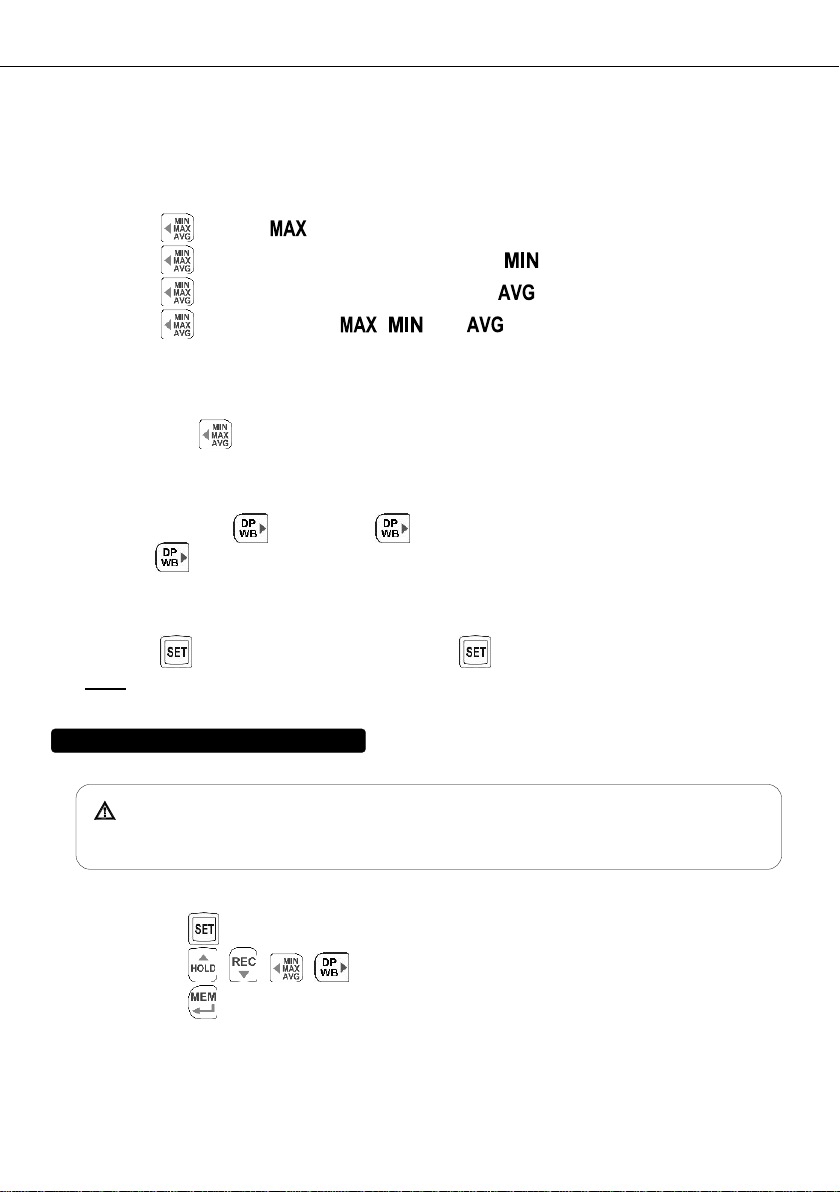
6.7 MAX/MIN/AVG Button:
Under this mode, the unit simultaneously monitors and stores the maximum, minimum and
average value in the memory. The unit will keep updating/refreshing the data.
To start:
(1) Press button. “ ”symbol lights up on LCD, the reading shows the maximum data.
(2) Press button again to show minimum data; the “”symbol lights up on LCD.
(3) Press button again to show average data; the “” symbol lights up on LCD.
(4) Press button again, the “ , and ”symbol blinks together, the readings
shows real time data.
To exit MAX/MIN/AVG mode:
Press and hold button for 2 seconds to exit MAX/MIN/AVG mode.
6.8 Selecting DP/WB Temperature :
The Meter displays ambient temperature when first turned on. To display wet bulb (WB)
temperature, press once. Press again to switch to dew point (DP) temperature.
Pressing third time returns the Meter to ambient temperature. The display indicates when
dew point and wet bulb temperatures are selected.
6.9 SETUP Button:
Press the button to enter setup options. Press again to exit setup mode anytime.
Note: When the meter is during connection section, setup options cannot be entered.
7. OPERATING INSTRUCTIONS
When moving thermometer from one extreme temperature/humidity environment
to another, allow time for the Meter to stabilize.
7.1 Setup Options:
(1) Press the button to enter setup options. Press it again to exit anytime.
(2) Using the , , , button to adjust parameters or move setting items.
(3) Press the button to save changes and move to next setting option.

Data Logger Hygro-thermometer
8
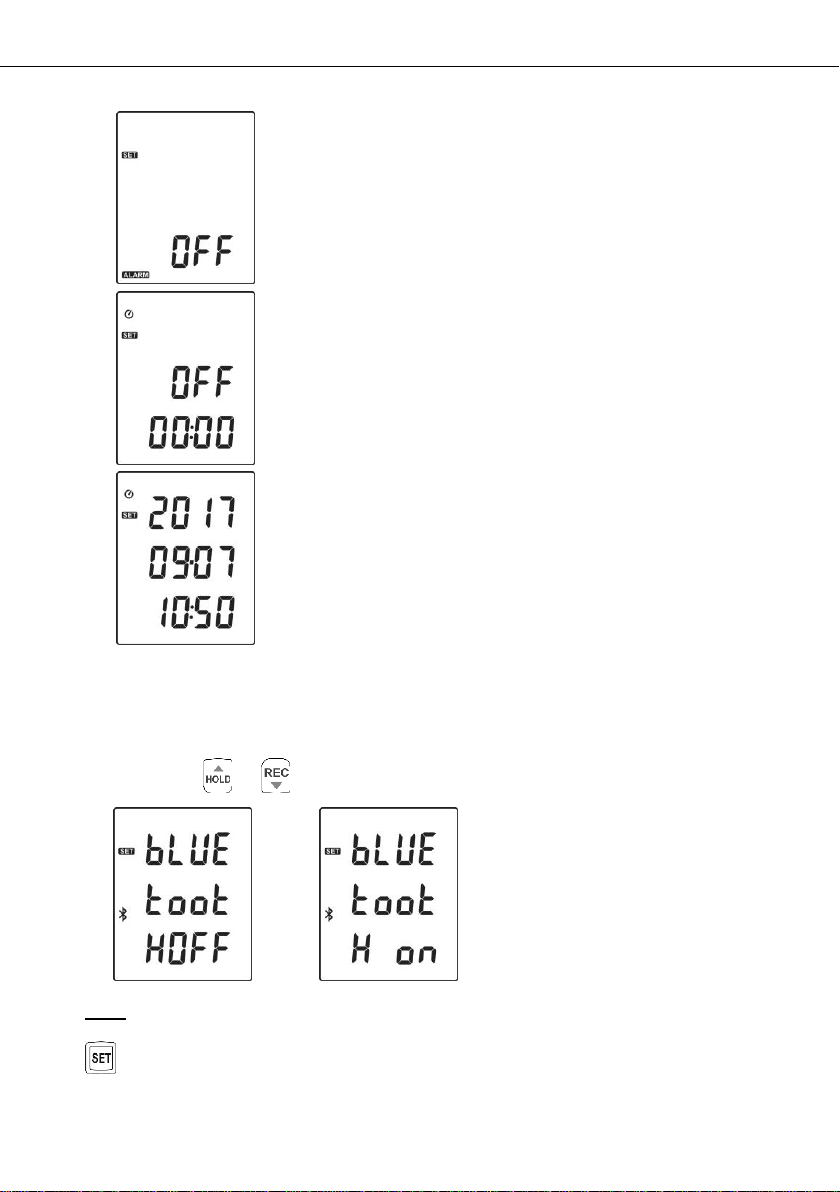
7.2 Menu Item:
(1) Fig.1 Set Bluetooth ON/OFF.
(2) Fig.2 Set thermocouple type.
(3) Fig.3 Set Unit.
(4) Fig.4 Set interval time for data logging.
(5) Fig.5 Set offset to compensate for probe errors.
Data Logger Hygro-thermometer
9
(6) Fig.6 Set alarm point.
(7) Fig.7 Set auto power off time.
(8) Fig.8 Set system clock.
7.3 Menu Description:
7.3.1 Set Bluetooth ON/OFF
Press the or button to turn on or off. (see Fig.9 or Fig.10)
Fig.9 Fig.10
Note:
When Bluetooth function is turned ON, it is entering standby/pairing mode, the blue LED built in
flashes once every 3 seconds. When successfully connected, the blue LED quickly flashes
thrice every 3 seconds.
Data Logger Hygro-thermometer
10
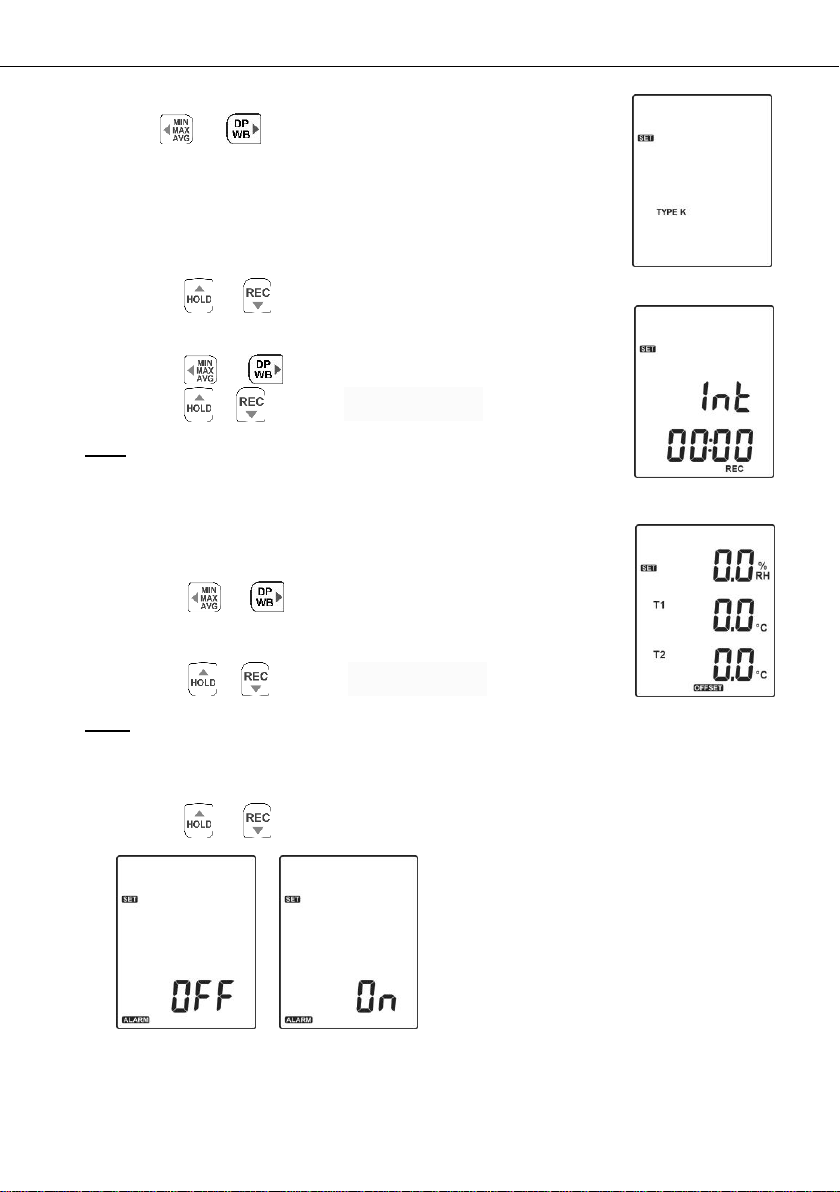
7.3.2 Select Thermocouple Type: K, J, E, T, N, R or S
Press the or button to select thermocouple type.
(see Fig.11)
7.3.3 Set Unit:
(1) Press the or button to select °C、°F、K.
7.3.4 Setting Interval Time For Data Storing:
(1) Press the or button to set minute or second. (see Fig.12)
(2) Press the / button to increase / decrease value.
Note:
Set interval time range:
1 Second (00:01) to 60 minutes 59 seconds (60:59)
7.3.5 Set Offset To Compensate For Probe Errors:
The user can adjust the readings of thermometer to compensate for the
errors against a specific thermocouple.
(1) Press the or button to select channel.
(see Fig.13)
Setting channel blinks on the LCD screen.
(2) Press the / button to increase / decrease value.
Note:
The offset to compensate for probe errors range: ±5%RH、±5°C or ±9°F.
7.3.6 Set Alarm Point:
(1) Press the or button to turn ON or OFF. (see Fig.14 or Fig.15)
Fig.12
Fig.13
Fig.11
Fig.14
Fig.15

Data Logger Hygro-thermometer
11
(2) When setting on mode, press the button to
set Hi and Lo limit.
( RH alarm setting see Fig.16 and Fig.17 )
( T1 alarm setting see Fig.18 and Fig.19 )
( T2 alarm setting see Fig.20 and Fig.21 )
Note:
When measuring value over alarm point, the symbol will
blink “ ” or “ ” on the
LCD.
The beeper will make “beep-beep-beep ”sound.
The Lo alarm set cannot be greater than Hi alarm
set.
7.3.7 Set Auto Power Off Time:
Press the or button to select auto power
off option 10, 30 minutes, 1, 2, 4, 8 hours, or off.
(see Fig.22 or Fig.23)
7.3.8 Set System Clock:
The unit is built-in a clock so that the data logger function can also record the data and time along
with the measurement value.
(1) Press the or button to select year, date, or time.
(see Fig.24)
(2) Press the / button to increase/ decrease value.
Note:
Check the clock setting after replacing batteries. If necessary, reset
system clock.
Fig.16
Fig.17
Fig.18
Fig.19
Fig.20
Fig.21
Fig.22
Fig.23
Fig.24

Data Logger Hygro-thermometer
12
7.4 Clearing Data Logger Records:
(1) Turn off the unit.
(2) Press and hold button and then press power button to turn on the unit.
(3) Keep holding and button, then LCD will show " ", " CLr " and “ SUrE 5,
4…1, 0 ” until clean the memory. (To abort, release all buttons in process)
7.5 Clearing Instant Read-out Memory:
(1) Turn off the unit.
(2) Press and hold button and then press power button to turn on the unit.
(3) Keep holding button, then LCD will show " ", " CLr" and “ SUrE 5, 4…1,
0” until clean the memory. (To abort, release button before “SUrE 0 ”.)
The LCD will show " CLr " , “ 0 ”and start erasing group 00 to 99 records.
7.6 Connecting To a Computer:
The meter can be connected to PC through a micro USB cable or Bluetooth adapter to download
recorded data or perform real time monitoring or datalogging in the software interface.
8. POWER & BULETOOTH ADAPTER PREPARATION
8.1 Battery Replacement:
(1) When the battery voltage drops below proper operation range, the symbol will blink on
the LCD display and the battery needs to be replaced.
(2) Before replacing the battery, power off the meter, and disconnect all temperature probes.
Open the cover of the battery cabinet by a screwdriver. Replace the old batteries with four new
UM-4 orAAA size batteries.
(3) Close the battery cabinet cover and fasten the screw.

Data Logger Hygro-thermometer
13
8.2 Bluetooth Adapter Installation:
9. Maintenance
In order to ensure the accuracy of the thermometer for a longer
period of time you should calibrate it once a year.
Clean the device and the window of the display with a clean, lint-free,
antistatic and dry cleaning cloth.
Do no use cleaning agents that contain carbon or
benzenes, alcohol or anything similar to clean the product
since these substances damage the surface of the
measuring instrument. Moreover, these fumes are
hazardous to health and explosive. Do not use tools with
sharp edges, screwdrivers, metal brushes or anything
similar to clean the device.
10. CONNECTION BETWEEN PROBE & MAIN UINT
The probe can be connected or disconnected from the main unit by
fastening screw as shown in the graph. Rotate only the fastening
screw rather than the probe body to prevent from damaging the
probe.
(1)Power off
(2)Open the cover of the Bluetooth cabinet by a screwdriver.
(3)Install the Bluetooth adapter into its compartment, push up the adapter to the
connector.
Close the Bluetooth cabinet cover and fasten the screw.
Data Logger Hygro-thermometer
14
11. Testlink SE-522 SOFTWARE
11.1 The SE-522 package contains:
Software CD disk
Micro USB cable
11.2 System Required:
Windows XP/ VISTA/ Windows 7/ Windows 8/ Windows 10
11.3 Minimum Hardware Required:
PC or laptop with CD-ROM drive.
At least 50 MB hard disk space available to install SE522
Recommended screen resolution 1024X768 or above.
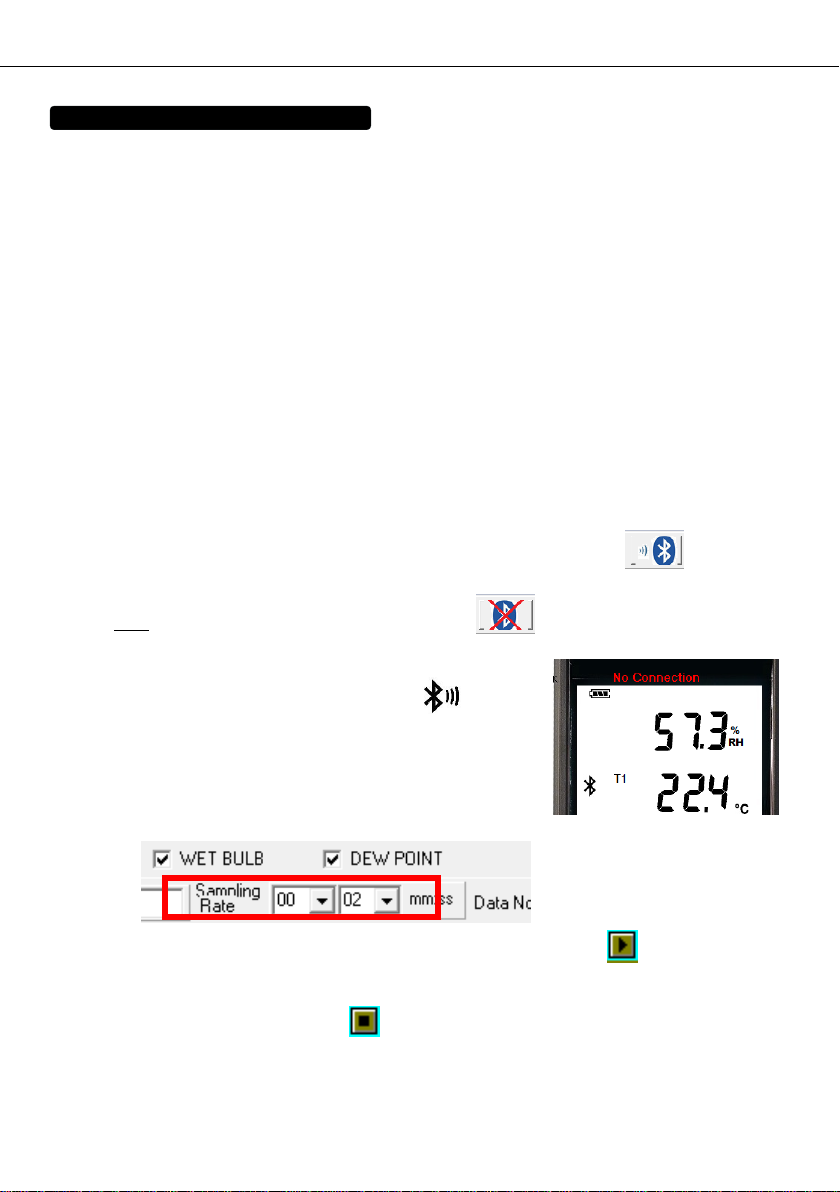
11.4 Tutorial - Quick Start to Use SE522:
Recording real time data in waveform:
(1) Power on the meter first and connect it to a PC USB port with the cable.(or set the
Bluetooth ON)
(2) Start SE522 program, or ( Click “search Bluetooth device” or to establish
connection.)
Note: Before clicking “search Bluetooth device” or , make sure Bluetooth pairing have
finished.
(3) If the connection is successful the panel will display the
same value (or Bluetooth symbol ) as the
Hygro Thermometer. If fail to connect the meter with
PC, it will display " No Connection " on the panel
window in SE522.
(4) Select sampling rate from Real-Time Graph
window.
(5) When the connection is successful, click “Real Time | run ”or from main menu to
start recording real time data and there will be a waveform on the Real Time Graph
Window.
(6) Click “ Real Time | Stop ”or to stop recording.
Data Logger Hygro-thermometer
15
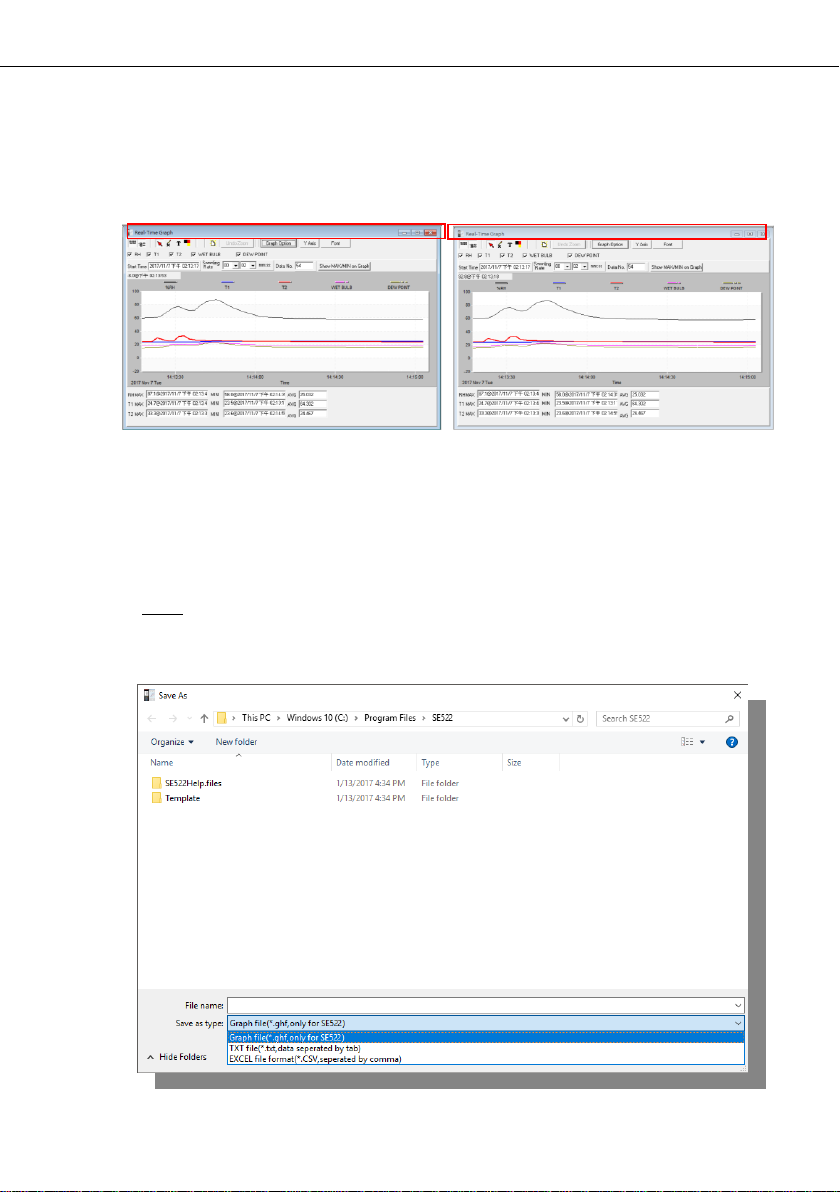
11.5 How to save the recorded real time data to a file?
(1) Click the graph window you want to save and the graph window will become active, then
choose File | Save from main menu or click from the tool bar .
(2) There will be a save dialog window for you to choose the file name and file type to save.
There are three types of file format you can choose, binary file(*.ghf), text file(*.txt) and
EXCEL format file(*.csv). The *.ghf file use much fewer disk space to save the data than
the other two file formats, but it can only be used in SE522. Text file can be opened by
SE522 and any other word processor program like word, notepad etc. EXCEL format file
can be opened by SE522 and Microsoft EXCEL.
Note: If decimal separator is comma in your country, this file format will be disabled,
because .CSV file also use comma to be data separator. For example 78,6 will become 78
and 6 in EXCEL )
an active window
not active window

Data Logger Hygro-thermometer
16
11.6 How to load the recorded data from the memory of Hygro Thermometer and
save it to a file?
(1) Power on the Hygro Thermometer.
(2) Press the “REC ” button of the meter to start recording data.
(3) After a while, press “ REC ” button again to stop recording data.
(4) Connect the Meter to PC
(5) Start SE522 program.
(6) Choose Data Logger from main menu or click from tool bar.
(7) In reference to Data Logger , see DataLogger
11.7 Main Menu:
File | Oepn- Retrieve files from the disk.
Save - Save the active window (when the caption bar is highlighted) data to the disk.
Print - Print the data of the acitve window (graph or list).
Printer Setup - Select printer.
File | Exit: Terminates program.
View | Control Panel:
By opening the Panel Window, the user can control meter via the button in this
window.
View | Real-Time Graph:
Open Real-Time Graph display to graph the present data.
Real Time Data | Run - Start collecting real time data.
Stop - Stop collecting real time data.

Data Logger Hygro-thermometer
17
DataLogger:
By opening the DataLogger Window, the user can load recorded data of meter to
PC in this window.
Output To Graph - Graphing tabular data.
Com port of Bluetooth device –
Choose com port to connect to Bluetooth device.
Search Bluetooth Device -
Automatically searching and connecting to Bluetooth device.
Disconnect Bluetooth Device –Disconnecting from Bluetooth device.
11.8 DataLogger:
When you have the Hygro thermometer connceted to PC, select " DataLogger " from main
menu or click Datalogger icon from tool bar to load recorded data from the meter and there
will be a progress indicator to show the loading status. If error occurs, just click “DataLogger
icon " again.
After the data was downloaded, the left hand side will show how many data sets were loaded
and detail information for each data set (start data, start time, recording rate and record
numbers).

Data Logger Hygro-thermometer
18
for examples:
It will transfer first data set to graph on the right hand side. The user can also click at any
other data set to choose that set for graph.
Graph:
Tool Bar:
- Display or hide Statistic1.
- Display or hide Statistic2.
Tool Bar
Statistic 1
Statistic 2
Data Logger Hygro-thermometer
19
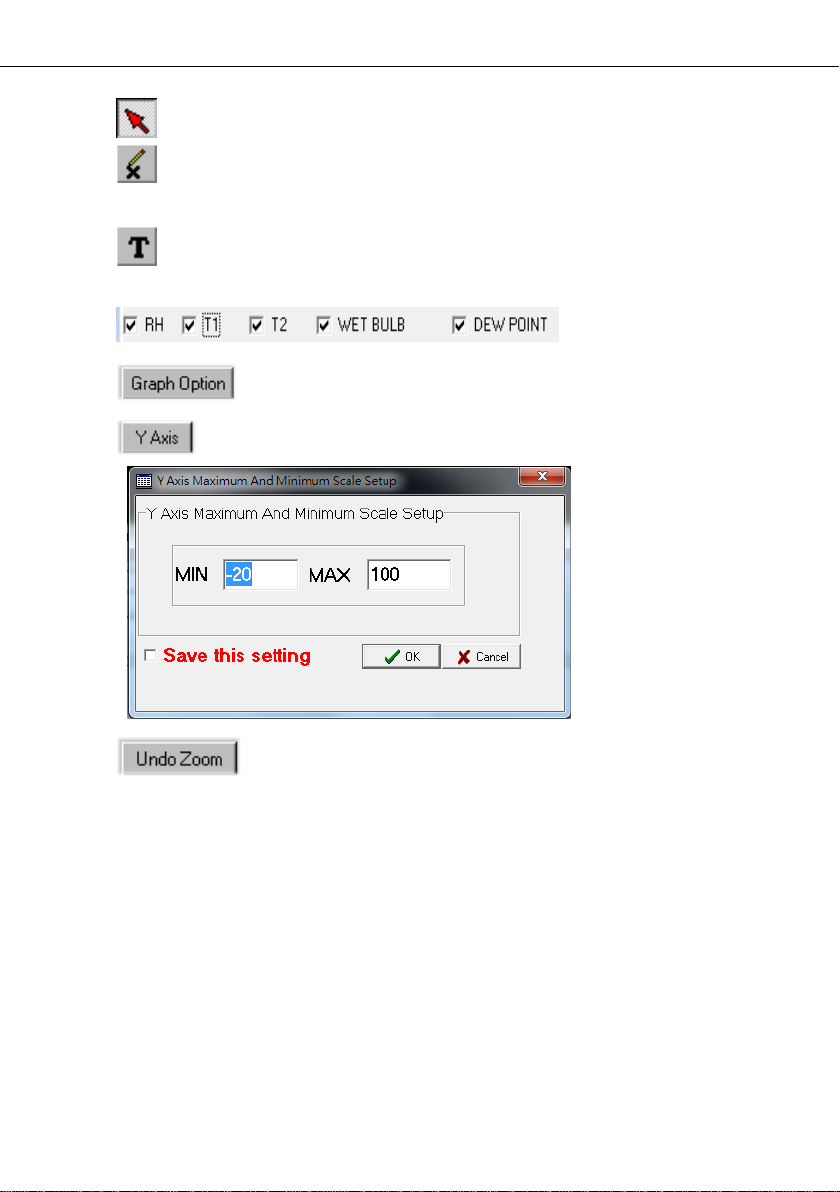
- Normal cursor.
- When selected, the mouse cursor will become a cross sign when moving to the graph,
click on the graph to mark a cross sign on the graph. And all the mark you make will
exist with T1.
- When selected, the mouse cursor will become a " I " sign when moving to the graph,
click on the graph to annotate. And all the text you make will exist with T1.
- Select the channel.
- Graph Customization
- Change the Y axis extention
- To Undo the Zoom
You can Zoom this graph by using mouse:
To Zoom:
(1) Press the left mouse button and drag the cursor to select the new extents.
(2) Release the mouse button.
You can choose channel number showing in the graph.
(a) Click " Graph Option " to call Customization dialog.
(b) Select Subsets tab.
(c) Select a single channel or multiselect (hold Ctrl key, use mouse to choose) channels.
This manual suits for next models
1
Table of contents
Other SEFRAM Thermometer manuals


Popular Thermometer manuals by other brands


FUDAKANG INDUSTRIAL CO.
FUDAKANG INDUSTRIAL CO. FT-F11-BT Instructions for use

Omega
Omega HH-2000 SERIES operating instructions

optris
optris CT Operator's manual

VOLTCRAFT
VOLTCRAFT 2399953 operating instructions

Hart Sceintific
Hart Sceintific 1506 Operator's manual

Maverick
Maverick DT-09 instruction manual