Segway Freee F2 User manual

Freee F2
Electric Wheelchair
User Manual

Page 2 of 89 User Manual F2
06/2017 V1.63 Freee Mobility GmbH
Copyright, Trademarks:
Segway® is a registered trademark of Segway Inc. USA
Freee® is a registered trademark of Freee Mobility GmbH, Germany
Contact Information:
For support, please contact us. We are always at your disposal.
Freee Mobility GmbH
Wasenstrasse 90
73660 Urbach
Germany
Phone: +49 7181 / 99498-0
www.freee.de

Page 3 of 89 User Manual F2
06/2017 V1.63 Freee Mobility GmbH
Table of Contents
1. Safety Notes Related to this User Manual......................................................7
1.1. About this Manual..........................................................................................7
1.2. Safety Messaging ..........................................................................................7
1.3. The Risk of Injury...........................................................................................7
1.4. Requirements for Riding the F2 .....................................................................7
1.5. Risk Prevention..............................................................................................8
2. Transportation and Assembly.........................................................................9
2.1. Transport Packaging......................................................................................9
2.2. Assembly.......................................................................................................9
2.3. Serial Number................................................................................................9
3. F2 Components and Subsystems.................................................................11
3.1. Vehicle.........................................................................................................11
3.2. Seat Platform...............................................................................................13
3.2.1. Seat.........................................................................................................13
3.2.2. Transfer Aids...........................................................................................15
3.2.3. Seat Cushion...........................................................................................17
3.3. Backrest.......................................................................................................18
3.4. Handlebar....................................................................................................19
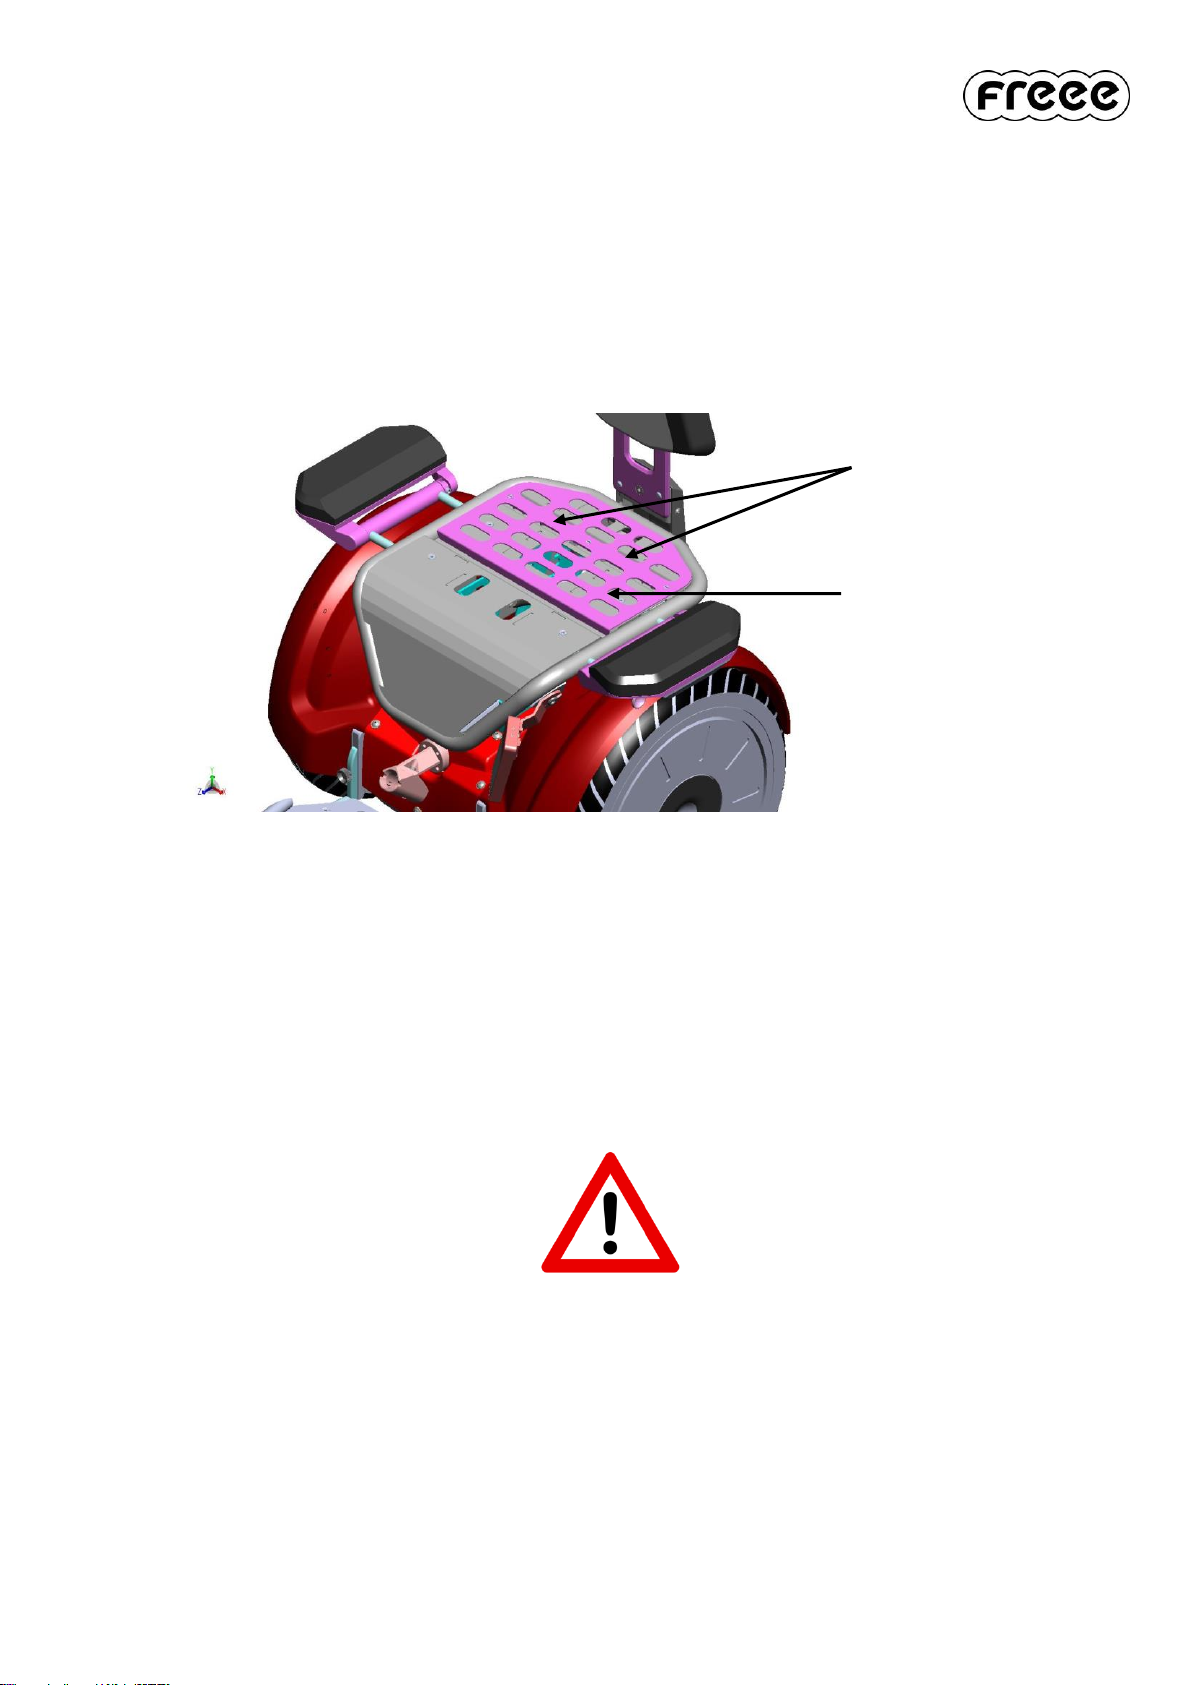
3.5. Footrest .......................................................................................................21
3.6. User Panel...................................................................................................22
3.7. InfoKey Controller........................................................................................24
3.7.1. Power/Standby Button Functions ............................................................28
3.7.2. Beginner Button Functions......................................................................28
3.7.3. Information Display Button Functions......................................................29
3.7.4. Security Button Functions........................................................................31
3.7.5. Button Combination Functions.................................................................32
4. Functionality...................................................................................................34
4.1. Safety ..........................................................................................................34
4.2. Moving Forward, Moving Backward and Stopping .......................................34
4.3. Turning ........................................................................................................35
4.4. Turning While Moving, Driving On Slopes....................................................35
4.5. Parking Stands ............................................................................................36

Page 4 of 89 User Manual F2
06/2017 V1.63 Freee Mobility GmbH
5. Handling.........................................................................................................37
5.1. Powering On the F2.....................................................................................37
5.2. Confirming the Beginner Setting..................................................................37
5.3. Balance Mode .............................................................................................38
5.4. Driving Out the Parking Stands....................................................................38
5.5. Transfer / Mounting the F2 ..........................................................................39
5.6. Driving In the Parking Stands ......................................................................40
5.7. Riding the F2...............................................................................................40
5.8. Driving Out the Parking Stands....................................................................40
5.9. Powering Off the Motor................................................................................41
5.10. Powering On the Motor again......................................................................41
5.11. Transfer / Dismounting ................................................................................42
5.12. Powering Off the F2.....................................................................................42
5.13. Loading Your F2 into a Vehicle....................................................................42
5.14. Unloading Your F2 from a Vehicle...............................................................44
6. Risk Prevention..............................................................................................46
6.1. Riding Form.................................................................................................46
6.2. Avoiding Hazards ........................................................................................47
6.3. Practice Riding............................................................................................50
6.4. Navigating Terrain.......................................................................................51
6.5. Riding Etiquette...........................................................................................51
6.6. Riding Tips and Safety Guidelines...............................................................52
6.7. Rider Weight................................................................................................54
7. Safety Alerts...................................................................................................56
7.1. Speed Limiter..............................................................................................56
7.2. Stick Shake Warning...................................................................................57
7.2.1. Rider On.................................................................................................57
7.2.2. Rider Off.................................................................................................58
7.3. Safety Shutdown.........................................................................................58
7.4. Empty Battery Condition..............................................................................59
8. Batteries.........................................................................................................61
8.1. Battery Safety..............................................................................................61
8.2. Technical Specifications of the Battery........................................................62
8.3. Charging the Batteries.................................................................................62
8.4. Unplugging the Power Cord.........................................................................63

Page 5 of 89 User Manual F2
06/2017 V1.63 Freee Mobility GmbH
8.5. Charging Failures ........................................................................................63
8.6. Regenerative Braking ..................................................................................64
8.7. Reading the Battery Charge Level Display...................................................64
8.8. How Temperatur Affects Performance.........................................................65
8.9. Maximizing Travelling Distance....................................................................66
8.10. Replacing Batteries......................................................................................67
8.11. Battery Transportation and Shipping............................................................67
9. Maintaining and Servicing your F2 ...............................................................69
9.1. Cleaning Your F2.........................................................................................69
9.2. Storing Your F2............................................................................................70
9.3. Lifting Your F2 .............................................................................................70
9.4. Checking the Wheels...................................................................................71
9.5. Tire Inflation Pressure..................................................................................71
9.6. Removing and Installing the Batteries..........................................................72
9.7. Removing and Installing a Wheel.................................................................73
9.8. Replacing the InfoKey Controller Battery .....................................................74
10. Troubleshooting the F2 .................................................................................76
10.1. Power on / Power off....................................................................................76
10.1.1. The Motor will not power on ....................................................................76
10.1.2. The F2 will not power on .........................................................................77
10.1.3. Power Cord plugged in, no Operation possible........................................77
10.1.4. Startup Error Conditions..........................................................................77
10.1.5. The F2 will not power off .........................................................................78
10.1.6. The Motor will not power off ....................................................................78
10.1.7. The F2 will not enter Balance Mode ........................................................78
10.2. Chassis........................................................................................................79
10.2.1. Wheel is loose and/or wobbles................................................................79
10.2.2. F2 pulls to one Side when riding..............................................................79
10.2.3. Tire is flat or will not hold Air....................................................................79
10.3. Reduced Performance Level........................................................................80
10.4. System Faults while riding ...........................................................................80
10.5. Pitch or Roll Angle exceeded.......................................................................81
10.6. System Faults..............................................................................................81
10.7. Parking Stands ............................................................................................82
10.7.1. The Parking Stands will not drive out.......................................................82
10.7.2. The Parking Stands will not drive in.........................................................82

Page 6 of 89 User Manual F2
06/2017 V1.63 Freee Mobility GmbH
10.8. F2 Error Overview .......................................................................................83
10.9. Table of Errors.............................................................................................84
10.9.1. Table of Errors 2.....................................................................................86
11. Technical Specifications...............................................................................87
12. EC Declaration of Conformity.......................................................................89
Page 7 of 89 User Manual F2
06/2017 V1.63 Freee Mobility GmbH
1. Safety Notes Related to this User Manual
Congratulations on the purchase of your new F2 electric wheelchair!
1.1. About this Manual
To learn to ride your F2, you must read and follow all instructions and warnings in this User
Manual. It is important that you follow all safety warnings and cautions that appear throughout the
User Manual and that you use good judgement when riding your F2.
Should you have questions before you attempt to use your F2, please contact us.
1.2. Safety Messaging
The following safety messaging conventions are used throughout this guide:
Symbol
Description
Warns you about actions that could harm you
or others
1.3. The Risk of Injury
The F2 is an electric wheelchair with patented balancing technology. Balancing
technology cannot prevent injury if you do not ride the F2 safely. Whenever you ride the
F2, you risk death or serious injury from loss of control, collisions, and falls. To reduce
the risk of injury, you must read and follow all instructions and warnings in the User
Manual.
1.4. Requirements for Riding the F2
The F2 is suitable for persons with restricted mobility. The F2 is steered by the sitting rider. By
leaning the upper body forward, the F2 is accelerated, by leaning the upper body backwards, the
F2 is slowed down. Pivoting the Handlebar to the left, the F2 is steered to the left. Pivoting the
Handlebar to the right, the F2 is steered to the right.

Page 8 of 89 User Manual F2
06/2017 V1.63 Freee Mobility GmbH
The driver must have an unrestricted mobility of the upper body to safely steer and control the
F2.
Generally, it is highly recommended that the rider meets these requirements irrespective of the
traffic regulations in the country of use.
The minimum rider weight is 45 kg, the maximum rider weight is 100 kg.
1.5. Risk Prevention
The F2 is an electric wheelchair and is therefore only suitable for transporting a sitting
person.
The F2 is not suitable for:
transporting a standing person
transporting loads
towing another vehicle
Please pay attention to the notices in the chapter “Risk Prevention“.
Page 9 of 89 User Manual F2
06/2017 V1.63 Freee Mobility GmbH
2. Transportation and Assembly
The following procedures must be followed before being able to ride the F2.
2.1. Transport Packaging
The F2 can be taken out of the transport packaging. Instructions for removing the F2 out of the
transport packaging can be found in the transport packaging or in the enclosed documents.
2.2. Assembly
Tools are not required to assemble the F2. Subsystems such as the Handlebar, the Backrest and
Footrest can be easily assembled by hand. Instructions can be found in the enclosed documents.
2.3. Serial Number
The F2 is a vehicle consisting of a motor, a chassis and steering components. These
components are provided with serial numbers ex works. The serial numbers can be found on
each of these components as well as on the delivery papers. Store the delivery papers containing
the serial numbers in a secure place. The serial numbers can provide helpful information in case
of a repair.
F2 Serial Number, Segway® Serial Number
F2 serial number
Segway®serial number
Page 10 of 89 User Manual F2
06/2017 V1.63 Freee Mobility GmbH
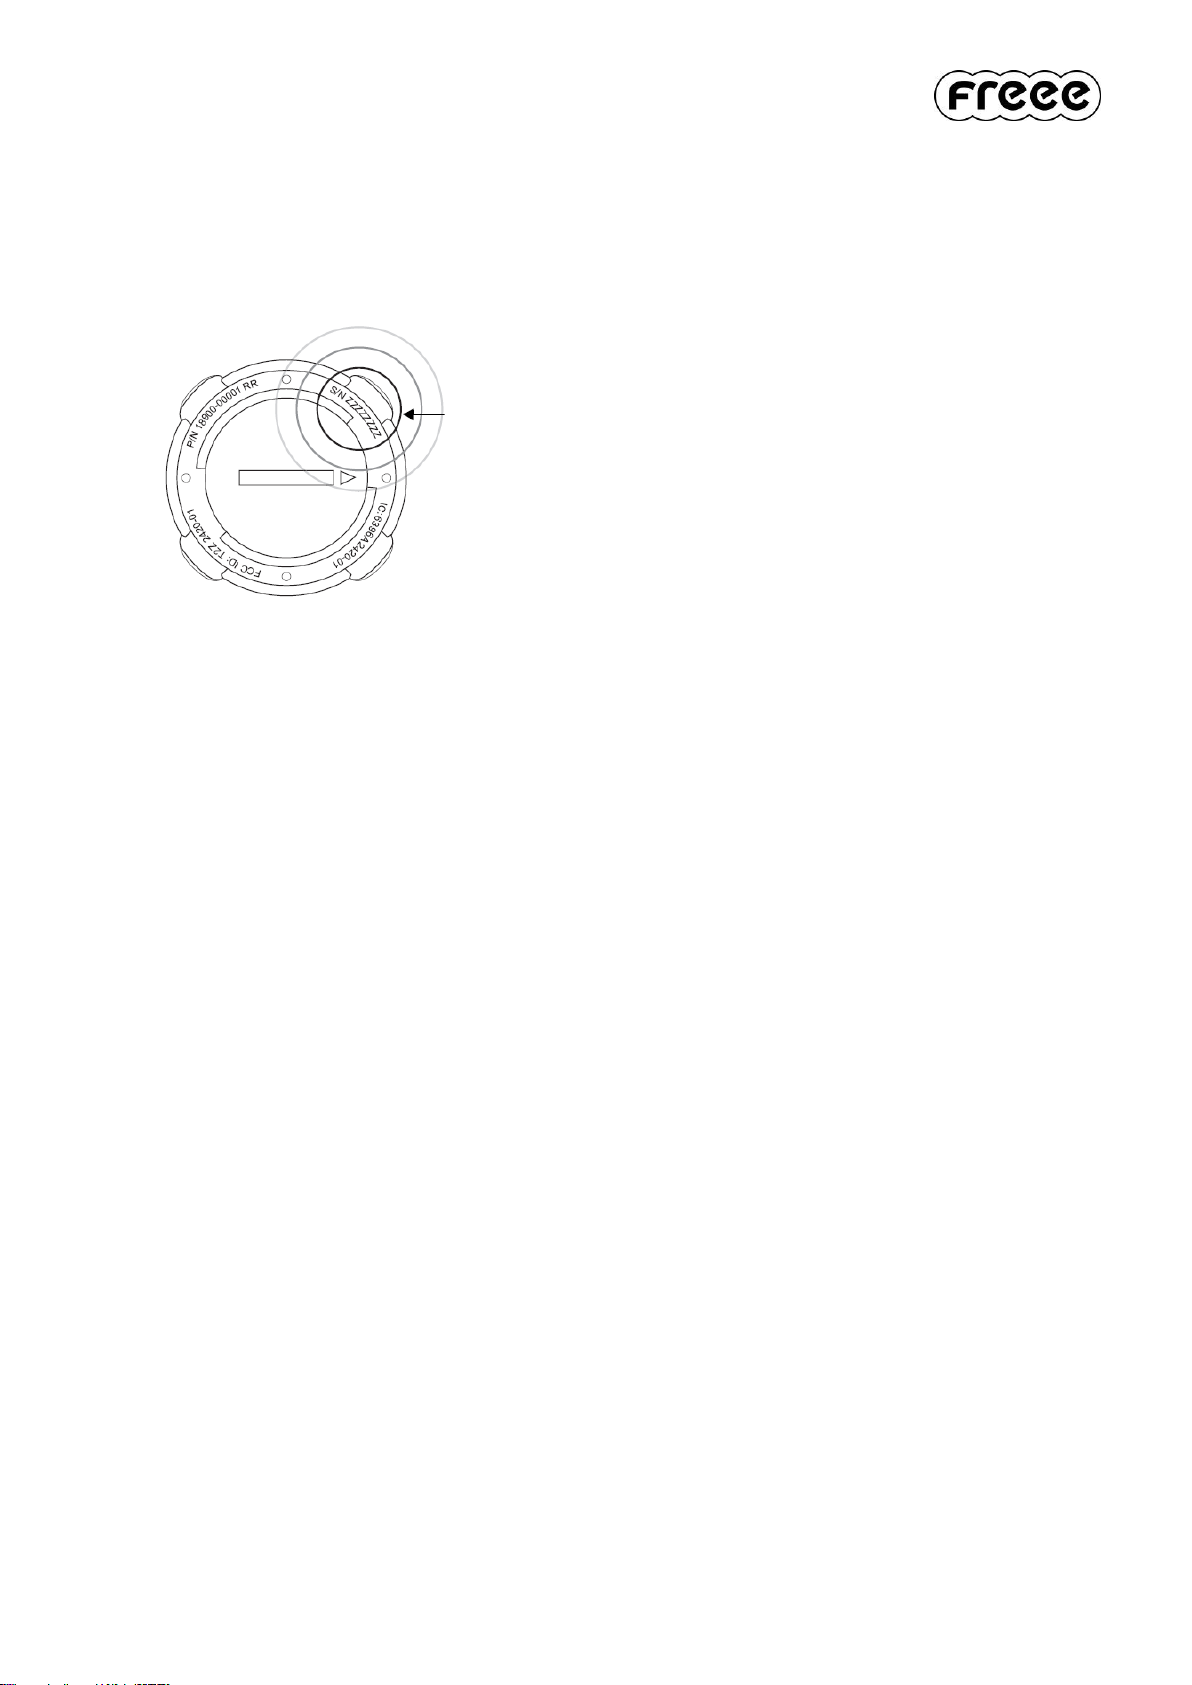
InfoKey Controller Serial Number
Your F2 is delivered with two InfoKey Controllers. The serial number of the InfoKey Controller is
located on the back under the trim ring of the InfoKey Controller. The serial number begins with
S/N.
serial number location of the
InfoKey Controller

Page 11 of 89 User Manual F2
06/2017 V1.63 Freee Mobility GmbH
3. F2 Components and Subsystems
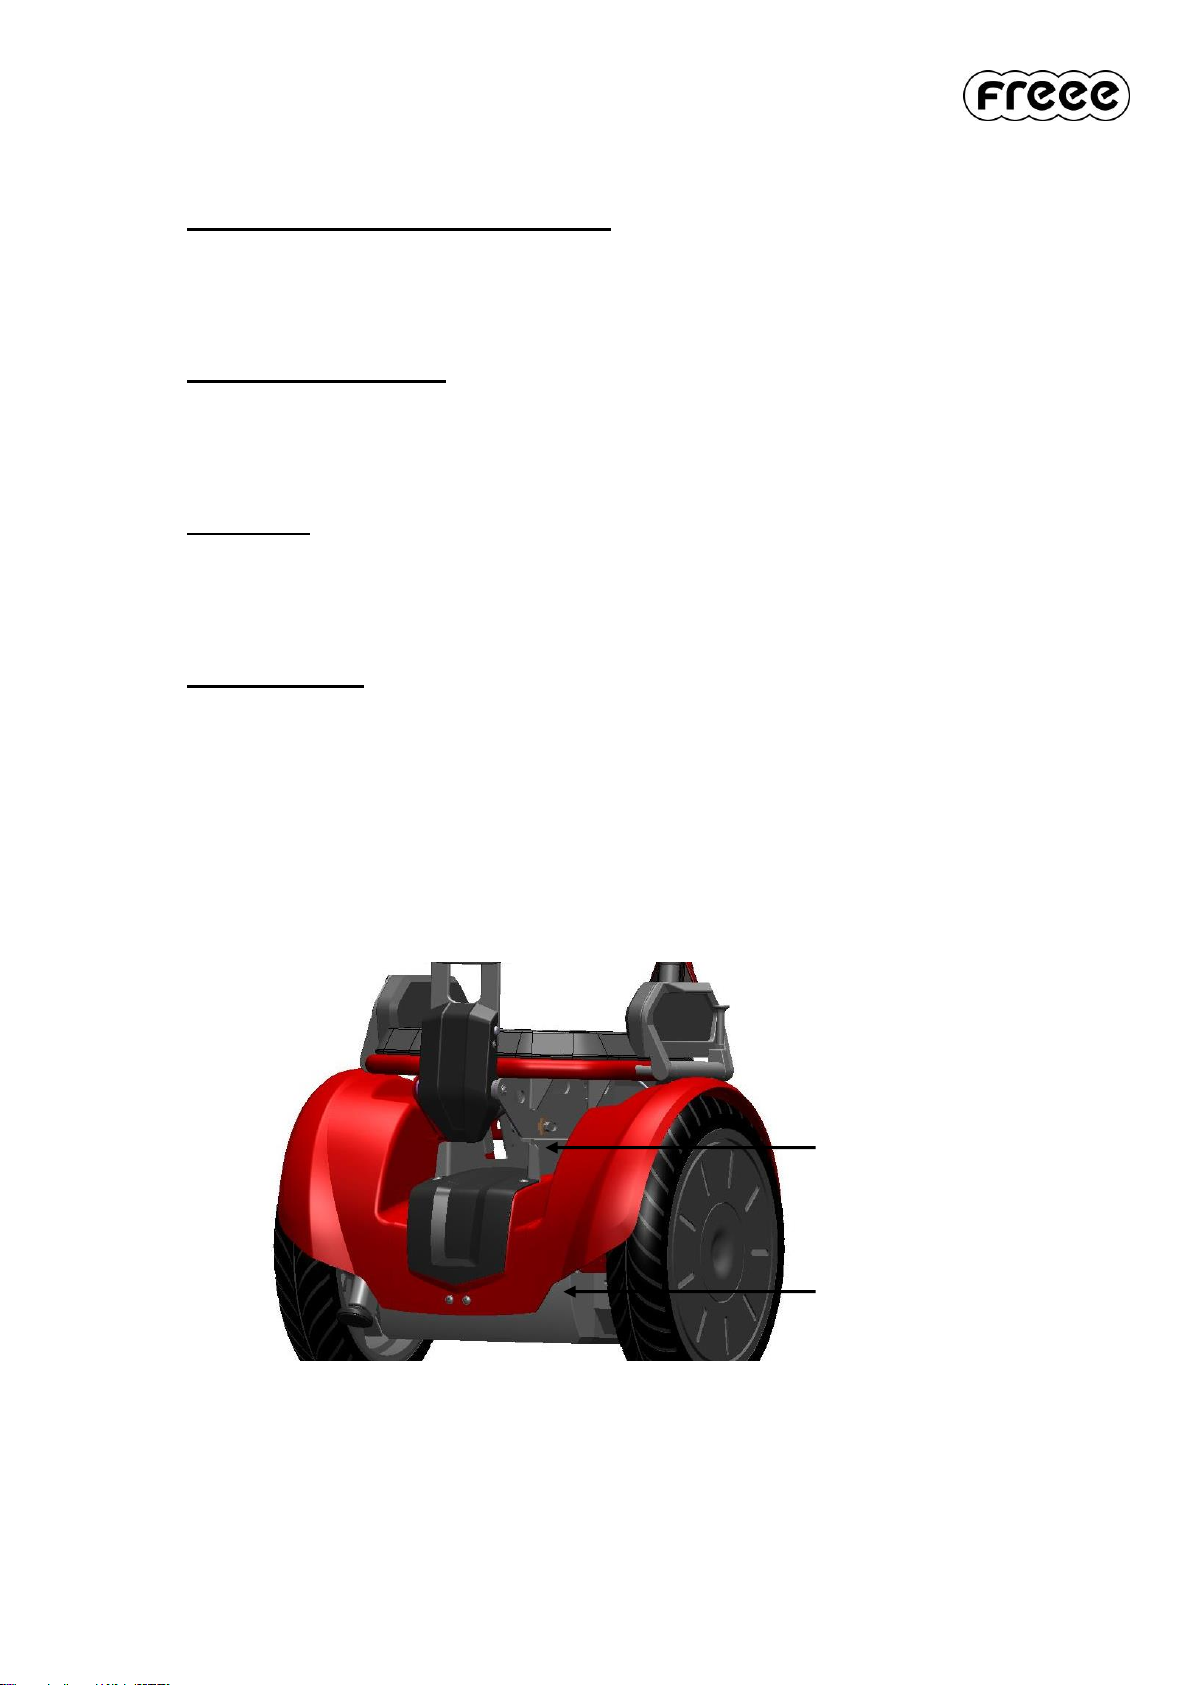
3.1. Vehicle
The F2 consists of a Segway® PT Chassis and a Seat Platform and electric Parking Stands.
Backrest
Seat
Footrest
Handlebar
User Panel
Segway® PT
chassis with
Wheels
InfoKey Controller
Transfer Aids
Lock-Out Bolts for
Transfer Aids
Page 12 of 89 User Manual F2
06/2017 V1.63 Freee Mobility GmbH
All parts of the F2 must be approved and properly installed by Freee Mobility. Never attempt to
ride the F2 without the Handlebar attached. Using your F2 without all parts properly installed
could damage your F2 and result in serious injury and/or damage from loss of control, collisions,
and falls.
Warning:
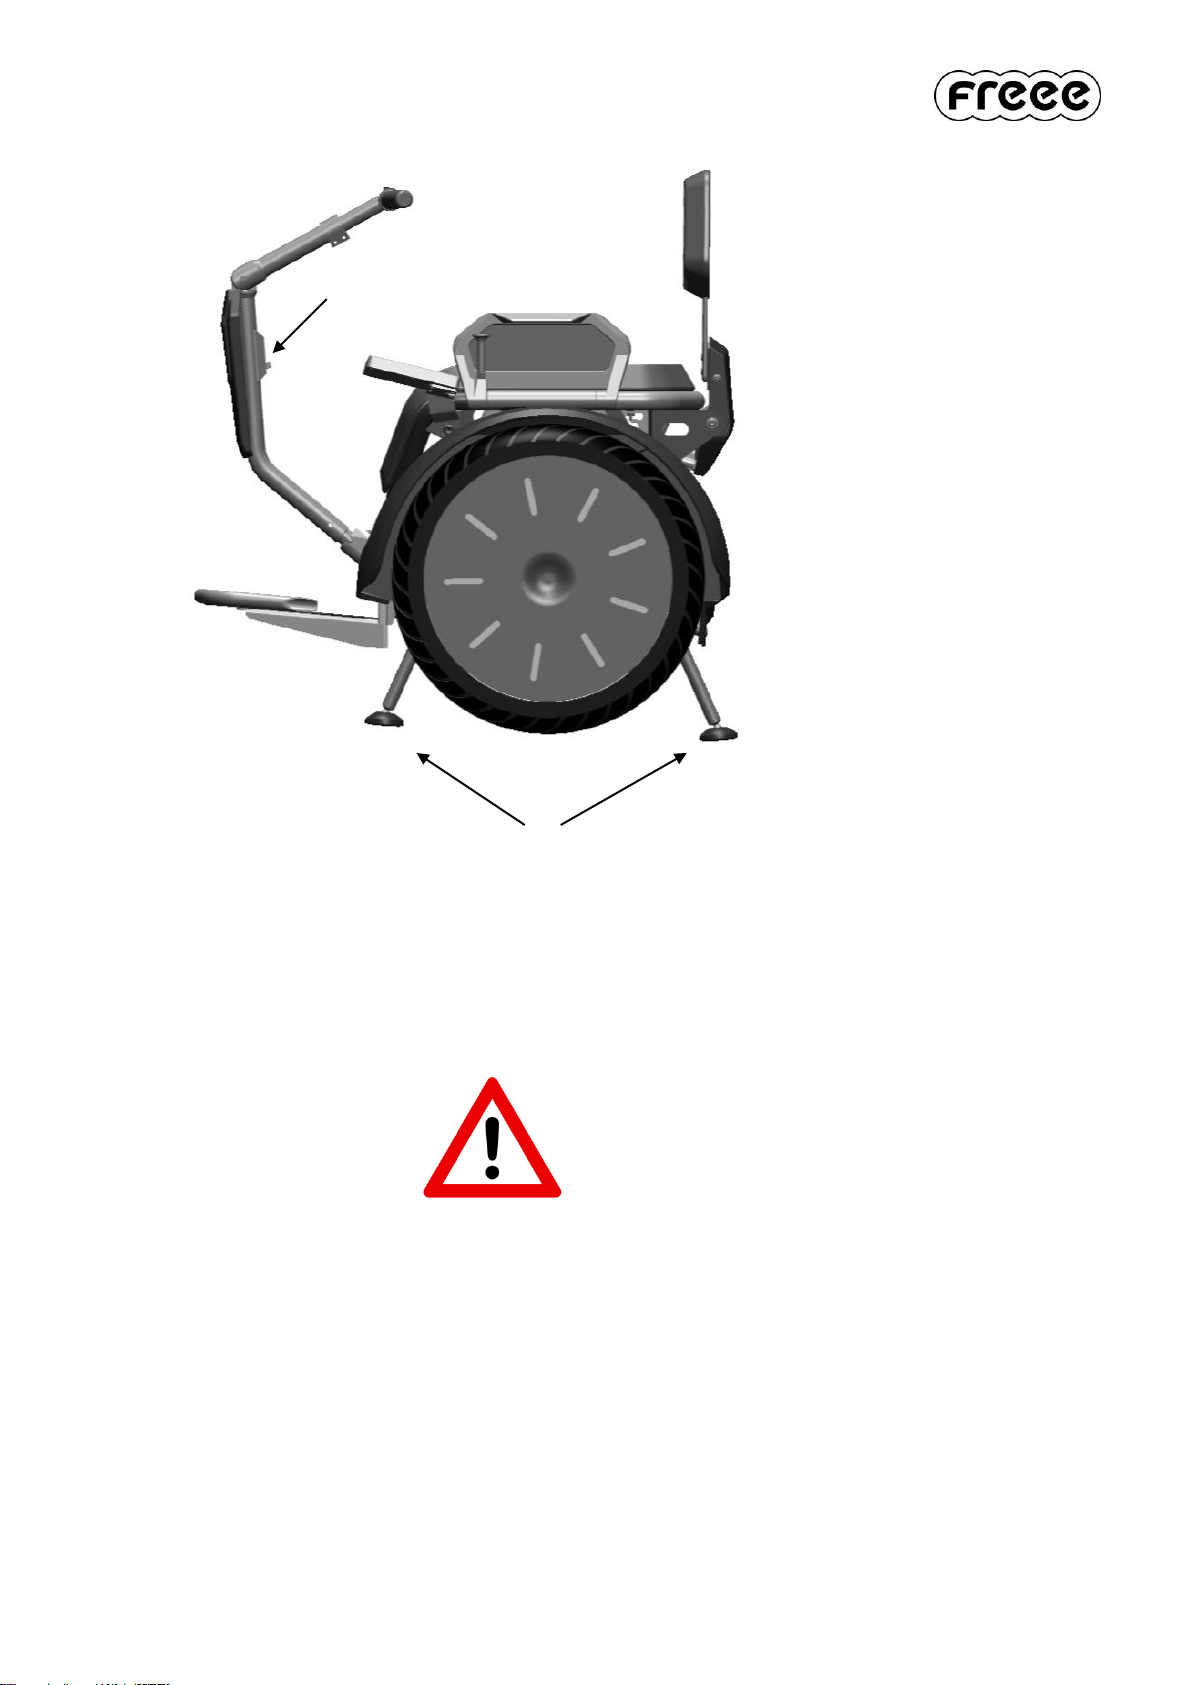
Do not modify the F2. Modifications to the F2 could interfere with the operation of the F2,
could result in serious injury and/or damage, and could void the F2 Limited Warranty.
Parking Stands
Lock-Out Release of
the Handlebar

Page 13 of 89 User Manual F2
06/2017 V1.63 Freee Mobility GmbH
3.2. Seat Platform
The Seat Platform consists of a Seat with a Cushion, Transfer Aids and Backrest.
3.2.1. Seat
The Seat is adjustable to 5 different heights. In horizontal direction, the Seat is adjustable
infinitely. The Seat is attached with 4 screws to the Chassis.
Adjusting the Seat Horizontally:
Loosen the screws with a 13 mm socket wrench.
Adjust the Seat to the desired position.
Tighten the screws in an appropriate manner using two screw-wrenches.
Adjusting the Height of the Seat:
Loosen the screws with a 13 mm socket wrench.
Adjust the Seat to the desired height.
Tighten the screws in an appropriate manner using two screw-wrenches.
Fastening Screws
(4 x)
Stages for height
adjustment

Page 14 of 89 User Manual F2
06/2017 V1.63 Freee Mobility GmbH
Caution:
Ensure the Seat screws are always tight. If the screws loosen during riding the F2, this
could result in loss of control and/or injury of yourself and/or others.

Page 15 of 89 User Manual F2
06/2017 V1.63 Freee Mobility GmbH
3.2.2. Transfer Aids
The Transfer Aids provide side support for your thighs. They can be adjusted in the width. For
transfer they can be folded aside.
Adjusting the Seat Width:
The Seat width can be adjusted individually to the riders needs.
Remove the Seat Cushion. This is secured with Velcro® strips on the Seat Plate.
Loosen the screws of the Transfer Aids with a 4 mm hex-wrench.
Adjust the Transfer Aids to the desired width.
Tighten the screws in an appropriate manner.
Folding Aside the Transfer Aids
Fastening Screws
(4 x)
Lock-Out Bolts of the
Transfer Aids
Seat Plate

Page 16 of 89 User Manual F2
06/2017 V1.63 Freee Mobility GmbH
If you want to fold aside the Transfer Aids, pull the lock-out bolts. As the Transfer Aids are folded
aside, they are automatically locked. Unlocking the bolts from the folded down position of the
Transfer Aids, the Transfer Aids are brought to their upright position.
Caution:
Located beneath the Seat Plate are two sensors detecting the presence or absence of a
rider while the F2 is powered on. Ensure the Seat Plate always remains moveable. The
Transfer Aids may not clamp the Seat Cushion, which can then result in the impediment
the movement of the Seat Plate.
Page 17 of 89 User Manual F2
06/2017 V1.63 Freee Mobility GmbH
3.2.3. Seat Cushion
The Seat Cushion is attached with Velcro® strips to the Seat Plate. The Seat Cushion of the F2
can be removed for cleaning.
You also have the possibility to exchange the Seat Cushion of the F2 with customary Seat
Cushions.
Exchanging the Seat Cushion:
Remove the Seat Cushion of the F2. The Seat Cushion is attached with Velcro® strips to
the Seat Plate.
Attach Velcro® strips to your cushion at the same position as on the Seat Cushion of the
F2.
Attach the cushion to the Seat Plate.
Caution:
Located beneath the Seat Plate are two sensors detecting the presence or absence of a
rider while the F2 is powered on. Ensure the Seat Plate always remains moveable. Ensure
that no parts of the Cushion can get into the Seat Plate that can then impede its function.
Sensors detecting if
a rider is present or
absent
Seat Plate
Page 18 of 89 User Manual F2
06/2017 V1.63 Freee Mobility GmbH
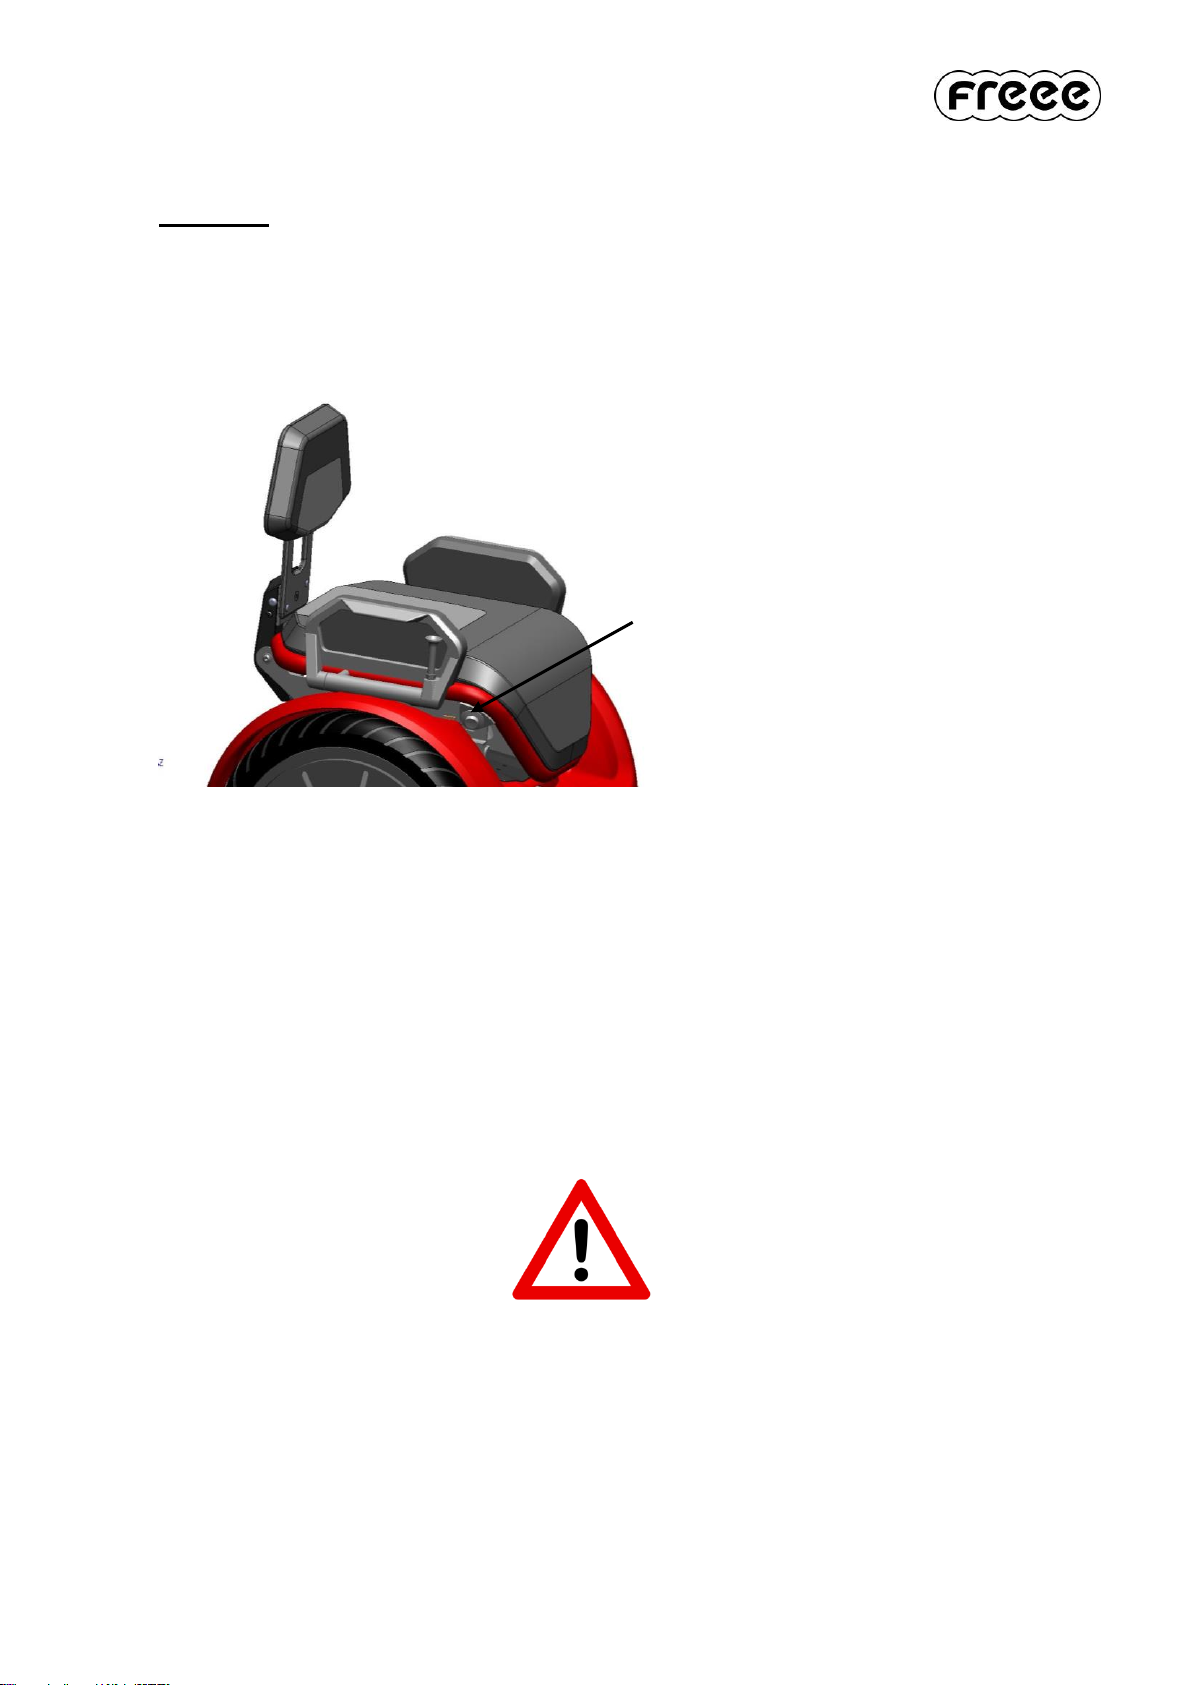
3.3. Backrest
The Backrest can be tilted. It can be removed for transportation. If you wish to attach your own
Backrest (e.g. Jay) on the F2, please ask Freee Mobility for an adapter.
Adjusting the Inclination of the Backrest
Press the Lock-Out Button.
While keeping the Button pressed, lean forward for a forward inclination of the Backrest.
When tilting your upper body forward, the Backrest automatically moves with your back
into the desired position.
Leaning your upper body backwards with a slight pressure on the Backrest leads to a
backward inclination of the Backrest. In this manner, tilt the Backrest into the desired
position.
Release the Lock-Out Button.
Caution:
Ensure you are always capable of moving your upper body backwards and that the
movement of your upper body is not impeded by the Backrest. The F2 is steered by
moving your upper body. Leaning forward leads to a forward motion of the F2, leaning
backward leads to a slowing down of the F2. If you are not capable of securely slowing
down the F2, you can put yourself and others at risk.
Lock-Out Button

Page 19 of 89 User Manual F2
06/2017 V1.63 Freee Mobility GmbH
3.4. Handlebar
The Handlebar is removable and can be adjusted in height and length.
Adjusting the Length of the Handlebar:
Loosen the screws of Clamping Piece for height adjustment with a 3 mm hex-wrench.
Adjust the Handlebar into the desired position.
Tighten the screws of the Clamping Piece.
Adjusting the Height of the Handlebar:
Loosen the screws of the Clamping Piece for height adjustment with a 6 mm hex-wrench.
Tilt the Handlebar into the desired position.
Tighten the screws of the Clamping Piece.
Caution:
Ensure the screws of the Clamping Pieces are tight. Ensure the Handlebar is in a fixed
position and that it cannot be pivoted or moved.
Clamping Piece for
length adjustment
Lock-Out Release
Handlebar
Receptacle
Clamping Piece for
height adjustment

Page 20 of 89 User Manual F2
06/2017 V1.63 Freee Mobility GmbH
Removing the Handlebar:
Push the Lock-Out Release.
Pull the Handlebar out of the Handlebar Receptacle.
Lay the Handlebar carefully aside.
Attaching the Handlebar:
Take the Handlebar and insert it into the Handlebar Receptacle.
Ensure the Centering Pins are aligned with the Centering.
Carefully press the Handlebar in the direction of the Handlebar Receptacle until the
Handlebar is locked.
Caution:
Before every ride with the F2, make sure that the Handlebar is properly locked into the
Handlebar Receptacle. If the Handlebar is not locked, this could lead to loss of control of
the F2 and to injury and/or damage of yourself and others.
Table of contents
Popular Wheelchair manuals by other brands


Invacare
Invacare TDX SP2 series user manual

Kohler
Kohler K-1843 installation guide

Sunrise Medical
Sunrise Medical Quickie Q200 R owner's manual

Nova
Nova 6000 Series user guide

Drive DeVilbiss Healthcare
Drive DeVilbiss Healthcare Silver Sport Wheelchair Instructions for use

Jay
Jay Care Back owner's manual


