Nova 6000 Series User manual

6000 SERIES
RECLINING WHEELCHAIR
USER GUIDE
Models: 6160S, 6180S, 6200S

2 of 8
USER GUIDE
NOVA RECLINING WHEELCHAIRS
6000 SERIES
OWNER
YOU MUST READ THIS MANUAL BEFORE USING THIS PRODUCT
DEALER
YOU MUST SUPPLY THE OWNER WITH THIS MANUAL
WARNINGS
ALWAYS ensure that all grips and textured surfaces are secure before pushing, pulling,
or placing weight on such surfaces.
ALWAYS perform the initial product inspection and all follow-up inspections before
using the product.
DO NOT sit on product unless the product is fully open and in it’s normal usable
position.
DO NOT use ramps or operate the product on inclines greater than 9 degrees of slope.
DO NOT operate on moving walkways, escalators, roads, streets, or highways (Use
extreme caution when operating product in crowded areas or outdoors).
DO NOT operate product in bad weather or when ground conditions may impair
traction, such as ground with water, oil, ice, gravel, or any other slippery or unstable
substance.
DO NOT attempt to cross curbs, bumps, trenches, or other uneven surfaces. Doing so
may tip over the product. Operate product only on smooth well-maintained surfaces.
DO NOT attempt to reach objects while using product as this requires you to move
your weight, and can cause the product to tip over.
DO NOT reach for objects, as this requires you to move your weight, and can cause the
product to tip over.
DO NOT pick up objects from the floor, as this requires you to move your weight, and
can cause the product to tip over.
DO NOT tilt the wheelchair while occupied.
DO NOT use the wheel locks as brakes, nor attempt to stop a moving product be
engaging the wheel locks.
DO NOT attempt to lift the product by lifting any removable part or surface.
DO NOT stand on the product, the product frame, or any other part of the product.
DO NOT use the legrests as a platform. When attempting to enter or exit the product,
ensure that the legrests are in the upward, unusable position.
DO NOT carry heavy weight while occupying the product. The product is not designed
for additional weight, and is not balanced to accommodate additional weight.
DO NOT lift weights or exercise while occupying the product.
DO NOT use this product without first reading and understanding this manual.
DO NOT use this equipment without first reading and understanding NOVA’s terms.
If you are unable to understand the CAUTIONS, TERMS AND CONDITIONS, AND
INSTRUCTIONS, then contact a healthcare professional, dealer, lawyer, or a qualified
technician before attempting to use this product - OTHERWISE INJURY OR DAMAGE
MAY RESULT. By using or continuing to use this product, YOU ARE AGREEING TO THE
NOVA TERMS AND CONDITIONS detailed at www.novajoy.com.
3 of 8
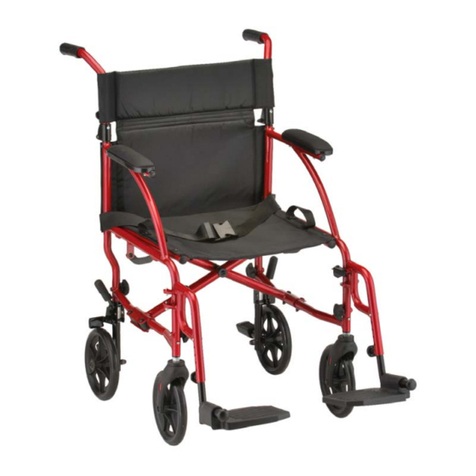
COMMON PART LOCATIONS
OPERATING INSTRUCTIONS
SERVICE
All service must be performed while the wheelchair is unoccupied.
Minor adjustments may be attempted by an able-bodied individual. All minor
adjustments that one should attempt are detailed in the manual. Do not attempt any
adjustment or repair without reading and understanding the instructions in this manual.
Do not attempt any adjustment or repair that is not detailed in this manual. Any
adjustment or repair not detailed in this manual should only be preformed by a dealer
or licensed technician.
Individuals with muscular or balance problems should not attempt to make adjustments
to the product, and are advised to seek assistance.
After any adjustment, and before using the product, ensure that all attaching hardware,
including without limitation all grips, screws, nuts, bolts, clamps, fasteners, and parts
are tight and secure.
DO NOT use parts, accessories, or adapters other than those manufactured by NOVA
Medical Products, Inc, which are designed specifically for this product.
BACK UPHOLSTERY
SEATBELT
PUSH HANDLES
BACK SUPPORT BAR
& KNOBS
ARMREST
24” WHEEL W/ RIM
WHEEL LOCKS
8” FRONT WHEEL
HEADREST PILLOW
HEADREST
SEAT UPHOLSTERY
CALF PAD
FOOT PLATE
ELEVATING LEGREST
RECLINER RELEASE
HANDLE

PROPER USE
OPENING YOUR CHAIR
- Tilt wheelchair to one side and push down on the seat rail until fully opened.
- Swing the back support bar up and attach downward to meet the rear knob
- Turn the black knobs to secure the bar into place.
CLOSING YOUR CHAIR
- Unhinge the back support bar from one side of the chair by unscrewing the knob
- Fold legrests and calf pads to the closed/vertical position.
- Grab the middle of the seat upholstery in the front and rear of the seat and pull
upward until chair is in a folded position.
HEADREST AND HEAD PILLOW INSTALLATION
– Place end of headrest tubes into the top of the wheelchair frame and push down until
headrest is firmly in place
– Place pillow on the headrest using the attached velcro
POSITIONING ANTI-TIPPING SUPPORTS
DO NOT OPERATE WITHOUT ANTI-TIPPERS IN PLACE OR SERIOUS INJURY OR
DEATH MAY OCCUR. Your reclining wheel chair includes anti-tippers which are already
attached but may need to be repositioned. ENSURE that the tips of the anti-tippers
face downward with the small wheels toward the floor. If they are not, DEPRESS push
buttons and rotate anti-tippers until positioned as such.
ENTERING AND EXITING PRODUCT
Ensure that there is as little space as possible between the occupant and product
when attempting to enter or exit the product. ALWAYS ensure that the wheel locks
are engaged when entering and exiting product. When attempting to enter or exit the
product, ensure that the legrests are in the upward, unusable position.
MOVING THE PRODUCT
ALWAYS use the wheel hand rims for self-propulsion. If your product does not have
hand rims, then have someone assist you by pushing the product using the push
handles design for that use.
USING THE RECLINING BACK
1 – Set parking brakes on both rear wheels
2 – Firmly grab the push handles and squeeze the recliner handles until BOTH reclining
mechanisms release
3 – Raise or lower the back to your desired setting
4 – Release the reclining handles while still holding onto the wheelchair push handles
5 – Be sure that the back is in a set position before removing your hands from the
wheelchair push handles.
4 of 8

5 of 8
SAFETY INSPECTION - MAINTENANCE
Your product is a precision product - proper care will ensure proper function. Regular
cleaning will reveal loose or worn parts. DO NOT over tighten parts or hardware,
as doing so can damage the frame. DO NOT operate the product if there are any
missing parts or hardware. You should have a dealer or qualified professional perform
maintenance on your product at least once every six months, or immediately if you
notice any item needing service. Frequent use likely means that your product will
require more maintenance than we suggest. In anticipation of and after any excessive
use, we recommend that you perform a complete safety inspection including all items.
ITEM I NSPECT I TEM
INITIA
LW EEK MONTH 6 MONTH
GENERAL
Wheelchair should roll straight, doesn't feel
"tight" or pull to one side
X X
Inspect for loose, missing, or broken hardware
in all locations
X X
FRAME Inspect for bent frame X X
Inspect weld points for cracks, chips, or loose
material
X X
CROSS-BRACES Inspect for bent cross-braces X X
Inspect weld points for cracks, chips, or loose
material
X X
WHEEL LOCKS
Ensure locks do not interfere with tires when
rolling
X X
Pivot points free of wear and looseness X X
Wheel locks are easy to engage, and engage
fully
X X
Wheel locks prevent wheelchair from moving
when engaged.
X X
SEAT AND BACK Inspect upholstery for rips or sagging X X
Inspect for loose or broken hardware X X
Inspect cane hand grips for wear, looseness, or
deterioration
X X
TI RES Inspect for correct and equal pressure X
Inspect for cracks and wear X X
REAR WHEELS
Lift, spin, and check for side movement,
rubbing, or binding
X X
Inspect for correct and equal pressure X
Inspect for cracks and wear X X
HAND RIMS Inspect for signs of rough edges or peeling X X
FRONT FORKS
Inspect wheel/fork assembly for proper tension
by spinning caster. Caster should come to a
gradual stop, and not bind or grind
X X
Adjust bearing system if wheel wobbles
noticeably or binds to a stop
X X
Ensure wheel bearings are clean and free of
moisture
X X
Check head tube locknuts for tightness X X
Inspect casters for cracks and wear (hubs and
rims)
X X
Inspect for cracked or broken spokes X X
CLEANING Clean upholstery and arm rests X X

ELEVATING LEGREST ASSEMBLY
INSTALLING ELEVATING LEGREST
1 - Hold the legrest assembly in position as if it were in ready for use.
2 - Turn the front legrest assembly to the side (so that open foot plate, which was
perpendicular to the wheel, is now parallel with the wheel).
3 - Slightly raise the assembly and place the hinge plates on the front legrest assembly
onto the hinge pins on the product frame.
4 - Rotate the legrest assembly inward, toward the inside of the wheelchair until it locks
into place (so that the foot plate is perpendicular with the wheel).
5 - Repeat for other legrest assembly.
REMOVING ELEVATING LEGREST
1 - Push the release lever inward.
2 - Rotate the front legrest assembly to the side (so that open foot plate, which was
perpendicular to the wheel, is now parallel with the wheel).
3 - Slightly lift the legrest assembly so that it comes off the hinge pins.
ADJUSTING ELEVATING LEG REST
1 – RELEASE the tension screw by pulling on the black plastic lever
2 - PRESS the leg rest release push buttons and adjust to your desired setting
3 - Ensure that the leg rest release button re-engages (push-buttons click in place).
4 – PRESS the tension screw back into place
5 – Swivel the calf pad down so that the patient’s calf area rests on it
ARMRESTS
INSTALLING ARMREST
1 - PRESS the armrest release levers at the front the armrest so the brass release pin
retracts into the tube.
2 - Lightly position the armrest in the front and rear armrest sockets
3 - Push armrest down evenly and so the brass pin locks into place.
4 - Ensure the armrest is secure by gently pulling up on the armrest.
5 - If armrest is loose, or not locked in place, then repeat above steps.
REMOVING ARMREST
1 - Push down armrest to ensure proper position prior to removal.
2 - PRESS the armrest release push button at the front of the armrest.
3 - While pushing in on the armrest release buttons, pull straight up on armrest to
remove.
REPLACE SEAT AND BACK UPHOLSTERY
1 - Remove the Phillips screws and washers, replace upholstery, and reattach screws
6 of 8

7 of 8
WHEELS
REPLACING TIRES
DO NOT ATTEMPT – Please see a dealer or qualified technician.
REMOVING AND REPLACING REAR WHEELS
1 - Remove dust cap (if any).
2 - Remove attachment bolt and related hardware (washer, spacers) that hold the wheel
in place.
3 - If replacing wheel, reverse above steps, and then continue with step 4.
4 - Tighten attachment bolt with torque wrench, to 40 ft.-lbs.
5 - Adjust wheel locks to ensure proper wheel lock function.
6 - Rotate (or spin wheel) to ensure proper fitting and alignment. Wheel should not
wobble, grind, or catch.
REPLACING HAND RIM
1 - Remove the rear wheel from the wheelchair before attempting to replace hand rim. If
needed, see Removing and Replacing Rear Wheels above.
2 - Remove the mounting screws and washers that secure the hand rim to the rear
wheel, and remove the hand rim.
3 - Align new hand rim so that the holes in hand rim line up with the holes in the rim,
and replace mounting screws and washers.
REMOVING AND REPLACING FRONT WHEEL
DO NOT change wheel sizes. Your product is design for a specific size wheel, and your
forks will not safely accommodate larger or smaller wheels.
1 - Remove axle bolt and hardware (washer, locknut, spacer, etc).
2 - Remove old wheel.
3 - Line up new wheel to ensure that you use same fork holes as the old wheel used.
4 - Replace axle bolt and hardware (washer, locknut, spacer, etc).
5 - Rotate (or spin wheel) to ensure proper fitting and alignment. Wheel should not
wobble, grind, or catch.
WHEEL LOCKS
ADJUSTING WHEEL LOCKS
DO NOT operate wheels locks while the product is moving. DO NOT attempt to stop
the product using wheel locks (wheel locks are NOT brakes).
1 - Disengage locks.
2 - Loosen the bolt and locknut that secure the wheel lock to the frame.
3 - Reposition the wheel lock so that if it were engaged, the lock would press against
the tire and depress it 1/8th inch.
4 - Securely tighten the bolt and locknut attaching the wheel lock to the frame.
5 - Engage wheel lock and test to ensure that product does not move, and wheel does
not turn, when pushed.
6 - If product moves with locks engaged, then repeat above steps and slightly increase
the amount that lock depresses tire when engaged.

8 of 8
Connect with us!
novajoy.com
facebook: novamedicalprod
twitter: novamedicalprod
twitter: novawalkerstalk
YouTube: NOVA Medical Products
WARRANTY INFORMATION
NOVA stands firm on our commitment to providing the highest quality products, as well as exceptional
service. This product was built to precise standards and thoroughly inspected prior to shipment. This
warranty represents our confidence in the materials and workmanship of our product.
NOVA extends this warranty only to the original purchaser of this product. The warranty does not extend
to any subsequent purchaser or owner. The warranty is void upon any sale or transfer of ownership or
use by other person. NOVA warrants its products are free from defects in material and workmanship
under NORMAL use for the period commencing upon the date of purchase and continuing for the
following specified period of time after that date:
Metal Frame Limited Lifetime Warranty
Non-Metal/Metal parts One Year Limited Warranty
(rubber tips, plastic or metal hardware)
This warranty does not cover problems due to user negligence, misuse of the product, failure to adhere
to product instructions, or normal wear and tear. Items that have been subject to negligent abuse,
modified without prior written authorization are not covered within this warranty.
For warranty service, please contact the dealer from whom you purchased your NOVA
product. In the event that you do not receive satisfactory service, please call us directly at the number
on the bottom front of this sheet. Be prepared to indicate, the nature of the defect, the product serial
number, and the name and location of where you purchased the product. You will also be required to
provide a receipt of your purchase. Do not return any products to our office without prior consent.
Repair or replacement is the only remedy under this limited warranty. This warranty does not include any
labor or shipping charges incurred in replacement part installation or repair of product.
THIS WARRANTY IS EXCLUSIVE AND IN LIEU OF ALL OTHER EXPRESS WARRANTIES, IMPLIED
WARRANTIES, IF ANY, INCLUDING THE IMPLIED WARRANTIES OF MERCHANTABILITY AND FITNESS
FOR A PARTICULAR PURPOSE. NOVA SHALL NOT BE LIABLE FOR ANY SEQUENTIAL OR INCIDENTAL
DAMAGES WHATSOEVER.
Regular cleaning is recommended. Use a non-abrasive cleaner or detergent, rinse with
warm water and dry completely. Abrasive cloths may damage the surface. Regularly
inspect your item and its parts for any corrosion, breakage, compression or wear.
IMPORTANT WARNING
FOLLOW ALL DIRECTIONS CAREFULLY BEFORE USE. FAILURE TO DO SO MAY RESULT IN SERIOUS INJURY.
This manual suits for next models
3
Table of contents
Other Nova Wheelchair manuals