Seiko I Infotech LP-1020 User manual

Quick Reference Guide
U00107692700
Black-and-White Raster Plotter
LP-1020
LP-1020L
Network Multi Function Plotter
LP-1020-MF
LP-1020L-MF

Introduction
Thank you for purchasing our LP-1020/LP-1020L Black-and-white Raster Plotter and LP-
1020-MF/LP-1020L-MF Network Multi-Function Plotter.
This manual explains the basic operations of LP-1020/LP-1020L and LP-1020-MF/LP-
1020L-MF. For details, refer to the respective PDF data saved in CD-ROM.
The DSCAN format described in this manual as well as DSCAN that appears on the
operation display are for only customers in Japan.
Table of Contents
1 LP-1020/LP-1020L ............................................................................................. 1
Name and functions of each part ............................................................... 1
Turning the power on and off ..................................................................... 3
Set menu ................................................................................................... 4
How to set the paper rolls .......................................................................... 6
Troubleshooting ......................................................................................... 9
◆◆◆
2 LP-1020-MF/LP-1020L-MF .............................................................................. 11
Name and functions of each part ............................................................. 11
Turning the power on and off ................................................................... 14
Set menu ................................................................................................. 15
How to input an original / Routine maintenance ...................................... 18
Troubleshooting ....................................................................................... 21
◆◆◆
3 Maintenance .................................................................................................... 22

1
1
LP-1020/LP-1020L
Front / right side/rear side
●Names and functions of each part LP-1020/LP-1020L
Fixation door (door 7)
Manual paper feeding guide
(door 8)
Manual feed inlet
Top cover (door 6)
Waste toner door
Roll 1 drawer
(door 1)
Manual feed drawer
(door 4)
Finished drawing outlet
Toner cover
Control panel
Roll 2 drawer
(door 2)
Power cord
Main power switch
Cutter door inside
(door 9)
Cutter door (door 5)
Cutter door
lower small door (door 10)
Parallel interface connector
USB interface connector
Ethernet interface
connector
Paper feed knob
Paper flange

2
Control panel
➁LCD
➀LEDs
➂Keys
➃Power key
Number Name Function
1LED's
Error lamp (red)
Indicates the presence or absence of errors.
On: Error present
Off: No error present
Toner lamp (green)
Indicates the amount of remaining toner.
On: There is sufficient toner.
Flashing: Toner is running low.
Off: There is no toner (plots cannot be produced without replenishment.)
Waste toner lamp
(green)
Indicates the toner waste bottle replacement time.
On: Normal
Flashing: Replacement timing is approaching
Off: Plots cannot be produced without replacement
Process lamp
(green)
Indicates the process cartridge replacement time.
On: Normal
Flashing: Replacement time is approaching
Off: Process cartridge is not installed.
Menu lamp
(green)
Indicates that this device is ready for setting, receiving data, or printing.
On: Setting operations can be performed
Off: Ready to receive data and print.
2Display LCD Displays a variety of messages in a 20-figure and 2-line display to inform you of
the device status.
3Keys
MENU key Switches the status of the device from setting ready status to data receive
and print ready status.
ENTER key Inputs the parameters.
CANCEL key Cancels parameter input.
▲Key Switches menu items and changes parameters.
▼Key Switches menu items and changes parameters.
Key Switches menu items/hierarchy and changes.
4Power Power key Turns the device power on and off.

3
1
LP-1020/LP-1020L
Power on
●Turning the power on and off LP-1020/LP-1020L
Turn on the Main power switch located at the
lower-left as seen from the rear of the device.
Press the power switch toward the ⎪symbol (upwards).
ON/OFF
Main power switch
PR I NT READY
When turning the power off, confirm that the device is in the
data receive standby mode.
Press the Power key on the control panel for
about 1 second.
Release the key when the display reads
“SHUTTING DOWN.”
When a job is present, it is automatically saved and
will be printable the next time you turn the power on.
(Only when HDD is installed)
Note
◆Even when “SHUTTING DOWN”appears, the
power will not turn off until you release the power
key.
This indicates that the device is executing a
shut down.
When the shut down process has been completed, the
power will turn off.
Press the power key located on the control
panel of this device (when the main power
switch is on).
When you first turn on the power after purchasing this
device, a guidance display prompts you to set the panel's
display language. If this setting has already been
completed, this message is omitted.
A “PRINT READY” message indicates that the device
is functioning normally.
Power off
Turn the main power off when you are not
using this device for an extended period of
time.
Press the power switch toward the symbol
(downwards).
ON/OFF
Main power switch
INITIALIZING
WA I T A MOMENT
SHUTDOWN
WA I T A MOMEN T

4
#POWER SAVE
>15mi n
PAPER
#ROLL1
#MENU PR I NT
>SYSTEM
PROTOCOL
#PORT1 : XPT
#SYSTEM RESET
>
SYSTEM
#COMM. PARAM
SETUP
#PORT1_HPGL
MENU
#DEV I CE
MENU
#PAPER
MENU
#FUNCT ION
MENU
# PROTOCOL
MENU
#RESET
MENU
#SYSTEM
MENU
#SETUP
Menu structure
●Set menu LP-1020/LP-1020L
Device menu
Setup menu
Function menu
Paper menu
System menu
Reset menu
Items which you can set
Menu Item Functions
Setup
PORT n_HPGL Sets the PDL table parameter settings for Ethernet port n.
Performs the settings relating to HPGL format printing.
PORT n_DSCAN Sets the PDL table parameter settings for Ethernet port n.
Performs the settings relating to DSCAN format printing.
PORT n_TIFF Sets PDL table parameter settings for Ethernet port n.
Perform the settings relating to TIFF format printing.
PORT n_CALS Sets PDL table parameter settings for Ethernet port n.
Performs the settings relating to CALS format printing.
Press to set the device offline before performing setting operations. Select a menu using the , keys and press the
key to enter each menu. Changed parameters are saved in non-volatile memory and are not lost when the power is turned
off.
Note
◆When using our company’s printer driver, the printer parameters set for this device are disabled and printing is
performed in accordance with the print parameters set for the print driver (printing in accord with the print driver
settings). If you wish to enable the PDL menu print parameters using our company’s print driver, see Chapter 3
in “User’s Guide.”
Protocol menu

5
1
LP-1020/LP-1020L
Menu Item Function
Device POWER SAVE Sets the time until the device enters the power saving mode.
EDGE CUT TIMER
Sets the data standby time to automatically have the paper roll end cut
before plotting using data received after a data standby status has
continued for a while.
DOOR OPEN CUT To plot the first data after the roll door is opened and ¥closed, sets whether
to start plotting after the end of the roll paper is automatically cut.
DENSITY Adjusts the printing density.
TRACE PAP. MODE Sets the tracing paper printing mode.
BOTTLE MAINT. Sets whether the maintenance of waste toner bottle starts automatically
or manually.
Paper ROLLn Specifes the paper type and series.
Function
MENU PRINT Prints the status of consumables, device information, and panel settings.
HPGL SELF PLOT Outputs the drawing for the data format (HPGL) built in this device.
DSCAN SELF PLOT Outputs the drawing for the data format (DSCAN) built in this device.
ERROR LOG Prints error log information.a
JOB LOG Prints job log information.
ENGINE LOG Prints detailed information for the engine.
SYSTEM DATE Sets the date (year, month, day).
SYSTEM TIME Sets the time (hour, minutes, seconds).
INIT CHARG. INF Initializes accounting information.
PRINT CHARG. INF Prints accounting information.
MAINT. INFO Prints maintenance information.
DATA DUMP Outputs a portion of the plotting data in hexadecimal digit onto paper.
Protocol PORTn : xxx
The Ethernet port PDL selection and protocol name are set here. N
indicates the port number, xxx indicates the Ethernet protocol type. Up
to 10 ports may be specified.
To set the protocol name, XPT sets the XPT port, LPD sets the printer
name, and FTP sets the user name.
PARALLEL Performs the PDL selection for the parallel channel.
Reset
SYSTEM RESET
System reset
Initializes the device to the same status as when the device power is
turned on.
PORT RESET Ethernet port reset
Resets the communication for the selected logical port.
System
COMM. PARAM Sets the communication parameters.
WEB LOCK Sets whether to allow setup privileges from the web browser to User
administrator and above.
ENABLE SERIES Sets the media series to be used in this device.
APPLY ROLL Sets the roll sizes for each media series you use in this device.
CHINA SIZE Sets the roll sizes to be used in China in this device.
INITIAL SET Sets all parameter settings to their initial values.
LANGUAGE Switches the language on the LCD message display.
LENGTH UNITS Switches the length unit (millimeter or inch).
ADMIN PASSWORD Specifies the administrator password. This password prevents the
settings of the plotter from being changed.

6
Replacing paper rolls
Detach and replace a paper roll when the device has run out
of paper rolls or when you change the paper roll size on type.
When the paper is used up during printing, the Error lamp
will turn on and the LCD will display the following message:
Example:
Note
◆The display may be automatically switched to the
paper menu when the paper roll is reloaded. In
such a case, set the type and series and of the
paper roll.
◆Precautions during replacement
Caution
◆The rolls are heavy so be careful not to hurt
yourself by dropping them while you are
replacing the rolls.
◆When attaching the rolls, use a cutter to cut the
end of the paper roll. While doing this, take care
not to cut yourself or damage the device.
◆When opening and closing the paper roll
drawers, take care not to get your hands caught
in the drawer.
Do not open other paper roll drawers while one
paper roll drawer is open. Doing so will increase
your chances of getting your hands caught in the
drawers.
Note
◆If you change the paper type, you must also
change the device settings accordingly.
⇒Page 5
◆Use media types specified by our company.
If you use media types which are not specified by
our company, we cannot assure printing quality.
◆Store the paper in a cool, dark location with low
humidity.
●How to set the paper rolls LP-1020/LP-1020L
◆How to detach the paper rolls
Pull out the Roll 1 or Roll 2 drawer.
Use your fingers to grasp the handle in the center of
the drawer and pull the drawer out gently.
(The diagram indicates a case where the Roll 2 drawer
is opened.)
Rewind the paper roll and then remove it.
Turn the paper flange in the direction indicated in the
diagram and continue to rewind the roll until you see
the end of roll. Lift up the paper flange and remove the
paper roll.
Remove the paper flange and take out the
paper roll.
Loosen the paper flange by turning the knobs in the
“OPEN” direction and remove both ends of the paper
flange.
Note
◆Take care not to use excessive force when you
turn the paper flange knobs. The flange ends
may come off.
C
L
O
S
E
O
P
E
N
Knob
SET PAPER
A0
Paper flange

7
1
LP-1020/LP-1020L
Load the paper into the drawer.
Hold the paper roll so that the end of the paper is
positioned at the bottom facing the back of the device.
Then align the paper flange to the depressions in the
flange guide and gently insert the flange in place.
Note
◆Take care not to drop the paper roll while
performing these activities.
Insert the end of the paper roll into the paper
feed inlet of the device.
Turn the paper flange and insert the end of the paper
roll so that it is straight. Turn the paper feed knob so
that the end of the paper roll projects about 10 cm.
Cut the end of the paper.
While holding the end of the paper roll, cut it off with
the cutter.
The “Paper cutter position” label is affixed to both ends
of the space where the cutter blade should be inserted.
Insert the cutter blade into the space beneath where the
label arrow is pointing. Slide the cutter blade along the
space and cut the paper.
◆The paper can be cut cleanly when the
cutter is inserted in a perfectly sideways
direction.
Paper feed knob
◆How to attach the paper roll
◆The paper flange ends do not have a
designated right or left side. You can attach
them to either side.
Attach the paper flange to a paper roll.
Push in the paper flange ends until they contact the
paper roll tube, then secure the flange ends by turning
the knob in the “CLOSE” direction.
Note
◆If the paper flange knobs are loosely fitted, the
paper roll will move adversely to the right and left
and negatively affect the drawing. Make sure that
the knobs are tightened securely.
Move the flange guide.
The label which is affixed to the inside of the drawer
indicates the flange positions for different roll widths.
Move the flange guide to match the paper roll size you
are using.
Flange guide
Label
C
L
O
S
E
O
P
E
N
C
L
O
S
E
O
P
E
N
Knob

8
This device offers a manual feeding feature as a service
function. As this is a service function, we cannot assure the
picture quality and printing accuracy.
◆Manual feeding procedures
Adjust the paper guide.
Adjust the paper guide to the position where you will
set the cut paper for manual feeding.
Set the paper so that the printing surface is
face down.
When you insert the paper into the manual paper feed
inlet, the paper is drawn in and the paper is ready for
printing.
Caution
◆Take care not to hurt yourself and damage the
device when handling the cutter.
◆Handle the cutter blade with care so that you do
not break it.
◆When sliding the cutter along the space, take
care not to cut the back of your hand on the sides
of the paper tray.
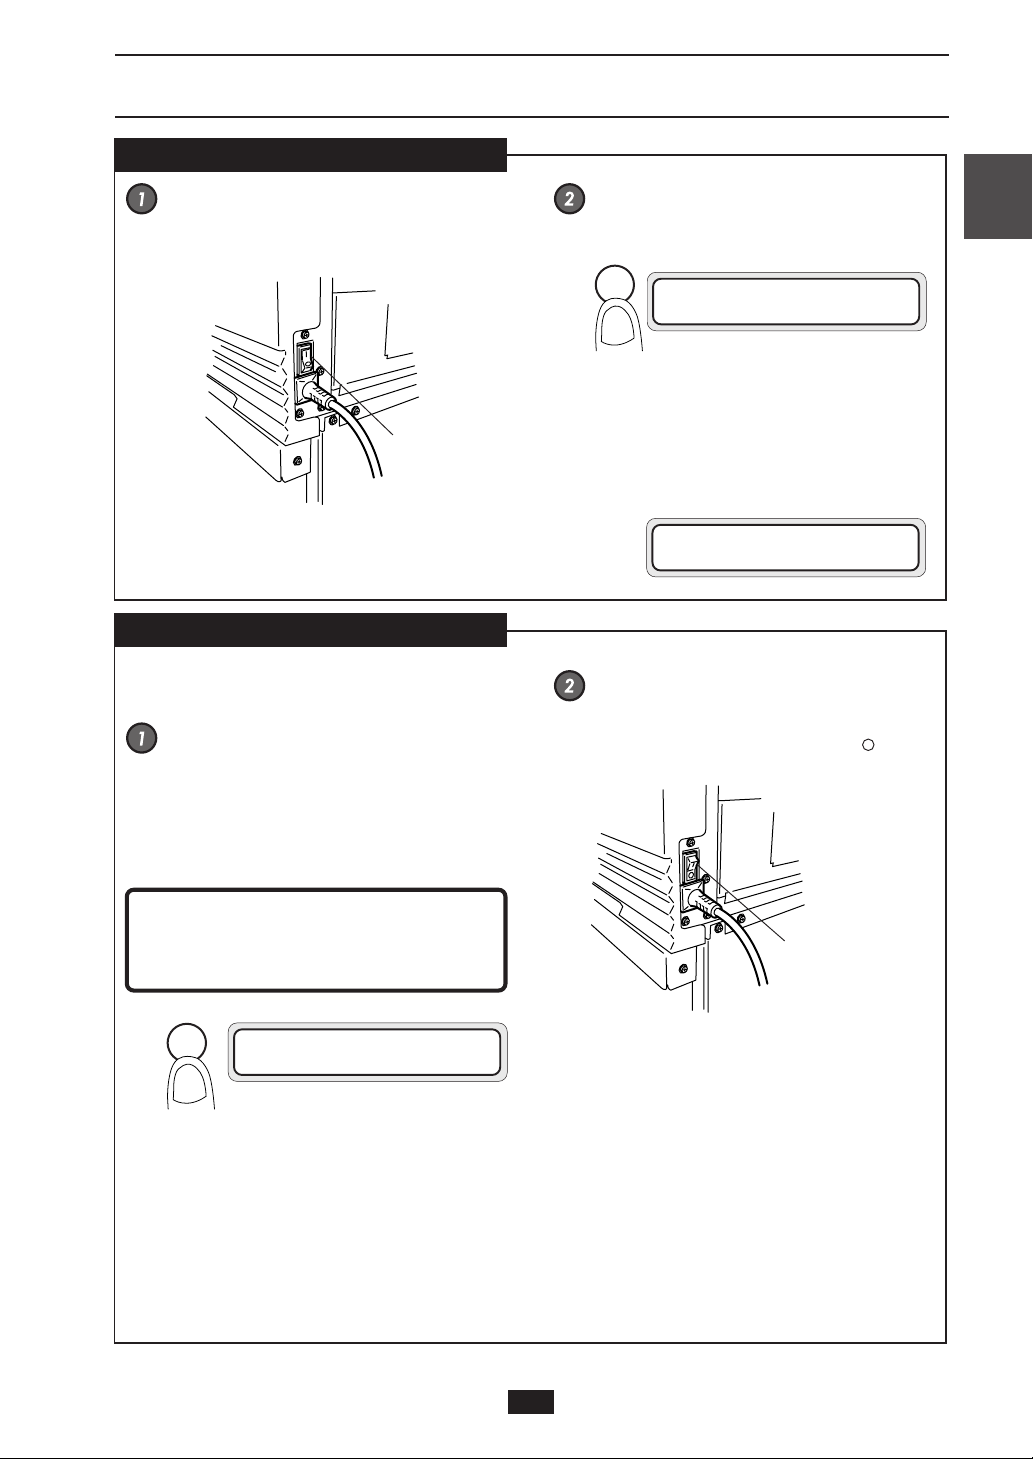
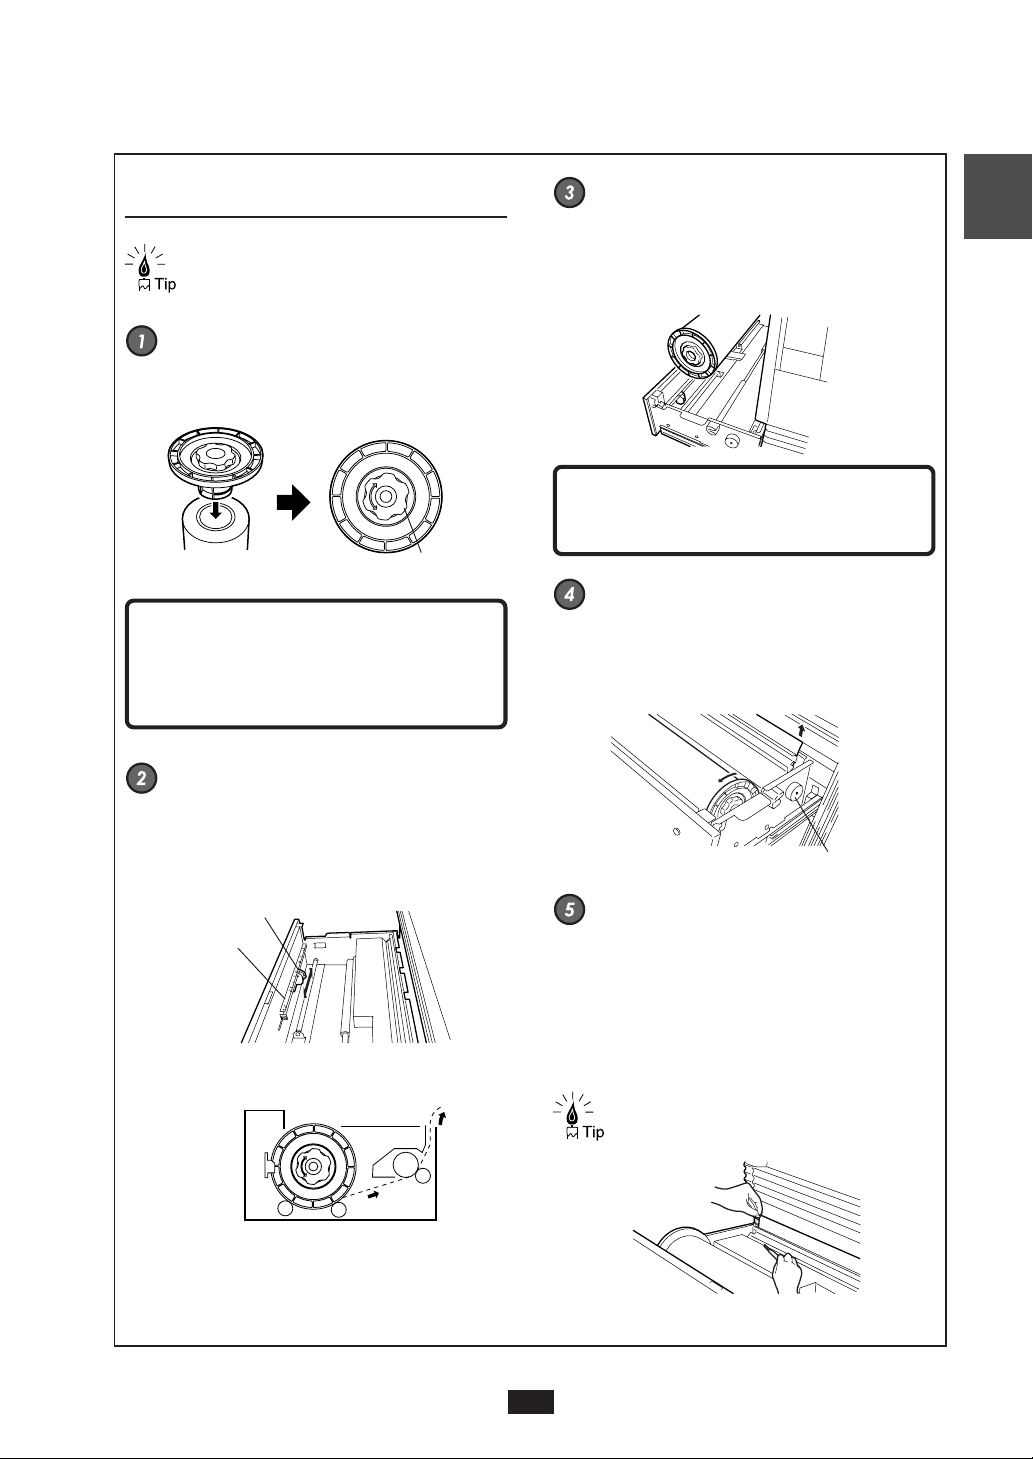
Close the paper roll drawer.
Gently push in the Roll 1 or Roll 2 drawer.
When the paper roll drawer is closed, the following
message appears.
(It will take about 30 seconds until paper feeding is
ready.)
Manual paper feeding (cut paper)
◆
Manual paper feeding procedure
Set the paper feeding mode.
When the PDL setup paper feeding mode is set to the
continuous or optimum mode, paper should be
manually fed only for the drawings for which the data
was processed immediately after the paper was fed into
the manual paper feeding unit (this function is called
"interrupt manual feeding function".)
When the PDL setup paper feeding mode is the manual
feeding mode, paper should be always fed from the
manual paper feeding unit. If no paper has been fed
into the manual paper feeding unit when data is
transferred, paper to be used is indicated on the display
(this function is called "continuous manual paper
feeding function".)
Refer to the User’s Guide for details of the paper
feeding mode.
Load the cut paper.
For cut paper and its setup method, refer to the
respective User’s Guide.
WA I T A MOMEN T
Note
◆After closing the paper roll drawer, wait until the
“WAIT A MOMENT” message disappears before
opening the paper roll drawer again.
As the device initiates a paper detection just after
the paper roll drawer is closed, so opening the
paper roll drawer during this operation may
cause a paper jam.
After the replacement, the device will return to the
status before the paper roll was replaced.
Note
◆If you change the type of paper roll, you must
change the setting of the paper menu.

9
1
LP-1020/LP-1020L
Paper jam
●Troubleshooting LP-1020/LP-1020L
If a paper jam occurs, the ERROR lamp lights and the
following error message appears on the LCD.
According to the paper jam point, the door number from which
the corrective measure starts is displayed (plural numbers may
be displayed as shown left).
In case of a paper jam, open the door of the displayed door
number, and take a corrective measure.
Error messages
◆Operator call
For this error message, the operator can take corrective action.
Take measures according to the displayed error message. See
Chapter 14 in “User’s Guide” for details.
However, if the same symptom recurs frequently, please
contact your dealer or our service center.
◆Service call errors
This error message may appear if an unrecoverable hardware
or firmware failure occurs in the device.
In this case, you need call a service person to take measures.
See Chpater 14 in User’s Guide for details.
If the device does not recover from this error after turning
the power off and on, please notify your dealer or our service
center of the displayed error message and error condition.
OPEN DOOR 9 , 4
REMOVE PAPER
SETUP I S WRONG
DELETE JOB?
Y=ENTER N=CANCEL
W xxxxxxxx
E xxxxxxxx

10
◆Measures to solve print quality problems
Symptom Cause Corrective measure
Plotting is light/dark ---------- Adjust the density. ⇒Chapter 6 in User's Guide
Plotting is locally
deleted
The type of loaded paper does not match
the type of paper specified on the panel.
Replace the paper, or change the setting. ⇒
Chapter 2 or 7 in User's Guide
Paper contains moisture. Cut the end of the rolled paper and retry plotting.
⇒Chapter 14 in User's Guide
The recommended paper is not used. Use our recommended paper.
⇒Chapter 1 in User's Guide
Plotting is locally
streaked Process cartridge reached its life. Replace the process cartridge.
⇒Page 26
Symptom and corrective measure
◆Items to be checked
Symptom Items to be checked Corrective measure
No power Power cable connection Plug the power cable into the outlet correctly.
Power supply to the outlet Supply the power to the outlet.
Failure to start or
operate correctly
ERROR lights and LC
message display
Take appropriate measures according to the error message.
⇒Chapter 14 in User's Guide
Failure to plot
Interface cable connection Connect the interface cable correctly.
ERROR lights and LC message
display (See "Note" below)
Take appropriate measures according to the error message.
⇒Chapter 14 in User's Guide
Failure to plot
transmitted data
immediately
DATA lights (on or flashing?) Review the time-out setting.
Frequent paper jam
Paper type
Check whether the paper type setting matches the type of the
loaded paper. ⇒Chapter 7 in User's Guide
Use our recommended paper. ⇒Chapter 1 in User's Guide
Paper roll Load the paper correctly. ⇒Chapter 2 in User's Guide
Check whether there is any
foreign material in the paper
path
Remove any foreign material. ⇒Chapter 14 in User's Guide
Refer to User’s Guide for other symptoms and appropriate measures.

11
2
LP-1020-MF/LP-1020L-MF
Front / right side/rear side
●
Names and functions of each part
LP-1020-MF/LP-1020L-MF
Fixation door
(door 7)
Scanner cover
Manual paper
feeding guide
(door 8)
Manual feed inlet
Top door (door 6)
Waste toner door
Roll 1 drawer
(door 1)
Manual feed drawer
(door 4)
Finished drawing outlet
Toner cover
Control panel Scanner exit guide
Roll 2 drawer
(door 2)
Power cord
Main power switch
Cutter door inside
(door 9)
Cutter door (door 5)
Cutter door
lower small door (door 10)
Parallel interface
connector
USB interface
connector
Ethernet interface
connector
Paper feed knob
Paper flange

12
Control panel
WARNING LIGHT MENU
POWER
SAVING
COPY
DELIVERY
PRINT
FILE
ERRORDATA
ORIGINAL
SIZE
AUTO
FIXED-SIZE
PORTRAIT
FIXED-SIZE
LANDSCAPE
SYNCHRO
ORIGINAL
TYPE BACKGROUND
REMOVAL DENSITY
LIGHT
NORMAL
DARK
SCALE x1
FIXED SCALE
ZOOM
NON-PROPORTIONAL
SCALE
PAPER
FEED
ORIGINAL
IMAGE
QUALITY
SORT
FUNCTION
SCAN STOP
REPRINT
MEMORY
TEXT/LINE
BLUE PRINT
PHOTO
TEXT/PHOTO
POWER
START
RESET
STOP
TONER
PROCESS MANUAL FEED
WASTE
TONER
1
6789
10
2345
No. Name Function
1 WARNING LIGHT
Indicates a print mode or standby status of the device.
ON (green): Normal
Flashing (orange): An error occurred
ON (orange): A warning event occurred
OFF: A status other than print mode and standby (OFF also in power saving
status)
2
[MENU] key/LED Switches to the MENU mode for various settings of the device. For details,
see Page 4.
[POWER SAVING] key/LED Switches to the POWER SAVING mode.
[COPY] key/LED Switches to the COPY mode. For details, see Page 15.
[DELIVERY] key/LED Switches to the DELIVERY mode. For details, see Page 16.
[PRINT] key/LED Switches to the PRINT mode for printing.
[FILE] key/LED Switches to the FILE mode. For details, see Page 17.
3 SCREEN Displays the status of the device.
4
[MEMORY] key/lLED Various settings used frequently can be registered in the memory.
[REPRINT] key The print outputted last can be reprinted.
For the reprint, only the number of copies can be set.
[RESET] key/LED Resets to initial values.
[STOP] key/LED Stops in the midway.
5 [Power] key Turns on/off the power supply to the device.
6
[TONER] LED
Indicates the amount of remaining toner.
On: There is sufficient toner.
Flashing: Toner is running low.
Off: There is no toner.
[WASTE TONER] LED
Indicates the toner waste bottle status.
On: Normal.
Flashing: Replacement time is approaching. (Even after the Waste toner
lamp starts flashing, you will be able to produce about 120 m of plots.)
Off: Plots cannot be produced without replacement

13
2
LP-1020-MF/LP-1020L-MF
No. Name Function
6
[PROCESS] LED
Indicates the process cartridge replacement time.
On: Normal.
Flashing: Replacement timing is approaching.
Off: Process cartridge is not installed.
[MANUAL FEED] LED Indicates whether the paper to be fed manually has been set.
On: Paper has been set.
Off: No paper.
[1], [2] LEDs
Indicate whether the paper has been set in the roll 1 and roll 2 drawers
respectively.
On: Paper has been set.
Off: No paper.
[DATA] LED
Indicates the data receiving status.
On: A job is waiting for the processing.
Flashing: Data are being received.
Off: No received data.
[ERROR] LED
Indicates whether an error exists in the device.
On: An error exists.
Off: No error.
7
[ORIGINAL SIZE] key Selects the original size.
[ORIGINAL TYPE] key Selects the type of image quality according to the original.
[REMOVAL] key Removes the background color.
[DENSITY] key Adjusts the copy density.
[SCALEx1] key Takes a copy in same size as the original without enlargement or reduction.
[FIXED SCALE] key The enlargement or reduction ratio to the same fixed-size series as original
can easily be selected.
[ZOOM] key Enlarges or reduces the original at same scale in vertical and horizontal
directions.
[NON-PROPORTIONAL
SCALE] key
Enlarges or reduces the original at different scale in vertical and horizontal
directions.
[PAPER FEED] key Makes the paper feed related settings such as paper type,margin, frameless,
etc.
[ORIGINAL] key Sets the media series of original set in the device.
[IMAGE QUALITY] key Sets the image quality according to the ORIGINAL TYPE.
[SORT] key Inactive on this device.
[FUNCTION] key Inactive on this device.
8
[Enter] key Inputs the parameters.
[▲][▼][ ][ ] key Switches menu items and changes parameters.
[Cancel] key Cancels parameter input.
9 Ten keys Enter the number of copies or to set values.
10 [SCAN STOP] key Stops the scanning of original.
[START] key Starts the scanning of original in the manual start mode.

14
Power on
●Turning the power on and off LP-1020-MF/LP-1020L-MF
Turn on the Main power switch located at the
lower-left as seen from the rear of the device.
Press the power switch toward the ⎪symbol (upwards).
Main power switch
When turning the power off, confirm that the device is in the
data receive standby mode.
Press the Power key on the device panel for
about 1 second. Release the key when the
display reads “Shutdown.”
When a job is present, it is automatically saved and
will be printable the next time you turn the power on.
(Only when HDD is installed)
Note
◆Even when “Shutdown” appears, the power will
not turn off until you release the power key.
This indicates that the device is executing a
shut down.
When the shut down process has been completed, the
power will turn off.
Press the power key located on the control
panel of this device (when the main power
switch is on).
When you first turn on the power after purchasing this
device, a guidance display prompts you to set the
panel's display language. If this setting has already been
completed, this message is omitted.
The message indicates that the device is now online
(“Print Ready”).
In the “Print Ready” status, press the PRINT key or
send data. The PRINT mode will be active and the print
will be ready.
Power off
Turn the main power off when you are not
using this device for an extended period of
time.
Press the power switch toward the symbol
(downwards).
Main power switch
Ini t ial izing
Pr i n t Ready
Shu t down

15
2
LP-1020-MF/LP-1020L-MF
●Set Menu LP-1020-MF/LP-1020L-MF
◆Copy function overview
Function list Description
Original Size Sets the original size.
Original Type Selects the image type according to the
original.
Background Removal
Removes the background color.
Density Adjusts the copy density.
Scale Enlarges or reduces the original.
Auto Reduces the original automatically so that
it can be accommodated in the paper.
Paper Location Selects which paper among the paper
loaded into the device is used for copy.
Paper Type Selects what type of paper is used for copy
among those set in the device.
Copy Count selects the number of copies.
Margin Sets the margin at the top and bottom
edges of an original.
Move Adjusts the position where an original is
copied.
FramErase Takes a copy by erasing the surrounding
of an original.
Original Series Selects the media series of an original.
Original Reject Direction
Sets the location to which an original is
output.
Sharpness Adjusts the sharpness of outline of an
original.
Contrast Adjusts the contrast of an original.
Mirror Copies the mirrored original.
Reverse Copies the reverse original.
Long Original Copies a long original.
Sort Sorts multiple originals and copies them.
◆Basic Operation
Select the original size.
Select the original type.
Select what image type the original is.
COPY mode
Press the [MENU] key during stand-by or in the PRINT mode and enter OFLINE. The menu message will appear. The setup
method and setting items are the same as those of LP-1020/LP-1020L. Refer to page 4.
PRINT mode
Adjust the background.
Adjust the background color if the original has uneven
density.
Adjust the density.
Adjust the copy density.
Set the scale.
Set the scale if the original is enlarged or reduced.
Select the location of paper feed.
Select which paper loaded into the device is to be used
for printing.
(For details, see “User’s Guide, Copy Part.”)
Enter the number of copies.
Input the original.
Input the original to the device.
Press the [START] key.
If the SCAN START has been set to the ORIGINAL
SET in the system menu, the copy/delivery starts
automatically without pressing the [START] key.
(For details, see "User's Guide, Plotter Unit.")
See “User's Guide, Copy part” for the copy operation.
■Manual feed copy
through
Perform the procedures described above.
Load the paper onto the manual paper
feeding holder.
Open the manual paper feeding holder, and load the
paper.
Set the location of paper feed to “MANUALS.”
Set so that the original can be copied on the paper set
on the manual paper feeding holder of the device. (For
details, see “User's Guide, Plotter Unit.”)
through
Perform the procedures described above.

16
DELIVERY mode
◆Delivery function
In the DELIVERY mode of the device, the scanned data can
be saved in the delivery host computer connected via network,
or the data can be transferred to other computers on the same
network. To use the delivery function, plotshare must be
installed beforehand in the delivery host computer used and
various settings must be made with this application software.
Exclusive application:.
•TeriostarDelivery (standard application attached)
This application provides the function that saves the image
data transferred from the device in the designated folder in
the delivery host computer.
◆Delivery function overview
Function list Description
Original Size Sets the original size.
Original Type Selects the image type according to the
original.
Background Removal
Removes the background color.
Density Adjusts the scanning density.
Original Series Selects the media series of an original.
Original Eject Direction
Sets the location from which an original
eject.
Sharpness Adjusts the sharpness of outline of an
original.
Contrast Adjusts the contrast of an original.
Reverse Copies the reverse original.
Resolution Selects the resolution of scanning.
File transfer Selects a transfer method of the scanned
image.
For details, see Chapter 3 in “User’s Guide, Copy part. ”
◆Basic Operation
Obtain the delivery list.
Obtain the delivery list from the delivery host computer.
For details, refer to the respective “User’s Guide, Copy
part.”
Select the original size.
Select the original type.
Select what image type the original is.
Adjust the background.
Adjust the background color if the original has uneven
density.
Adjust the density.
Adjust the copy density.
Delivery Host computer
Plotter

17
2
LP-1020-MF/LP-1020L-MF
FILE mode
◆File Function
Change the mode of the device to “FILE,” and the original
data is read from a computer connected via network. To use
this function, the exclusive application PlotShareOneDX
(standard application attached) is installed in advance in the
computer connected via network and one of the functions of
that application “ScanToFile” is used.
Plotter
Input the original.
Input the original to the device.
Press the [START] key.
If the SCAN START or ORIGINAL SET has been set
in the system menu, the copy/delivery starts
automatically without pressing the [START] key.
(For details, see “User's Guide, Plotter Unit.”)
◆Screens of file function
The file function is ensured via a network-connected
computer. For details, refer to the User’s Guide for
Application Side.
See “User's Guide, Copy part” for the delivery
operation.

18
How to input an original
●
How to input an original/Routine maintenance
LP-1020-MF/LP-1020L-MF
Adjust the position of the original width guide.
Adjust the original width guide to the applicable line
according to the original size.
Note
◆This device allows you to select whether the
original is returned to the front or the rear of the
scanner. In case of front return, the original could
be damaged if the original width guide is in its
way. Accordingly, move the original width guide
to the right end if selecting this option.
◆In this device, the original must be positioned in
the center. The non-fixed size original must also
be positioned in the center.
Input the original.
Input the original facedown along the original width
guide. The inserted original is automatically pulled in
the device and set in position.
◆Butt the original against the front roller and
give it a slack, so
that the original
can be inserted
straight.
Note
◆If you selected the front reject of the original, set
the original, aligning with correct size line.
◆If a carrier sheet is used, do not select the front
outlet of the original. The carrier could get stuck,
causing the original to be damaged.
Original width guide
Slack Roller
Removing scanner exit guide
◆Removing scanner exit guide
When scanning a long original or rounded original from the
rear, remove the scanner exit guide before scanning.
Open the scanner cover.
Lift the scanner cover up to its stop position. Pull the
stopper towards the arrow direction and raise the
scanner cover. The scanner cover will be held.
Other manuals for LP-1020
2
This manual suits for next models
3
Table of contents
Other Seiko I Infotech Plotter manuals