Seiko KT-601 User manual

表紙
Thank you for purchasing SEIKO SPORTS COUNTER KT-601.
Before using your SEIKO SPORTS COUNTER, please read this
manual carefully for its proper use and care.
Keep this manual handy for ready reference.

CAUTION
(1) This manual may not be copied or reproduced in any form, in whole or in part, without the express
written consent of SEIKO.
(2) This manual may be subject to change without notice.
(3) This manual has been prepared carefully to provide you with complete information for the operation
of this product. For the purpose of constant improvement in this manual, your suggestions and
comments on the descriptions included in it are highly appreciated.
(4) SEIKO shall not be liable for any failure of this product or direct or indirect damages resulting from
such failure if such failure is caused due to abuse, misuse, failure to observe instructions in this
manual and neglect of other reasonable care, and servicing, changes, modifications or alterations
performed by other than SEIKO or a servicing contractor authorized by SEIKO.
SAFETY ALERT SYMBOLS
The symbols and terms used in this manual have the meaning as explained below:
WARNING
WARNING is used to indicate a potentially hazardous situation
which is likely to cause death or severe personal injury if the
instructions under this heading are not followed correctly.
CAUTION
CAUTION is used to indicate a potentially hazardous situation
which is likely to cause personal injury or property loss if the
instructions under this heading are not followed correctly.
The following pictorial symbols indicate what must NOT be done.
The following pictorial symbols indicate what must be done.
Gene
r
al
prohibition
Prohibition
against
disassembly/
tampering
Prohibition
against
use near
water
Prohibition
against
handling with
wet hands
Prohibition
against
exposure to
water
General
instructions
Extraction of
power plug

Table of Contents
1. SAFETY PRECAUTIONS......................................................................................................................... 1
2. NAMES AND FUNCTIONS OF PARTS................................................................................................... 3
3. BEFORE USING YOUR SPORTS COUNTER ....................................................................................... 4
4. METHOD OF OPERATION.................................................................................................................... 5
4-1 Basketball (24 Sec. Timer) ....................................................................................................................... 5
4-2 Basketball (Timeout Timer) ...................................................................................................................... 8
4-3 Basketball (Team Fouls) ........................................................................................................................... 9
4-4 Volleyball .................................................................................................................................................. 10
4-5 Judo: Contest Timer/ Osaekomi Timer ................................................................................................. 12
4-6 TENNIS..................................................................................................................................................... 14
4-7 Soft Tennis................................................................................................................................................ 16
4-8 Boxing ....................................................................................................................................................... 17
4-9 Programmable Timer .............................................................................................................................. 19
4-10 Pace Setter ............................................................................................................................................ 21
4-11 Stopwatch ............................................................................................................................................... 22
4-12 Timer (with Warning Buzzer)................................................................................................................ 25
4-13 Clock & Alarm ........................................................................................................................................ 26
4-14 Factory Default Settings (Initial Setting) of Each Event/Function.................................................... 27
5. HOW TO USE INFRARED WIRELESS REMOTE CONTROLLER ................................................ 28
6. CONNECTION WITH OTHER DEVICES INCLUDING ANOTHER KT-601 .................................. 30
6-1 Use of Sports Counter KT-601 as Master Device................................................................................ 30
6-2 Receiver/ Sports Counter ....................................................................................................................... 31
6-3 Receiver/ Sports Printer.......................................................................................................................... 31
6-4 Receiver/ Game Operation Board ......................................................................................................... 31
7. PRODUCT COMPOSITION AND SPECIFICATIONS....................................................................... 32

1
1. SAFETY PRECAUTIONS
The following precautions must be strictly observed for the safety of yourself and your fellow
workers and for the protection of property from loss and damages.
WARNING
Actions to be
taken in case of
troubles
If the Product is giving out smoke or burnt smell, or showing other
abnormal symptoms, turn off the power switch and cut the power
supply immediately. Then, call your nearby SEIKO dealer or
agent for repair serve. If the Product is used again without being
reconditioned, an electric shock or fire may be caused.
When unplugging the power cord from the outlet, do not pull the
cord, but hold the plug. An electric shock, a malfunction or fire
may be caused.
Never use any damaged power cord or plug, or loose socket. An
electric shock, short circuit or fire may result.
Caution on cable
connection
Do not use the Product at humid or dusty places, or places
where the temperature changes abruptly. A short circuit or
electric shock may result.
Prohibition
against
unauthorized
disassembly,
repair or
modification
Unless you are a qualified electrician, never try to disassemble,
repair or modify the Product.
For repair serve, contact your nearby SEIKO dealer or agent.
Unauthorized disassembly, repair or modification may cause an
electric shock or fire.
No foreign matter
Do not let any foreign matter such as pin and a piece of metal
enter into the inside of the Product. In case this has occurred,
turn off the power switch immediately, and call your nearby
SEIKO dealer or agent for inspection. If the Product is used
again without being reconditioned, an electric shock or fire may
result.
Prohibition
against use near
water
The Product is designed for indoor use only, and its case is not
water resistant. Never expose the Product to water. Do not
use it outdoors or near a swimming pool, where it may be
exposed to rain or splashes of water. A short circuit or electric
shock may result.
Prohibition against
handling with wet
hands
Never operate the Product with wet hands. An electric shock or
malfunction may result.
Prohibition
against exposure
to water
Do not get the power and other connectors wet. A burn or a
malfunction may be caused.

2
CAUTION
Do not leave the Product under direct sunlight for a long time. The temperature
inside it may rise excessively to damage the circuit and other parts.
Before connecting the power cord and other cables to the Product, be sure to check
that the power switch is turned off. Do not use any power cord or cable other than
specified. Otherwise, an electric shock or malfunction may be caused.
This Product is equipped with precision electronic circuits. Misuse or abuse, or
rough handling of the Product may adversely affect the performance of such
electronic circuits, causing a malfunction and reducing the serveable life of the
Product.
When the power switch is turned on and off or vice versa in succession, an interval
of at least 5 seconds should be provided between the switch operations.
Before moving the Product, be sure to turn off the power switch. An electric shock
or malfunction may result.
While the Product is not in use, be sure to keep the power plug disconnected from
the outlet. Otherwise, the insulation will be deteriorated to cause an electric shock,
leakage of electricity, or fire.
If any abnormal operation occurs due to an abnormal signal transmitted from outside
or other causes, turn off the power switch, and then turn it on again after at least 5
seconds.
When connecting the cables, insert the plugs properly. Otherwise, a malfunction or
abnormal operation may be caused.
Do not expose the case of the Product to solvents such as alcohol and gasoline,
spray of cosmetics or the like, cleaners, adhesives, or paints. They may discolor,
deteriorate or damage the case due to chemical change.

3
2. NAMES AND FUNCTIONS OF PARTS
<Front Side>
<Rear Side>
<Operation Panel>
<Timer section>
Time/ Points won/ No. of times
repeated
Serve/ Possession/
Tem po d ispla y
Period
Points won/ Set count/
Sets won/ Hour digits of
time/ Others
Points/ Set count/ Games won/
Program No./ 1/10 second digits
of time/ Others
<Second timer section>
24 seconds/ Time-out/ Sets won/ Split time/
La
p
time/ Others
Buzzer
Guest/
Home
Power switch
<POWER>
Connector for
external buzzer
<EXT.BUZZER>
Connector for grip
switch
<GRIP SWITCH>
<O
p
eration Panel>
Connector for adaptor with
power cable
<DC IN>
Connectors for
data signal
<SIGNAL>
Stopper to prevent adaptor
with power cable from
dropping
24-/30-sec. timer
selector button
Equipment
connection
button
Game reset button
Remote control
setting button
<Second timer
section>
Events/
Functions
Buzzer button
Section for buttons for set count, court change,
points, etc.
Selector button <Timer Section>
<Display monitor>
Setting button
Buzzer selector

4
3. BEFORE USING YOUR SPORTS COUNTER
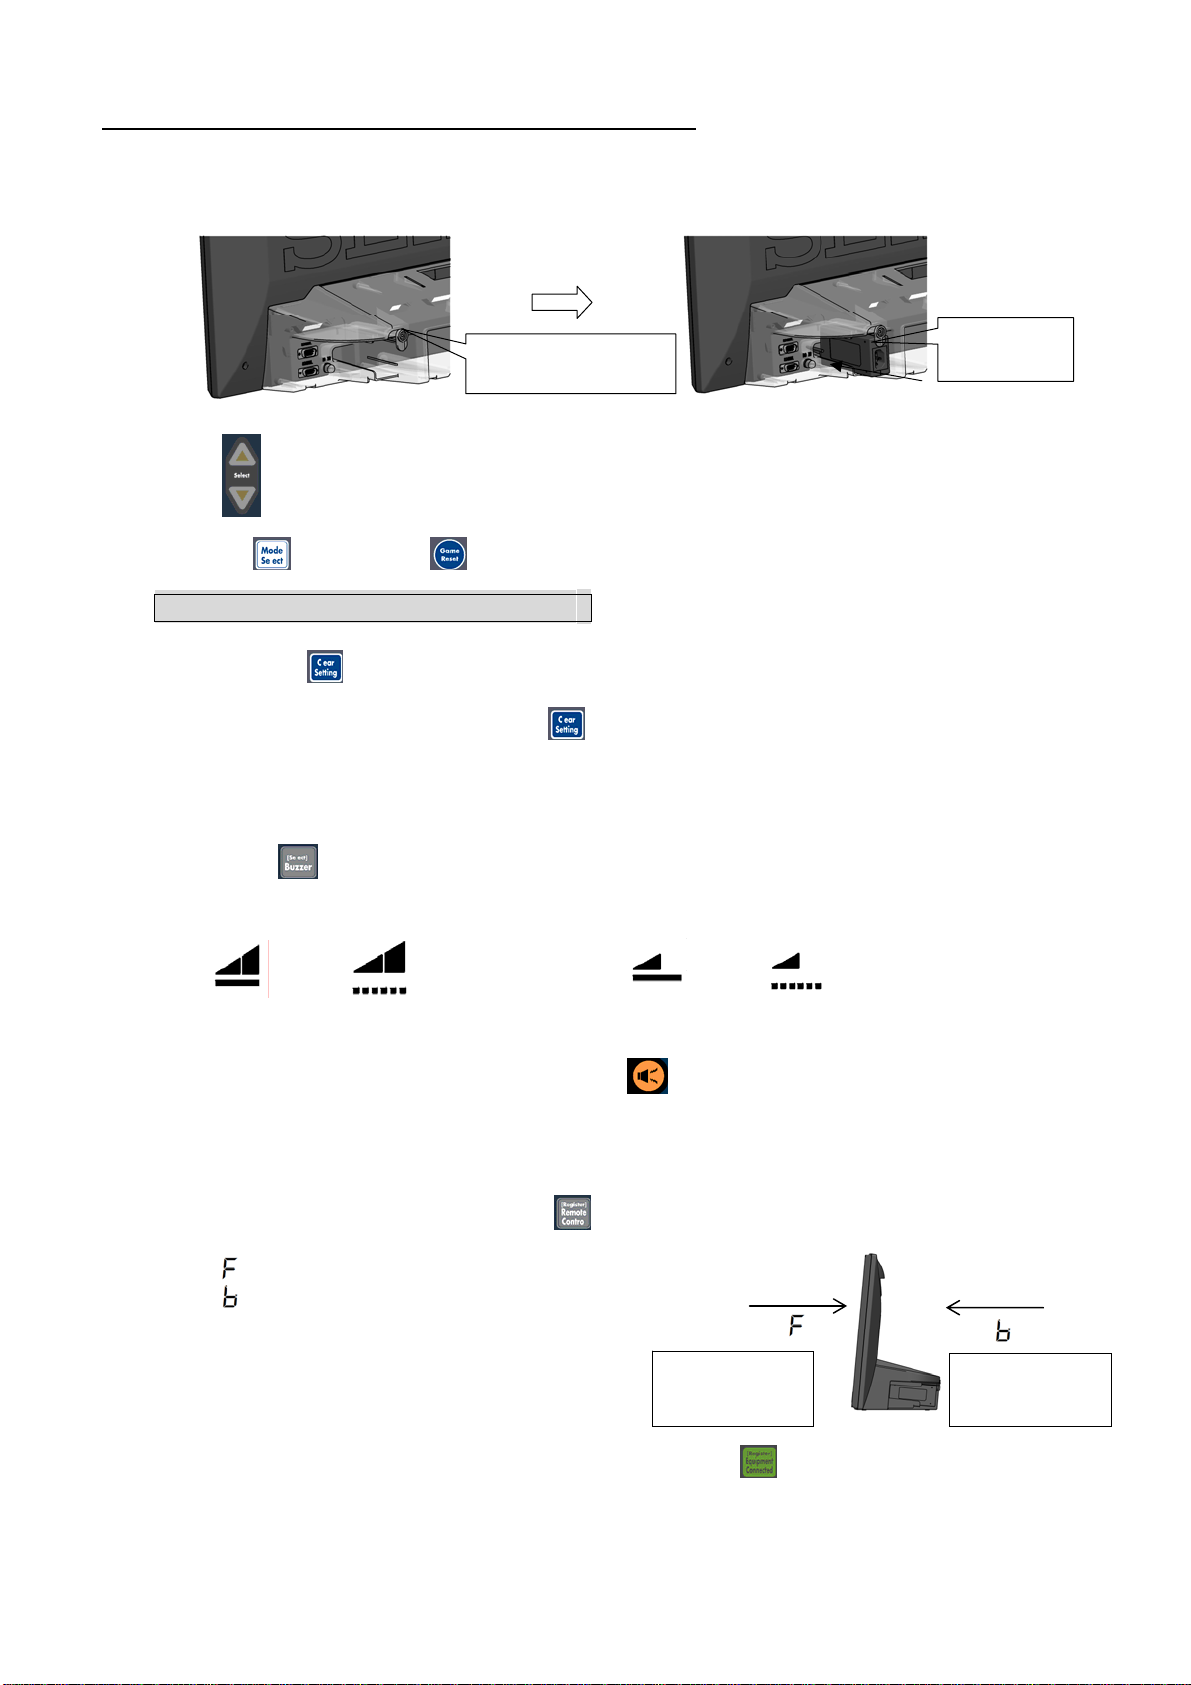
1. Insert the plug of the adaptor with power cable securely into the power connector of the main unit.
Fix the adaptor with the stopper to prevent it from dropping, and insert the power plug of the adaptor
into the outlet properly.
2. Turn on the power switch (POWER).
3. Press button to select the desired event or function. The button is disabled while the setting
procedure is performed or the timer is counting.
4. To enable button, press button to reset the Sports Counter.
5. FACTORY DEFAULT SETTINGS
a. To reset the current event/function settings to the default settings:
By keeping button pressed for 2 seconds while the setting procedure is not performed, the
current event/function settings are cleared, and the factory default settings will be restored.
b. By turning on the power while keeping button pressed, all the current settings will be reset to
the factory default settings. (The LED on the front side and the display monitor flash for 3
seconds to indicate that all the current settings have been reset.)
c. For the factory default settings, refer to “4-14 Factory Default Settings (Initial Settings) of Each
Event/Function”.
6. By pressing button, the volume and the manner of ringing of the buzzer can be selected from 5
patterns, namely, “high and continuous”, “high and intermittent”, “silent”, “low and continuous”, and
“low and intermittent” as shown below.
→ →No mark→ →
* While in the Pace Setter function (4-10), the buzzer rings in a fixed manner irrespective of the
above setting.
The buzzer keeps ringing while the buzzer button is kept pressed.
7. A power failure backup function is provided. If the power plug is disconnected from the outlet by
accident or a power failure occurs, the display becomes blank, but the condition immediately before
the power failure returns when the power is restored, provided that the Clock (4-13) should be
re-adjusted.
8. To use the wireless remote controller, press button to select from the following.
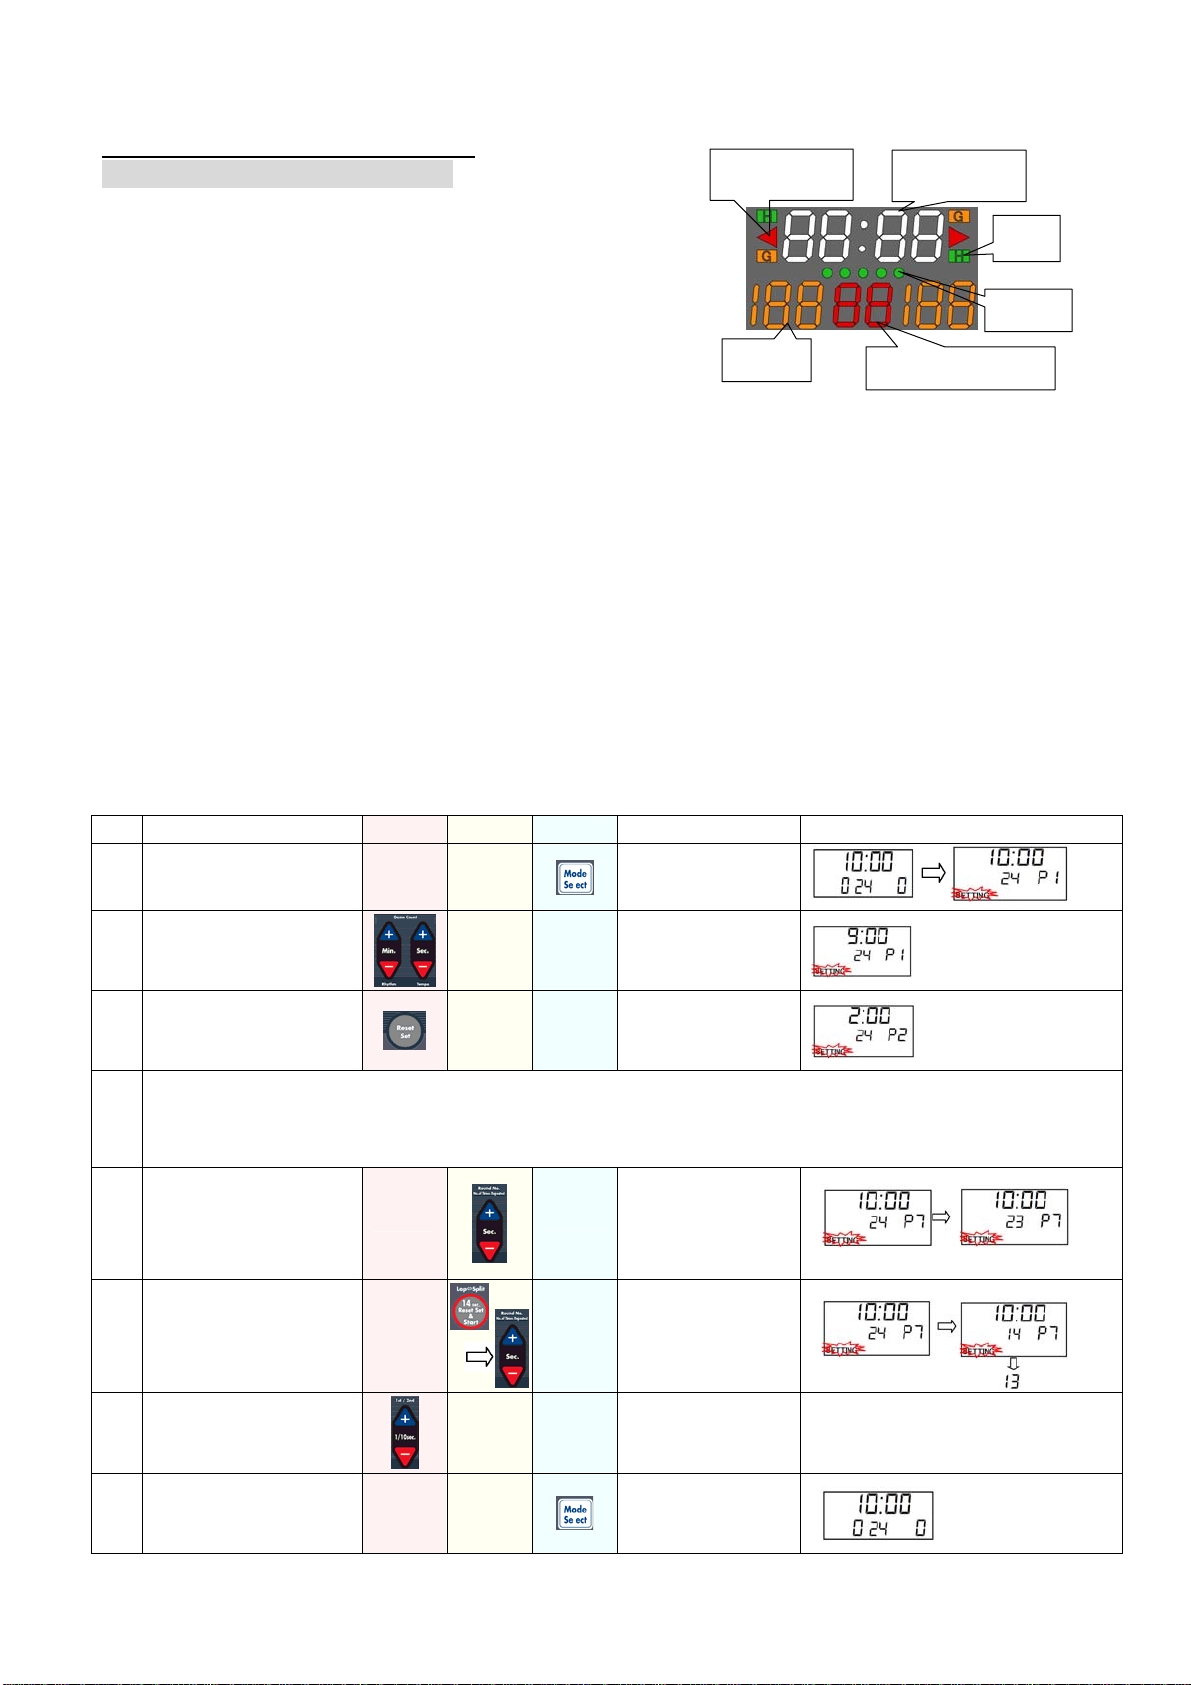
Indications shown on the display monitor:
“ ” ··· When operating Sports Counter from its front
“ ” ··· When operating Sports Counter from its back
“ ―” ··· When remote controller is not used
For the details of button operation of the remote
controller, refer to “5. BUTTON OPERATION OF
WIRELESS REMOTE CONTROLLER”.
9. When using Sports Counter KT-601 as a master device, press button to select “1. Master”.
For the details of connection with other devices, refer to “6. CONNECTION WITH OTHER DEVICES
INCLUDING ANOTHER KT-601”.
When operating
Sports Counter
from its front
When operating
Sports Counter
from its back
Stopper to prevent
adaptor from dropping
Adaptor with
power cable

5
4. METHOD OF OPERATION
4-1 Basketball (24 Sec. Timer)
(1) Items shown on the display panel:
①Counting of time of period, interval, half time, etc. is
displayed on the Timer Section (up to 99 minutes
and 59 seconds can be set).
② Points of the team on each side are displayed (up
to 199 vs. 199).
③ Counting of 24 or 30 seconds is displayed.
④ A mark is lighted to indicate the team possessing the ball.
⑤ “H” (HOME), “G” (GUEST), and the number of periods (up to 5 periods) are shown by
respective lighted marks.
(2) Items that can be adjusted:
① Up to 9 programs can be set.
② 24 and 14 seconds can be adjusted to a desired time.
③ The color of the LED indicating 24 seconds can be selected from red and green.
④ When the time set for the timer is less than 1 minute, the timer can be set to count in 1/10
second increments (default setting) of 1 second increments as necessary.
⑤ The timer can be set to count down or up the set time.
* For the default settings, refer to 4-14 of this manual.
* If Sports Counter is used with the default settings, the following procedure of confirmation of
settings and adjustment need not be performed.
■Method of Confirmation/Adjustment of Settings
Operation Timer
section
2nd timer
section
Section for
points, etc. Action/Remarks Display monitor
1 To activate setting mode
2 To confirm/
adjust Program 1
3 To register Program 1, and
move to Program 2 setting.
4
*1. To adjust the settings for Program 3 and more Programs, follow the above steps.
*2. Once “0:00” is set for the time of a Program during the setting mode, the setting procedure of the rest of the Programs
will be cancelled.
*3. Programs 8 and 9 have no default setting.
5 24 seconds can be adjusted
as desired.
Adjustment can be
made at any time
during setting mode
(not in the case of 30
seconds).
6 14 seconds can be adjusted
as desired.
Adjustment can be
made at any time
during setting mode.
7 Color of 24-sec. timer can
be selected.
Color of 24-sec. timer
changes alternately
between red and
green.
Color of 24 seconds on display monitor
remains the same. Color of LED on
display panel will change.
8
After all settings are
completed, change over to
game mode.
Game timer
24 or 30 sec. timer
Points
Possession
H-G
Period

6
*1. With each press of button while in the setting mode, the timer can be set to count upward (UP)
and downward (DOWN) alternately.
*2. When the time set for the timer is less than 1 minute, pressing button will set the timer to count in
1/10 second increments instead of 1 second increments. The button operation can be made at any
time, as long as the timer is set to count downward (DOWN). 1/10-second-interval counting is not
available when the timer is set to count upward (UP).
●Operation Procedure: Start of Game
Operation Timer
section
2nd timer
section
Section for
points, etc. Action/Remarks Display monitor
1 To start the game Counting is started.
2 To start 24-sec. timer
Start 24-sec. timer
when a player
possesses the ball.
While the button is
kept pressed, timer is
stopped, indicating
“24”.
3 To start and stop 24-sec.
timer during game
4 To adjust 24 seconds
Operation can be
made only while timer
is stopped.
Counting restarts.
Pressing “Clear”
button resets time to
“24”, and stops timer.
5 To adjust game time
Operation can be
made only while game
timer is stopped.
6 To restart game
To start 14-sec. timer
Game timer is
restarted.
While 14-sec. timer
start button is kept
pressed, timer is
stopped, indicating
“14”.
Kept pressed. Release.
7 End of 1st period:
Interval display is shown.
Game timer is stopped
automatically (buzzer
rings).
Interval display
appears automatically.
24-sec. timer
continues counting.
Press “Clear” button to
stop and reset timer.
(Buzzer)
Unless “Clear” button is pressed, timer
continues counting down to “0”.
21→20→→→0(Buzzer)
8 To skip period/interval time
Pressing “Reset”
button while timer is
stopped will ring
buzzer and advance
timer to the next
period/interval time.
(Buzzer rings.)
9 To change 24 to 30
seconds or vice versa
Operation can be
made only while
24-sec. timer is
stopped.
10 End of game:
To reset game time
Display returns to the
settings made before
the game.

7
●Operation Procedure: Display of Points, Possession, and Court Change
Operation Timer
section
2nd timer
section
Section for
points, etc. Action/Remarks Display monitor
1 To increase points of
right-side team
2 To show possession display
of team on left side
Pressing the button
again while
possession display is
shown will clear the
display.
3 To change court
If possession or “H-G”
display is shown, court
change is made
automatically.
4 To clear points
Only points are
cleared. Time,
possession and
24-sec. timer remain
unchanged.
●Operation Procedure: Period and “H” (Home) – “G” (Guest) Indication
Operation Timer
section
2nd timer
section
Section for
points, etc. Action/Remarks Display monitor
1 To change number of
periods
Period marks are
lighted from left to
indicate number of
periods (up to 5
periods).
2 To change over between
“H” and “G”
Operation can be
made while the game
is in progress.

8
4-2 Basketball (Timeout Timer)
(1) Items shown on the display panel:
① Timeout time is displayed (up to 99 seconds).
* The items displayed and the settings other than the
timeout time are the same as in the case of “4-1
Basketball (24 Sec. Timer)”.
(2) Items that can be adjusted:
①Any desired amount of time can be set for the
timeout timer in 1 second increments.
②The color of the LED for the time-out display can be selected from red and green.
* For the default settings, refer to 4-14 of this manual.
* If Sports Counter is used with the default settings, the following procedure of confirmation of
settings and adjustment need not be performed.
■Method of Confirmation/Adjustment of Timeout Time Settings
Operation Timer
section
2nd timer
section
Section for
points, etc. Action/Remarks Display monitor
1 To activate timeout timer
setting mode
2
To adjust timeout time from
60 seconds to any desired
amount of time
Operation can be
made at any time
while setting mode is
activated.
3 To change color of timeout
time display
Color of timeout time
display changes
alternately between
red and green.
Color of timeout time on display monitor
remains the same. Color of LED on
display panel will change.
4
After all settings are
completed, change over to
game mode.
●Operation procedure: Start of Game and Timeout Time
Operation Timer
section
2nd timer
section
Section for
points, etc. Action/Remarks Display monitor
1 To start the game Counting is started.
2
To stop game time
To start timeout timer
3 To stop timeout timer
To change timeout time
4 To stop timeout timer before
set time is up
Timeout timer is
stopped.
Timeout time display
disappears.
5 When timeout time is up
Timeout timer is
stopped automatically
with a buzzer sound.
Timeout time display
disappears
automatically.
(Buzzer)
Game timer
Timeout timer
Points
Possession
H-G
Period

9
4-3 Basketball (Team Fouls)
(1) Items shown on the display panel:
①The number of team fouls is displayed.
0~4 fouls are indicated in green (default setting).
5 or more fouls are indicated in red (default setting).
* The items displayed and the settings other than the
timeout time are the same as in the case of “4-1
Basketball (24 Sec. Timer)”.
(2) Items that can be adjusted:
①The number of fouls to be indicated in red can be changed as desired.
* For the default settings, refer to 4-14 of this manual.
* If Sports Counter is used with the default settings, the following procedure of confirmation of
settings and adjustment need not be performed.
■Method of Confirmation/Adjustment of Team Foul Settings
Operation Timer
section
2nd timer
section
Section for
points, etc. Action/Remarks Display monitor
1 To activate team foul setting
mode
LED on front side is
green.
LED on front side is
red.
2 To change number of fouls
to be indicated in red
When number of team
fouls reaches the set
number, color of team
foul display changes
from green to red.
LED on front side is
red.
3
After all settings are
completed, change over to
game mode.
●Operation Procedure: Team Fouls Display
Operation Timer
section
2nd timer
section
Section for
points, etc. Action/Remarks Display monitor
1
To increase team fouls
committed by right-side
team
2
When fouls of teams on left
and right sides are “2” and
“5”, respectively:
Fouls of left-side
team: 2
Fouls of right-side
team: 5
LED on front side
(2: green, 5: red)
3 To clear team fouls
Possession Game timer
H-G
Period
Team foul display
Points

10
4-4 Volleyball
(1) Items shown on the display panel:
① Interval time is displayed.
②Points of the team on each side are displayed.
③Team to serve and team calling timeout is indicated
by lighting of a mark.
④The time to sound end-of-interval warning buzzer
can be programmed, and the program number is
displayed while the program is engaged.
⑤Sets won by the team on each side are displayed.
⑥Timeout time, and 1st/2nd serve indication are
displayed.
⑦“H” (HOME), “G” (GUEST), and the number of
periods (up to 5 periods) are shown by respective
lighted marks.
(2) Items that can be adjusted:
①Interval time can be adjusted.
②The time to sound end-of-interval warning buzzer can be programmed (up to 9 programs).
③Timeout time can be adjusted as desired (from 0 to 99 seconds).
④The color of the LED indicating timeout time can be selected from red and green.
1st/2nd serve indication is indicated by the same selected color.
* For the default settings, refer to 4-14 of this manual.
■Method of Confirmation/Adjustment of Interval Time, Time to Sound End-of-Interval Warning Buzzer
and Timeout Time Settings
Operation Timer
section
2nd timer
section
Section for
points, etc. Action/Remarks Display monitor
1 To activate timeout/interval
time setting mode
2
To register interval time,
and move to mode to set
time to sound
end-of-interval buzzer 1
3
To register time to sound
end-of-interval buzzer 1,
and move mode to set time
to sound end-of-interval
buzzer 2
4 *1. To set the time to sound end-of-interval buzzer 2 and more buzzers, follow the above steps.
*2. No default setting has been programmed for the time to sound end-of-interval buzzer.
5 To change timeout time
from 30 to 25 seconds
Operation can be
made at any time
while setting mode is
activated.
6 Color of timeout time
display can be selected.
Color of timeout time
display changes
alternately between
red and green.
Color of timeout time on display monitor
remains the same. Color of LED on
display panel will change. (1st/2nd serve
indication is indicated by the same color.)
7
To register time to sound
end-of-interval buzzer 2,
and change over to game
mode
*1. With each press of button while in the setting mode, the interval timer can be set to count upward
(UP) and downward (DOWN) alternately.
Team to serve/
team calling
timeout
Interval timer/ point
dis
p
la
y
H-G
Period
End-o
f
-interval
warning buzzer
indication (when
engaged)/
sets-won display
Timeout time
r
/
1st/2nd serve
indication

11
●Operation Procedure: Serve/ Points/ Sets Won/ Court Change Display
Operation Timer
section
2nd timer
section
Section for
points, etc. Action/Remarks Display monitor
1
To indicate right-side team
is to serve/ to increase
points of right-side team
Mark to indicate
right-side team is to
serve lights up.
Another press clears
the mark.
2
To increase sets won by
right-side team
To clear points
Right-side team won
a point, and sets won
are increased by one.
3 To change court
Points, sets won, and
team-to-serve marks
of both teams change
places.
4 To clear sets won Sets won of both
teams are reset to “0”.
●Operation Procedure: 1st/2nd Serve Display, Set Count, and “H” (Home) – “G” (Guest) Indication
Operation Timer
section
2nd timer
section
Section for
points, etc. Action/Remarks Display monitor
1 To indicate 1st/2nd serve
and turn off the indication
With each press of “+”
or “-”, indication
changes in the order of
1→2→blank, or
2→1→blank,
respectively.
2 To display set count
(period)
Set count (period)
marks light up one by
one from left to right
(up to 5 sets)
3 To change over “H” and “G”
Operation can be
made during game.
●Operation Procedure: Start of Interval Time
Operation Timer
section
2nd timer
section
Section for
points, etc. Action/Remarks Display monitor
1 To start interval timer
2 Interval time can be
stopped and adjusted
3
Programmed
end-of-interval warning
buzzer
End-of-interval
warning buzzer
sounds at the
programmed time.
(Warning buzzer)
4 End of interval
Interval timer stops
and disappears
automatically with a
buzzer sound. Mode
returns to game.
(Buzzer)
●Operation Procedure: Start of Timeout Time
Operation Timer
section
2nd timer
section
Section for
points, etc. Action/Remarks Display monitor
1 To start timeout timer
2
To stop timeout time before
it is up
Timeout timer stops.
Timeout timer
disappears.
3 End of timeout
Timeout timer stops
and disappears
automatically with a
buzzer sound.
(Buzzer)

12
4-5 Judo: Contest Timer/ Osaekomi Timer
(1) Items shown on the display panel:
①Contest time is displayed (up to 99 hours and 59
minutes can be set for the timer).
② Osaekomi time is displayed (indication for the
contestant entering osaekomi can be displayed).
(2) Items that can be adjusted:
①Contest time can be adjusted as desired.
②Osaekomi time can be adjusted as desired.
* For the default settings, refer to 4-14 of this manual.
■Method of Confirmation/Adjustment of Settings
Operation Timer
section
2nd timer
section
Section for
points, etc. Action/Remarks Display monitor
1
To activate
contest/osaekomi time
setting mode
2
Contest time can be
adjusted.
Osaekomi time can be
adjusted.
3
If the contestant has
already been awarded
waza-ari, osaekomi time
can also be adjusted.
Ex.) 20 sec.→19sec..
To change over
between osaekomi
times with and without
waza-ari, press
button.
4
To register setting, and
change over to contest
mode
*1. With each press of button while in the setting mode, the contest timer can be set to count upward
(UP) and downward (DOWN) alternately.
●Operation Procedure: Start of Contest (Ex.: Contest Time - 5 minutes, Osaekomi Time - 25 seconds)
Operation Timer
section
2nd timer
section
Section for
points, etc. Action/Remarks Display monitor
1 To start contest timer Contest timer starts
counting.
2
To start osaekomi timer
immediately after osaekomi
was escaped
Osaekomi timer starts
counting.
To start osaekomi
timer immediately
after osaekomi was
escaped, press
button.
3
When osaekomi has been
escaped but contest is in
progress
Osaekomi timer is
stopped.
Osaekomi time is
reset to original time.
4
When 25 seconds of
osaekomi time has elapsed
(ippon), or contest is ended
Contest and
osaekomi timers stop
automatically with a
buzzer sound.
or
(Buzzer)
5 To show display for a new
contest
Display is reset to the
settings you made
initially.
*1. Pressing button (possession/serve button) will light up the LED indicating the contestant
applying osaekomi. Another press of the button will turn off the LED.
Contestant
applying
osaekomi Contest time
r
Osaekomi time
r

13
●Operation Procedure: Start of Contest (When Contestant Awarded Waza-Ari Applies Osaekomi)
Operation Timer
section
2nd timer
section
Section for
points, etc. Action/Remarks Display monitor
1 To start osaekomi timer Osaekomi timer starts
counting.
2 When contestant awarded
waza-ari applies osaekomi
Osaekomi time is
changed to 20
seconds.
Full osaekomi time is indicated at lower
left corner.
3
When 20 seonds of
saekomi time has elapsed
(ippon), and contest is
ended.
Contest and
osaekomi timers stop
automatically with a
buzzer sound.
(Buzzer)
●Operation Procedure: Start of Contest (When Osaekomi Continues after Contest Time is Up)
Operation Timer
section
2nd timer
section
Section for
points, etc. Action/Remarks Display monitor
1 To start osaekomi timer Osaekomi timer starts
counting.
2 Contest time is over.
Display shows the set
contest time, and
timer starts counting
from that time
(indicating total
contest time).
Buzzer does not ring,
and osaekomi timer
continues counting.
3-1
When 25 seconds of
osaekomi time has elapsed
(ippon), and contest is
ended
Contest and
osaekomi timers stop
automatically with a
buzzer sound.
(Buzzer)
3-2
When osaekomi is escaped
before osaekomi time has
elapsed, and contest is
ended
Osaekomi timer stops
counting, and contest
timer is stopped with
a buzzer sound.
(Buzzer)
●Operation Procedure: Start of Contest
(Ex.: If “osaekomi” button is pressed 2 seconds after the contest time is over, osaekomi is
considered to have started at the same time as the contest was ended, and the osaekomi
timer starts counting.)
Operation Timer
section
2nd timer
section
Section for
points, etc. Action/Remarks Display monitor
1
Contest time is over.
Osaekomi started at the
same time as contest was
ended.
(Button is pressed 2
seconds after end of
contest.)
Contest timer is
stopped automatically
with a buzzer sound.
Osaekomi is
considered to have
started at the same
time as contest was
ended, and osaekomi
timer starts counting.
(Buzzer)
*1. Even if osaekomi has started at the same time as the contest time was over and the timer was stopped
with a buzzer sound, “osaekomi” button is enabled for 5 seconds after the contest was ended, or
until button is pressed, whichever is earlier.

14
4-6 TENNIS
(1) Items shown on the display panel:
① Points of player on each side are displayed.
(Point display for both players can be adjusted
independently.)
②A mark is lighted to indicate the player to serve.
③A mark is light to indicate 1st or 2nd serve.
④Games and sets won by the player on each side
are displayed.
●Operation Procedure: Point Display
Operation Timer
section
2nd timer
section
Section for
points, etc. Action/Remarks Display monitor
1 Select “Tennis”.
2 To increase points
Points are increased
in order of
0→15→30→40.
After“40”,
button will not
change points.
Press button
to reset points of
both sides to “0”.
3 In case of deuce
button for
player having gained
advantage will not
change points.
Press button
to reset points of both
sides to “0”.
4 To clear points
Points of both sides
are reset to “0”.
5 In case of tie-break
Tie-break display
appears only before a
new game is started.
Press “Tie-Break”
button immediately
after pressing
button.
●Operation Procedure: Games-Won Display
Operation Timer
section
2nd timer
section
Section for
points, etc. Action/Remarks Display monitor
1 To increase games won
2 To clear games won Games won of both
sides are reset to “0”.
Serve 1st/2nd serve Points
H-G
Sets won
Games won

15
●Operation Procedure: Sets-Won Display
Operation Timer
section
2nd timer
section
Section for points,
etc. Action/Remarks Display monitor
1 To increase sets won
2 To clear sets won Sets won of both sides are
reset to “0”.
3 To end the match
Display for a new match
appears.
Points, sets won, and
games won of both sides
are all reset to “0”.
●Operation Procedure: 1st/2nd Serve Display
Operation Timer
section
2nd timer
section
Section for
points, etc. Action/Remarks Display monitor
1 To indicate 1st or 2nd serve
To turn off indication
With each press of
button, colon
mark on upper
row changes in
order of “.”→
“:” →blank.
With each press of
button, colon
mark on upper
row changes in
order of “:”
→“.”→blank.
*1. For the operation of Serve, Court Change, and “H”-“G” displays, refer to “4-4 Volleyball”.

16
4-7 Soft Tennis
(1) Items shown on the display panel:
①Points of player on each side are displayed.
②A mark is lighted to indicate the player to serve.
③ A mark is light to indicate 1st or 2nd serve.
④ Games won by player on each side are displayed.
(2) Items that can be adjusted:
① The number of points at which Advantage mark is
displayed can be adjusted as desired (for games
before final and final game).
* For the default settings, refer to 4-14 of this manual.
■Confirmation of Settings for Points at Which Advantage Mark is Displayed/ Method of Adjustment
Operation Timer
section
2nd timer
section
Section for
points, etc. Action/Remarks Display monitor
1 To activate setting mode
2
Points at which Advantage
mark is shown in games
before final can be
adjusted.
3 To register setting, and
move to final game setting
4
Points at which Advantage
mark is shown in final game
can be adjusted.
5 To register setting, and
change over to game mode
●Operation Procedure: Point Display
Operation Timer
section
2nd timer
section
Section for
points, etc. Action/Remarks Display monitor
1 Select Soft Tennis.
2 To increase points in
games before final
button for
player having gained
advantage will not
change points.
Press button to
reset points of both
sides to “0”.
3 To change over display to
final game
Operation can be
made at any time
during game.
“F” is shown on display
monitor only.
4 To increase points in final
game
Operate buttons in the
same manner as in
games before final.
5 To clear points
Final game display
returns to display for
games before final.
*1. For the operation of Serve, Court Change, and “H”-“G” displays, refer to “4-6 Tennis”.
Serve 1st/2nd serve Points
H-G
Games won

17
4-8 Boxing
(1) Items shown on display panel:
①Round time, time to sound end-of-round warning
buzzer, interval time, and time to sound
end-of-interval warning buzzer are displayed in the
timer section.
② Round No. is displayed.
③ Program code representing the program item
shown is displayed.
(2) Items that can be adjusted:
① Round time, time to sound end-of-round warning buzzer, interval time, and time to sound
end-of-interval warning buzzer can be programmed into memory. They have the following
program code:
Round time: P1, time to sound end-of-round warning buzzer: b1, interval time: P2, and time to
sound end-of-interval warning buzzer: b2
② The number of rounds can be set as desired (up to 99).
If “0” is set for the number of rounds, the round continues endlessly.
③ The color of the digits indicating Round No. can be selected from red and green.
* For the default settings, refer to 4-14 of this manual.
■Method of Confirmation/Adjustment of Settings: (Ex.: Round time: 3 minutes, time to sound
end-of-round warning buzzer: 30 seconds before end, interval: 1 minute, and time to end-of-interval
warning buzzer: 5 seconds before end)
Operation Timer
section
2nd timer
section
Section for
points, etc. Action/Remarks Display monitor
1 To activate setting mode
2
To set round time (P1) to 3
minutes, and register
setting
Time to sound
end-of-round buzzer
(b1) appears.
3
To set time to sound
end-of-round buzzer (b1) to
30 seconds, and register
setting
Interval time (P2)
appears.
4 To set interval time (P2) to 1
minute, and register setting
Time to sound
end-of-interval buzzer
(b2) appears.
5
To set time to sound
end-of-interval buzzer (b2)
to 5 seconds
6 Number or rounds can be
adjusted.
7 Color of round display can
be selected.
Color of round display
changes alternately
between red and
green.
Color of round on display monitor remains
the same. Color of LED on display panel
will change.
8 To register settings, and
change over to game mode
*1. With each press of button while in the setting mode, the timers can be set to count upward (UP)
and downward (DOWN) alternately. Note that the round No. is counted only upward.
Time
r
Round No. Program code
(for program shown)
Table of contents
Popular Cash Counter manuals by other brands

Fri-Jado
Fri-Jado MCC-60 H Service manual

Nautilus Hyosung
Nautilus Hyosung MONiMAX7600 installation manual

Cashmaster
Cashmaster Sigma 105 quick start guide

TeraBee
TeraBee People Counting L installation guide

Keysight Technologies
Keysight Technologies 53150A operating guide

Velleman
Velleman PEM7D/C quick start guide