Seikosha SP-180VC User manual

Sa
SP-18S0VC
MATRIX
PRINTER
OWNER’S
MANUAL
SEIKOSHA

ieee
PR
LER
LEDER
LER
A
RL
ALP
REPL
LR
LLL
PLL
LLIN
AOR
PRontterntemnernen
(RAR
AEE
AL
AE
AEE
LAE
ANAL
NALN
ALN
ARLEN
ARE PRE
PRLE
PRE
LPL
WARNING:
“This
equipment
has
been
certified
to
comply
with
the
limits
for
a
Class
B
computing
device,
pursuant
to
Subpart
J
of
Part
1S
of
PCC
Rules.
Only
computers
certified
to
comply
with
the
Class
B
limits
may
be
attached
to
this
printer.
Operation
with
noncertified
computers
is
likely
to
result
in
interference
to
radio
and
TV
reception.”
“This
equipment
generates
and
uses
radio
frequeney
and
if
not
installed
and
used
properly,
that
is,
in
strict
accordance
with
the
manufacturer's
instructions,
may
cause
interference
to
radio
and
television
reception.
It
has
been
tested
and
found
to
comply
with
the
limits
for
a
Class
B
comput-
ing
device
in
accordance
with
the
specifications
in
Subpart
J
of
Part
15
of
FCC
Rules,
which
are
designed
to
provide
reasonable
protection
against
guarantee
that
interference
will
not
occur
in
a
particular
installation.
If
this
equipment
does
cause
interference
to
radio
or
television
reception,
which
can
be
determined
by
turning
the
equipment
off
and
on,
the
user
is
encouraged
to
try
to
correct
the
interference
by
one
or
more
of
the
following
measures:
Reorient
the
receiving
antenna
Relocate
the
computer
with
respect
to
the
receivel
Move
the
computer
away
from
the
recciver
Plug
the
computer
into
a
different
outlet
so
that
computer
and
receiver
are
on
different
branch
circuits.
If
necessary,
the
user
should
consult
the
dealer
or
an
experienced
radio/
television
technician
for
additional
suggestions.
The
user
may
find
the
following
booklet
prepared
by
the
Federal
Communications
Commission
helpful:
“How
to
Identify
and
Resolve
Radio-TV
Interference
Problems”,
This
booklet
is
available
from
the
U.S.
Government
Printing
Office,
Washington,
D.C.
20402,
Stock
No.
004-000-00345-4,
“It
is
necessary
to
use
shielded
interconnect
cables
to
insure
compliance
with
FCC
Class
B
limits
for
radio
frequency
emissions”.
COMMODORE
is
a
trademark
of
Commodore
Business
Machines,
Ine.
x
i
\
;
i
‘
;
i
;
i
i
;
\
;
}
\
|
;
i
i
|
|
;
i
5
;
;
|
;
3
i
;
;
;
;
;
;
3
;
3
;
fe
iA
PPADS
ADA
AERA
UEP
AD
SPP
APARNA
PNR
DELIA

CONTENTS
INTRODUCTION
csscesascusssgusracmenencsnacneans
onvanessanadumnraxensunesepeccasasnesusawanane
1
CAUTIONS
FOR
USE
coxsssosscnvsasseiasenisicavennnenenencsnesssennsanceeanesesncecesenenss
1
SETTING
UP
THE.
PRINTER,
ccccscscscersenstansenscxacasaacanavensonenneasersunsunesensaes
2
Unpacking
the
Printer
ssccsccccsasasensevswninveswnassensnaseccasnnensensasavenanswanensesnes
2
Operator
Controls:
sissicsssassvsesssncanscrccsenscvensunmsaniacnevcennoveessakeesenrmesaceeauen
3
Installing
the:
Ribbon
Cassette
sscsssssescscesssesevscvasesssevsvsosvanscacsvevesenaewosexees
4
Using
Continnous
Foss,
sasissscssscaciscsseccnexcsvasnssacesovesnoneawecvenscasasanemavevens
5
Connecting
the
Printer
to
the
Computer
...........cscscccsccsesecsececcccecscecescesess
7
Loading
Single
Sheet
Paper
ssississscsccsscasvssosssssnassancosvacsenvecsceseasscowsseasees
8
Installing
the:
Tractor
Unit
sisicsissanssacctiavaccsascenavennivcrsanadenssanawanenaxcensnesas
10
ADJUSTING
THE
HEAD
ADJUSTMENT
LEVER
............ccsccesesesecersceees
11
RUNNING
THE
SELE
TEST
ccssstssscavccsressnisisiccsmnwsasniessannisareamneiansesees
11
BRD
ee
Cee
RR
eriscnsis
pce
coche
vicevenjecrdeetoeibredceempip
insecie
a
eit
mcatecheieero
conan
aia
12
TOURETTE.
.siecvieus
dvtaindaitenvna
nicighe
viva
npnlensdasiomntauiatanetiank
aniseed
punapanniiiaipcanmeent
iment
12
EICIREAEE
WVAMLINEINGES
‘sicschsndenntsoncntadenenasientpabearspeotteiianesinesrsporvaapweneurrant
12
PRINT
MODE
PRIORITY
AND
COMBINATIONS.
.........ccccccsessscesceseeeees
13
OPERATING
THE,
PRINTER
scscvesavexcrcnninanssesatiyveinctipdisentiaiivaiexeimmiooieene
13
PRINTER-ASSOCIATED
COMMANDS
..........cccccscceccccececsccscnceesscsceseseees
14
LISTING
A.
BASIC.
PROGRAM
sesscesersercessassrsasanseastneesnenemaeinerensnennnees
17
PRINTING
UNDER
PROGRAM
CONTROL
o..........ccccessscecscssssceseecscesees
18
SECONDARY
ADDRESS
EXPLANATIONS.
..........cccccsccccsccvcscscccsssecsseees
19
e
SA=
0:
Printing
Graphic
Character
Mode
...........cccccessscssesescssecscsscsces
19
®
SA=
3:
Setting
2
Page
Lengiht
scssscusvccessssaszessiwaivsvaraannonnvuenvaccouneavene
20
®
SA=
6:
Setting
a
Limefeed
Pitely:
susssssccesnnssassssisnvnsvacsseaseconverassanenwnens
21
e
SA=
7:
Printing
in
Business
Character
Mode
...........0+4
wemauguanaiintin
canine
21
®
SA=—10:
Resetting
the
Printer
sssssssscsscssscvssesesccscsscscavasscsseceswasevessaseses
22
e
SA=13:
Designating
Condensed
Character
Mode
...........csssececessceseesese
22
CONTROL
CODE
EXPLANATIONS
.
sccssessassassnsscscssaccsavevsnaatoceaseasescosacss
23
@
Print
Command
ccsescisssntecasnnsusnaccasancacnvacassevessaenstedsisnsastatseasesvsaavaees
23
©
Double-Width
Character/Condensed
Character
...........scccscesesescecscssceces
27
@
DOU
WAE:
RESGE
ssccscissnasssssicsansisisssidediaensiindincsesedensisinstevaneneeranesaonsene
29
S
Griphic
Pring
Gack
SPHte
...cccsceeciveicsacescastesovesssvesvaresavapeseessenrensare
30
®
PVE
CONGR
soci
ccseceninncnoreuncacemeavarmeneursnsagneamenoaremnnren
ponmenionnreders
33
WW
TRG
WESE
CECE
ai
Sirs
sdccccicnnncrecn
aenis
cheatin
ae
ercatsehietinne
34
©
ECU,
BOREL
POR
oc
essesernarssanserkarnisereeuoeaeseuambeiemereariaens
38
@
Teg
CHARACIER
seianecrsasnncsncennemennaseunixcnemcnonetncenninesn
en
easunnive
bie
RUNES
39

@
Underline
........cccccesccccsccsccscvccccccceccoccccccccscccesesccssccccesecccosessosscssoesces
40
@
Skip-Over
Perforation
.........cccccccecscsececscesscsececsccscsccscsssscsvsssensssesseees
41
@
Print
Direction
.........cccccccccccccccsccccsccccccccccsccsoscssescssosccseccssescacsscscceecs
42
©
Double-Strike
Character
..........cscccccsoscscsccccscvcscscscssecesssssscscssscsscscvsces
43
@
Character
Pitch
...........ccccccccccccccccccscncccvcccceccescsccescscessccesonscseessscessece
44
©
Margin
Setting
...........cccccccscscsscecsscscscescscserscessseseescncessscecsccccescceseres
45
e@
Superscript
and
Subscript
...........
{us
eekaeRsevaswerereunteesDecdaeeterannrsneyeesesnoee
46
@
Near
Letter
Quality
..........cccccccccsccesccccescccsccscvcsccoscsceccsccccosesoscscsasoses
47
@
Limefeed
Pitch
.scccsccccccccscsssvccsccarscssccccscoscscscsessoscssscccssessccsesevecesesons
48
@
Emphasized
Character
(Bold)
........scsececsesecscseceessceesccscscescecssseseseeeeeees
49
©@
Double-Width
Character
.............ccccsccccsccccsccccccsccccsscccsscescssssescsscecsece
50
TROUBLESHOOTING
...........sceeeeseeeee
{avnessaaveasresaepqenaveenenacenestavasaxeweaness
roa
|
APPENDIX
A
(GloSSary)
.........scccscscscccscccsscccerscccccescscscecesescsesscesessesscoece
52
APPENDIX
B
(Specifications)
........ccccccsecesesecerecscscsceesssscesssssscsssenseeeeoeens
59
APPENDIX
C
(Character
Category
Specifications)
..........sccesesescecesecsseneeeees
60
APPENDIX
D
(Code
Table)
...........scccccscccscscccsccccccsoccccscccescscccsssscssescosecs
61
CBM
Standard
Font
in
Graphic
Character
Mode
(Cursor
Up)
........eeseeeeeeee
61
CBM
Standard
Font
in
Business
Character
Mode
(Cursor
Down)
............++
62
ASCII
Character
Mode
..........ccccccsccssscscccscvccsccccccsccccsscscscsscscssscsoscscssees
63
APPENDIX
E
(Programming
Through
Secondary
Address)
...........sessssseeeees
64
APPENDIX
F
(Control
Code
Summary)
............ssccccscesseseceseceeeesecesececeees
65
—
INTRODUCTION
Congratulations
for
selecting
this
dot-matrix
printer!
The
printer
can
be
connected
to
your
Commodore
Computer,
such
as
Commodore
64
Le
—
ro)
—
CAUTIONS
FOR
USE
eo
oe
ND
WA RF
WY
DN
,
With
the
following
features
provided:
A
variety
of
character
fonts
are
possible
including
Near
Letter
Quality
(N.L.Q.)
and
Graphic
printing.
Self
Test
printing
Automatic
printing
Double-Width
character
mode
Double-Strike
character
mode
.
Reverse
printing
.
Italic
Cursive
character
mode
.
Internal
RAM
error
detection
.
Left
and
right
margin
settings
.
Emphasized
character
mode
Do
not
use
a
power
supply
voltage
that
is
other
than
the
specified
one.
Wait
at
least
two
seconds
after
turning
power
off
before
turning
it
back
on
again.
The
initialization
process
may
not
be
performed
correctly
if
this
is
not
done.
The
printer
should
be
used
when
the
humidity
is
low,
when
there
is
little
dust,
and
where
the
printer
is
not
in
direct
sunlight.
Do
not
perform
printing
without
the
ribbon
cassette
and
paper
properly
installed.
Never
install
the
tractor
unit
when
using
friction
feed
for
cut
sheet
paper.
Do
not
touch
the
print
head
immediately
after
printing
because
it
is
hot.
When
using
continuous
forms,
refrain
from
turning
the
paper
feed
knob
counter-
clockwise
to
feed
paper
backwards
because
a
paper
jam
may
occur.

—
SETTING
UP
THE
PRINTER
Unpacking
the
Printer
Be
sure
to
locate
the
following
components
that
come
with
the
printer
in
the
box.
1.
Printer
.
Ribbon
Cassette
2
3.
Tractor
Unit
(installed
on
printer)
4.
Paper
Separator
5
.
Serial
Cable
6.
Owner’s
Manual
Printer
Tractor
unit
Owner’s
manual
Ribbon
cassette
Fig.
1

Operator
Controls
It is
important
to
become
familiar
with
the
printer
before
setting
it
up
and
using
it.
Paper
separator
Platen
Fig.
2
Paper
bail
Tractor
unit
Printer
cover
Fig.
3
DIP
switch
Serial
connectors
1.
Power
switch
This
switch
turns
the
printer
on
and
off.
2.
Power
lamp
(green)
Remains
on
while
the
power
is
on.
3.
NLQ
switch
(Near
Letter
Quality)
This
switch
selects
the
NLOQ
or
Draft
mode.
If
the
NLO
mode
is
selected,
the
lamp
is
on.
If
the
Draft
mode
is
selected,
the
lamp
is
off.
4.
NLQ
lamp
(green)
The
Imap
is
on
in
the
NLO
mode
and
is
off
in
the
Draft
mode.
While
in
the
error
state,
the
lamp
blinks.
3

Installing
the
Ribbon
Cassette
1.
Unpack
the
ribbon
cassette
and
turn
the
ribbon
feed
knob
in
the
direction
of
the
arrow
to
remove
the
slack
in
the
ribbon.
Ribbon
feed
knob
Ribbon
2.
Be
sure
the
power
is
switched
off,
and
manually
move
the
print
head
to
the
extreme
left.
Note:
It
is
easier
to
insert
the
ribbon
when
the
print
head
is at
the
home
position
(extreme
left).
3.
Insert
the
ribbon
between
the
ribbon
mask
and
the
print
head,
and
position
the
cassette
so
that
the
ribbon
feed
shaft
in
the
printer
is
inserted
into
the
hole
under
the
ribbon
feed
knob.
Ribbon
mask
Ribbon
feed
shaft
Print
head
Fig.
5
4.
Press
gently
on
the
cassette
until
it
snaps
into
place.
Twist
the
ribbon
feed
knob
to
tighten
the
ribbon.
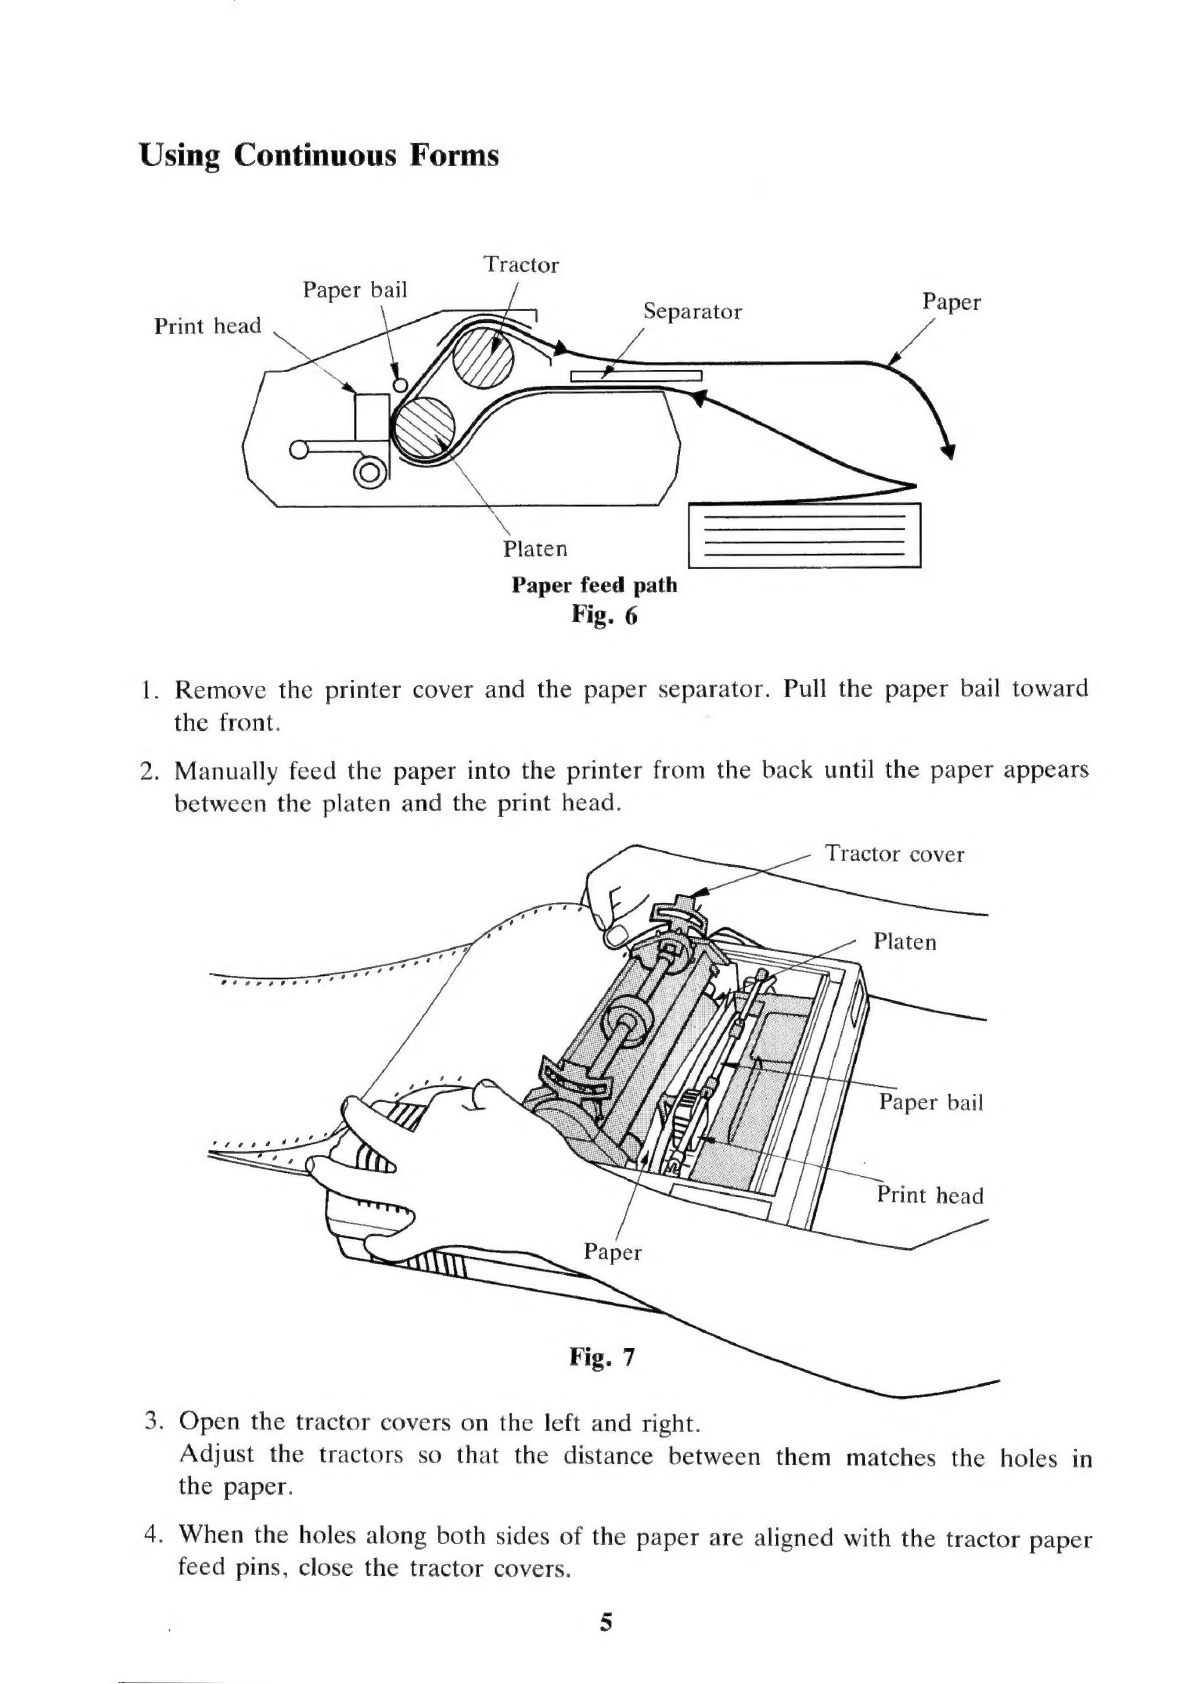
Using
Continuous
Forms
Tractor
Paper
bail
Separator
Paper
Print
head
Platen
Paper
feed
path
Fig.
6
1.
Remove
the
printer
cover
and
the
paper
separator.
Pull
the
paper
bail
toward
the
front.
2.
Manually
feed
the
paper
into
the
printer
from
the
back
until
the
paper
appears
between
the
platen
and
the
print
head.
Tractor
cover
7
7
7
7
7
7
ra
ae
rere
ee
Paper
bail
Print
head
3.
Open
the
tractor
covers
on
the
left
and
right.
Adjust
the
tractors
so
that
the
distance
between
them
matches
the
holes
in
the
paper.
4.
When
the
holes
along
both
sides
of
the
paper
are
aligned
with
the
tractor
paper
feed
pins,
close
the
tractor
covers.

5.
Push
the
paper
bail
toward
the
platen.
6.
Hold
the
paper
separator
upright
and
place
it
on
the
two
supports
located
behind
the
tractor.
Paper
bail
7.
Lay
the
paper
separator
down
flat.
8.
Replace
the
printer
cover.
Printer
cover
NLO
switch
9.
Perform
self
test
printing
to
make
sure
the
printer
is
working
properly.
To
initiate
self
test
printing,
hold
down
the
NLQ
switch
while
turning
the
power
switch
on.
The
NLQ
switch
can
be
released
after
self
test
printing
starts.
The
printer
can
now
be
connected
to
the
computer.
6

Connecting
the
Printer
to
the
Computer
Commodore
computer
Serial
cable
1.
Make
sure
that
both
the
computer
and
printer
are
turned
off.
iw)
.
Connect
one
end
of
the
6-pin
DIN
cable
to
the
connector
holes
located
in
the
back
of
the
printer
at
the
lower
right.
3.
Connect
the
other
end
of
the
cable
to
the
computer
in
the
Serial
Port
Connector
located
in
the
back
of
the
computer.
4.
Turn
on
the
power
to
the
computer
and
then
to
the
printer.
5.
Type
the
program
below
and
run
it
to
output
data
to
the
printer.
6.
The
printout
should
look
like
this:
TF
OORSOWSHT
I
RATERS
This
printout
shows
that
the
hookup
you
have
performed
is
correct.
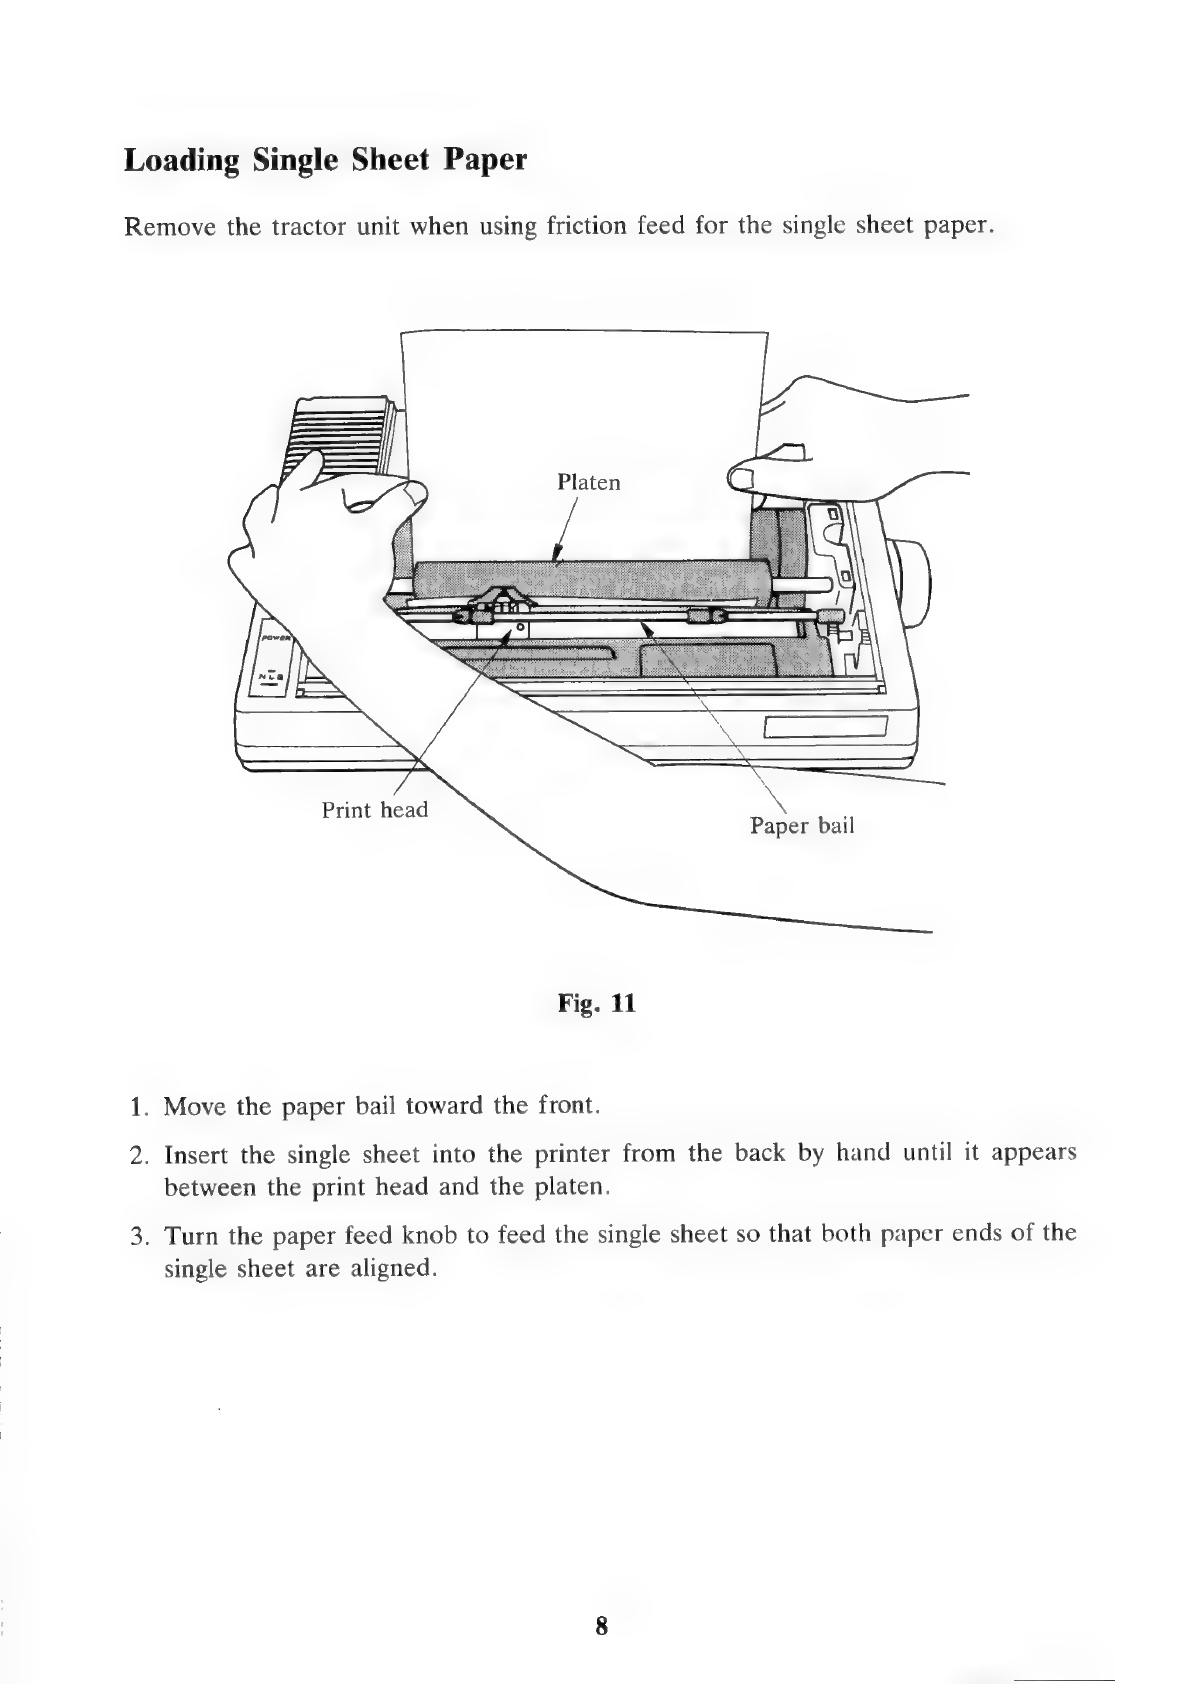
Loading
Single
Sheet
Paper
Remove
the
tractor
unit
when
using
friction
feed
for
the
single
sheet
paper.
Print
head
.
Paper
bail
Fig.
11
1.
Move
the
paper
bail
toward
the
front.
2.
Insert
the
single
sheet
into
the
printer
from
the
back
by
hand
until
it
appears
between
the
print
head
and
the
platen.
3.
Turn
the
paper
feed
knob
to
feed
the
single
sheet
so
that
both
paper
ends
of
the
single
sheet
are
aligned.

Paper
end
4.
Rectify
the
single
sheet
so
that
the
upper
and
lower
ends
would
meet
exactly
if
placed
together.
5.
Move
the
paper
bail
toward
the
platen
to
press
against
the
single
sheet.
6.
Turn
the
paper
feed
knob
counterclockwise
to
set
the
single
sheet
to
the
TOF
(top
of
form)
position.
_——
——
=
———)
—=
i
Paper
bail
7
Fig.
13
7.
Replace
the
printer
cover.
Note:
The
paper
bail
rollers
must
press
against
the
single
sheet
to
feed
accurately.
Printing
starts
at
a
position
about
4mm
away
from
the
left
edge
of
the
platen.
9

Installing
the
Tractor
Unit
Tractor
unit
Front
hole
Fig.
14
1.
Move
the
paper
bail
toward
the
front.
2.
Insert
the
front
tabs
of
the
tractor
into
the
holes
on
both
sides
of
the
platen.
3.
Push
down
on
both ends
at
the
rear
of
the
tractor
until
it
is
firmly
secured.
10
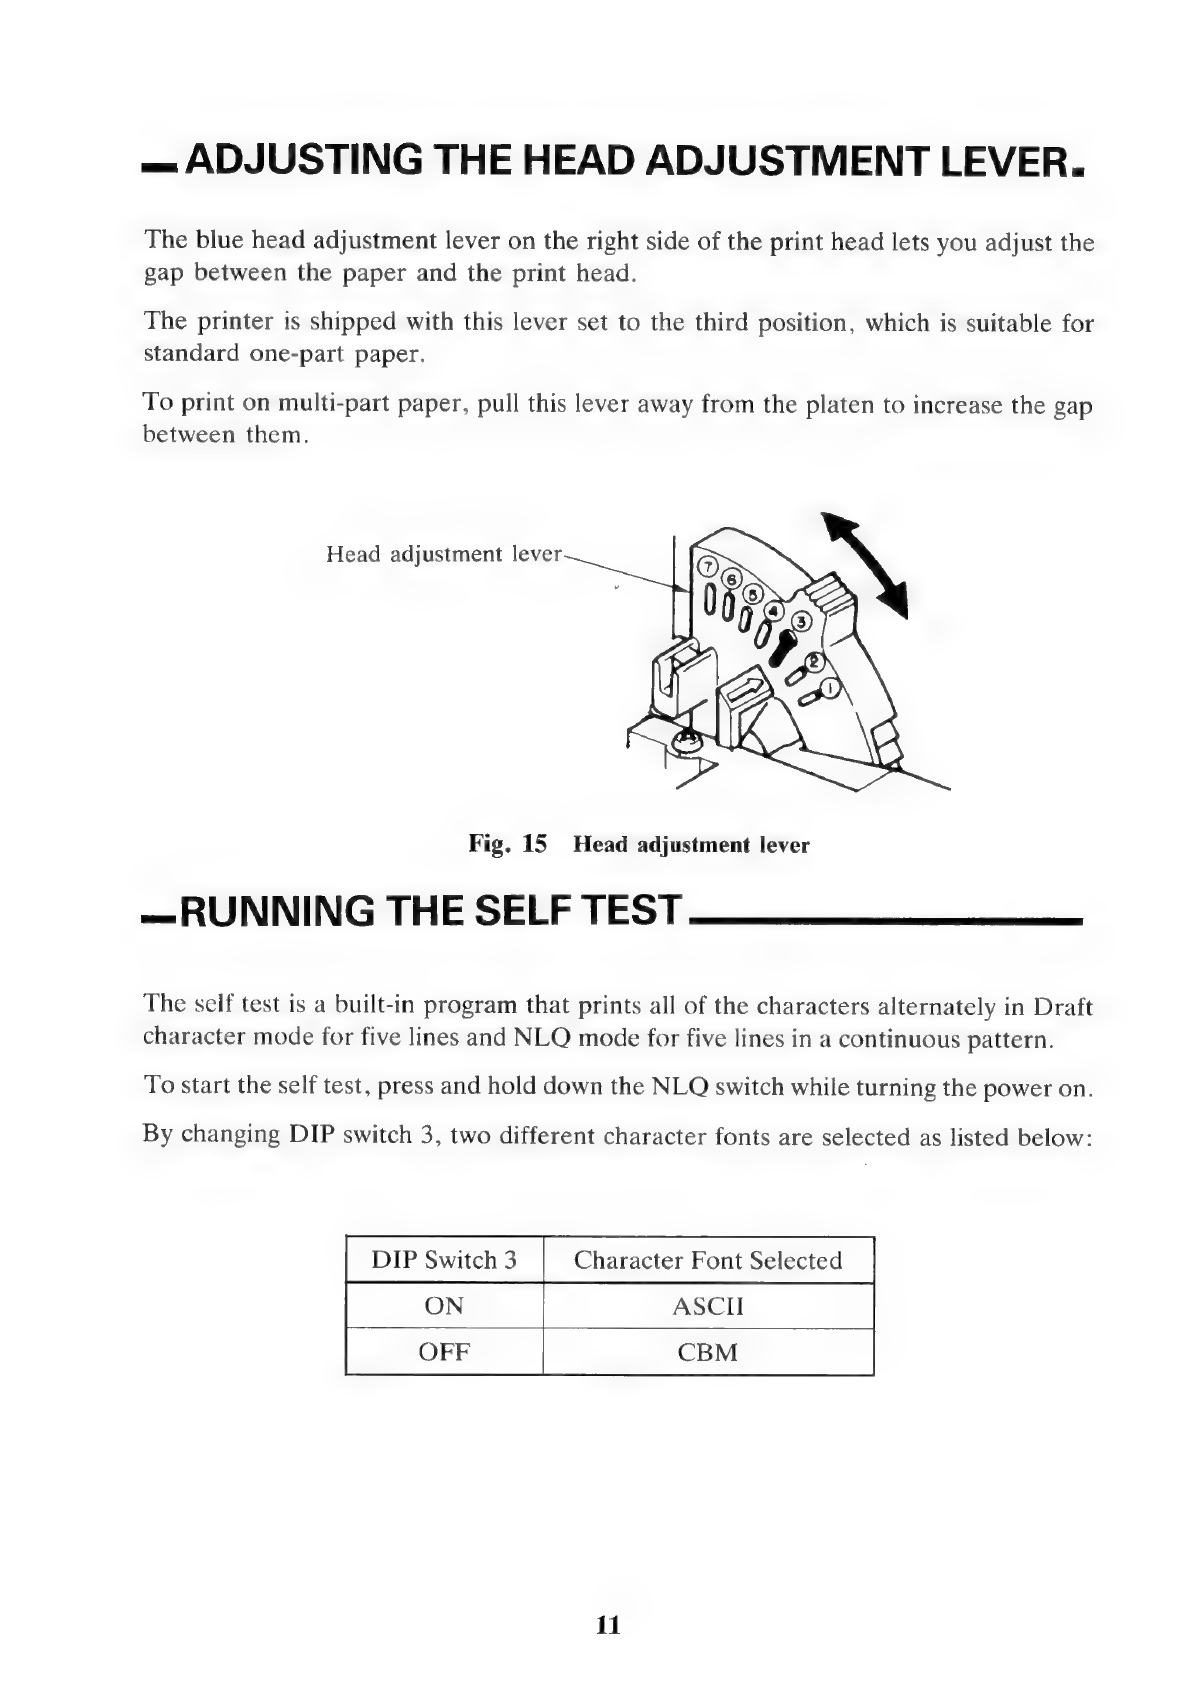
—
ADJUSTING
THE
HEAD
ADJUSTMENT
LEVER.
The
blue
head
adjustment
lever
on
the
right
side
of
the
print
head
lets
you
adjust
the
gap
between
the
paper
and
the
print
head.
The
printer
is
shipped
with
this
lever
set
to
the
third
position,
which
is
suitable
for
standard
one-part
paper.
To
print
on
multi-part
paper,
pull
this
lever
away
from
the
platen
to
increase
the
gap
between
them.
Head
adjustment
lever
Fig.
15
Head
adjustment
lever
—RUNNING
THE
SELF
TEST
The
self
test
is
a
built-in
program
that
prints
all
of
the
characters
alternately
in
Draft
character
mode
for
five
lines
and
NLQ
mode
for
five
lines
in
a
continuous
pattern.
To
start
the
self
test,
press
and
hold
down
the
NLQ
switch
while
turning
the
power
on.
By
changing
DIP
switch
3,
two
different
character
fonts
are
selected
as
listed
below:
DIP
Switch
3
Character
Font
Selected
11

=DIP
SWITCHES
The
DIP
switches
are
located
at
the
back
of
the
printer.
They
are
covered
by
a
small
plastic
insert.
For
most
uses,
these
switches
can
be
left
as
they
were
set
at
the
factory.
Each
switch
has
two
positions:
when
the
switch
is
moved
down,
it
is
OFF;
when
it
is
moved
up,
it
is
ON.
After
changing
switch
settings,
turn
the
power
off
and
back
on
again
to
reinitialize
the
new
switch
settings.
DIP
Factory
Device
Number
5
4
=
CBM
mode
ASCII
mode
Mode
Selection
ASCII
mode
|
CBM
mode
Page
Length
12
inches
11
inches
CR
Code
Selection
CR
only
Print
Character
Mode
i
Condensed
In
ASCII
mode,
the
page
length
automatically
set
at
power-on
is
11
inches.
_
INTERFACE
Signal
SERIAL
SRQ
GND
SERIAL
ATN
SERIAL
CLK
SERIAL
DATA
1.
Connector
2.
Interface
The
device
number
(4
or
5)
can
be
selected
by
DIP
switch
1
located
at
the
back
of
the
printer.
When
shipped
from
the
factory,
the
device
number
is
4.
—
ERROR
WARNINGS
If
the
printer
stops
printing
and
the
NLQ
lamp
blinks,
it
indicates
that
the
printer
has
detected
an
error
condition.
In
this
case,
turn
the
printer
off
and
back
on
again.
If
the
NLQ
lamp
blinks
again
and
still
won’t
print,
take
it
to
the
store
where
you
made
the
purchase
for
repair.
12
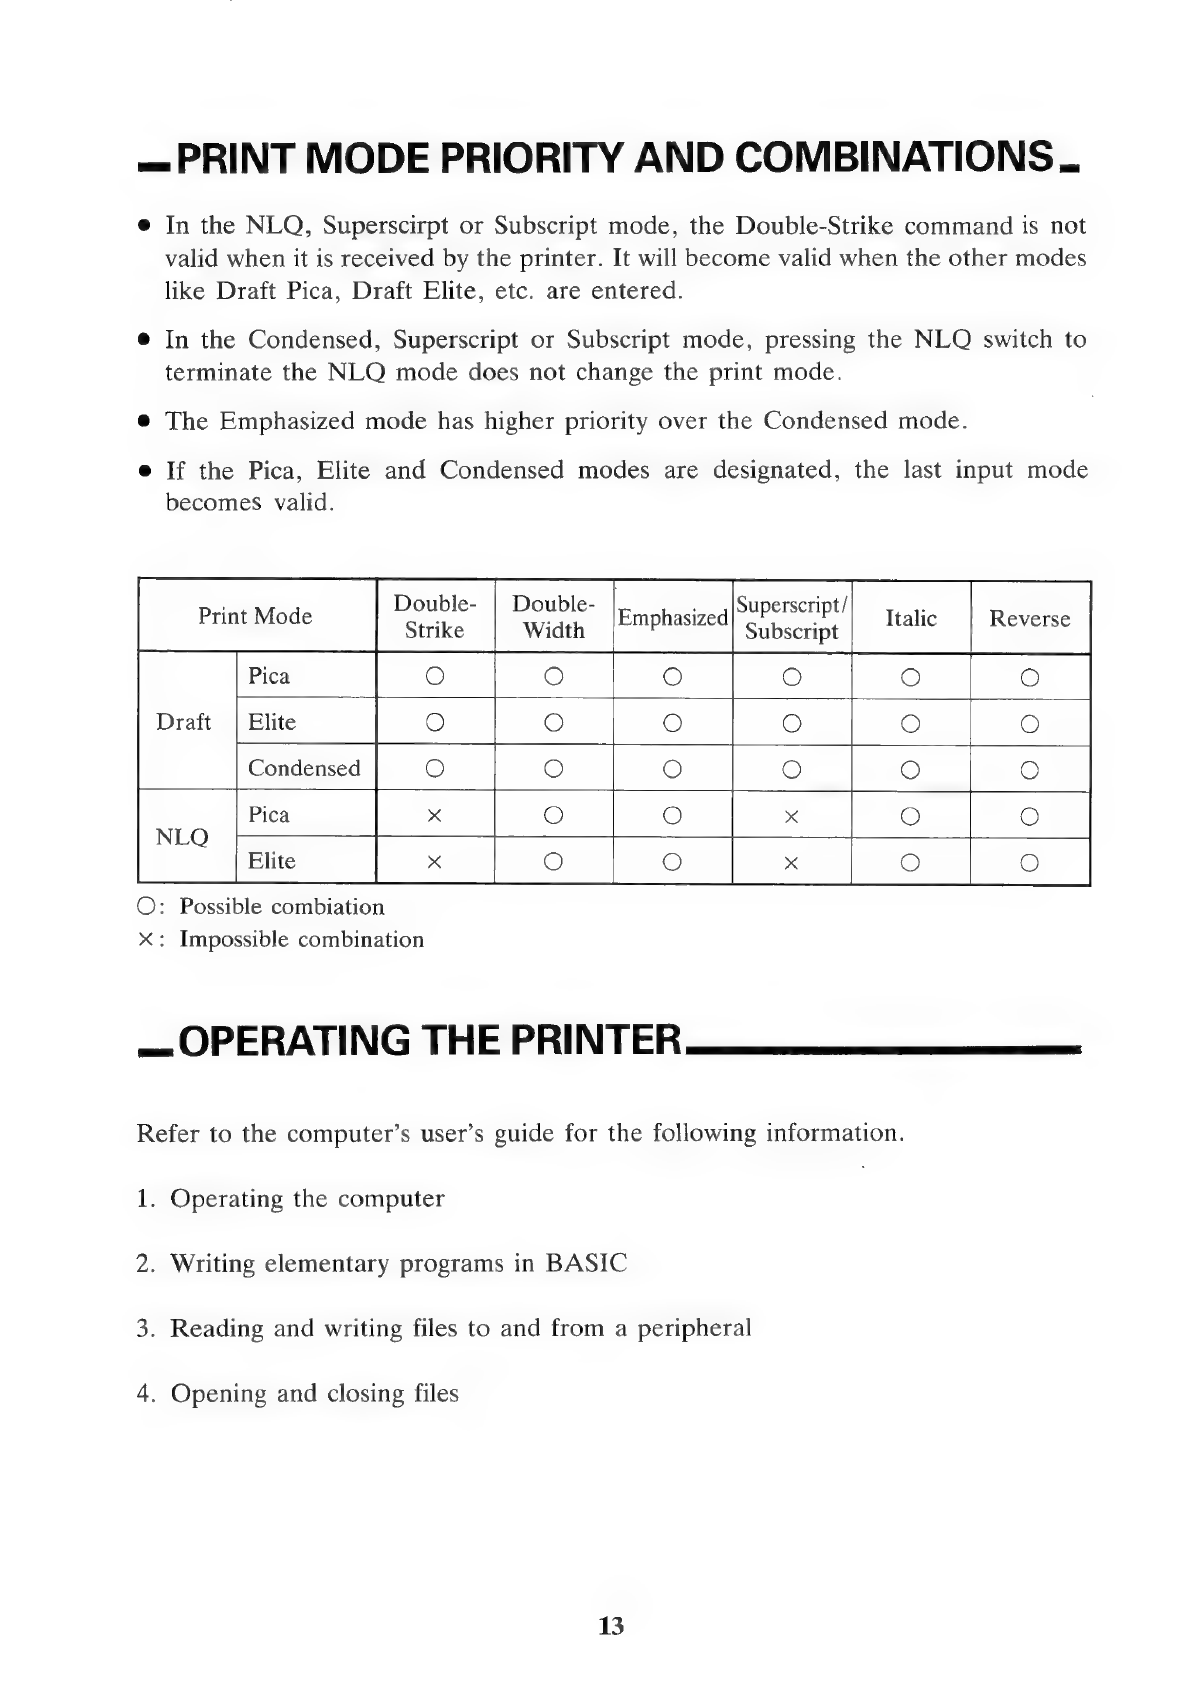
=
PRINT
MODE
PRIORITY
AND
COMBINATIONS.
@
In
the
NLQ,
Superscirpt
or
Subscript
mode,
the
Double-Strike
command
is
not
valid
when
it
is
received
by
the
printer.
It
will
become
valid
when
the
other
modes
like
Draft
Pica,
Draft
Elite,
etc.
are
entered.
@
In
the
Condensed,
Superscript
or
Subscript
mode,
pressing
the
NLQ
switch
to
terminate
the
NLO
mode
does
not
change
the
print
mode.
@
The
Emphasized
mode
has
higher
priority
over
the
Condensed
mode.
e
If
the
Pica,
Elite
and
Condensed
modes
are
designated,
the
last
input
mode
becomes
valid.
Double-
s4|Superscript/
Strike
Emphasized
Subscript
Reverse
Condensed
Pica
O:
Possible
combiation
x:
Impossible
combination
—
OPERATING
THE
PRINTER
Refer
to
the
computer’s
user’s
guide
for
the
following
information.
1.
Operating
the
computer
2.
Writing
elementary
programs
in
BASIC
3.
Reading
and
writing
files
to
and
from
a
peripheral
4.
Opening
and
closing
files
13
=
PRINTER-ASSOCIATED
COMMANDS
Don’t
forget
to
push
the
RETURN
key
after
you
type
in
each
command.
OPEN,
CMD,
PRINT#,
and
CLOSE
commands
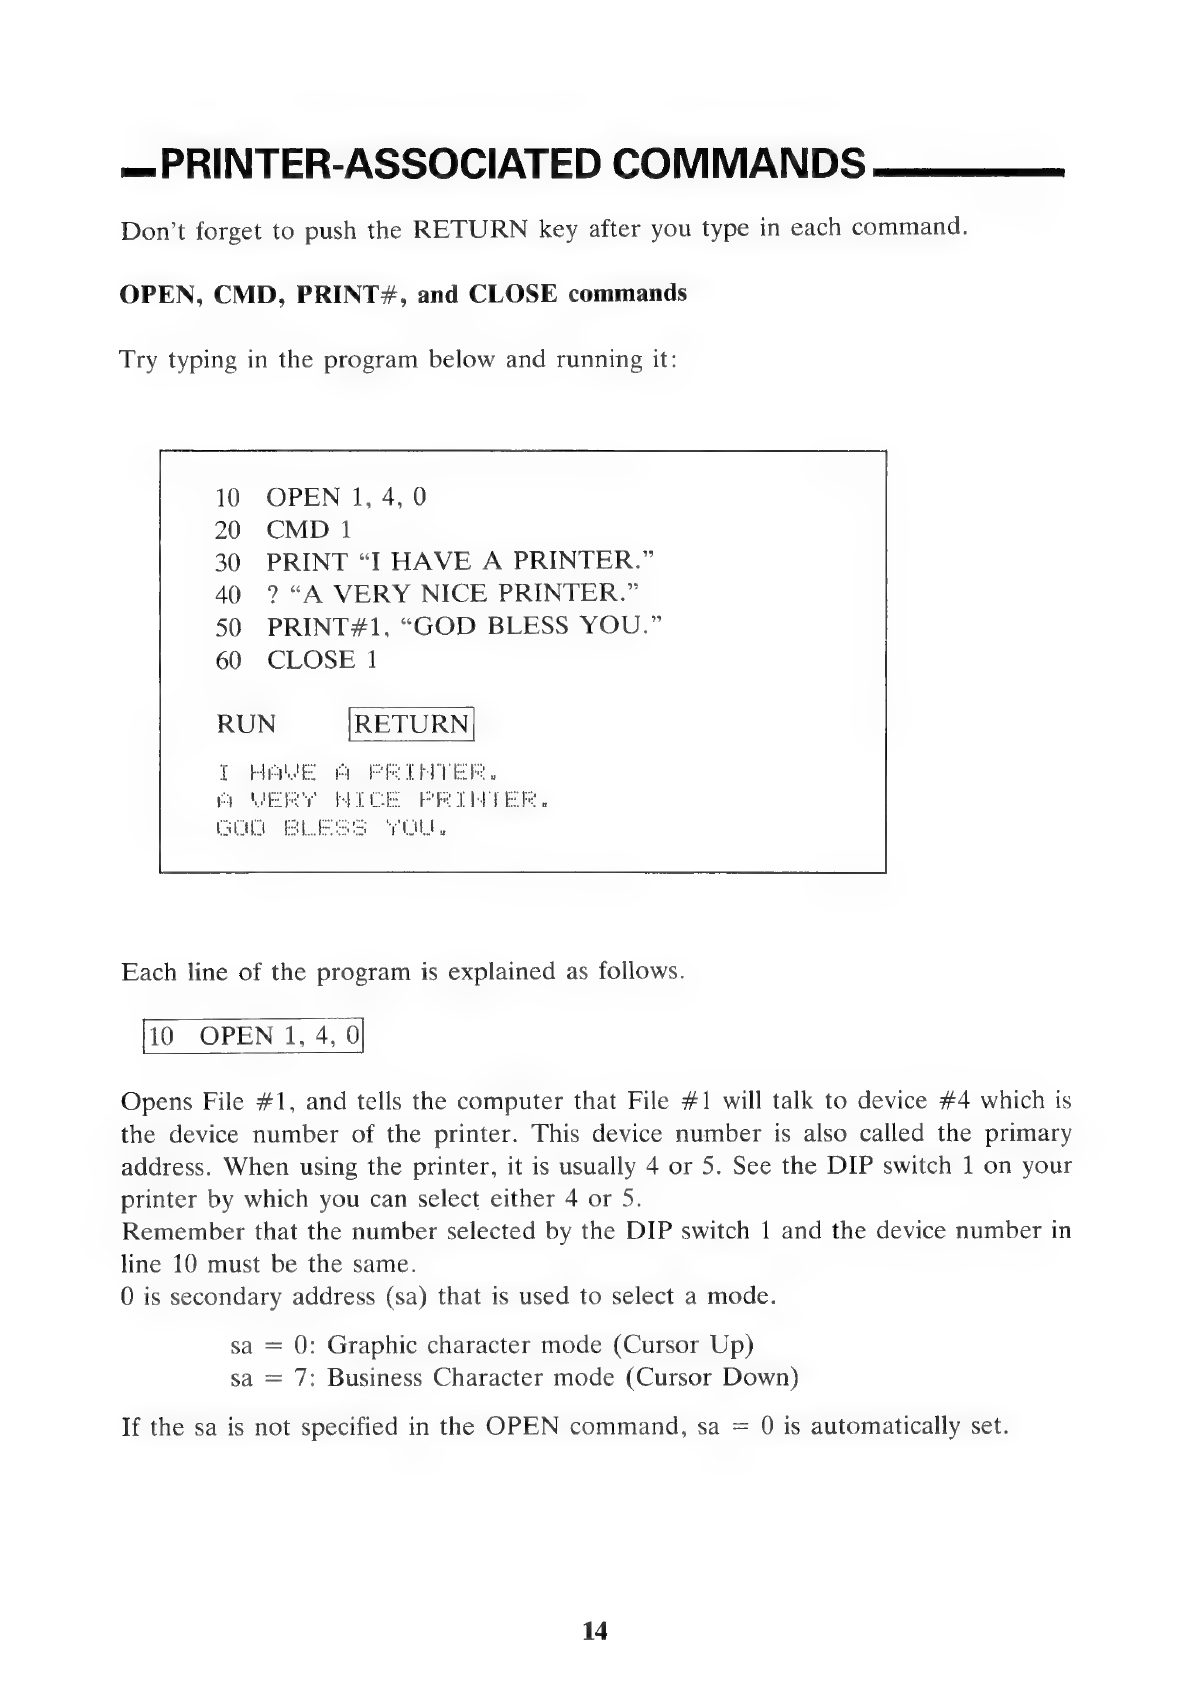
Try
typing
in
the
program
below
and
running
it:
OPEN
1,
4,
0
CMD
1
PRINT
“I
HAVE
A
PRINTER.”
?
“A
VERY
NICE
PRINTER.”
PRINT#1,
“GOD
BLESS
YOU.”
CLOSE
1
Each
line
of
the
program
is
explained
as
follows.
10
OPEN
1,
4,
0
Opens
File
#1,
and
tells
the
computer
that
File
#1
will
talk
to
device
#4
which
is
the
device
number
of
the
printer.
This
device
number
is
also
called
the
primary
address.
When
using
the
printer,
it
is
usually
4
or
5.
See
the
DIP
switch
1
on
your
printer
by
which
you
can
select
either
4
or
5.
Remember
that
the
number
selected
by
the
DIP
switch
1
and
the
device
number
in
line
10
must
be
the
same.
0
is
secondary
address
(sa)
that
is
used
to
select
a
mode.
sa
=
0:
Graphic
character
mode
(Cursor
Up)
sa
=
7:
Business
Character
mode
(Cursor
Down)
If
the
sa
is
not
specified
in
the
OPEN
command,
sa
=
0
is
automatically
set.
14

20
CMD
1
Commands
the
computer
to
send
all
PRINT
statements
to
File
#1.
Line
10
has
already
specified
with
the
device
number
4
that
this
goes
to
the
printer.
Once
the
CMD
command
is
given,
the
printer
prints
out
“READY”
and
the
line
to
the
printer
is
left
open
to
receive
more
commands.
The
printer
given
this
command
is
said
to
be
in
the
state
of
listening.
Any
LIST
or
PRINT
command
goes
directly
to
the
printer
when
it
is
listening.
30
PRINT
“I
HAVE
A
PRINTER.”
is
now
sent
to
the
printer,
instead
of
the
screen.
40
?
You
can
use
the
abbreviation(?)
for
print
statements,
just
like
to
the
screen.
50
PRINT#1,
This
is
another
way
of
sending
information
to
File
#1
for
the
printer.
It
also
cancels
the
CMD1
status
to
close
the
line
to
the
printer,
so
that
now
ordinary
PRINT
state-
ments
will
go
to
the
screen.
This
status
for
the
printer
is
called
“unlistening”.
You
must
always
cancel
the
CMD
status
with
a
PRINT#
before
you
close
a
file,
as
we
do
here
and
line
60.
Note:
You
cannot
shorten
PRINT#1
to
?
#1.
It
must
always
be
typed
as
PRINT#
in
full.
15

60
CLOSE
1
Closes
the
file
you
defined
in
line
10,
so
that
you
now
cannot
use
CMD
or
PRINT
#
until
you
have
OPENed
a
new
file.
If
you
have
used
CMD,
then
always
remember
to
cancel
the
CMD
status
with
a
PRINT#
statement
before
trying
to
CLOSE
a
file.
10
files
are
the
maximum
allowed
to
be
left
OPENed
at
a
time
so
that
make
it
a
habit
to
close
files
after
finishing
with
them.
Pressing
the
SHIFT
and
COMMODORE
keys
together
on
your
computer
will
change
the
screen
display
back
and
forth
between
Cursor
Up
and
Cursor
Down.
You
can
do
the
same
on
the
printout
by
selecting
a
secondary
address.
Change
line
10
to
read:
10
OPEN
1,
4,
7
RUN
tobias:
2
purdrcesg.,
owe
robime
perdrrieco.
De
I
16
Table of contents
Other Seikosha Printer manuals


