Seikosha LT-20 User manual
LAPTOP
PRINTER
____
________
SEICOSHA

WARNING:
This
equipment
has
been
tested
and
found
to
comply
with
the
limits
for
a
Class
B
digital
de ice,
pursuant
to
Part
15
of
the
FCC
Rules.
These
limits
are
designed
to
pro ide
reasonable
protection
against
harmful
interference
in
a
residential
installation.
This
equipment
generates,
uses,
and
can
radiate
radio
frequency
energy
and,
if
not
installed
and
used
in
accordance
with
the
instructions,
may
cause
harmful
interference
to
radio
communica
tions.
Howe er,
there
is
no
guarantee
that
interference
will
not
occur
in
a
particular
installation.
If
this
equipment
does
cause
harmful
interference
to
radio
or
tele ision
reception,
which
can
be
determined
by
turning
the
equipment
off
an
on,
the
user
is
encouraged
to
try
to
correct
the
inter
ference
by
one
or
more
of
the
following
measures:
—
Reorient
or
relocate
the
recei ing
antenna.
—
Increase
the
separation
between
the
equipment
and
recei er.
—
Connect
the
equipment
into
an
outlet
on
a
circuit
different
from
that
to
which
the
recei er
is
connected.
—
Consult
the
dealer
or
an
experienced
radio/TV
technician
for
help.
“
It
is
necessary
to
use
shielded
interconnect
cables
to
insure
compliance
with
FCC
Class
B
limits
for
radio
frequency
emissions.
”
Caution:
Changes
or
modifications
not
expressly
appro ed
by
the
party
responsible
for
compliance
could
oid
the
user
’
s
authority
to
operate
the
equipment.
This
manual
and
the
program
samples
described
in
it
are
copyrighted
by
Seikosha
Co.,
Ltd.,
with
all
rights
reser ed.
No
part
of
this
publication
may
be
reproduced,
stored
in
a
retrie al
system,
or
transmitted,
in
any
form
or
by
any
means,
mechanical,
photocopying,
recording
or
otherwise,
without
the
prior
written
permission
of
Seikosha
Co.,
Ltd.
•
IBM
is
a
registered
trademark
of
International
Business
Machines
Cor
poration.
Copyright®
1991
by
Seikosha
Co.,
Ltd.
Tokyo,
Japan

IMPORTANT
SAFETY
INSTRUCTIONS
1.
Read
all
of
these
instructions.
2.
Sa e
these
instructions
for
later
use.
3.
Follow
all
warnings
and
instructions
marked
on
the
product.
4.
Unplug
this
product
from
the
wall
outlet
before
cleaning.
Do
not
use
liquid
cleaners
or
aerosol
cleaners.
Use
a
damp
cloth
for
cleaning.
5.
Do
not
use
this
product
near
water.
6.
Do
not
place
this
product
on
an
unstable
cart,
stand,
or
table.
The
product
may
fall,
causing
serious
damage
to
the
product.
7.
Slots
and
openings
in
the
cabinet
and
the
back
or
bottom
are
pro ided
for
en
tilation;
to
ensure
reliable
operation
of
the
product
and
to
protect
it
from
o er
heating,
these
openings
must
not
be
blocked
or
co ered.
The
openings
should
ne er
be
blocked
by
placing
the
product
on
a
bed,
sofa,
rug,
or
other
similar
surface.
This
product
should
ne er
be
placed
near
or
o er
a
radiator
or
heat
register.
This
product
should
not
be
placed
in
a
built-in,
installation
unless
proper
entilation
is
pro ided.
8.
This
product
should
be
operated
from
the
type
of
power
source
indicated
on
the
marking
label.
If
you
are
not
sure
of
the
type
of
power
a ailable,
consult
your
dealer
or
local
power
company.
9.
Do
not
allow
anything
to
rest
on
the
power
cord.
Do
not
locate
this
product
where
persons
will
walk
on
the
cord.
10.
If
an
extension
cord
is
used
with
this
product,
make
sure
that
the
total
of
the
ampere
ratings
on
the
products
plugged
into
the
extension
cord
do
not
exceed
the
extension
cord
ampere
rating.
Also,
make
sure
that
the
total
of
all
products
plugged
into
the
wall
outlet
does
not
exceed
15
amperes.

11.
Ne er
push
objects
of
any
kind
into
this
product
through
cabinet
slots
as
they
may
touch
dangerous
oltage
points
or
short
out
parts
that
could
result
in
a
risk
of
fire
or
electric
shock.
Ne er
spill
liquid
of
any
kind
on
the
product.
12.
Except
as
explained
elsewhere
in
this
manual,
do
not
attempt
to
ser ice
this
product
yourself.
Opening
or
remo ing
those
co ers
that
are
marked
"Do
not
Remo e"
may
expose
you
to
dangerous
oltage
points
or
other
risks.
Refer
all
ser icing
in
those
compartments
to
ser ice
personnel.
13.
Unplug
this
product
from
the
wall
outlet
and
refer
ser icing
to
qualified
ser
ice
personnel
under
the
following
conditions:
A.
When
the
power
cord
or
plug
is
damaged
or
frayed.
B.
If
liquid
has
been
spilled
into
the
product
C.
If
the
product
has
been
exposed
to
rain
or
water.
D.
If
the
product
does
not
operate
normally
when
the
operating
instructions
are
followed.
Adjust
only
those
controls
that
are
co ered
by
the
operating
in
structions
since
improper
adjustment
of
other
controls
may
result
in
dam
age
and
will
often
require
extensi e
work
by
a
qualified
technician
to
re
store
the
product
to
normal
operation.
E.
If
the
product
has
been
dropped
or
the
cabinet
has
been
damaged.
F.
If
the
product
exhibits
a
distinct
change
in
performance,
indicating
a
need
for
ser ice.
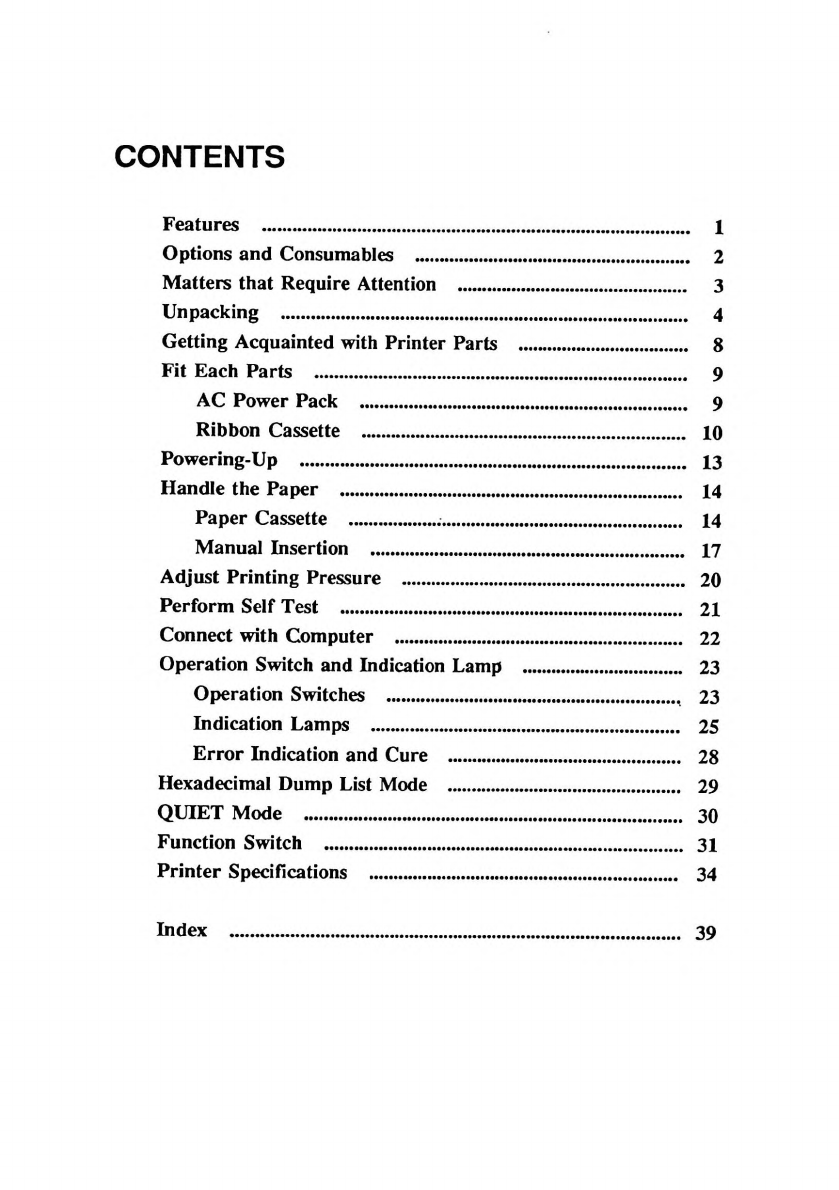
CONTENTS
Features
...........................................................................................
1
Options
and
Consumables
..........................................................
2
Matters
that
Require
Attention
................................................
3
Unpacking
......................................................................................
4
etting
Acquainted
with
Printer
Parts
...................................
8
Fit
Each
Parts
...............................................................................
9
AC
Power
Pack
.....................................................................
9
Ribbon
Cassette
....................................................................
10
Powering-Up
..................................................................................
13
Handle
the
Paper
........................................................................
14
Paper
Cassette
..............................................
14
Manual
Insertion
....................................................................
17
Adjust
Printing
Pressure
.............................................................
20
Perform
Self
Test
..........................................................................
21
Connect
with
Computer
..............................................................
22
Operation
Switch
and
Indication
Lamp
...................................
23
Operation
Switches
.............................................................
,
23
Indication
Lamps
...................................................................
25
Error
Indication
and
Cure
...................................................
28
Hexadecimal
Dump
List
Mode
...................................................
29
QUIET
Mode
..................................................................................
30
Function
Switch
.............................................................................
31
Printer
Specifications
...................................................................
34
Index
39


Features
Features
•
This
high-quality,
high-density
24-pin
printer
has
a
built
in
cut-sheet
feeder
for
use
with
cut
sheets
only.
•
You
can
use
the
printer
by
putting
your
note
book
computer
on
top
of
it.
•
The
following
printing
modes
are
a ailable:
Letter
quality
Draft
S.S.D
(Super-Speed
Draft
—
15
cpi)
•
You
can
feed
paper
by
manual
insertion
instead
of
using
paper
cassette
paper
feeding
mode.
•
Paper
size
automatic
detection
function
This
printer
decides
printing
width
by
detecting
paper
width
automatically.
•
It
has
standard
Courier
10
as
letter
quality
characters.
•
You
can
set
each
printer
function
easily
by
optical
type
function
switch.
•
You
can
use
it
with
3-way
power
source:
domestic
power,
rechargeable
battery
pack
(option),
or
car
battery
pack
(option).
1
Options
and
Consumables
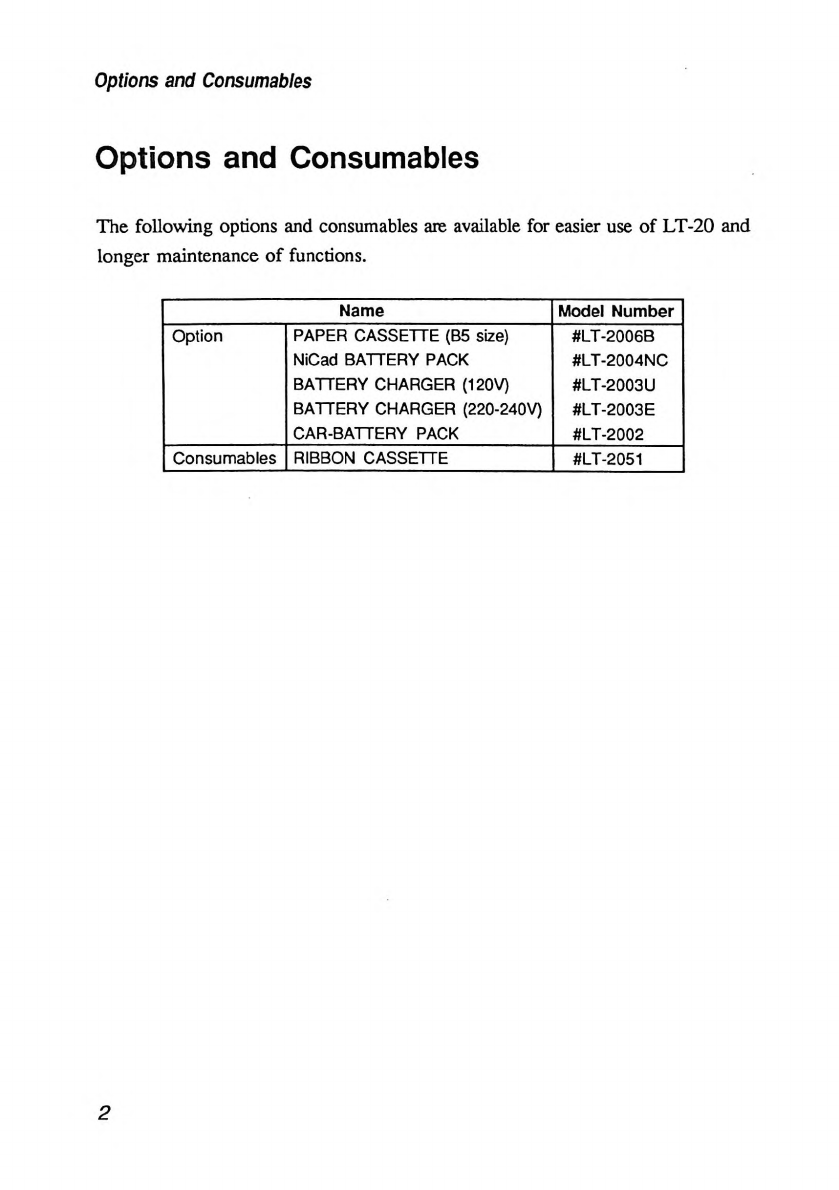
Options
and
Consumables
The
following
options
and
consumables
are
a ailable
for
easier
use
of
LT-20
and
longer
maintenance
of
functions.
Name
Model
Number
Option
PAPER
CASSETTE
(B5
size)
NiCad
BATTERY
PACK
BATTERY
CHARGER
(120V)
BATTERY
CHARGER
{220-240V)
CAR-BATTERY
PACK
#LT-2006B
#LT-2004NC
#LT-2003U
#LT-2003E
#LT-2002
Consumables
RIBBON
CASSETTE
#LT-2051
2
Matters
that
Require
Attention
Matters
t at
Require
Attention
[When
positioning]
□
Position
the
printer
e enly
on
a
flat
surface.
□
Do
not
use
the
printer
in
the
place
recei ing
direct
sunlight
or
near
heaters.
□
Do
not
use
the
printer
in
humid
or
dusty
places.
□
Use
only
standardized
power
sources.
□
You
must
switch
off
the
power
before
fitting/remo ing
the
interface
cable
or
the
ribbon
cassette.
□
To
pre ent
print
head
from
a
damage
during
transportation,
it
is
fixed
with
wire
band.
Remo e
this
wire
band
before
using
printer.
[When
using]
□
Ne er
print
without
a
ribbon
cassette
and
printer
co er.
This
damages
the
print
head
or
platen.
□
Do
not
cut
off
the
power
source
of
printer
while
printing
except
in
emergencies.
□
Print
head
gets
hot
immediately
after
printing.
Do
not
touch
it
directly.
□
Wipe
dirty
case
co er
with
a
slightly
wet
soft
cloth.
Wipe
hea y
dirt
with
a
soft
cloth
dampened
with
neutral
detergent
diluted
with
water.
Ne er
wipe
with
a
hard
cloth
or
olatile
sol ent
such
as
alcohol,
benzine
or
thinner.
These
cause
discoloration,
transformation
or
damage
on
the
surface.
□
When
you
use
your
note
book
computer
on
top
of
this
printer,
pay
attention
to
the
following:
•
Do
not
put
any
equipments
hea ier
than
3-kg
on
this
printer.
•
Do
not
put
any
equipments
on
the
printer
co er.
•
Do
not
put
the
equipments
which
generate
oscillation,
high-temperature,
or
radio
wa e
on
this
printer.
3

Unpacking
Unpacking
The
following
are
in
the
printer
carton.
Check
that
no
shortage
or
damage
exists.
Packed
goods
Printer
(includes
AC
power
pack
and
paper
casssette)
Ribbon
cassette
Owner's
manual
Reference
manual
Note
:
Keep
packaging
cartons
or
materials
for
retransportation.
4
Unpacking
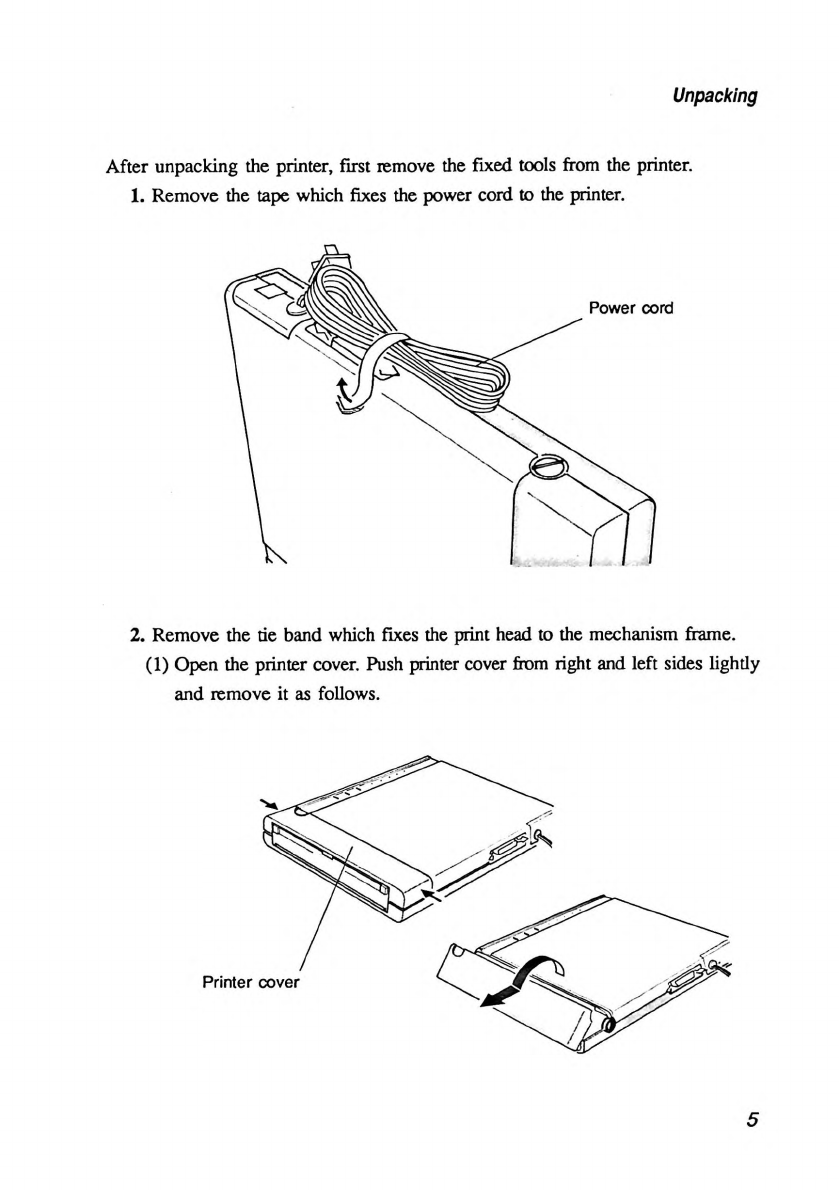
After
unpacking
the
printer,
first
remo e
the
fixed
tools
from
the
printer.
1.
Remo e
the
tape
which
fixes
the
power
cord
to
the
printer.
2.
Remo e
the
tie
band
which
fixes
the
print
head
to
the
mechanism
frame.
(1)
Open
the
printer
co er.
Push
printer
co er
from
right
and
left
sides
lightly
and
remo e
it
as
follows.
5

Unpacking
(2)
Remo e
the
tie
band
from
the
printer.
3.
Remo e
the
paperboard
inside
the
paper
cassette.
(1)
Slide
the
paper
cassette
opener,
a
part
of
paper
cassette
will
expose.
Then
pull
it
out.

Unpacking
(2)
Lift
up
the
cassette
co er
and
remo e
the
paperboard.
Paper
cassette
co er
Paper
cassette
7

Getting
Acquainted
with
Printer
Parts
Getting
Acquainted
wit
Printer
Parts
The
illustrations
that
follow
show
main
printer
parts.
8
Fit
Each
Part
Fit
eac
part
AC
Power
Pack
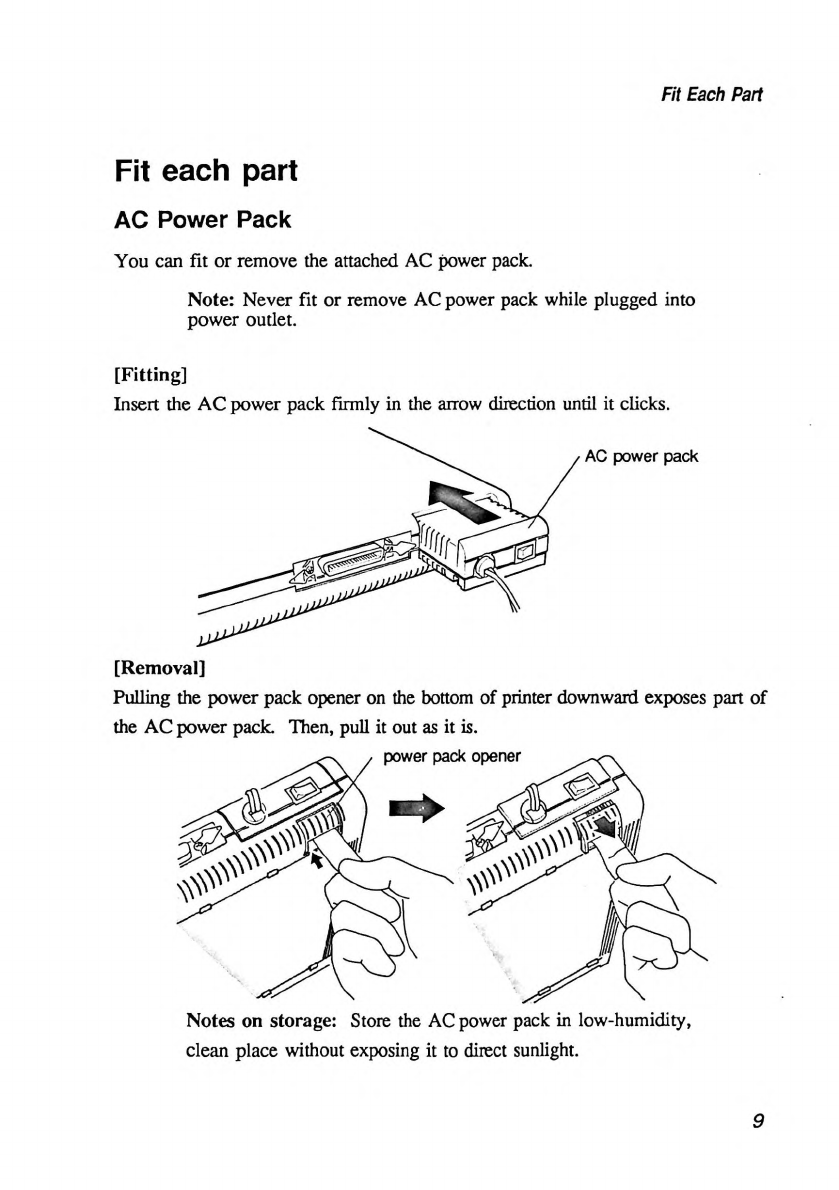
You
can
fit
or
remo e
the
attached
AC
power
pack.
Note:
Ne er
fit
or
remo e
AC
power
pack
while
plugged
into
power
outlet.
[Fitting]
Insert
the
AC
power
pack
firmly
in
the
arrow
direction
until
it
clicks.
[Removal]
Pulling
the
power
pack
opener
on
the
bottom
of
printer
downward
exposes
part
of
the
AC
power
pack.
Then,
pull
it
out
as
it
is.
Notes
on
storage:
Store
the
AC
power
pack
in
low-humidity,
clean
place
without
exposing
it
to
direct
sunlight.
9
Fit
Each
Part
Ribbon
Cassette
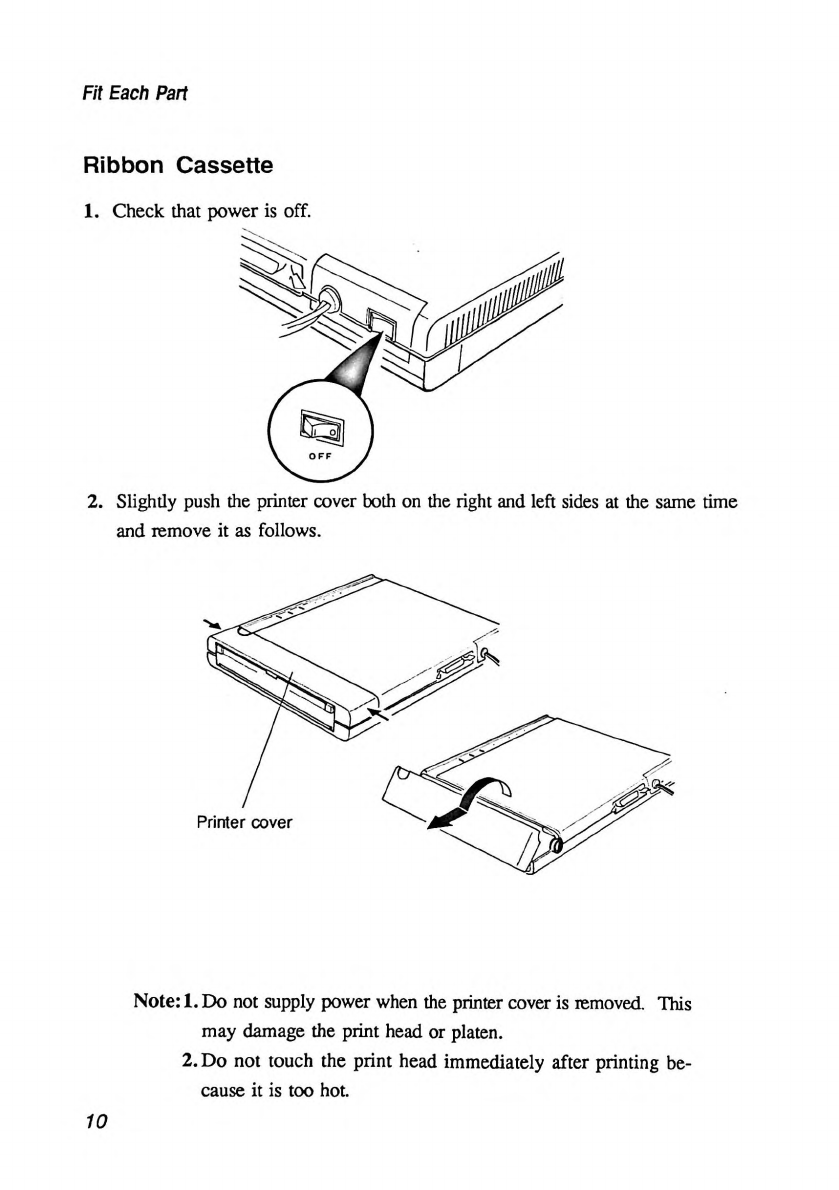
1.
Check
that
power
is
off.
2.
Slightly
push
the
printer
co er
both
on
the
right
and
left
sides
at
the
same
time
and
remo e
it
as
follows.
Note:
1.
Do
not
supply
power
when
the
printer
co er
is
remo ed.
This
may
damage
the
print
head
or
platen.
2.
Do
not
touch
the
print
head
immediately
after
printing
be
cause
it
is
too
hot.
10
Fit
Each
Part
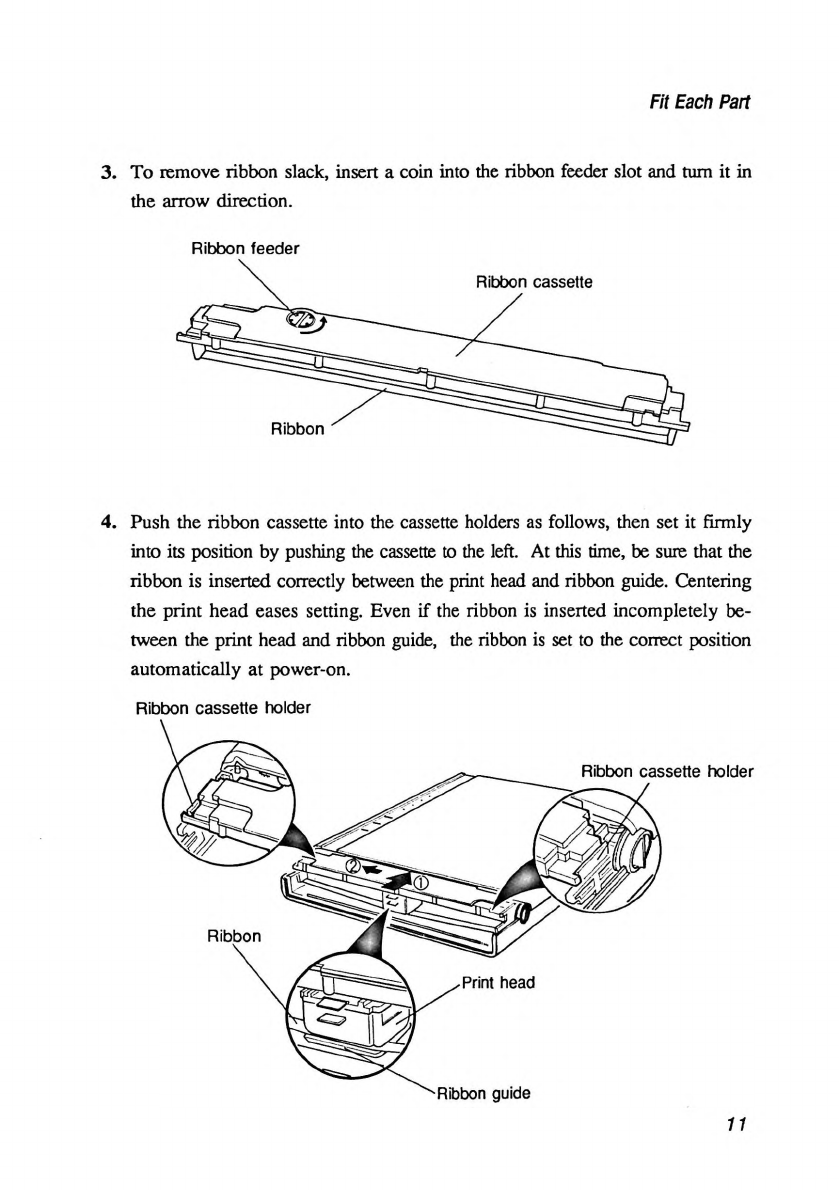
3.
To
remo e
ribbon
slack,
insert
a
coin
into
the
ribbon
feeder
slot
and
turn
it
in
the
arrow
direction.
4.
Push
the
ribbon
cassette
into
the
cassette
holders
as
follows,
then
set
it
firmly
into
its
position
by
pushing
the
cassette
to
the
left.
At
this
time,
be
sure
that
the
ribbon
is
inserted
correctly
between
the
print
head
and
ribbon
guide.
Centering
the
print
head
eases
setting.
E en
if
the
ribbon
is
inserted
incompletely
be
tween
the
print
head
and
ribbon
guide,
the
ribbon
is
set
to
the
correct
position
automatically
at
power-on.
Ribbon
cassette
holder
11
Fit
Each
Part
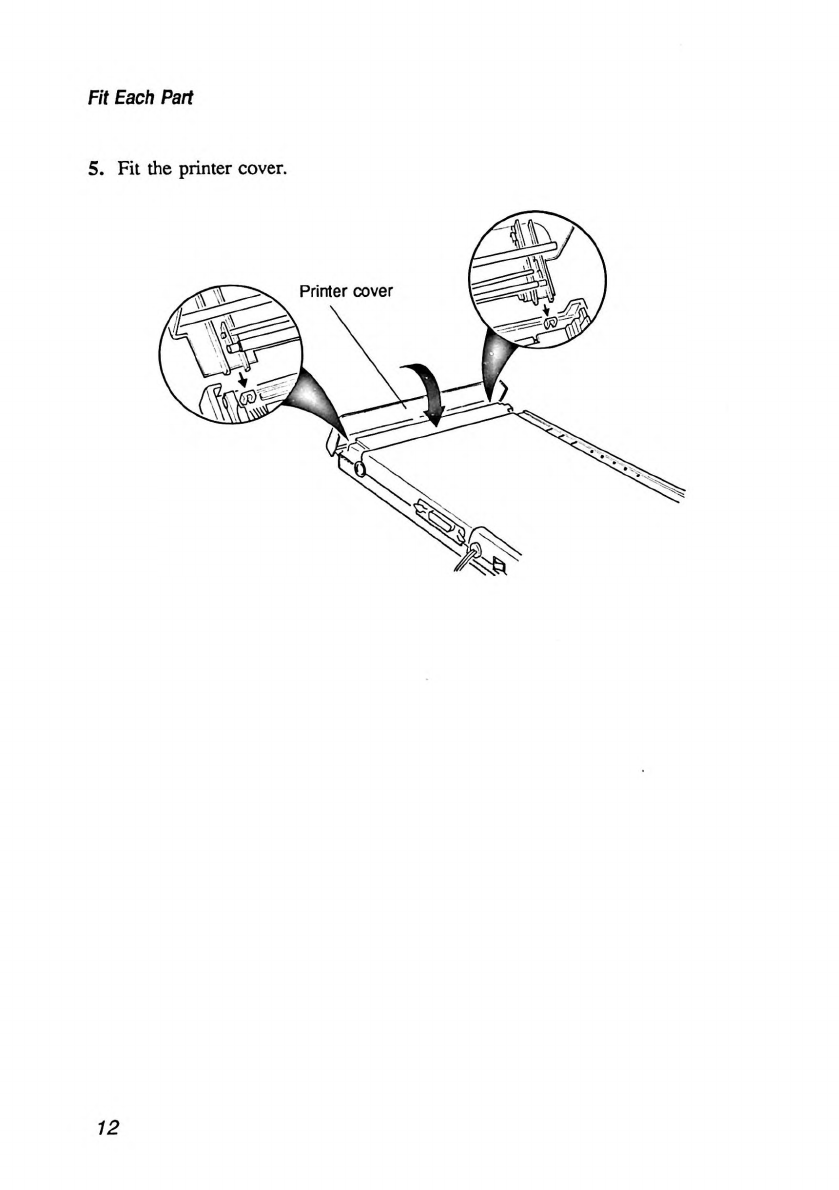
5.
Fit
the
printer
co er.
12
Powering-Up
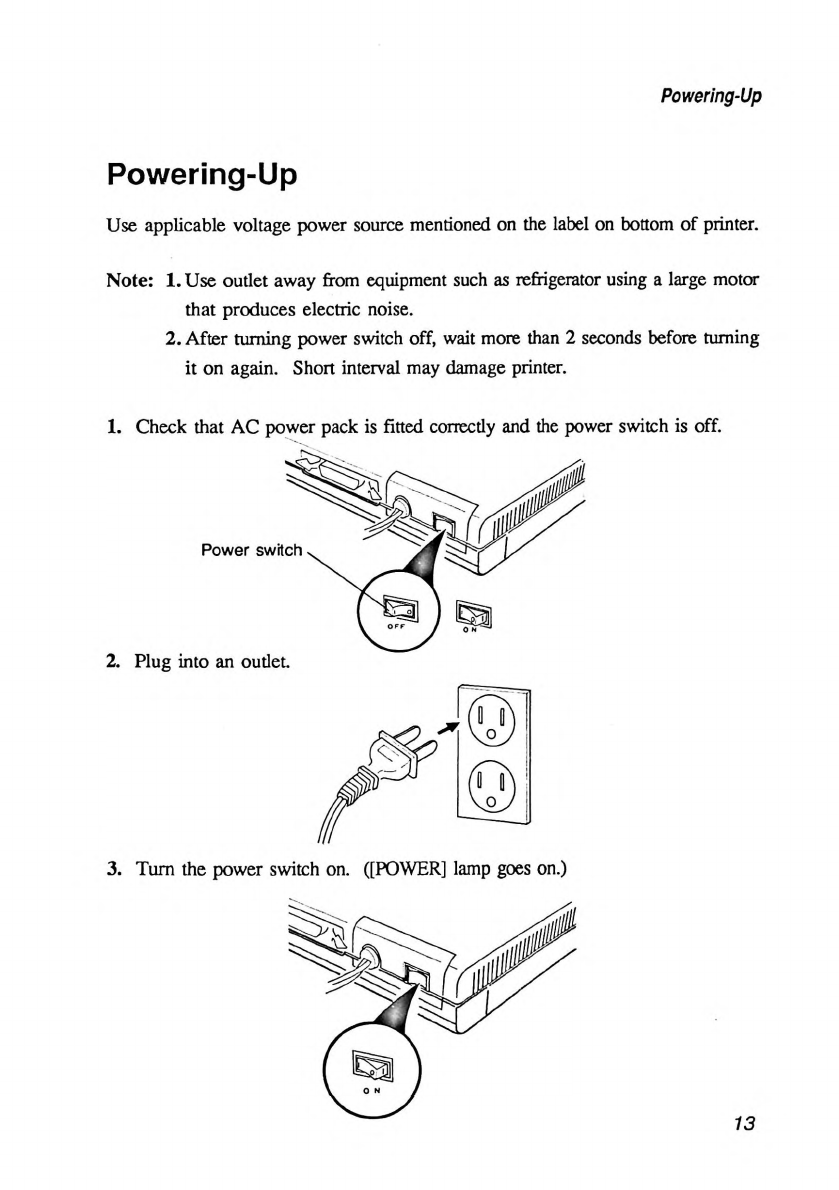
Powering-Up
Use
applicable
oltage
power
source
mentioned
on
the
label
on
bottom
of
printer.
Note:
1.
Use
outlet
away
from
equipment
such
as
refrigerator
using
a
large
motor
that
produces
electric
noise.
2.
After
turning
power
switch
off,
wait
more
than
2
seconds
before
turning
it
on
again.
Short
inter al
may
damage
printer.
1.
Check
that
AC
power
pack
is
fitted
correctly
and
the
power
switch
is
off.
3.
Turn
the
power
switch
on.
([POWER]
lamp
goes
on.)
13
Handle
the
Paper
Handle
t e
Paper
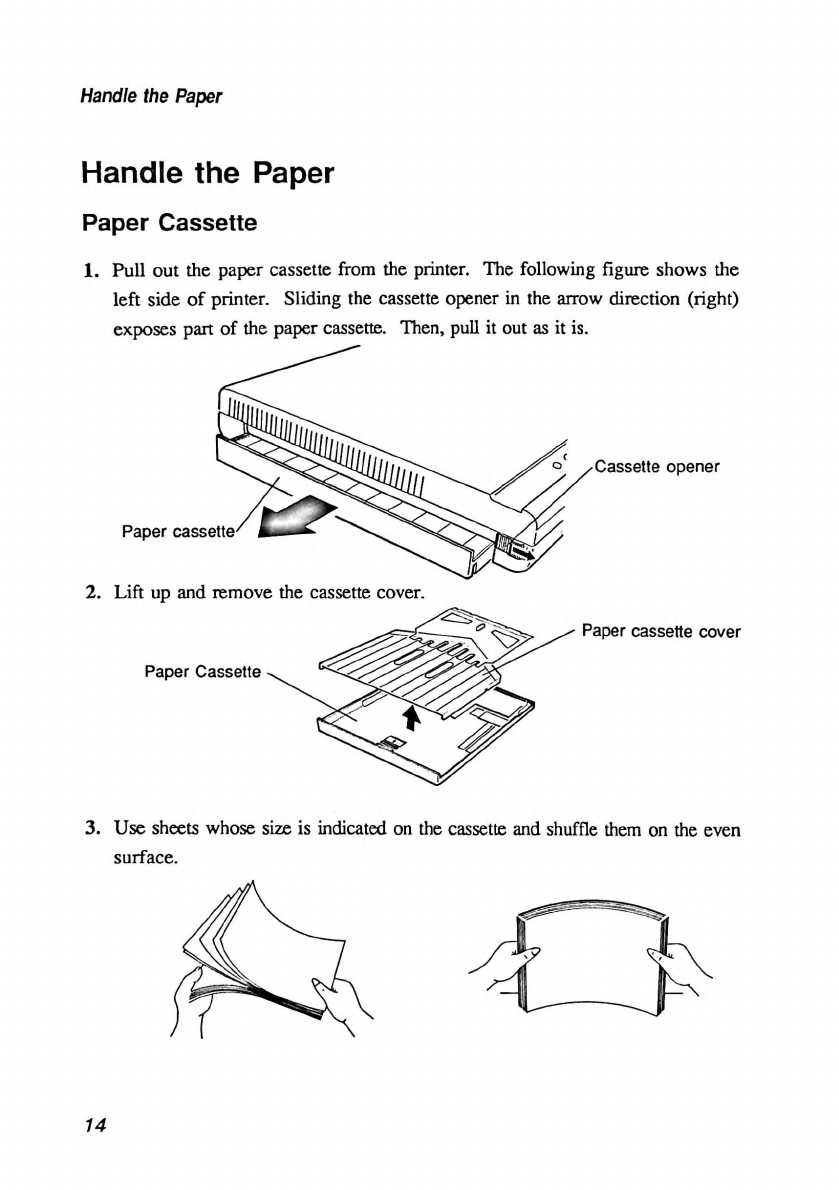
Paper
Cassette
1.
Pull
out
the
paper
cassette
from
the
printer.
The
following
figure
shows
the
left
side
of
printer.
Sliding
the
cassette
opener
in
the
arrow
direction
(right)
exposes
part
of
the
paper
cassette.
Then,
pull
it
out
as
it
is.
3.
Use
sheets
whose
size
is
indicated
on
the
cassette
and
shuffle
them
on
the
e en
surface.
14
Table of contents
Other Seikosha Printer manuals


