SEIS Shimano Steps EC-E6000 User manual

UM-7GP0A-001
SHIMANO STEPS special battery and
parts user's manual
SHIMANO Total Electric Power System


1
English
CONTENTS
IMPORTANT NOTICE
......................................................................................2
GENERAL SAFETY INFORMATION
.....................................................................2
TO ENSURE SAFETY
.......................................................................................2
NOTICE
.......................................................................................................4
Introduction
................................................................................................5
Items for regular inspection before riding the bicycle
........................................5
Handling method
.........................................................................................5
Charging time
.....................................................................................................................5
Battery storage method
........................................................................................................5
Battery life
.........................................................................................................................5
Used batteries
.....................................................................................................................5
Names of parts
.............................................................................................7
Main specifications
.......................................................................................8
Charging method
.........................................................................................9
When charging the battery alone
...........................................................................................9
When charging the battery while it is mounted on the bicycle
..................................................11
Charger LED lamp
..............................................................................................................13
Battery LED lamp
...............................................................................................................14
Installing the battery
..................................................................................16
Removing the battery
.................................................................................18
Power ON/OFF
...................................................................................................................24
TROUBLESHOOTING
....................................................................................26
TROUBLESHOOTING
...........................................................................................................26
Battery LED lamp error indication
.........................................................................................28
2
IMPORTANT NOTICE
•
Contact the place of purchase or a bicycle dealer for
information on installation and adjustment of the products
which are not found in the user's manual. The dealer's manual
for professional bicycle mechanics is available from our
website (https://si.shimano.com).
•
Do not disassemble or modify the product.
•
Please observe the appropriate rules and regulations of the
country, state or region in which you conduct your business as
a dealer.
•
Also, read the SHIMANO STEPS user's manual.
For safety, be sure to read this user’s
manual thoroughly before use, and
follow it for correct use.
GENERAL SAFETY
INFORMATION
For information on the replacement procedure,
contact the place of purchase or distributor.
Be sure to observe the following instructions in order
to avoid burns or other injury from fluid leakage,
overheating, fire, or explosion.
TO ENSURE SAFETY
DANGER
Handling the battery
•
Use the specified battery charger for charging and observe the
specified charging conditions. Doing otherwise may cause
overheating, bursting, or ignition.
•
Do not leave the battery near sources of heat such as heaters.
Doing so may cause it to burst or ignite.
•
Do not heat the battery or throw it into a fire.
Doing so may cause it to burst or ignite.
•
Do not deform, modify, disassemble or apply solder directly to
the battery. Doing so may cause it to leak, overheat, burst, or
ignite.
•
Do not connect the terminals with metallic objects. Doing so
may cause them to short circuit or overheat, and result in
burns or injury.
•
Do not carry or store the battery together with metallic objects
such as necklaces or hairpins.
Doing so may cause it to short circuit or overheat, and result in
burns or injury.
•
Do not place the battery into fresh water or sea water, and do
not allow the battery terminals to get wet. Doing so may
cause overheating, bursting, or ignition.
•
Do not throw or subject the battery to strong shock. Doing so
may cause overheating, bursting, or ignition.
Handling the battery charger
•
Do not allow the battery charger to get wet. If it is wet or
water is allowed inside, it could cause a fire, ignition,
overheating, or electric shock.
•
Do not use it while it is wet, and do not touch or hold it with
wet hands. An electric shock may occur
•
Do not cover the battery charger with a cloth while it is in use.
Doing otherwise may cause the heat to build up and the case
may become deformed, or fire, ignition, or overheating may
occur.
•
Do not disassemble or modify the battery charger. If this is not
observed, electric shocks or injury may occur.
•
Use the battery charger at the specified power supply voltage
only. If a power supply voltage other than that specified is
used, fire, explosions, smoke, overheating, electric shocks or
burns may occur.
•
Use the specified battery and charger combination for
charging and observe the specified charging conditions.
Doing otherwise may cause overheating, bursting, or ignition.
WARNING
•
After reading the user's manual thoroughly, keep it in a safe
place for later reference.
•
Do not insert or remove the plug while it is wet. Doing so may
result in electric shock. If there is water leaking out of the
plug, dry it thoroughly before inserting it.
•
Do not recharge the battery in wet or very humid places, or
outdoors.
A fire, ignition, overheating, or electric shock may occur.

3
•
If the battery does not become fully charged after two hours
of charging, immediately unplug the battery from the electrical
outlet and contact the place of purchase. Doing otherwise
may cause overheating, bursting, or ignition.
Refer to "Charging method" in "Charger LED lamp" for the
designated charging time of the battery.
Handling the battery
•
If any liquid leaking from the battery gets into your eyes,
immediately wash the affected area thoroughly with clean
water such as tap water without rubbing your eyes, and seek
medical advice immediately. If this is not done, the battery
liquid may damage your eyes.
•
Do not use it outside of the operating temperature range of
the battery.
If the battery is used or stored in temperatures which are
outside these ranges, fire, damage to the battery or problems
with operation may occur.
1. During discharge: -10°C - 50°C
2. During charging: 0°C - 40°C
•
Do not use the battery if it has any noticeable scratches or
other external damage. If this is not observed, bursting,
overheating or problems with operation may occur.
•
Do not use the battery if leakages, discoloration, deformation
or any other abnormalities occur. If this is not observed,
bursting, overheating or problems with operation may occur.
Handling the battery charger
•
Hold the power plug when connecting or disconnecting the
plug. Failure to do so may cause a fire or electric shock. If the
following occurs, stop using the device and contact your place
of purchase. A fire or electric shock may occur.
*
If heat or acrid-smelling smoke is coming out from the
power plug.
*
There is a bad connection inside the power plug.
•
Do not touch metallic parts of the power plug or the AC
adapter if there is a lightning storm. If lightning strikes,
electric shocks may occur.
•
Do not overload the electrical outlet with appliances beyond
its rated capacity, and use only a 100 - 240 V AC electrical
outlet. If the electrical outlet is overloaded by connecting too
many appliances using adapters, overheating resulting in fire
may occur.
•
Do not damage the power cord or power plug. (Do not
damage, modify, let near hot objects, bend, twist or pull them;
do not place heavy objects on top or bundle them tightly.) If
they are used while damaged, fire, electric shocks or
short-circuits may occur.
•
Do not use the battery charger with commercially-available
electrical transformers designed for overseas use (travel
converters).
They may damage the battery charger.
•
Always be sure to insert the power plug as far as it will go. If
this is not observed, fire may occur.
•
When charging the battery while it is installed on the bicycle,
do not move the bicycle.
The battery charger’s power plug may come loose and not be
fully inserted into the electrical outlet, resulting in risk of fire.
CAUTION
Handling the battery
•
Do not leave the battery in a place exposed to direct sunlight,
inside a vehicle on a hot day, or other hot places. This may
result in battery leakage.
•
If any leaked fluid gets on your skin or clothes, wash it off
immediately with clean water. The leaked fluid may damage
your skin.
•
Store the battery in a safe place out of the reach of infants
and pets.
•
Handle components with both hands. Failure to do so may
cause the components to fall and break or cause injury.
•
If an error occurs during the battery discharge or charge
operation, immediately stop using it and check the user's
manual. If you are not sure, consult the place of purchase or
distributor.
Handling the battery charger
•
When performing cleaning, disconnect the power plug from
the electrical outlet and the charging plug from the battery.
If this is not observed an electric shock may occur.
•
Do not let the battery touch the same area of skin for an
extended period of time while it is charging. The temperature
of components may reach 40 to 70°C, which can cause
low-temperature burns.
•
Periodically check the battery charger and adapter, particularly
the cord, plug, and case, for any damage. If the charger or
adapter is broken, do not use it until it has been repaired by
the place of purchase or distributor.

4
•
Use the product under the supervision of someone responsible
for safety and upon receiving usage instructions. Do not allow
physically, sensory, or mentally impaired persons,
inexperienced persons, or persons with no required
knowledge, including children, to use the product. Do not
allow children to play near the product.
NOTICE
Charging can be carried out at any time, regardless of
the remaining battery, but please fully charge the
battery in the following cases:
•
The battery cannot be used at the time of purchase. Before
riding, be sure to fully charge the battery.
If the battery has become completely empty, charge it as soon as
possible. If you leave the battery without charging it, the battery
will deteriorate and may become unable to be used.
Handling the battery
•
If the screen of the cycle computer is not displayed, fully
charge the battery. The battery level may affect the display.
•
If the LED display of the battery does not turn on even when
the battery power switch is pressed, the protection circuit may
have activated. Connect the battery charger to deactivate the
protection circuit.
•
If the battery is charged in a low-temperature environment of
5°C or lower, the traveling distance of a full charge will be
shorter. Also, if the battery is used in a low-temperature
environment of 5°C or lower, the battery consumption will
become quicker. This is due to the characteristics of the
battery, and the battery will return to normal when at a
normal temperature.
Handling the battery charger
•
The battery can be charged at temperatures between 0°C and
40°C. The battery charger will not operate at temperatures
outside the range. It will display an error. (The battery charger
LED lamp flashes.)
•
Do not use outdoors or in environments with high humidity.
•
Charge the battery indoors to avoid exposure to rain or wind.
•
Do not place the battery charger on dusty floors when using
it.
•
Place the battery charger on a stable surface such as a table
when using it.
•
Do not place any objects on top of the battery charger or its
cable. Also do not cover them with a cloth or other material.
•
Do not bundle the cables.
•
Do not hold the battery charger by the cables when carrying
it.
•
Do not apply excessive tension to the cable and charging plug.
•
In order to prevent the cable from being damaged, avoid
wrapping it around the main body during storage.
•
Do not wash the battery charger or wipe it using detergents.
•
Do not allow children to play near the product.
•
When charging with the battery installed to a bicycle, take
care that your legs, etc. do not get caught in the battery
charger cord. Doing so may cause injury or cause the bicycle
to fall over and break the components.
•
When charging the battery while it is mounted on the bicycle,
be careful of the following:
-
Before charging, check that there is no water on the
charging port of the charging plug.
-
Check that the battery mount is locked before charging.
-
Do not remove the battery from the battery mount while
charging.
-
Do not ride with the charger mounted.
-
Close the cap on the charging port when not charging.
-
Fix the bicycle in place when charging, so that it does not
tip over.
•
Make sure to close the charge socket cap after charging is
complete. If foreign material such as dirt or dust is attached to
the charge socket, the charging plug may become unable to
be inserted.
•
Using the battery outside the operating temperature range
may cause problems with operation or performance
degradation.
•
The charging time is longer when the battery temperature is
high.
Cleaning
•
The number written on the key of the battery mount is
necessary when purchasing a spare key. Store it carefully.
•
Do not use thinner or other solvents to clean any of the
components. Doing so may damage their surface.

5
•
When there is dirt on the terminals of the battery mount and
battery charger, remove the battery, remove the power plug
from the electrical outlet, and then clean them with a waste
cloth or cotton bud dampened with ethanol, etc. If you
repeatedly install and remove the battery while they are still
dirty, it may cause wear on the terminals and make them
unable to be used.
Terminal example
•
Keep the surface where the battery contacts the battery
mount clean. If the battery is connected with foreign material
such as dirt or dust attached, the battery may become unable
to be removed.
•
Use a damp, well wrung out cloth when cleaning the battery
and plastic cover.
•
If you have any questions about the use and maintenance of
the product, consult the place of purchase.
•
Products are not guaranteed against natural wear and
deterioration from normal use and aging.
•
For maximum performance we highly recommend SHIMANO
lubricants and maintenance products.
Introduction
You cannot use the battery immediately after shipment. The
battery can be used after fully charging it with the designated
battery charger. Be sure to charge it before use. The battery can
be used when the LED on it turns on.
Items for regular inspection
before riding the bicycle
Inspect the following items before riding the bicycle. If any
problems are found, consult the place of purchase or distributor.
•
Is the battery level sufficient?
•
Is the battery installed correctly?
Handling method
Charging time
The charging time will vary depending on the battery level and
the battery charger being used.
This is a lithium-ion battery. Use the dedicated battery charger
designated by SHIMANO.
Battery storage method
•
If the bicycle will not be ridden for an extended period, store it
with a battery level of approximately 70%. Also, charge the
battery once every six months to ensure that it is not
completely discharged.
•
Store the battery or bicycle with battery installed in a cool
indoor location away from direct sunlight and rain (estimate:
10 to 20°C). If the storage temperature is low or high, the
performance of the battery is reduced, and its useable time
will be shorter. When you use the battery after a long storage
period, make sure to charge it first.
Battery life
•
The battery is an exhaustible item. The battery will gradually
lose its capacity to charging after repeated use. If the length
of time that the battery can be used and its traveling distance
become extremely short, it has probably reached the end of its
life, and so you will need to purchase a new battery.
•
The life of the battery will vary depending on factors such as
the storage method, the usage conditions, the surrounding
environment and the characteristics of the individual battery
pack.
Used batteries
Lithium-ion batteries are recyclable, valuable resources.
Please observe the appropriate rules of the country, state or
region regarding the disposal of used batteries. If you are not
sure, consult the place of purchase or distributor.
Disposal information for countries outside
the European Union
This symbol is only valid within the
European Union. Follow local regulations
when disposing of used batteries. If you
are not sure, consult the place of purchase
or a bicycle dealer.

6
FCC compliance information
This device complies with Part 15 of the FCC Rules.
Operation is subject to the following two conditions:
(1) This device may not cause harmful interference, and
(2) This device must accept any interference received,
including interference that may cause undesired
operation.
NOTICE: This equipment has been tested and found to
comply with the limits for a Class B digital device,
pursuant to Part 15 of the FCC Rules. These limits are
designed to provide reasonable protection against
harmful interference in a residential installation. This
equipment generates, uses and can radiate radio
frequency energy and, if not installed and used in
accordance with the instructions, may cause harmful
interference to radio communications. However, there
is no guarantee that interference will not occur in a
particular installation. If this equipment does cause
harmful interference to radio or television reception,
which can be determined by turning the equipment off
and on, the user is encouraged to try to correct the
interference by one or more of the following measures:
-
Reorient or relocate the receiving antenna.
-
Increase the separation between the equipment and
receiver.
-
Connect the equipment into an outlet on a circuit
different from that to which the receiver is
connected.
-
Consult the dealer or an experienced radio/TV
technician for help.

7
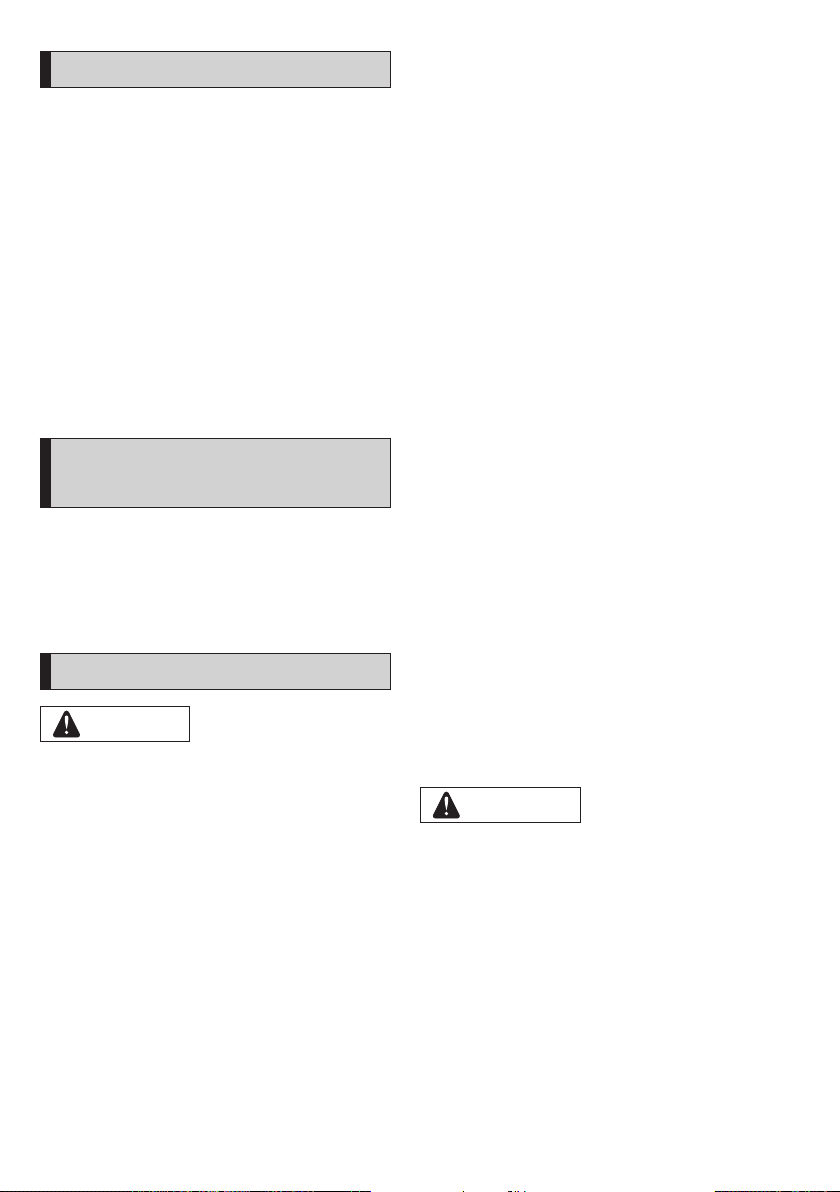
Names of parts
Charging plug
Battery charger
LED lamp
EC-E6000
EC-E6002
Charging plug LED lamp
Battery charger
Power cord connector
SM-BCC1
Insert into the connector
* Insert it fully
SM-BCC1 (sold separately)
EW-CP100 *1
EW-SW100 *1
Satellite charging port
Satellite power button
*1 The installation location differs depending on the frame design.
EC-E8004
Charging plug LED lamp
Battery charger
Adapter (sold separately)
SM-BTE60 SM-BTE80

8
Main specifications
Battery
Battery main body Lithium-ion
Nominal capacity
BT-E6000/BT-E6010/BTE8014: 11.6 Ah
BT-E6001*/BT-E8010*/BT-E8020*/BT-E8035*:
14 Ah
Operating
temperature range
During discharge: -10˚C - 50˚C
During charging: 0˚C - 40˚C
Nominal voltage 36 V
*
The drive unit may not operate correctly when its firmware version is 3.2.6 or earlier. Update the firmware version using E-TUBE
PROJECT.
Battery charger
Input
EC-E6000: 100 - 240 V AC, 2.5 A, 50/60 Hz
EC-E6002: 100 - 240 V AC, 1.5 A, 50/60 Hz
EC-E8004 (US/CANADA): 120 V AC, 1.6 A, 60 Hz
EC-E8004 (Others): 100 - 240 V AC, 1.9 - 0.9 A, 50/60 Hz
Output
EC-E6000: 40 V DC, 4.4 A/42 V DC, 4 A
EC-E6002: 42 V DC, 1.8 A
EC-E8004 (US/CANADA): 42 V DC, 4 A
EC-E8004 (Others): 42 V DC, 4 - 4.6 A (INPUT: 100 - 240 V AC)
Compatible batteries
(*)
SHIMANO BT-E6000, BT-E6001, BT-E6010, BT-E8010, BT-E8014,
BT-E8020, BT-E8035
*
Includes batteries that may not be available in your region.

9
Charging method
When charging the battery alone
When charging, orient the battery and the battery charger as indicated in the figure.
*
The orientation of the socket differs according to the battery specifications.
BT-E6000/BT-E6001/BT-E6010/BT-E8035
1.
Attach the adapter to the battery charger’s charging plug.
2.
Connect the battery charger’s power plug to the electrical outlet.
3.
Insert the adapter into the battery charge socket.
*
Charge the battery on a flat surface indoors.
Adapter
SM-BTE60 (sold separately)
BT-E6000/BT-E6001
BT-E6010
Charging plug
Charging plug
Battery
Charging port
Charging port
Adapter
SM-BTE60 (sold separately)
BatteryCharging plug
Adapter
SM-BTE60 (sold separately)
Adapter
SM-BTE80 (sold separately)
BT-E8035
Charging plug
Charging plug
Battery
Charging port
Adapter
SM-BTE80 (sold separately)
10
BT-E8010/BT-E8014/BT-E8020
1.
Connect the battery charger’s power plug to the electrical
outlet.
2.
Insert the charging plug into the battery's charging port.
*
Charge the battery on a flat surface indoors.
BT-E8010/BT-E8014
Charging plug
Battery Charging port
BT-E8020
Charging plug Battery
Charging port
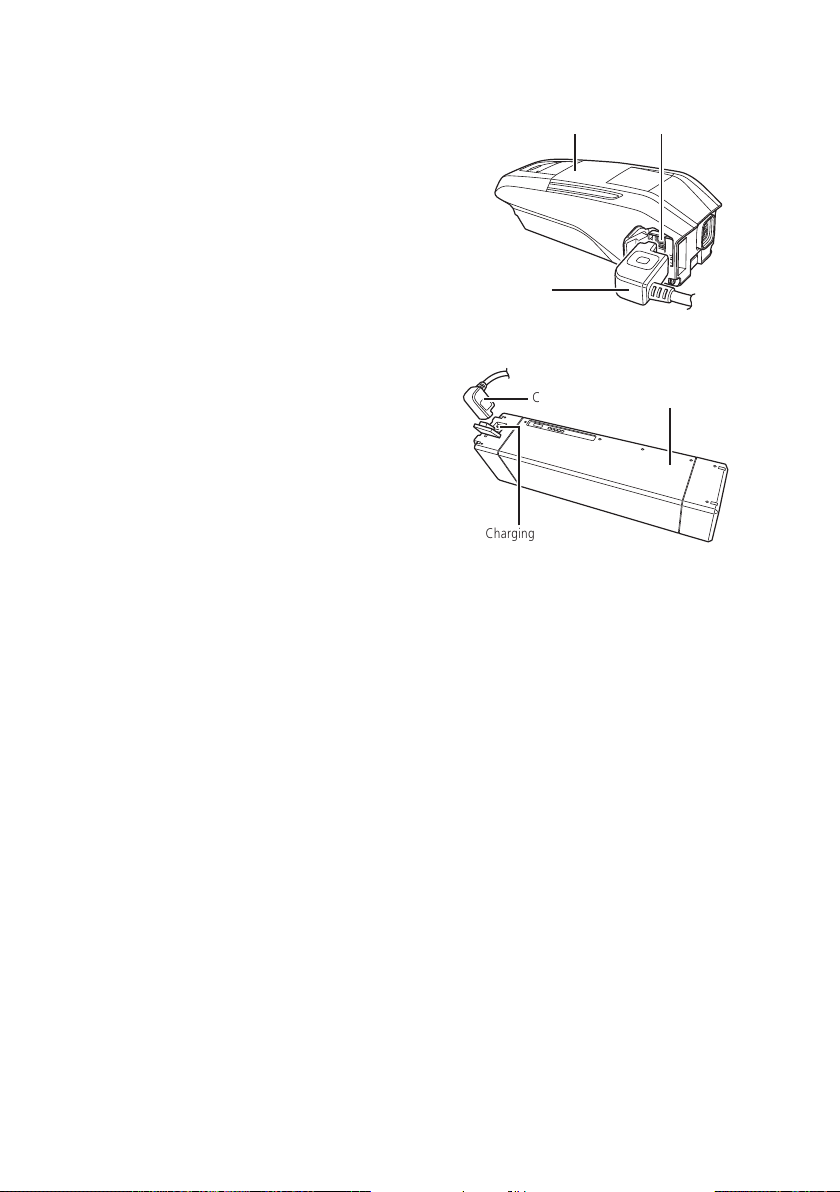
11
When charging the battery while it is mounted on the bicycle
1.
Connect the battery charger’s power plug to the electrical outlet.
2.
Insert the charging plug into the charging port of the battery mount/satellite charging port.
*
Charge the battery on a flat surface indoors.
*
Place the battery charger main body on a steady surface such as the table before charging.
*
Stabilize the bicycle when charging so that it does not fall over.
BT-E6000/BT-E6001
Battery mount
Charging port
Charging plug
Battery
BT-E8020
Battery
Charging plug
Charging port
Battery
Charging plug
Battery mount
Charging port
BT-E6010 BT-E8010/BT-E8014
Battery
Charging port
Charging plug
BT-E6010/BT-E8010/BT-E8014
Charging plug
Charging port
BT-E8035
•
The position of the satellite charging port
differs depending on the frame design.
12
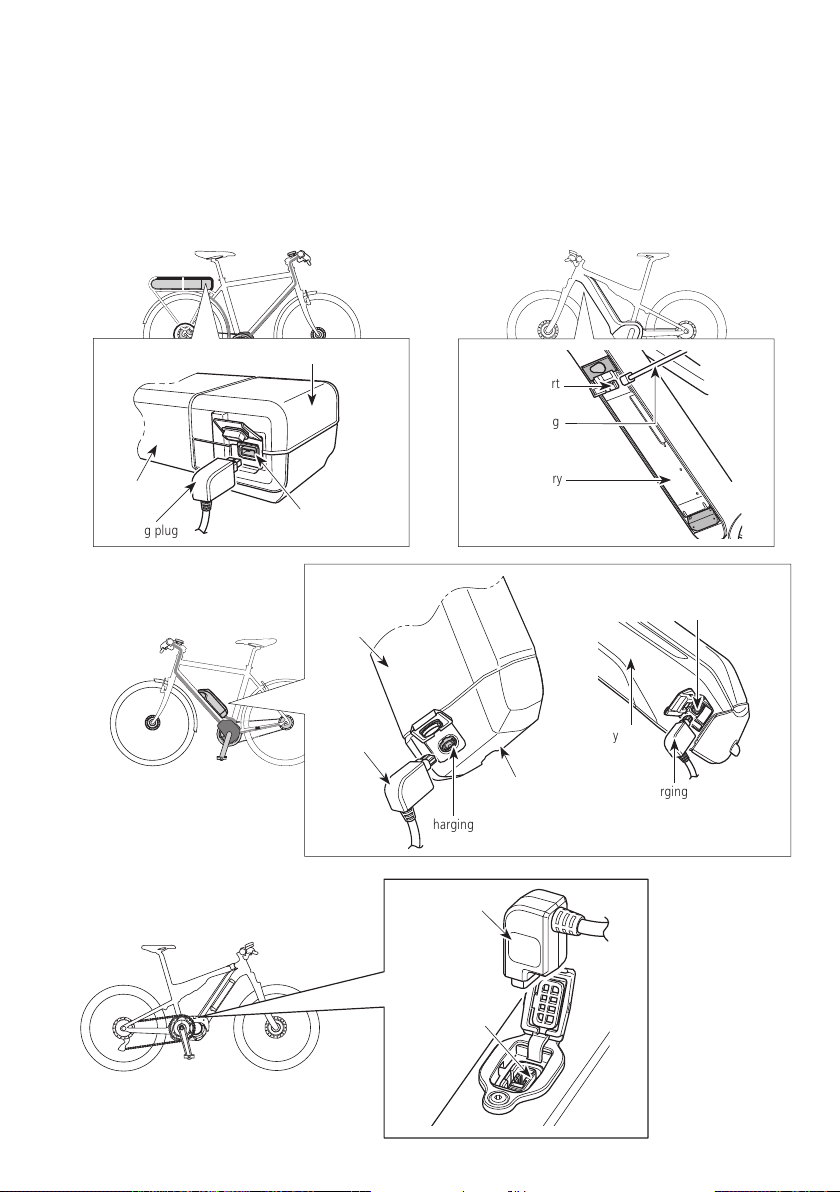
3.
Firmly close the charging port cap after charging.
BM-E6000
Charging port
cap
BM-E6010
Charging port
cap
Charging port
cap
EW-CP100

13
Charger LED lamp
Regarding the charger LED lamp
After charging has started, the LED lamp on the battery charger
lights up.
Lit up Charging
Flashing Charge error
Off Battery disconnected
Charger LED lamp
Charger LED lamp
Charger LED lamp
EC-E6000
EC-E6002
EC-E8004
For information on the charging time, refer to the following.
Designated charging time
Battery
Charging time from a battery level of 0%
EC-E6000 EC-E6002
EC-E8004
100 - 127 V AC 220 - 240 V AC
BT-E6000, BT-E6010, BT-E8014 About 4 hours About 6.5 hours About 3.5 hours About 3 hours
BT-E6001, BT-E8010, BT-E8020, BT-E8035 About 5 hours About 7.5 hours About 4.5 hours About 4 hours
14
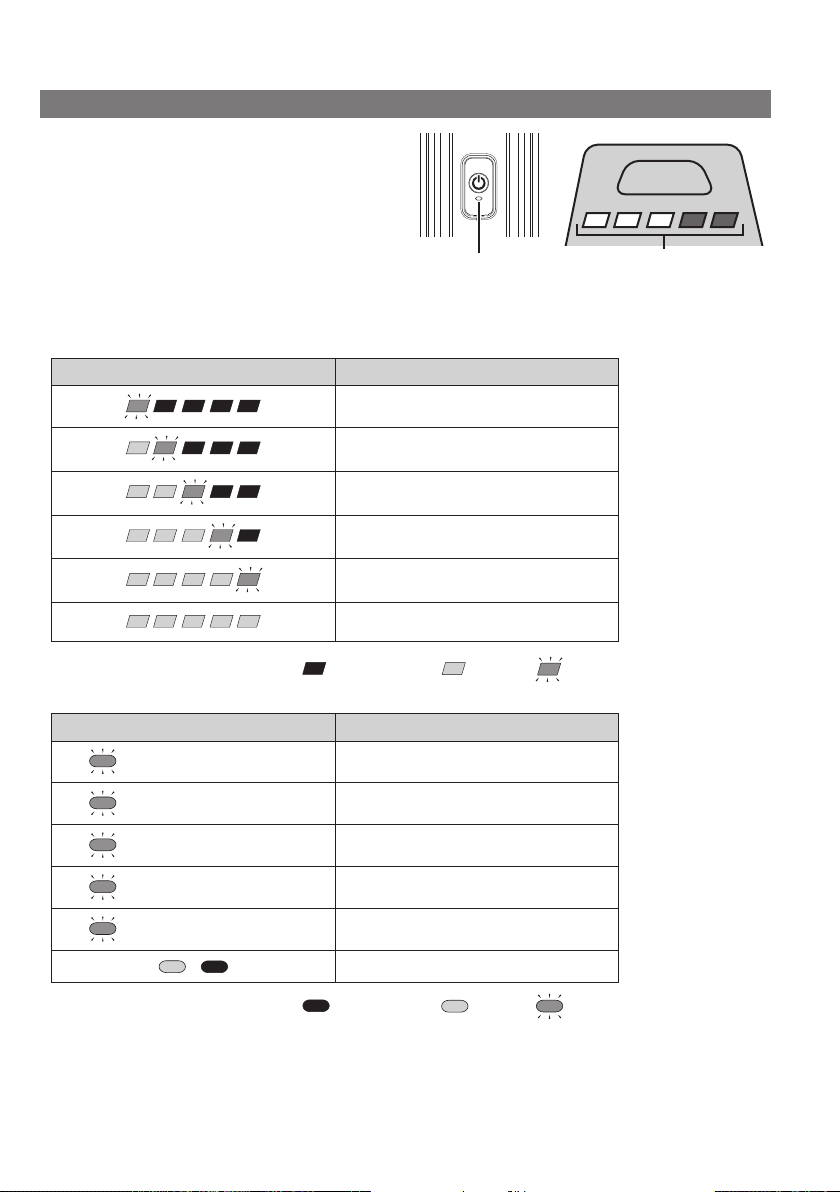
Battery LED lamp
Regarding the battery LED lamp
The current charge status can be checked via the LED lamp on
the battery.
Battery LED lamp
Battery LED lamp
Charging
Battery LED lamp x 5
Lighting pattern*1 Charging status
0 - 20%
21 - 40%
41 - 60%
61 - 80%
81 - 99%
100%
*1 : Does not light up : Lights up : Flashes
Battery LED lamp x 1
Lighting pattern*1 Charging status
(Repeatedly flashes green 1 time) 0 - 20%
(Repeatedly flashes green 2 time) 21 - 40%
(Repeatedly flashes green 3 time) 41 - 60%
(Repeatedly flashes green 4 time) 61 - 80%
(Repeatedly flashes green 5 time) 81 - 99%
/ 100%*2
*1 : Does not light up : Lights up : Flashes
*2 Turns off one hour after fully charged.
15
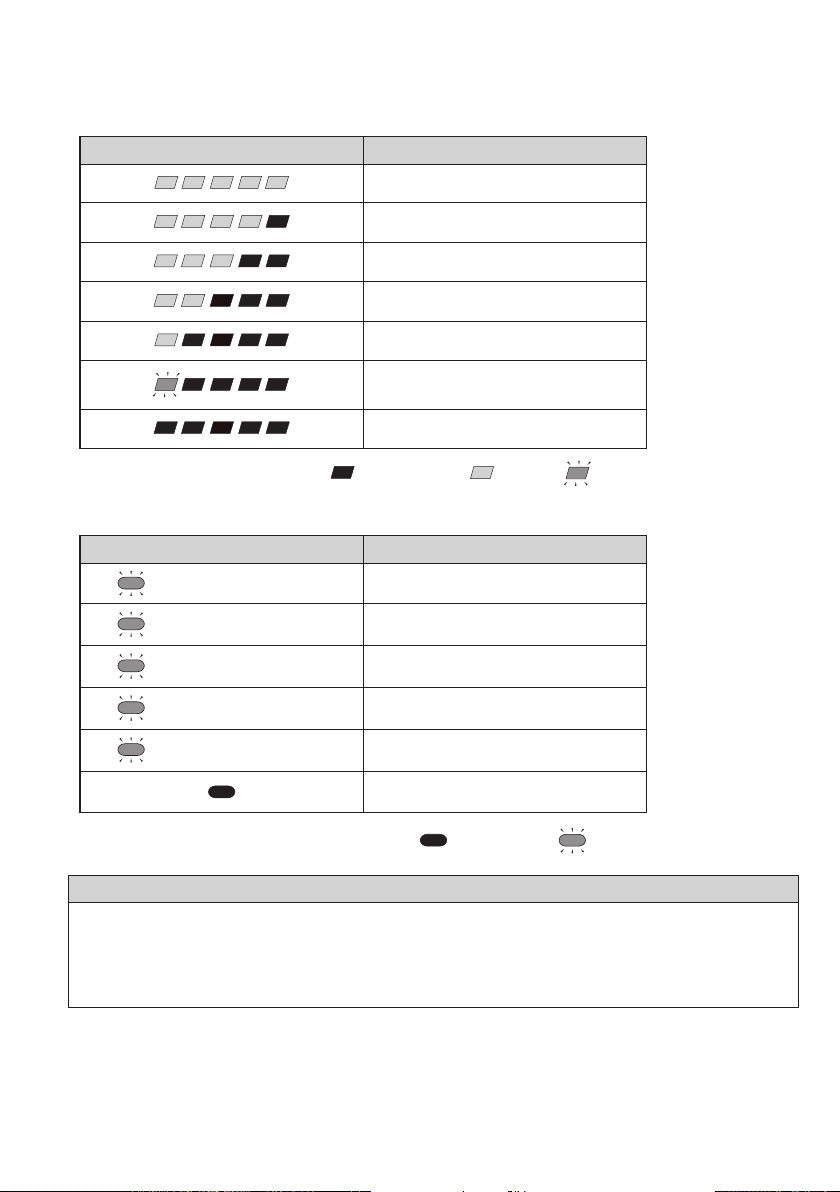
Battery level indicator
You can press the power switch to check the current battery level.
Battery LED lamp x 5
Lighting pattern*1 Battery level
100 - 81%
80 - 61%
60 - 41%
40 - 21%
20 - 1%
0%
(if the battery is not attached to the bicycle)
0% (if the battery is attached to the bicycle)
*1 : Does not light up : Lights up : Flashes
Battery LED lamp x 1
•
The LED lights up when the battery is attached to the bicycle. (Unless the battery level is at 0%)
Lighting pattern*1 Battery level
(Repeatedly flashes green 5 time) 100 - 81%
(Repeatedly flashes green 4 time) 80 - 61%
(Repeatedly flashes green 3 time) 60 - 41%
(Repeatedly flashes green 2 time) 40 - 21%
(Repeatedly flashes green 1 time) 20 - 0%
0% (if the battery is attached to the bicycle)
*1 : Does not light up : Flashing
NOTICE
When the battery level is low, system functions will be shut off in the following order.
1. Electronic assist (The assist mode stops after automatically switching to [ECO]. If the battery-powered light is connected, the mode will switch to [ECO]
earlier.)
2. Gear shifting
3. Light

16
Proper use of the battery
Charging can be carried out at any time, regardless of the remaining battery, but please fully charge the battery in the
following cases: Be sure to use the dedicated battery charger.
•
The battery cannot be used at the time of purchase. Before riding, be sure to fully charge the battery.
If the battery has become completely empty, charge it as soon as possible. If you leave the battery without charging it, it
will cause the battery to deteriorate.
•
If the bicycle will not be ridden for a long period, store with the battery level around 70%. Also, make sure to charge the battery
every six months to ensure that it does not completely discharge.
Installing the battery
CAUTION
•
Ride the bicycle after confirming that the battery is locked. If the battery is not locked securely, it may become detached and fall
down while riding.
•
Confirm the following before riding the bicycle.
-
That the battery is securely locked to the battery mount
-
That the key has not been left in the battery
NOTICE
Confirm that the cap of the charging port is closed before riding.
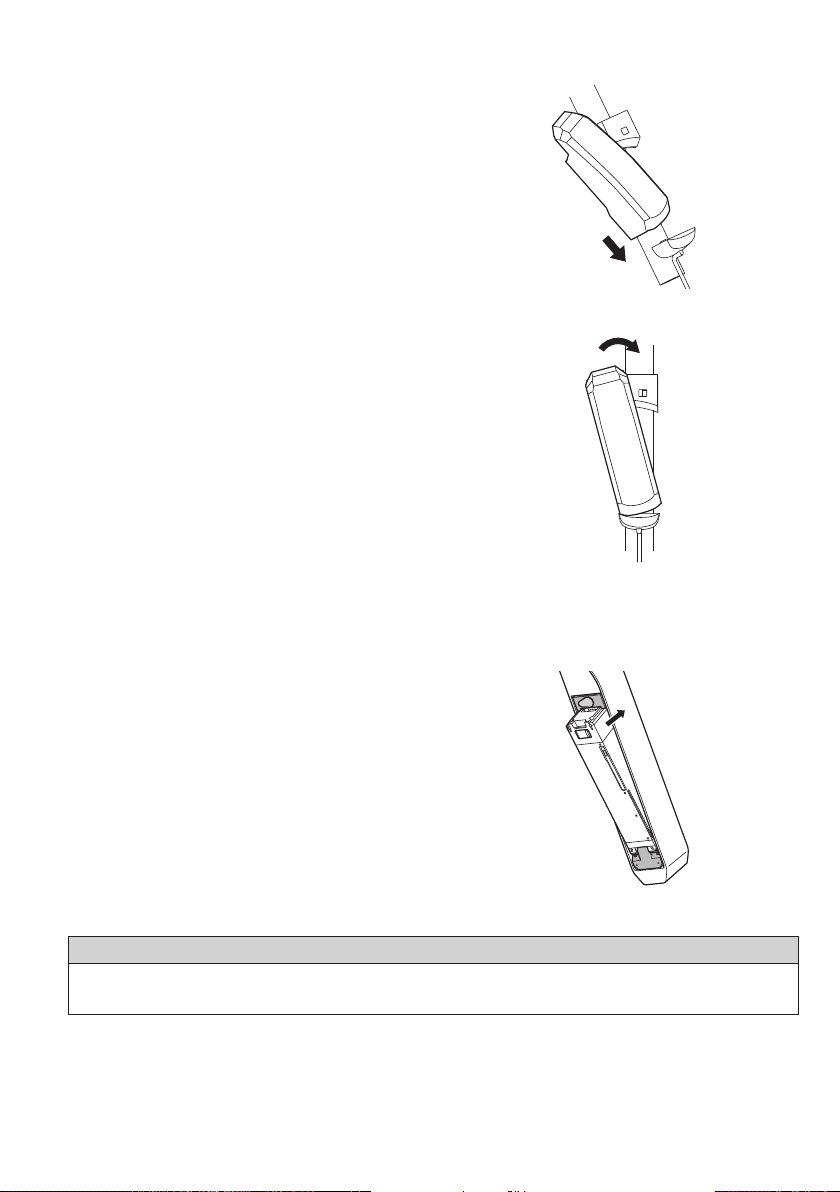
BT-E6000/BT-E6001
1.
Insert the battery into the rail from the rear of the bicycle.
•
Slide the battery to the front and push it in firmly.
2.
Remove the key.
•
Return the key to the locked position, and then remove
it.
Rail
17
BT-E8010/BT-E8014
1.
Insert the battery from its base.
•
Align the indentation in the bottom of the battery with
the convex section on the mount and insert the battery.
2.
Slide the battery.
•
Insert the battery until you hear a click.
3.
Remove the key.
•
Return it to the lock position and remove the key.
BT-E8020
This section describes an example of a frame design where the battery is removed/installed from the bottom.
1.
Insert the battery from its base.
2.
Insert the battery.
•
Insert the battery until you hear a click.
NOTICE
Do not install or remove the battery with the key inserted or the socket cap left open. The battery could make contact with the handle on the key or the
socket cap, damaging it.
18
BT-E8035
This section describes an example of a frame design where the battery is removed/installed from the bottom.
1.
Insert the battery from its base.
2.
Insert the battery.
•
Insert the battery until you hear a click.
CAUTION
•
After pushing the battery in, pull the battery to confirm that it is locked securely.
Removing the battery
CAUTION
•
Firmly hold the battery when removing or carrying it to make sure that you do not drop it.
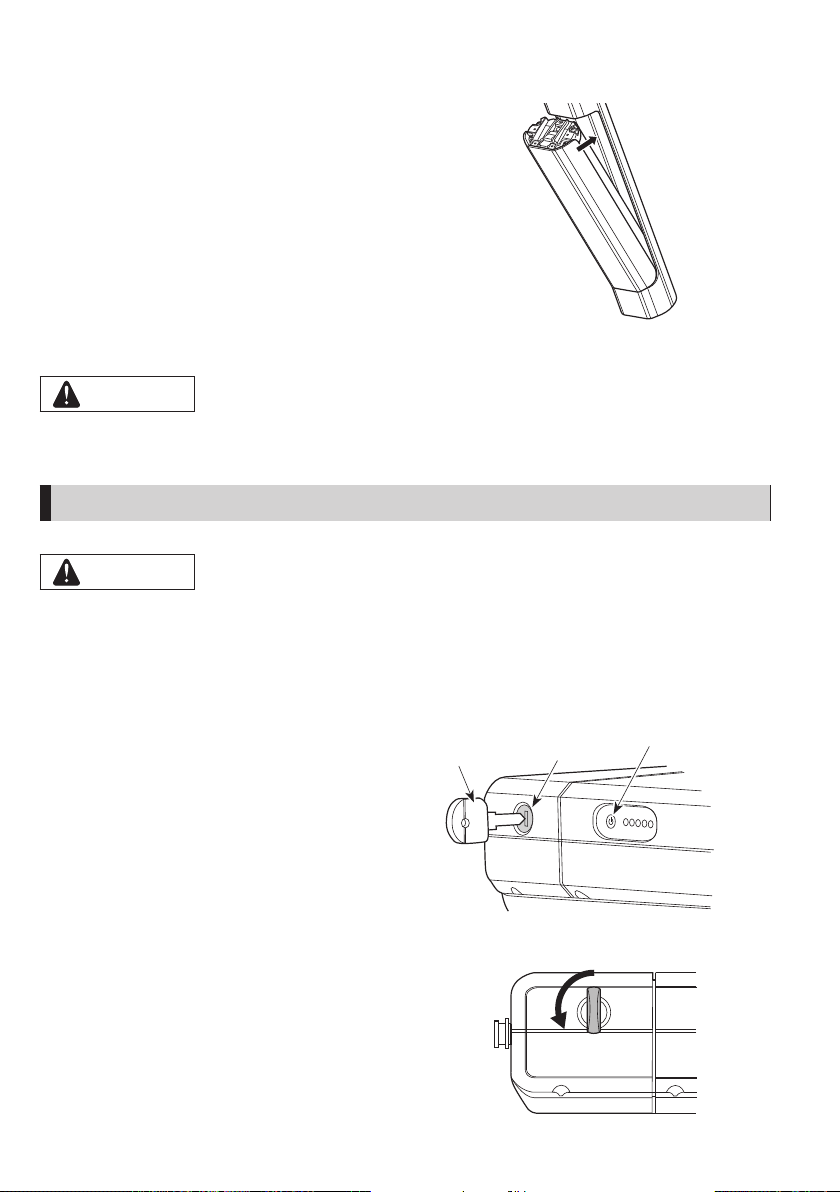
BT-E6000/BT-E6001
The position of the key does not affect battery insertion. The battery can be inserted regardless of the key position.
1.
Insert the key.
Turn the power OFF, and then insert the key into the key
cylinder of the battery mount. Key Key cylinder
Press the power switch
to turn the power OFF.
2.
Turn the key counterclockwise until you feel contact.
This manual suits for next models
2
Table of contents


