Seko ProTwin User manual

0000137791 Rev. 4.0
EN
DE
ES
FR
IT
PROTWIN
INSTALLATION MANUAL
HANDBUCH
MANUAL DE INSTALACION
MANUEL D’INSTALLATION
MANUALE D’INSTALLAZIONE

0000137791 Rev. 4.0

0000137791 Rev. 4.0 EN
1
PROTWIN
PACKAGE CONTENTS:
1. ProTwin
2. Suction hose 6ft (1 roll for each product)
3. Hose bracket
4. Complete installation kit:
- Water inlet elbow fitting ¾” GHT
- Plastic hose clamps (2 for each product)
- 15 metering tips (1 bag for each product)
- 4 ultra-lean tips (1 bag for each product)
- Foot valve (1 for each product)
- Ceramic weight (1 for each product)
- Suction elbow (1 for each product)
- Wall anchors (3 pcs)
- Screws (3 pcs)
- Washers (3 pcs)

0000137791 Rev. 4.0 EN
2
TECHNICAL CHARACTERISTICS:
Water supply
connection
Connection on left side with elbow
Inlet connection type
Male ¾” GHT
Outlet connection type
Male ¾” GHT
Chemical product
channel flow rate
Water supply of 8gal/min flow rate and 45psi: 2.4 gal/min
Rinse channel flow rate
Water supply of 8gal/min at 45psi: 4.2 gal/min
Maximum dimensions
H = 15.75”
L = 13”
D = 6.3”
Working pressure
Min 22 PSI
Max 85 PSI
Optimum: 30 – 60 PSI
Temperature
Max 140°F (60°C)
!PLEASE READ THE FOLLOWING WARNINGS BEFORE INSTALLING OR SERVICING THE
CLEANING STATION
"Make sure that the water supply pressure is between 22 -85 PSI, in case of excessive pressure use a
pressure regulator to avoid breackage.
"Make sure that the water supply temperature does not exceed 140° (60°C)
"The ProTwin’s fittings have been tested with commonly used liquid detergents mixed with water.
"Check that the detergent used is compatible with polypropylene.
"Install the station near as possible to a water supply connection point.
"Mount the ProTwin considering easy access for cleaning and routine maintenance.
#WARNING: Disconnect water supply before servicing the ProTwin.
#WARNING: Follow common safety procedures. Use adequate protection for the eyes, face, hands,
and clothing.
!We constantly work to improve our products and reserve the right to make changes at any time
without prior notice.
!Failure to follow these safety precautions may cause personal injury or damage to the equipment.
!Only use recommended accessories.

0000137791 Rev. 4.0 EN
3
INSTALLATION
The ProTwin should be installed where it is easily connected to the water supply.
Before mounting, check that all valves can be easily operated and exposed surfaces are accessible for cleaning
and routine maintenance.
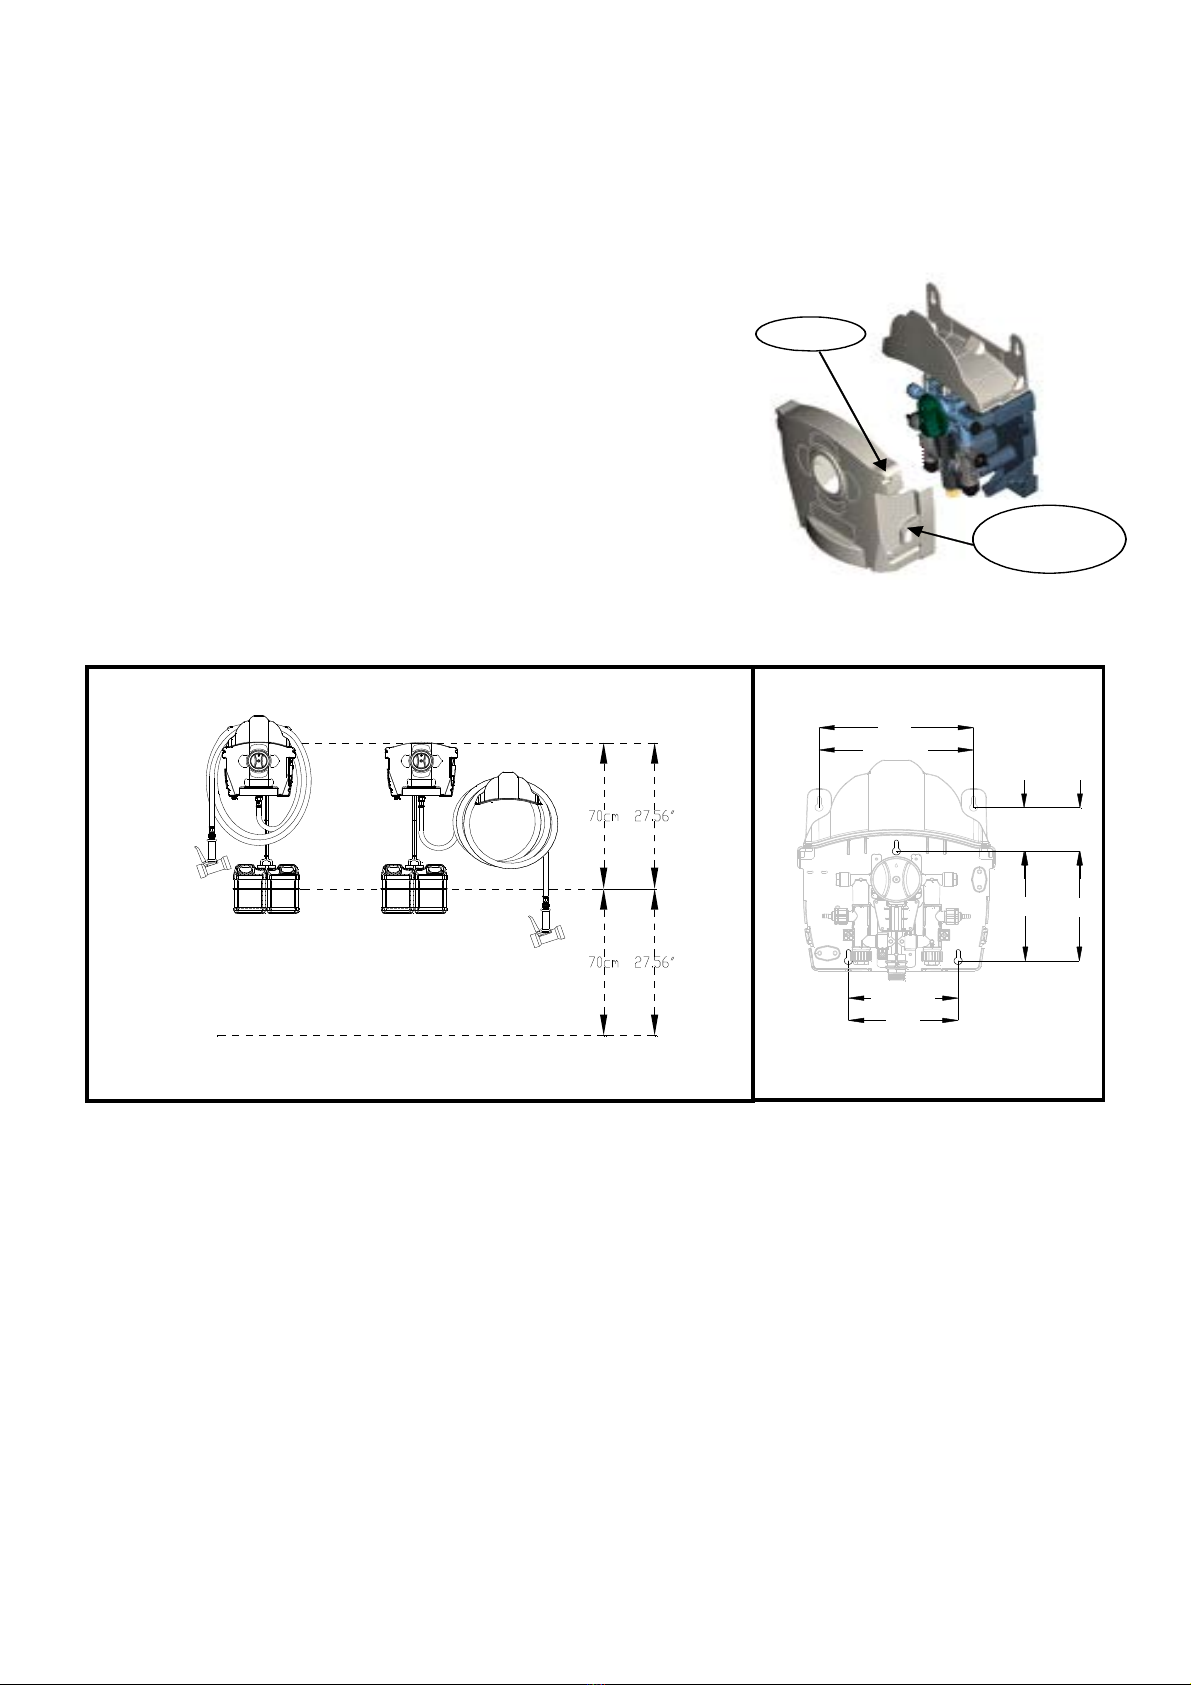
Positioning and drilling plans:
Remove the ProTwin from the box and remove the cover by removing
the screws at the top and pressing the release tabs. You can now access
to the mounting holes (located on the rear panel). Mount the ProTwin on
the wall using the supplied anchors, screws and washers.
The versatility of the ProTwin allows the hose bracket to be installed as
an integrated part of the unit or mounted independently as pictured
below.
177.5mm
198.0mm
250.0mm
9.8"
7.8"
7.0"
79.2mm 3.1"
PAVIMENTO
Figure 2 – Drilling plans and positioning
Release
tabs
Screws
FLOOR
0000137791 Rev. 4.0 EN
4
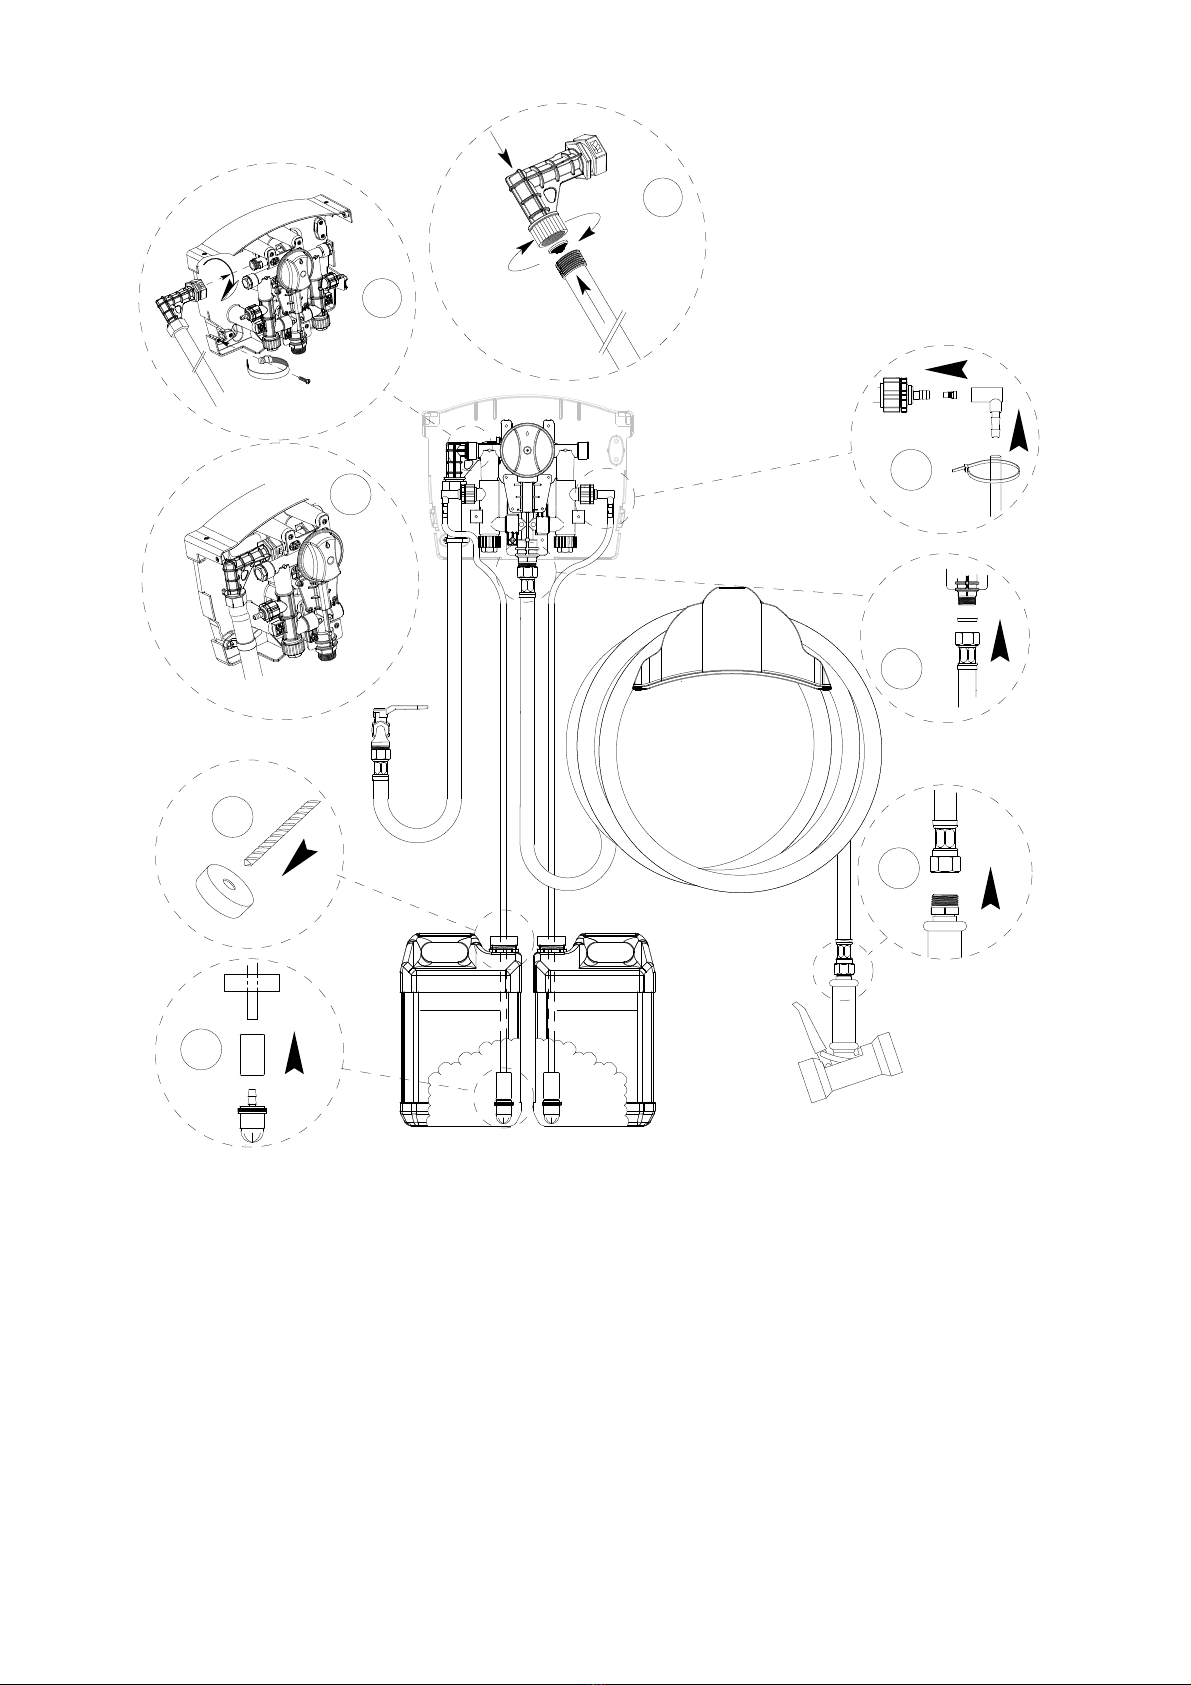
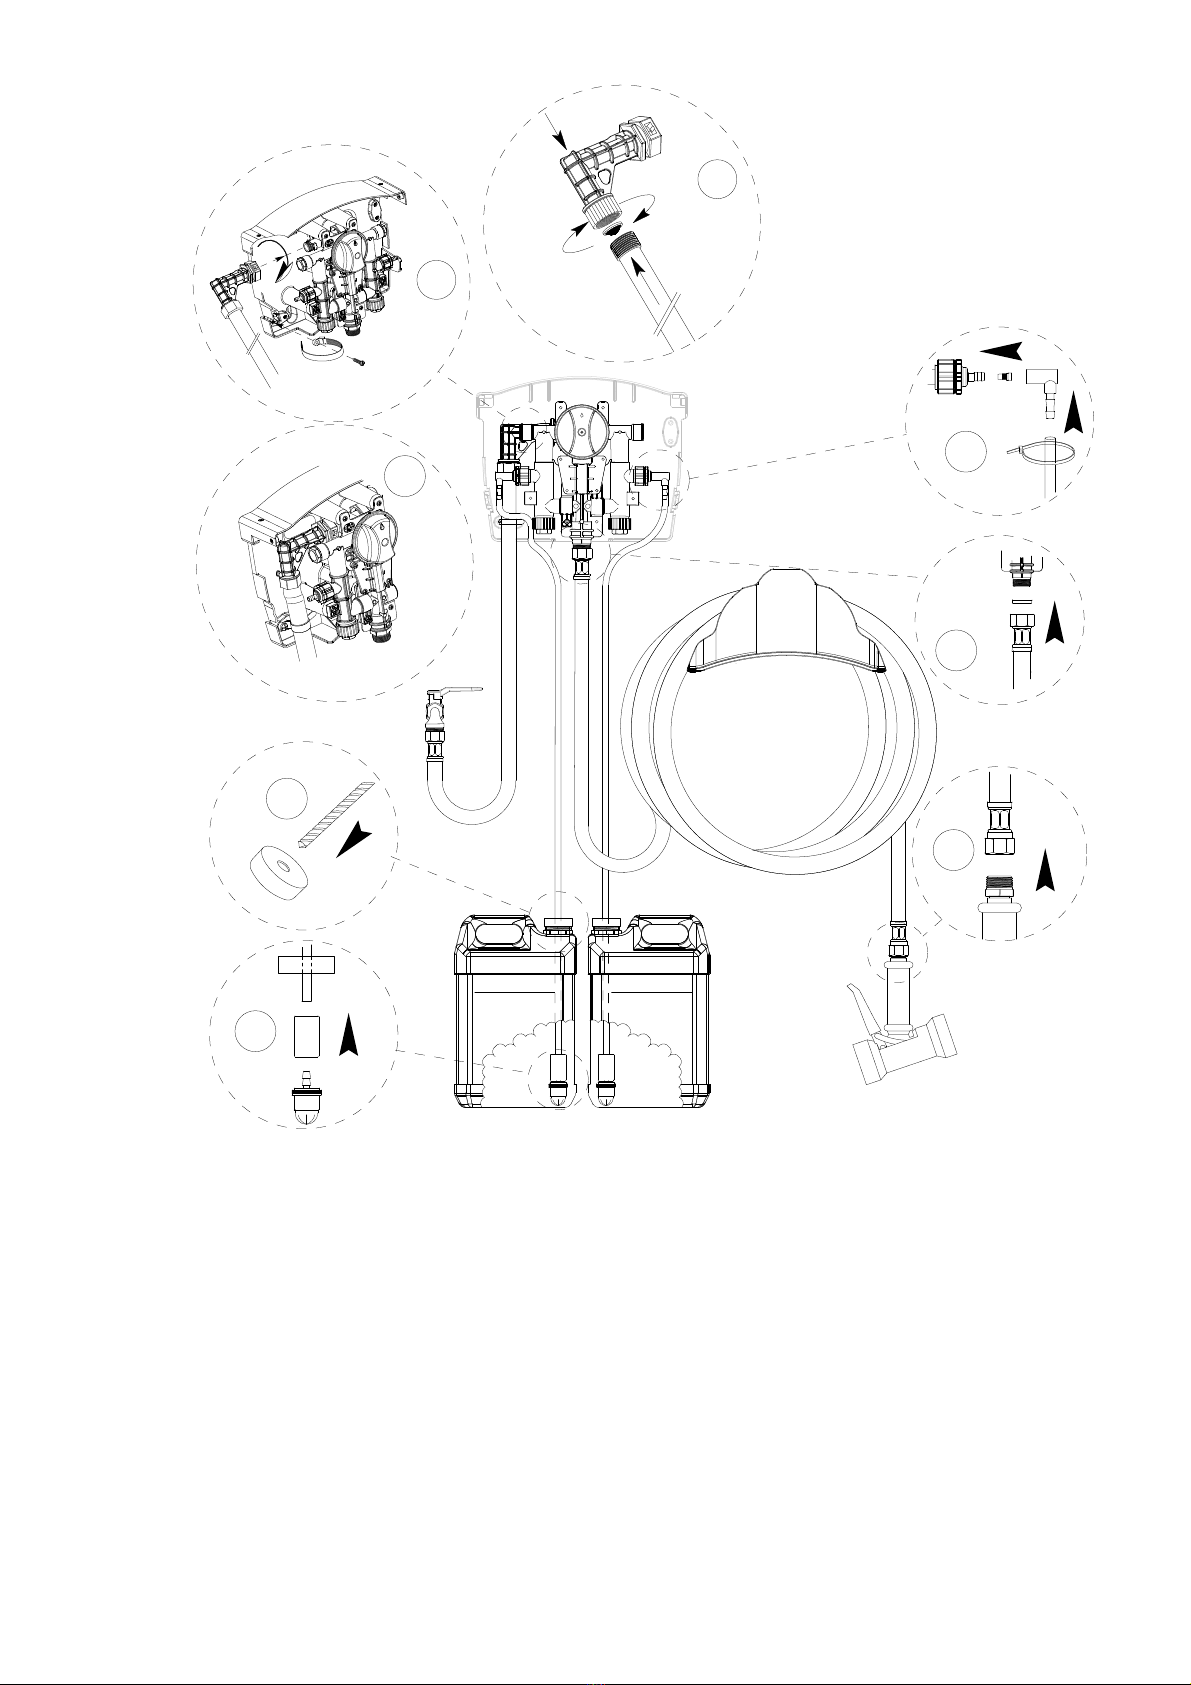
How to install:
Figure 3 – Installation
1. Disconnect the 90° water inlet from the station by rotating it 45° anticlokwise to unlock it, connect then to
the water inlet hose;
2. Reconnect the 90° inlet fitting back into the Protwin, tilted counterclockwise by 45° to its side, consecutively
rotate 45° clockwise to lock the connection;
3. Secure the hose to Protwin through the clamp and the screw supplied as shown;
4. Drill the top of the product container using a 3/8 drill bit;
5. Slide the cap, ceramic weight onto the bootom of the supplied product pick up tube. Connect to the foot
valve as in figure above.
6. Connect the pick up tube to the ProTwin as follows:
a. Select the ' nozzle calibration produced according to the table to be inserted into the aspiration valve as
shown in the figure;
b. Insert the link at 90°;
c. For each product, place the aspiration tube into the fitting 90° and then fix it with plastic cable tie.
7. Attach the discharge hose to ¾Male GHT fitting at the bottom of the Protwin;
8. Attach the dosing gun.
5
4
PRODUCT 1 PRODUCT 2
6
8
7
3
2
1

0000137791 Rev. 4.0 EN
5
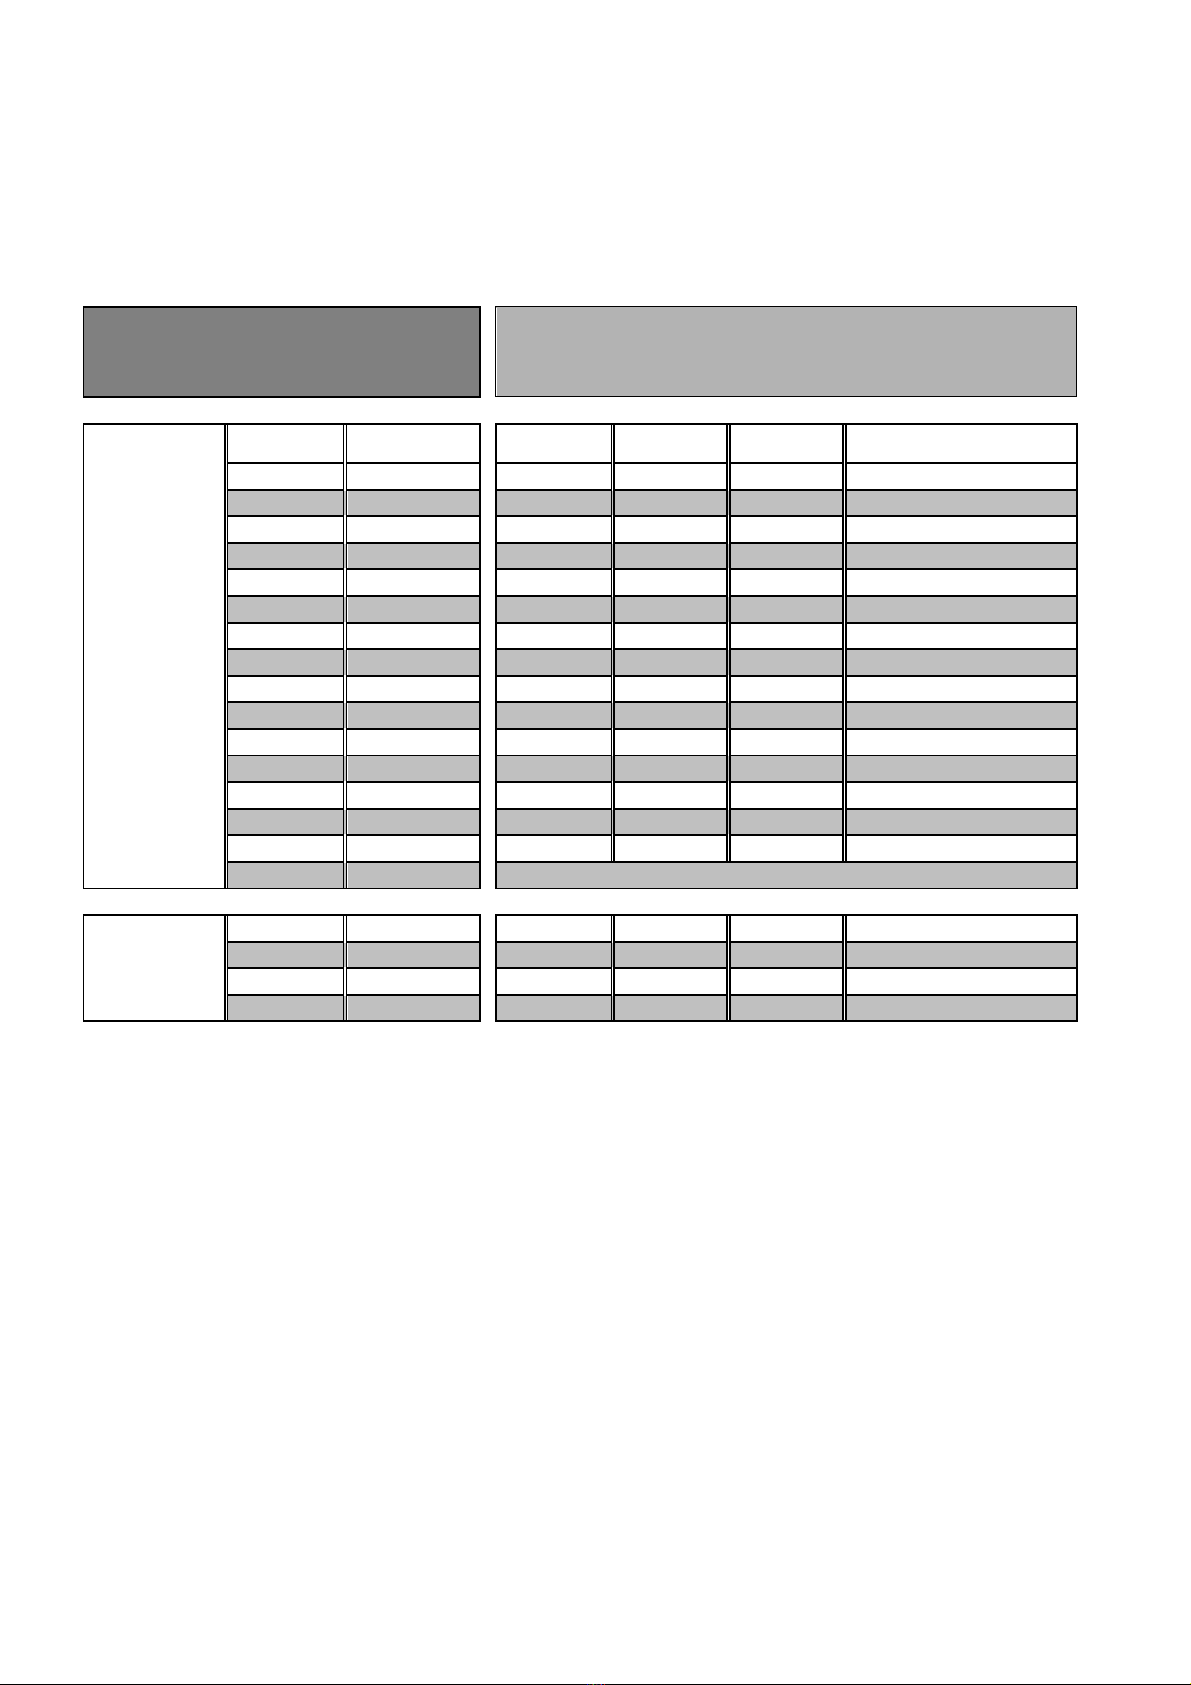
DILUTION RATIO CHART
The dilution ratio can be achieved by using one of the 19 supplied metering tips;
Metering tips have small openings of decreasing diameter and are distinguished by different colors.
Table 1 below shows the dilution ratio’s of the various colored tips assuming chemical viscosity of 1 cps (water thin)
(Water supply pressure and flow rates will vary so adjustments in the field may be necessary)
The dilution ratios refer to a static pressure of
50PSI with products
having a viscosity of 1 cps
Black Venturi
2.6 GPM
STANDARD
MEASUREMENT
TIP
Tip color:
Diameter mm:
Oz/Gal
gr/lt
%
Ratio
No tips
\
19.21
150
15.0
6,7
:1
Grey
3.25
18.95
148
14.8
6,8
:1
Black
2.54
18.69
146
14.6
6,9
:1
Beige
1.78
15.36
120
12.0
8
:1
Red
1.32
12.29
96
9.6
10
:1
White
1.09
7.43
58
5.8
17
:1
Blue
1.01
6.66
52
5.3
19
:1
Tan
0.88
5.12
40
4.0
25
:1
Green
0.71
3.20
25
2.5
40
:1
Orange
0.63
2.69
21
2.1
48
:1
Brown
0.58
2.18
17
1.7
59
:1
Yellow
0.51
1.54
12
1.2
83
:1
Acqua
0.46
1.15
9
0.9
111
:1
Purple
0.36
1.02
8
0.8
125
:1
Pink
0.25
0.38
3
0.3
333
:1
Transparent
\
No drill
ULTRAFINE TIP
Lime
0.228
0.29
2,3
0.23
435
:1
Burgundy
0.208
0.23
1,8
0.18
556
:1
Pumpkin
0.168
0.15
1,2
0.12
833
:1
Copper
0.155
0.09
0,7
0.07
1.429
:1
Table 1 – The dilution values given in this table are measured at a flow rate of 8 gpm and a supply
pressure of 50psi with a delivery hose of 50 ft.
The values in the table should be considered only as a reference, as they are dependent on many variables such
as water flow rate, pressure, chemical viscosity, temperature of the water etc.
To obtain a proper dilution it is recommended to perform the calibration as follows:
1. Fill a graduated container with the chemical product.
2. Using the Table 1, select and insert the metering tip closest to the desired dilution ratio for the product.
3. Insert the suction hose into the graduated container.
4. Select the product to be calibrated by turning the selector to the left or to the right.
5. Activate the spray gun and discharge into a container until the suction and delivery hoses are completely
full and free of air (check for air bubbles at the input and for a steady output stream).
6. Mark the level in the graduated container.
7. Turn on the spray gun to the maximum and discharge into a 1 liter or 1 gallon container (or other volumes
considering the proportion).
8. Turn off the spray gun when the container is completely filled.
9. Read the amount of product in the graduated container.
10. The difference of level between the point 8 and 5 indicates the amount of mixed product per gallon.
11. Repeat the calibration procedure for the other product.
A transparent metering tip is also provided without a pre-drilled opening.
This tip can be manually drilled to obtain a customized degree of dilution.
0000137791 Rev. 4.0 EN
6
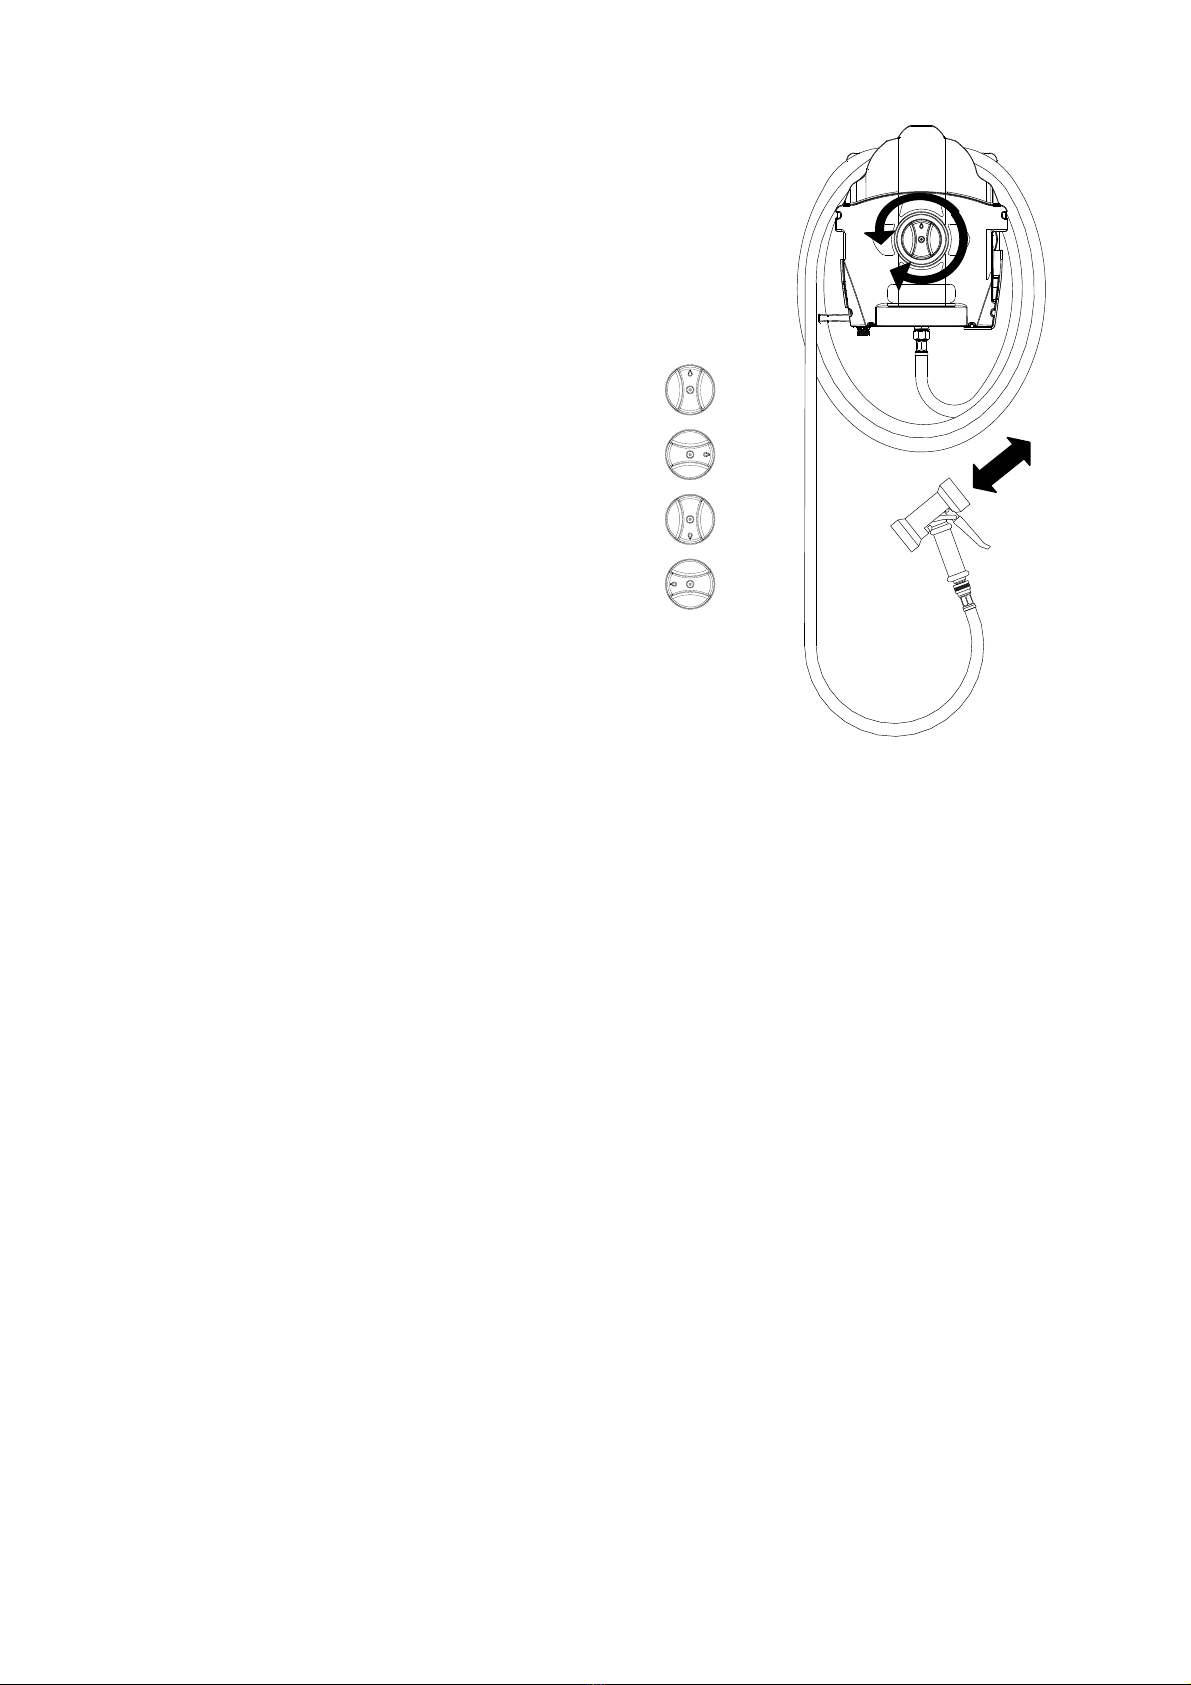
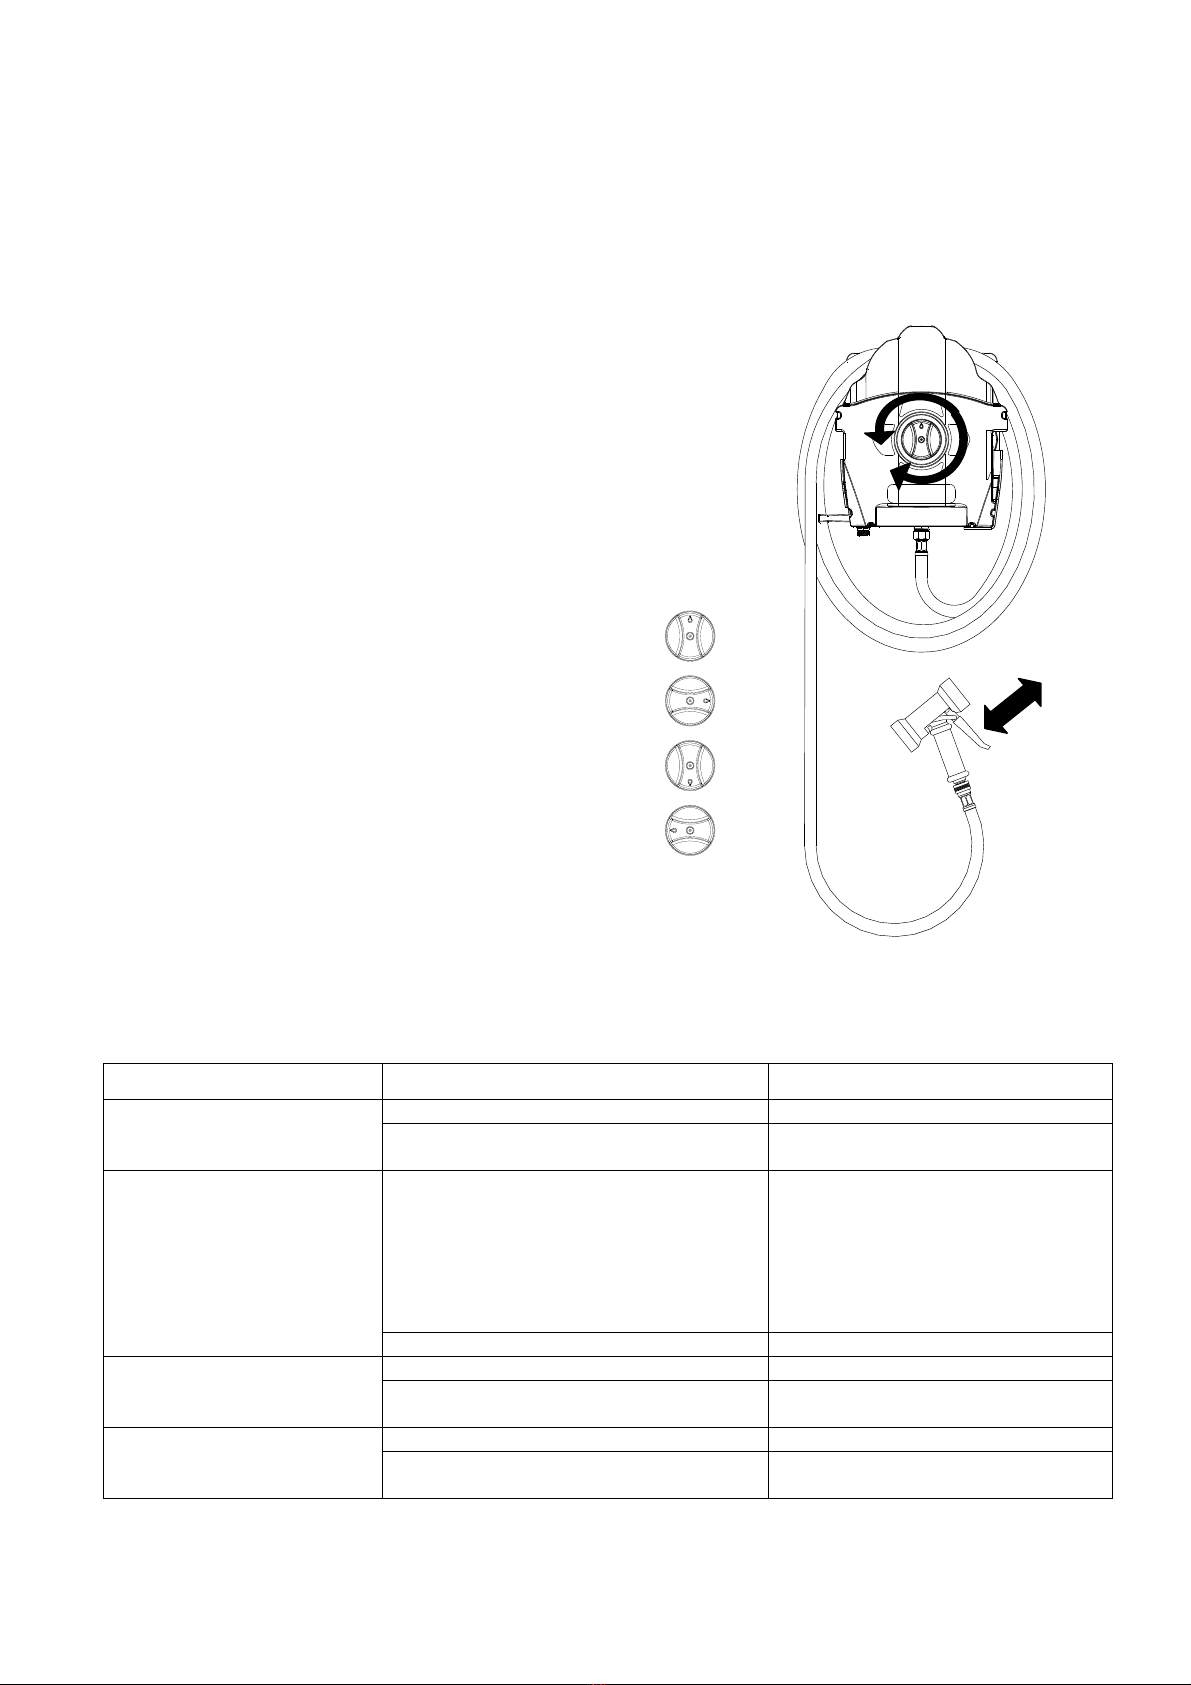
Operation
The ProTwin allows the dilution of chemical products with water without using
an electrical or other power source. The only energy required is the pressure
of the water passing through a venturi which aspirates a metered chemical
into the flow of water through the venturi.
When the installation is properly completed,follow these steps:
1. Turn on the water supply
2. Select the desired cleaning phase
- Selector facing up “OFF”
- Selector facing right “PRODUCT N° 1”
- Selector facing down “RINSE”
- Selector facing left “PRODUCT N° 2”
3. Activate the spray gun
4. Shut off the water supply when not in use

0000137791 Rev. 4.0 EN
7
MAINTENANCE
ITEM
CAUSE
MAINTENANCE
Water supply filter
Limestone deposits on the screen
Replace
Debris or solids on the screen
Clean with water or replace
Venturi
Limestone deposits
Clean or replace
(Warning: do not use tools to remove
the lime deposits because you can
affect the functioning of the venturi;
only use anti lime products)
Congealed product
Clean with water
Non-return valves
Worn
Replace
Congealed product
Clean if possible or Replace
Foot filters
Worn
Replace
Congealed product
Clean if possible orReplace
TROUBLESHOOTING GUIDE
PROBLEM
CAUSE
REMEDY
No flow
No water supply
Open the water supply outside tap
Select product or rinse
Turn on the spray gun
Clogged hydraulic parts
Check the water supply filter (input
station)
Check the venturi
Product is not mixed or not dosed
correctly
The foot filter is clogged
Clean or replace the filter
The calibration nozzle is clogged
Clean or replace the nozzle
Insufficient water pressure
A minimum pressure of 22PSI is
required for correct operation; if the
pressure is not correct, contact a
plumber
The chemical product container is
empty
Refill or change the chemical product
container
The suction hose is not properly
connected to the elbow fitting
Check that the suction hose is
properly connected to the fitting, use
a clamp for a better grip
The suction hose is crimped
somewhere
Check that the suction hose is
properly positioned
Debris or Solids in the venturi
Clean with water or compressed air
(Warning: do not use tools to remove
the lime deposits because you can
affect the functioning of the venturi;
only use anti lime products)
Concentration too high
The nozzle is not fully inserted or
Wrong metering tip
Check that the nozzle is securely
plugged into the non return valve or
select a smaller metering tip
The chemical product container
fills with water.
The non return valve is clogged or
worn
Clean or replace the non return valve

0000137791 Rev. 4.0 DE
1
PROTWIN
Das Paket enthält:
1. ProTwin
2. Saugschlauch ca.1,8m (1 Rolle pro Produkt)
3. Schlauchhalter
4. Komplettes Installationspaket:
- Wasserzulauf Winkelverschraubung ¾” GHT
- Plastik-Schlauchschellen (2 Stück pro Produkt)
- 15 Dosierspritzen(1 Tütepro Produkt)
- 4 sehr feine Dosierspritzen(1 Tütepro Produkt)
- Fußventil (1 Stück pro Produkt)
- Keramikgewicht(1 Stück pro Produkt)
- Krümmer (1 Stück pro Produkt)
- Wandanker (3 Stück)
- Schrauben(3 Stück)
- Dichtungen (3 Stück)

0000137791 Rev. 4.0 DE
2
TECHNISCHE MERKMALE:
Wasseranschluss
Oben rechts oder unten links
Anschlussart der
Zuführung
Weiblich ¾” GHT
Anschlussart des Ablaufs
Männlich¾” GHT
Fließrate des Kanals für
chemische Produkte
Mit einer Fließrate von 30L/min des Wasser 8gal/min bei
45psi: 2.4 gal/min
Fließrate des
Abflusskanals
Mit einer Fließrate von 30L/min des Wasser 8gal/min bei
45psi: 4.2 gal/min
Maximale Abmessungen
H = 15.75”
L = 13”
D = 6.3”
Betriebsdruck
Min 22 PSI
Max 85 PSI
Optimal: 30 – 60 PSI
Temperatur
Max 140°F (60°C)
!BITTE LESEN SIE FOLGENDE HINWEISE BEVOR SIE DIE REINIGUNGSSTATION INSTALLIEREN
ODER WARTEN
"Stellen Sie sicher, dass der Wasserdruck zwischen 22 -85 PSI liegt.
"Stellen Sie sicher, dass die Wassertemperatur nicht über 140° (60°C) liegt.
"Die ProTwin Anschlussstellen wurden mit gebräuchlichen Flüssigwaschmitteln, vermischt mit Wasser,
getestet.
"Kontrollieren Sie, ob das verwendete Mittel mit Polypropylen kompatibel ist.
"Installieren Sie die Station so nah wie möglich an die Wasserversorgungsstelle-
"Montieren Sie ProTwin so, dass Sie das Gerät leicht reinigen und bedienen können.
#ACHTUNG: Trennen Sie die Wasserversorgung bevor Sie ProTwin warten.
#ACHTUNG: Folgen Sie den gewöhnlichen Sicherheitsmaßnahmen. Verwenden Sie angemessene
Schutzkleidung für die Augen, das Gesicht und die Hände.
!Wir arbeiten ständig an unseren Produkten und behalten uns das Recht vor, Änderungen
vorzunehmen ohne dies vorher anzukündigen.
!Bei Nichtbeachtung dieser Schutzmaßnahmen können Sie sich selbst verletzen oder das Gerät
beschädigen.
!Verwenden Sie nur empfohlenes Werkzeug.
0000137791 Rev. 4.0 DE
3
INSTALLATION
ProTwin sollte so nah wie möglich an der Wasserversorgungsstelle installiert werden.
Vor der Montage sollten Sie kontrollieren, ob Sie alle Ventile und Oberflächen zum bedienen und reinigen
erreichen können.
Positionier- und Bohrpläne
Holen Sie ProTwin aus der Verpackung und entfernen Sie die
Abdeckung, indem Sie die oberen Schrauben entfernen und die
Löselaschen drücken. Sie haben jetzt Zugang zu den
Befestigungslöchern (diese befinden sich auf der Rückseite). Montieren
Sie ProTwin an die Wand mit den mitgelieferten Ankern, Schrauben und
Dichtungen.
Die Flexibilität von ProTwin erlaubt es, den Schlauchhalter als
integriertes oder eigenes Stück, wie auf dem Bild gezeigt, zu installieren.
177.5mm
198.0mm
250.0mm
9.8"
7.8"
7.0"
79.2mm 3.1"
PAVIMENTO
Bild 2 - Positionier- und Bohrpläne
Release
tabs
Screws
BODEN

0000137791 Rev. 4.0 DE
4
So installieren Sie ProTwin:
Bild 3 - Installation
Installation
1. Demontieren Sie den Link des Wasserzulaufs von der Station zu 90° und verbinden Sie den Schlauch mit dem
gleichen weiblichen Stromanschluss zu 3/4 GHT
2. Schließen Sie den Link zu 90° an Protwin an und kippen Sie diesen gegen den Uhrzeigersinn zu 45° und drehen
Sie im Uhrzeigersinn 45° bis die Verbindung schließt:
3. Schließen Sie den Schlauch mit Hilfe der Klemme und Schraube wie folgt an
4. Bohren Sie in die Oberseite des Tanks mit dem Produkt mit einem Durchmesser von ∅3/8
5. Befestigen Sie den Hydraulikkreis der Aspirationsprodukt (Tankseite), legen Sie nun der Reihe nach den
gelochten Deckel, das Gewicht und die Filter auf den Boden des Tanks. Befestigen Sie den Filter mit dem
Schlauch
6. Schließen Sie den hydraulischen Schaltkreis des Aspirationsprodukts wie folgt an die Station an
a. Wählen Sie die einzusetzende Kalibrierungsdüse, gemäß der Tabelle der Aspirationswerte
b. Schließen Sie den Link zu 90° an
c. Platzieren Sie das Aspirationsrohr bei 90° in die Armatur und befestigen Sie es mit einem Plastik-
Kabelbinder (wiederholen Sie dieses für das zweite Produkt):
7. Befestigen Sie den Ablaufschlauch an den ¾GHT weiblichen Anschluss von Protwin
8. Befestigen Sie die Dosierungspumpe
5
4
PRODUCT 1 PRODUCT 2
6
8
7
3
2
1
0000137791 Rev. 4.0 DE
5
HYRDAULISCHE DATEN - VERDÜNNUNGSVERHÄLTNIS
Das Verdünnungsverhältnis kann durch Verwendung von einer der 19 mitgelieferten Dosierspritzen erreicht
werden: Die Dosierspritzen haben kleine Öffnungen mit abnehmenden Durchmesser und sind durch verschiedene
Farben gekennzeichnet.
Tabelle 1 zeigt das Verdünnungsverhältnis von verschieden farbigen Spritzen, mit Annahme, dass die chemische
Viskosität bei 1cps (Wasser dünn) liegt (der Wasserdruck und die Fließrate können variieren, deswegen muss man
eventuell Änderungen in diesem Feld machen).
Die Verdünnungsverhältnis bezieht sich
auf einen statischen Druck von 50PSI mit
Produktenmit einer Viskosität von 1 cps
Black Venturi
2.6 GPM
STANDARD
DOSIERSPRITZE
Farbe:
Durchmesser
mm:
Oz/Gal
gr/lt
%
Verhältnis
Keine Spritze
\
19,21
150
15,0
6,7
:1
Grau
3,25
18,95
148
14,8
6,8
:1
Schwarz
2,54
18,69
146
14,6
6,9
:1
Beige
1,78
15,36
120
12,0
8
:1
Rot
1,32
12,29
96
9,6
10
:1
Weiß
1,09
7,43
58
5,8
17
:1
Blau
1,01
6,66
52
5,3
19
:1
Hellbraun
0,88
5,12
40
4,0
25
:1
Grün
0,71
3,20
25
2,5
40
:1
Orange
0,63
2,69
21
2,1
48
:1
Braun
0,58
2,18
17
1,7
59
:1
Gelb
0,51
1,54
12
1,2
83
:1
Hellblau
0,46
1,15
9
0,9
111
:1
Lila
0,36
1,02
8
0,8
125
:1
Pink
0,25
0,38
3
0,3
333
:1
Transparent
\
nicht gebohrt
SEHR FEINE
SPRITZE
Limette
0,228
0,29
2,3
0,23
435
:1
Burgunderrot
0,208
0,23
1,8
0,18
556
:1
Kürbisfarben
0,168
0,15
1,2
0,12
833
:1
Kupfer
0,155
0,09
0,7
0,07
1,429
:1
Tabelle 1 - Die Verdünnungsverhätnisse in dieser Tabelle wurden mit einer Fließrate von 8gpm und einem
Versorgunsdruck von 50psi mit einem 50ft Versorgungsschlauch gemacht.
Die Werte in der Tabelle sollten nur als Referenz dienen, da viele Variablen wie Wasser Fließrate, Druck,
chemische Viskosität, Wassertemperatur etc. beachtet werden müssen.
Um das richtige Verdünnungsverhältnis zu bekommen empfehlen wir die Kalibrierung wie folgt zu
machen:
1. Befüllen Sie einen graduierten Behälter mit dem chemischen Produkt.
2. Mit Hilfe von Tabelle 1 suchen Sie sich die passendste Dosierspritze für das gewünschte
Verdünnungsverhältnis aus.
3. Legen Sie den Saugschlauch in den Behälter.
4. Wählen Sie das Produkt aus, welches kalibriert werden soll, indem Sie den Schaltknopf nach links oder
rechts drehen.
5. Aktivieren Sie die Spritzpistole und entladen Sie alles in einen leeren Behälter, bis die Schläuche komplett
voll und frei von Luft sind (schauen Sie ob sich Lufblasen bilden und ob ein stätiger Ausgabe-Strom
besteht).
6. Markieren Sie die Höhe im graduierten Behälter.
7. Schalten Sie die Spritzpistole auf höchste Stufe und entladen Sie sie in einen 1 Liter Behälter (oder je nach
Proportionen in einen größeren).
8. Schalten Sie die Pistole aus sobald der Behälter voll ist.
9. Messen Sie die Menge des Produkts im graduierten Behälter.
0000137791 Rev. 4.0 DE
6
10. Der Unterschied des Levels zwischen Punkt 8 und 5 indiziert die Menge des gemixten Produkts pro
Gallone.
11. Wiederholen Sie diesen Vorgang für das andere Produkt.
Eine transparente Spritzdüse ist ohne Loch mitgeliefert. Diese Spritze kann selbst gebohrt werden um das
Verdünnungsverhältnis selbst einzustellen.
Bedienung
ProTwin ermöglicht die Verdünnung von chemischen Produkten mit Wasser
ohne elektrische oder andere Stromquelle. Die einzige Energie die genutzt
wird, ist der Druck des Wasser, während es durch einen Venturi fließt. Dabei
wird ein chemisches Produkt in den Wasserfluss und durch den Venturi
gezogen.
Wenn Sie die Installation gemacht haben, folgen Sie bitte diesen
Anweisungen:
1. Schalten Sie die Wasserversorgung an
2. Wählen Sie die gewünschte Reinigungsoption
- Schaltknopf nach oben "CLOSE"
-Schaltknopf nach links "PRODUKT Nr. 1"
- Schaltknopf nach unten "SPÜLEN"
- Schaltknopf nach rechts "PRODUKT Nr. 2"
3. Aktivieren Sie die Spritzpistole
4. Schalten Sie die Stromversorgung nach der letzen Benutzung des Tages ab.
WARTUNG
GEGENSTAND
URSACHE
WARTUNG
Wasserversorgungsfilter
Kalkablagerungen auf dem Bildschirm
Austauschen
Schmutz oder Feststoffe auf dem
Bildschirm
Mit Wasser reinigen oder
austauschen
Venturi
Kalkablagerungen
Reinigen oder austauschen
(Achtung: Verwenden Sie kein
Werkzeug um die Kalkablagerungen
an der Venturi zu entfernen, diese
könnten Sie dabei schädigen.
Verwenden Sie nur Anti-Kalk
Produkte)
Geronnenes Produkt
Mit Wasser reinigen
Rückschlagventile
Abgenutzt
Austauschen
Geronnenes Produkt
Wenn möglich mit Wasser reinigen
oder austauschen
Fußventile
Abgenutzt
Austauschen
Geronnenes Produkt
Wenn möglich mit Wasser reinigen
oder austauschen

0000137791 Rev. 4.0 DE
7
PROBLEMLÖSUNGEN
PROBLEM
URSACHE
LÖSUNG
Kein Fluss
Keine Wasserversorgung
Öffnen Sie die Leitung der
Wasserversorgung
Wählen Sie ein Produkt oder Spülen
Sie
Schalten Sie die Spritzpistole an
Verstopfte hydraulische Teile
Überprüfen Sie den
Wasserversorgungsfilter
(Eingabestation)
Überprüfen Sie die Venturi.
Das Produkt ist nicht gemixt oder
nicht korrekt dosiert
Das Fußventil ist verstopft
Säubern Sie den Filter oder
tauschen Sie ihn aus.
Das Kalibrierdüse ist verstopft
Säubern Sie die Düse oder tauschen
Sie sie aus.
Zu wenig Wasserdruck
Damit das Gerät ordnungsgemäß
funktionieren kann muss ein
Wasserdruck von mindestens 1.5
Bar bestehen. Wenn dies nicht der
Fall ist, sollten Sie einen Klempner
rufen.
Der Behälter mit dem chemischen
Produkt ist leer.
Befüllen Sie den Behälter.
Der Saugschlauch ist nicht richtig an
die Winkelverschraubung
angebracht.
Kontrollieren Sie, ob der
Saugschlauch ordnungsgemäß an
die Winkelverschraubung gebracht
ist, verwenden Sie eine Klemme für
einen besseren Halt.
Der Saugschlauch ist an einer Stelle
gequetscht
Kontrollieren Sie, ob der
Saugschlauch ordnungsgemäß
positioniert ist.
Debris/Feststoffe in der Venturi
Reinigen Sie ihn mit Wasser oder
Druckluft (Achtung: Verwenden Sie
kein Werkzeug um die
Kalkablagerungen an der Venturi zu
entfernen, diese könnten Sie dabei
schädigen. Verwenden Sie nur Anti-
Kalk Produkte)
Die Konzentration ist zu hoch
Die Spritzdüse ist nicht richtig
angebracht oder
es wurde die falsche ausgesucht
Üperprüfen Sie, ob die Düse richtig
an das Rückschlagventil montiert ist
oder nehmen Sie eine kleinere oder
größere Kalibrierdrüse.
Der Behälter für das chemische
Produkt füllt sich mit Wasser
Das Rückschlagventil ist verstopft
oder abgenutzt
Reinigen Sie das Ventil oder
tauschen Sie es aus.

0000137791 Rev. 4.0 ES
1
PROTWIN
CONTENIDO DEL PAQUETE:
1. ProTwin
2. Manguera de Succión de 6 pies (1 rollo por cada producto)
3. Soporte de Manguera
4. Kit Completo de Instalación:
- Entrada de Agua con Accesorio de Codo de ¾” GHT
- Abrazaderas de Plástico para manguera (2 por cada producto)
- 15 puntas de medición (1 bolsa por cada producto)
- 4 puntas ultra-delgadas (1 bolsa por cada producto)
- Válvula de pie (1 por cada producto)
- Peso de Cerámica (1 por cada producto)
- Codo de Succión (1 por cada producto)
- Anclas de Pared (3 piezas.)
- Tornillos (3 piezas.)
- Arandelas (3 piezas.)

0000137791 Rev. 4.0 ES
2
CARACTERÍSTICAS TÉCNICAS:
Conexión de
Suministro de Agua
Móvil en la parte superior derecha o inferior izquierda
Tipo de Conexión de
Entrada
Hembra ¾” GHT
Tipo de Conexión de
Salida
Macho ¾” GHT
Velocidad de Flujo del Canal
de los Productos Químicos
Con una velocidad de flujo del suministro de agua de
8gal/min a 45psi: 2.4 gal/min
Velocidad de Flujo de
Enjuague del Canal
Con una velocidad de flujo del suministro de agua de
8gal/min a 45psi: 4.2 gal/min
Dimensiones Máximas
H = 15.75”
L= 13”
D = 6.3”
Presión de Trabajo
Mín 22 PSI
Máx 85 PSI
Óptimo: 30 – 60 PSI
Temperatura
Máx 140°F (60°C)
!POR FAVOR LEA LAS SIGUIENTES ADVERTENCIAS ANTES DE INSTALAR O DAR SERVICIO A LA
ESTACIÓN DE LIMPIEZA.
"Asegúrese que la presión del suministro de agua se encuentre entre 22 -85 PSI.
"Asegúrese que la temperatura del suministro de agua no exceda los 140° (60°C)
"Los accesorios de ProTwin´s han sido probados con los líquidos detergentes comúmente usados
mezclados con agua.
"Verifique que el detergente usado es compatible con polipropileno.
"Instale la estación tan cerca como sea posible de un punto de conexión de suministro de agua.
"Instale el ProTwin considerando tener un acceso fácil para la limpieza y rutina de mantenimiento.
#ADVERTENCIA: Desconecte el suministro de agua antes de dar servicio al ProTwin.
#ADVERTENCIA: Siga los procedimientos de seguridad comúnes. Use una protección adecuada
para ojos, cara, manos y ropa.
!Nosotros trabajamos constantemente para mejor nuestros productos y nos reservamos el derecho
de hacer cambios en algún momento sin previo aviso.
!El incumplimiento de estas medidas de seguridad puede causar lesiones personales, o daño en el
equipo.
!Solo use los accesorios recomendados.

0000137791 Rev. 4.0 ES
3
INSTALACIÓN
El ProTwin debe ser instalado donde sea fácilmente conectado al suministro de agua.
Antes de instalarse, verifque que todas las válvulas puedan ser fácilmente operadas y que las superficies
expuestas puedan ser accesibles para la limpieza y el mantenimiento de rutina.
Colocación y planes de Perforación:
Remueva el Pro Twin de la caja y remueva la cubierta, retirando los
tornillos de la tapa y presionando las pestañas de liberación. Usted
puede ahora accesar a los orificios de montaje (localizados en el panel
trasero). Coloque el ProTwin en la pared usando las anclas, tornillos y
arandelas proporcionadas.
La versatilidad del Pro Twin permite que el soporte de manguera sea
instalado como una parte integrada de la unidad o montada
independientemente como se muestra en la figura de abajo.
177.5mm
198.0mm
250.0mm
9.8"
7.8"
7.0"
79.2mm 3.1"
PAVIMENTO
Figura 2 – Planes de Perforación y Colocación.
Release
tabs
Screws
PISO
Tornillos
Pestañas de
liberación
0000137791 Rev. 4.0 ES
4
Cómo instalarlo:
Figura 3 – Instalación
1.Desensamble el vínculo de la entrada de agua de la estación a 90° y conecte la manguera a la misma fuente tipo
hembra de agua 3/4GHT;
2. Inserte el vinculo a 90° en Protwin,inclinado hacia el sentido contrario de las manecillas del reloj por 45°,
consecutivamente rote 45° en sentido de las manecillas del roj para asegurar la conexión;
3 . Asegure la manguera al Protwin a través de abrazaderas y tornillos proporcionados como se muestra;
4 . Perfore la tapa de arriba del tanque contenedor del producto, con un diametro de punto∅3/8;
5 . Conecte el circuito hidraúlico del producto de aspiración (del lado del tanque) inserte en una fila: la tapa
perforada, pesar y filtrar el fondo, asegurar el filtro con la manguera de plástico proporcionada;
6 . Conecte el circuito hidraúlico del producto de aspiración a la estación como se describe a continuación:
a. Seleccione la "calibración de la boquilla de acuerdo a la tabla que será insertada dentro la válvula de
aspiración se muestra en la figura;
b. Inserte el vinculo en 90°;
c. Coloque el tubo de aspiración dentro de la conexión de 90° y luego fíjelo con bridas de plástico (repetir
para el segundo producto);
7 . Conecte la manguera de desagüe al Protwin Hembra de ¾GHT;
8 . Conecte la pistola dosificadora.
5
4
PRODUCT 1 PRODUCT 2
6
8
7
3
2
1
Table of contents
Languages:


