Aztec STRIPMASTER User manual

STRIPMASTER
OWNER’S MANUAL
(215) 721-4455 (800) 331-1423 FAX (215) 721-7213
4304 BETHLEHEM PIKE • TELFORD, PA 18969

I. POWERED EQUIPMENT PREPARATION
A. Familiarize yourself with equipment by reading
manuals and identifying components and controls.
B. Check that suggested maintenance schedule has
been observed.
C. All machines are equipped with a multi-function
maintenance meter. The four functions include the
following: hours, job timer, service alarm and
tachometer. (See Engine Maintenance Meter Instructions)
D. Never let an untrained person operate or perform
repairs on the machine. They may hurt themselves,
damage the floor or the equipment.
E. Never change or alter the propane control equipment!
F. Always check oil before attempting to start engine!
G. Install approved and properly filled propane tank.
•Never complete the connection of the tank to the
machine by using a wrench. Always do it by hand.
Listen for the rush of fuel to the lock-out device
when you open the tank valve. If you hear this, it
will indicate that a good connection has been
made at the tank.
•European tank connections may require use of a
wrench. However, care should be taken not to
overtighten the gas fittings.
•Provide and use ear protection during operation.
II. STARTING THE ENGINE
A. Open propane (LPG) tank valve (counter clockwise).
B. Set throttle control at idle for 12 V & choke for
electric start system.
C. Electric start - push “Start” button until engine starts.
Starter should not be engaged for more than 10
seconds at a time.
•When a propane tank is overfilled it may temporarily
cause the fuel regulator to malfunction. Remove the
tank to a well ventilated location. Release some gas
until the cloud disappears and escaping gas is
“clear”. Reinstall tank.
•All machines are equipped with tamper proof fuel
systems. If a fuel problem exists, contact an
authorized service center.
•Propane tanks should be removed & stored in a
protected off site area.
III. STRIPMASTER OPERATION
A. After starting engine, put throttle lever in idle position
until ready to strip. Unit has centrifugal clutch. Brush
will not turn while engine is in idle position.
B. Increase engine speed to desired RPM (2500-3000).
Brush will begin to function as you reach 1800 RPM
Engine speed not to exceed 3400 RPM.
C. Push machine straight ahead at normal walking speed.
•When operation is completed remove tank and
store in a secure, protected off site (preferably
outdoor) location.
•Do not use on surfaces with a gradient exceeding 2%.
•Never tilt back machine to maintenance position
while engine is running.
•Never reach under machine deck when engine
is running.
IV. CAUTION IN STORAGE AND
HANDLING: PROPANE TANKS
A. Always store equipment away from heater rooms,
boilers, gas-fired water heaters or any other source of
open flame and away from possible falling objects.
B. Always vent an over-full bottle out of doors away
from all closed places and away from any fire or
flame producing device. Use a screwdriver to vent
excess propane which escapes as a white mist until
at proper level in tank.
C. Always store LPG tanks outside. Remove all tanks
from inside building except during equipment use.
Store them in a secure, well ventilated area.
V. BRUSH ADJUSTMENT
A. To adjust or change brush, lean machine back
towards propane tank. Never turn machine on its side.
B. Depending on what kind of surfaces the machine is
used on; concrete, ceramic tile, vinyl tile, brush life
should range from 500,000 to 1,000,000 square feet.
As the brush wears down the nose of the machine
will lean slightly forward causing the brush to wear
down more on the edges.
C. The brush bristles start out 1 1/2" long. When the
outer bristles are approximately 3/4"-1" move the
wheels to the higher holes on the wheel mounts. This
will extend brush life and allow the machine to most
efficiently address the floor.
PG. 2 STRIPMASTER

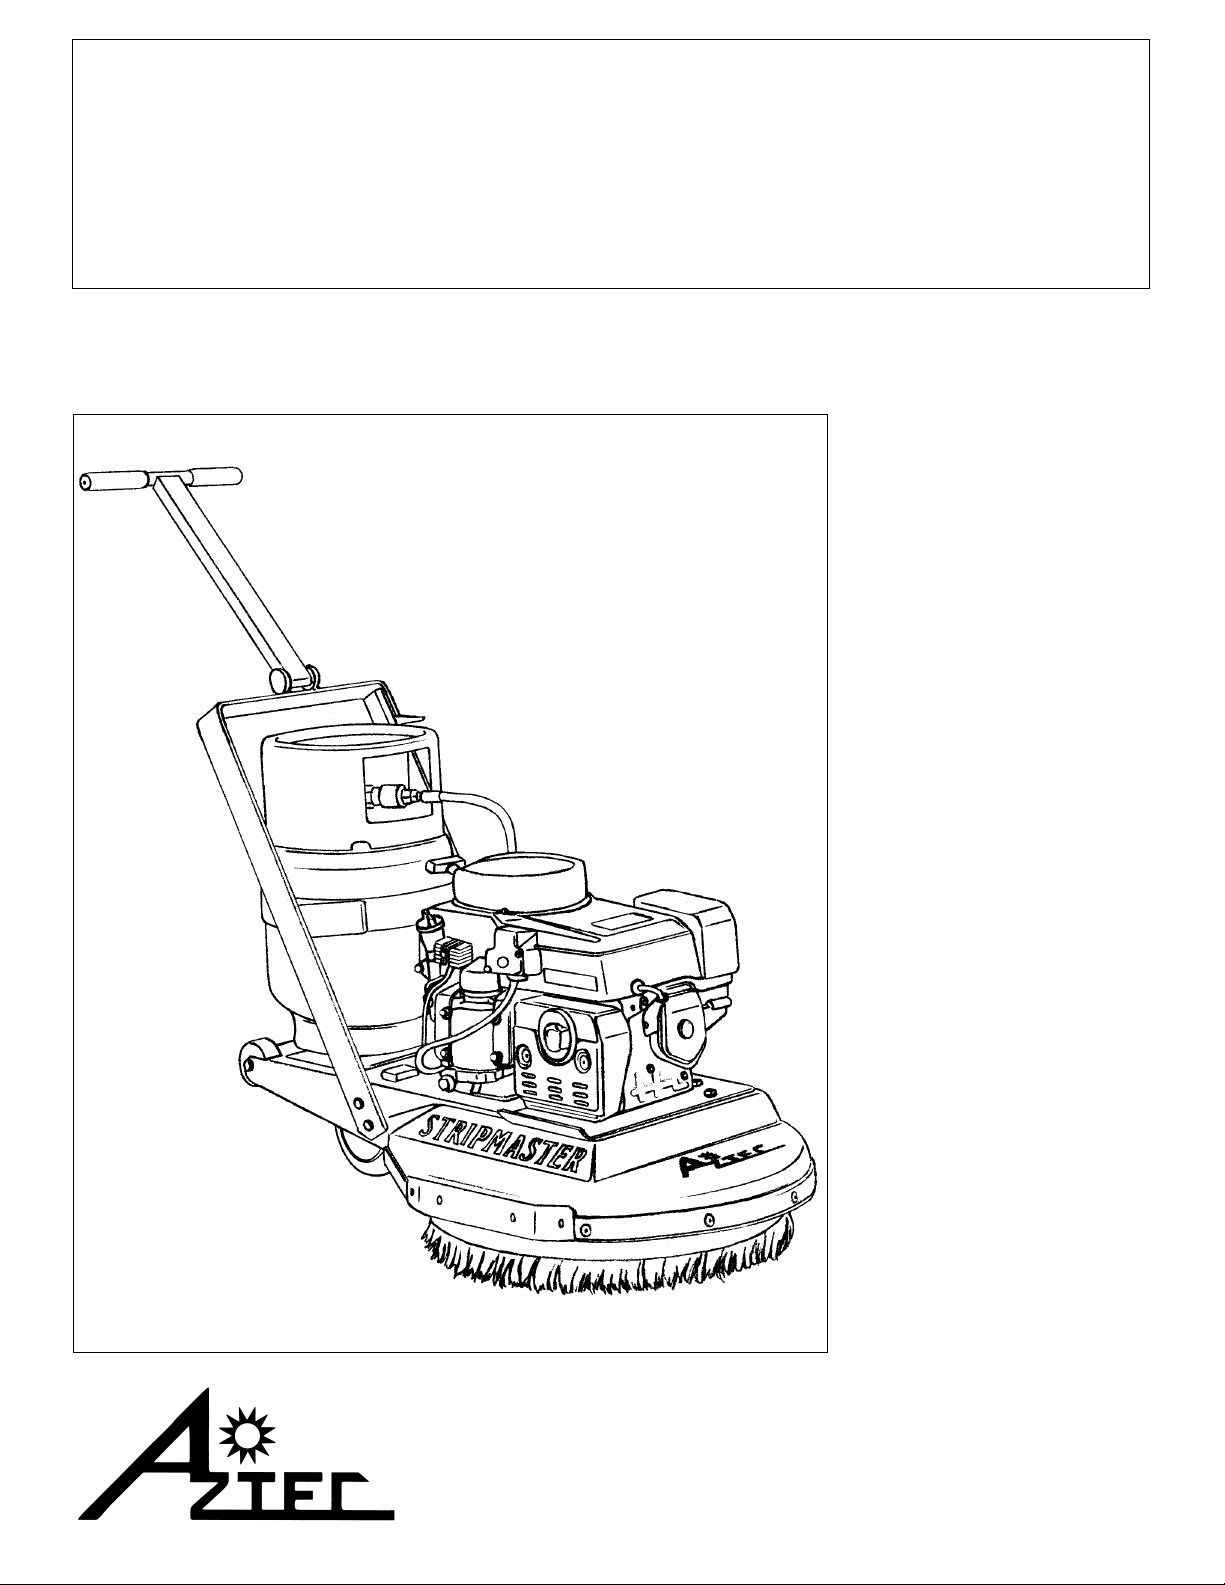
STRIPMASTER INFORMATION
I. ENGINE
A. See engine manual for maintenance schedule.
•Consult local laws regarding used oil.
II. BRUSH, BELT, IDLER PULLEY, OR DRIVE
SHAFT REPLACEMENT:
A. Adjust the handle to enable the buffer to stand on
rear wheels. Never turn machine on its side.
•Handle must be in shipping (forward) position to
insure stability in the “tilt back” position. A
second person should aide in the lift and to
secure the buffer while being serviced.
•Do not use handle when attempting to tilt
back machine for service or cleaning. Handle
is designed for control during operation — Do not
use excessive vertical pressure.
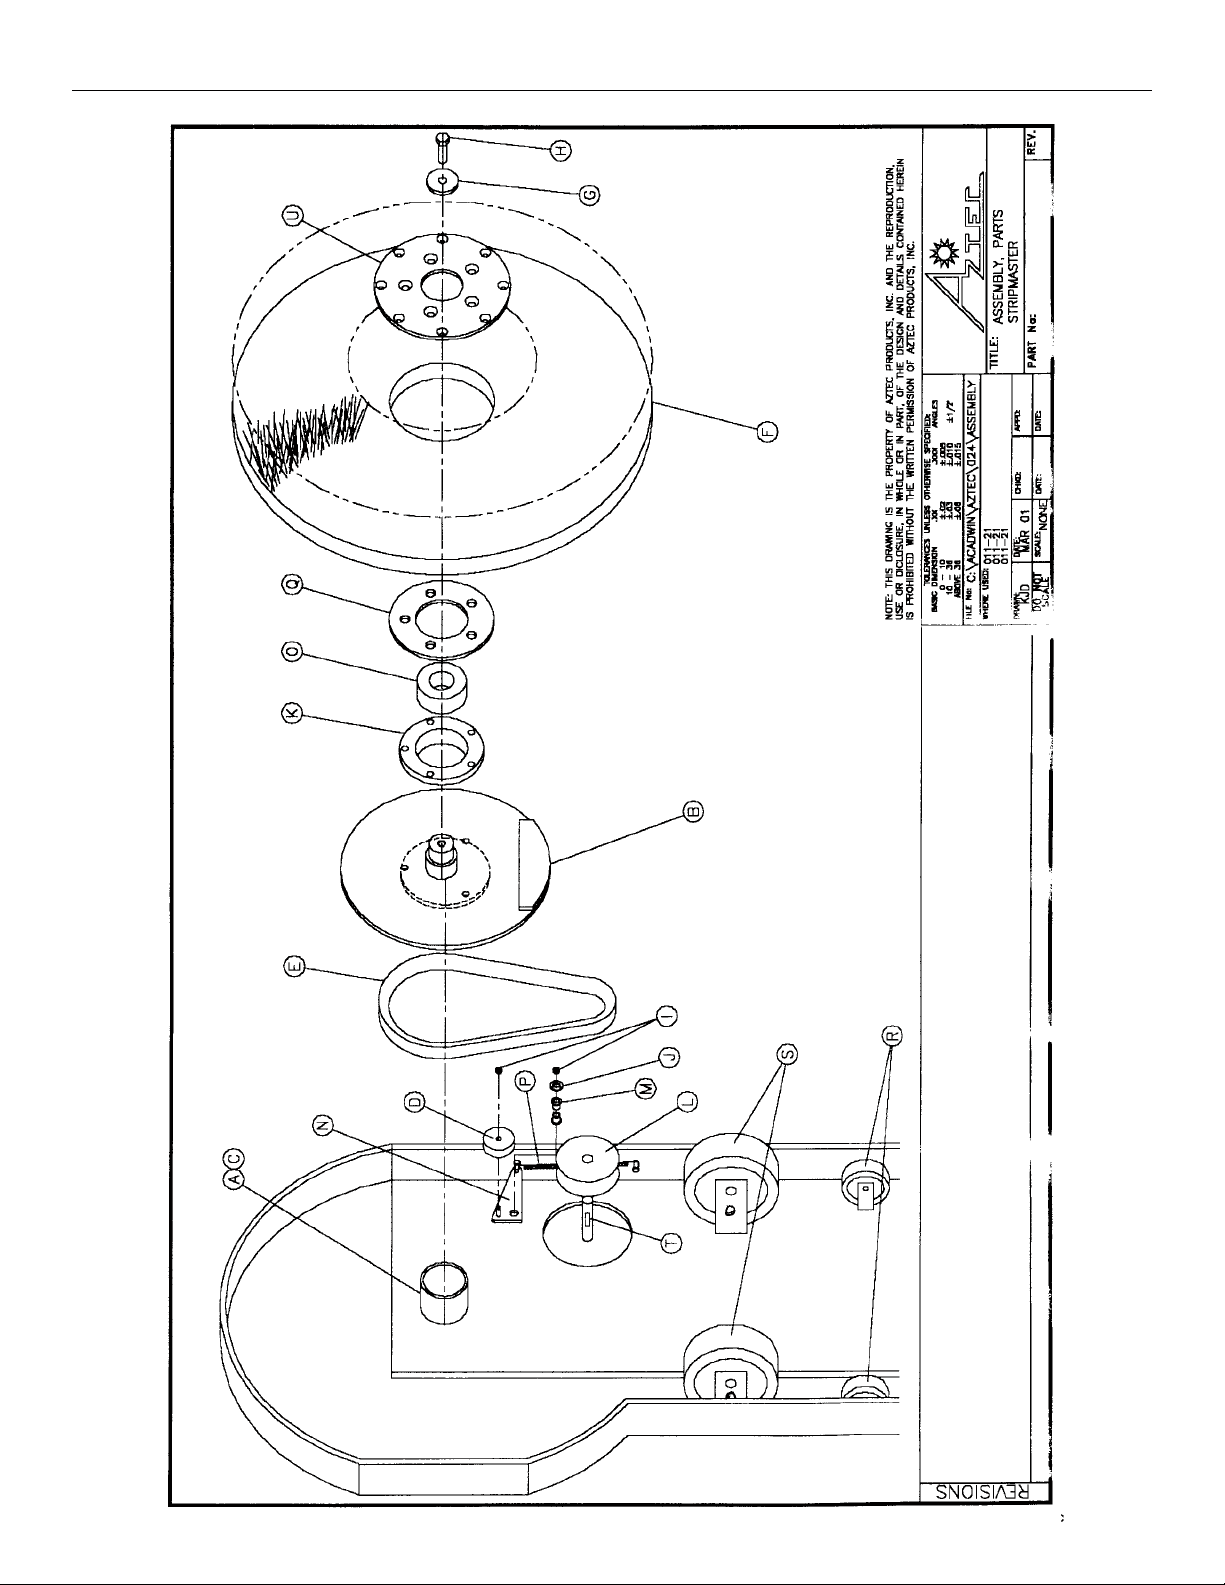
B. Remove brush nut & brush centering device.
C. Remove brush. (Replace if worn.)
D. Remove idler pulley. (Replace if worn.)
E. Remove belt(s). (Replace if worn.)
F. To remove driveshaft unit: Remove retaining bolt &
clip—pull driveshaft out of housing—use of a slide
hammer may assist in removal (Do not pry with
crow bar). While drive shaft is removed, spin bearings.
If roughness is felt, bearing replacement may be
necessary.
G. To reassemble, reverse order of all steps taken above.
NOT ALL OF THESE STEPS WILL BE NECESSARY FOR
ALL JOBS, BUT IF THEY ARE, THE ENTIRE JOB CAN
BE COMPLETED QUICKLY WITH A FEW TOOLS.
III. LUBRICATION INSTRUCTIONS:
A. Refer to engine manufacturer’s owner’s manual and
comply completely with the lubrication instructions.
Any evidence of under -lubrication will make a
claim against the manufacturer invalid.
B. Thoroughly clean air filter each time engine oil is changed.
C. Keep a good service log on each machine with the
date, hour meter reading, type(s) of service performed.
This will assist you and Aztec in spotting weaknesses
in our respective areas of responsibility.
IV. ENGINE MAINTENANCE METER
A. This meter is used to perform preventive maintenance
which benefits you with increased fuel economy, less
down time and longer engine life. It is simple to
operate because of its functional and user friendly
design and has a function for every application, detailed
as follows:
HOUR METER: Records actual running time of
engine. Non-erasable.
B. TACHOMETER: Tells you what RPM your engine is
running at for maximum power and efficiency. Reads
up to 6,000 RPM Do not run in excess of 3400 RPM.
RETURN GOODS POLICY
As an Aztec customer, you are aware that the equipment
we design and build is both innovative and unique. Since
this is true, in order to trouble-shoot our equipment, we
rely heavily on returned defective or failed parts so that
we can examine first-hand the causes of failure. While
this may at first seem to be an inconvenience, ultimately
you benefit from safer and better designed machine
components. Please give us the opportunity to serve
you better by following these RGA (Returned Goods
Authorization) rules.
1. We maintain the serial number, date of shipment or
sale, and customer name on each piece of equipment
sold. If you were the purchaser, please reference that
information on your request for replacement or repair.
If you purchased the equipment through a distributor,
please contact them first. If you are not satisfied,
contact Aztec and give us the Distributor name,
purchase date, and the serial number of the product.
2. Order the replacement part from your distributor or
Aztec Products by calling 800-331-1423 during
normal business hours (8:30-5:00 Eastern Time).
We will ship warranted parts at our expense.
3. When dealing with Aztec ask for an RGA number
when you are ordering the replacement part. Return
the failed part to us within 30 days, freight prepaid,
exactly as it was at the time of failure. Our inspection
and evaluation will attempt to determine the probable
cause of failure.
4. If our inspection reveals that the failed part was
defective, we will credit your account for the entire
amount of the part including your cost of return
freight. When incomplete parts are returned for credit,
STRIPMASTER PG. 3

AZTEC PRODUCTS WARRANTY
Aztec Products, Inc. warrants its products to be free from defects in material and workmanship for
a period of one year from the date of sale. (Sidewinders will be warranted for one year or the total
wear time on a set of brushes, whichever comes first.) All engines are warranted by the
manufacturer of the engine. Honda is warranted for 2 years. The Onan engines are warranted for
3 years but can be extended to 5 years.
Aztec Products, Inc. agrees, at its discretion, to repair or replace at its own expense any product
or part(s) which examination proves to be defective in workmanship or materials provided that
the purchaser notifies Aztec Products, Inc. directly, within the warranty period and follows the
Return Policy.
This warranty does not apply to or cover equipment damaged by misuse, abuse, neglect,
accident, or any use not specified in the instruction manual, or any other circumstances that are
clearly out of the control of Aztec Products, Inc. or their authorized agents.
The propane devices are to be regarded as non-serviceable equipment. All repairs or changes must
be made under the supervision or arrangement of Aztec Products, Inc. or their agents unless
prior written consent has been issued. Any deviation from this arrangement shall make the owner
of the equipment and/or party involved in those changes responsible for any and all damages
resulting from such changes.
The foregoing is the entire and only Aztec Products, Inc. warranty which in no event covers
incidental or consequential damages resulting from any such defective product or part(s). This
warranty gives specific legal rights. Purchaser may have other rights which may
vary from state to state.
RETURN GOODS POLICY (cont’d)
their condition or state of incompletion will be
assessed against the credit claim at the sole
discretion of Aztec Products, Inc.
5. We also offer to do warranty related repairs free of
charge at our facility. Arrangements must be made in
advance as outlined above. We will not accept freight
collect returns or returns that do not indicate the RGA
# on the packing list.
Your satisfaction in all of your dealings with Aztec
Products, Inc. is extremely important to us. We intend
to be reasonable on any matter that is related to our
warranted service or other wear-related problems which
our customers feel need attention. Please help us to help
you. Before assuming that a part is defective, check the
repair manual to see if the problem might be something
that you or one of your employees might be capable of
correcting. If it is not, follow the above policy and depend
on us to respond quickly and responsibly.
PG. 4 STRIPMASTER
This warranty is non-transferable.
AZTEC PRODUCTS, INC.
4304 Bethlehem Pike • Telford, PA 18969 • (215) 721-4455

STRIPMASTER PG. 5
Notes

PG. 6 STRIPMASTER

STRIPMASTER PG. 7
PART DESCRIPTION PART NUMBER QTY NOTES
A BEARING CAPTURE N/A 1
B DRIVE SHAFT 024-772DS 1
C SET SCREW N/A 1 1/4x20x1/2" BOLT
D V-IDLER PULLEY 188-V42B 1
E DRIVE BELT 113-L536
F BRUSH 20" 201-20000SP 1
G BRUSH HOLDER PLATE 024-700 1
H BOLT N/A 4 3/8"-16x1 1/4x3/4 BOLT
I HEX NUT N/A 3 3/8"-16 HEX NUT
J FLAT WASHER N/A 2 5/16" FLAT WASHER
K BEARING HOUSING 024-100 1
L CENTRIFUGAL CLUTCH 311-160015 1
M NYLON BUSHING 196-71200 2
N CLUTCHING IDLER 024-962I 1
O BEARING 024-200 1
P SPRING 173-7599-DWG 1 .085-.75(OD)x7" SPRING
Q SPACER 024-300
R POLY WHEEL 156-PB-03041-08 2 3x1.25 POLYOFIN WHEEL
S 5" WHEEL 156-ACPL4-5J3 2
T KEY 199-NHNT-SE-UND 1 1/4" SQUARE KEY
U BRUSH ADAPTER PLATES 024-400 1
PART LIST FOR STRIPMASTER

(215) 721-4455 (800) 331-1423 FAX (215) 721-7213
4304 BETHLEHEM PIKE • TELFORD, PA 18969
Table of contents
Other Aztec Cleaning Equipment manuals
Popular Cleaning Equipment manuals by other brands

HB-THERM
HB-THERM M8146-EN Assembly instructions

Larson Electronics
Larson Electronics IND-HVAC-DTW-UVC-R1-SS Series Instruction guide

Becca
Becca Solvent Saver 9711 Operator's guide

Meech
Meech CyClean Series operating manual

Biosecurity Technology
Biosecurity Technology Bio-Safe quick start guide

Homeright
Homeright Deck Pro StainStick With Gap Wheel instructions