Semi-auto EXS-128 Manual
EXS-128 AUTOMATIC STRAP MACHINE
OPERATION &MAINTENANCE MANUAL
+7(977) 478-08-97 Мазур Руслан
+7(926) 571-19-50 Мазур Руслан
Заказ Оборудования изапчастей

SAFETY INSTRUCTIONS
Read these safety instructions before operating
or servicing your strapping machine.
1. Before operating the machine, please fit over voltage and under voltage protection to the machine.
2. Wear eye or face, and hand protection. Do not wear loose clothing.
3. Keep hands or other parts of the body out of the strap chute area during operation.
4. The temperature of the heater plate is very high. Do not touch.
5. Do not insert strap while there is not a package on the operation table.
6. Do not replace any safety parts of different specifications.
7. Shut off all electric power after machine operation or servicing machine.
8. Do not use water or steam to clean the machine.
9. Keep this operation manual with your strapping machine. Refer to it often.
- 1 -
+7(977) 478-08-97 Мазур Руслан
+7(926) 571-19-50 Мазур Руслан
Заказ Оборудования изапчастей

TABLE OF CONTENTS
Assembly of arch and machine --------------------------------------------------3-7
Important safety information ------------------------------------------------------8
Chapter 1 Explanation and specification --------------------------------------9
Chapter 2 Safety instruction ------------------------------------------------------10
Chapter 3 Exterior machine -------------------------------------------------------11
Chapter 4 Switches -----------------------------------------------------------------12
Chapter 5 Preparation for operation --------------------------------------------13-15
Chapter 6 Operation ----------------------------------------------------------------16
Chapter 7 Stop Operation ---------------------------------------------------------16
Chapter 8 Shutting down ----------------------------------------------------------16
Chapter 9 Repair and maintenance ---------------------------------------------17
Chapter 10 Adjustment -------------------------------------------------------------18-19
Chapter 11 Trouble shooting ------------------------------------------------------20-22
- 2 -
+7(977) 478-08-97 Мазур Руслан
+7(926) 571-19-50 Мазур Руслан
Заказ Оборудования изапчастей
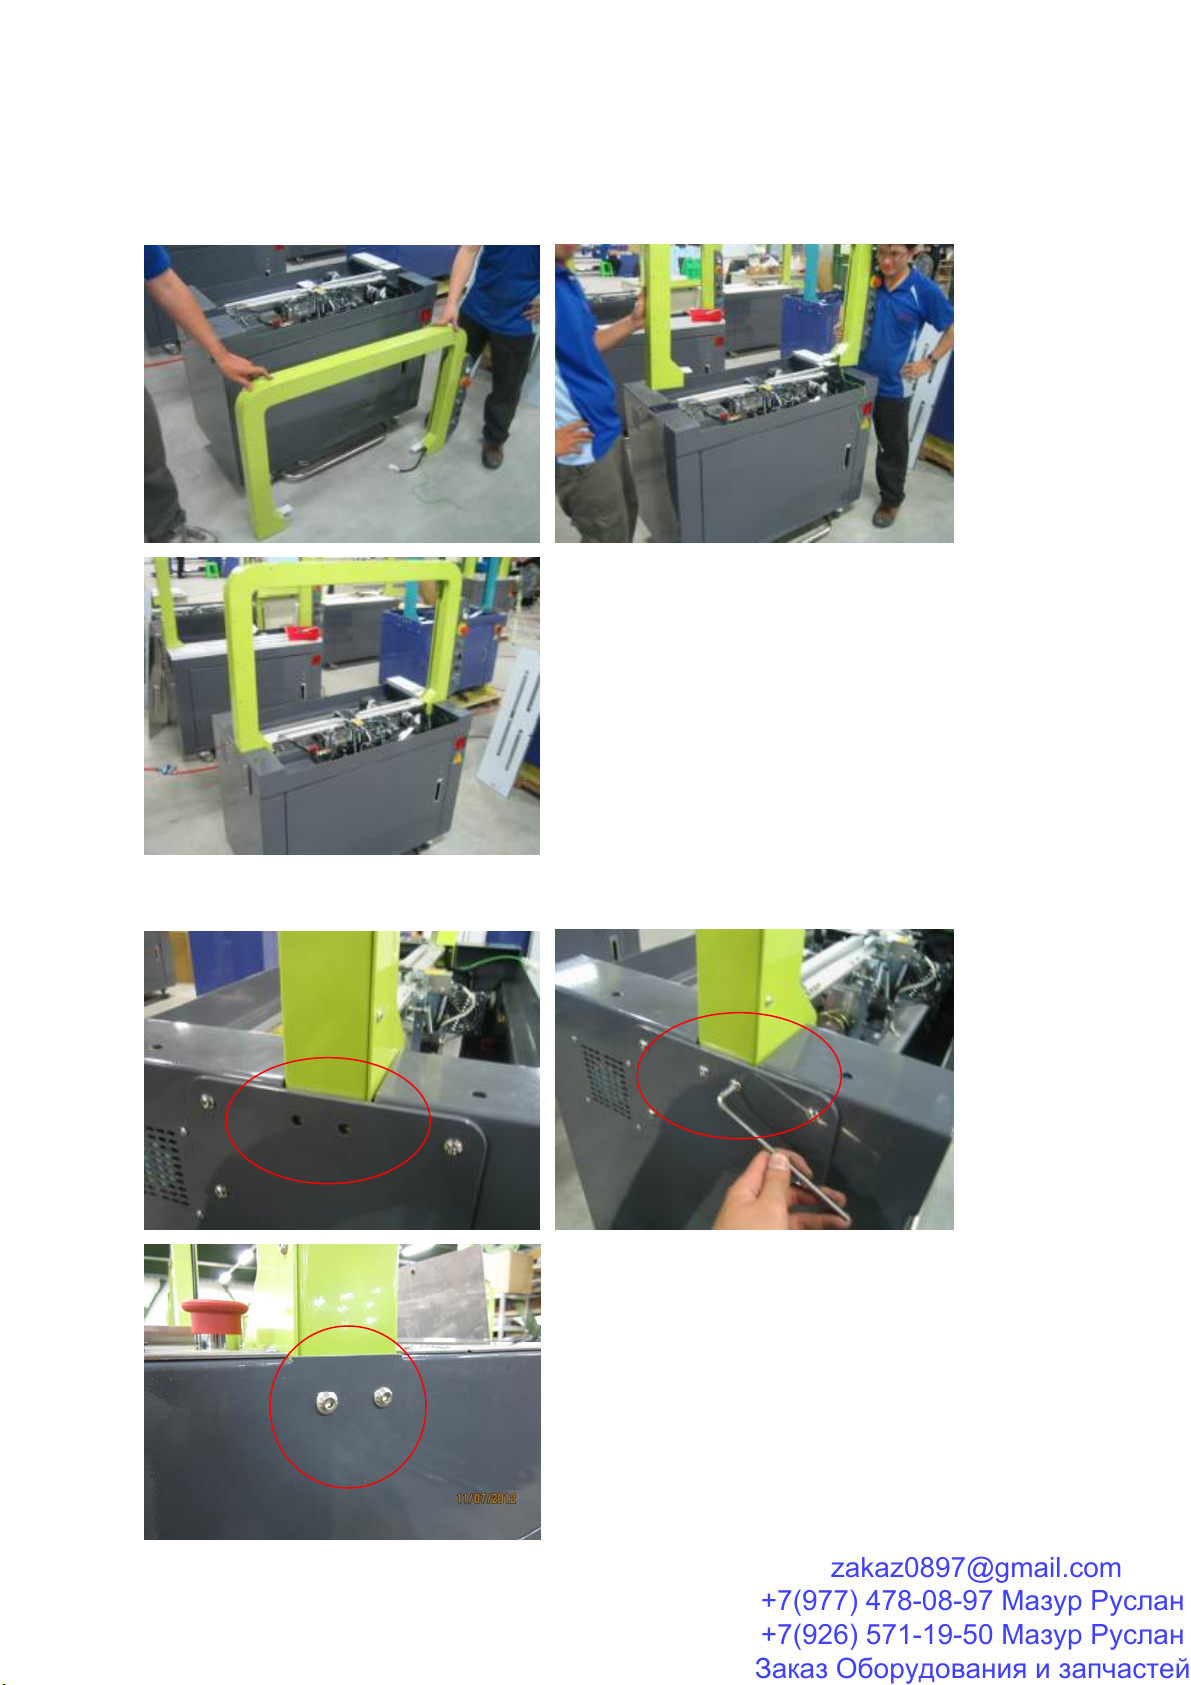
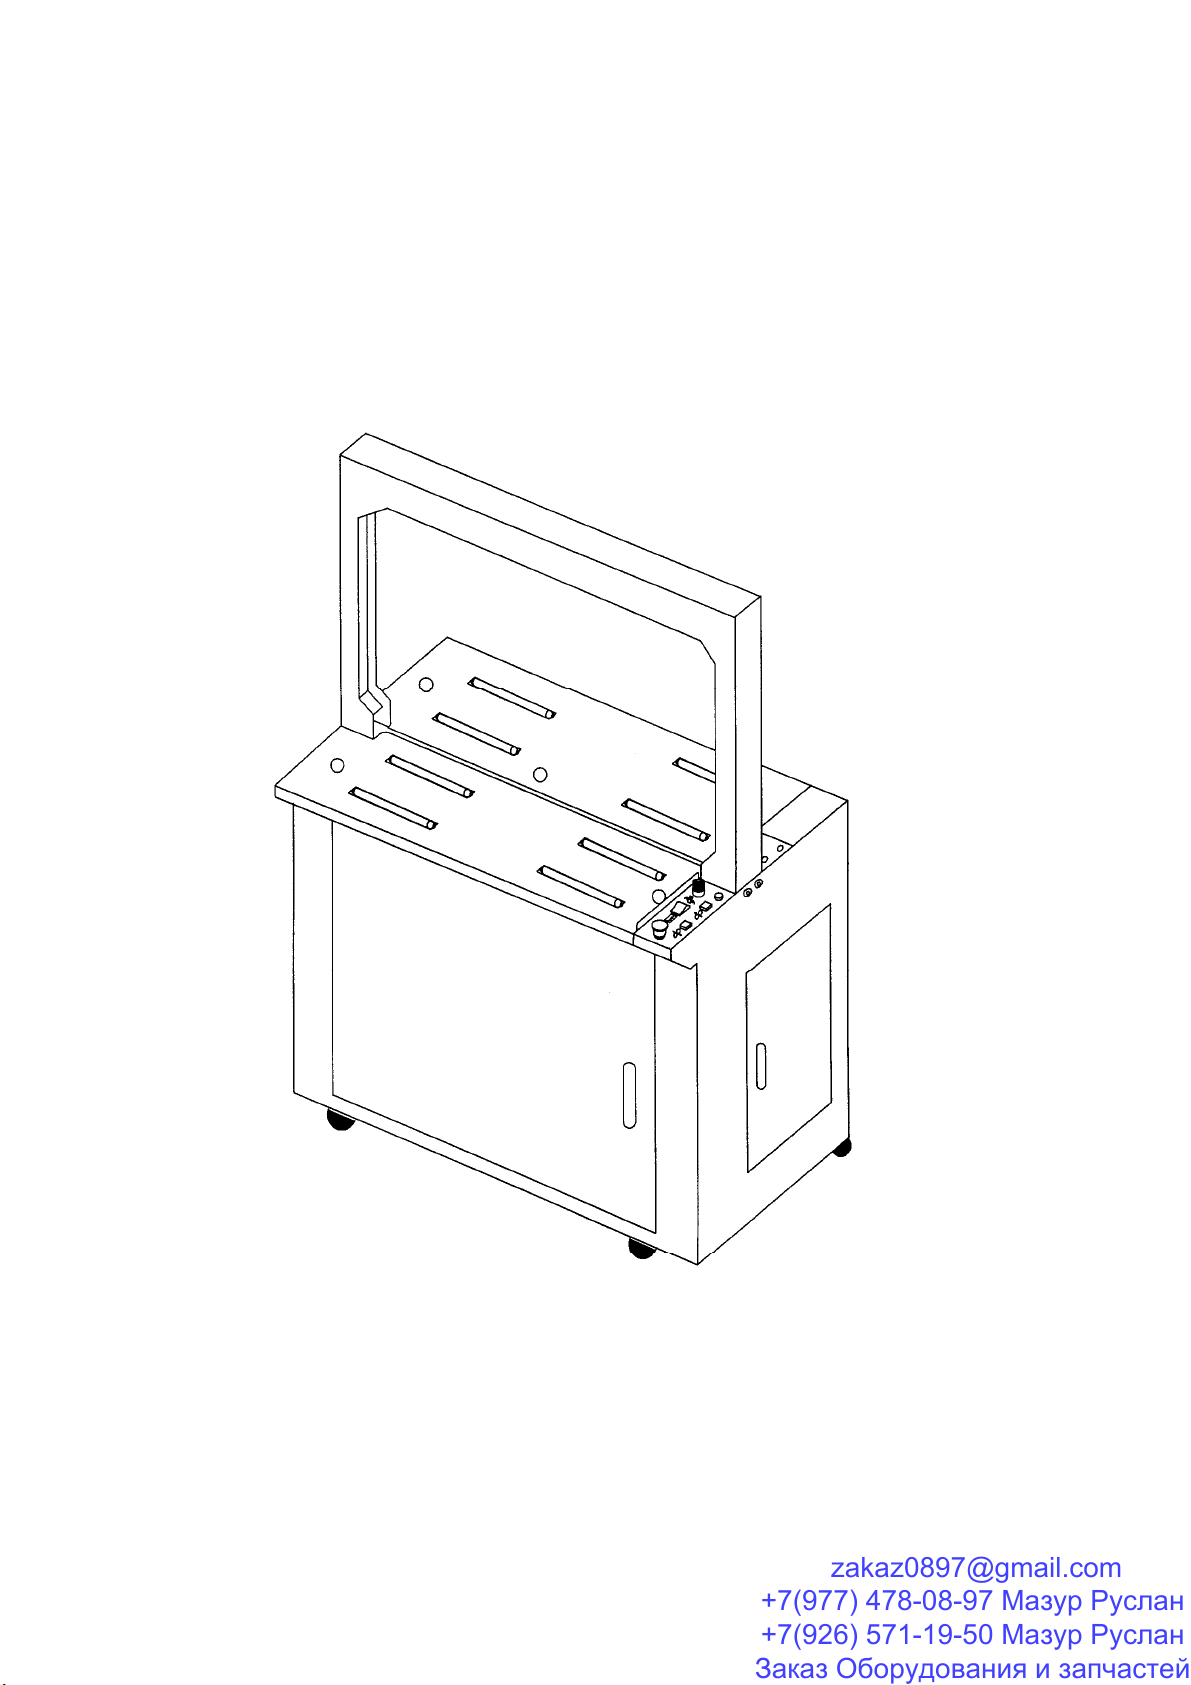
Assembly of arch
1. INSET THE ARCH INTO THE MACHINE BODY
2. LOCATE THE SCREWS OF BOTH SIDE, BUT DON’T TIGHTEN
- 3 -
+7(977) 478-08-97 Мазур Руслан
+7(926) 571-19-50 Мазур Руслан
Заказ Оборудования изапчастей
3. LOCATE THE SCREWS BELOW OF THE ARCH, BUT DON’T TIGHTEN
4. TIGHTEN THE SCREWS OF BOTH INSIDE OF ARCH
- 4 -
+7(977) 478-08-97 Мазур Руслан
+7(926) 571-19-50 Мазур Руслан
Заказ Оборудования изапчастей
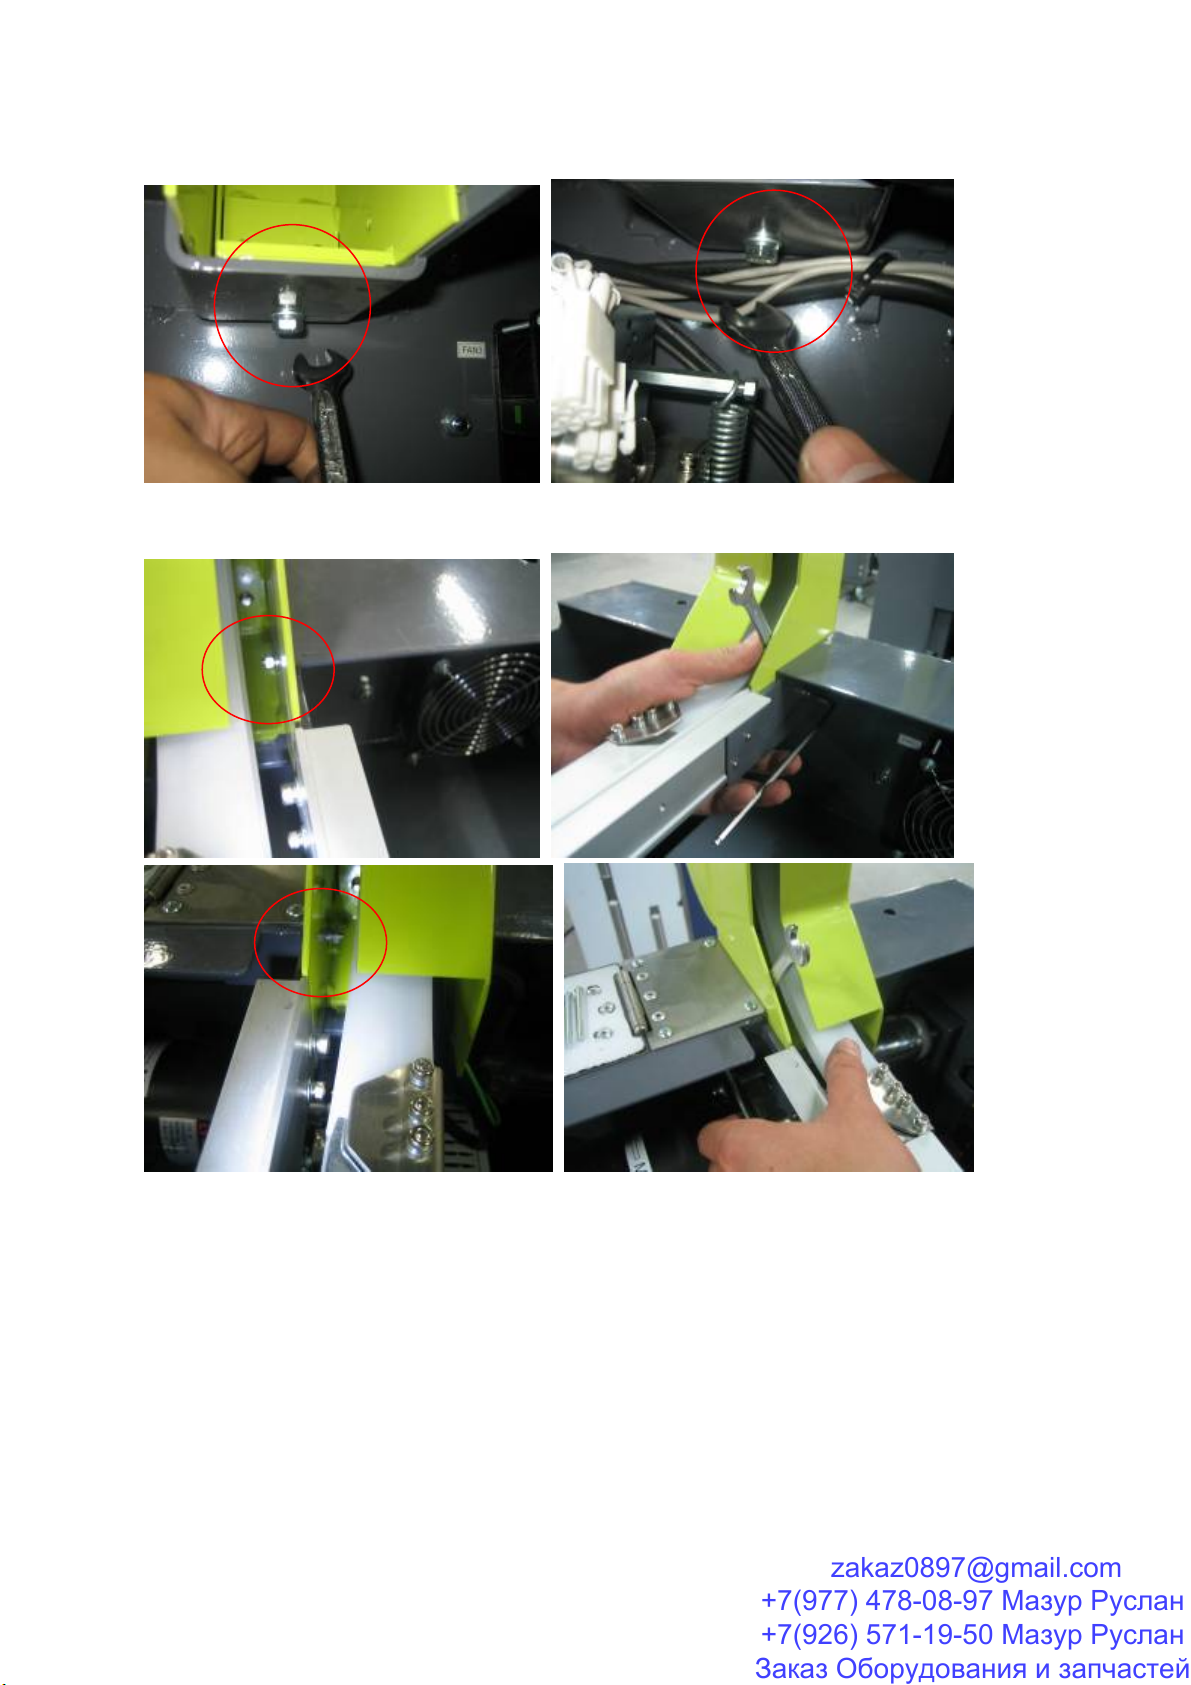
5. ALIGN THE RIGHT & LEFT BANDWAY AND CORNER BANDWAY AND THEN
TIGHTEN THE SCREWS
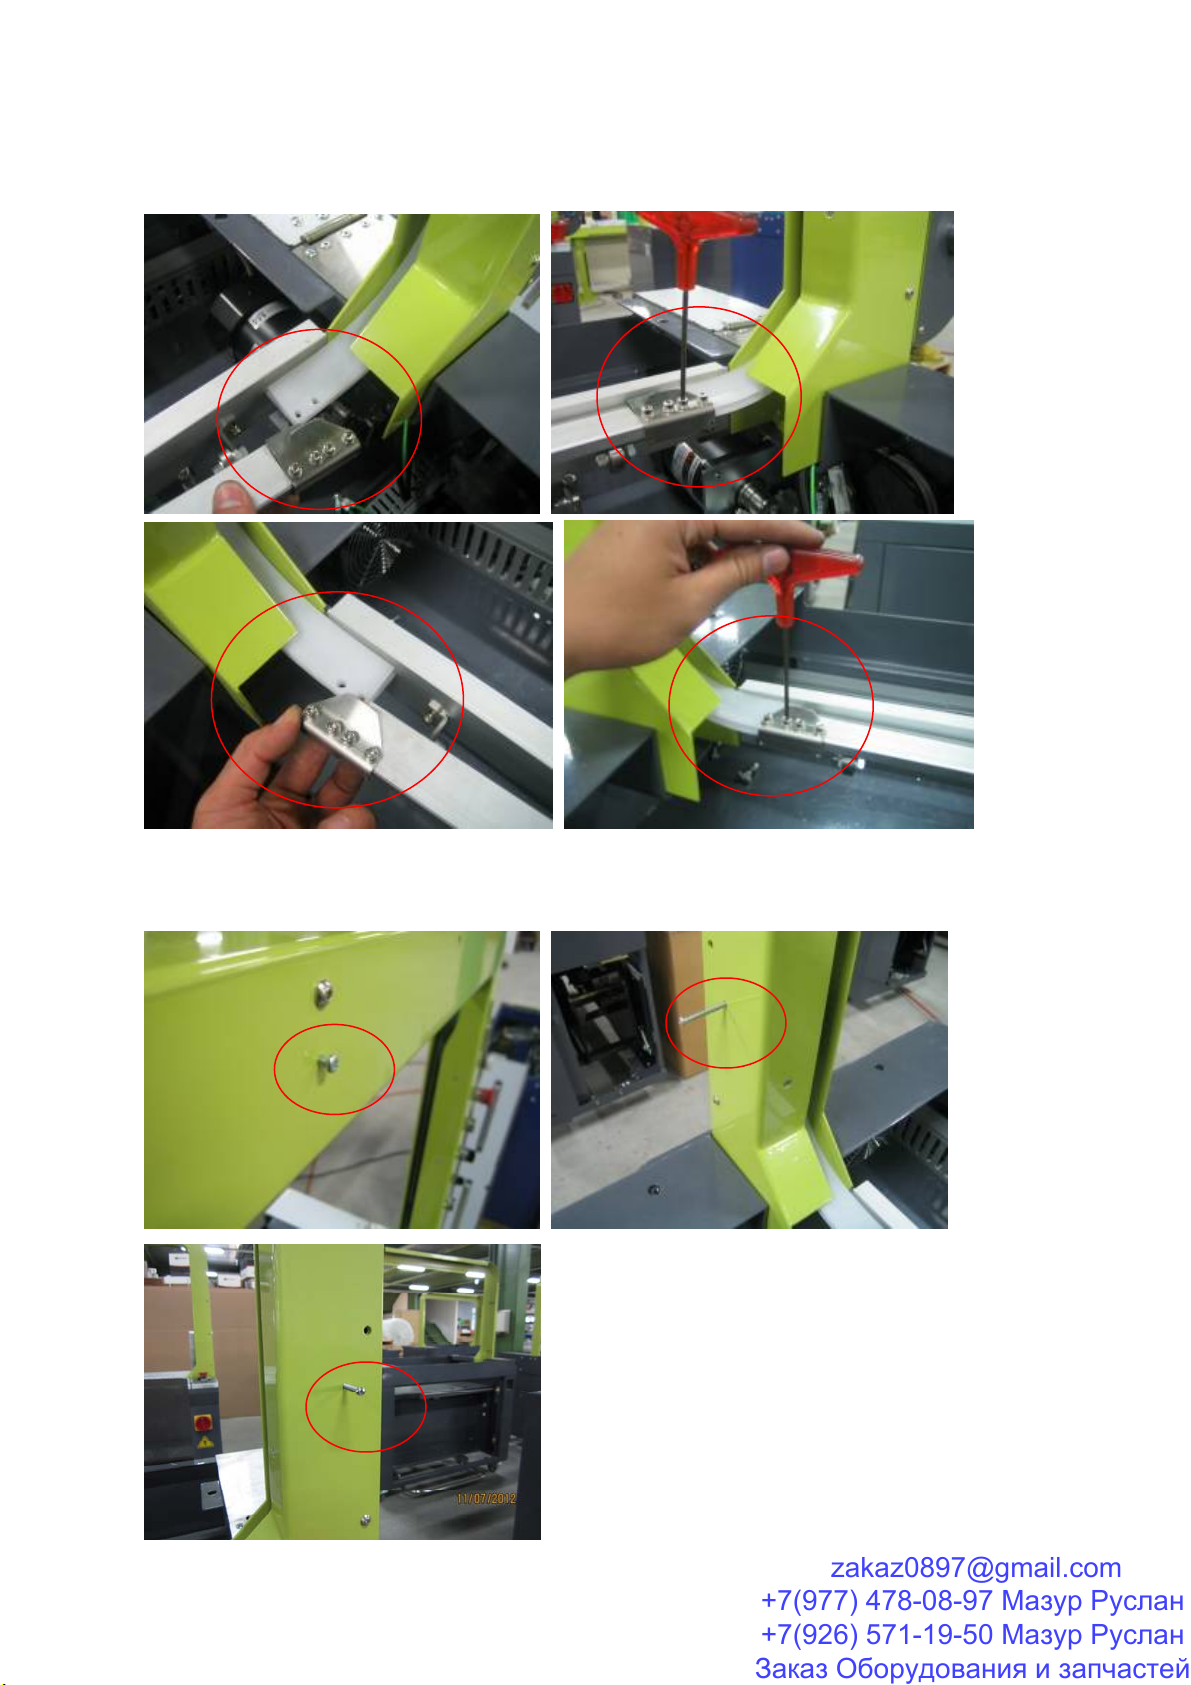
6. MOVE OUT THE 3 FIXED SCREWS ON THE ARCH
- 5 -
+7(977) 478-08-97 Мазур Руслан
+7(926) 571-19-50 Мазур Руслан
Заказ Оборудования изапчастей
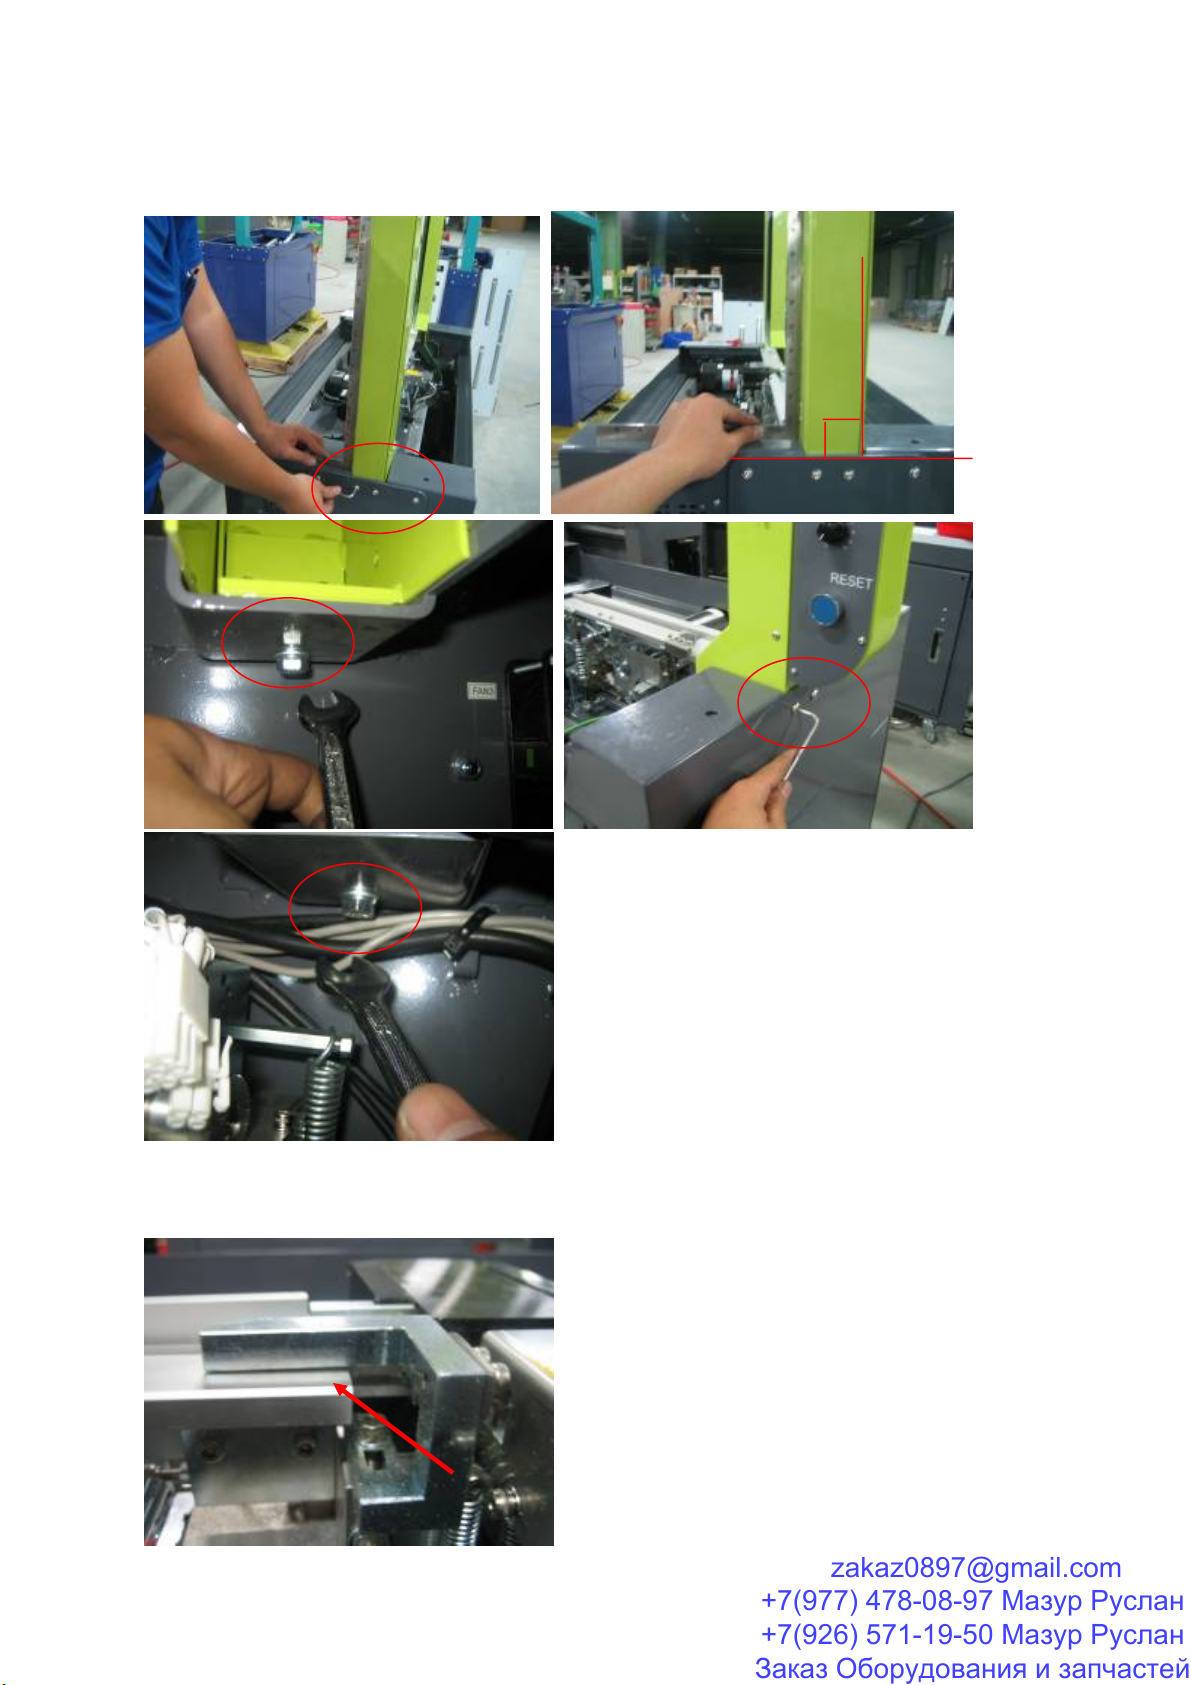
7. CONFIRM THE ARCH AND MACHINE IS 90°,AND THEN TIGHTEN THE SCREWS
8. CONFIRM THE LEFT BANDWAY MOVE SMOOTH, IT SHOULD BE A GAP BETWEEN
THE ADJUSTMENT BLOCK
- 6 -
+7(977) 478-08-97 Мазур Руслан
+7(926) 571-19-50 Мазур Руслан
Заказ Оборудования изапчастей
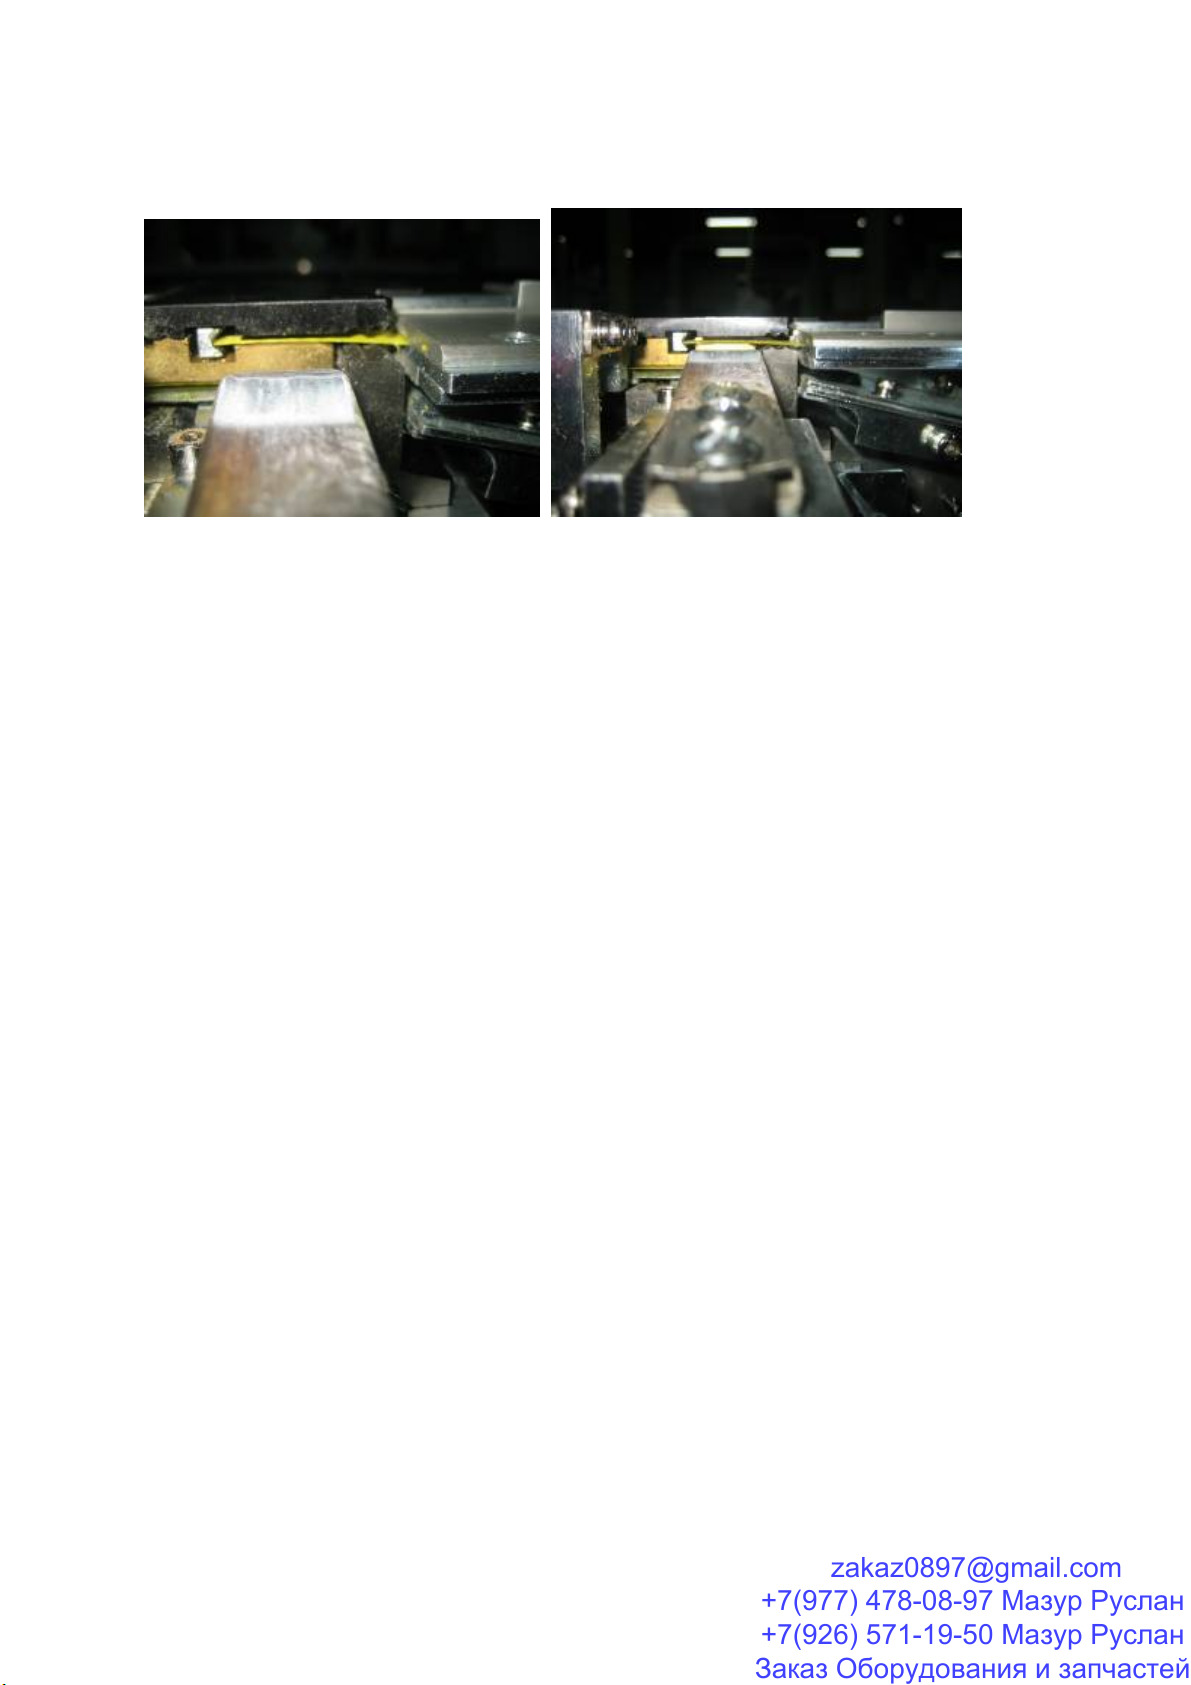
9. CONFIRM THE PP STRAP FEED IN SMOOTH FROM RIGHT BANDWAY TO THE
HEAD
- 7 -
+7(977) 478-08-97 Мазур Руслан
+7(926) 571-19-50 Мазур Руслан
Заказ Оборудования изапчастей
Important Safety Information
Following safety instructions give warning for the operation of strapping machine.
Read these safety instructions carefully before the operation of the machine.
CAUTION: Avoid placing hands or limbs in this area
Operation
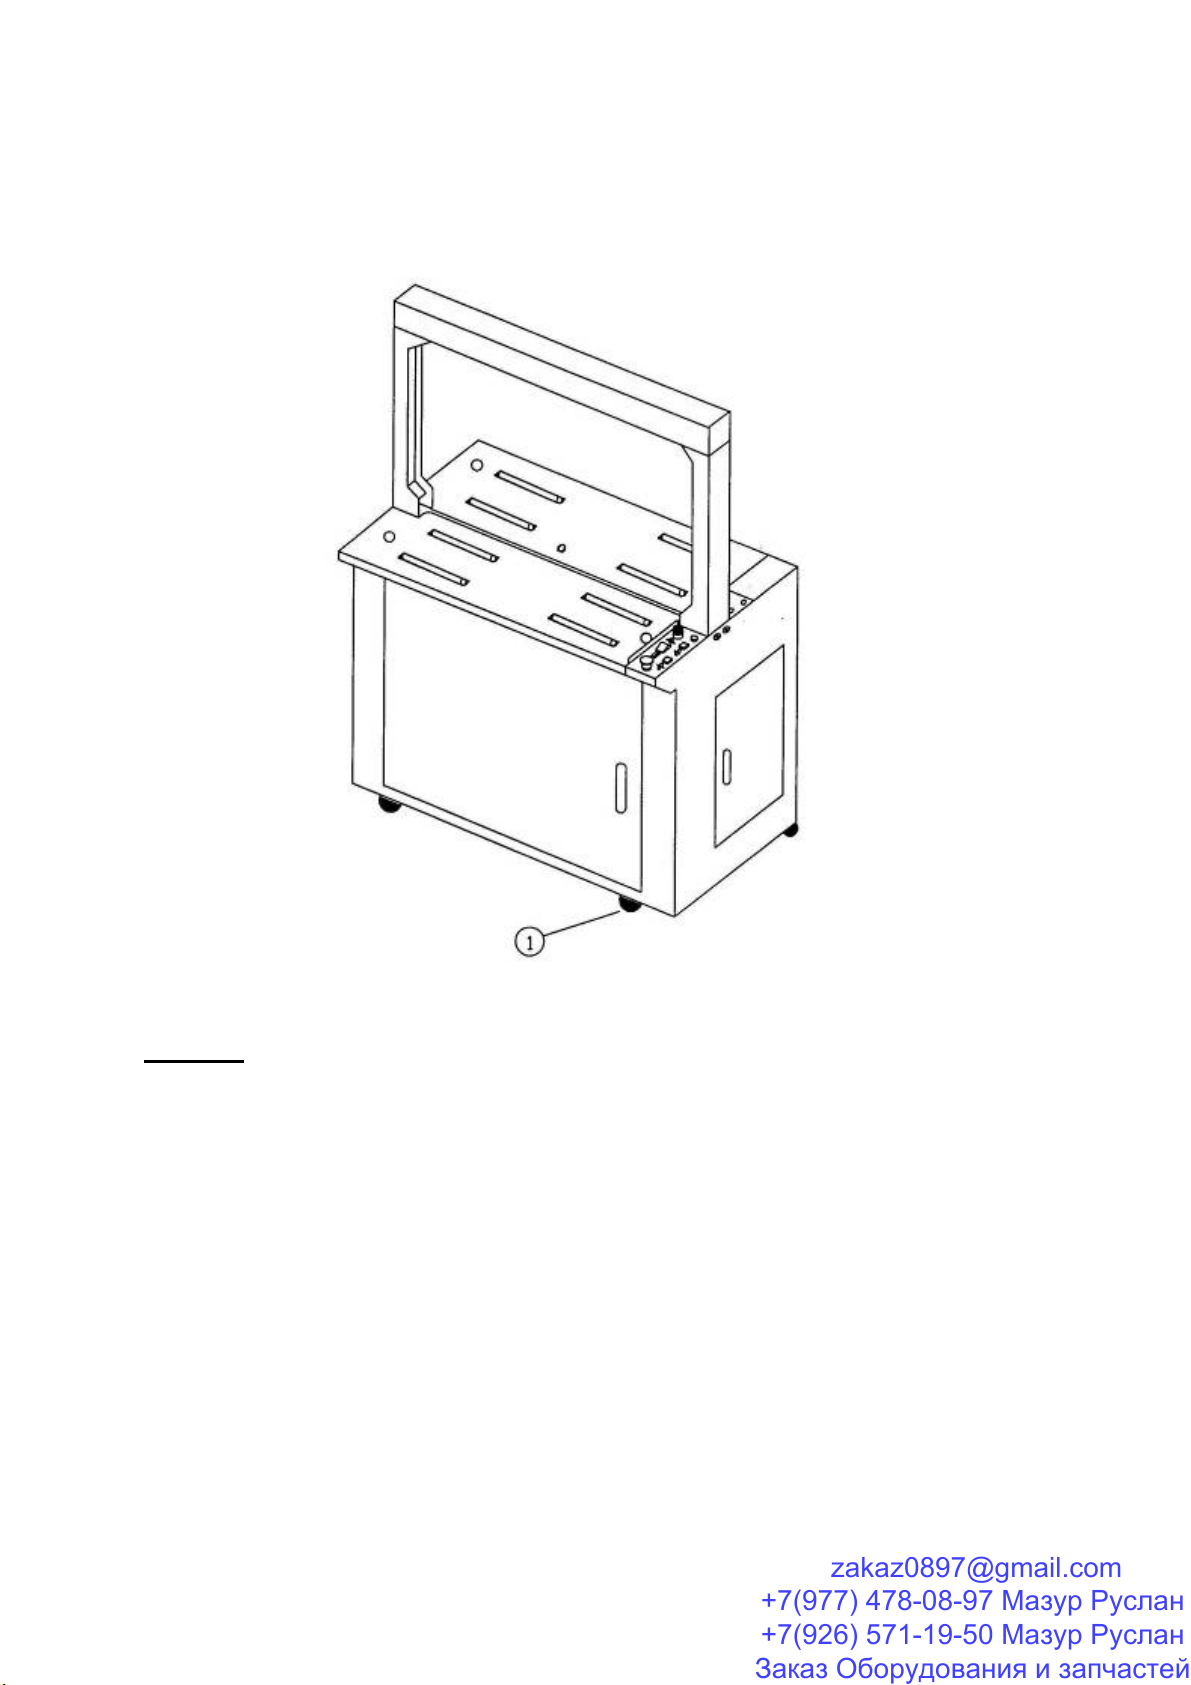
(1) Floor Locking for your safely, to use Floor Locking is recommended.
Turn the floor Locking Bolt1 until the bottom surface of it presses against Floor with which the machine
is not moved even when the machine is pushed lightly.
(2) Before the operation, make sure that all the guards are fitted to the machine.
(3) Never put any part of your body into or close to any moving section of the machine. Otherwise, you may
be hurt.
(4) Before the operation, make sure that any safety device has not been moved.
(5) Never put your hand onto the wiring label when the machine is operated.
(6) Fully follow to the operation instruction.
(7) Use the specified power source.
(8) Do not put strap or string onto any part of your body.
(9) To avoid overloading of the machine, keep recommended load limits.
- 8 -
+7(977) 478-08-97 Мазур Руслан
+7(926) 571-19-50 Мазур Руслан
Заказ Оборудования изапчастей
Chapter 1 Explanation and Specification
1-1 Explanation
This machine is a strapping machine which applies a strap to an object automatically.
The following accessories are attached to the machine.
1-2 STANDARD ACCESSARIES *Optional accessories
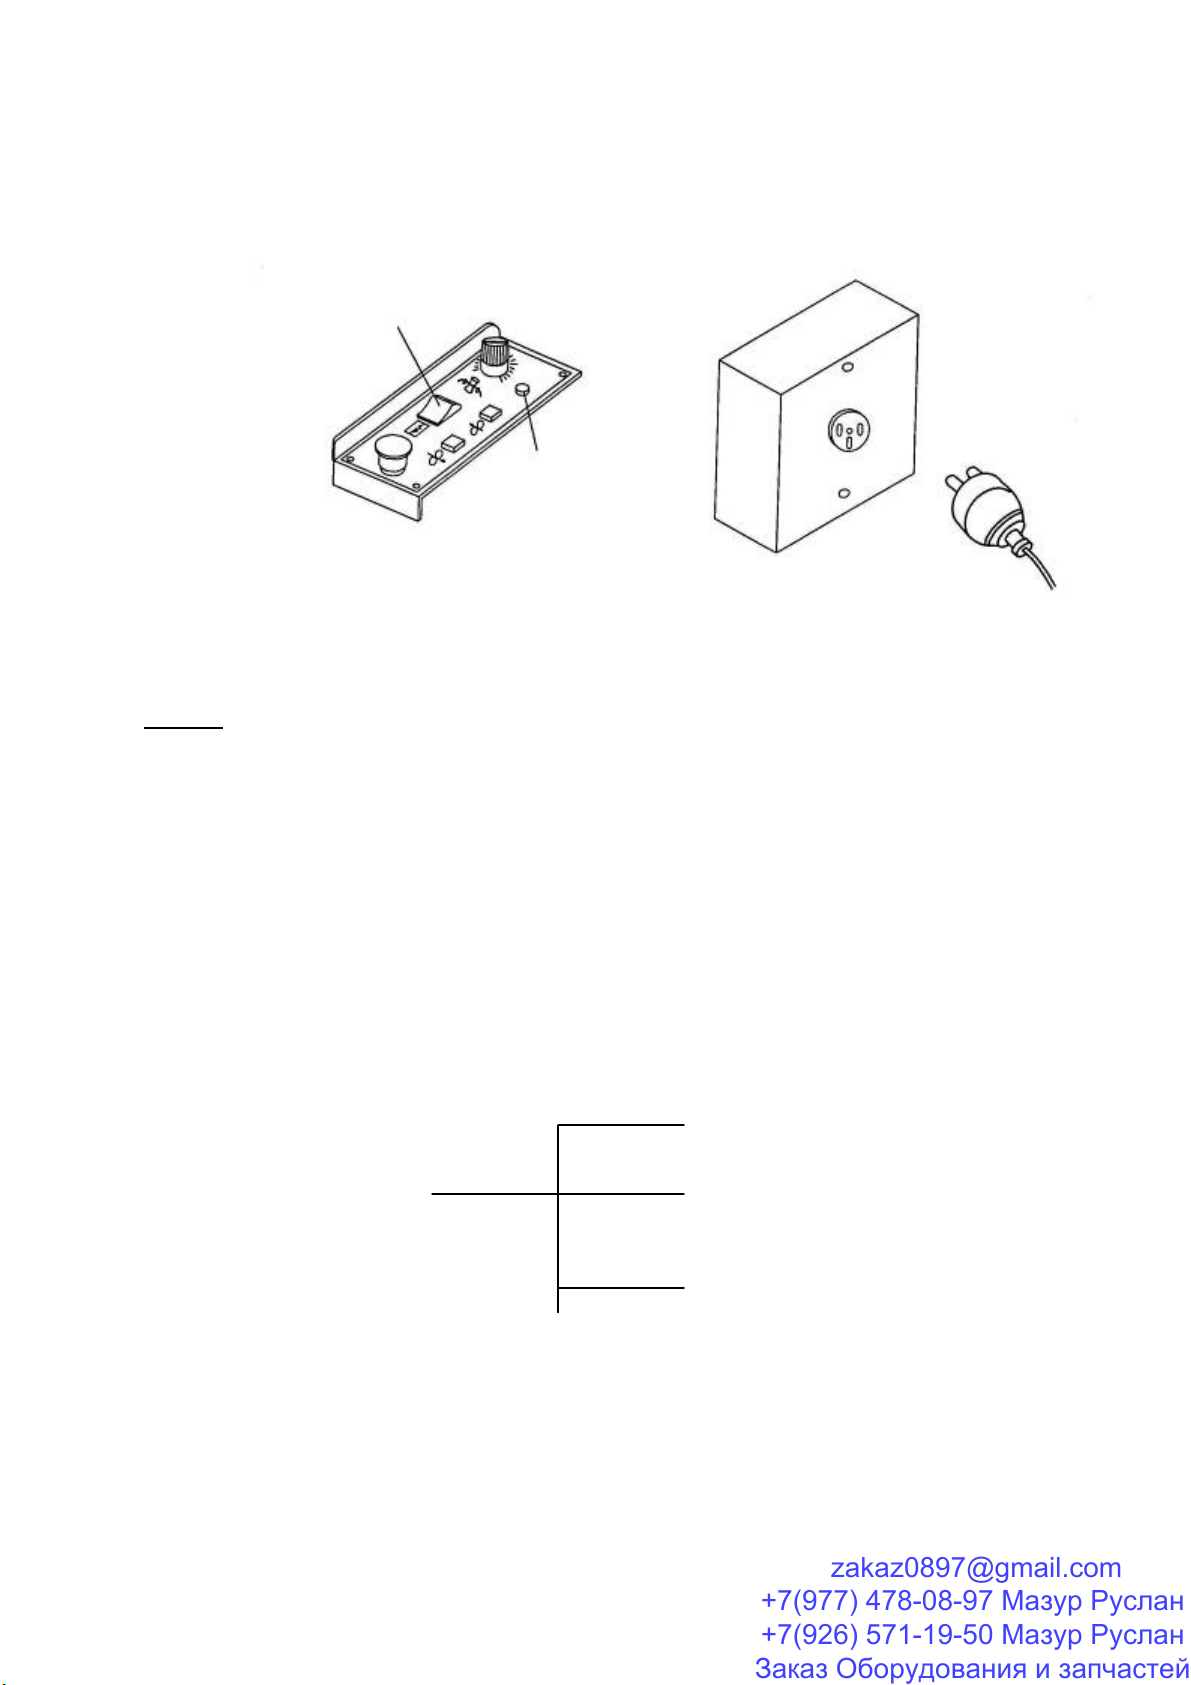
DESCRIPTION QTY Foot Switch
INSTRUCTION MANUL PARTS-LIST 1 VOLUME
TOOLS 1SET
SWITCH KEY (4-09000-200) 1 PC
SCREWS, NUTS, WASHERS, ETC
Warning: Do not use the attached tools, for repairing the machine.
Warning: Do not attempt to maintain or repair the machine until power source has been disconnected and
locked out.
1-3 Specification (Standard Specification)
[Strapping Machine Unit]
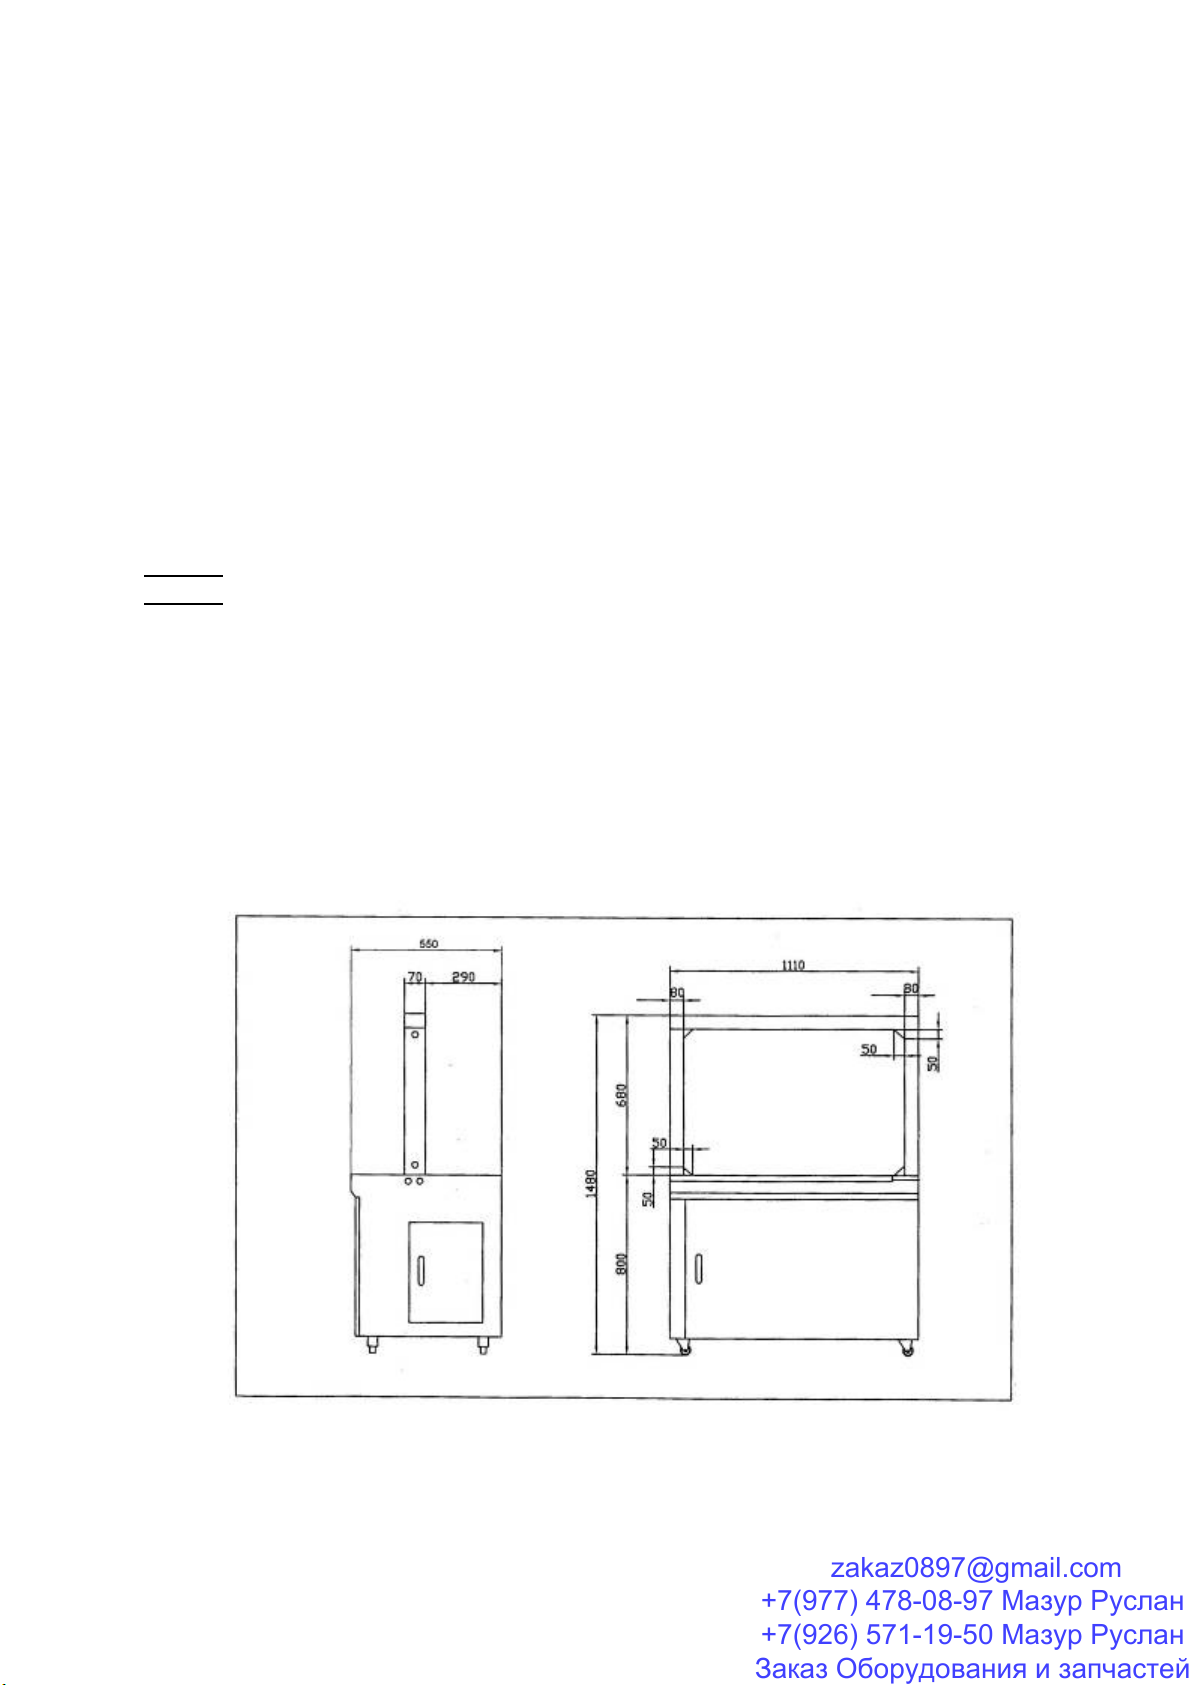
Dimensions: Refer to the follow figure.
Weight: 175 Kg
Strapping Speed: 28-30strap/min
Dimension of package: Maximum: W850mm H600mm
Minimum:W80mmH30mm
Strap to be used: 9-15mm width.
- 9 -
+7(977) 478-08-97 Мазур Руслан
+7(926) 571-19-50 Мазур Руслан
Заказ Оборудования изапчастей
Chapter 2 Safety instruction
Electric shock may strike you if you
touch the electric box ,transformer ,
motor or any electric parts while the
power is not switch off.
Never touch the running belts, as
it may catch you hurt
Heater become over
380℃.never
touch heater plate
and heater cover
otherwise you may be hurt
You may be hurt ,if
you put your finger
into the smoke fan
while power is ON.
You may be caught to hurt
if you put your finger or hand
below the heater arm while
operating
- 10 -
+7(977) 478-08-97 Мазур Руслан
+7(926) 571-19-50 Мазур Руслан
Заказ Оборудования изапчастей
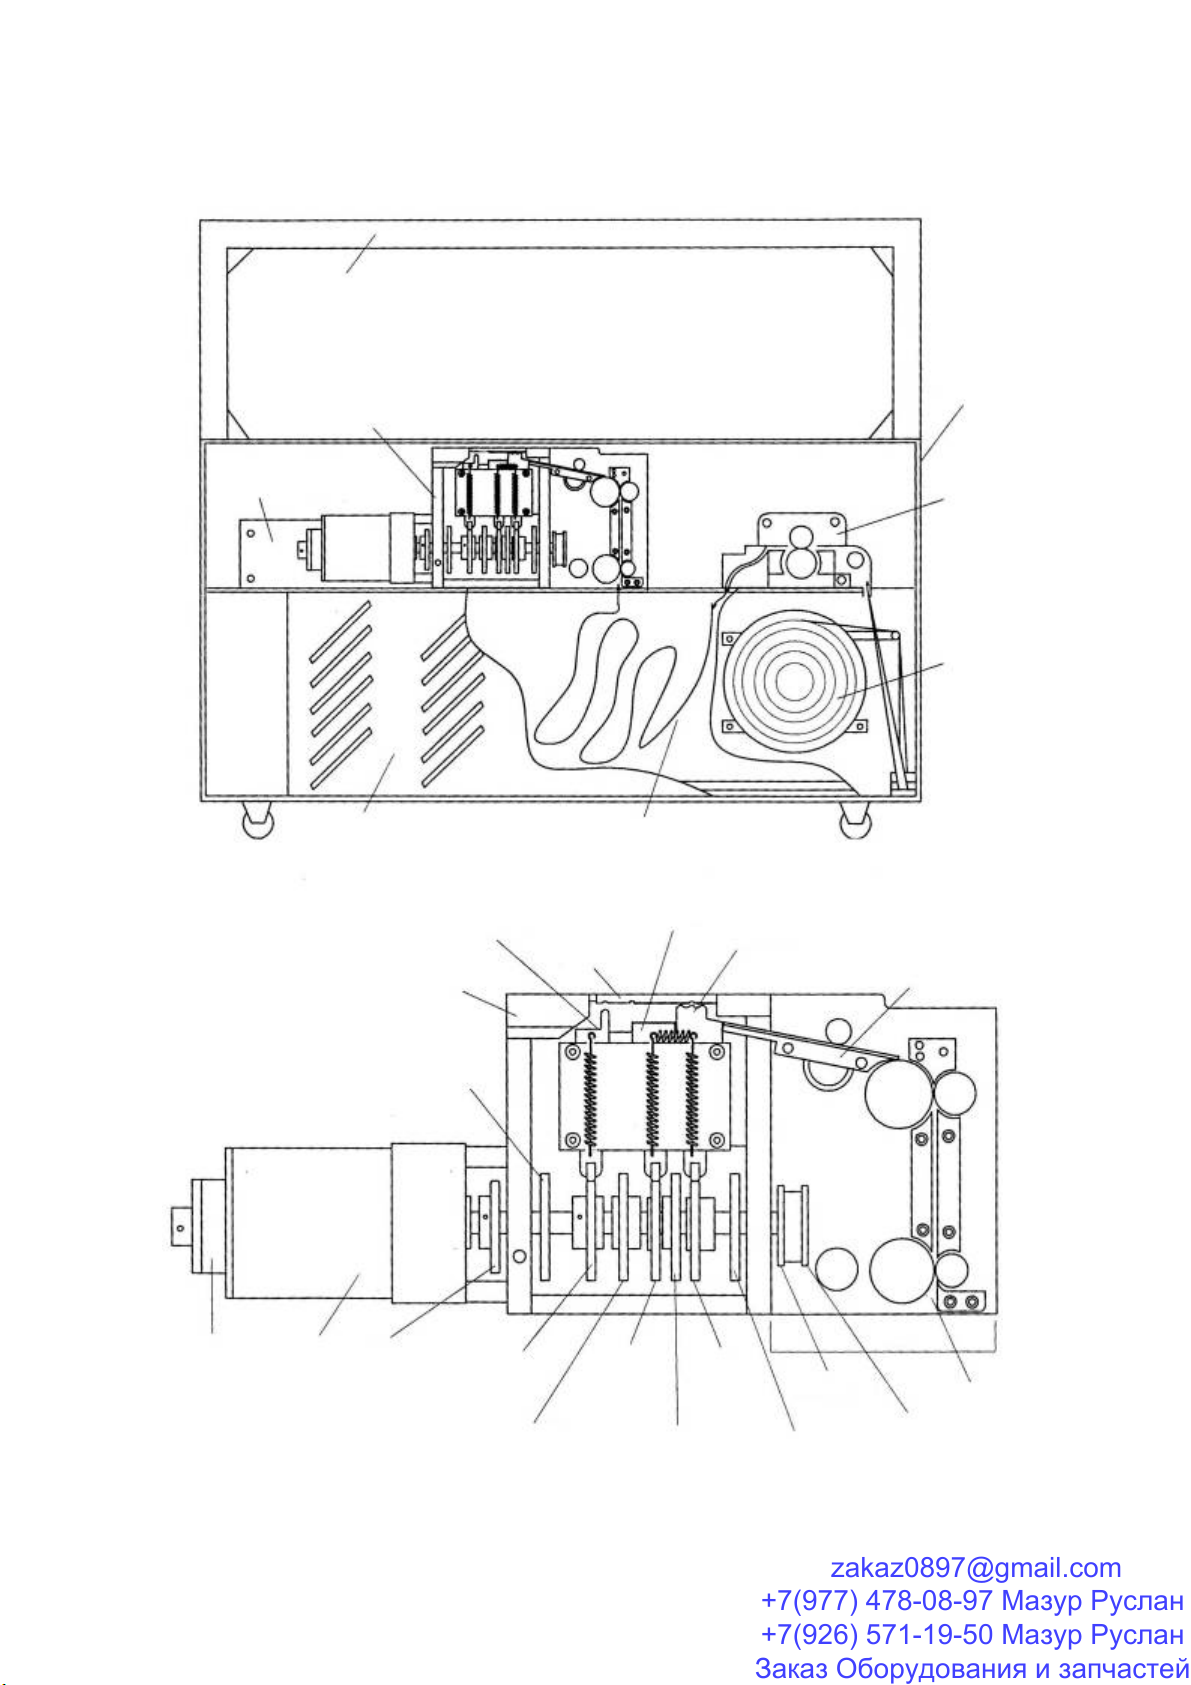
Chapter 3 Exterior machine
arch unit
cabinet unit
electrical unit
Sealer unit
pre-feed unit
reel and
break unit
pool unit pp strap
FIGURE 1: MAJOR COMPONENTS, CUTAWAY VIEW
guide
holding gripper welding clamp
entry guide
end holding gripper
top cover
cam (6)
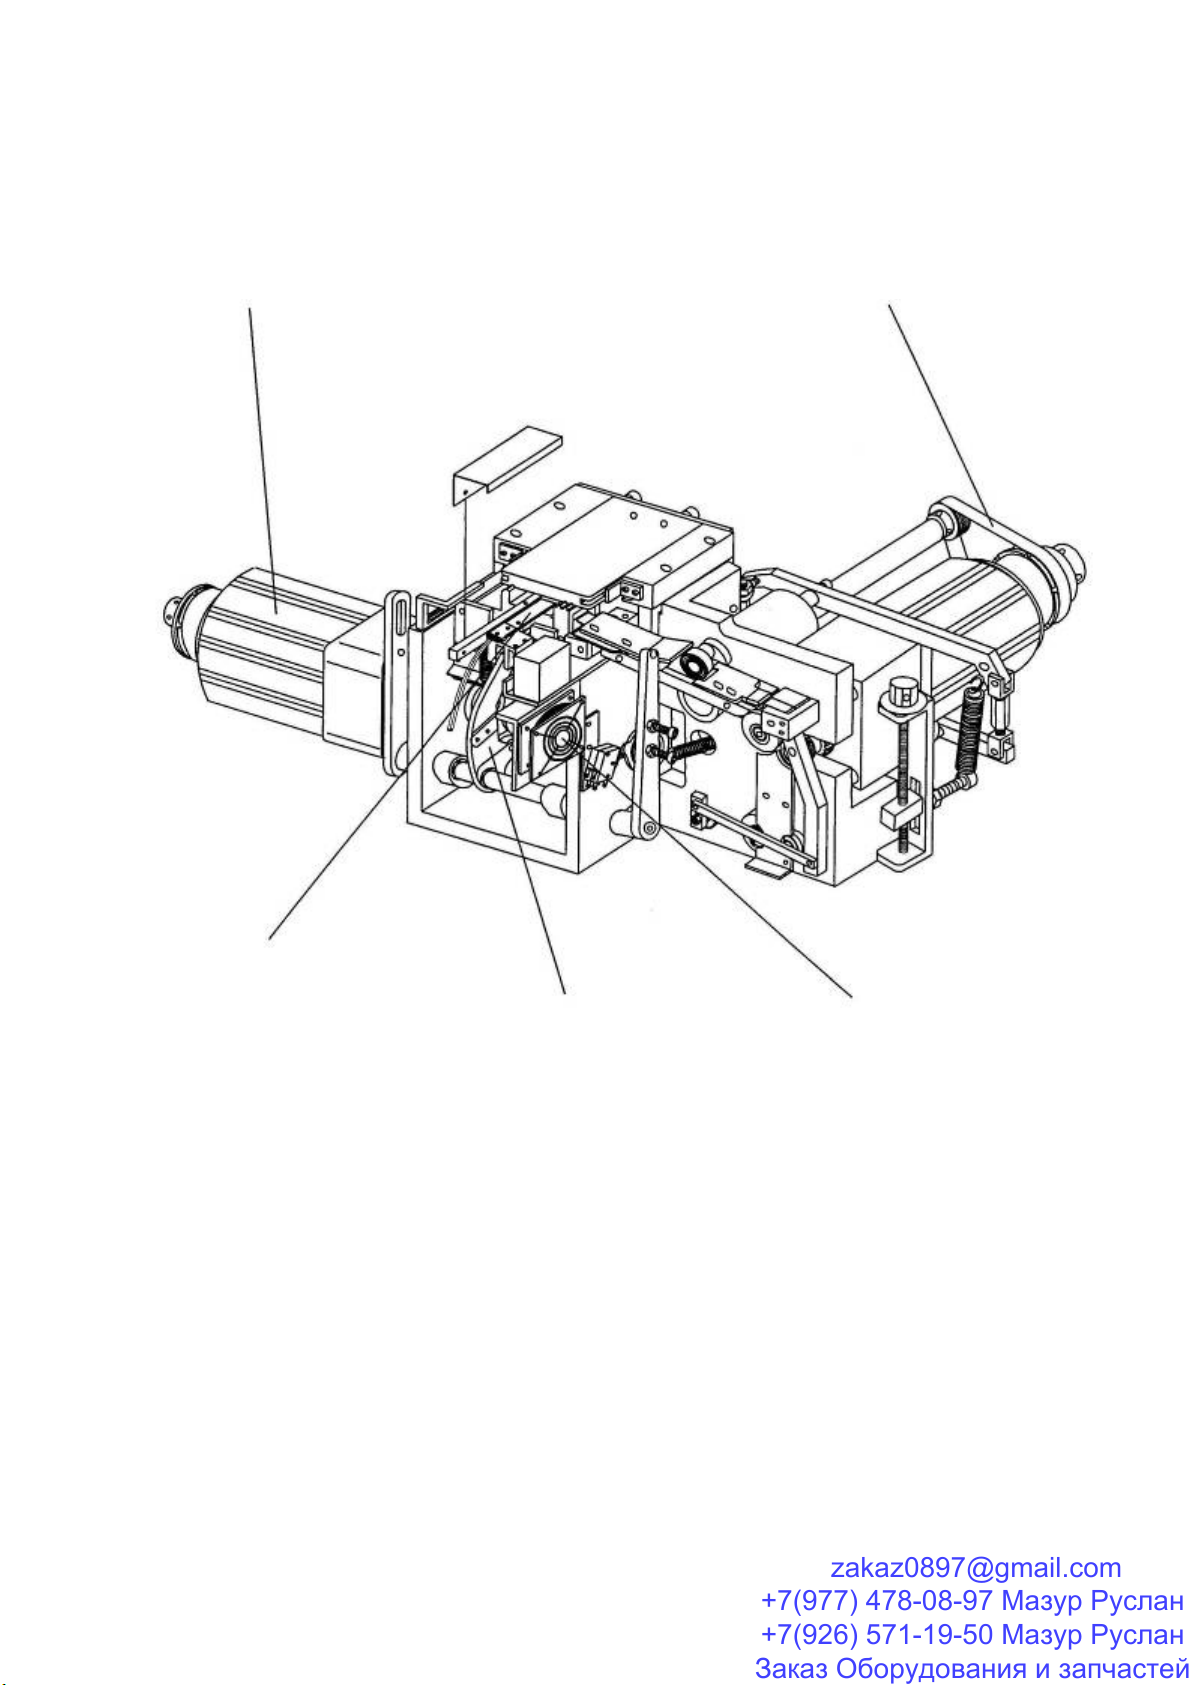
FIGURE 2: MAJOR COMPONENTS: SEALER UNIT
feed unit
holding
gripper
cam(1)
welding
clamp
cam(3)
hot-knife
cam(4)
end
gripper
cam(5)
cam(7)
reset cam strap guide
back strap cam
anvil
cam(2)
flap cammotor
brake
- 11 -
+7(977) 478-08-97 Мазур Руслан
+7(926) 571-19-50 Мазур Руслан
Заказ Оборудования изапчастей
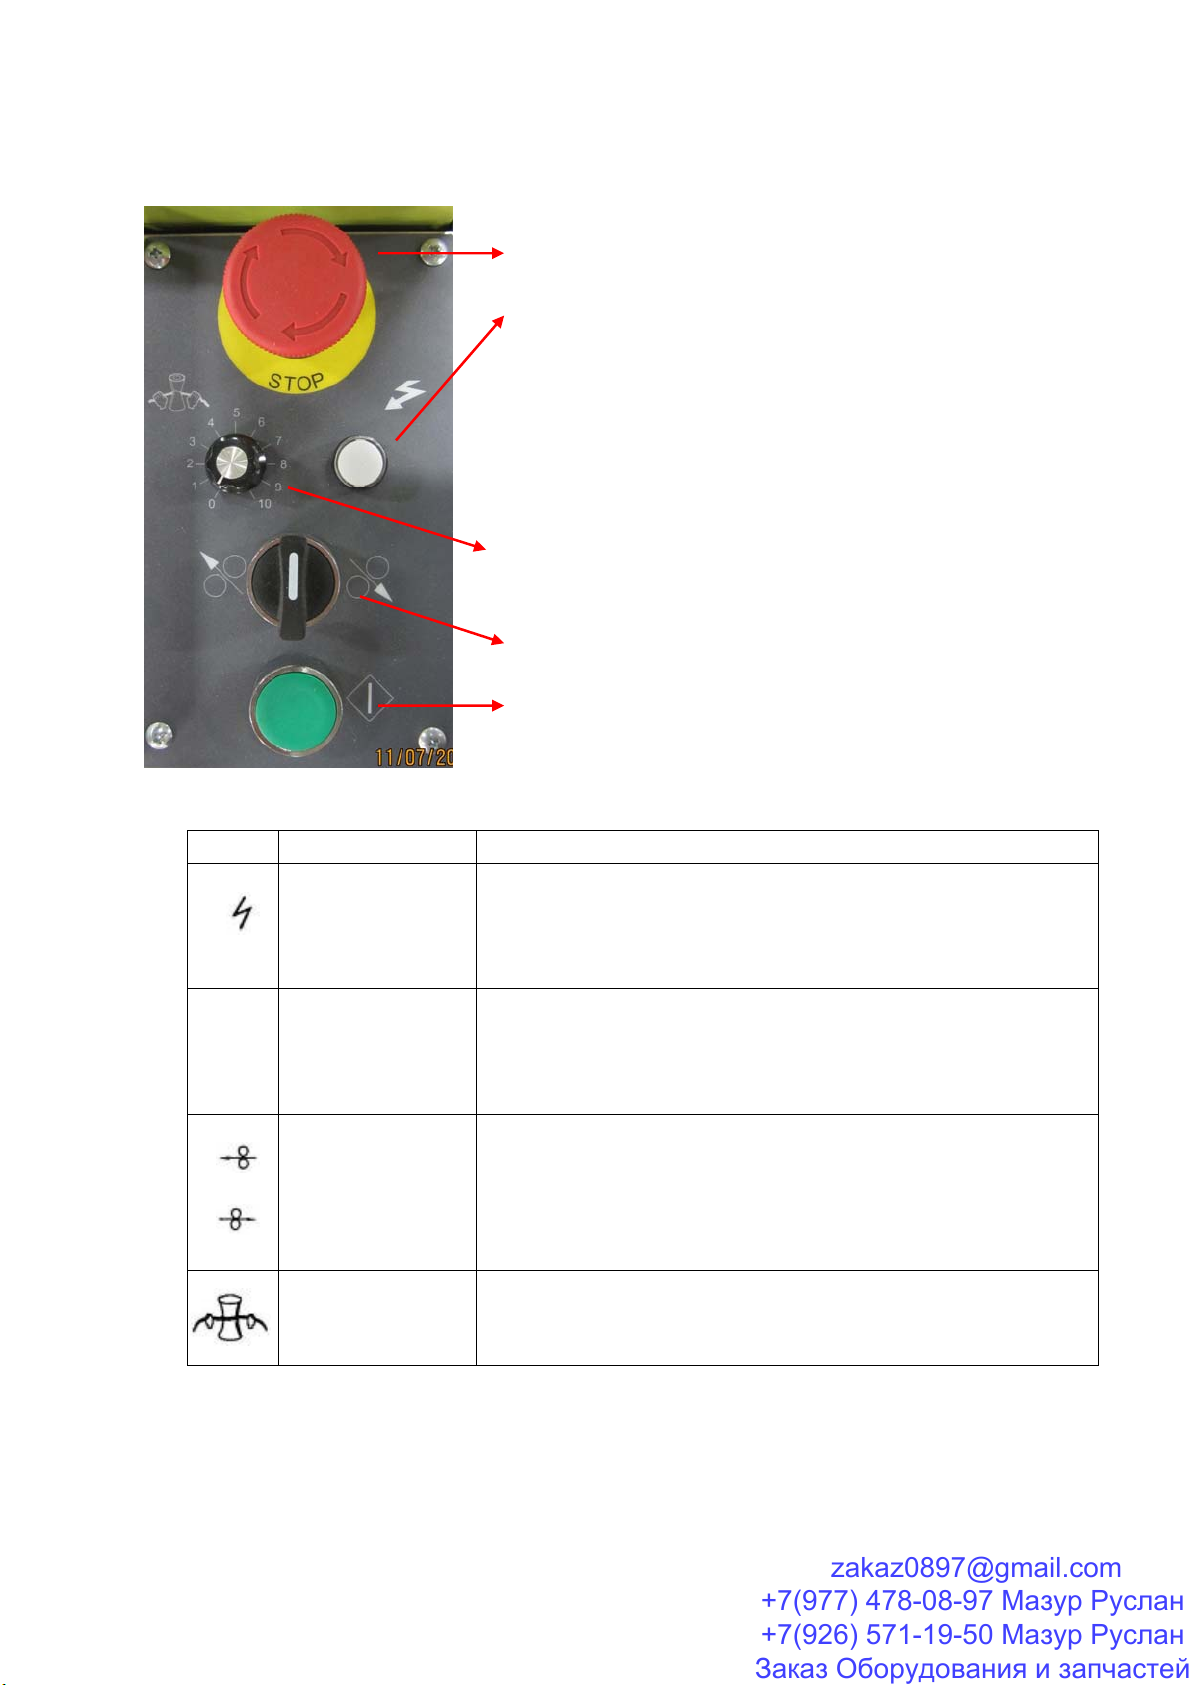
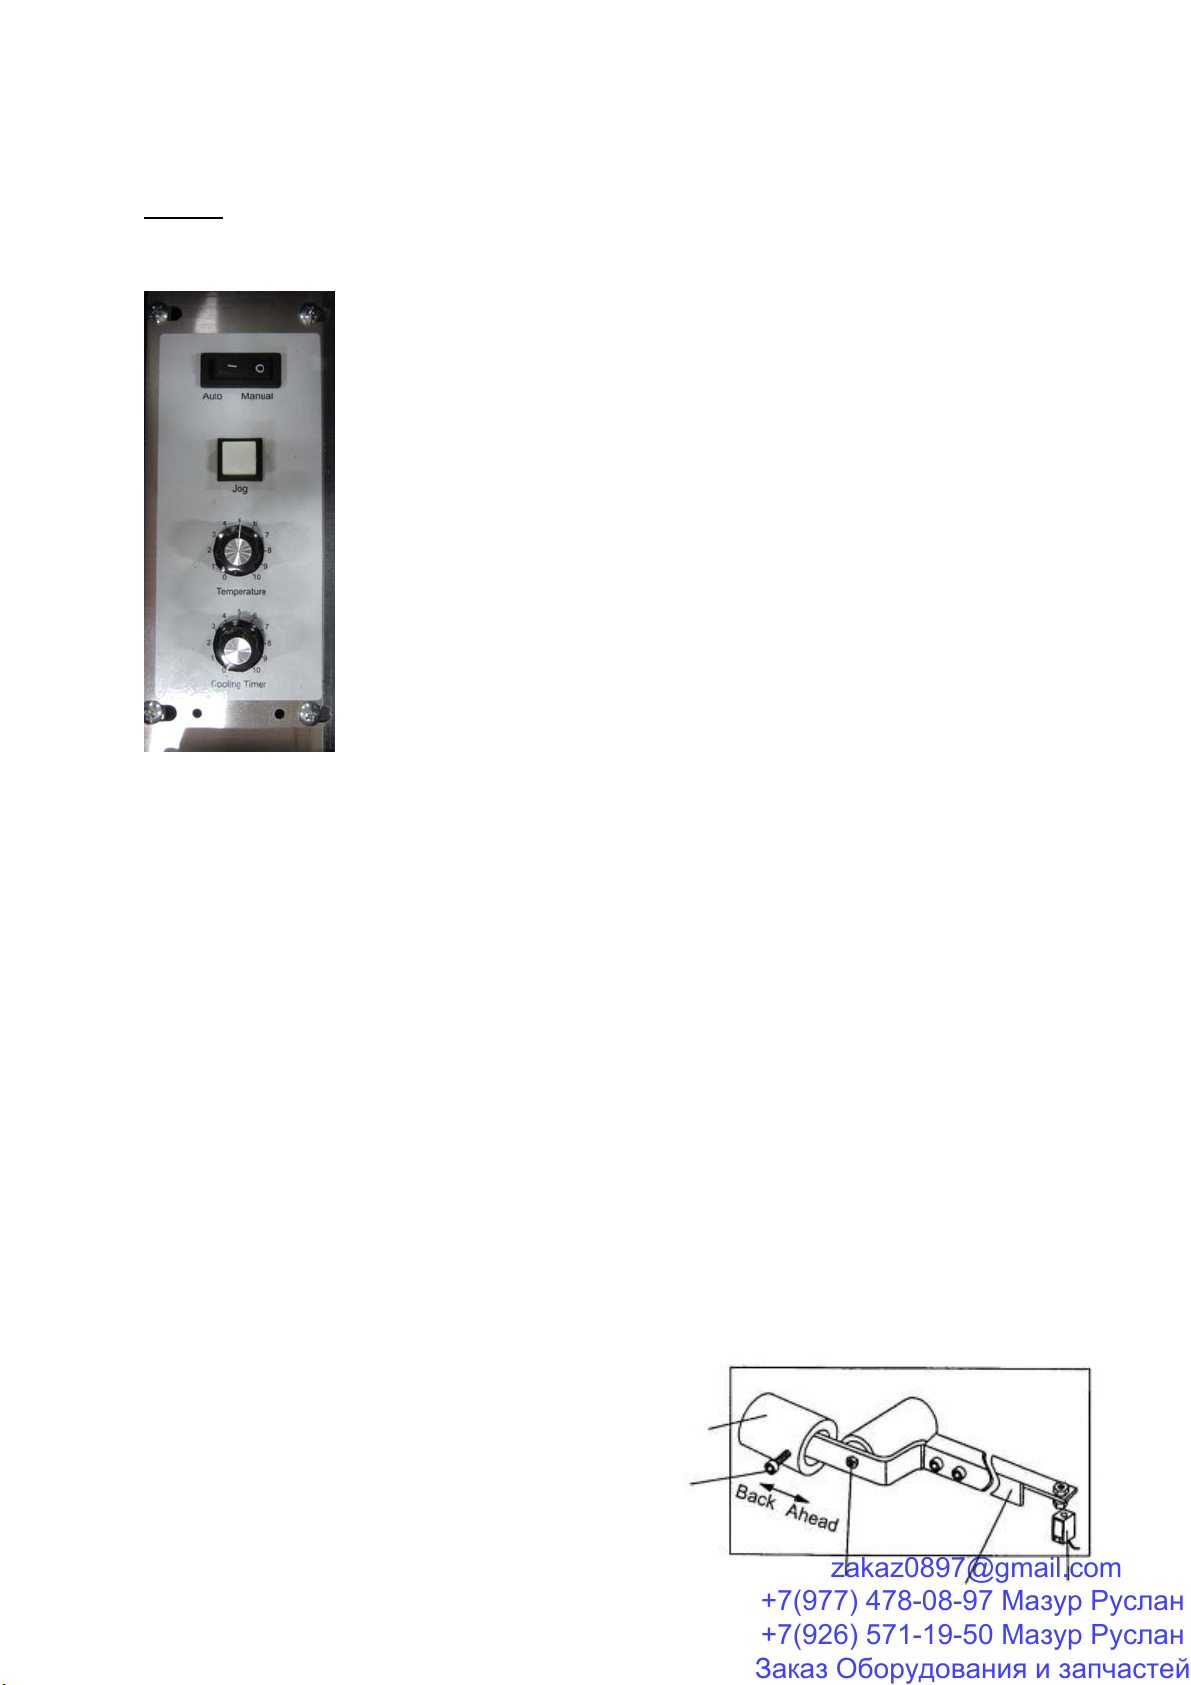
Chapter 4 Switches
EMG. Stop
Power Lamp
Tension Dial
StartButton
Strap Feed / Back Switch
Symbol Name Function
Power Switch
The machine gets ON by press the switch and the power lamp is
light. When the switch is pressed again, the machine gets OFF.
.
Start Button
The switch has 2 roles:
1. To start strap.
2.To return the cam shaft to the origin and set strap in the arch
Strap Feed / Back
Switch
Use this switch to keep this switch to Right until the strap is feed or
to Left until the strap is back.
Tension dial
To adjust tightening stroke.
Strap is tightened strong by turning right.
Strap is loosened strong by turning left.
- 12 -
+7(977) 478-08-97 Мазур Руслан
+7(926) 571-19-50 Мазур Руслан
Заказ Оборудования изапчастей
Chapter 5 Preparation for Operation
5-1 Connecting Electric Power
Power Switch
Power lamp
[Procedures]
Step [1] Press the power switch to turn the power OFF
Step [2] Insert the plug in the outlet.
Warning: If the earth grounding wire is not connected an operator may get hurt due to electric shock.
Step [3] Turn the power on by pressing the power switch. power lamp starts
[Notes]
The machine can start while the heater has reached the temperature for strap welding (about 1 Min.)
The machine may not operate when the power voltage ≤90%standard voltage
The following states occur just after power ON
Th
epowerlamplights
Setting the power switch ON The heater temperature starts increasing
Th
eductfanrotates
- 13 -
+7(977) 478-08-97 Мазур Руслан
+7(926) 571-19-50 Мазур Руслан
Заказ Оборудования изапчастей
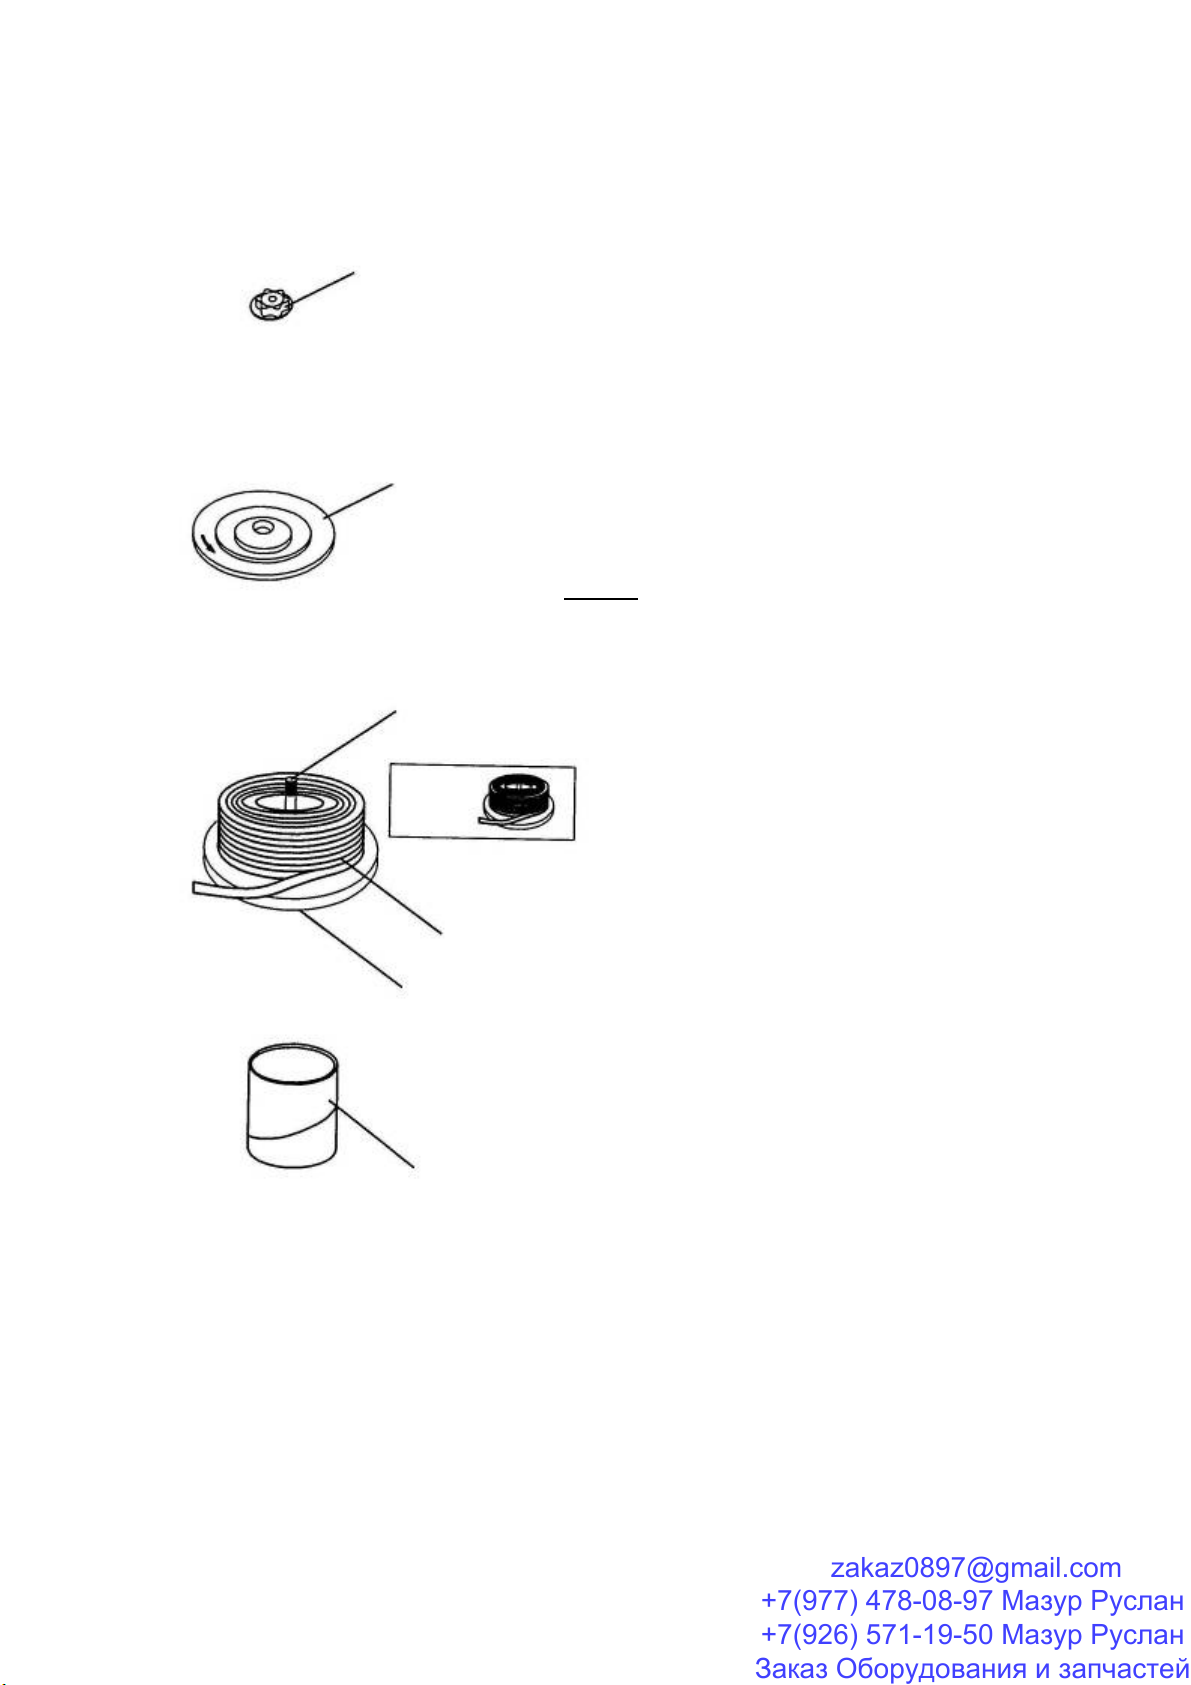
5-2 Setting Strap Coil
Thrust Nut [Procedures]
Step
[1]
Remove the thrust nut by turning it anti-clockwise and
remove the reel plate (left).
Remove the empty strap core.
Reel Plate (right) Step [2]
Fit a new strap coil in the reel plate (right). At this time,
set the coil in such a way that the strap winding
direction is clockwise.
Caution:
If the coil is set counterclockwise, re-set it, because the
reel brake does not work well at that way.
Reel Shaft
St
ep[3]
Fitthereelplate(left)inthereelshaft.
Step[4]
Finally,tightenthethrustnutstrongly.
Reel Plate (left)
Reel Coil
M
a
k
e sure
the strap
clockwise as
shown.
Strap Core
[Notes]
TO place the empty strap core under the reel place (left) make this job easier.
If the coil setting direction is wrong, the reel brake does not work well, and a normal operation is
not possible due to loose strap.
- 14 -
+7(977) 478-08-97 Мазур Руслан
+7(926) 571-19-50 Мазур Руслан
Заказ Оборудования изапчастей
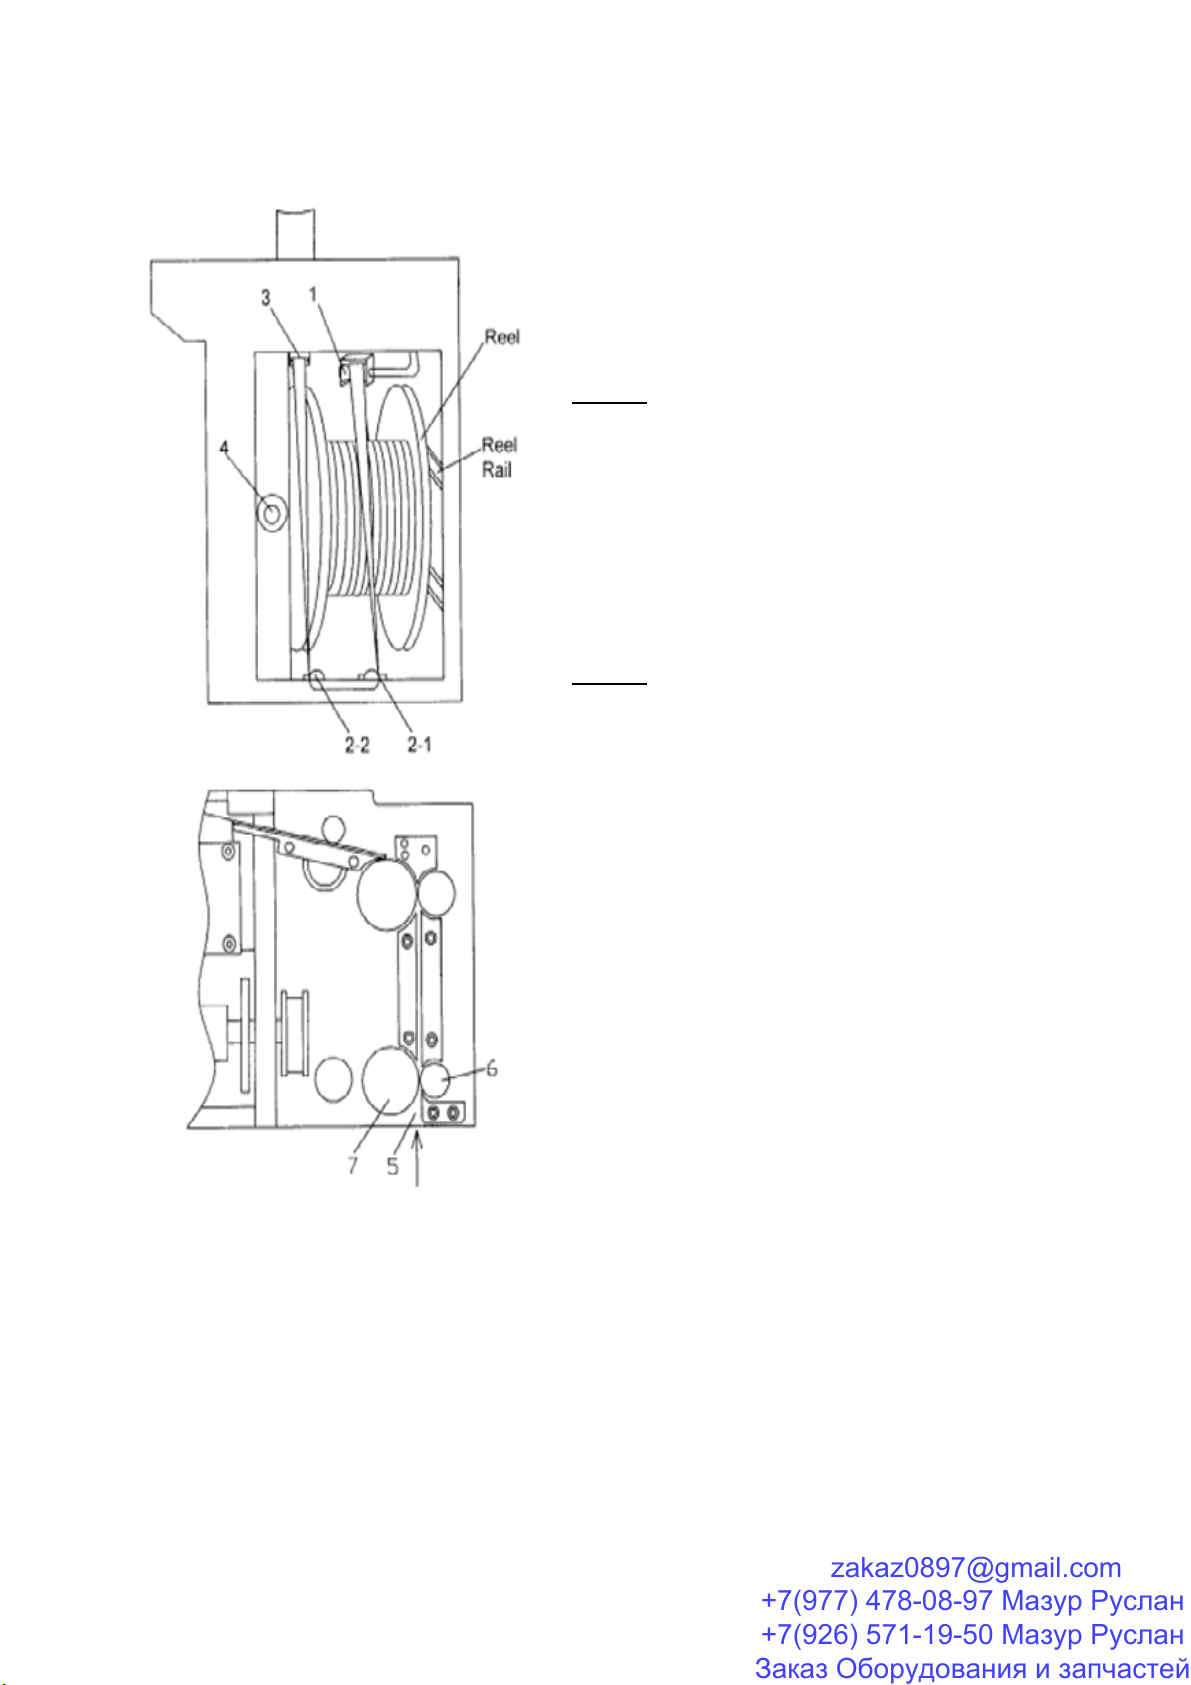
5-3 Thread of strap
[Procedures]
Step[1]
Place the reel onto the rail and push the reel, until
the reel shaft falls into the reel slot.
Caution : When putting the reel onto the rail, set it in
such a way that the strap end comes out up the reel.
Step [2]
Please install the P.P. strap through the brake
roller(1) then refer to the draft for installing the p.p. strap
through the free roller(2-1) and (2-2),then press the
lever(4) and insert the strap into the entrance (3) till it
reaches the pool unit.
Caution : If the strap end is split or bend, strap may
catch and block the machine side. At this time you
should cut the strap end, and then try to thread the
strap again.
Step [3]
Draw the end of pp strap in pool cabinet (refer to
FIG.10) and insert it into strap guide (5) through out
the roller(6) and (7) about 15mm.
Step [4]
Close the door and press the power button to make
the machine be ON.
Step [5]
Press the feed strap button and the strap is sent to
the arch fully.
[NOTE]
If the strap is not set to the arch properly, the strap is discharged out of the strapping automatically
Check the strap end, if the strap end is split or bent, cut it and reuse the procedures for threading
the strap into the entrance..
- 15 -
+7(977) 478-08-97 Мазур Руслан
+7(926) 571-19-50 Мазур Руслан
Заказ Оборудования изапчастей

Chapter 6 Operation
[Procedures]
Step [1] Place the object on the center position of the sealing head.
If the object is light, it needs to be held while it is strapped. Please do not hold the place where
the strap is being put.
Step [2] Depress the start button. the strap will be put automatically on the object.
Do
not operate the machine if the heater can not reach temperature for welding
(About
1 Minute long for heater temperature rising)
Caution: The strap may hurt your hands if you do not wear gloves.
Step [3] the jammed strap is caught at pre-feed roller, pull out the strap and cut it, then set the strap as
the chapter 5-3.
Step [4] the buzzer will make a sound while the strap is empty from the reel coil
Chapter 7 Stop Operation
If it is necessary to stop the strapping during operation, press the power switch to off, the machine stops. To
restore the operation, do the following procedures.
[Restoration procedure]
Step [1] Grab the strap with the hand and pull it.
Step [2] Keeping this state, press the start button. The strap grabbed with the hand is discharged out of
the strapping and a new strap is set to the arch automatically
Step [3] Follow the procedures in chapter 6.
Chapter 8 Shutting Down
To shut down the machine, following the procedures are as below:
[Procedures]
Step [1] Press the power switch on “OFF”
Step [2] Disconnect the plug to the outlet.
Step [3] Wind back the strap from pool to the strap coil as follows.
(1) Pull up the brake lever with the left hand, then turn the
reel plate with the right hand in the direction of winding
the strap.
(2) When the reel plate being to turn heavy, stop winding back.
Caution: If too much strap is remained in the pool, trouble may occur when resuming strapping activity.
Step
[4] Cleaning
Cleaning is very important to prevent the machine from trouble and enjoy longer life.
Remove strap leftover, cut dust ect. stick to especially the sealer ect.
The details, contact us or your dealer.
Remarks: This machine is a non oiling type, you don’t have to make daily oiling.
-
- 16 -
+7(977) 478-08-97 Мазур Руслан
+7(926) 571-19-50 Мазур Руслан
Заказ Оборудования изапчастей

Chapter 9 Repair and maintenance
(1) The maintenance of the machine shall be done only by people who has been authorized by distributor.
(2) Before maintaining the machine, cut off all power sources.
(3) Use appropriate tools and devices for maintenance and repair.
(4) Repair and maintenance should be conducted only by well-trained service persons.
Other Notes
(1) Do not touch the heater and surrounding area before they are fully cooled down.
The heater reaches about 380℃
(2) Install the machine on horizontal floor and keep the surrounding area free from dust and pieces of cut
off the strap.
(3) If there is any obscure point about the machine operation and the maintenance,
Please contact with the service engineer.
- 17 -
+7(977) 478-08-97 Мазур Руслан
+7(926) 571-19-50 Мазур Руслан
Заказ Оборудования изапчастей
Chapter 10 Adjustment
Warning: Before adjusting portion of the machine, cut the power first, and then make adjustment after
receiving instructions
10-1 Adjustment of Heater Temperature
Turn the heater temperature knob to the right to increase the temperature and turn left to reduce the
temperature. Depending on the type and size of the strap, the heater temperature may need to be If the
temperature is too short, the strap can not be welded; on the contrary, the strap will be welded over and
break. (Please refer to the diagram on the right)
10-2 Adjustment of cooling Timer
The timer is to adjust the press cooling time for the strap welding portion. The time is set long by turning this
knob clockwise and set short by turning counterclockwise. The range of the time is 0-0.4sec. The standard
setting is in the scale 4(0.15sec.). If the time is too short, the strap will break when the tension is bigger.
10-3 Jog switch
When something wrong with the machine you could press this button to run the machine step by step to
analysis the problem.
10-4 Auto/manual switch
You can choose the mode by pressing the button to change the operation automatically or by hand
10-5 Adjustment of Strap-collected Length in the Pool
This is to adjust the length of the strap collected in
the pool with the prefeed roller. The length gets long
when loosening the bolt and moving back the
balance block. The length gets short when loosening
the bolt and moving ahead the balance block. The
length of the strap is according to the size of the arch.
If the length is too long, not only the strap will not be
Balance block
Bolt
- 18 - SwitchBalance bar
Supporting
point
+7(977) 478-08-97 Мазур Руслан
+7(926) 571-19-50 Мазур Руслан
Заказ Оборудования изапчастей
feed/turned back smoothly, but also the strap will be
distorted; If the length is too short, one packing circle
can not be finished.
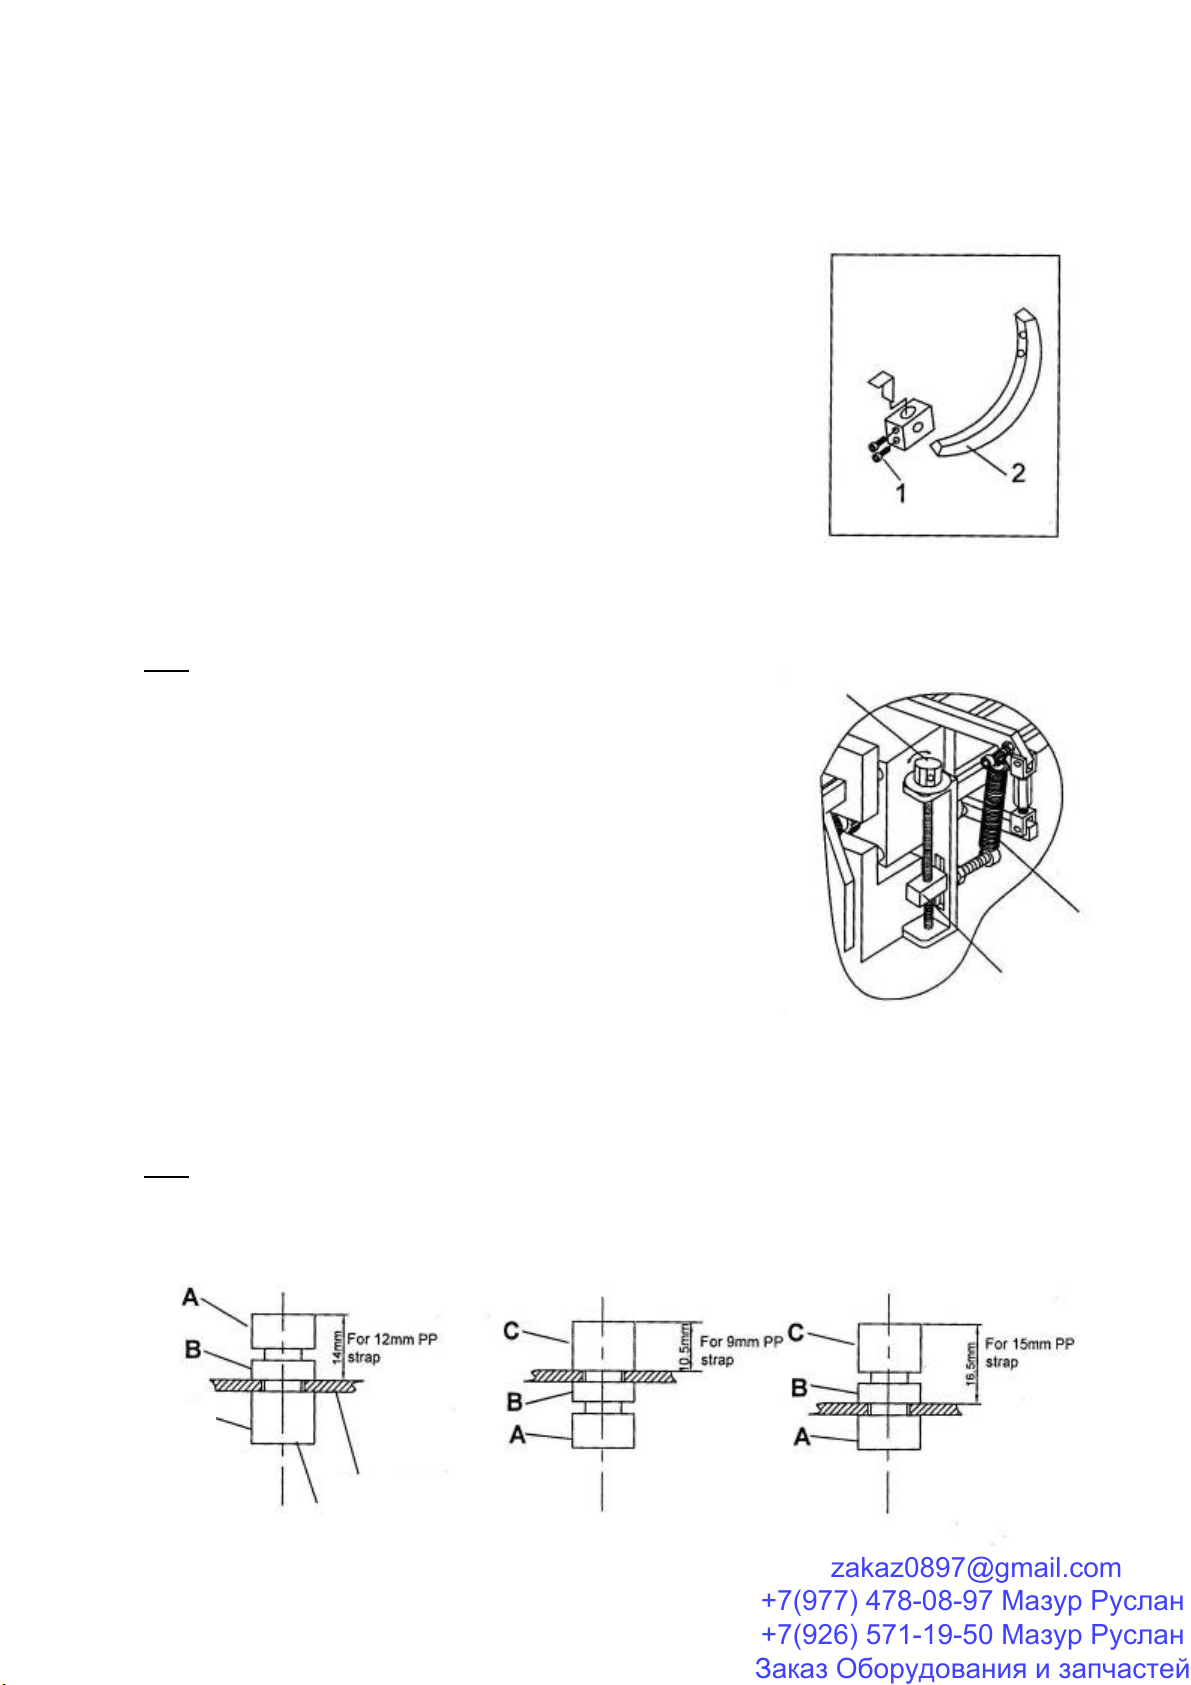
10-6 Reel Brake Adjustment
Loosen the bolts(1) and move the brake belt(2) to adjust the brake
belt stronger or weaker. When the strap becomes much loose on
the strap coil, change the position to tighten it.
10-7 Feed Roller Pressure Adjustment
To adjust the tension of the spring, rotate the knob to move the
position of the spring hook. Spring tension becomes weaker when
the knob is rotating clockwise, and it become stronger when the
knob is rotated anti-clockwise.
Note: Setting position depending on the type of strap, strap
thickness, air temperature (season) and other conditions. The user
may have a micro-adjustment. In common currency, the position is
set in the factory. If spring tension is too strong, strap will be
distorted because of over pressure. On the contrary, the end of the
strap can not reach the right position where the switch is sensed.
Knob
Spring hook
Feed tension spring
10-8 Position Adjustment
Refer to FIG. 10 POOL UNIT, you need change the position of the part item 11 and item 12 according to the
width of PP strap. You have to turn over the item 12 by 180℃from 12mm strap to 9mm or 15mm, and
change the position of the item 11 shown as follows:
Note: Please refer to FIG.9, you can loosen the screw NO.111 when you change the position of the item
11.Lock the screw tightly when you finish your setting.
C
- 19 -
Refer to FIG.9 item 11
Refer to FIG.9 item 12
+7(977) 478-08-97 Мазур Руслан
+7(926) 571-19-50 Мазур Руслан
Заказ Оборудования изапчастей
Table of contents


