SENDO S300 User manual

Contents
1Copyright and Legal Information 3
2Your phone 5
3Getting started 8
4Making a call 11
5Answering a call 13
6Using the contact list 14
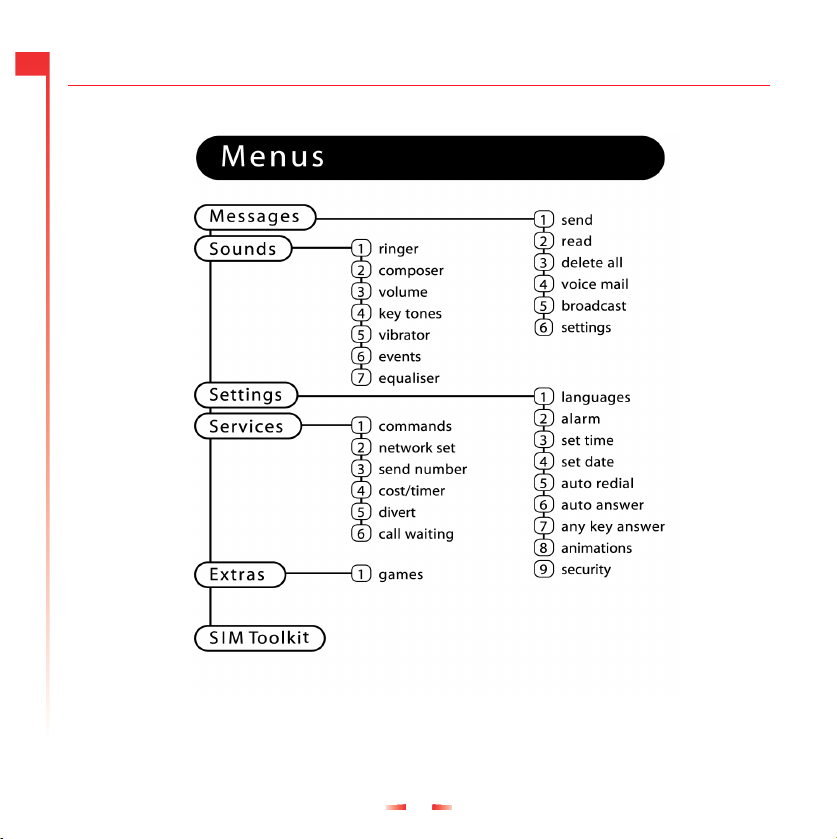
7Menu navigation 15
8Messages 16
9Sounds 20
10 Extras 22
11 Settings 24
12 Services 26
13 Troubleshooting 28
14 Safety information 31
15 Regulatory Compliance and SAR Statements 35
16 Warranty Statement 37


3
1
Copyright and Legal Information
1 Copyright and Legal Information
The wireless phone described in this
manual is approved for use in GSM 900 and
1800 networks.
Copyright Information
Part number: 8E30-26011-50000,
Edition 1.
Copyright Sendo 2003. All rights reserved.
Printed in the Netherlands.
SENDOis a registered trademark, or
trademark, of Sendo International Ltd. and/
or its affiliates.
Reproduction, transfer, distribution or
storage of part or all of the contents in this
document in any form without the prior
written permission of Sendo is prohibited.
T9 Text Input is a registered trademark of
Tegic Communications. All rights reserved.
T9 Text input is licensed under one or more
of the following U.S. Patents: 5,818,437,
5,953,541, 5,945,928, 6,011,554 and
additional patents are pending worldwide.
DISCLAIMER
The information contained in this user guide
is written for the Sendo phone model 300.
Sendo reserves the right to make changes
and improvements to the products and any
of the features of the products described in
this document without prior notice
THE CONTENTS OF THIS DOCUMENT ARE
PROVIDED "AS IS". EXCEPT AS REQUIRED
BY APPLICABLE LAW, NO WARRANTIES
OF ANY KIND, EITHER EXPRESS OR
IMPLIED, INCLUDING, BUT NOT LIMITED
TO, THE IMPLIED WARRANTIES OF
MERCHANTABILITY AND FITNESS FOR A
PARTICULAR PURPOSE, ARE MADE IN
RELATION TO THE ACCURACY,
RELIABILITY OR CONTENTS OF THIS
DOCUMENT. SENDO RESERVES THE
RIGHT TO REVISE THIS DOCUMENT OR
WITHDRAW IT AT ANY TIME WITHOUT
PRIOR NOTICE. UNDER NO
CIRCUMSTANCES SHALL SENDO BE
RESPONSIBLE FOR ANY LOSS OF DATA
OR INCOME OR ANY SPECIAL,
INCIDENTAL, CONSEQUENTIAL OR
INDIRECT DAMAGES HOWSOEVER
CAUSED.
Export Information
The product is subject to the United States
Export Administration Regulations.
Diversion contrary to U.S. law is prohibited.
You must comply with all applicable export
laws, restrictions and regulations of the
United States or foreign agencies or
authorities, and shall not export, or transfer
for the purpose of re-export, this product in
violation of any such restrictions, laws or
regulations, or without all necessary
approvals. As of June 2001 under US legal
requirements, this means that the Exported
Product may not be downloaded or
otherwise exported or re-exported (i) into
Cuba, Iran, Iraq, Libya, North Korea, Sudan,

4
1
Copyright and Legal Information
Syria, the Taliban-controlled areas of
Afghanistan or any other country subject to
U.S. trade sanctions covering the
downloaded software product, to
individuals or entities controlled by such
countries, or to nationals or residents of
such countries other than nationals who are
lawfully admitted permanent residents of
countries not subject to such sanctions; or
(ii) to anyone on the U.S. Treasury
Department's list of Specially Designated
Nationals and Blocked Persons, the U.S.
Commerce Department's Denied Persons
List, or the U.S. Commerce Department's
Entity List.
For your safety
You should observe and follow the
guidelines given in this manual for the safe
and efficient use of your phone. Failure to
comply with these guidelines and
requirements may void your warranty and
may invalidate any approvals given to the
phone. Please see the Important Safety
section of this manual before you use the
phone.
Approved Accessories warning
Use only batteries, charger and accessories
approved by Sendo for use with this phone
model. The use of any other types may
invalidate any warranty applying to the
phone, and may be dangerous. For
availability of approved accessories, please
check with your dealer or visit
www.sendo.com.
When you disconnect the power cord of any
accessory, grasp and pull the plug, not the
cord.
Network Services
A number of features included in this guide
are called network services. They are
services provided by wireless service
providers. Before you can take advantage
of any of these network services, you must
subscribe to these service(s) from your
home wireless service provider and obtain
instructions for their use. Some of these
network services may not be available when
roaming on a network other than your home
network.
5
2
Your phone
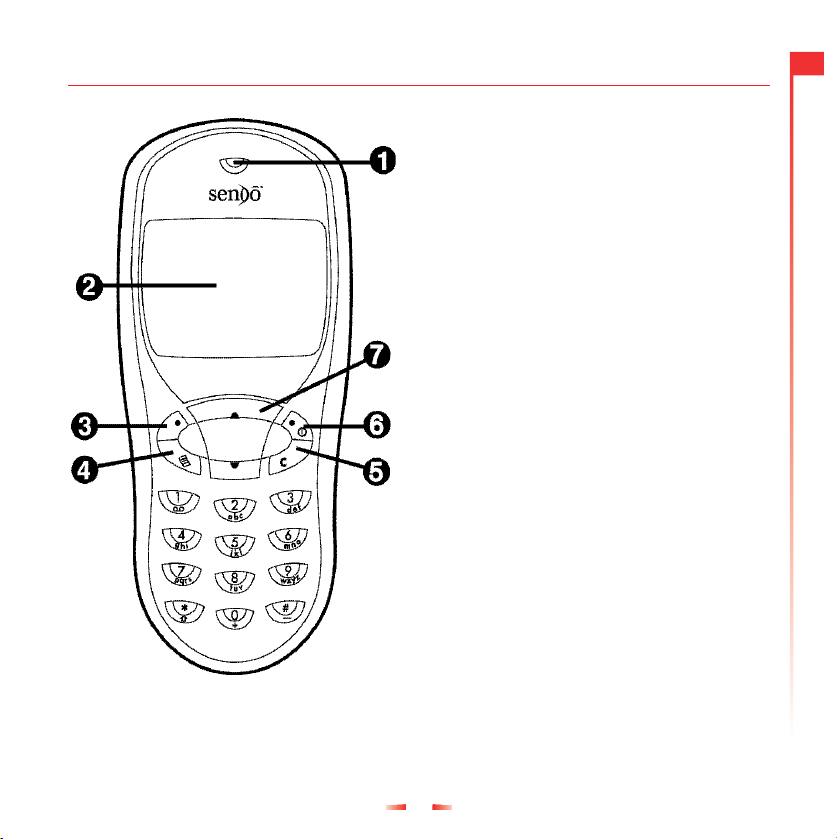
2 Your phone
nEarpiece
oDisplay – Graphical indicators, menu
options and other information are shown
here.
pLeft soft key – This key performs the function
immediately above it on the display
qQuick access key – The function of this key
will vary depending on the model of your
phone. It provides quick access to a certain
function such as SIM Toolkit or messaging.
rClear key – This erases text or takes you
back to your previous step, depending on
the context. A long press of this key takes
you back to the main screen.
sRight soft key – A long press of this key will
switch the telephone on and off. It also
performs the function immediately above it
on the display.
tUp and down keys – Used to scroll through
menus and options.
6
2
Your phone
Available menu items and features will vary by model of phone
and network operator. Please review your phone’s menu to
determine the menu items and features available on your phone.

7
2
Your phone
Symbol description
Main screen
Battery indicator
Empty icon indicates a very weak
battery level. Solid icon indicates a
fully charged battery level
Battery charging
Signal strength indicator
No bars indicates a very weak
signal.
Four bars indicates a very strong
signal
µNew text message
All incoming calls are diverted
Keypad locked
λNew voice mail message (this icon
is network dependent)
Silent mode active
Alarm clock set
In calls list
νShows that a call was incoming
οShows that a call was outgoing
ξShows that a call was missed
In messages list
Indicates the messages which
have not yet been read
Indicates the messages which
have been read
κIndicates the smiley messages
which have not yet been read
ϕIndicates the smiley messages
which have been read
Lists
In lists shows the option that is currently activated

8
3
Getting started
3 Getting started
To use your phone, you must first insert the
SIM card supplied by your service provider,
and then charge the battery.
Removing the back cover
Press down on
the area on the
top of the back
of the phone
and lift the cover
off.
Inserting the SIM card
Place the SIM in the phone, starting with the
shorter left edge first, making sure that the
golden coloured contacts of the card are
touching the contacts of the phone.
☛Note: You cannot remove the SIM unless
you remove the battery.
.
☛Note: Keep all SIM cards out of small
children’s reach. The SIM card is easily
damaged by scratches or bending, so
be cautious when inserting and
removing the card.
Fitting the battery
Insert the battery into the phone, starting
with the top edge first. Align the tabs on the
edge of the battery with the tabs on the back
of the phone. Make sure the golden
coloured contacts of the battery are
touching the contacts on the phone. Push
down into place.
To remove the battery, press down on the
tab at the centre of the bottom edge of the
battery and lift out.
1You must charge the battery for at least
12 hours before using the telephone for
the first time.
2Allow your battery to fully discharge
occasionally before recharging it.
3When the battery is completely
discharged it may take some time for the

9
3
Getting started
battery charging icon to appear after you
have connected the charger.
If you remove your battery you will find the
phone’s label on the back portion of the
phone. This label includes information about
the phone, such as the model number.
Do not remove the phone’s label. In the
unlikely event that you ever need to make a
warranty claim or seek assistance with
respect to use of your phone, you may be
asked for this information.
☛Note: Always turn your phone off before
you insert or remove the battery.
Charging the battery
Insert the connector on the charger lead into
the connector on the top of the phone. Plug
the charger into a mains AC socket. When
charging commences, the battery icon will
change into a charger cable icon. When the
battery is fully charged, the battery icon will
reappear and you can disconnect the
charger.
The battery will normally take around 2 to 3
hours to charge.
Charging and Discharging
A new battery's full performance is achieved
only after two or three complete charge and
discharge cycles. The operations times
provided are reasonable estimates and may
be affected by network conditions, charging
and phone usage.
The battery can be charged and
discharged hundreds of times but it will
eventually wear out. When the operating
time (talk-time and standby time) is
noticeably shorter than normal, it is time to
buy a new battery.
Use only batteries approved by Sendo and
recharge your battery only with the chargers
approved by Sendo. When a charger is not
in use, disconnect it from the power source.
Do not leave the battery connected after its
battery indicator shows that the battery is
full, or for longer than a single day, since
overcharging may shorten its life. If left
unused a fully charged battery will
discharge itself over time.
If the battery is completely empty, it may
take a few minutes before you can make or
receive a call once you plug the phone into
a charger.
For better operation times, discharge the
battery from time to time by leaving your
phone switched on until it turns itself off and
the battery is fully discharged.
Do not attempt to discharge the battery by
any other means.
☛Note: Use the battery only for its
intended purpose.
☛Never use any charger or battery that is
damaged or worn out.

10
3
Getting started
☛Do not short circuit the battery. All
batteries can cause property damage,
injury or burns if a conductive material
such as jewelry or keys comes into
contact with the exposed terminals. The
material may complete an electrical
circuit and become quite hot. Exercise
care in handling your phone battery. For
example, avoid carrying your phone
battery loose in a pocket or purse. This
product is designed for use with Sendo-
approved batteries only. Use of
unapproved batteries may be
dangerous and may cause damage to
the battery or the phone and may void
your warranty.
☛Leaving the battery in hot or cold places,
such as in a closed car in summer or
winter conditions, may reduce the
capacity and lifetime of the battery.
Always try to keep the battery between
59 F and 77 F (15 °C and 25° C). A
phone with a battery that has been
exposed to temperature extremes may
temporarily not work, even when the
battery is fully charged.
Dispose of the battery properly. Comply
with all local laws or regulations in disposing
of your battery. Do not dispose of batteries
in a fire.
Powering up/down
To switch the phone on, press δ. If the
phone asks for a PIN code: Enter the code
that is supplied with the SIM card. The code
will be displayed as asterisks. When
complete, press γ, OK. Wait a few seconds
while the phone searches for the network.
Once the network has been found, the main
screen appears and your phone is ready to
be used. The main screen shows the
network name and two icons giving the
signal strength (top right) and battery level
(top left).
To switch the phone off, press and hold δ.

11
4
Making a call
4 Making a call
Dialling a number
1Key in the area code and number that
you want to call then press γ, Call to
dial.
To delete the entire number and return to the
main screen, press and hold χ.
2You can adjust the earpiece volume in a
call by using the front keys :;.
3To end the call, press δ, End.
Making an international call
1Press and hold 0until the plus sign "+"
is displayed. This replaces the
international access code.
2Enter the country code, area code, and
phone number.
3Press γ, Call to dial.
Making an emergency call
1Enter 999 (or the local emergency
number).
2Press γ, Call to dial.
☛Warning:The phone must be switched
on, open, properly charged and used in
a service area with adequate signal
strength to make an emergency call.
Emergency calls also may not be
possible when certain network services
or phone features are in use. Do not rely
on your wireless phone as your only
method of emergency communications.
Making calls from the contact list
1Press ;from the main screen. You
can also press δ, Contacts then select
the Search option.
2Type in the first letters of the name or
scroll and find the one that you want.
3Press γ, Call to dial.
Speed dialling
Allows you to dial a number simply by
pressing and holding the assigned key from
the main screen.
To assign a contact list entry to a key:
Press ;, then press and hold one of the
keys 2to 9until the key number
appears on the left of the screen, beside the
name. This indicates that the speed dial is
successfully assigned.
☛Note: 1is normally reserved for
voicemail.
Making calls using speed dial
1Press and hold the number key assigned
to the contact you want to call.
Making a call from the calls list
The phone stores a list of your recent
incoming, outgoing and missed calls.
The list stores up to 30 entries.

12
4
Making a call
An icon on the left of the screen indicates the
type of call:
νIncoming call
ξMissed call
οOutgoing call
To dial a number from the redial/calls list:
Press :to access the list. Scroll and
find the one that you want and press γ, Call
to dial.
Adjusting the loudness
The receiver volume may be adjusted
during a conversation. Press :to make
the speech louder and ;to make it
quieter.

13
5
Answering a call
5 Answering a call
To answer a call, press γ, Accept. To reject a call, press δ, Reject.
Call waiting
This feature means you are informed of a
second incoming call by an audible tone in
the earpiece.
☛Note: Please refer to the Services
chapter of this guide for more
information on how to activate Call
Waiting.
Press δ, Reject to reject the second call.
Press γ, Accept to put the current call on
hold and activate the second call.
To end the active call and return to the held
call, press δ, End.
To switch between calls, press γ, Options
and then select the Swap option.
☛Note: Your network may not support call
waiting or may require you to subscribe
to this feature. If you do not have call
waiting or are roaming on another
network, accepting a second call will
end the first call. You will not be able to
switch.
In call options
When you are in a call, you can press γ,
Options. These could be:
Contacts
Gives you access to the contact list.
Hold/Unhold
Puts the active call on hold/reactivates the
held call.
Mute/Unmute
Switches the microphone off/on.
Send message
Allows you to send a text message.
SIMToolkit
Gives you access to the SIM Toolkit.
Swap
Swaps between the current call and the
call on hold.
End all
Ends all calls.

14
6
Using the contact list
6 Using the contact list
The names and numbers you enter into your contact list are stored on the SIM card.
To access your contact list entries, press ;from the main screen.
Storing a name and number
1Press δ, Contacts from the main screen.
2Use the up and down keys :and
;to scroll to the Add new option,
then press γ, Select.
3Enter the area code and phone number,
then press γ, OK.
4Enter the name you wish to store in the
contact list, then press γ, OK. Use the
keypad as explained in the table in the
Messages section to enter the characters
and to switch between lower case, upper
case, and numeric modes.
Correcting an entry
Pressing χdeletes the character
immediately to the left of the cursor.
Pressing and holding χdeletes all of the
text that you have entered.
Contact list options
When you have selected a name you can
open a list of options by pressing δ,
Options which will allow you to change,
delete, give details and send a message.
Fixed names
This service allows you to restrict your
outgoing calls to certain selected numbers
from your SIM card. This feature is
dependent on your service provider. Your
phone will ask for the PIN2 code to activate
this function. You can obtain this code from
your service provider. When this feature is
activated, a new contact list is made visible
in place of your standard one. Only numbers
from this contact list can be dialled. You can
add numbers to this contact list in the same
way as adding numbers to your normal
contact list, with the exception that you have
to enter the PIN2 code.

15
7
Menu navigation
7 Menu navigation
To enter the main menu, press γ, Menu from the main screen.
Scrolling
You can scroll from one menu to another
using the front keys :and ;. When
you find the menu that you are looking for,
press γ, Select to go in. Press End, back or
χto return to the previous level.
SIM Toolkit
Your service provider may offer some
special services or applications. The name
of the menu may change to indicate the type
of service, for example “Information”.
For more details, please contact your
service provider.

16
8
Messages
8 Messages
Calling your voice mail
When you have a new message in your
voice mailbox, your phone displays either
the voice mail icon λin the main screen or
a text message sent from the network. This
depends on your service provider.
☛Note: Voice mail is a network service
provided by your service provider. You
may have to subscribe to this service.
This service may not be available when
roaming.
Press and hold 1. If the phone asks for
the voice mailbox number, enter it and press
γ, Call. The number can be obtained from
your service provider.
Broadcast messages
Your service provider may offer Cell
Broadcast. This could be information on the
traffic, weather, events, or local information
which is broadcast by the network to all
mobiles in a specific area. When you
activate this feature, you may receive
messages about the selected topic. Contact
your service provider for more details.
Reading a text message
When you receive a text message, the
envelope µicon is displayed at the top of
the main screen.
1Press γ, Read to display the new
message directly from the main screen.
2To read old messages select Read from
the Messages menu.
3Use the up and down keys :and
;to scroll through the message.
4Press δ, Options to access the following
message options:
Delete
Removes the message.
Reply
Sends a text message to the sender.
Call
Calls the sender (or, if there is a number in
quotes in the message, this number is
called instead).
Save no.
Adds the sender’s phone number to your
contact list.
Time/date
Displays the date and time of the
message.
Forward
Sends the message to someone else.
Sending a text message
You can send messages of up to 160
characters to another GSM phone.
1Enter the Messages menu and select the
option Send.
2Type in a new message or select a
message from a list of saved messages.

17
8
Messages
3When you have entered the text, press
γ, Send.
4Enter the destination phone number, or
press δ, Contacts and select a name
from your contact list.
5Press γ, Send to send the message.
☛Note: If you reply to a message, you do
not have to re-enter the number. This is
done automatically.
Sending a Smiley SMS
Send a picture with your text message to
compatible phones. All other phones will
display an Internet style Smiley. Choose γ,
Smiley.
1. Emotions
2. Celebrations
3. Sports
4. Animals
5. Others
Select the Smiley you would like to use from
one of these categories and press γ,
Select. The text is restricted to 156
characters to allow space for the Smiley.
Reading a Smiley SMS
When you choose a message that has a
Smiley in it, the Smiley appears on the
screen for 3 seconds or until a key is
pressed. Then the message appears. After
this time the message reads as normal. A
message with a smiley attached has a κ
icon if new and a ϕif read.
☛Note: If replying to or forwarding an SMS
the Smiley will not display and only
appears on a new message.
Message settings
This menu offers three options:
Status report
Allows you to set whether or not you wish
to be informed when your correspondent
has received the text message.
Centre number
Allows you to enter or change the service
centre number for text messaging.
Voice mail
Allows you to enter or change your voice
mail number.
Predictive Text Input
To save time when you are writing a text
message, your phone has a feature which
guesses the letters that you are typing and
tries to complete the word.
This input method allows you to simply
press each key once. For example, to write
the name “Ross”, press 7, then 6, then
7, then 7just once each.
The word may change as you type, but don’t
worry about what is on the screen until you
have finished the word. Sometimes different

18
8
Messages
words share the same sequence of key
presses. If the finished word is wrong, press
0to scroll through other possibilities. If
the word that you are looking for is still not
there, press *repeatedly to change the
text mode to αand enter the word again.
After you have completed a word, press the
space key #to enter the next word. Press
and hold #to pick a symbol to insert from the
character table.
Some intelligent punctuation (including full
stops, hyphens and apostrophes) is also
available on 1. The punctuation mark is
completed when you enter the next
keystroke.
Changing the editing mode
The current editing mode is indicated at the
bottom of the screen by one of these icons:
αLower case text mode
βUpper case text mode
θNumeric mode
ηT9 Text Input (lower case)
ιT9 Text Input (upper case)
You can switch between upper case, lower
case, and numeric modes by repeatedly
pressing *. You can switch to predictive
T9 Text Input by repeatedly pressing *.
These are the characters which come on to
the screen when you press the numeric
keypad. They are featured in the table
below:
To enter two characters on the same key,
enter the first one and then wait for the
cursor to reappear before entering the
second.
Example: To enter the name “Ross” when
you are in lower case mode:
Press *to enter upper case mode,
Press 7three times, to display "R". You
will then return to lower case mode.
Press 6three times, to display "o".
Press 7four times, to display "s".
Then press 7four times, to display "s".
Key List of characters available
1 1 . , @ ‘ ? ! “ : ; ¿ ¡
2 a b c 2 à ä å æ ç
3 d e f 3 é è
4 g h i 4 ì
5 j k l 5
6 m n o 6 ñ ò ö ø ó
7 p q r s 7 ß
8 t u v 8 ü ù
9 w x y z 9
00
#Space

19
8
Messages
Entering symbols
A long press on #displays a table showing
all the symbols available to you.
Scroll down the table to display more
symbols.
To enter a symbol:
1Scroll to the row containing the symbol
you want.
2Press the numeric key (1to 9) to
reach the symbol you want.
Example: To enter the symbol ε, scroll to the
4th row then press 3.
123456789
.,-|?@():
&‘ “/_;$%+
*=<>#£¥¤ƒ
§√ε»ÀŒ—”÷
ÿŸ¿ìàäåæç
éèìÄÄÉòñÆ
ö ø ß ü ù ÑÖØÜ

20
9
Sounds
9 Sounds
This menu allows you to configure the various tones that the phone plays when you receive a
call or a new text message, or some other event occurs.
Ringer
Select this option to set the ringing tone for
incoming calls.
Ringer tone composer
Go into the Sounds menu and press γ,
Composer.
Change your ringer tones to personalise
your phone. Create your own tones with our
ring tone composer.
In this menu the keys represent the following
notes:
1C5G
2D6A
3E7B
4F
8Enters a rest (text mode only)
9Changes the scale of the note
between the range 1-4
0Changes the duration of the note.
Each press decreases the duration
of the note between the range: full
note, half note, quarter note, eighth
note, sixteenth note and thirty-
second note.
#Changes a normal note to a sharp
and a sharp back to a normal note.
*Changes a normal note to a dotted,
double dotted or 2/3 note.
χErases the previous note. A long
press will clear all notes.
Once you have composed the tone press
γ, Options to enter the menu screen. The
available options are:
Tempo
Allows you to choose from a list of tempos
at which to play your tone.
Play
Allows you to play your melody.
Save
Allows you to save your melody.
Delete
Allows you to delete the tone.
Send
Allows you to send your tone to one of your
friends.
Receiving a ringer tone
If you have received a ringer tone press γ,
Options to enter the menu from where you
can play, save or delete the tone. If you
press χthe ring tone and message will be
deleted.
☛Note: It is only possible to save 5 ringer
tones whether you have composed them
Table of contents
Other SENDO Cell Phone manuals


