SENDO P600 User manual

[[[]]]
i
Contents
Copyright and Legal Information v
1Your phone 1
Layout - front 1
Layout - back 2
Menus 3
Display indicators 4
2Getting started 6
Removing the back cover 6
Removing the battery 6
Inserting the SIM card 6
Inserting the battery 7
Replacing the back cover 7
Charging the battery 7
3The basics 9
Switching on/off 9
Navigation and scrolling 9
My number 9
Screensaver 9
Power save 9
SIM Toolkit 10
Shortcuts 10
Entering text, numbers and symbols 10
4Calls 13
Making a call 13
Answering a call 14
In-call options 14
Adjusting the volume 15
Using the calls list 15
5Messages 16
Using Messages 16
Text messages 16
MMS messages 19
Sending an MMS message 20

[[[]]]
ii
Using templates 22
Sorting and deleting messages 22
Calling your voice mail 22
SMS and MMS settings 23
6Internet 25
Internet settings 25
Internet menu 25
Connecting to an internet page 25
Downloading 25
In browser options 26
Setting your homepage 26
Bookmarks 26
Settings 27
7Personalise your phone 29
Ringtones 29
Sounds 29
Volume and vibrate 29
Display 30
Covers 30
Wrist/neck strap 32
8Contacts 33
Phone contacts and SIM contacts 33
Adding a contact 33
Finding a contact 36
Copying contacts 36
Deleting contacts 36
Fixed names 36
Additional Contacts menu options 37
Calls list 38
9Camera 39
Taking a photo 39
Sending a photo 39
Photo options 40

[[[]]]
iii
Camera options 40
Memory 41
Timeout 41
Editing your photos 41
10 Games 42
Funny Farmer 42
Solitaire 44
Sumito 44
Tenpin 45
Splat 45
Volume 45
11 Applications 46
Calculator 46
Converter 46
12 Java 48
Downloading and installing 48
Deleting 48
Options 49
13 Pictures/Sounds 50
Pictures 50
Sounds 51
14 Settings 53
Languages 53
Time/Date 53
Alarm 53
Display 54
Sounds 54
Advanced 55
Data accounts 56
Shortcuts 57
Auto key lock 57
15 Services 58


[[[]]]
v
Copyright and Legal Information
The wireless phone described in this manual is
approved for use in GSM 900 and 1800 networks.
This manual and the accompanying Safety, Warranty
and Licence booklet are available for download from
www.sendo.com.
Copyright Information
Part number: 8E30-T4011-50001 (Edition 1).
Copyright Sendo 2004. All rights reserved.
Printed in the EU.
Sendo, the Sendo logo, the Sendo “D” and the
Sendo model P600 phone are trademarks or
registered trademarks of Sendo International Ltd.
and/or its affiliates. All rights reserved.
Reproduction, transfer, distribution or storage of part
or all of the contents in this document in any form
without the prior written permission of Sendo is
prohibited.
T9 Text Input is a registered trademark of Tegic
Communications. All rights reserved. T9 Text input is
licensed under one or more of the following U.S.
Patents: 5,818,437, 5,953,541, 5,945,928,
6,011,554 and additional patents are pending
worldwide.
Java and all Java-based trademarks
and logos are trademarks or registered
trademarks of Sun Microsystems, Inc.
in the U.S and other countries. The
names of actual companies and
products mentioned herein may be the
trademarks of their respective owners.
Disclaimer
The information contained in this user guide is
written for the Sendo model P600 phone. Sendo
reserves the right to make changes and
improvements to the products and any of the features
of the products described in this document, and/or
this document itself, without prior notice.
THE CONTENTS OF THIS DOCUMENT ARE
PROVIDED "AS IS". EXCEPT AS REQUIRED BY
APPLICABLE LAW, NO WARRANTIES OF ANY KIND,
EITHER EXPRESS OR IMPLIED, INCLUDING, BUT
NOT LIMITED TO, THE IMPLIED WARRANTIES OF
MERCHANTABILITY AND FITNESS FOR A
PARTICULAR PURPOSE, ARE MADE IN RELATION TO
THE ACCURACY, RELIABILITY OR CONTENTS OF
THIS DOCUMENT. SENDO RESERVES THE RIGHT
TO REVISE THIS DOCUMENT OR WITHDRAW IT AT
ANY TIME WITHOUT PRIOR NOTICE. UNDER NO
CIRCUMSTANCES SHALL SENDO BE RESPONSIBLE
FOR ANY LOSS OF DATA OR INCOME OR ANY
SPECIAL, INCIDENTAL, CONSEQUENTIAL OR
INDIRECT DAMAGES HOWSOEVER CAUSED.
Export Information
This phone may be subject to export regulation of the
United Kingdom and other countries. Diversion
contrary to law is prohibited. You must comply with
all applicable export laws, restrictions and
regulations of the United Kingdom or foreign
agencies or authorities, and shall not export, or
transfer for the purpose of re-export, the phone or
any part of the phone in violation of any applicable
restrictions, laws or regulations, or without all
necessary approvals.
For Your Safety
You should observe and follow the guidelines given
in this manual for the safe and efficient use of your
phone. Failure to comply with these guidelines and
requirements may void your warranty and may
invalidate any approvals given to the phone.
Please read this manual in conjunction with the
Safety, Warranty and Licence booklet provided (and
in particular the safety section), before you use your
phone.
!Warning: Throughout the main body of this
manual, text in this format is used to act as a
warning. Please read each warning carefully.
This phone is equipped with an internal antenna on
the top area of the phone. Avoid touching or
covering the antenna as detailed in the Safety section
of the Safety, Warranty and Licence booklet supplied
with this manual.
Safety, Warranty, Licence
Please refer to the information contained in the
Safety, Warranty and Licence booklet supplied with
this manual. The booklet contains important Safety,
Warranty and End User Licence Agreement
information.
Approved Accessories Warning
Use only batteries, chargers and accessories
approved by Sendo for use with this phone model.
The use of any other types may invalidate any
warranty applying to the phone, and may be
dangerous. For availability of approved accessories,

[[[]]]
vi
please check with your dealer or visit
www.sendo.com.
When you disconnect the power cord of any
accessory, grasp and pull the plug, not the cord.
Network Services
A number of features included in this guide are
called network services. They are services provided
by wireless service providers. Before you can take
advantage of any of these network services, you must
subscribe to these service(s) from your home wireless
service provider and obtain instructions for their use.
Some of these network services may not be available
when roaming on a network other than your home
network.
[[[]]]
1
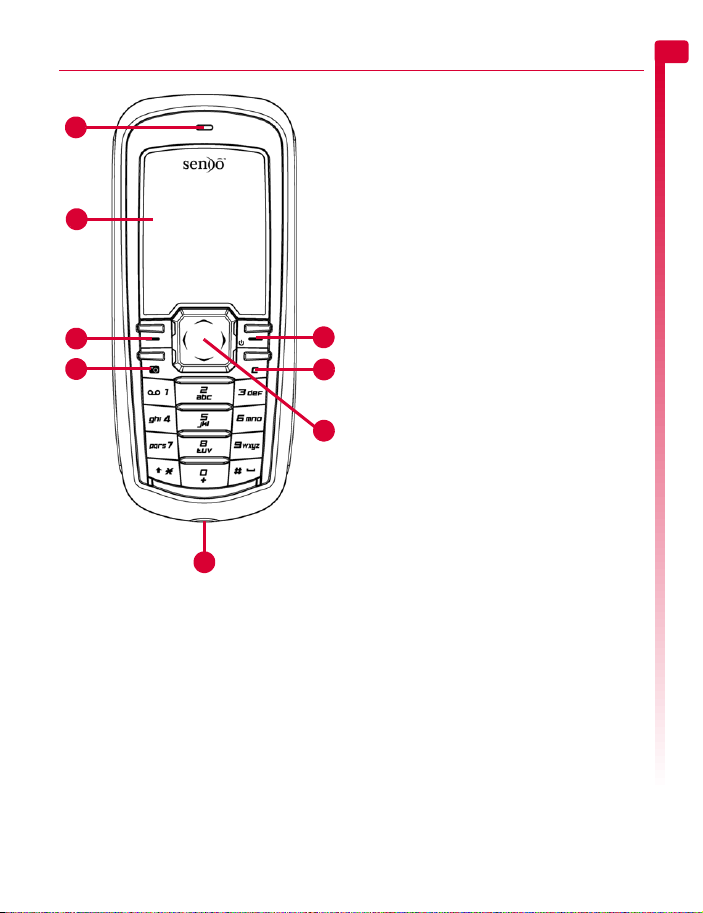
Your phone
1
1 Your phone
Colours and layout shown above may not exactly
match the phone supplied.
Layout - front
1Earpiece
2Display – Display indicators, menu
options and other information is shown
here.
3Left soft key g– This key performs the
function immediately above it on the
display.
4Right soft key/Power key d– A short
press of this key performs the function
immediately above it on the display. A long
press of this key will switch the phone on
and off.
5Camera key f– Opens the Camera
feature.
6Clear key c– This key erases text or
takes you back to your previous step,
depending on what you’re doing. A long
press of this key takes you back to the main
screen.
7Navigation keys : ; [ ] – Used
to scroll up, down, left and right in menus
and features.
8Charger/accessories connector – Insert
the charger connector here. This connector
is also used to connect accessories such as
a hands-free kit.
1
1
2
3
5
7
4
6
8
[[[]]]
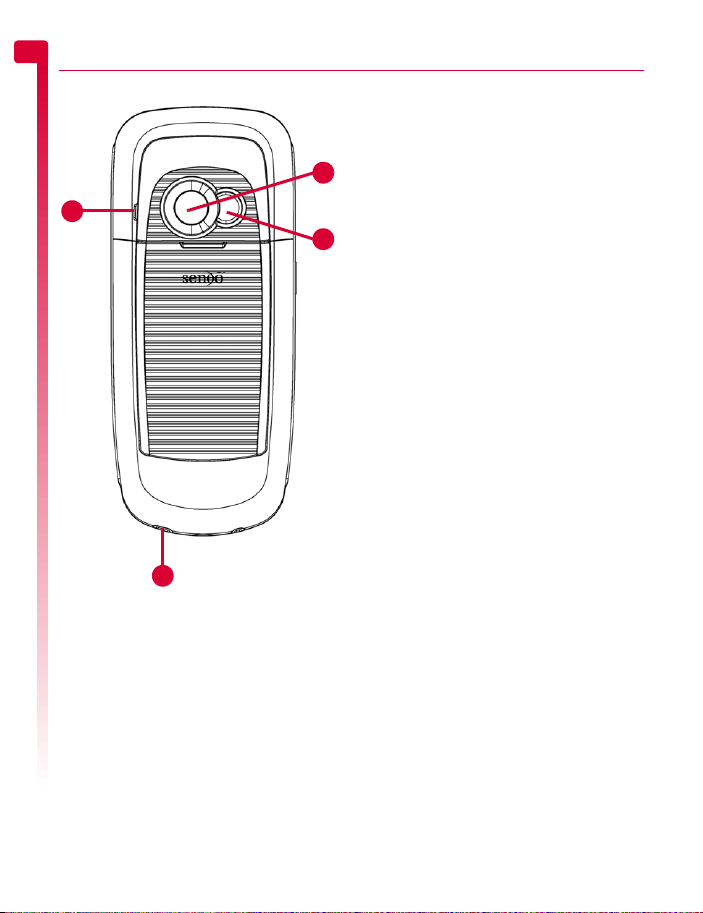
2
Your phone
1
Colours and layout shown above may not exactly
match the phone supplied.
Layout - back
1Speaker – Used to play ringtones, alerts
and sounds.
2Camera lens – Used for the digital
camera.
3Self-portrait mirror – Used to take a
photo of yourself. Look at the self-portrait
mirror and position your reflection in the
centre of the mirror. When you take a
photo, your image will be aligned correctly.
4Wrist/neck strap aperture – Used to
attach a wrist strap or neck strap. See the
Wrist/neck strap section on Page 32 for
details.
2
1
3
4

[[[]]]
3
Your phone
1
Menus
Create MMS
Create SMS
Inbox
Drafts
Sent
Templates
Voice mail
Settings
Languages
Time/Date
Alarm
Display
Sounds
Advanced
Data accounts
Shortcuts
Auto key lock
Menus
Messages
Settings
Services
Games/Apps
SIM Toolkit
Commands
Network sel.
Send number
Cost/timers
Divert
Call waiting
Broadcast
Available menu items and features may vary by model of phone and network service provider.
Please review your phone’s menu to determine the menu items and features available on your phone.
Pictures
Sounds
Homepage
Bookmarks
Recent Pages
Enter Address
Resume
Settings
Internet
Pictures/Sounds
1
2
3
4
5
6
7
8
1
2
3
4
5
6
7
8
1
2
3
4
5
6
7
1
2
1
2
3
4
5
6
Camera 9
[[[]]]
4
Your phone
1
Display indicators
Main screen
In contacts lists
In messages list
In calls list
>Note: The Type and Direction icons are
used together to indicate the number/
contact type and the direction of the call.
For example, indicates an incoming
call from a work number stored in your
contacts.
Indicator Meaning
Battery level - low
Battery level - high
Battery charging (phone on)
Battery charging (phone off)
Signal strength - weak
Signal strength - strong
GPRS service available
GPRS service not available
(these icons are network dependent)
New SMS, EMS or MMS message
New voice mail message
(this icon is network dependent)
Indicates you had a missed call
All incoming calls are diverted
Keypad locked
Silent mode active
Alarm clock set
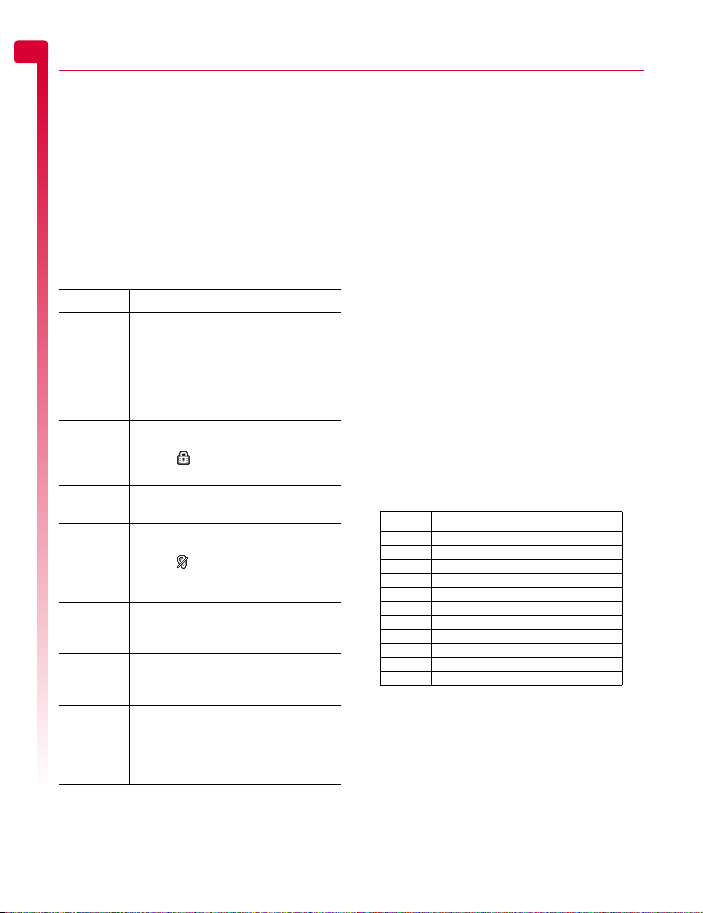
Indicator Meaning
Mobile phone number
Work phone number
Home phone number
Email address
SIM contact
Indicator Meaning
Message has not been read
(subject text in bold)
Message has been read
(normal subject text)
Yellow icon MMS (multimedia) message
Blue icon SMS (text) message
Type Meaning
Mobile number
Work number
Home number
SIM contact
Unknown contact
Direction Meaning
Incoming call from a number
Outgoing call to a number
Missed call from a number

[[[]]]
5
Your phone
1
In lists
Text entry
Internet
Camera
Indicator Meaning
Shows the option that is currently
activated
Indicates that more information is
available. When a line like this is
highlighted in features such as the
contacts list, the text will scroll
automatically to reveal the
additional information.
Indicator Meaning
αMultitap text input - lower case
βMultitap text input - upper case
ηT9 predictive text input (lower case)
ιT9 predictive text input (upper case)
θNumeric mode
Indicator Meaning
G GPRS WAP session
C GSM WAP session
Indicator Meaning
L
M
S
XS
LP
SP
Photo size setting:
Large
Medium
Small
Extra Small
Large Portrait
Small Portrait
White balance (if not set to Automatic)
Sharpness (if not set to zero).
Timer active
Multishot active
5Photos remaining counter.
For example, this icon indicates that
another 5 photos can be stored on
the phone (with the available memory
and current resolution and quality
settings).

[[[]]]
6
Getting started
22 Getting started
To use your phone, you must first insert the
SIM card supplied by your network service
provider, and then charge the battery.
Removing the back cover
Press down on the area on the top of the back
cover, slide the cover down and lift off.
Removing the battery
If you need to remove the battery, press down
on the tab at the centre of the bottom edge of
the battery and lift out.
>Note: Always turn your phone off before
you remove the battery.
Inserting the SIM card
>Note: You cannot insert or remove the
SIM unless you remove the battery.
Always turn your phone off before you
remove the battery. See the Removing the
battery section above for details.
Slide the SIM into place, starting with the
shorter edge first, making sure that the gold-
coloured contacts of the card are facing
down, touching the contacts of the phone.
!Warning: Keep all SIM cards out of reach
of small children. This small part can be
swallowed.
!Warning: The SIM card is easily damaged
by scratches or bending, so be careful
when inserting and removing the card.
[[[]]]
7
Getting started
2
Inserting the battery
Insert the battery into the phone, starting with
the top edge first. Align the tabs on the edge
of the battery with the tabs on the back of the
phone. Make sure the gold-coloured contacts
of the battery are touching the contacts on the
phone. Push down into place.
!Warning: Do not insert the battery with
the phone’s front cover removed.
Replacing the back cover
Place the cover onto the back of the phone
and slide the cover into place, making sure
the tab at the top of the cover clicks into
place.
Charging the battery
You must charge the battery for at least 12
hours before using the phone for the first
time. After this, the battery will normally take
around 3 to 5 hours to charge.
Insert the connector on the charger lead into
the connector on the bottom of the phone.
Plug the charger into a wall socket. When
charging commences, an animated charging
icon or charger cable icon appears. When
the battery is fully charged, a full battery icon
will appear and you can disconnect the
charger.
!Warning: Only use chargers designed for
use with your P600 and approved by
Sendo. Incorrect use of chargers, or use
of any other charger, may damage your
phone and may invalidate your warranty.
Once you connect the charger, you can
switch your phone on. If the battery is
completely empty, it may take a few minutes
before you can make or receive a call once
you plug the phone into a charger.
>Note: When the battery is completely
discharged it may take some time for the
battery charging icon to appear after you
have connected the charger.
Charging and Discharging
Please observe the following notes and
precautions regarding the use of batteries
and related equipment.
Note
Do not charge the battery with either of the phone
covers removed.
If you remove your battery you will find the phone’s
label on the back portion of the phone. This label
includes information about the phone, such as the
model number.
Do not remove the phone’s label. In the unlikely event
that you ever need to make a warranty claim or seek
assistance with respect to use of your phone, you may
be asked for this information.
Note that a new battery's full performance is achieved
only after two or three complete charge and
discharge cycles. The operation times provided are
reasonable estimates and may be affected by
network conditions, charging and phone usage.
The battery can be charged and discharged hundreds
of times, but it will eventually wear out. When the
operating time (talk time and standby time) is
noticeably shorter than normal, it may be time to buy
a new battery.

[[[]]]
8
Getting started
2
Caution: Only use batteries approved by Sendo and
recharge your battery only with the chargers
approved by Sendo. When a charger is not in use,
disconnect it from the power source. Do not leave the
battery connected after the battery indicator shows
that the battery is full, or for longer than a single day,
since overcharging may shorten its life. If left unused
a fully charged battery will discharge itself over time.
For longer operation times, discharge the battery
from time to time by leaving your phone switched on
until it turns itself off and the battery is fully
discharged.
Do not attempt to discharge the battery by any other
means.
Use the battery only for its intended purpose.
Never use any charger or battery that is damaged or
worn out.
Warning: Do not short circuit the battery. All batteries
can cause property damage, injury or burns if a
conductive material such as jewellery or keys comes
into contact with the exposed terminals. The material
may complete an electrical circuit and become quite
hot. Exercise care in handling your phone battery. For
example, avoid carrying your phone battery loose in
a pocket or purse. This product is designed for use
with Sendo-approved batteries only. Use of
unapproved batteries may be dangerous and may
cause damage to the battery or the phone and may
void your warranty.
Leaving the battery in hot or cold places, such as in a
closed car in summer or winter conditions, may
reduce the capacity and lifetime of the battery. Always
try to keep the battery between 15°C and 25°C (59°F
and 77°F). A phone with a battery that has been
exposed to temperature extremes may temporarily
not work, even when the battery is fully charged.
Dispose of the battery properly. Comply with all local
laws or regulations in disposing of your battery. Do
not dispose of batteries in a fire.
Note

[[[]]]
9
The basics
3
3 The basics
Switching on/off
To switch the phone on, press d.
If the phone asks for a PIN code, enter the
code that is supplied with the SIM card. The
code will be displayed as asterisks. When
complete, press g, OK.
When you switch the phone on for the first
time (or after removing the battery) you may
also be asked to enter the date (in the format
dd/mm/yyyy). When complete, press g,
OK. You will then be asked to enter the time
(in 24 hour format). When complete, press
g, OK.
>Note: If you make a mistake, use the [
and ]navigation keys to move between
the characters.
Wait a few seconds while the phone searches
for the network. Once the network has been
found, the main screen appears and your
phone is ready to be used. The main screen
shows the network name and two icons
giving the signal strength (top right) and
battery level (top left).
To switch the phone off, press and hold d.
Navigation and scrolling
To enter the main menu on your phone, press
g, Menu from the main screen.
You can scroll through menus using the up
and down keys, :and ;. When you find
the menu option that you are looking for,
press g, Select to activate. Press d, Back
or cto return to the previous level.
In certain features such as entering text
messages, you can also use the left and right
keys, [and ], to scroll left and right.
When scrolling in menus or messages,
continue to hold :, ;, [or ]to increase
the scrolling speed.
?Tip: See the Shortcuts section on Page 10
for details of useful menu shortcuts.
My number
Your phone number is stored on your SIM
card and should be stated in the
documentation that came with the card.
If you need to remind yourself of your
number, try calling another mobile phone
and make a note of the number that appears
on that phone’s display. Alternatively, contact
your network service provider.
Your number may also be available through
the My number feature (if set by your network
service provider). Press d, Contacts from
the main screen and select the My number
option. Select Consult, press d, Options
and select Details to display your phone
number (press cto return to previous
screens).
Screensaver
A screensaver is a picture or animation that is
displayed when the phone has been idle for
a certain amount of time.
When the screensaver is displayed, press any
key to return to normal display (or press g,
Unlock then *if the keypad is locked).
To modify the screensaver settings, see the
Display settings section on Page 54.
Power save
To get better battery performance, your
phone will automatically switch to power save
mode after it has been idle for a certain
amount of time. In this mode, the screen’s
backlight is switched off and a clock is
displayed showing the current time.
When the power save mode is active, press
any key to return to normal display (or press
g, Unlock then *if the keypad is locked).
[[[]]]
10
The basics
3
SIM Toolkit
Your network service provider may offer
some special services or features using the
SIM Toolkit menu. However, the name of this
menu may change to indicate the type of
service, for example “Information”.
For more details, please contact your network
service provider.
Shortcuts
Shortcuts to some useful features:
Entering text, numbers and
symbols
You can enter text, numbers and symbols on
your phone in a number of ways. The current
input mode is indicated at the bottom of the
screen (in features such as messaging) by one
of these icons:
αMultitap text input - lower case
βMultitap text input - upper case
θNumeric mode
ηT9 predictive text input (lower case)
ιT9 predictive text input (upper case)
You can switch between Multitap, numeric
and predictive text modes manually by
repeatedly pressing *.
>Note: When you are in screen that
requires text or numeric entry, the phone
automatically changes to the appropriate
input mode.
The table below lists the characters
associated with each key on the numeric
keypad:
?Tip: For all input modes, a long press on
#displays a table showing all the
symbols available. See the Entering
symbols section below for details.
Shortcut Description
:, ;, [
and ]
You can set what features are accessed
when you press the :, ;, [or ]
navigation key from the main screen.
Try each key from the main screen to
see what features they are currently set
to. The Shortcuts section on Page 57
describes how to change the settings.
Lock
keypad
To lock the keypad, press g, then *
from the main screen. The locked
symbol, is displayed on the main
screen when the phone is locked.
Unlock
keypad
To unlock the keypad, press g, Unlock
then *.
Silent mode To enter/exit silent mode press gthen
#from the main screen. The silent
symbol, is displayed on the main
screen when the phone is in silent
mode.
Silence
ringtone
If you can’t answer a call, but you don’t
want to reject it, press ;to silence the
ringtone.
Scrolling When scrolling in menus or messages,
continue to hold :, ;, [or ]to
increase the scrolling speed.
Language If the phone language is changed by
mistake, press and hold *from the
main screen to display the language list.
Scroll to the language you want (using
:and ;) and press g.
Key List of characters available
1 1 . , @ ‘ ? ! " : ; ¿ ¡
2 a b c 2 à ä å æ ç
3 d e f 3 é è
4 g h i 4 ì
5jkl5
6 m n o 6 ñ ò ö ø
7 p q r s 7 ß
8 t u v 8 ü ù
9 w x y z 9
0 0 (numeric mode only)
# Space (short press)

[[[]]]
11
The basics
3
Multitap standard text input
When you are in Multitap mode (sometimes
called multipress mode), you enter a letter by
pressing the number key on which the letter is
printed. Press the key repeatedly until the
required character is displayed. If you pass
the character you want, keep pressing the key
to scroll through all the characters again.
For example, to enter the letter “r” press 7
three times.
If a word you are entering contains two
consecutive letters which are located on the
same key, enter the first one and then wait for
the cursor to reappear before entering the
second.
Also, you will notice that some intelligent
features are built in. For example, when
entering the first word in a sentence, the text
input mode changes automatically from
upper case to lower case after the first letter.
Some punctuation marks (including full stops,
hyphens and apostrophes) are available on
1. Alternatively, press and hold #to pick a
symbol to insert from the character table (see
the Entering symbols section below).
When you have finished entering a word,
press #to enter a space and move on to the
next word.
For example, to enter the name "Ross" when
you are in lower case mode:
1
Press *to enter upper case mode,
2
Press 7three times, to display "R", you
will then return to lower case mode.
3
Press 6three times, to display "o".
4
Press 7four times, to display "s". Now
pause slightly until the cursor reappears.
5
Then press 7four times, to display "s".
Predictive text input
To save time when you are writing a text
message or MMS message, your phone has
a built-in dictionary feature which uses the
letters that you are typing to complete the
word.
This input method allows you to simply press
each key once. For example, to write the
name "Ross", press 7, then 6, then 7,
then 7just once each.
The word may change as you type, but don’t
worry about what is on the screen until you
have finished the word. Sometimes different
words share the same sequence of key
presses. If the finished word is wrong, press
0to scroll through other possibilities. If the
word that you are looking for is still not there,
press *repeatedly to change the text mode
to βor αand enter the word again.
After you have completed a word, press the
space key #to enter a space and move on
to the next word. Press and hold #to pick a
symbol to insert from the character table (see
the Entering symbols section below).
Some intelligent punctuation (including full
stops, hyphens and apostrophes) are also
available on 1. The punctuation mark is
completed when you enter the next keystroke.
Entering numbers
To enter a number in upper case or lower
case text input mode, simply press the
number key repeatedly until the number is
displayed.
To enter a number in predictive text input
mode, press the number key and then scroll
through the characters (by pressing 0) until
the number is displayed.
If you have multiple numbers to enter, it is
often more convenient to use the numeric
input mode. Press *repeatedly to change
the mode to θ. Now whenever you press
any of the number keys, only the number is
entered.
γ

[[[]]]
12
The basics
3
Entering symbols
For all input modes, a long press on #
displays a table, similar to the one below,
showing all the symbols available to you:
X
To enter a symbol:
1
Press and hold #to display the symbol
table.
2
Use the :and ;keys to scroll to the row
containing the symbol you want.
3
Press the numeric key (1to 9) to select
the symbol.
.,-!?@():
&‘ " /_;$%+
*=<>#£¥ƒ¤
§√ìËÀŒ—”÷
ÿŸ¿iàäâæç
éèÄÅÉòñÆ€
[]{}\|~^
123456789

[[[]]]
13
Calls
4
4 Calls
Making a call
Dialling a number
1
Key in the area code and number that you
want to call, then press g, Call to dial.
If you make a mistake, press cto delete
a single number.
To delete the entire number and return to
the main screen, press and hold c.
?Tip: Press and hold #until the letter p
appears to insert a pause of 3 seconds.
This can be used, for example, with
certain telephone banking systems.
2
To end the call, press d, End.
Making an international call
1
Press and hold 0until the plus sign "+"
is displayed. This replaces the
international access code.
2
Enter the country code, area code, and
phone number.
3
Press g, Call to dial.
Making an emergency call
1
Key in the emergency number for your
present location (e.g. 999, 911, 112 or
other official emergency number).
Emergency numbers vary by location.
2
Press g, Call to dial.
!Warning: To make an emergency call,
the phone must be switched on, properly
charged and used in a service area with
adequate signal strength. Also,
emergency calls may not be possible
when certain network services or phone
features are in use. Do not rely on your
mobile phone as your only method of
emergency communications.
Making calls from the contacts list
QQuick tip: dContacts
X
Search
X
:/;
X
gCall
1
Press d, Contacts from the main screen
and select Search to display your contacts
list.
2
Type in the first letter(s) of the name or
scroll (using :and ;) to the contact that
you want.
3
Press g, Call to dial. If the selected
contact has more than one phone number
stored, e.g. Mobile, Work, Home, scroll to
the number you want in the list displayed,
and press g, Call to call the number. The
favourite number for the contact is
highlighted first.
For more information about creating and
using your contacts list, see the Contacts
chapter on Page 33.
Making a call from the calls list
The phone stores a list of your recent
incoming, outgoing and missed calls.
X
To dial a number from the calls list
QQuick tip: dContacts
X
Calls list
X
:/;
X
gCall
1
Press d, Contacts from the main screen,
and select the Calls list option to display
the calls list.
2
Scroll and find the entry that you want and
press g, Call to dial.
For information about the calls list, see the
Using the calls list section on Page 15.
Speed dialling
This feature allows you to dial a number
simply by pressing and holding a single key.
For more information about creating and
deleting speed dials, see the Contacts
chapter on Page 33.

[[[]]]
14
Calls
4
X
To add a speed dial
φFind it: dContacts
X
Search
1
Type in the first letters of the name or scroll
and find the one that you want.
2
Press and hold one of the keys 2to 9
until the key number appears on the left of
the screen, beside the name. This indicates
that the speed dial is successfully assigned.
>Note: If the contact has more than one
phone number stored, e.g. Mobile, Work,
Home, the speed dial is linked to the
favourite number.
>Note: 1is normally reserved for
voicemail.
X
To make a call using speed dial
1
From the main screen, press and hold the
number key assigned to the contact you
want to call.
>Note: If the contact has more than one
phone number stored, e.g. Mobile, Work,
Home, the favourite number is called.
Answering a call
To accept a call press g, Accept.
To reject a call, press d, Reject.
>Note: If you can’t answer a call, but you
don’t want to reject it, press ;to silence
the ringtone.
Call waiting
This feature means you are informed of a
second incoming call by an audible melody
in the earpiece.
>Note: Please refer to the Call waiting
section on Page 59 for more information
on how to activate call waiting.
Press g, Accept to put the current call on
hold and activate the second call.
Press d, Reject to reject the second call.
To end the active call and return to the held
call, press d, End.
To switch between calls, press g, Options
and then select the Swap option.
In the main screen, the active call is shown
using the icon and the call on hold is
shown using the icon.
>Note: Your network may not support call
waiting or may require you to subscribe to
this feature. If you do not have call
waiting or are roaming on another
network, accepting a second call will end
the first call (or you simply may not be
able to accept another call). You will not
be able to switch between calls.
Conference calls
This feature allows you to connect all parties
when you have accepted two incoming calls.
During the call, press g, Options and select
Conference to connect the callers.
To end the call, press d, End.
>Note: Conference calls is a network
service. You may have to subscribe to this
service and it may not be available when
roaming. Check with your network
service provider for details.
In-call options
When you are in a call, you can press g,
Options. The possible menu options are
listed below.
Select this To
Contacts Access your contacts list.
Hold/Unhold Put the active call on hold/
reactivate the held call.
Mute/Unmute Switch the microphone off/on.
Send message Send a text message.
Swap Swap between the current call
and the call on hold.
Conference Connect all current callers.
Table of contents
Other SENDO Cell Phone manuals


