SENDO X User manual

i Sendo X User Guide
Table of Contents
Copyright and Legal Information.................................................................................... iii
Chapter 1 The Basics....................................................................................................................... 1
Chapter 2 Phone Calls .................................................................................................................. 27
Chapter 3 Settings and Profiles...................................................................................................... 42
Chapter 4 Contacts ....................................................................................................................... 55
Chapter 5 Messaging .................................................................................................................... 62
Chapter 6 Now! Screen................................................................................................................. 79
Chapter 7 Calendar and Tasks ...................................................................................................... 83
Chapter 8 Camera ........................................................................................................................ 90
Chapter 9 Image Editor ................................................................................................................. 95
Chapter 10 Camcorder ................................................................................................................. 100
Chapter 11 MP3 Player ................................................................................................................. 104
Chapter 12 RealOne™ Player ........................................................................................................ 108
Chapter 13 Internet and WAP........................................................................................................ 112
Chapter 14 Games ....................................................................................................................... 123
Chapter 15 Managing Applications ............................................................................................... 127
Chapter 16 Extras ......................................................................................................................... 133

ii Sendo X User Guide
Table of Contents
Chapter 17 Connectivity................................................................................................................ 142
Chapter 18 Accessories ................................................................................................................. 147
Chapter 19 Troubleshooting.......................................................................................................... 152
Safety Information ...................................................................................................... 158
Regulatory Compliance and SAR Statements................................................................ 164
End User Licence Agreement ....................................................................................... 172
Warranty Statements................................................................................................... 175
Declaration of Conformity ........................................................................................... 181

iii Sendo X User Guide
Copyright and Legal Information
Copyright and Legal Information
The wireless phone described in this guide is
approved for use on the GSM and GPRS networks
operating on the 900, 1800 (DCS/PCN) and 1900
(PCS) bands. It is approved for use in the country
where it was originally sold and may be approved
for use in other countries.
Part No. 8E30-0H011-50000, Edition 0.1 (Draft).
Copyright © Sendo 2003. All rights reserved.
SENDO is a trademark of Sendo International and/
or its affiliates. Reproduction, transfer, distribution or
storage of part or all of the contents in this document
in any form without the prior written permission of
Sendo is prohibited.
T9® Text Input is a registered trademark of Tegic
Communications. All rights reserved. T9 Text input is
licensed under one or more of the following U.S.
Patents: 5,818,437, 5,953,541, 5,945,928,
6,011,554 and additional patents are pending
worldwide. Complying with all applicable copyright
laws is the responsibility of the user.
Java and all Java-based trademarks and logos are
trademarks or registered trademarks of Sun
Microsystems, Inc. in the U.S and other countries.
The names of actual companies and products
mentioned herein may be the trademarks of their
respective owners.
This product includes software licensed from
Symbian Ltd © 1998-2003.
This product contains software licensed from Atelier.
Copyright © 2003 Atelier, All rights reserved.
Contains portions of Copyright © 2001 Symbian
Ltd.
This product contains software copyright © Beatnik,
Inc. 1996-2002.
Quick View Plus® for Symbian © 1999-2002
Stellent Chicago, Inc. All rights reserved.
Disclaimer
The information contained in this User Guide is
written for the Sendo model X phone. Sendo
reserves the right to make changes and
improvements to the products and any of the
features of the products described in this document
without prior notice.
THE CONTENTS OF THIS DOCUMENT ARE
PROVIDED "AS IS". EXCEPT AS REQUIRED BY
APPLICABLE LAW, NO WARRANTIES OF ANY KIND,
EITHER EXPRESS OR IMPLIED, INCLUDING, BUT
NOT LIMITED TO, THE IMPLIED WARRANTIES OF
MERCHANTABILITY AND FITNESS FOR A
PARTICULAR PURPOSE, ARE MADE IN RELATION TO
THE ACCURACY, RELIABILITY OR CONTENTS OF
THIS DOCUMENT. SENDO RESERVES THE RIGHT
TO REVISE THIS DOCUMENT OR WITHDRAW IT AT
ANY TIME WITHOUT PRIOR NOTICE. UNDER NO
CIRCUMSTANCES SHALL SENDO BE RESPONSIBLE
FOR ANY LOSS OF DATA OR INCOME OR ANY
SPECIAL, INCIDENTAL, CONSEQUENTIAL OR
INDIRECT DAMAGES HOWSOEVER CAUSED.

Copyright and Legal Information
iv Sendo X User Guide
Export Information
This phone may be subject to export regulation of
the United Kingdom and other countries. Diversion
contrary to law is prohibited. You must comply with
all applicable export laws, restrictions and
regulations of the United Kingdom or foreign
agencies or authorities, and shall not export, or
transfer for the purpose of reexport, the phone or
any part of the phone in violation of any applicable
restrictions, laws or regulations, or without all
necessary approvals.
For Your Safety
You should observe and follow the guidelines given
in this manual for the safe and efficient use of your
phone. Failure to comply with these guidelines and
requirements may void your warranty and may
invalidate any approvals given to the phone. Please
see the Safety Information section of this manual
before you use the phone.
Approved Accessories Warning
Use only batteries, chargers and accessories
approved by Sendo for use with this phone model.
The use of any other types may invalidate any
warranty applying to the phone, and may be
dangerous. For availability of approved accessories,
please check with your dealer or visit
www.sendo.com.
When you disconnect the power cord of any
accessory, grasp and pull the plug, not the cord.
FCC/Industry Canada Notice
This phone may cause TV or radio interference (for
example, when using the phone in close proximity to
receiving equipment). The FCC or Industry Canada
can require you to stop using the phone if such
interference cannot be eliminated.
This device complies with part 15 of the FCC rules.
Operation is subject to the condition that this device
does not cause harmful interference.
Network Services
A number of features included in this guide are
called Network Services. They are special services
provided by wireless service providers. Before you
can take advantage of any of these Network
Services, you must subscribe to these service(s) from
your home service provider and obtain instructions
for their use. Some of these network services may
not be available when roaming on a network other
than your home network.

Copyright and Legal Information
v Sendo X User Guide
Standby and Talktime Information
Your phone incorporates features that are new to the
mobile phone world. These include camera and
camcorder facilities, Email, advanced graphic
games, music & video reproduction and browsing
the Internet. To enhance the quality of reproduction
we have also incorporated a 65,536 -colour display.
The way you use this display and the features will
affect the performance of the battery and how long it
lasts between charge cycles. We have quoted
standby times and talk times that show the minimum
and maximum performance you can expect from the
battery under normal network conditions and with
the default settings as set by the factory. However,
you should be aware that playing games
(particularly with the backlight continuously switched
on), using the camera and camcorder, listening to
music and watching videos will shorten the time
available for standby and to make and receive
telephone calls.
Operation times also vary depending on network
conditions, SIM settings, charging and battery
condition, how you use your phone, and other
factors.
Memory
Your phone contains an internal memory device that
stores the software required to operate the mobile
phone, communicate with the GSM/GPRS network
and provide the user interface. We have also
included some features in this internal memory to
run additional devices, such as the camera,
camcorder, and attachable keyboard, and some
additional games and utilities. Unlike some other
mobile phones you can also load your own games
and other applications into the phone from, for
example, websites such as:
http://www.sendo.com/shop
You should be aware that the amount of internal
memory available in the phone is finite and may be
insufficient to store large numbers of applications
and media files. We have provided an additional
external memory feature on the phone that provides
more resource on which to store games, photos,
video clips and applications.
You can add to the memory capacity of your phone
by inserting a memory card.
zWarning: Remember to back up your data
frequently. Always back up all data and
programs before sending your phone in for
repair.

1 Sendo X User Guide
1
The Basics
Chapter 1 The Basics
This chapter will help you to familiarise yourself with
your Sendo X phone, enabling you to get the most
out of it.
Topics covered here include:
•How to get your phone ready for use.
•What different parts of the phone do.
•How to navigate around your phone.
•How to enter text and numbers on your phone.
•Actions which are common to different features in
your phone, for example, organising items using
folders.
•Where to get additional help about using your
phone.
Introduction
In addition to telephony, your phone is equipped
with a wide range of business and entertainment
features.
The phone has a number of Personal Information
Management features, which can help you to keep
on top of a busy schedule. These include a
Calendar, Tasks feature, Contacts and Email, all of
which can be synchronised easily with your personal
computer.
The phone’s Now! screen gives speedy access to
your Calendar, Contacts, and Messages whenever
you need them - even while a call is in progress! You
can also add links to frequently used websites,
documents, and other types of file to the Now!
screen, so that all your favourites can be accessed
from the same place.
Entertainment features include:
•Camera (with flash) and Camcorder (with
sound), making it simple to take photos and
record video clips at the touch of a button, which
you can then send to your friends.
•RealOne™ player, and to watch video clips and
listen to streaming audio on the internet.
•An MP3 player and stereo headset enabling you
to listen to high quality MP3 music.
•Internet connectivity, and web browsing with the
Internet and WAP browsers. Content can be
downloaded to your phone from the Internet,
and also via wireless Bluetooth®or infrared
connections.
•A selection of Java™ games. You can also
download further games from the Internet, for
example, from http://www.sendo.com/shop.
Getting started
Before you can use your phone you must:
•Insert the SIM (Subscriber Identity Module) card
supplied by your service provider.
•Charge the battery.
•Install the Companion CD.
These simple steps are described on the next few
pages.

2 Sendo X User Guide
1
The Basics
zTip: You will have been supplied with a Quick
Start Guide with your Sendo X phone. This
guide provides simple step-by-step information
on getting started with your phone. Also, the
interactive tutorial (the Sendo X Experience) on
the Companion CD provides a demonstration
of the basic features of your phone.
Inserting the SIM card
1. Remove the back cover of the phone - press
down on the raised Sendo logo near the bottom
of the phone, slide the cover down and lift off.
2. Remove the SIM from its packaging as detailed
in the instructions provided with the SIM. Slide
the SIM into the socket, with the logo facing you
and the cutout towards the top of the phone (as
shown below). Make sure that the gold-coloured
contacts of the card are touching the contacts of
the phone.
zNote: Keep all SIM cards out of small children’s
reach. The SIM card is easily damaged by
scratches or bending, so be cautious when
inserting and removing the card.
3. Insert the battery with the label facing up. Align
the tabs at the top of the battery with the tabs on
the back of the phone. Slide into place and press
down.
If you need to remove the battery, ensure your phone
is switched off, pull the small tab at the bottom of the
phone and lift the battery out.
4. Replace the cover. Place the cover onto the back
of the phone and slide the cover into place
making sure the tabs click into place.
Charging the battery
You must charge the battery for at least 4 hours
before you use the phone for the first time. After this,
the battery will normally take around 2 to 3 hours to
charge.
1. Insert the connector on the charger lead into the
connector at the base of the phone.

3 Sendo X User Guide
1
The Basics
2. Plug the charger into a mains AC socket. When
charging commences, the battery icon will
change into a charger cable icon (insert icon).
When the battery is fully charged, the battery
icon will reappear and you can disconnect the
charger.
zNote: When the battery is completely
discharged it may take some time for the battery
charging icon (insert icon) to appear after you
have connected the charger.
Once you connect the charger, you can switch your
phone on. If the battery is completely empty, it may
take a few minutes before you can make or receive a
call once you plug the phone into a charger.
Charging and discharging
Please observe the following precautions regarding
the use of batteries and related equipment.
Note
Note that a new battery's full performance is achieved only after
two or three complete charge and discharge cycles. Operation
times provided vary depending on network conditions, SIM
settings, charging and battery condition, how you use your
phone, and other factors. Some activities, such as playing
games, accessing the Internet or using other features, reduce talk
and standby time.
The battery can be charged and discharged hundreds of times,
but it will eventually wear out. When the operating time (talk time
and standby time) is noticeably shorter than normal, it is time to
buy a new battery.
Use only batteries approved by Sendo and recharge your battery
only with the chargers approved by Sendo. When a charger is
not in use, disconnect it from the power source. Do not leave the
battery connected after the battery indicator shows that the
battery is full, or for longer than a single day, since overcharging
may shorten its life. If left unused a fully charged battery will
discharge itself over time.
Do not attempt to discharge the battery by any other means.
Use the battery only for its intended purpose.
Never use any charger or battery that is damaged or worn out.
Do not short circuit the battery. All batteries can cause property
damage, injury or burns if a conductive material such as jewelry
or keys comes into contact with the exposed terminals. The
material may complete an electrical circuit and become quite
hot. Exercise care in handling your phone battery. For example,
avoid carrying your phone battery loose in a pocket or purse.
This product is designed for use with Sendo-approved batteries
only. Use of unapproved batteries may be dangerous and may
cause damage to the battery or the phone and may void your
warranty.
Leaving the battery in hot or cold places, such as in a closed car
in summer or winter conditions, may reduce the capacity and
lifetime of the battery. Always try to keep the battery between
15°C and 25°C (59°F and 77°F). A phone with a battery that has
been exposed to temperature extremes may temporarily not
work, even when the battery is fully charged.
Dispose of the battery properly. Comply with all local laws or
regulations in disposing of your battery. Do not dispose of
batteries in a fire.
Note

4 Sendo X User Guide
1
The Basics
Installing the Companion CD
The Companion CD provides:
•Sendo PC Connect software for performing
synchronisation between your Sendo X phone
and PC (see Connecting to your PC on Page 146).
•Companion software to help you learn how to
use your phone and add to/customise your
phone’s features.
zNote: The software requires a minimum
specification on your PC. See the Minimum PC
system requirements on Page 4 section below
for details.
To install the software on your PC, simply insert the
CD into your CD drive. The autorun feature will
launch the installation process automatically. Simply
follow all on-screen instructions.
zNote: If autorun is not set on your PC, then
please browse to the CD in Windows Explorer,
and run the companion.exe file.
We recommend that you register your phone with
Sendo. A link is provided in the Companion
software.
Once installed, launch the Companion software
using your normal method in Windows.
Minimum PC system requirements
Some features of your Sendo X phone package,
require a PC. The following is a list of the minimum
PC system requirements:
General requirements:
•Microsoft Windows® XP (Professional and Home
Editions), 2000, ME, 98, or 98SE.
•An internet browser (for web links only).
•Adobe® Acrobat® Reader® (included on the
Companion CD).
•VGA or compatible video graphics adapter
•CD-ROM drive.
•Keyboard.
•Mouse or compatible input device.
Additional Sendo PC Connect requirements:
•Compatible Personal Information Manager (such
as Microsoft Outlook® 98) as detailed in the
Connecting to your PC on Page 146 section. This
is required for PC synchronisation of e-mail,
calendar, contacts, and tasks.
•65 MB of available hard disk space.
•Available infrared port, USB port or Bluetooth
connection.
5 Sendo X User Guide
1
The Basics
Getting to know your phone
Figure 1 Your phone layout - front view
Infrared (IrDA) Port
Power Key
Voice Key
5-way Joypad
Right Soft Key
End Key
Clear Key
Voicemail
Call Key
Left Soft Key
Menu Key
Headset Connector
Accessory Connector
Edit Key
Launch Camera
Asterisk Key (*)
Hash Key (#)
International Acces
s
Key (+)
Numeric Keypad
Charger Connector
Earpiece
Loudspeaker
Microphone
Colour Screen
Camera Lens
Self Portrait Mirror
Flash
Call Key
External Antenna
Connector
Wrist/Neck Strap Hook

6 Sendo X User Guide
1
The Basics
Figure 2 Your phone layout - rear view
Camera Lens
Self Portrait Mirror
Flash
External Antenna
Connector

7 Sendo X User Guide
1
The Basics
Switching your phone on and off
•Press the Power key pto turn your phone on.
•Press and hold the Power key pto turn your
phone off.
Speakers
The phone has two speakers:
1. Earpiece - provides the speaker functionality for
voice calls.
2. Loudspeakers - provides the speaker
functionality for voice calls (in speakerphone
mode), ring tones and device/software sound
effects.
zWarning: Do not hold the loudspeakers to your
ear when using speakerphone or audio modes.
Microphone
•Speak into the microphone during a call or to
record a voice memo or voice tag. You don’t
need to speak directly into the phone when
you’re using speakerphone mode.
Headset connector
•Use to connect a stereo headset. You can use a
headset to make and receive voice calls or to
listen to music and other audio. See Accessories
on Page 147 for details of using a stereo headset.
Volume
•Control the volume of the earpiece and the
loudspeaker by pressing the left [ joypad key
(decrease volume) or the right ] joypad key
(increase volume). This can be done during a
call, or when a volume control view is displayed.
Display
•The phone has a colour screen, 176 x 220 pixels
in size.
•The top of the display shows a title bar, where
you can see status indicators about your phone’s
current mode, or the name of the current activity
or active feature.
•The bottom of the display shows which
commands are currently assigned to the phone’s
soft keys (see Soft keys on Page 8).
•The rest of the display shows the main screen
data. The screen display changes depending on
what you are currently doing with the phone.
When you switch on your phone, the Now! screen
is displayed.

8 Sendo X User Guide
1
The Basics
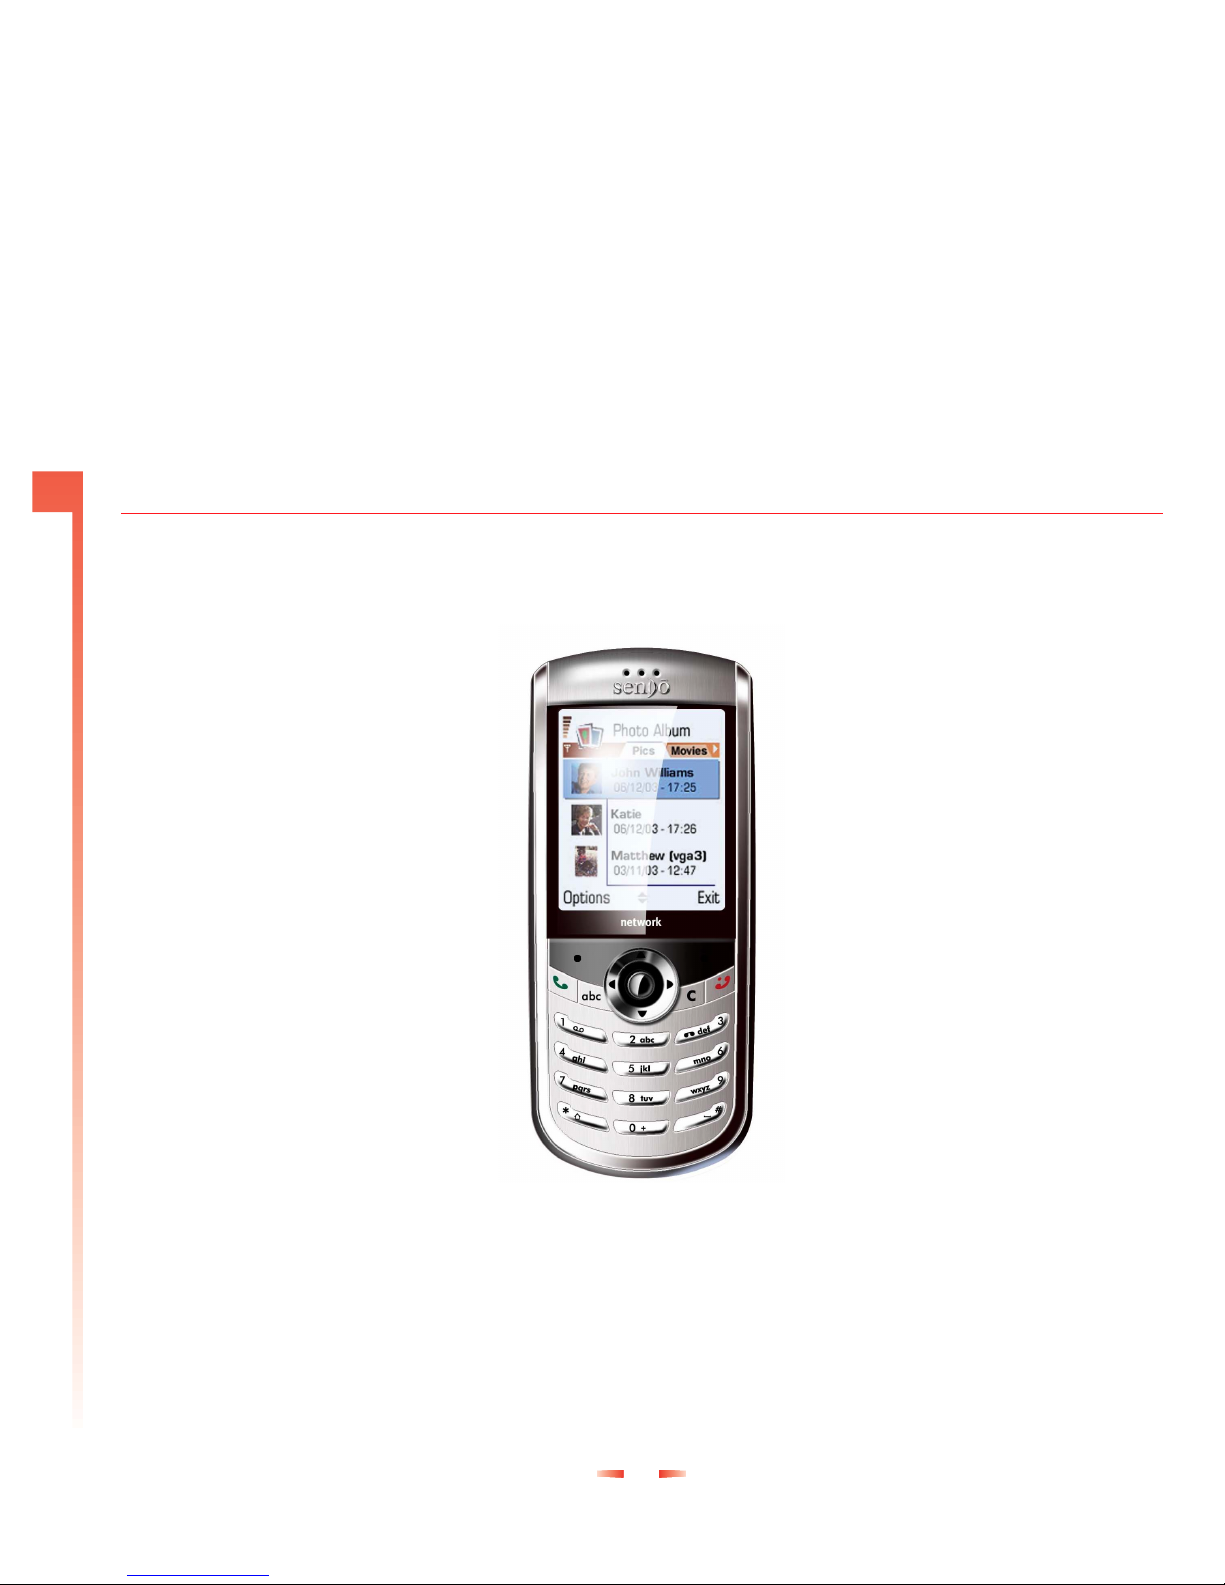
Now! screen
•The Now! screen displays lots of useful
information, such as whether you have any new
messages, and whether you have missed any
calls. You can customise your Now! screen to add
photos, and links to your favourite websites. See
Now! Screen on Page 79 for more information.
zNote: The Now! screen can be fully customised.
Therefore your Now! screen may contain
additional or different information to the
examples shown in this guide.
Date and time
The phone displays the current date and time in the
Now! screen. See Date and time settings on Page 48
for details of how to reset the date and time.
Changing profiles
A profile is a set of instructions for how the phone
alerts you to incoming calls and messages. There
are 5 profiles predefined on your phone - you can
edit the profiles so that they work best for you. For
more information about profiles see Profiles on
Page 53.
!
To change your profile
1. While the phone is switched on, do a short press
on the Power key p.
2. The profile currently being used has a tick
displayed next to it. Use the up :and down ;
joypad keys to select the profile you want to use
and press OK g.
Voice key
•Use the Voice key tfor voice dialling, to record
voice tags, and to record notes and other sound
clips.
Soft keys
•There are two soft keys on your phone – left g
and right d. They are located directly below
the display screen. Each soft key performs the
command which is displayed immediately above
it on the screen. These commands change
depending on which screen is in use.
Menu key
•The Menu key stakes you to the Menu screen,
from where you can open any of the phone’s
features.
•Press the Menu key sin the Menu screen to take
you back to the Now! screen.
•Press and hold the Menu key sto show a list of
all features which are currently in use. You can
then use this list to move quickly between
features.

9 Sendo X User Guide
1
The Basics
Call key
The Call key c:
•Answers an incoming call.
•Dials a phone number you have entered using
the numeric keypad, or a speed dial.
•Opens the call history Log feature when pressed
from the Now! screen.
•Dials a phone number you have selected from
the call history Log.
•Redials the most recently dialled number when
pressed twice from the Now! screen.
•Places a call on hold to answer a second
incoming call (if you are subscribed to a Call
Waiting service).
•Switches between an active call and a call that is
on hold.
End key
The End key f:
•Ends active data calls at any time.
•Ends a voice call when one party is on the line,
and ends the active call when multiple parties are
connected.
zNote: Conference calling is a Network Service.
Edit key
The Edit key e:
•Changes the text entry mode when inputting
data.
•Marks items in a list.
Clear key
The Clear key r:
•Backspaces over one or more characters when
you are in a text field, deleting them.
•Displays the previous screen.
zNote: In some cases you may have to press the
appropriate soft key to return to the previous
screen.
5-way joypad
•Use the joypad to move up :, down ;, left [,
or right ](for example, in a menu or a text
field).
•The Select key Ais at the centre of the joypad.
Press it to confirm a selection. The Select key’s
functionality is similar to pressing Enter on a
computer keyboard.
•Many games use the joypad - see their specific
instructions.
Numeric keypad
•Use to enter numbers and characters.
Asterisk key
•Pressing and holding the Asterisk key *switches
between text and numeric input modes. In
multitap text or predictive text modes, a short
press switches between caps, caps lock and
lowercase entry.

10 Sendo X User Guide
1
The Basics
Hash key
•Press and hold the Hash key #to display a list of
symbols when you are in input mode.
Voicemail shortcut key
•To call your voice mailbox, press 1followed by
Call f, or from the Now! screen, do a long
press on 1.
zNote: Voicemail is a Network Service. Check
with your service provider for more information.
Camera shortcut key
•To launch the Camera from the Now! screen,
press and hold 3.
WAP shortcut key
•To launch the WAP browser from the Now!
screen, press and hold 2.
Antenna
•Your phone has an internal antenna which is
located on the rear of the phone, above the
battery compartment.
zWarning: Contact with the antenna affects call
quality and may cause the phone to operate at
a higher power level than otherwise needed.
For best results, avoid covering the antenna
area with your hand.
External antenna connector
•This is located on the back of the phone. Use this
to connect to a different antenna; for example, a
car kit could plug into this to use with an antenna
mounted on the outside of your car.
Infrared (IrDA) port
•Align the infrared (IrDA) port with the infrared
port on another device to exchange information
between your phone and the other device.
Accessory connector
•Use this connector to attach included or optional
accessories, such as the USB cable or foldable
keyboard.
Charger connector, or in-car charger
•Plug the approved charger in here.
11 Sendo X User Guide
1
The Basics
Feature list
zNote: The list of features shown in your phone’s Menu screen may not be identical to the list given below.
Icon Feature Description
Messaging Send, read and manage SMS (text) messages, MMS (multimedia) messages, and Emails.
Contacts Edit, store and view all your contact details.
Calendar Edit, store and view all your appointments.
Internet Browse the Internet with the Opera browser.
WAP Use WAP Internet services.
Instant messaging * See if your friends and family are online, and communicate with them faster than Email or text
messages.
Camera Use your phone as a camera whenever, wherever.
Photo Album Store and manage your photos.
Games Play advanced games. Your phone includes:
Sendo Pinball
Sendo Farm
There may be other games in the Games folder, if you have downloaded games to your phone.
Camcorder Record video clips with sound, and play them back.
RealOne Player Play MP3, other audio files, and video clips with the built-in RealOne Player.
Tasks Store a list of outstanding tasks.
Notes Write memos and other text notes.
Calculator Do calculations on the move.
12 Sendo X User Guide
1
The Basics
Profiles Change the way that your phone responds to incoming calls and messages.
Settings Set the defaults for your phone.
SIM toolkit * Operator services that may be contained on the SIM card (such as traffic, news or shopping
services).This may not be installed on your phone. Check with your service provider for details.
Doc viewer View different types of document, such as .doc, .xls, and .pdf files.
Bluetooth Connect to another compatible device via a Bluetooth connection to send or receive data.
Normally located in the Connectivity folder in the Menu screen.
Infrared Connect to another compatible device via an infrared connection to send or receive data.
Normally located in the Connectivity folder in the Menu screen.
Modem Use your phone as a modem for your laptop computer or another device. Normally located in
the Connectivity folder in the Menu screen.
Log Tells you about your phone’s call history. Normally located in the Tools folder in the Menu
screen.
SIM Contacts Access any contact details that are stored on your SIM card. Normally located in the Tools
folder in the Menu screen.
Speed dial Set up and view speed dials. Normally located in the Tools folder in the Menu screen.
Program Manager Manage any extra features that you have downloaded. Normally located in the Tools folder in
the Menu screen.
Java Apps. Manage any Java applications that you have downloaded. Normally located in the Tools folder
in the Menu screen.
Memory card Access the phone’s memory card, if you have one. Normally located in the Tools folder in the
Menu screen.
Recorder Record voice notes, voice tags, or even your own ring tones. Normally located in the Extras
folder in the Menu screen.
Clock An alarm clock, which tells you what time it is in different time zones around the world.
Normally located in the Extras folder in the Menu screen.
Icon Feature Description

13 Sendo X User Guide
1
The Basics
Status Indicators
Status indicators are displayed in the title bar at the
top of the phone’s display. The following table lists
some of the common status indicators and their
meanings.
Indicator Meaning
New SMS, MMS or cell broadcast message
New Email
New voicemail
New instant message
Camera flash is active
Voice call active
Data call active
Call forwarding /Call Divert
Call on hold
Missed call
Line 1
Battery level
Low battery
Battery charging
No battery
Indicator Meaning
Signal strength
No signal
GPRS available
GPRS in use
Roaming
Ringer off
Multitap text input mode, lowercase
Multitap text input mode, uppercase
Multitap text input mode, caps lock
T9 predictive text input mode, lowercase
T9 predictive text input mode, uppercase
T9 predictive text input mode, caps lock
Numeric input mode

14 Sendo X User Guide
1
The Basics
Navigation
The following section describes the different ways of
navigating around your phone to accomplish tasks
quickly and easily.
Using the 5-way joypad
Use the joypad to navigate horizontally and
vertically on the screen and to move the selection
focus, so you can select the item you want.
The following table shows what actions you can take
using the joypad:
Using the navigation bar
The navigation bar is displayed just above the main
screen data, and is an aid to horizontal navigation
using the left [ and right ] joypad keys.
The navigation bar displays tabs with small arrows
to indicate that there are more views, folders, or files
to move to horizontally. (insert screen shot of
navigation bar)
Using lists and grids
On your phone, you will find that many features use
lists and grids to display information.
•Lists are displayed vertically, and are navigated
using the up :and down ; joypad keys.
•Grids can be navigated both horizontally and
vertically, using all of the directional joypad keys.
The Menu screen displays the phone’s features in
grid format.
(insert screen shot of Menu screen)
Using the Now! screen
The Now! screen is displayed automatically when
you turn on your phone, or when your phone is
turned on but idle.
It is designed to allow you quick and easy access to
many of your phone’s key features, and allows you
to add your own links to phone features, web sites,
photos, games, or whatever you use most often.
See Now! Screen on Page 79 for more information.
Using the Menu screen
Your phone comes pre-installed with many features
that you can start using right now. For more
information about installing additional features on
your phone, see Managing Applications on
Page 127.
The Menu screen displays a grid of icons which
represent all of the currently installed features.
zNote: If your network provides a SIM Toolkit to
access special services or features on your SIM
Action Navigation
Press Up :Moves the selection focus upward on the
screen, or scrolls up in a list.
Press Down ;Moves the selection focus downward on the
screen or scrolls down in a list.
Press Right ]Moves the selection focus right on the
screen, or moves the cursor right through
characters in a text field.
Press Left [Moves the selection focus left on the screen,
or moves the cursor left through characters
in a text field (without deleting characters).
Press Select AConfirms a selection that you’ve made.

15 Sendo X User Guide
1
The Basics
card, the toolkit is added to the Menu list. The
name, icon and contents of the toolkit are totally
dependent on your service provider. The name
changes to indicate the type of service, for
example “Information”. For more details,
contact your service provider.
!
To open a feature from the Menu screen
1. From the Now! screen, press the Menu key s.
zTip: Press the Menu key sto switch between
the Now! screen and the Menu screen.
2. Scroll to the feature you want using the
directional joypad keys.
3. Press Select A, or press Options g and select
Open.
zNote: Only nine feature icons will fit on the
screen at a time. If more features are available,
you can see them by using the up : and down
; joypad keys to scroll through the grid.
!
To close a feature
•Press Options g and select Exit.
Or:
•Use the right soft key dwhere it is labelled Exit
or Back to step back out of the current feature.
Rearranging the Menu screen
You can rearrange the order of the Menu screen as
you like. For example, you may want to move a
feature which you use frequently, to the top of the
grid.
!
To move a feature
1. Highlight the Menu icon you wish to move, using
the joypad.
2. Press Options g and select Move. A tick
appears next to the feature you have selected.
3. Navigate the screen using the joypad to where
you want to position the icon.
4. Press OK gto confirm the move.
Switching between features
If you have more than one feature open at a time,
you can switch between them by pressing and
holding the Menu key s. This causes a list of
currently open features to appear. You can then
scroll through the list using the joypad and select the
feature you want to go to by pressing Select A.
Using the Clear key
The Clear key r is used to navigate back to a
previous view, screen or feature, and also as a
backspace key when you are inputting text.
!
To go back to the previous screen
•Press the Clear key r.
Other manuals for X
2
Table of contents
Other SENDO Cell Phone manuals


