Seneca eno User manual

Using the ēno Interactive Whiteboard
Part A: Equipment
Please come to Teaching and Learning in room A2508 to sign out the ēno Stylus kit and to get
the ēno Application installed on your laptop.
ēno Stylus Kit
ēno Bluetooth Receiver Stylus Tip Replacements Installation CD
Rechargable ēno Stylus USB Charging Cable
1

Part B: Installing the ēno Application
1. Insert the ēno getting started CD. When you insert a CD into a Windows computer,
AutoPlay will run. Click “Install ēno Application.”
If AutoPlay does not run, open “My Computer” to see your CD/DVD drive, right click the
“DVD RW Drive ēno App 3.2.1”, and click “Install ēno Application.”
2
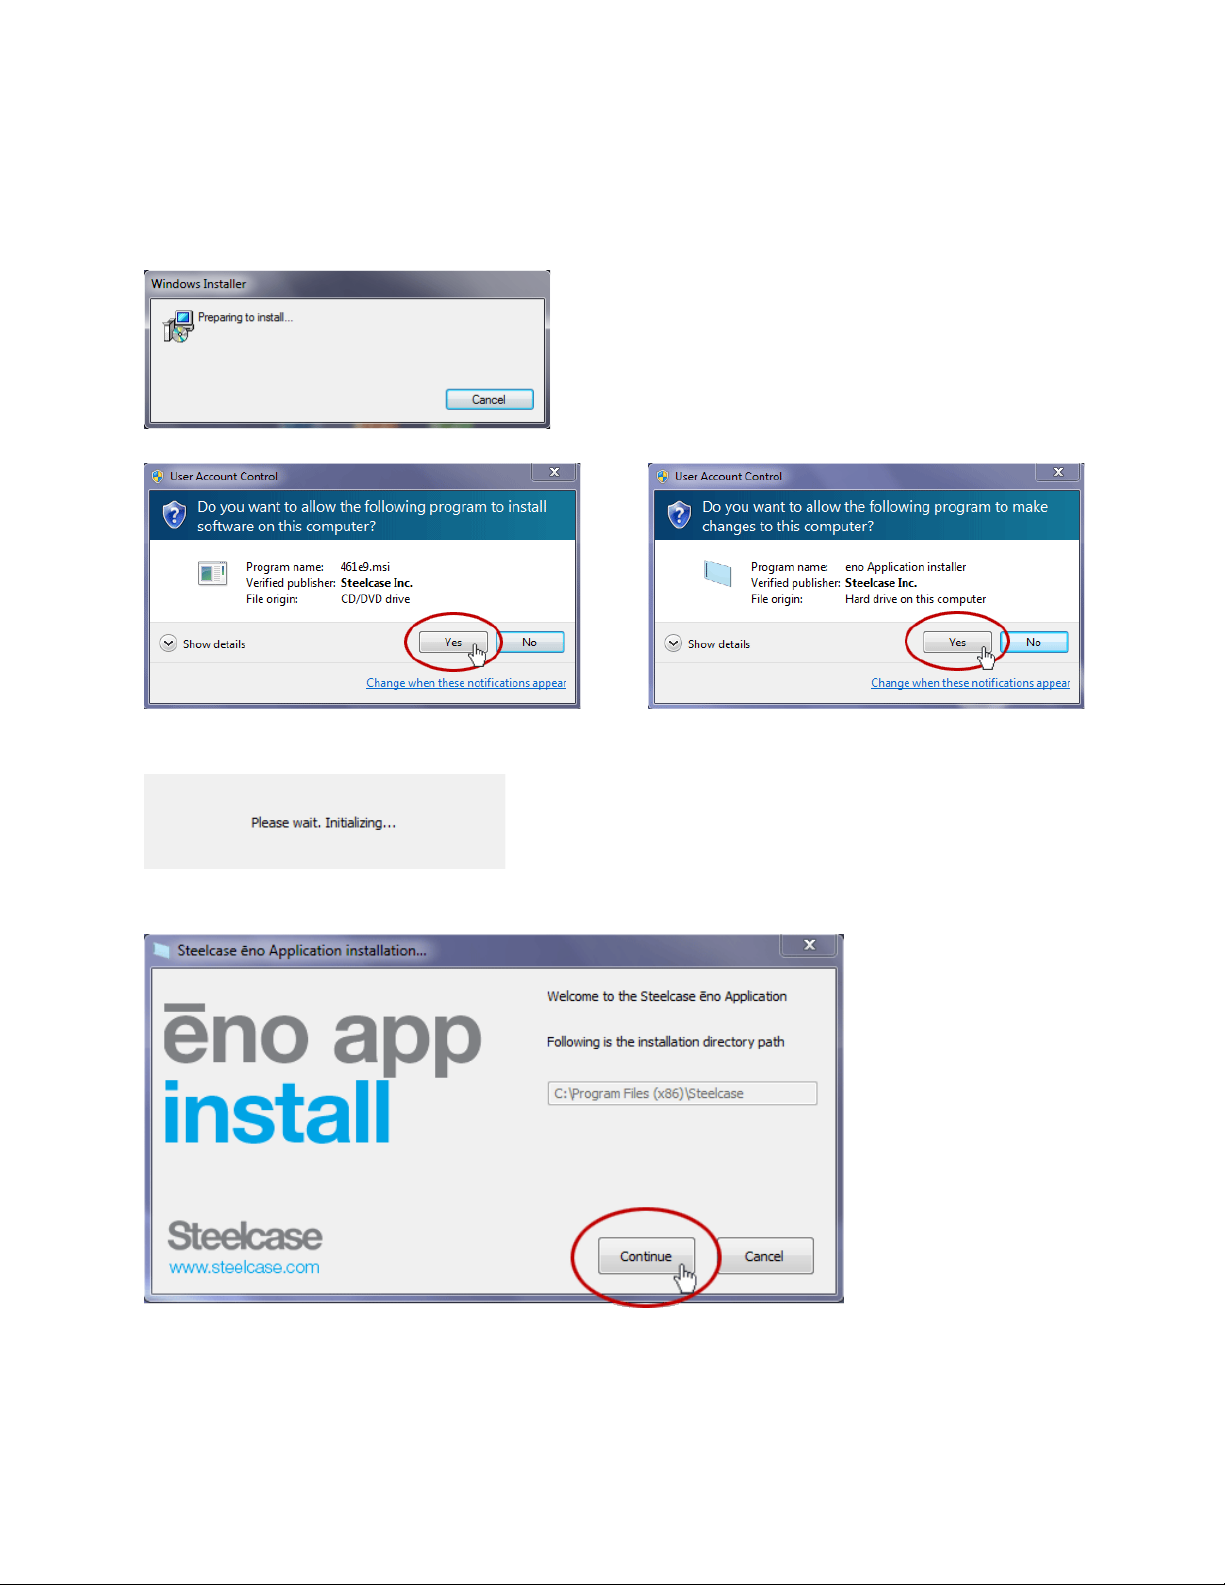
2. Windows Installer will begin the installation process. The User Account Control prompt will
appear, asking for permission to install the software onto your computer. Click “Yes.” The
User Account Control will also ask for permission for the installer to make changes to your
computer; click “Yes.”
3. Please wait while the installer is initializing.
4. The Steelcase ēno Application installer will appear. Click “Continue.”
3
5. Check the box to accept the terms in the license agreement and click “Continue.”
6. By default, “ēno” should be selected; if not, check the “ēno”option box. Click “Install.”
7. Please wait while the ēno application is installing.
4
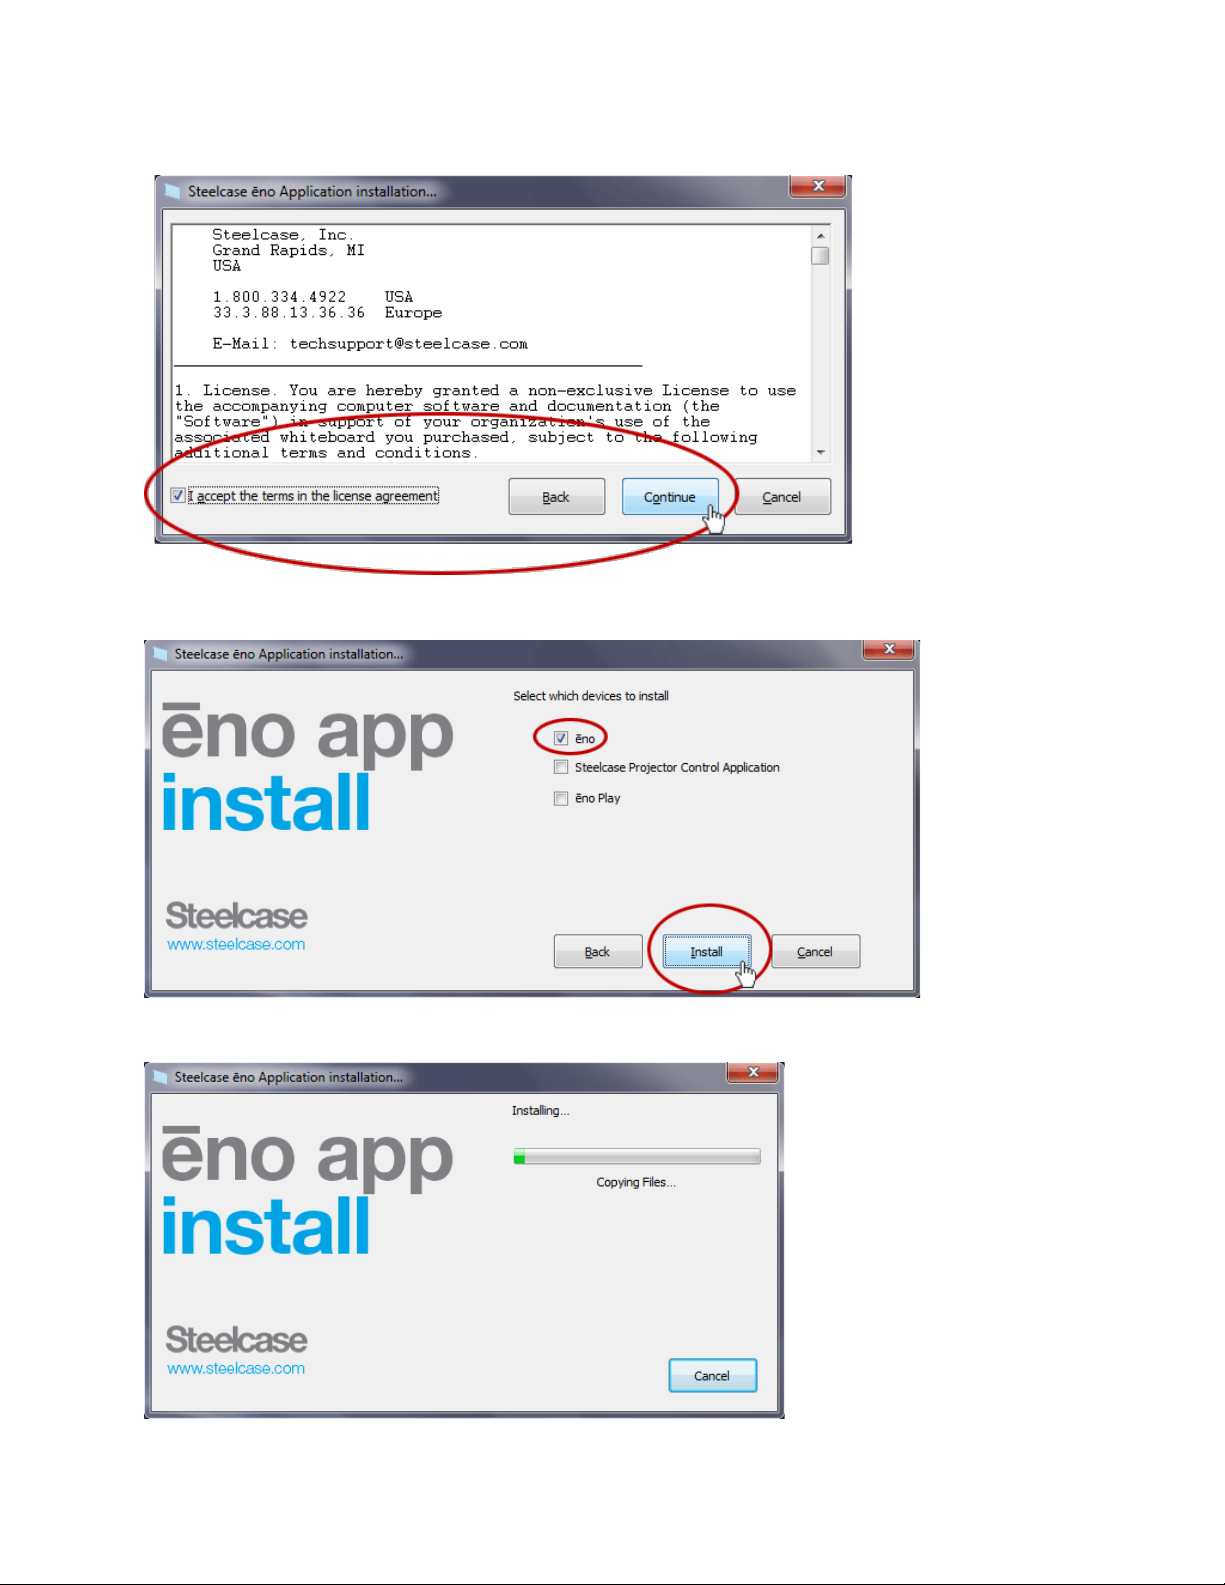
8. When you receive the prompt, plug the ēno Receiver into a USB port on your computer.
Click “OK” to close the prompt.
9. Once the installation is complete, click on “Reboot” to reboot your system.
5
Part C: Pairing with the ēno Application
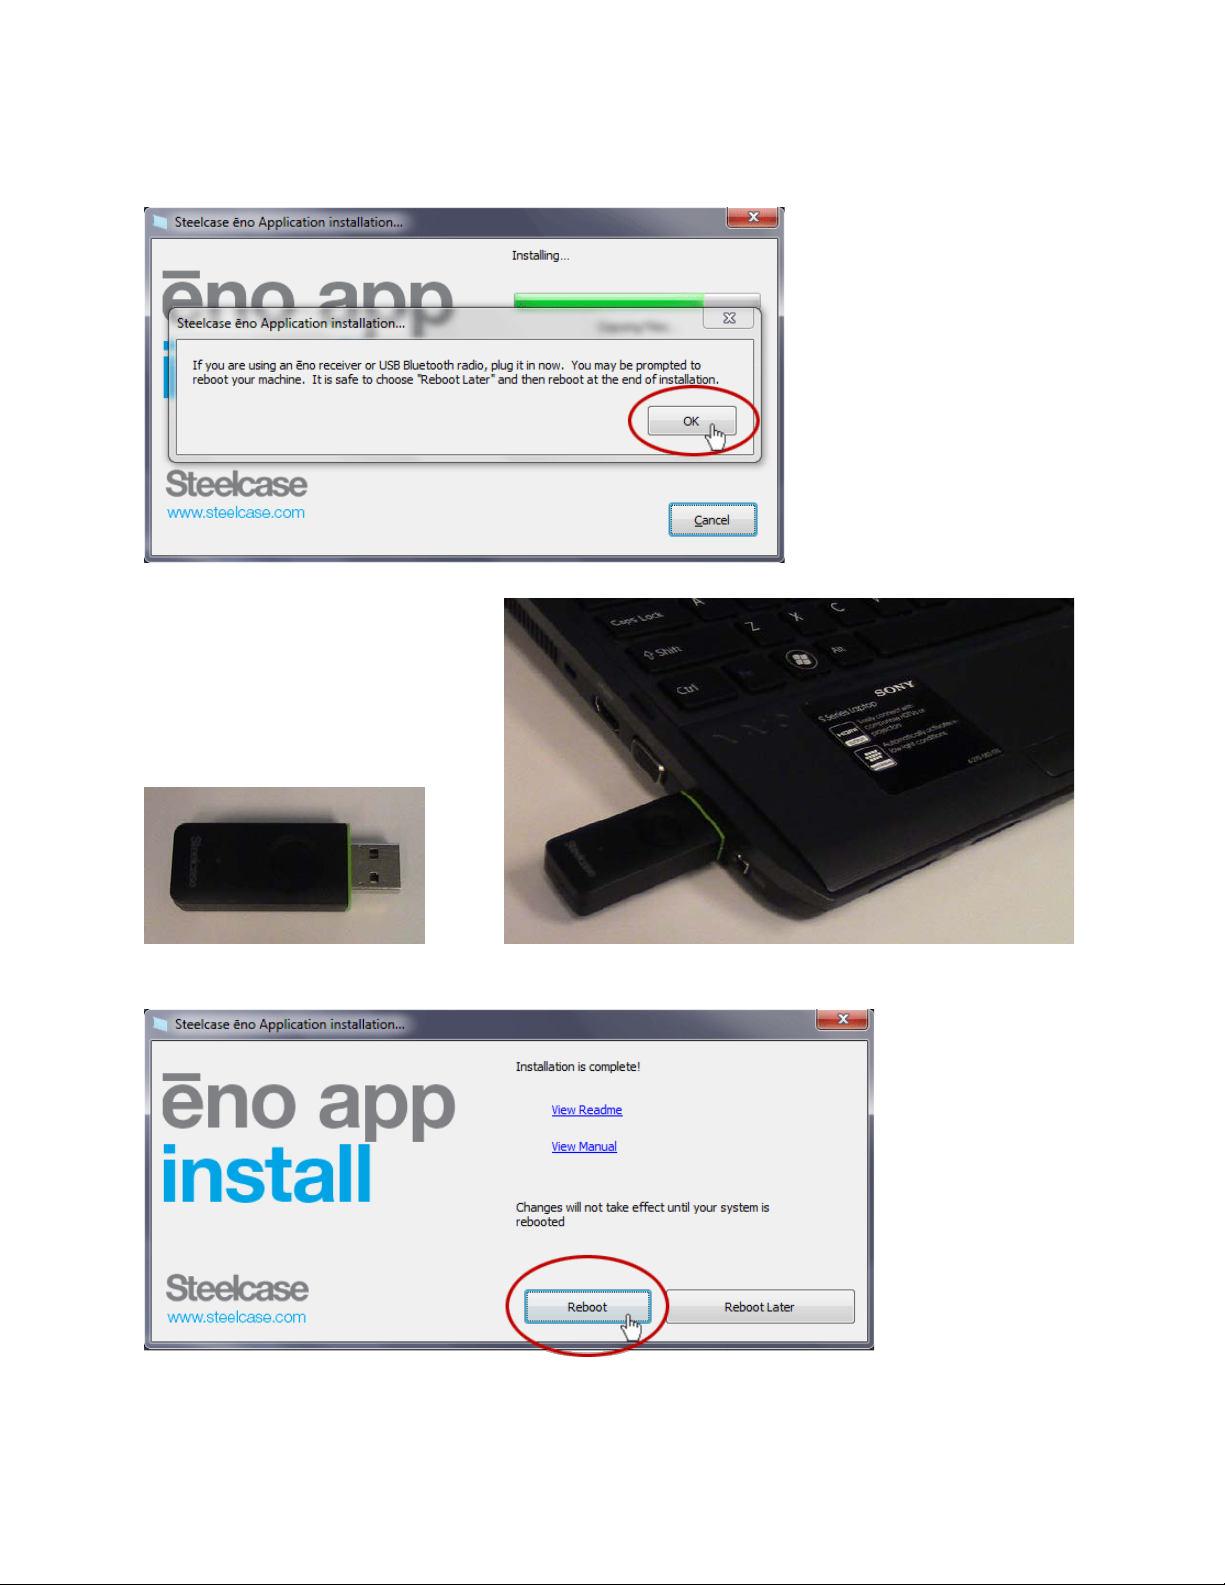
1. Once your computer finishes rebooting and loading, click on the “Windows” button (or
“Start”) and open the Steelcase ēno Application.
2. When the application is finished loading, you will see the screen shown below.
If the ēno Receiver is not plugged into your computer at this point, plug it into a USB port.
3. Pair the stylus to your computer.
There are two ways you can begin the pairing process:
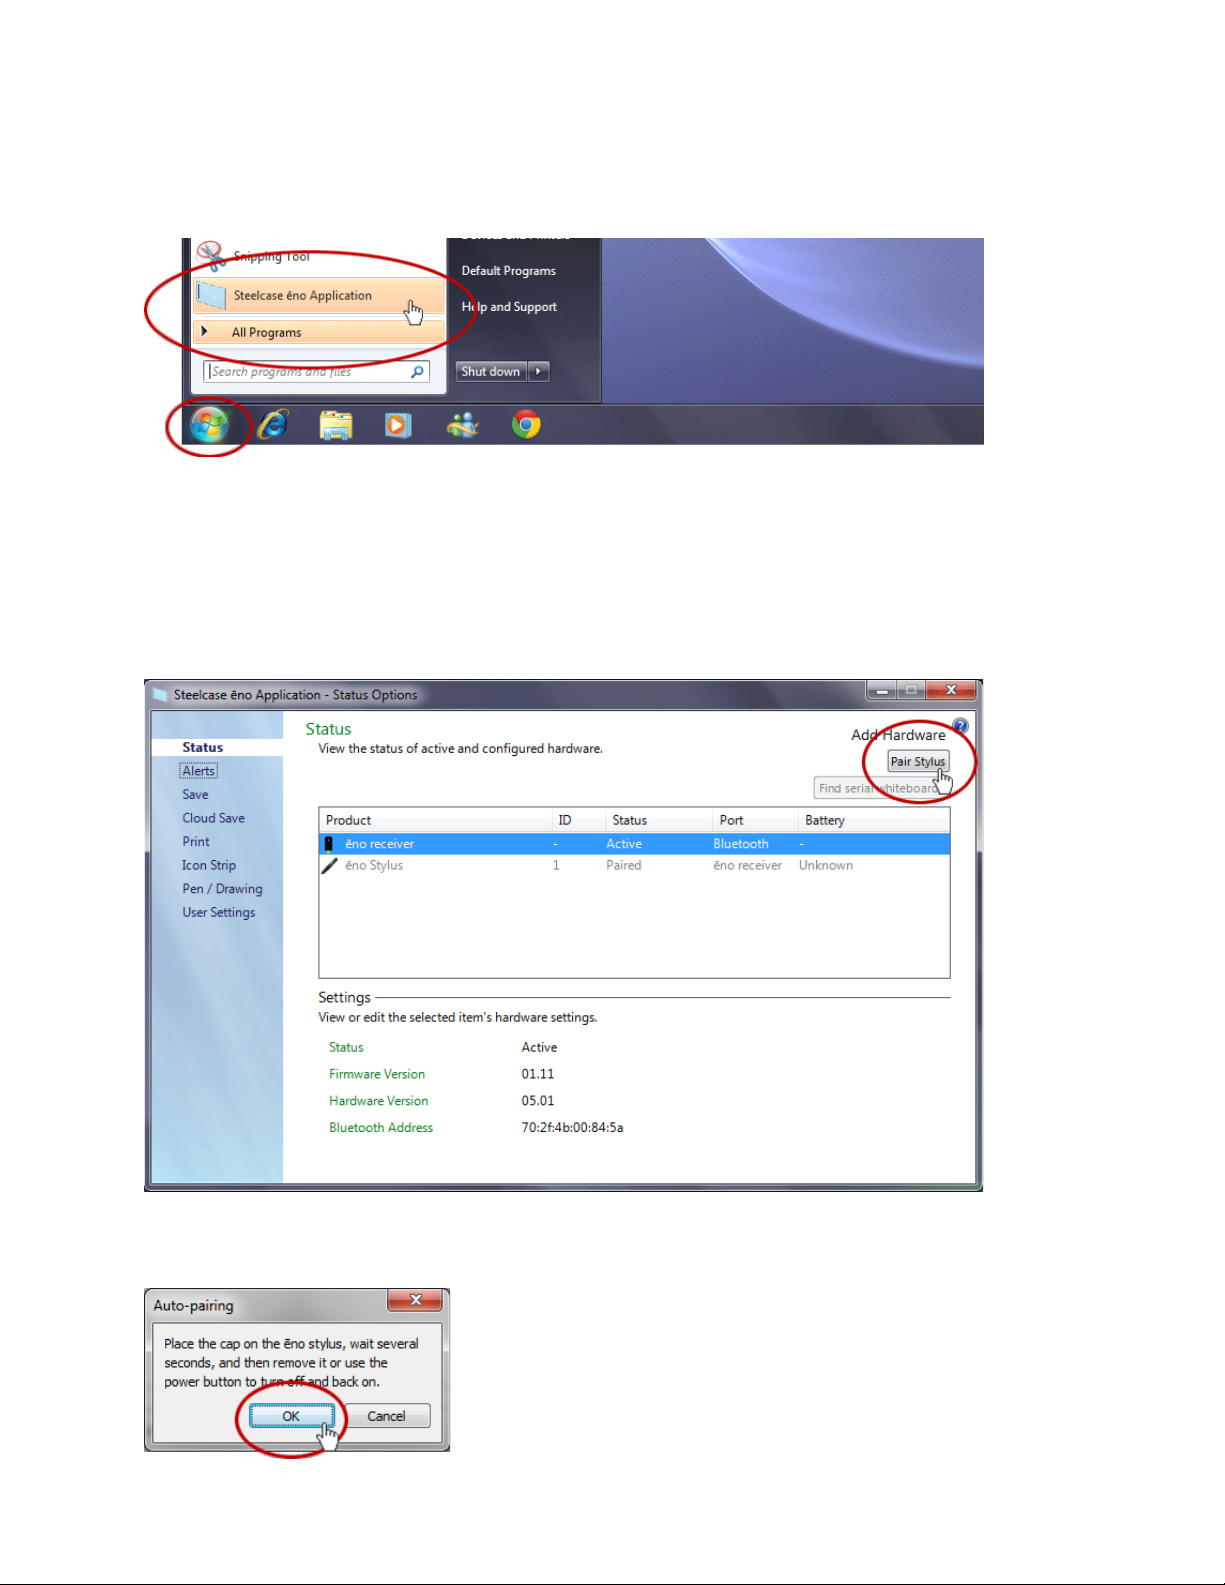
a. Click on “Pair Stylus” to begin the pairing process.
When you see the prompt to turn off and on the ēno Stylus, as shown below, click “OK”
and proceed to step 4.
6

b. Click on the button on the ēno Receiver and proceed to step 4.
4. Power off and on the ēno Stylus.
There are two ways to do this.
a. Press the power button.
b. Replace and remove the stylus cap.
7

There will be a green blinking light when the stylus turns on.
5. Wait for the auto-pairing to be complete. The ēno Receiver will have a blinking green light
while it’s attempting to connect. When the ēno Stylus is paired successfully, click “OK.”
When successfully paired, the light on the ēno Stylus will have a solid green light and
the ēno Receiver will have a solid blue light.
If the automatic pairing fails:
a. Make sure the ēno Receiver is plugged into your computer.
8
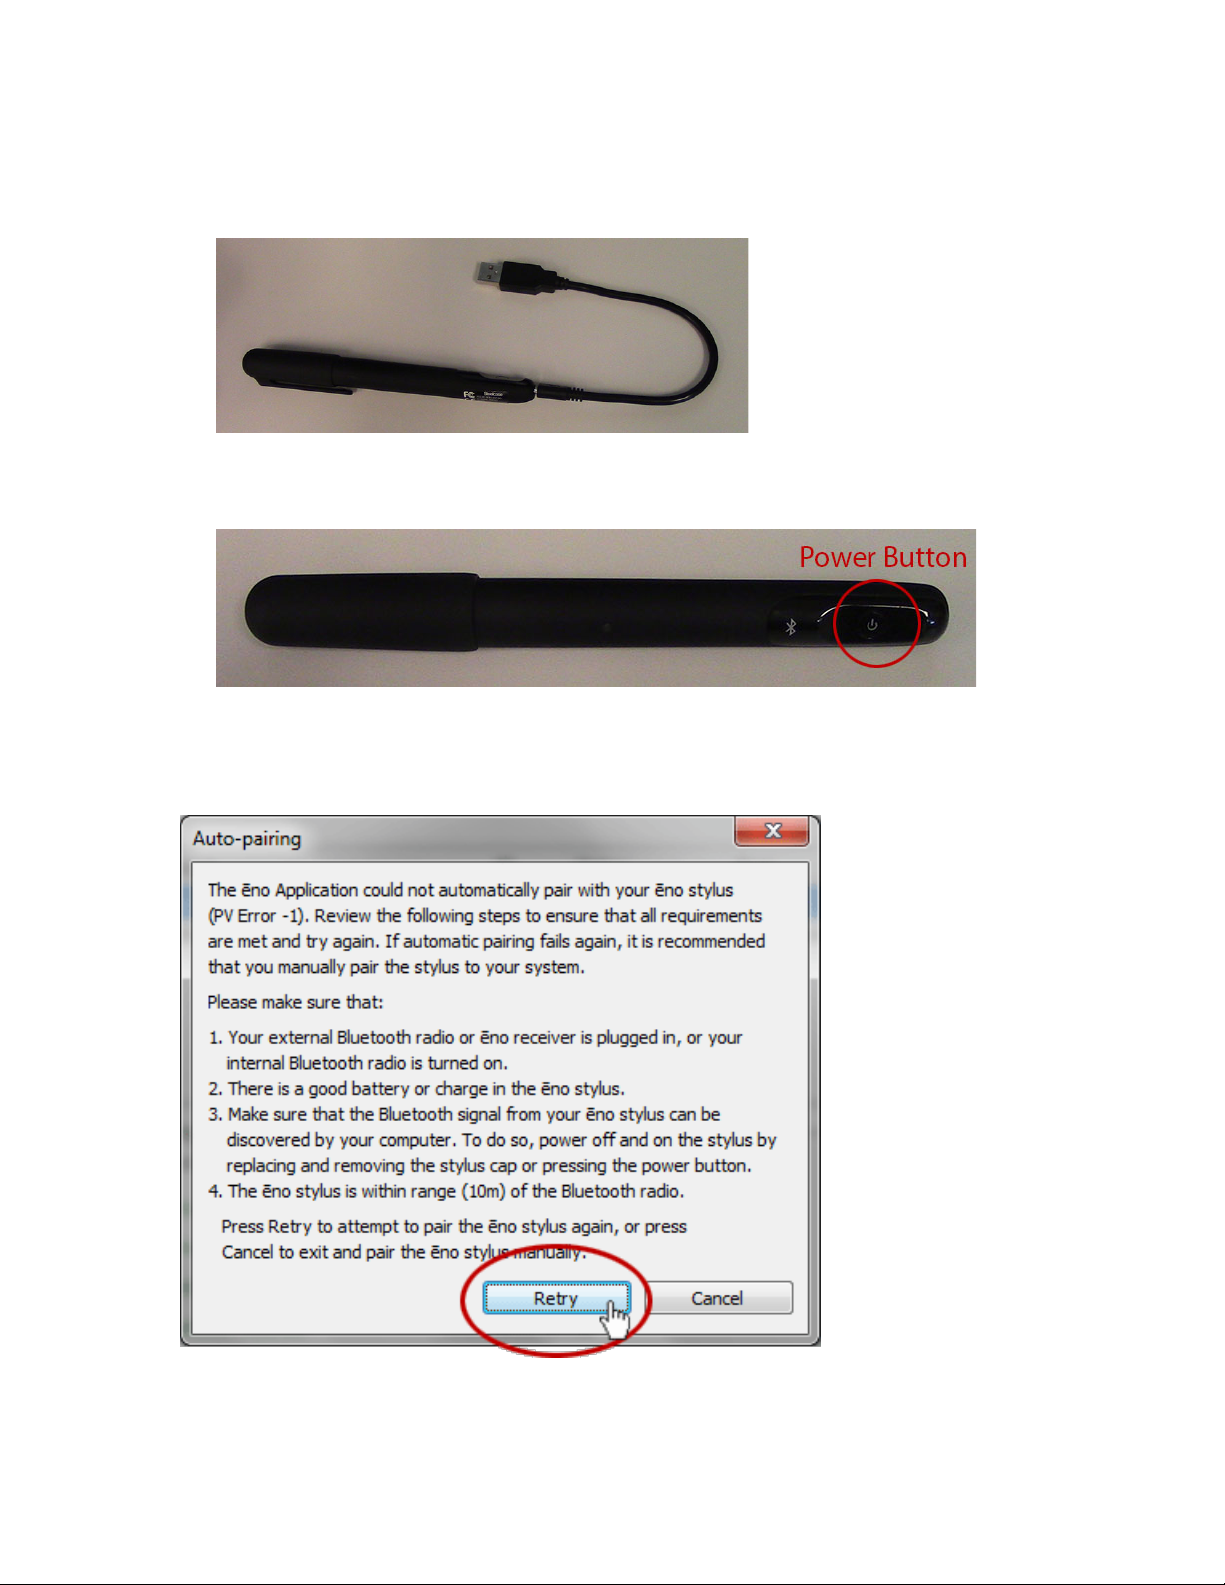
b. Make sure the ēno Stylus is charged.
If it needs charging, plug the micro USB end of the charger into the ēno Stylus and plug
the USB end into your computer's USB port.
c. Power the ēno Stylus off and on by pressing the power button or replace and remove
the stylus cap.
d. Make sure the ēno Stylus is within range (10m) of the ēno Receiver.
Click “Retry” to attempt to pair the ēno Stylus again or click “Cancel” and return to step 3.
9
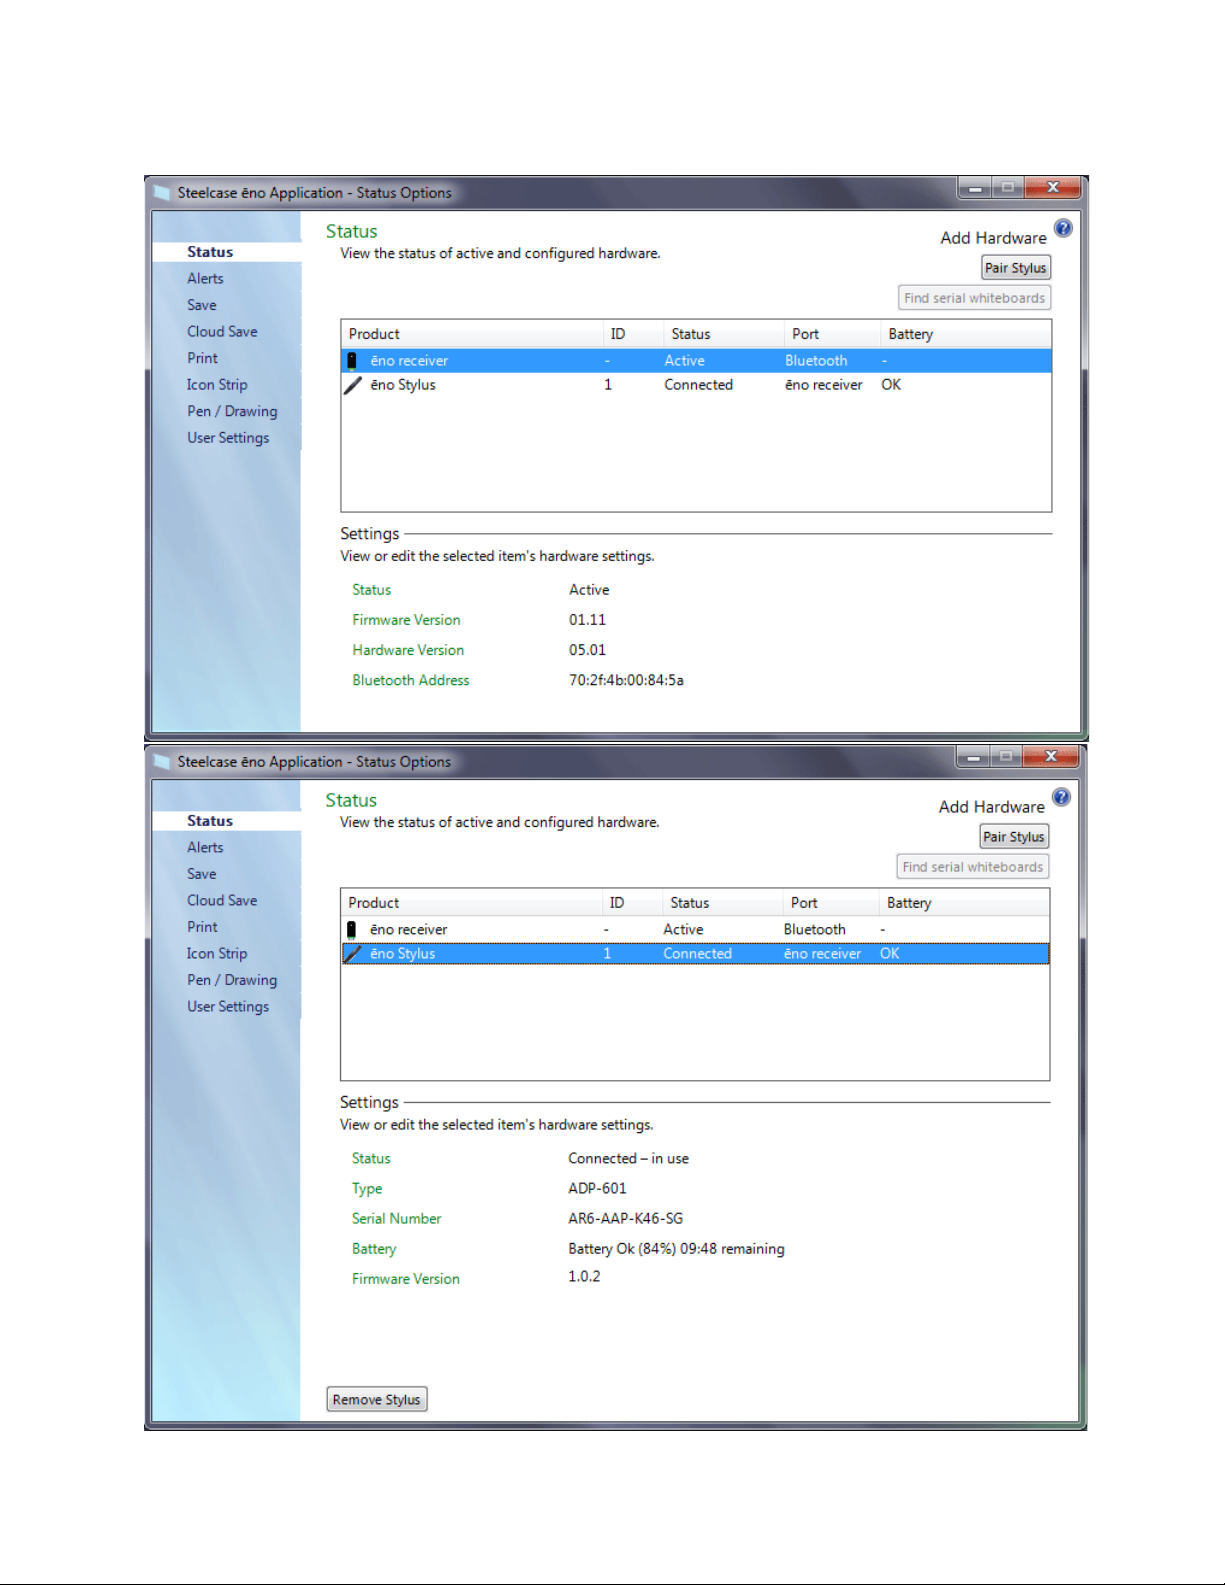
6. You will see that the ēno Stylus is “Connected” and the ēno Receiver is “Active.”
10
Popular Interactive Whiteboard manuals by other brands


Dukane
Dukane ITP84 user guide

Bretford
Bretford EDUIMS Assembly instructions and user guide

Panasonic
Panasonic Panaboard UB-5315 operating instructions

Plus
Plus M-11S Brochure & specs

TRIUMPH BOARD
TRIUMPH BOARD ULTRA SLIM user manual

Returnstar Interactive Tech
Returnstar Interactive Tech IQBoard DVT V7.0 user manual