Senix BLVE12-M User manual

8458-A072012001-011
For customer support, please call 1-800-261-3981 or send email to:
SAVE THIS MANUAL FOR FUTURE REFERENCE.
Operator’s manual
Model : BLVE12-M

2 WWW.SENIXTOOLS.COM
SPECIFICATIONS*
SAFETY SYMBOLS.................................................................2
TECHNICAL DATA..................................................................2
SAFETY...................................................................................3
COMPONENT LOCATION......................................................6
ASSEMBLY...............................................................................7
OPERATION..........................................................................10
MAINTENANCE.....................................................................12
PARTS....................................................................................13
TROUBLESHOOTING...........................................................14
WARRANTY...........................................................................15
To reduce the risk of injury, user must
read instruction manual.
Wear ear protection.
Wear eye protection.
Wear dust mask.
Wear hand protection.
Wear non-slip safety footwear.
Avoid power lines, use in dry conditions.
TABLE OF CONTENTS
Do not expose to rain.
Thrown objects can ricochet and result in
personal injury or property damage.
Keep all bystanders at least 50 ft. away.
Indicates danger, warning or caution.
Precautions that involve your safety.
Disconnect from the mains plug if the cord
is damaged or entangled. DO NOT TOUCH
THE CORD BEFORE DISCONNECTING
THE SUPPLY.
Model BLVE12-M
Rated Voltage 120V ~60Hz
Rated Current 12A
Motor Type Universal Motor
No Load Speed 14000 /min
Max Air Speed 179 MPH
Max Air Volume 420 CFM
Mulch Ratio 14:1
Bag Capacity 1.24 Bushel
Weight 8.2lbs (3.72kg)
SAFETY SYMBOLS
3WWW.SENIXTOOLS.COM
WHEN USING (THIS APPLIANCE)
Do not unplug by pulling on cord. To unplug, grasp the
plug, not the cord.
Turn off all controls before unplugging.
liquids, gases, or dust. Power tools create sparks that
may ignite the dust or fumes.
allow adults to operate the equipment without proper
instruction.
loose garments or jewelry that could get caught in
moving parts of the machine or its motor.
and safely when it is used at the rate that it was
designed to work at.
wearing sandals or similar lightweight footwear.
and improve your footing on slippery surfaces.
necessary when used by or near children.
manufacturer’s recommended attachments.
away from openings and moving parts.
working as it should, or if it has been dropped,
damaged, left outdoors, or dropped into water, return
it to an authorized service center.
direct sunshine.
When using an electrical appliance, basic precautions
should always be followed, including the following:
READ ALL INSTRUCTIONS BEFORE USING (THIS
APPLIANCE)
IMPORTANT SAFETY
INSTRUCTIONS prevent entanglement in any moving parts.
Overreaching can result in loss of balance.
this unit.
off. Any tool that cannot be controlled with the switch
is dangerous, and must be repaired.
(15 m) away.
parts and all hot surfaces of the unit.
any opening blocked. Keep openings free of dust,
objects that can be thrown or become entangled in
the machine, such as rocks, broken glass, nails, wire,
or string.
and accessories. Use of any other parts may create
a hazard or cause product damage.
CHILD SAFETY
Tragic accidents can occur if the operator is not aware
of the presence of children.
watchful care of a responsible adult.
this blower. Children who are 14 years of age and
older must read and understand the operating
instructions and safety rules in this manual and must
be trained and supervised by a parent.
other person enters the working area.
doorways, shrubs, trees, or other objects that may
obscure your view of a child who may run into the
path of the blower.
WARNING (PROPOSITION 65)
Some dust created by power sanding, sawing, grinding,
drilling, and other construction activities contains
chemicals known to cause cancer, birth defects or other
reproductive harm. Some examples of these chemicals
are:
masonry products, and
SAFETY
4 WWW.SENIXTOOLS.COM
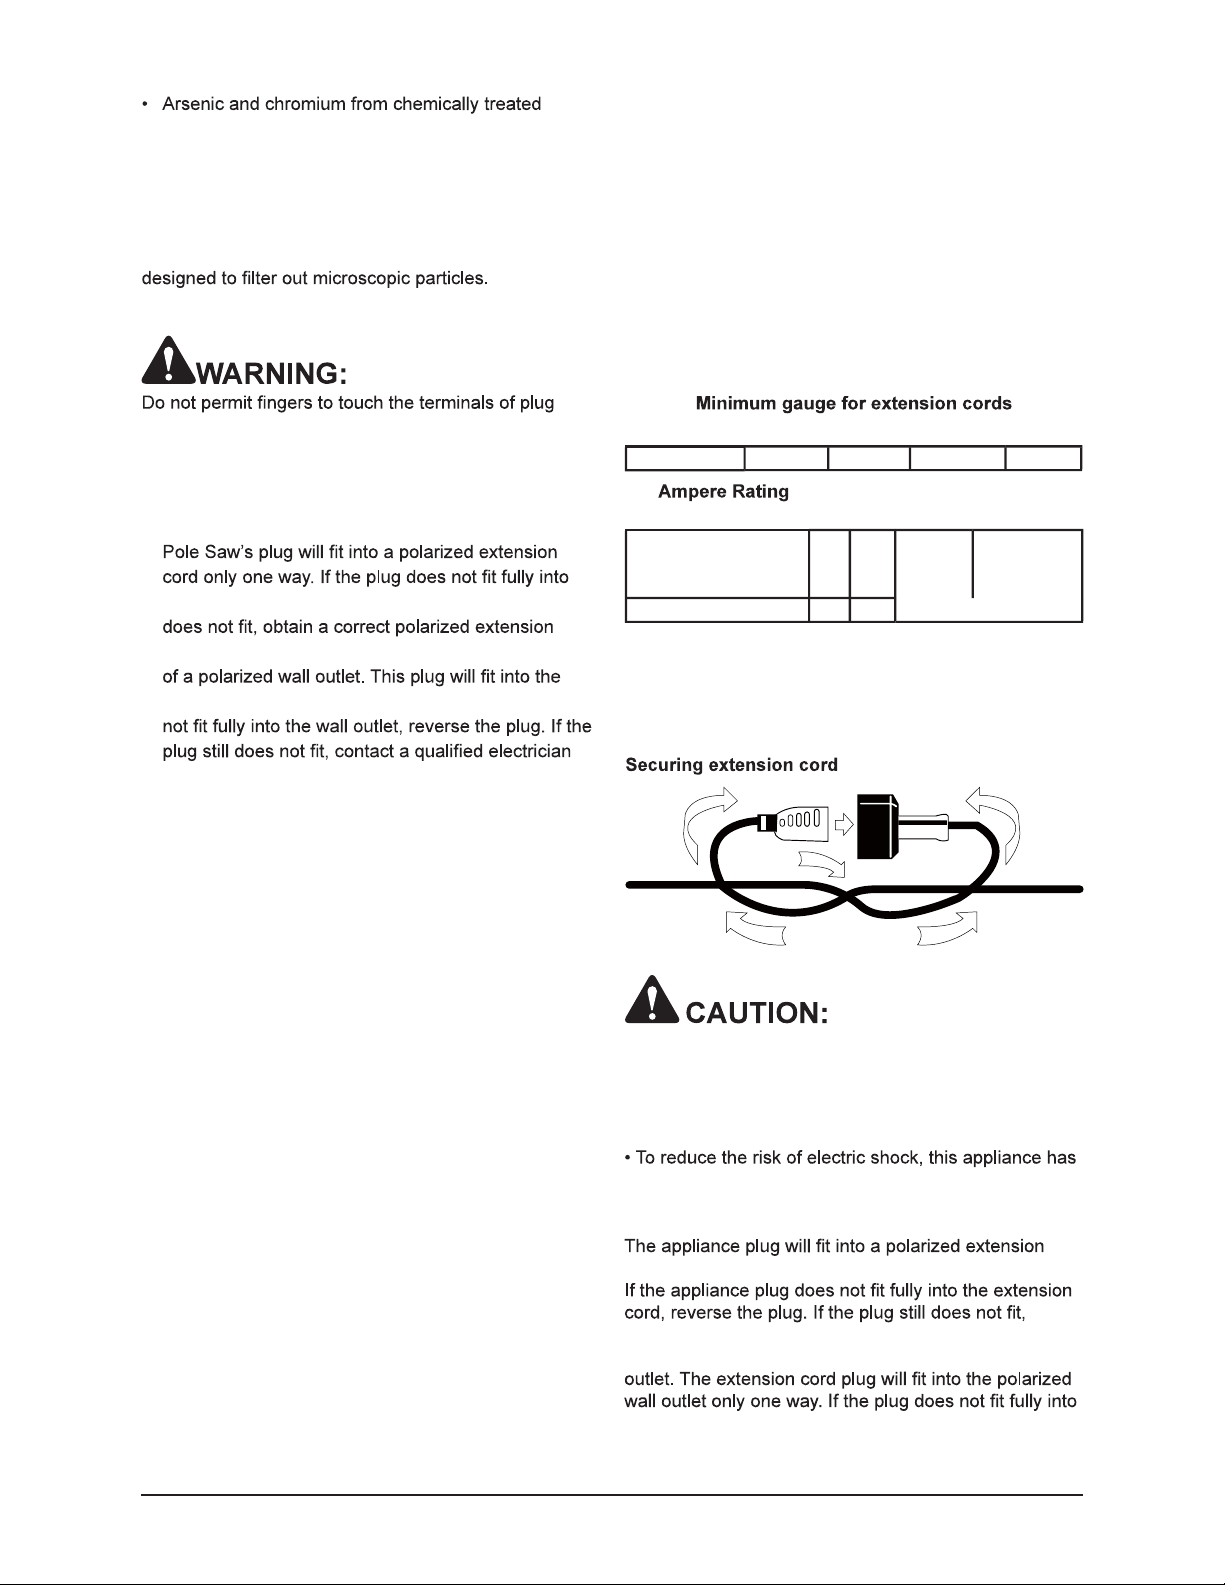
To prevent the appliance cord from disconnecting from
the extension cord during operation, make a knot with
the two cords as shown below.
Volts Total length of cord in feet
More than/Not more than AWG
120 V 25 50 100 150
0-6
6-10
10-12
18
18
16
16
16
16
16
14
14
14
12
12
12-16 14 12 Not recommended
Keep the extension cord clear of the work area. Position
the cord so that it will not get caught on bushes,
hedges, tree trunks, lawnmowers or other obstructions
while you are working with the blower vacuum.
a polarized plug (i.e. one blade is wider than the other).
Use this appliance only with a polarized UL-, CSA- or
ETL rated extension cord for outdoor, all-weather use.
cord only one way.
obtain a correct polarized extension cord. A polarized
extension cord will require the use of a polarized wall
lumber.
Your risk of exposure to these chemicals varies
depending on how often you do this type of work.
To reduce your exposure to these chemicals, work in
a well-ventilated area, and work with approved safety
equipment, such as dust masks that are specially
ELECTRICAL SAFETY
when installing or removing the extension cord from the
plug.
1. Double insulated tools are equipped with a polarized
plug (one blade is wider than the other and will
require the use of a polarized extension cord. The
the extension cord, reverse the plug. If the plug still
cord. A polarized extension cord will require the use
polarized wall outlet only one way. If the plug does
to install the proper outlet. Do not change or alter
the equipment plug, extension cord receptacle, or
extension cord plug in any way.
2.Double insulation eliminates the need for the three-
wire grounded power cord and grounded power
supply system. Applicable only to Class II (double-
insulated) tools.
3 Ground fault circuit interrupter (GFCI) protection
should be provided on the circuit(s) or outlet(s) to be
used for the blower. Receptacles are available having
built-in GFCI protection and may be used for this
measure of safety.
4 To prevent electric shock, use only with an extension
cord suitable for outdoor use, such as SW-A,
SOW-A, STW-A, STOW-A, SJW-A, SJOW-A,
SJTW-A, or SJTOW-A. Before use, check that the
extension cord is in good condition. When using
an extension cord, make sure to use one heavy
enough to carry the current your product will draw.
For lengths less than 50 ft (15 m), a No.14 AWG
(or greater) extension cord should be used. An
undersized cord will cause a drop in line voltage
resulting in loss of power and overheating.
5.Use a proper extension cord. ONLY use cords listed
by underwriters Laboratories (UL). Other extension
cords can cause a drop in line voltage, resulting
in a loss of power and overheating of tool. For this
tool an AWG (American Wire Gauge) size of a
least 14-gauge is recommended for an extension
cord of 25-ft. or less in length. Use 12-gauge for an
extension cord of 50-ft. Extension cords 100-ft. or
longer are not recommended. Remember, a smaller
wire gauge size has greater capacity than a larger
number (14-gauge wire has more capacity than
16-gauge wire; 12-gauge wire has more capacity
than 14-gauge). When in doubt use the smaller
number.

5WWW.SENIXTOOLS.COM
SAVE THESE INSTRUCTIONS
the wall outlet, reverse the plug. If the plug still does
wall outlet. Do not modify the appliance plug, extension
cord receptacle or extension cord plug in any way.
Warning – To reduce the risk of personal injury due to
a loose electrical connection between the appliance’s
appliance plug to the extension cord. Periodically check
the connection while operating to ensure it is fully
attached. Do not use an extension cord that provides
a loose connection. A loose connection may result in
Maintain Appliance With Care – Inspect extension cords
periodically and replace if damaged.
Do not abuse the cord. Never pull the blower by
the cord or yank the cord to disconnect it from the
receptacle. Keep the cord away from heat, oil, and
sharp edges.
6 WWW.SENIXTOOLS.COM
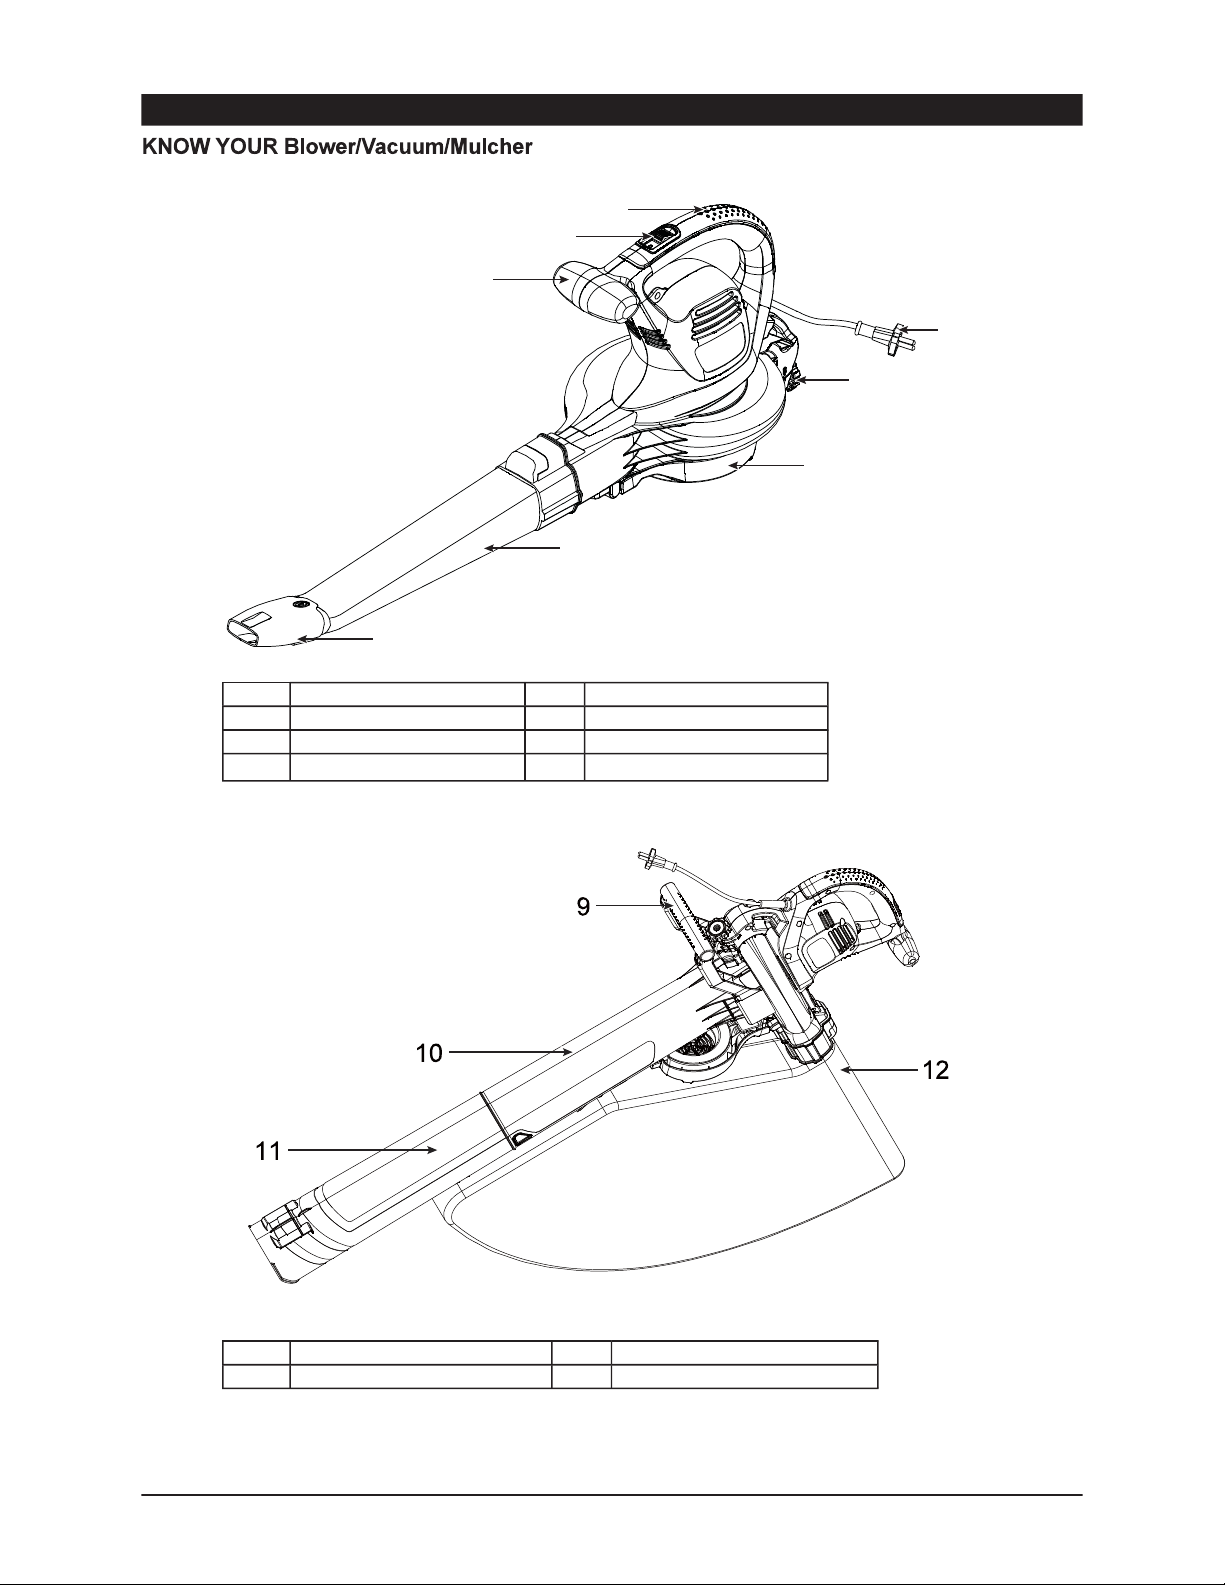
COMPONENT LOCATION
5
6
7
8
4
3
21
1 Handle 5 Lock knob
2 ON/OFF switch 6 Vacuum inlet cover
3 Auxiliary handle 7 Blower tube
4 Plug 8 Blower concentrator nozzle
9 Auxiliary handle 11 Rear vacuum/mulcher tube
10 Front vacuum/mulcher tube 12 Collective bag

7WWW.SENIXTOOLS.COM
ASSEMBLY
Read the ENTIRE IMPORTANT SAFETY
INFORMATION section at the beginning of this manual
including all text under subheading therein before set up
or use of this product.
ASSEMBLE AS A BLOWER
1. Slide the blower tube forward until the notched area
on the blower housing clicks into the slot on the
blower tube.
2. Insert the concentrator nozzle onto the end of the
blower tube until it locks into position (Fig. 1).
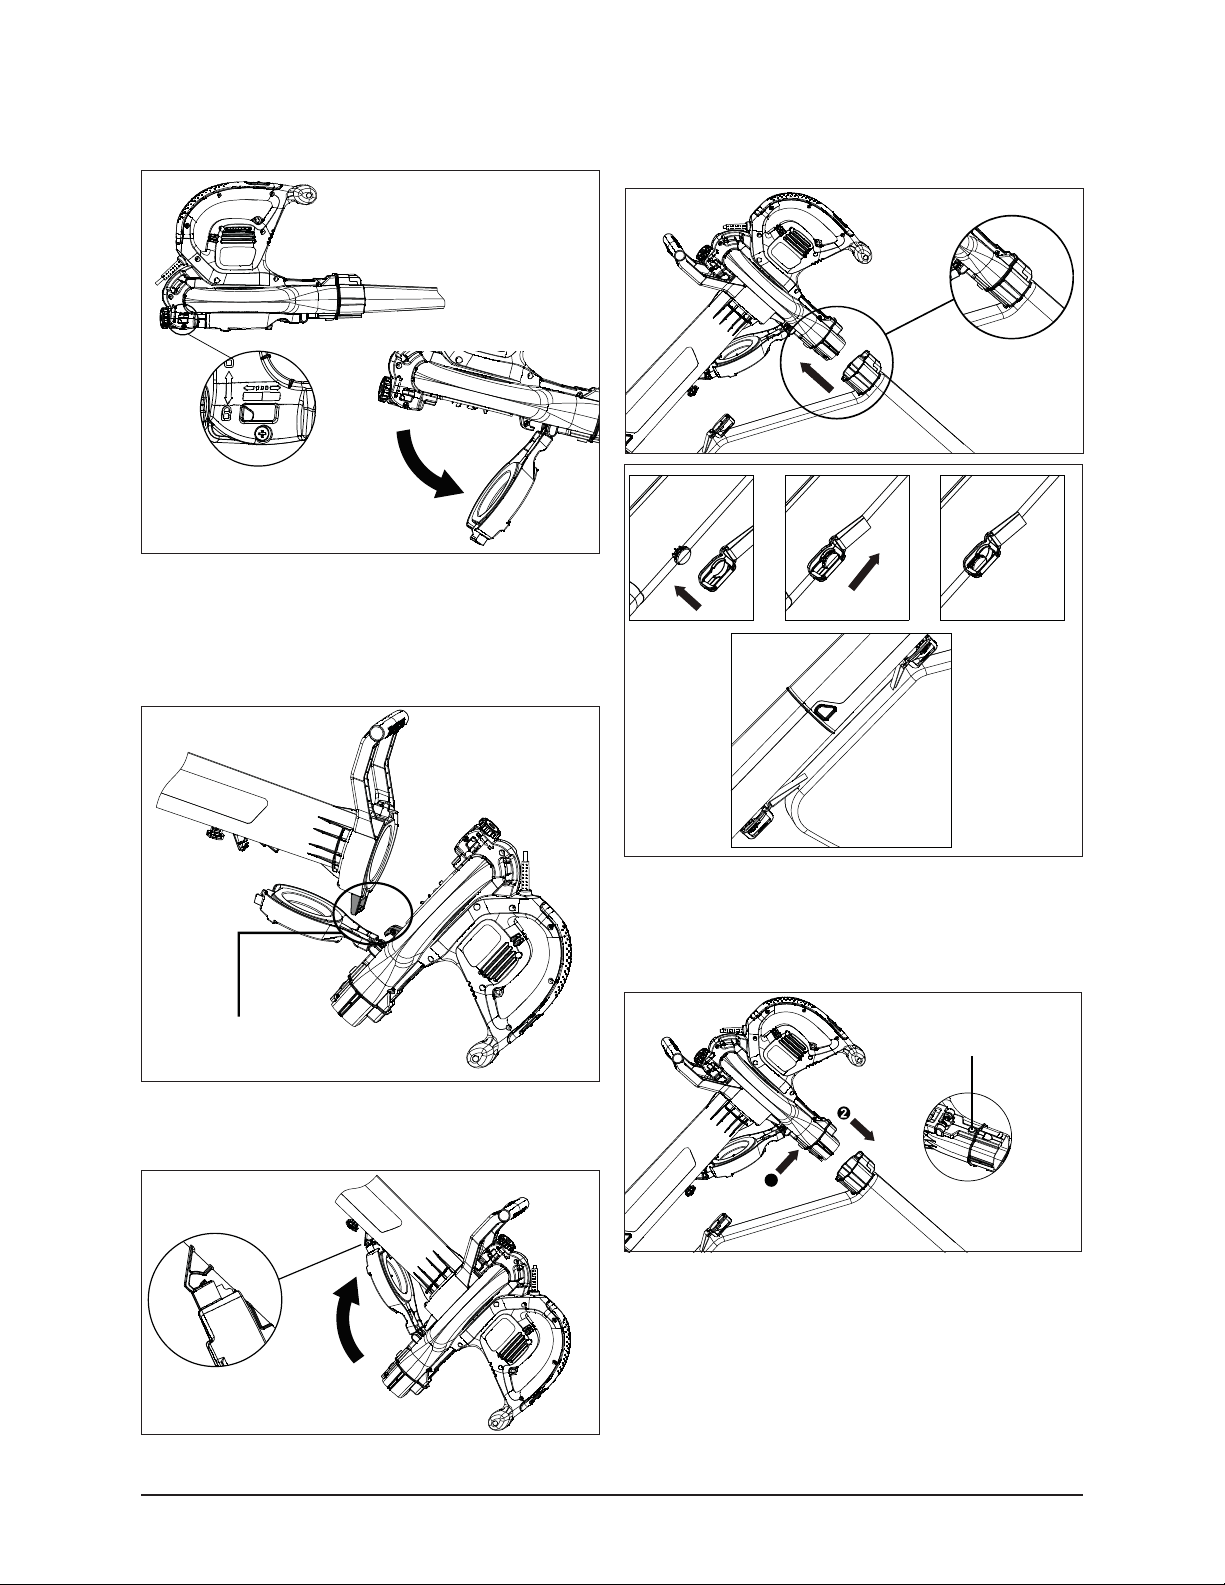
1. Slide the front and rear vacuum/mulcher tubes
together until the lock button engages (Fig. 5).
NOTE: The concentrator nozzle is used to increase air
etc.).
3. Before using the blower function, rotate the lock knob
to lock the cover in place(The indicator will be on the
far right position,Fig. 2).
4. To remove the blower tube, turn the ON/OFF power
switch to the OFF (O) position and disconnect the
tool from the power supply (Fig. 3).
5. Press the tube release button and remove the blower
tube (Fig. 4).
ON
OFF
Notched area
Concentrator
nozzle
Air outlet
Blower tube
Fig. 1
Fig. 2
Fig. 3
Tube release button Fig. 4
Fig. 5
8 WWW.SENIXTOOLS.COM
2. Rotate the lock knob to unlock the cover (The
indicator is on the far left position,Fig. 6).
5. Insert the collection bag adaptor into the blower air
outlet until the collection bag is securely fastened
(Fig. 9), then make the bag hook the strap holder on
the two sides of the tube (Fig. 10).
3. With the blower tube removed, insert the "hooked"
Side end of the mulcher tube into the rear clip on the
unit. Rotate the lock knob to close the front tube (The
indicator is on the far right position,Fig. 7).
1. To remove the collective bag ,release the bag from
the strap holder on the two sides of the tube,and
simply press the tube release button to remove the
bag (Fig. 11).
2. To remove the vacuum/mulcher tube assembly,
release the inter cover from the hook of the tube,
rotate the lock knob to unlock , then remove the tube
assembly from its housing (Fig. 12).
4. Make the inter cover hook the hook of the rear tube
(Fig. 8).
Fig. 6
Fig. 9
Fig. 7
Rear clip + Hook side
Fig. 8
1 2 3
Fig. 10
Fig. 11
Tube release button
1

9WWW.SENIXTOOLS.COM
8. Make sure to disconnect the unit from the power
supply before attempting to clear any obstructions.
The indicator of the lock knob must be entered into
13).
NOTE: It may be necessary to remove the blower tube
or vacuum/mulcher tubes to clear a blocked tube or
impeller.
1
Fig. 12
Fig. 13

10 WWW.SENIXTOOLS.COM
OPERATION
Read the ENTIRE IMPORTANT SAFETY
INFORMATION section at the beginning of this manual
including all text under subheading therein before set up
or use of this product.
Use the blower/vacuum/mulcher only in daylight or good
To avoid serious personal injury, wear ear defenders,
goggles or safety glasses at all times when operating
this unit. Wear a face mask or dust mask in dusty
locations.
To prevent serious personal injury or damage to the
unit, make sure the blower tube or the mulcher tubes
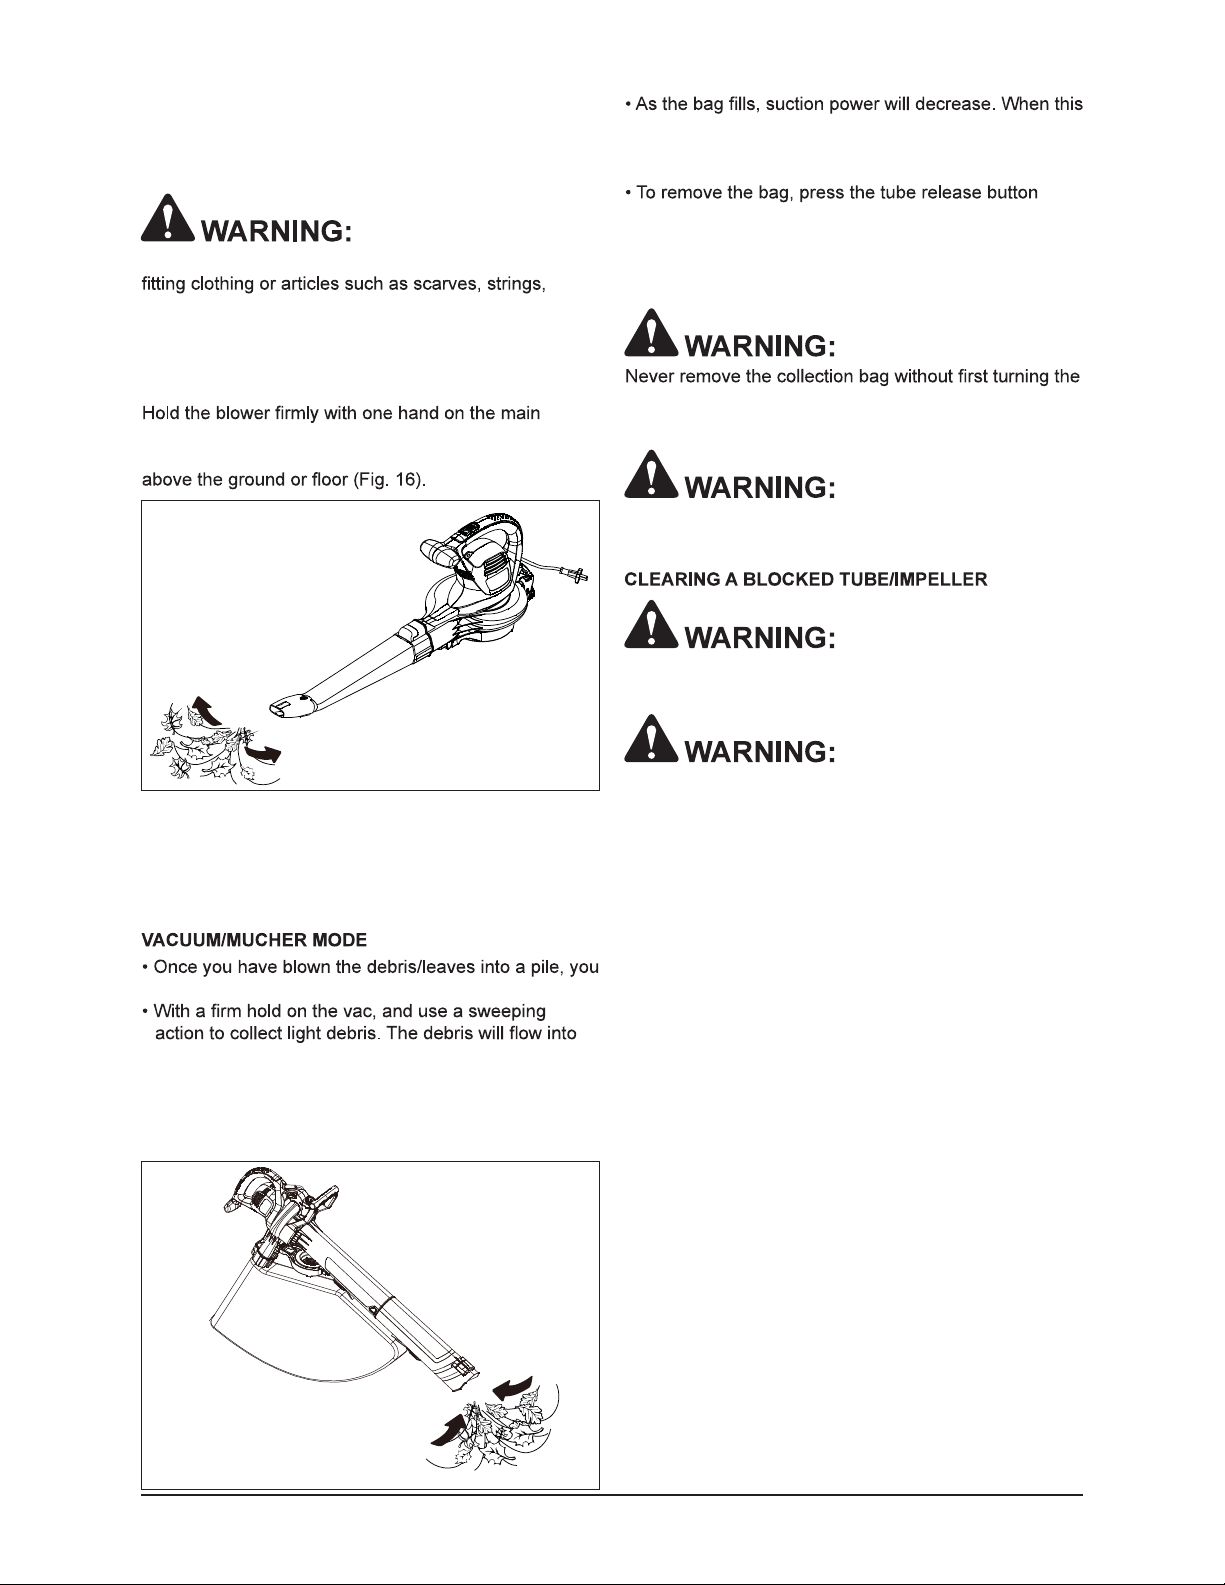
and the bag are in place before operating the unit.
the ground and place one hand on the unit handle and
the other hand on the auxiliary handle.
Wear personal protective equipment during your work
session. This includes boots, safety glasses/goggles,
ear defenders, long pants and a long-sleeve shirt.
When using the unit as mulcher, make sure the bag is
properly installed and zipped closed.
Make sure the blower tube nozzle is not directed at
anybody or any loose debris before starting the unit.
Verify that the unit is in good working condition. Make
sure the tubes and guards are in place and secure.
Ensure that the vacuum/mulch inlet cover is
completely closed and locked.
grips.
To reduce the risk of hearing loss associated with
soundlevel(s), hearing protection is required.
Use the shoulder strap when using the unit as a
mulcher.
Operate power equipment only at reasonable hours—
not early in the morning or late at night when people
might be disturbed. Comply with times listed in local
ordinances.Usual recommendations are 9:00 am to
5:00 pm, Monday through Saturday.
To reduce noise levels, limit the number of pieces of
power equipment used at any one time and operate
power blowers at the lowest possible speed setting
necessary to do the job.
Use rakes and brooms to loosen debris before
blowing.
In dusty conditions, slightly dampen surfaces.
Conserve water by using power blowers instead
of hoses for many lawn and garden applications,
including areas such as gutters, screens, patios, grills,
porches and gardens.
Blow debris into a safe, open area away from children,
pets, open windows or freshly washed cars.
Clean up after using leaf blowers and other lawn
equipment. Dispose of debris appropriately.
CONNECTING TO A PWER SOURCE
OPERATING TIPS
STARTING AND STOPPING
1. Secure the extension cord to the motor housing using
the cord retainer located at the rear of the blower.
Securing the extension cord in this manner prevents
accidental removal of the electrical cord during
operation (Fig. 14).
1. To start the electric blower/vacuum/mulcher, slide the
ON/OFF switch to position (1),This unit is equipped
with one speed settings (1 ) (Fig. 15).
2. To stop the unit, slide the ON/OFF switch to position
(0) (Fig. 15).
2. Plug the female end of the electrical cord into the
receptacle at the back of the unit.
Fig. 14
ON
OFF
Fig. 15
11WWW.SENIXTOOLS.COM
To avoid serious personal injury, do not wear loose
chains, ties, etc., that could get drawn into the air vents.
To make sure long hair does not get drawn into the air
vents, tie back long hair.
power switch to the OFF (0) position and unplugging the
unit from the main power source.
Do not use in vacuum/mulcher mode without the
vacuum tubes and collection bag in place.
To avoid serious personal injury, be sure the unit is OFF
and unplugged before clearing the impeller.
To avoid serious personal injury, always wear gloves to
protect yourself from the impeller blades or other sharp
objects.
During the vacuuming process, certain objects such as
cloth, rope or large diameter sticks may obstruct the fan
and block the motor. A thermal protection device, which
is built into the blower vac, will cut off the electricity to
the motor to prevent damage from overheating.
In the event an obstruction occurs and power is
curtailed:
Never cover air vents. Keep them free from obstructions
and debris. They must always remain clear for proper
motor cooling.
handle and the other hand on the auxiliary handle.
Sweep from side to side with the nozzle several inches
Slowly advance the unit, keeping the accumulated pile
of debris in front of you. Most dry blowing operations
are better suited to low speeds rather than high speeds.
High speed blowing is best for moving heavier items like
large debris or gravel.
can convert to vacuum mode to collect the debris.
the bag. Items such as small leaves and twigs will be
mulched as they pass through the fan housing. For
longer bag life and increased performance, empty the
bag frequently
(Fig. 17).
happens, turn the power switch to the OFF (0) position
and unplug the unit from the power supply. Remove
the bag and empty the debris.
(Fig. 11). To empty, hold the plastic handle and grab
the nylon handle on the underside of the bag. Turn
the bag upside down and shake out any debris and
leaves.
AIR VENTS
BLOWER MODE
1. Slide the ON/OFF switch down to the OFF (0)
position until the unit comes to a complete stop.
2. Unplug the unit.
3. Remove the blower tube or vacuum/mulcher tubes
and the bag.
4. Using protective gloves, carefully remove the
material blocking the tube or impeller. Inspect the
blades to ensure no damage has occurred. Rotate
the impeller blades by hand to ensure the blockage is
completely cleared.
5. Reinstall the blower tube or vacuum/mulcher tubes
and the bag.
6. Wait 3 minutes for the motor to cool.
7. Plug the unit back into the power supply and turn
the ON/OFF switch to ON (1). The blower vac will
resume normal function.
Fig. 17
Fig. 16

12 WWW.SENIXTOOLS.COM
MAINTENANCE
Read the ENTIRE IMPORTANT SAFETY
INFORMATION section at the beginning of this manual
including all text under subheading therein before
maintenance this product.
Disconnect the extension cord before performing any
maintenance task.
If the extension cord is plugged into the appliance,
someone could accidentally turn on the unit while you
are performing maintenance on it, which could result in
serious personal injury.
To avoid serious personal injury, always turn the unit off
and unplug it before cleaning or servicing.
Use a small brush to clean the outside of the unit. Do
not use strong detergents, household cleaners that
contain aromatic oils (e.g. pine and lemon) or harsh
solvents such as kerosene as these substances can
damage the plastic housing or the handles. Wipe off
any moisture with a soft, dry cloth.
Examine the extension cord thoroughly for signs of
excess wear or damage. If it is worn or damaged,
replace it immediately.
Disconnect the extension cord from the electric blower/
vacuum/mulcher before storing.
Store the cord with the electric blower/vacuum/mulcher
indoors in a clean, dry and locked location out of the
reach of children and animals.
Normal maintenance, replacement or repair of emission
control devices and systems may be performed by any
or equivalent parts. Warranty and recall repairs must
be performed by an authorized service center; please
contact customer service for assistance.
CLEANING
STORAGE
1. Empty the bag after each use to avoid deterioration
performance of the mulcher.
2. Wear eye protection and a dust mask. Clean the
bag as needed. Turn the bag inside out after initial
emptying and vigorously shake out dust and debris.
3. Wash the bag once a year, or more often if needed.
Follow the steps below:
i. Remove the bag.
ii. Turn the bag inside out.
iii. Hang it up.
iv. Hose it down thoroughly.
v. Leave it hanging to dry.
vi. Turn the bag right-side up and reinstall.
NOTE: Devices for retaining extension cords are
commercially available should you wish to purchase
one.
13WWW.SENIXTOOLS.COM
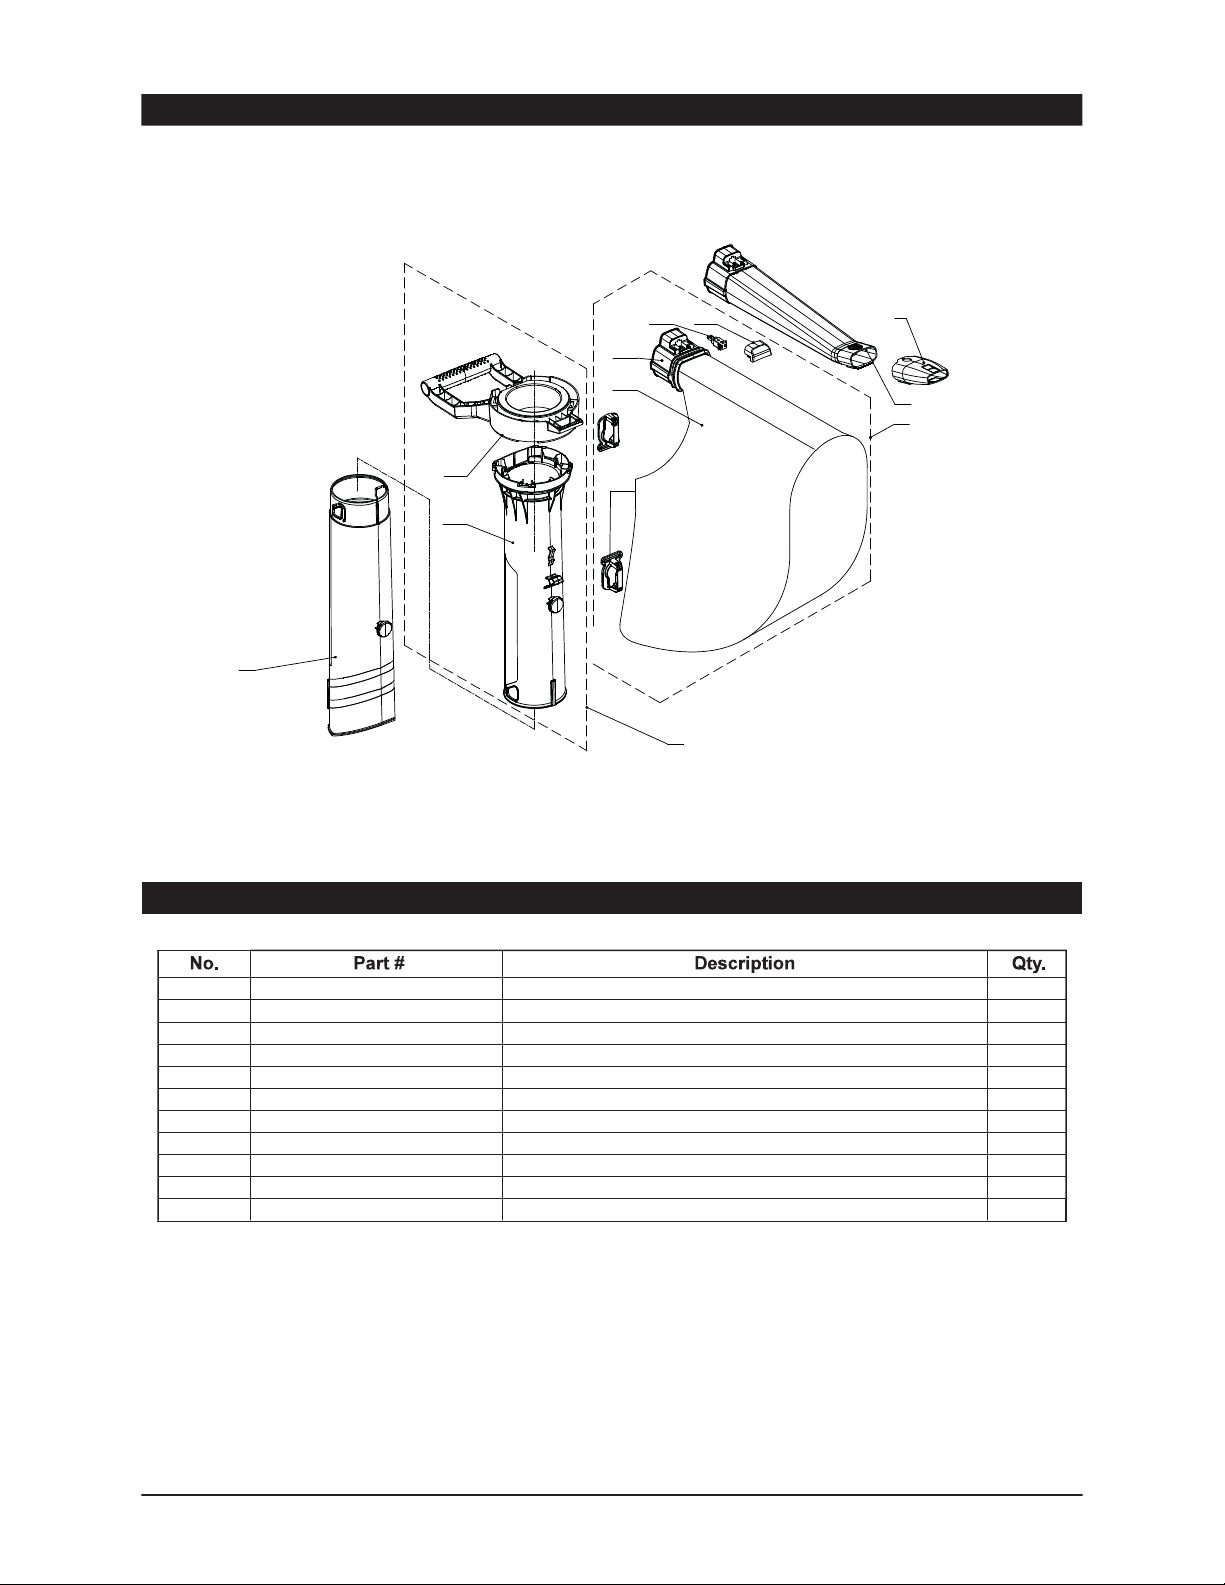
PARTS
EXPLODED VIEW
1
2
3
3-1
3-2
3-3
3-4
3-5
4-1
4-2
4
5
1 202041000012 Flat Nose 1
2 202054000039 Blowpipe 1
3 199068000012 Dust Bag Assembly 1
3-1 202030001729 Shroud 1
3-2 202999001785 U type male terminal block 1
3-3 202154000009 Bend Tube 1
3-4 299010000031 Dust Bag 1
4 199049000033 Duct Components 1
4-1 202024002548 Handle 1
4-2 202155000033 Blowpipe 1
5 202155000034 Blowpipe 1
PARTS
For replacement parts, email: parts@SENIXtools.com.
14 WWW.SENIXTOOLS.COM
TROUBLESHOOTING
SYMPTOM POSSIBLE CAUSE RECOMMENDED ACTIONS
Unit will not blow
or mulch
1. Bag full 1. Empty the bag.
2. Blocked tube 2. Clear the blockage.
3. Blocked impeller 3. Clear the blockage.
4. Dirty bag 4. Clean the bag.
5. Torn bag 5. Replace the bag.
6. Bag unzipped 6. Zip up the bag.
7. Unit unplugged 7. Plug into an outlet or an extension cord.
Unit will not start 1. Unit is unplugged 1. Check cord to make sure it is plugged into an
electrical outlet.
2. Power/speed switch is in the
OFF (0) position. 2. Slide the power switch to the ON (1) position
3. Defective power switch. 3. Contact Senix customer service at 1-800-261-3981.
4. Vac tubes are not correctly
installed.
4. Check vac tubes and ensure that they are correctly
installed to allow the switch to be engaged.
5. Intake gate/cover is not closed. 5. Ensure that gate/cover is fully closed and locked.
6. House circuit may have tripped. 6. Check wall circuit breaker panel and reset if
necessary.
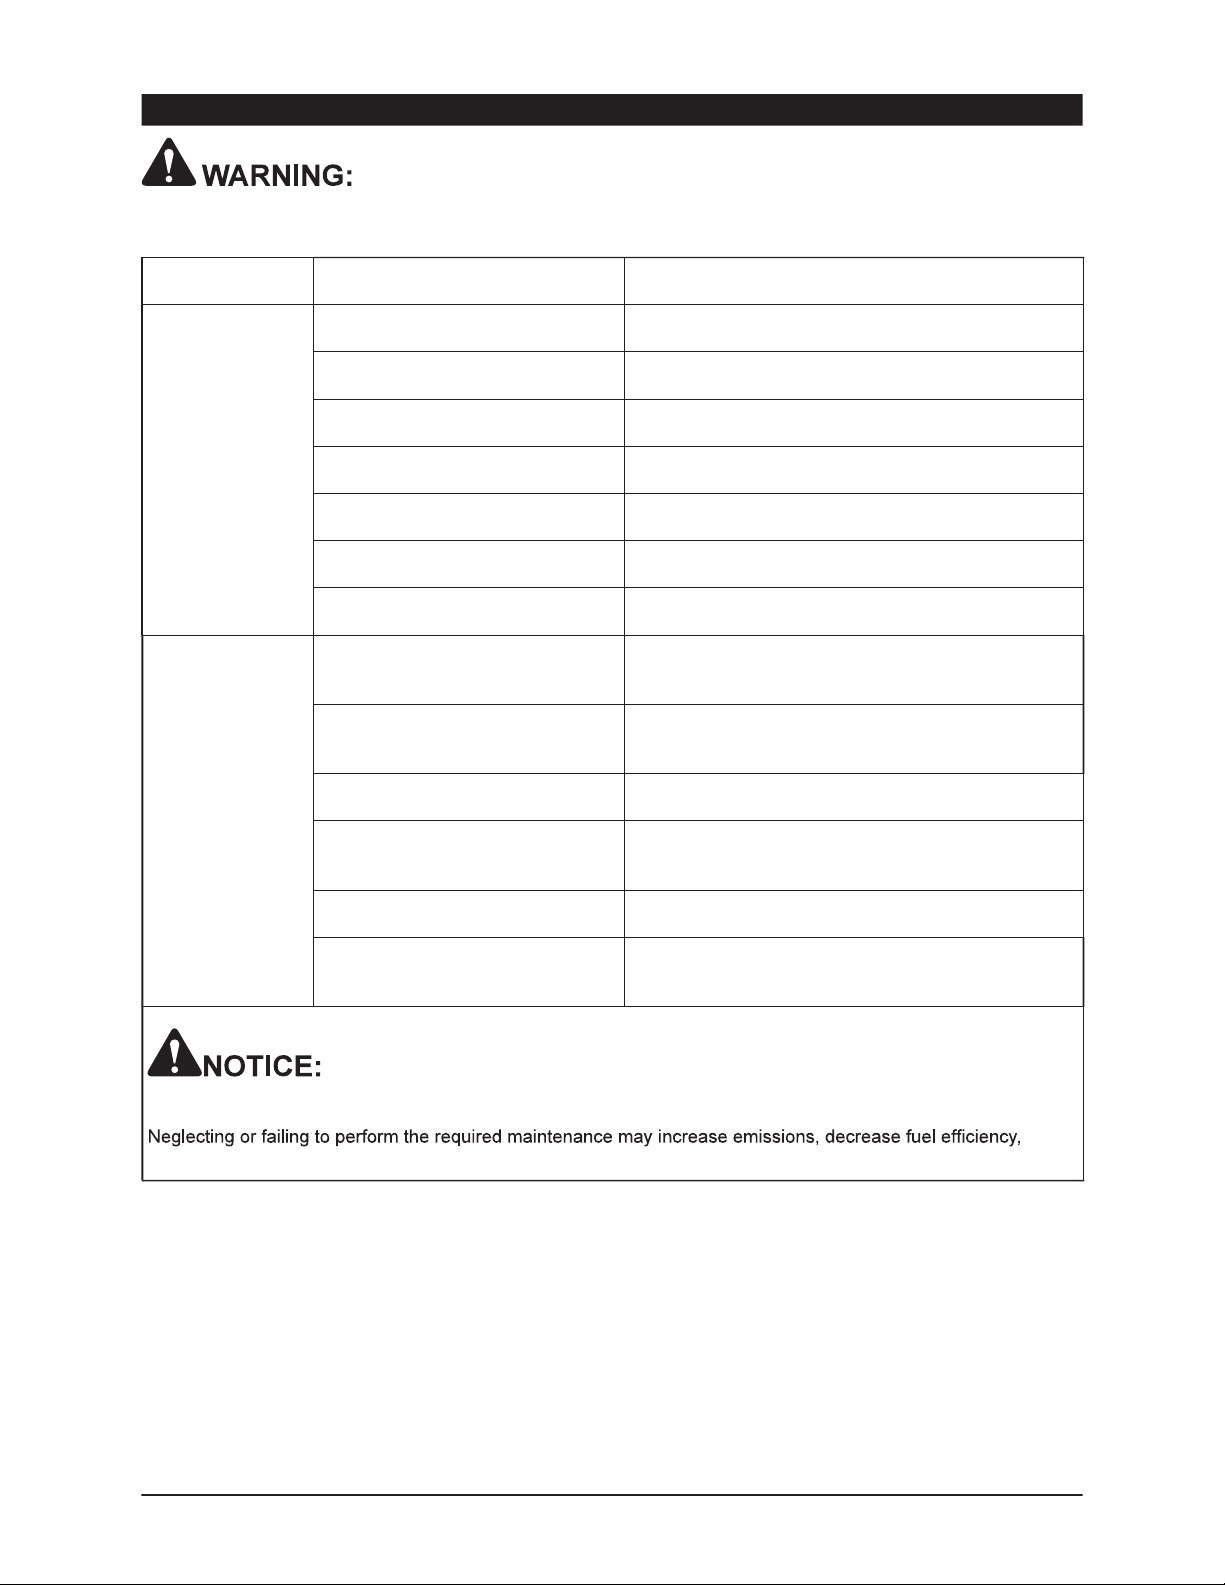
As the equipment owner, you are responsible for the performance of the required maintenance listed in the
Maintenance section. It is recommended that you retain all receipts covering maintenance on your equipment.
degrade performance, cause irreversible engine damage and/or void your warranty.
Always unplug the power cord before performing any adjustments, maintenance or repairs to your electric blower
vac.

15WWW.SENIXTOOLS.COM
WARRANTY
LIMITED TWO-YEAR WARRANTY
FOR TWO YEARS from the original date of retail purchase this Senix product is warranted against defects in
materials or workmanship on power tools and chargers. Defective product will receive free repair.*
FOR TWO YEARS from the original date of retail purchase this Senix product is warranted against defects in
materials or workmanship on batteries. Defective product will receive free repair.*
This warranty does not cover normal wear of parts and components such as cutting chain, line or blades nor does
this warranty cover product transportation cost for warranty or service.
purpose, are limited to three years from the date of purchase on power tools and chargers and seven years on
batteries. The manufacturer is not responsible for direct, indirect, incidental or consequential damages. Some
states and provinces do not allow limitations on how long an implied warranty lasts and/or do not allow the
exclusion or limitation of incidental damages, so the above limitations and exclusions may not apply to you. This
province to province.
The YAT USA declines any responsibility in regard to civil liability arising from abusive use or not in conformity with
proper use and maintenance of the machine as described in the operator’s manual.
YAT USA is not responsible for direct, indirect, incidental or consequential damages.
After the purchase, the manufacturer recommends proper maintenance of the machine and to read the operator’s
manual before using the machine.
*Original purchase receipt may be required for proof of purchase
For customer service contact us toll free at 1-800-261-3981 or Senixtools.com.
YAT USA, Inc. 9048 E Bahia Dr, suite 105, Scottsdale, AZ 85260.
To locate your nearest Senix service provider call toll free at 800-261-3981 or email us at [email protected].
Warranty is subject to the following conditions:
authorized service center
defect resulting from misuse, abuse (including overloading the product, exposure to water or rain) accidents,
neglect or lack of proper installation and improper maintenance or storage.
Para el servicio de atención al cliente, llame al 1-800-261-3981 o envíe un
correo electrónico a: [email protected]m
GUARDE ESTE MANUAL PARA CONSUTAS FUTURAS.
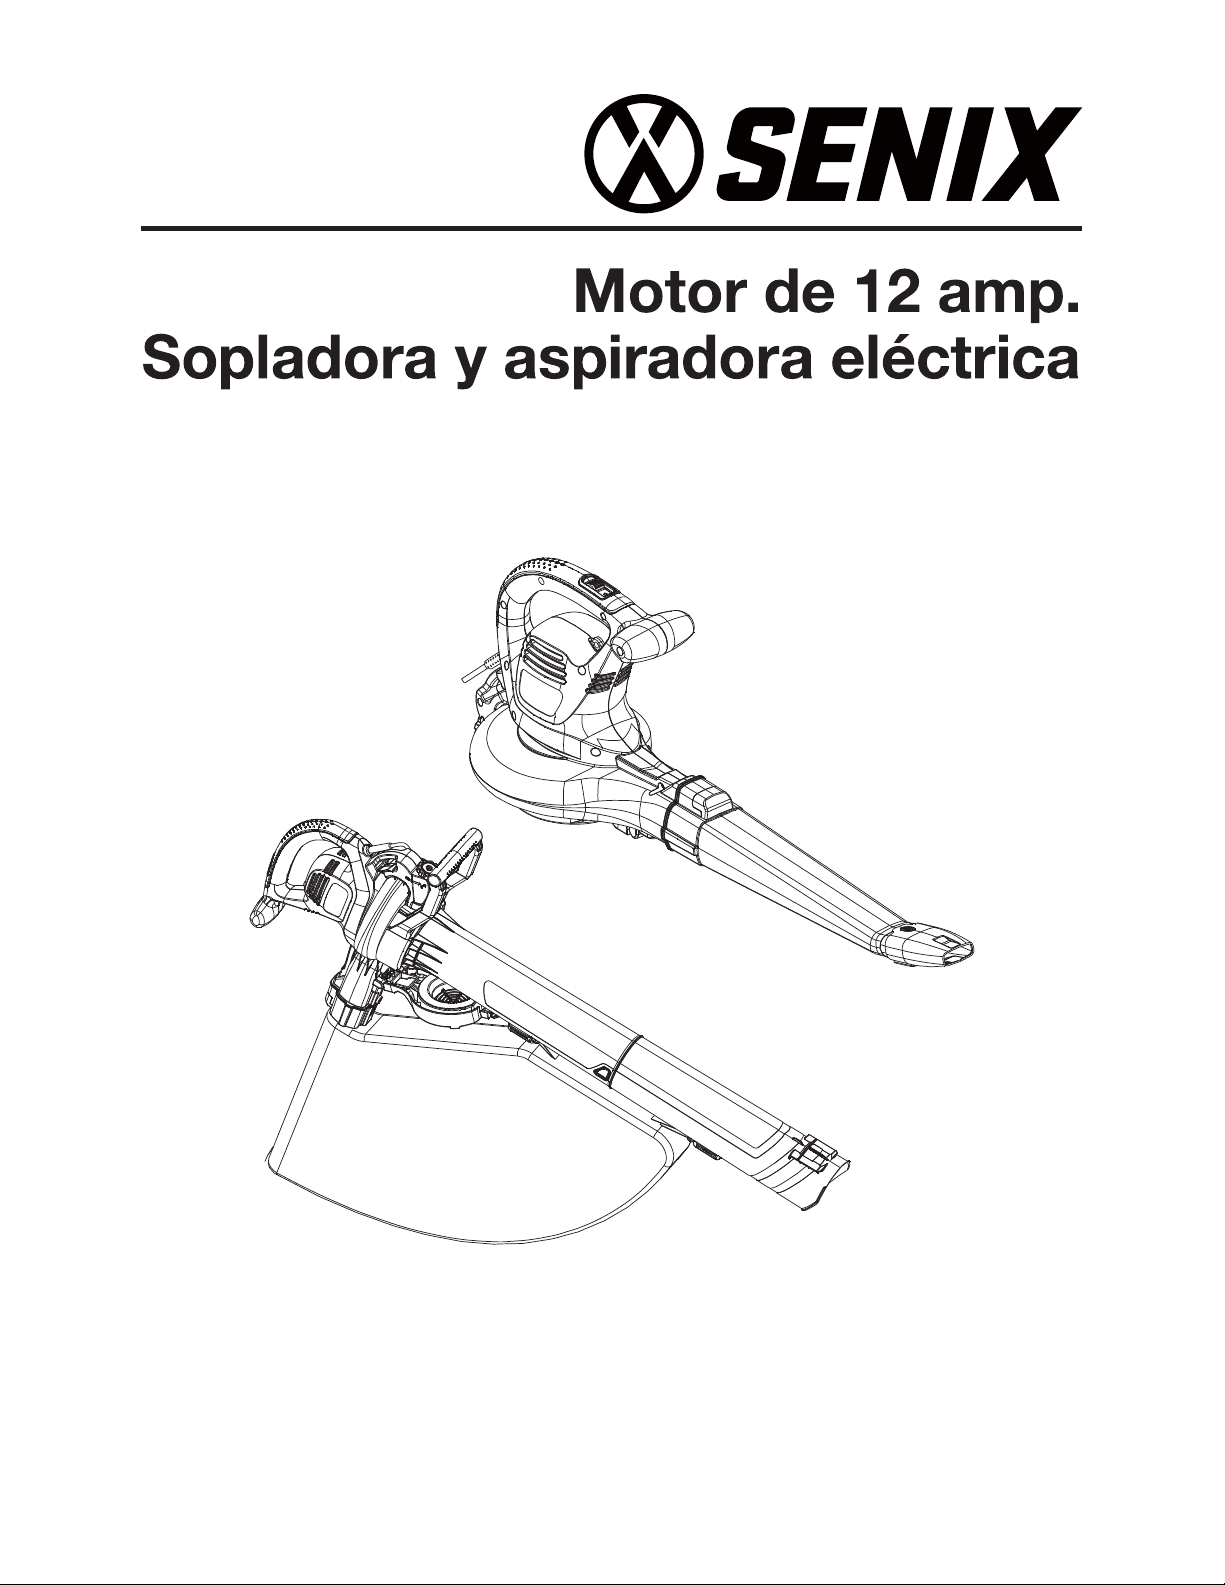
Manual del operador
Modelo: BLVE12-M

17WWW.SENIXTOOLS.COM
ESPECIFICACIONES*
SÍMBOLOS DE SEGURIDAD.....................................................17
DATOS TECNICOS.....................................................................17
SEGURIDAD...............................................................................18
UBICACION DE COMPONENTES............................................. 21
ENSAMBLAJE............................................................................ 22
OPERACIÓN.............................................................................. 25
MANTENIMIENTO...................................................................... 27
PIEZAS....................................................................................... 28
SOLUCIÓN DE PROBLEMAS.................................................... 29
GARANTÍA................................................................................. 30
Para reducir el riesgo de lesiones, el usuario
debe leer el manual de instrucciones.
Use protección para los oídos.
Use protección para los ojos.
Use máscara antipolvo.
Use protección para las manos.
Use calzado de seguridad antideslizante.
Evite las líneas eléctricas y use el producto
en condiciones secas.
ÍNDICE
No exponer el producto a la lluvia.
Los objetos lanzados pueden rebotar y causar
lesiones personales o daños a la propiedad.
Mantenga a todos los transeúntes al menos
a 50 pies de distancia.
Indica peligro, advertencia o precaución.
Precauciones relacionadas con su seguridad.
Desconecte del enchufe de la red eléctrica
si el cable está dañado o enredado.
NO TOQUE EL CABLE ANTES DE
DESCONECTAR LA CORRIENTE.
Modelo BLVE12-M
Tensión nominal 120V a 60Hz
Corriente nominal 12A
Tipo de motor Motor Universal
Velocidad sin carga 14000 /min
Velocidad máxima de aire 179 MPH
Volumen máximo de aire 420 CFM
Relación de mantillo 14:1
Capacidad de la bolsa 9.9 galones
Peso 8.2 lb. (3.72 kg)
SÍMBOLOS DE SEGURIDAD

18 WWW.SENIXTOOLS.COM
CUANDO ESTÉ UTILIZANDO ESTE APARATO
No lo desenchufe tirando del cable. Para
desenchufarlo, sujete el enchufe, no tire del cable.
Apague todos los controles antes de desenchufar el
aparato.
explosivos, como ante la presencia de líquidos,
eléctricas generan chispas que pueden incendiar el
polvo o los vapores.
permita que los adultos usen el aparato sin la
instrucción adecuada.
Evite usar prendas sueltas o joyas que podrían
quedar atrapadas en las partes móviles del aparato o
en su motor.
correcta para su aplicación. La herramienta correcta
se utilice a la velocidad de funcionamiento para la
Es necesario prestar mucha atención cuando se
utiliza por niños o cerca de ellos.
en este manual. Utilice únicamente los accesorios
recomendados por el fabricante.
todas las demás partes del cuerpo lejos de las partes
móviles y de las aberturas.
funciona como debería, o si se ha caído, dañado,
dejado al aire libre o caído en el agua, llévelo a un
centro de servicio autorizado.
alejado del agua.
funcionamiento.
aparato a la lluvia ni al agua. Evite el sol directo.
Para reducir el riesgo de incendio, descarga eléctrica o
lesiones:
No deje sin vigilancia el aparato (soplador) cuando esté
enchufado. Desenchúfelo del tomacorriente cuando
no esté en uso y antes de realizarle operaciones de
mantenimiento.
Cuando se utilizan aparatos eléctricos, siempre se
deben seguir las precauciones básicas, incluyendo las
siguientes:
LEA TODAS LAS INSTRUCCIONES ANTES DE USAR
ESTE APARATO
MEDIDAS DE SEGURIDAD
IMPORTANTES
que fue diseñada.
calzado ligero similar.
para evitar que se pueda enredar en las partes
móviles.
momento. No extienda el cuerpo en exceso. Si se
estira demasiado puede perder el equilibrio.
instruidas en el uso del aparato lo utilicen.
y apaga. Cualquier aparato que no pueda ser
controlado con el interruptor es peligroso, y debe ser
reparado.
m) de distancia.
los medicamentos.
del aparato.
utilice el aparato si alguna de sus aberturas estuviera
bloqueada. Mantenga las aberturas libres de polvo,
pelusas, cabello y cualquier otra cosa que pueda
todos los objetos que pudieran salir despedidos
o que se puedan enganchar en el aparato, como
piedras, vidrios rotos, clavos, alambres o cuerdas.
idénticos a los del fabricante. El uso de cualquier otra
pieza puede crear un peligro o causar daños en el
producto.
SEGURIDAD INFANTIL
Pueden ocurrir accidentes trágicos si el operador no es
consciente de la presencia de niños.
el cuidado vigilante de un adulto responsable.
utilicen este soplador. Los niños mayores de 14 años
deben leer y entender las instrucciones de uso y
las reglas de seguridad de este manual y deben ser
entrenados y supervisados por su madre o su padre.
cualquier otra persona entra en el área de trabajo.
ciegas, puertas, arbustos, árboles u otros objetos
que puedan ocultar de su vista a un niño que pueda
acceder al camino del soplador.
ADVERTENCIA (PROPOSICIÓN 65)
El polvo creado por las acciones de lijar, aserrar, moler,
SEGURIDAD

19WWW.SENIXTOOLS.COM
Voltios Longitud total del cable en pies
Más de / No más de
120 V 25 50 100 150
0-6
6-10
10-12
18
18
16
16
16
16
16
14
14
14
12
12
12-16 14 12 No recomendado
Mantenga el cable de extensión
alejado del área de trabajo. Coloque el cable de
modo que no pueda quedar atrapado en arbustos,
setos, troncos de árboles, cortadoras de pasto u otras
obstrucciones mientras trabaja con el soplador.
aparato tiene un enchufe polarizado (es decir, una
clavija es más ancha que la otra). Utilice este aparato
únicamente con un cable de extensión polarizado
y en cualquier condición climática. El enchufe de
Para evitar que el cable del aparato se desconecte
del cable de extensión durante el funcionamiento,
haga un nudo con los dos cables como se muestra a
continuación.
taladrar y otras actividades de construcción contiene
sustancias químicas que se sabe que causan cáncer,
defectos de nacimiento u otros daños al sistema
reproductor. Algunos ejemplos de estos productos
químicos son:
productos de albañilería, y
El riesgo de exposición a estos productos químicos
varía en función de la frecuencia con la que se realice
este tipo de trabajo.
Para reducir su exposición a estos productos químicos,
trabaje en un área bien ventilada con equipos de
seguridad aprobados, como máscaras antipolvo
microscópicas.
SEGURIDAD ELÉCTRICA
No deje que los dedos entren en contacto con los
terminales del enchufe al conectar o desconectar el
cable de extensión del enchufe.
1. Las herramientas de doble aislamiento están
equipadas con un enchufe polarizado, una clavija
es más ancha que la otra, y requieren el uso de
un cable de extensión polarizado. El enchufe de
la herramienta se conecta a un cable de extensión
polarizado en una sola posición. Si el enchufe no
entra completamente en el cable de extensión,
invierta el enchufe. Si el enchufe sigue sin entrar,
obtenga un cable de extensión polarizado correcto.
Un cable de extensión polarizado requerirá el uso
de un tomacorriente polarizado. Este enchufe se
conecta al tomacorriente polarizado en una sola
posición. Si el enchufe no entra completamente en
el tomacorriente, invierta el enchufe. Si el enchufe
sigue sin entrar, póngase en contacto con un
equipo, ni el receptáculo del cable de extensión, ni el
enchufe del cable de extensión en modo alguno.
2. El doble aislamiento elimina la necesidad de usar un
cable de alimentación conectado a tierra de tres hilos
y de un sistema de alimentación conectado a tierra.
Aplicable sólo a herramientas de clase II (doble
aislamiento).
3. La protección del interruptor de circuito de falla a
tierra (GFCI) debe proporcionarse en los circuitos
o salidas que se utilizarán para el soplador. Hay
receptáculos disponibles con protección GFCI
integrada que pueden usarse para esta medida de
protección.
4. Para evitar descargas eléctricas, utilice únicamente
con un cable de extensión adecuado para uso al
aire libre, como SW-A, SOW-A, STW-A, STOW-A,
SJW-A, SJOW-A, SJTW-A, o SJTOW-A. Antes de
su uso, compruebe que el cable de extensión está
en buenas condiciones. Cuando utilice un cable
de extensión, asegúrese de usar uno del calibre
aparato. Para longitudes inferiores a 50 pies (15 m),
se debe utilizar un cable de extensión Nº 14 AWG (o
superior). Otros cables de extensión pueden causar
una caída de tensión, provocando una pérdida de
potencia y un sobrecalentamiento.
5. Utilice un cable de extensión adecuado. Utilice
SOLAMENTE los cables recomendados por
Underwriters Laboratories (UL). Otros cables
de extensión pueden causar una caída de
tensión, provocando una pérdida de potencia y el
sobrecalentamiento de la herramienta. Para esta
herramienta se recomienda una medida AWG
(American Wire Gauge) de al menos calibre 14 para
un cable de extensión de 25 pies (7,62 m) o menos
de longitud. Utilice un calibre 12 para un cable de
extensión de 50 pies (15,24 m). No se recomiendan
cables de extensión de 100 pies (30,48 m) o más.
Recuerde, una medida de calibre de cable más
pequeña tiene mayor capacidad que una medida
mayor (un cable calibre 14 tiene más capacidad
que un cable calibre 16; un cable calibre 12 tiene
más capacidad que un cable calibre 14). En caso de
duda, utilice el número más pequeño.

20 WWW.SENIXTOOLS.COM
CONSERVE ESTE INSTRUCTIVO
la herramienta se conecta a un cable de extensión
polarizado en una sola posición.
Si el enchufe no entra completamente en el cable de
extensión, invierta el enchufe. Si el enchufe sigue
sin entrar, obtenga un cable de extensión polarizado
correcto. Un cable de extensión polarizado requerirá
el uso de un tomacorriente polarizado. Este enchufe
del cable de extensión se conecta al tomacorriente
polarizado en una sola posición. Si el enchufe no entra
completamente en el tomacorriente, invierta el enchufe.
Si el enchufe sigue sin entrar, póngase en contacto con
receptáculo del cable de extensión, ni el enchufe del
cable de extensión de modo alguno.
Advertencia – Para reducir el riesgo de lesiones
personales debido a una conexión eléctrica
desajustada entre el enchufe y el cable de extensión
el enchufe del aparato al cable de extensión.
Compruebe periódicamente la conexión mientras
está en funcionamiento para asegurarse de que está
completamente conectada. No utilice un cable de
extensión con una conexión desajustada. Una conexión
desajustada puede provocar un sobrecalentamiento o
un incendio y aumenta el riesgo de sufrir quemaduras.
Preste atención al mantenimiento del aparato:
Inspeccione los cables de extensión periódicamente y
sustitúyalos si están dañados.
No maltrate el cable. Nunca tire del soplador por
el cable ni tire del cable para desconectarlo del
receptáculo. Mantenga el cable alejado del calor, el
Other manuals for BLVE12-M
1
Table of contents
Languages:
Other Senix Blower manuals


Popular Blower manuals by other brands


Craftsman
Craftsman 151.30382 Operator's manual

Keyang
Keyang KPB-6030DM Manual for use

Masport
Masport BL25 Owners manual and use manual

Performance Tool
Performance Tool W50063 owner's manual

Tempest
Tempest Power Blower Direct-Drive Series owner's manual

ADEO Services
ADEO Services YT6201-13 Assembly, Use, Maintenance Manual