Sensorex S675 Instruction sheet
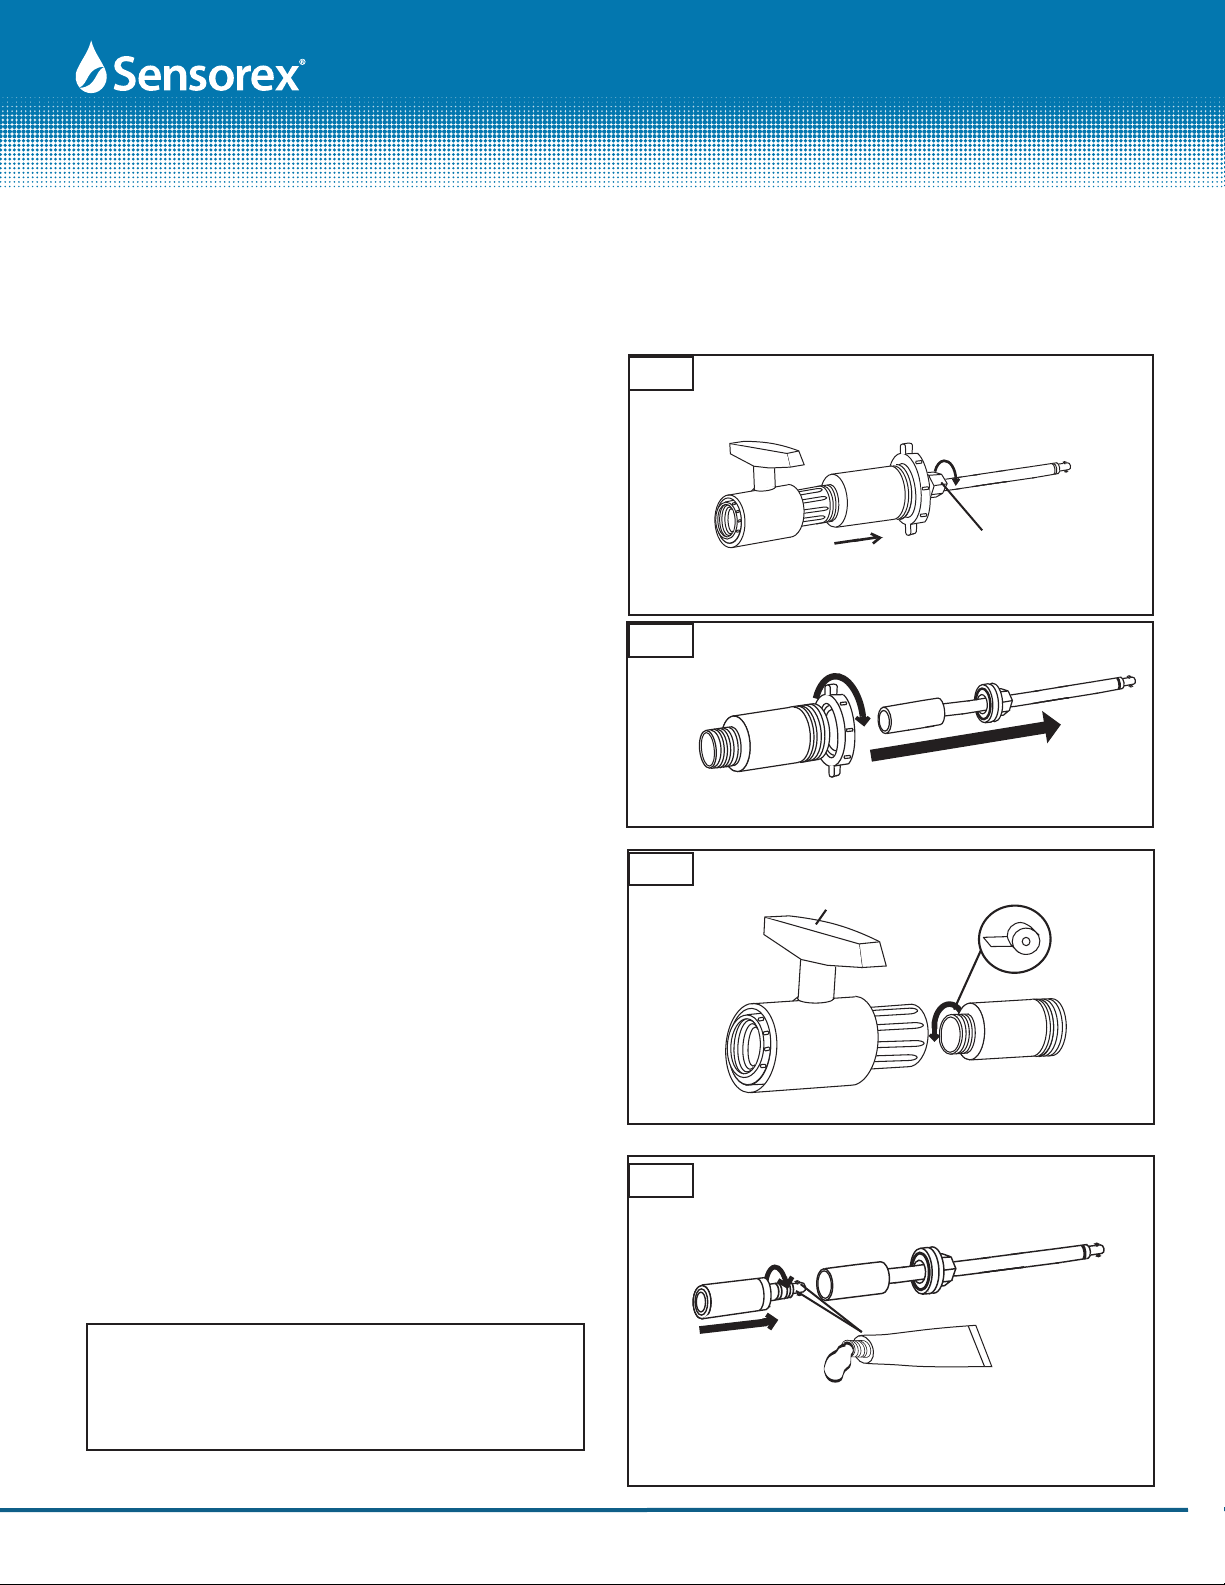
RETRACT INTO
HOUSING UNTIL
YOU HEAR A
CLICK
TURN
COUNTER-
CLOCKWISE
BEFORE
RETRACTING
ROD
Mechanical Installation
FIG. 1
FIG. 2
Description of Parts
S675 Insertion assembly with 12" insertion depth, 18" total length.
S676 Insertion assembly with 18" insertion depth, 24" total length.
S677 Insertion assembly with 24" insertion depth, 30" total length.
1. Unscrew the hex nut from the adapter body and retract rod
into body until you hear a“CLICK”(FIG 1)
2. Unscrew the white or black nut from the adapter body and
pull out the insertion tube and the parts mounted on it as
shown in FIG. 2.
3.Thread body assembly into 1”full-port ball-valve (user sup-
plied) as shown in FIG. 3. Be sure and seal threads with Pipe
Thread Sealing Tape.
4. Install electrode into rod assembly by pushing electrode
into large end of rod and rotate to align connector as shown
in FIG. 4. Apply liberal amount of 0-ring grease to o-rings on
electrode. After engaging connectors, rotate 1/4 run to lock
electrode in place. DO NOT INSERT INSERTION ROD
ASSEMBLY INTO SOLUTION WITHOUT ELECTRODE AT-
TACHED!!!
5. Insert rod into body assembly until o-ring face seal seals
against body. Then slide white nut over rod from back side
and tighten onto body. (FIG. 5)
6. Open ball valve then loosen hex nut and push rod into de-
sired position. Tighten nut to hold position.(FIG. 6)
7. Push cap cable assembly into insertion rod and rotate to
align tabs of BNC receptacle on rod with grooves of BNC in cap.
BALL
VALVE
CLOSED
THREAD
ASSEMBLY
INTO BALL
VALVE
CLOCKWISE
1/4 TURN
CLOCKWISE
AFTER PUSHING IN
ALIGN TABS
AND PRESS IN
TO ENGAGE
FIG. 3
FIG. 4
SILICONE O-RING GREASE
Grease all o-ring seals
before installation
HEX NUT
CAUTION: MAKE SURE ELECTRODE IS ORIENTED AS
SHOWN IN FIG 4. OR WITH GLASS POINTED DOWN-
WARD WHEN INSTALLING OR REMOVING SO THAT
LIQUID CANNOT FLOW BACK INTO THE INTERNAL
CONNECTOR!
Insertion/Wet-Tap pH and ORP Assembly (No ATC)
Product Instructions
PRODUCT INSTRUCTION SHEET
Page 1 of 3
Parts covered by this product data sheet include:
S675, S676, S677
Form: InstallInsert [Rev: 2012-05-16]
©2011 Sensorex Corporation

BALL VALVE
OPEN
ELECTRODE INSERTED
THROUGH BALL VALVE
INTO PIPE OR TANK
1/4 TURN
Electrical Connections
FIG. 5
FIG. 6
FIG. 7
BALL
VALVE
CLOSED
STEEL WASHER
O-RING
FACE SEAL
ELECTRODE
WHITE
RETAINER NUT
Mechanical Removal
1. Remove cable assembly. This is reverse of step 7 (FIG.7) in
Mechanical Installation.
2. Loosen the hex nut and retract rode into body until you
hear a "CLICK"
3. Remove the large white nut by turning counterclockwise
and remove rod assembly with electrode attached as shown in
FIG. 9.
4. Remove electrode by grasping rod in one hand and rotating
the electrode cartridge 1/4 turn. Then pull the electrode and
rod assembly apart as shown in FIG. 10.
RETRACT INTO
HOUSING UNTIL
YOU HEAR A
CLICK
TURN
COUNTER-
CLOCKWISE
BEFORE
RETRACTING
ROD
FIG. 8
The cable assembly connects the electrode to the pH pre-
amplifier, transmitter or meter. It is usually supplied with
connector(s) to match those of the pH meter. S653 cap cable
Insertion/Wet-Tap pH and ORP Assembly (No ATC)
Product Instructions
PRODUCT INSTRUCTION SHEET
Page 2 of 3
Parts covered by this product data sheet include:
S675, S676, S677
Form: InstallInsert [Rev: 2012-05-16]
©2011 Sensorex Corporation

1/4 TURN AND
PULL TO REMOVE
Cable Considerations
To install the cable in conduit, a threaded cable cap assembly
should be used (S653). Before the main rigid conduit a length
of flexible conduit (at least 6"longer than the insertion rod
should be used so that the insertion rod can completely clear
the adapter body (large body with 1" NPT that threads into ball
valve) for removal or the electrode.
Part number Minimum Length Flexible Conduit
S675 24"(61cm)
S676 30" (76cm)
S677 36" (91cm)
FIG. 9
FIG. 10
BALL
VALVE
CLOSED
STEEL WASHER
O-RING
FACE SEAL
ELECTRODE
WHITE
RETAINER NUT
CAUTIONS:
1) DO NOT INSERT INSERTION ROD ASSEM-
BLY INTO SOLUTION WITHOUT ELECTRODE
ATTACHED!!!
2) MAKE SURE ELECTRODE IS ORIENTED AS
SHOWN IN FIG 4. OR WITH GLASS POINTED
DOWNWARD WHEN INSTALLING OR RE-
MOVING SO THAT LIQUID CANNOT FLOW
BACK INTO THE INTERNAL CONNECTOR!
Insertion/Wet-Tap pH and ORP Assembly (No ATC)
Product Instructions
PRODUCT INSTRUCTION SHEET
Page 3 of 3
Parts covered by this product data sheet include:
S675, S676, S677
Form: InstallInsert [Rev: 2012-05-16]
©2011 Sensorex Corporation
This manual suits for next models
2


