Iso ISOJET Cleaner 6 User manual

AktionAktion
Print. GF 21 /11Print. GF 21 /11Print. GF 21 /11Print. GF 21 /11
Welding with you!Welding with you!
Instruction manual
DC
Instruction manual
DC
Type ISOJET Cleaner 6
Red = primary voltage 110 V
Type ISOJET Cleaner 6
Blue = primary voltage 230 V

ISO-Oerlikon AG Schweisstechnik
Hauptstrasse 23 CH - 5737 Menziken - Tel.: +41 (0) 62 771 83 05 - Fax: +41 (0) 62 771 84 54 - E-Mail: [email protected]

ISO-Oerlikon AG Schweisstechnik
Hauptstrasse 23 CH - 5737 Menziken - Tel.: +41 (0) 62 771 83 05 - Fax: +41 (0) 62 771 84 54 - E-Mail: [email protected]

ISO-Oerlikon AG Schweisstechnik
Hauptstrasse 23 CH - 5737 Menziken - Tel.: +41 (0) 62 771 83 05 - Fax: +41 (0) 62 771 84 54 - E-Mail: [email protected]
Features / Short description
Cleaning (with ISOL N or ISOL C uids)
Deep pore cleaning of stainless steel surfaces. Remove the electrochemical from harmful ferrites
(which can lead to corrosion) which cause contamination on the surface down to the depths. In par-
ticular: Tarnish from TIG welding or other tarnish, rust, surface contaminations or inscriptions etc. are
easily and safely removed without removing the surface protection. By cleaning with Surnox Green
- the oxide skint of the metal is repaired more quickly.
Electropolishing (with ISOL GZ - uid)
Torch at the -pol (red plug on red socket) the more often the surface is run over, the softer the surface
becomes and the gloss level increases. Electropolishing is used for decorative purposes, for example
facade sheet metal and jewellery. It is used in pipeline and tank construction. Electropolishing is also
used in medical technology. Electropolishing reduced germ adherence.
Electrochemical marking (with ISOL ES 2 (non toxic) and ISOL ES - dark but toxid uid)
Easy way a picture / number - anything that can be printed - on a piece of metal, mainly stainless steel
(Inox) to etch up. The marking can be used for labelling in production and safety engineering and for
labelling in quality mangement. It is the application of certain characteristics (the brand or marking on
objects). Making a movie requires a ti/eps/ or jpeg le. Then a tool is manufactured for making print
lms - which are used with ISOL ES 2 and the ISOJET Cleaner 6 to make a mark using electrochemi-
cals. The print lms can be reordered at any time.

Welcome
Congratulations and thank you for choosing our Carbon Cleaner 6.
This operation instructions have been designed to assist you in getting the most out of your product.
Please take time to read the safety features carefully. They will help you to protect yourself from po-
tential hazards in the workplace. With proper maintenance, this equipment should provide years of
reliable operation. All your systems comply with ISO9001:2000 quality specications and are indepen-
dently tested by NQA.
The entire product range bears the CE mark and has been manufactured in accordance with the Eu-
ropean Guidlines and product-specic standards. To ensure your safety and that of other users, we
recommend that you read this manual carefully and fully understand it before installing and use. Our
products have a warranty period of one year, from the purchase date.
About the device
With your new ISO-JET Cleaner 6 you have acquired an ecient and exible system for gentle and
fast removal of weld tarnish on stainless steel from material no. 1.4301 and higher. The unit is specially
designed for very easy and fast handling. The set-up times are minimal. Plug and Work ....a few simple
steps and you are „cleaning“, thanks to the carbon technology on at seams as well as in llet welds
or in hard to reach corners without changing electrodes. And when your work is nished, the system
can be put away as quickly as it was set up.
The extremely durable, robust stainless steel construction is designed for tough workshop use. The
system is also characterized by low costs in consumable parts and helps you to stay competitive. The
accessories are constantly being developed further, you prot from it.
Clarication notes
The warning sign indicates all important instructions for safety. Always follow these
instructions, otherwise serious injuries may result. The labelling of each device parts
conforms to that of the replacement and accessories part.
Use of operating instructions
Please read the manual carefully before using the device. This manual cannot consider every thinka-
ble operation. For further information or in the event of problems that are not covered here in detail
please contact your nearest dealer or the manufacturer directly.
Accessories not included in the basic set are supplied with additional, supplementary instructions.
Keep this operation instruction in a safe place, if necessary, pass them to any additonal users.

Important note regarding product liability
Due to the EU-Guidelines in force since 01.01.1990, the manufacturer is liable for his product only
if all parts originate from the manufacturer and the device was correctly assembled and operated. If
third-party accessories or replacement parts are used, the liability and the warranty may be comple-
tely or partially invalid. With original Carbon Cleaner 6 accessories and replacement parts you have a
guarantee that all safety requirements are fullled and you benet from ongoing further development.
Safety instructions
Safe working with the Cleaner 6 is only possible if you read the instruction manual and the safety ins-
tructions completely and strictly follow them.
1. The use of the Cleaner 6 is only permitted in the commercial and industrial area.
2. Keep your workplace tidy. Disorder in the work area promotes the risk of accidents.
3. Protect your eyes with tight-tting glasses or use face shield.
4. To avoid allergies (e.g. nickel), gloves made of latex, vinyl or similar should be worn.
5. Ensure sucient ventilation. If possible use an extraction system.
6. Take environmental inuences into account. Ensure good lighting. Do not use the Cleaner 6 near
by ammable substances (sparking).
7. Keep away from children. The chemicals contain partly toxic substances.
8. The operator must be at least 18 years old, trainees at least 16 year old, but only under supervision.
9. Eletromagnetic elds can aect pacemakers. Persons wearing these devices are not allowed to
work with the Cleaner 6.
10. Do not overload the Cleaner 6. Do not make short circuits. You will work better and safer in the
specied power range.
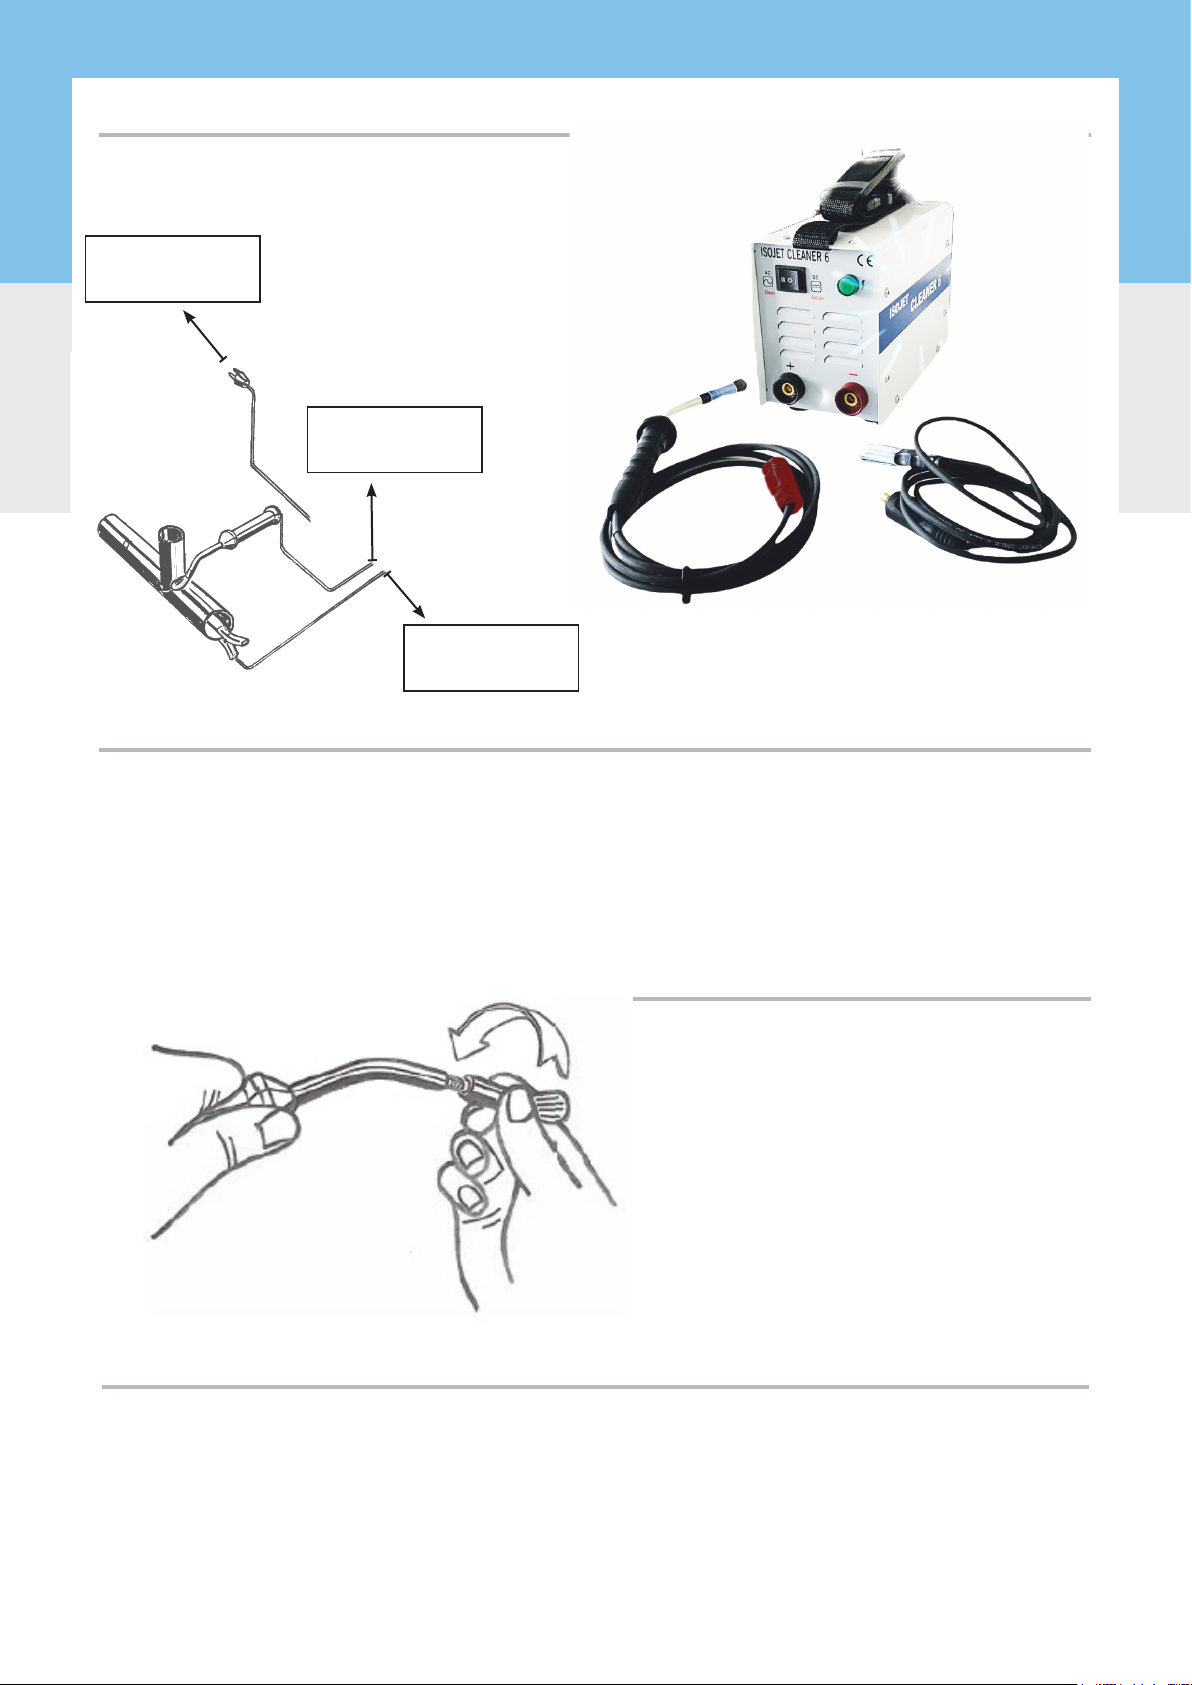
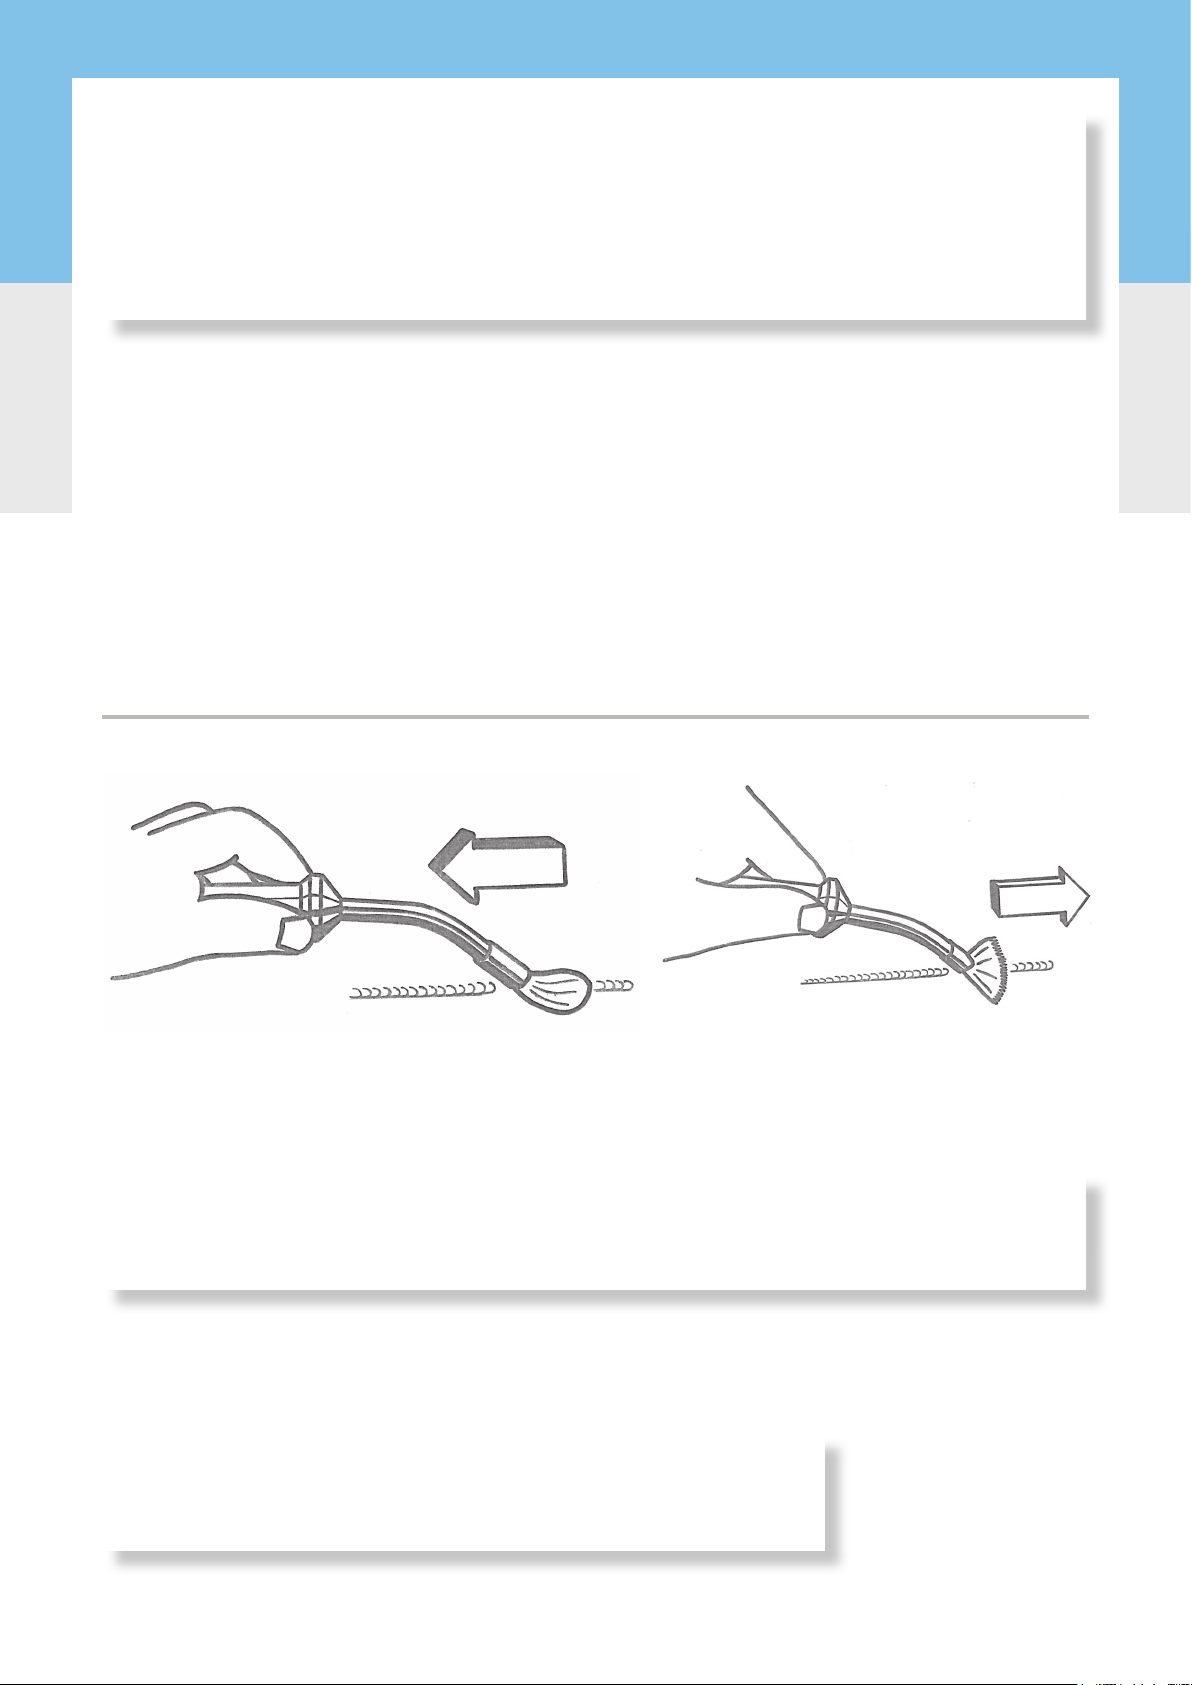
11. Use the correct tools. Use the attachments (carbon brush/electrode) appropriately.
12. Wear suitable clothing. The chemicals may cause discoloration on items of clothing.
13. Do not misuse the cables and hoses. Do not carry the Cleaner 6 by the cable. Check from time to
time wether the cables and hoses are damaged. Replace defective cables and hoses in good time.
14. Save the workpiece. Use holding devices to secure the tool, it is safer than being held by your
hand.
15. Do not overstretch your standing area. Avoid abnormal postures.
16. Ensure secure footing and maintain your balance at all times.
17. Take special care of your Cleaner 6.
18. Keep your device clean and clean it with soapy water or with SURFINOX N.
19. Unplug the power cord when not in use, maintenance etc.
20. Avoid unintended operation. Make sure that the Cleaner 6 is not damaged by tools, sheet metal,
welding tables etc.

21. Extrension cords: use only tested extention cords.
22. Chemical safety instructions: Observe the safety instructions axed to the chemical containers
safety instructions, the safety data sheets and the local regulations.
23. Never leave the applicator unattended on the worktable when the unit is switched on, the carbon
brush overheats on contact with the table.
24. The ISOJET Cleaner must be operated from a socket outlet which is also protected by an FI.
Device protection
• Make sure that the attachments (carbon brush/electrode) are securly seated.
• Lightly tighten the carbon brush/electrode by hand.
• Ensure clean contact for the plugs and tight connection for the hoses.
• Check the supply cables and hoses regularly.
• Use only original accessories and chemicals.
• Do not opern the device, protect it from hard knocks, store the Cleaner 6 dry and frost-proof
(chemicals).
Operation
The device is tested and delivered immediately ready for use. Only the rst carbon brush must be
installed. Remove the basic unit and the accessories from the delivery carton and the appropriate
correponding protective polyethylene bags.
Dispose of the packaging material separately for recycling or at a collection point for recyclable
materials. Remove one carbon brush from the blister pack. The remaining replacement brushes in the
blister pack and the rell container with ISO-JET ISOL C can be stored away. You will not need these
products for quite a while.
Unwind the cables from the drum and connect the device according to the drawing.
If the workpiece does not permit direct clamping of the mass tongs, you can make a connection using
screw clamps, clamping pliers, etc. Avoid scraches on visible places.
Before plugging the device into the mains socket, make sure that the mains voltage corresponds to
the specication on the back of the device!

Connections
The connections are arranged in a proteced manner and are located in the lower cylindrical part of
the device. As a rule the cabels remain plugged in even at the end of work and are only unplugged or
mounted for cleaning purposes, for disentangling, for replacement, etc.
Note the color coding of the connectors.
Scheme workpiece connection
Carbon brush assembly to the applicator handle
You have received 2 x 5 pieces of carbon brushes with the basic set. These cover almost the entire
possible range of applications and can be used for at and llet welds, as well as for corners that are
dicult to access.
Attention
1. Do not tilt when screwing on!
2. The thread must run smoothly. Please
check occasionally for oxidation and clean
if necessary.
3. Only tighten the carbon brush attachment
lightly by hand!
red-plug
on -- pol =
red socket
Mains-plug
red=110V
blue= 230V
Ground clamp
on black +pol.

The Work
Attention!
The used electrolytes are strongly acidic. Splashes in the eyes can cause serious damage.
Wear protective glasses and gloves. Observe the labels on the containers and the safety
data sheets.
With the unit you have selected, the carbon brush is wetted by simply dipping the brush into the
electrolyte. This wetting is what makes the current ow from electrode to workpiece possible in the
rst place. It also serves to cool the bers and thus considerably reduce wear on the carbon brushes.
Always use the spplied square bottle for immersion. This special bottle, with a large opening, is opitmal
in handling an very stable. The bottle can be closed absolutely tightly after use.
Note: During use, the electrolyte gradually turns black.
These color changes are normal and usually do not
aect the cleaning process.
When the bottle is empty, it is advisable to clean it with
absorbent paper and then to rell with a new electrolyte
from the ISO-JET ISOL C rell bottle.
Immerse the carbon brush into the
electrolyte until it is fully soaked.
Especially when the brush is still new
and cold, it may take a moment until
it is well wetted with electrolyte. Strip
the brush at the edge to save and
avoid dripping. To prevent unnec
wear on brushes, they need to be
wet. (cooling).

Attention! Avoid inhalation of the vapors. Ensure sucient ventilation!
Use extraction systems whenever possible.
Note! Dripping electrolyte can cause irreversible stains on marble
or on other sensitive surfaces.
Glide the brush using a slight pulling motion, not pushing, over the seam to be cleaned. High
pressure only causes increased wear on the brush. Remember that the stream should do the work.
Avoid scraping the brush socket on the workpiece!
Right Wrong
With this method, the cleaning is not always immediately visible!
Tip: By wiping with a moist cloth, the result is quickly seen and
removes excess electrolyte solution.
Attention! Only tighten lightly by hand !
If the brush is not used for a longer period of time
unscrew and wash with water if necessary !
Using carbon brushes (article no. ISO7000051) the following should be noted.

You also have the option of using art. no. K7000008, which allows you to adjust the hardness of the
brush in a wide range by moving a Teon sleeve. Especially for small seams in tight situations this can
be an advantage!
Depending on the heat input during the welding process, the seam must be run over several times to
remove the oxidation completely. The darker the seam, the longer the cleaning phase. Burns due to
too high temperature, lack of shielding gas, etc. cannot be removed metallically as they are not longer
conductive.
These must be removed mechanically. Pay attention to any excess electrolyte that may run o. It can
cause unsightly runs. Remove excess electrolyte from the workpiece with the cleaning rag and a litte
water.
After cleaning, the seam must always be cleaned with water to remove oxide residues. For demanding
applications, Carbon Cleaner 5 N can be applied by using of a pump sprayer. This product neutralizes
the electrolyte and improves the passivation of the surface of the workpiece.
After drying, a stainless steel care uid such as MCT 900 S can be applied. These products eectively
protect against dirt, ngerprints and other enviroment inuences indoors. The chrome steel retains its
shine.

Parking the applicator
During work interruptions and when transporting the device, switch o the device and place the
applicator in the handle recess provided for this purpose. When transporting the device, wrap the
cables around the device drum. You can grip the applicator at the same time when carrying it. The
mass clamp is usually clamped to the rear equipment nipple.
Troubleshooting
Problem Cause Solution
No cleaning power source not switchen on
power source not on mains
Ground terminal not connected
Ground terminal oxidized
Applicator not connected
No electrolyte on the brush
Overtemperature - thermal protection
Switch on power source (red LED)
Connect to the power source
Check terminals connection
Clean clamp
Check applicator connection
Dip brush in electrolyte
Allow power source to cool down
Consumables & Replacement Parts
K940459 Electrolyte ISOL N (standard cleaning uid) 250 ml PU / 1 Pc.
K940461 Electrolyte ISOL N (standard cleaning uid) 1 kg PU / 1 Pc.
K940464 Electrolyte ISOL N (standard cleaning uid) 3 kg PU / 1 Canister
K940462 Electrolyte ISOL N (standard cleaning uid) 10 kg PU / 1 Canister
K940463 Electrolyte ISOL N (standard cleaning uid) 220 kg barrel PU / 2 barrel / Pal
K11022 Surnox N (Neutralizer & Cleaner) 250ml spray PU / 1 Pc.
K940604 ISOL ES Marking Fluid Black (toxic) 250ml Can PU / 1 Pc.
K940601 ISOL ES Marking Fluid Black (toxic) 500ml Can PU / 1 Pc.
K940600 ISOL ES 2 Marking Fluid Grey (NON-toxic) 250ml Can PU / 1 Pc.
Problem Cause Solution
Wave optics eect too little movement with the brush Move brush more
Poor cleaning Brush worn
Contact error brush
Contac error ground
Diluted electrolytes
Seams almost burnt
Replace brush
Clean thread
Check mass connection
Use new electrolyte
Introduce less heat into the seam
during welding
Brushes wear out too
quickly
Brush bumping against bers
too much work pressure
too little electrolyte
too rough weld seam
glide over sharp edge
pull with the bers
reduce pressure
more immerse to cool
cleaner welding
always work away from edge

Spare Parts
K7000014 Electrolyte ISOL Nature (ECO friendly cleaning) 1 Lt PU / 1 Pc.
K7000033 Electrolyte ISOL Nature (ECO friendly cleaning) 250 ml PU / 1 Pc.
K7000029 Electrolyte ISOL C (ECO friendly cleaning) 3 Lt. PU / 1 Pc.
5900101 Electrolyte (Polishing) ISOL GX 1 Lt. PU / 1 Pc.
5900102 Electrolyte (Polishing) ISOL GX 250 ml PU / 1 Pc.
ISO7000051 Carbon-brush-SET standard 1 Set= 5 Pc PU / 1 Set
ISO7000050 Carbon-brush-SET with Silikon-Shell 1 Set= 5 Pc PU / 1 Set
ISO7000052 Carbon Silikon-Shell to brushes 1 Set=10 Pc. PU / 1 Set
ISO7000027 Applicator with connecting cable, Plug Red, SK25 1 Pc L= 2,6m PU / 1 Pc.
ISO7000028 Ground cable with terminal 60A, Black, SK 25 1 Pc L= 1,85m PU / 1 Pc.
ISO7000006 ISOJET Cleaner 6 power source (without acc.) 110 V PU / 1 Pc.
ISO7000004 ISOJET Cleaner 6 power source (without acc.) 230 V PU / 1 Pc.
Spare Part
1 Switch AC/DC selector switch 6 Feet
2 LED Display 7 Ventilator
3Socket (A=Red) Socket (B=black) 8Equalizer board
4Transformer (A=230V ) (B=110V) 9On/O-Switch
5External housing (Red 110V) (Blue 230V) 10 Primary connector socket without
cable
1
2
5
4
10
7
6
9
8
3

AktionAktion
Table of contents
Other Iso Welding Accessories manuals
Popular Welding Accessories manuals by other brands

iWeld
iWeld GORILLA MULTIFLUX 153 SYNERGIC NOGAS user manual

Abicor Binzel
Abicor Binzel ABIMIG A operating instructions

ESAB
ESAB Origo Feed 304 P4 User manual and spare parts

ESAB
ESAB A6 S Arc Master instruction manual

STAYER WELDING
STAYER WELDING AS-0 operating instructions

Lincoln Electric
Lincoln Electric 180C Technical specifications