Sequoia Advantage Series User manual
Congratulations
,
You
have
a
brand
new
Sequoia
Advantage
Central
Vacuum
Accessory
Kit
.
Use
this
kit
along
with
any
central
vacuum
system
to
help
you
efficiently
clean
your
home
.
We
stand
behind
our
products
and
hope
to
earn
your
trust
and
support
.
Happy
cleaning
!
This
manual
covers
safety
,
operations
and
maintenance
of
your
hose
and
tool
kit
.
All
information
in
this
publication
is
based
on
the
latest
product
information
available
at
the
time
of
printing
.
Seqouia
Central
Vacuum
reserves
the
right
to
make
changes
at
any
time
without
notice
and
without
incurring
any
obligation
.
No
part
of
this
publication
may
be
reproduced
without
prior
written
permission
.
This
manual
should
be
considered
a
permanent
part
of
your
vacuum
system
and
should
remain
with
the
vacuum
system
after
purchase
and
installation
.
If
any
problems
should
arise
,
or
if
you
have
any
questions
about
your
hose
and
tool
kit
,
consult
Sequoia
Central
Vacu
-
um
at
1
-
800
-
234
-
6268
,
or
visit
our
comprehensive
website
.
Sequoia
,
ADVANTAGE
SERIES
OWNER
’
S
MANUAL
Sequoia
Advantage
Vacuum
Kit
Sequoia
Advantage
Vacuum
Kit
includes
:
•
Sequoia
Advantage
Vacuum
Power
Brush
•
Crushproof
Electric
Hose
•
13
”
Axis
Floor
Brush
•
Dusting
Brush
•
Upholstery
Tool
•
12
”
Crevice
Tool
•
Integrated
Telescopic
Wand
•
Telescopic
Button
Lock
Wand
•
Mesh
Tool
Caddy
•
Wire
Hose
Hanger
•
Clip
-
on
Tool
Caddy
Full
Two
-
Year
Warranty
Sequoia
Central
Vacuum
,
warrants
the
Sequoia
Advantage
Power
Brush
and
attachment
kit
from
defects
in
material
and
workmanship
under
normal
household
usage
for
a
period
of
two
2
-
years
from
date
of
purchase
.
This
warranty
does
not
include
damage
to
the
product
resulting
from
accident
,
misuse
,
commercial
applications
or
if
repairs
have
been
performed
by
unauthorized
personnel
.
Ordinary
wear
and
tear
is
also
not
covered
under
this
warranty
for
parts
such
as
belts
and
bulbs
.
If
the
product
should
become
defective
within
the
warranty
period
,
or
for
questions
regarding
the
warranty
or
service
,
first
call
the
original
Authorized
Dealer
from
whom
the
purchase
was
made
.
If
that
dealer
is
not
available
within
a
reasonable
period
of
time
,
please
call
Sequoia
Customer
Service
at
1
-
800
-
234
-
6268
.
A
return
authoriza
-
tion
number
will
be
required
for
items
sent
to
Sequoia
Central
Vacuum
.
The
customer
is
responsible
for
the
cost
of
sending
any
item
to
Sequoia
Central
Vacuum
.
Returned
items
that
are
repaired
under
warranty
will
be
repaired
and
returned
for
free
.
Sequoia
reserves
the
right
to
replace
the
product
with
one
of
equal
or
greater
value
.
12
/
17
WHEN
USING
AN
ELECTRICAL
APPLIANCE
,
BASIC
PRECAUTIONS
SHOULD
ALWAYS
BE
FOLLOWED
,
INCLUDING
THE
FOLLOWING
:
IMPORTANT
SAFETY
INSTRUCTIONS
Read
these
operating
instructions
carefully
.
Do
not
suck
up
matches
,
ash
or
cigarettes
that
are
still
burning
.
Be
sure
hose
is
inserted
securely
into
the
inlet
valve
before
attempting
to
vacuum
Do
not
suck
up
flammable
liquid
materials
or
any
other
liquid
material
.
•
Always
keep
hands
,
feet
,
hair
and
clothes
away
when
vacu
-
uming
.
•
Do
not
use
on
any
wet
sur
-
faces
.
Avoid
vacuuming
hard
or
sharp
objects
or
damage
may
result
.
Do
not
leave
the
vacuum
on
unattended
and
do
not
allow
the
vacuum
to
be
used
as
a
Do
not
vacuum
over
electri
-
cal
cord
.
It
can
become
tangled
and
create
and
electrical
hazard
.
toy
.
•
Do
not
leave
hose
plugged
in
when
not
in
use
or
during
ser
-
vicing
of
your
central
vacuum
Do
not
handle
hose
,
outlets
or
vacuum
unit
with
wet
hands
.
unit
•
Do
not
put
any
objects
into
openings
.
Do
not
use
with
any
openings
blocked
:
keep
free
of
dust
,
lint
,
hair
,
and
anything
that
may
reduce
air
flow
Use
only
as
described
in
this
manual
.
Use
only
manufacturer
’
s
recommend
-
ed
attachments
.
Page
2
Installing
your
hose
hanger
Install
your
hose
hanger
close
to
your
general
use
area
.
The
most
common
installation
is
in
an
entry
or
utility
closet
.
Install
at
shoulder
/
chest
height
and
use
appropriate
wall
anchors
to
secure
the
hose
hanger
’
s
two
metal
back
posts
.
Installing
your
tool
caddy
on
the
hose
hanger
After
the
hose
hanger
is
mounted
,
simply
hang
the
caddy
’
s
handle
over
the
entire
hose
hanger
,
not
on
the
front
hooks
.
Install
your
wand
wall
clamp
on
a
stud
at
chest
level
using
drywall
mounting
anchors
.
Coiling
your
hose
Either
place
one
end
of
the
hose
on
the
ground
or
draped
over
the
hose
hanger
.
Grabbing
large
sections
of
hose
,
twist
it
as
you
lay
it
down
in
four
or
five
circles
.
For
best
results
disconnect
attachments
before
coiling
.
Assembling
and
starting
Step
1
:
Stretch
out
the
new
hose
and
let
it
relax
.
Extend
your
telescopic
wand
by
holding
the
plastic
lever
down
and
lifting
the
top
section
up
.
Step
2
:
Slide
the
tapered
end
of
the
wand
into
the
neck
of
the
power
brush
by
aligning
the
button
lock
with
the
button
hole
.
Step
3
:
Insert
the
short
metal
hose
end
into
the
inlet
valve
.
If
your
hose
has
a
cord
on
it
,
plug
it
into
the
nearest
electrical
outlet
.
Depress
hose
handle
rocker
switch
to
left
for
suc
-
tion
only
(
position
“
I
”
)
,
depress
to
right
for
suction
and
electric
power
brush
(
position
“
II
”
)
.
Both
are
turned
off
at
position
“
0
”
.
DETACHING
:
To
detach
hose
handle
simply
push
the
button
lock
in
and
pull
apart
.
How
to
switch
hose
to
direct
connect
:
If
your
vacuum
wall
inlet
plates
accommodate
direct
electrical
pin
connections
then
switch
the
hose
from
“
corded
”
to
“
direct
connect
”
using
the
included
two
pin
plug
.
Simply
slide
the
hose
cuff
off
the
end
of
the
hose
and
replace
the
cord
assembly
with
the
prong
assembly
.
Depress
the
plastic
tab
under
the
sticker
to
remove
cuff
.
Use
needle
nose
pliers
to
remove
and
reattach
the
wire
connections
.
*
*
*
TURN
POWER
OFF
(
HOSE
“
0
”
POSITION
)
BEFORE
DISCONNECTING
THE
HOSE
HANDLE
OR
THE
HOSE
FROM
THE
WALL
INLET
*
**
6
=
^
Direct
electrical
connection
Inlet
valves
may
be
installed
with
the
lid
in
other
posi
-
tions
.
Clip
-
on
Tool
Caddy
1
.
Attach
the
clip
-
on
tool
caddy
to
the
upper
wand
by
pressing
it
on
or
sliding
over
the
unattached
wand
.
2
.
Insert
up
to
three
attach
-
ments
.
f
'
f
'
ri
Corded
electrical
connection
—
Plug
into
closest
electrical
outlet
.
Page
5
ft
.
'
*
-
V
^
'
d
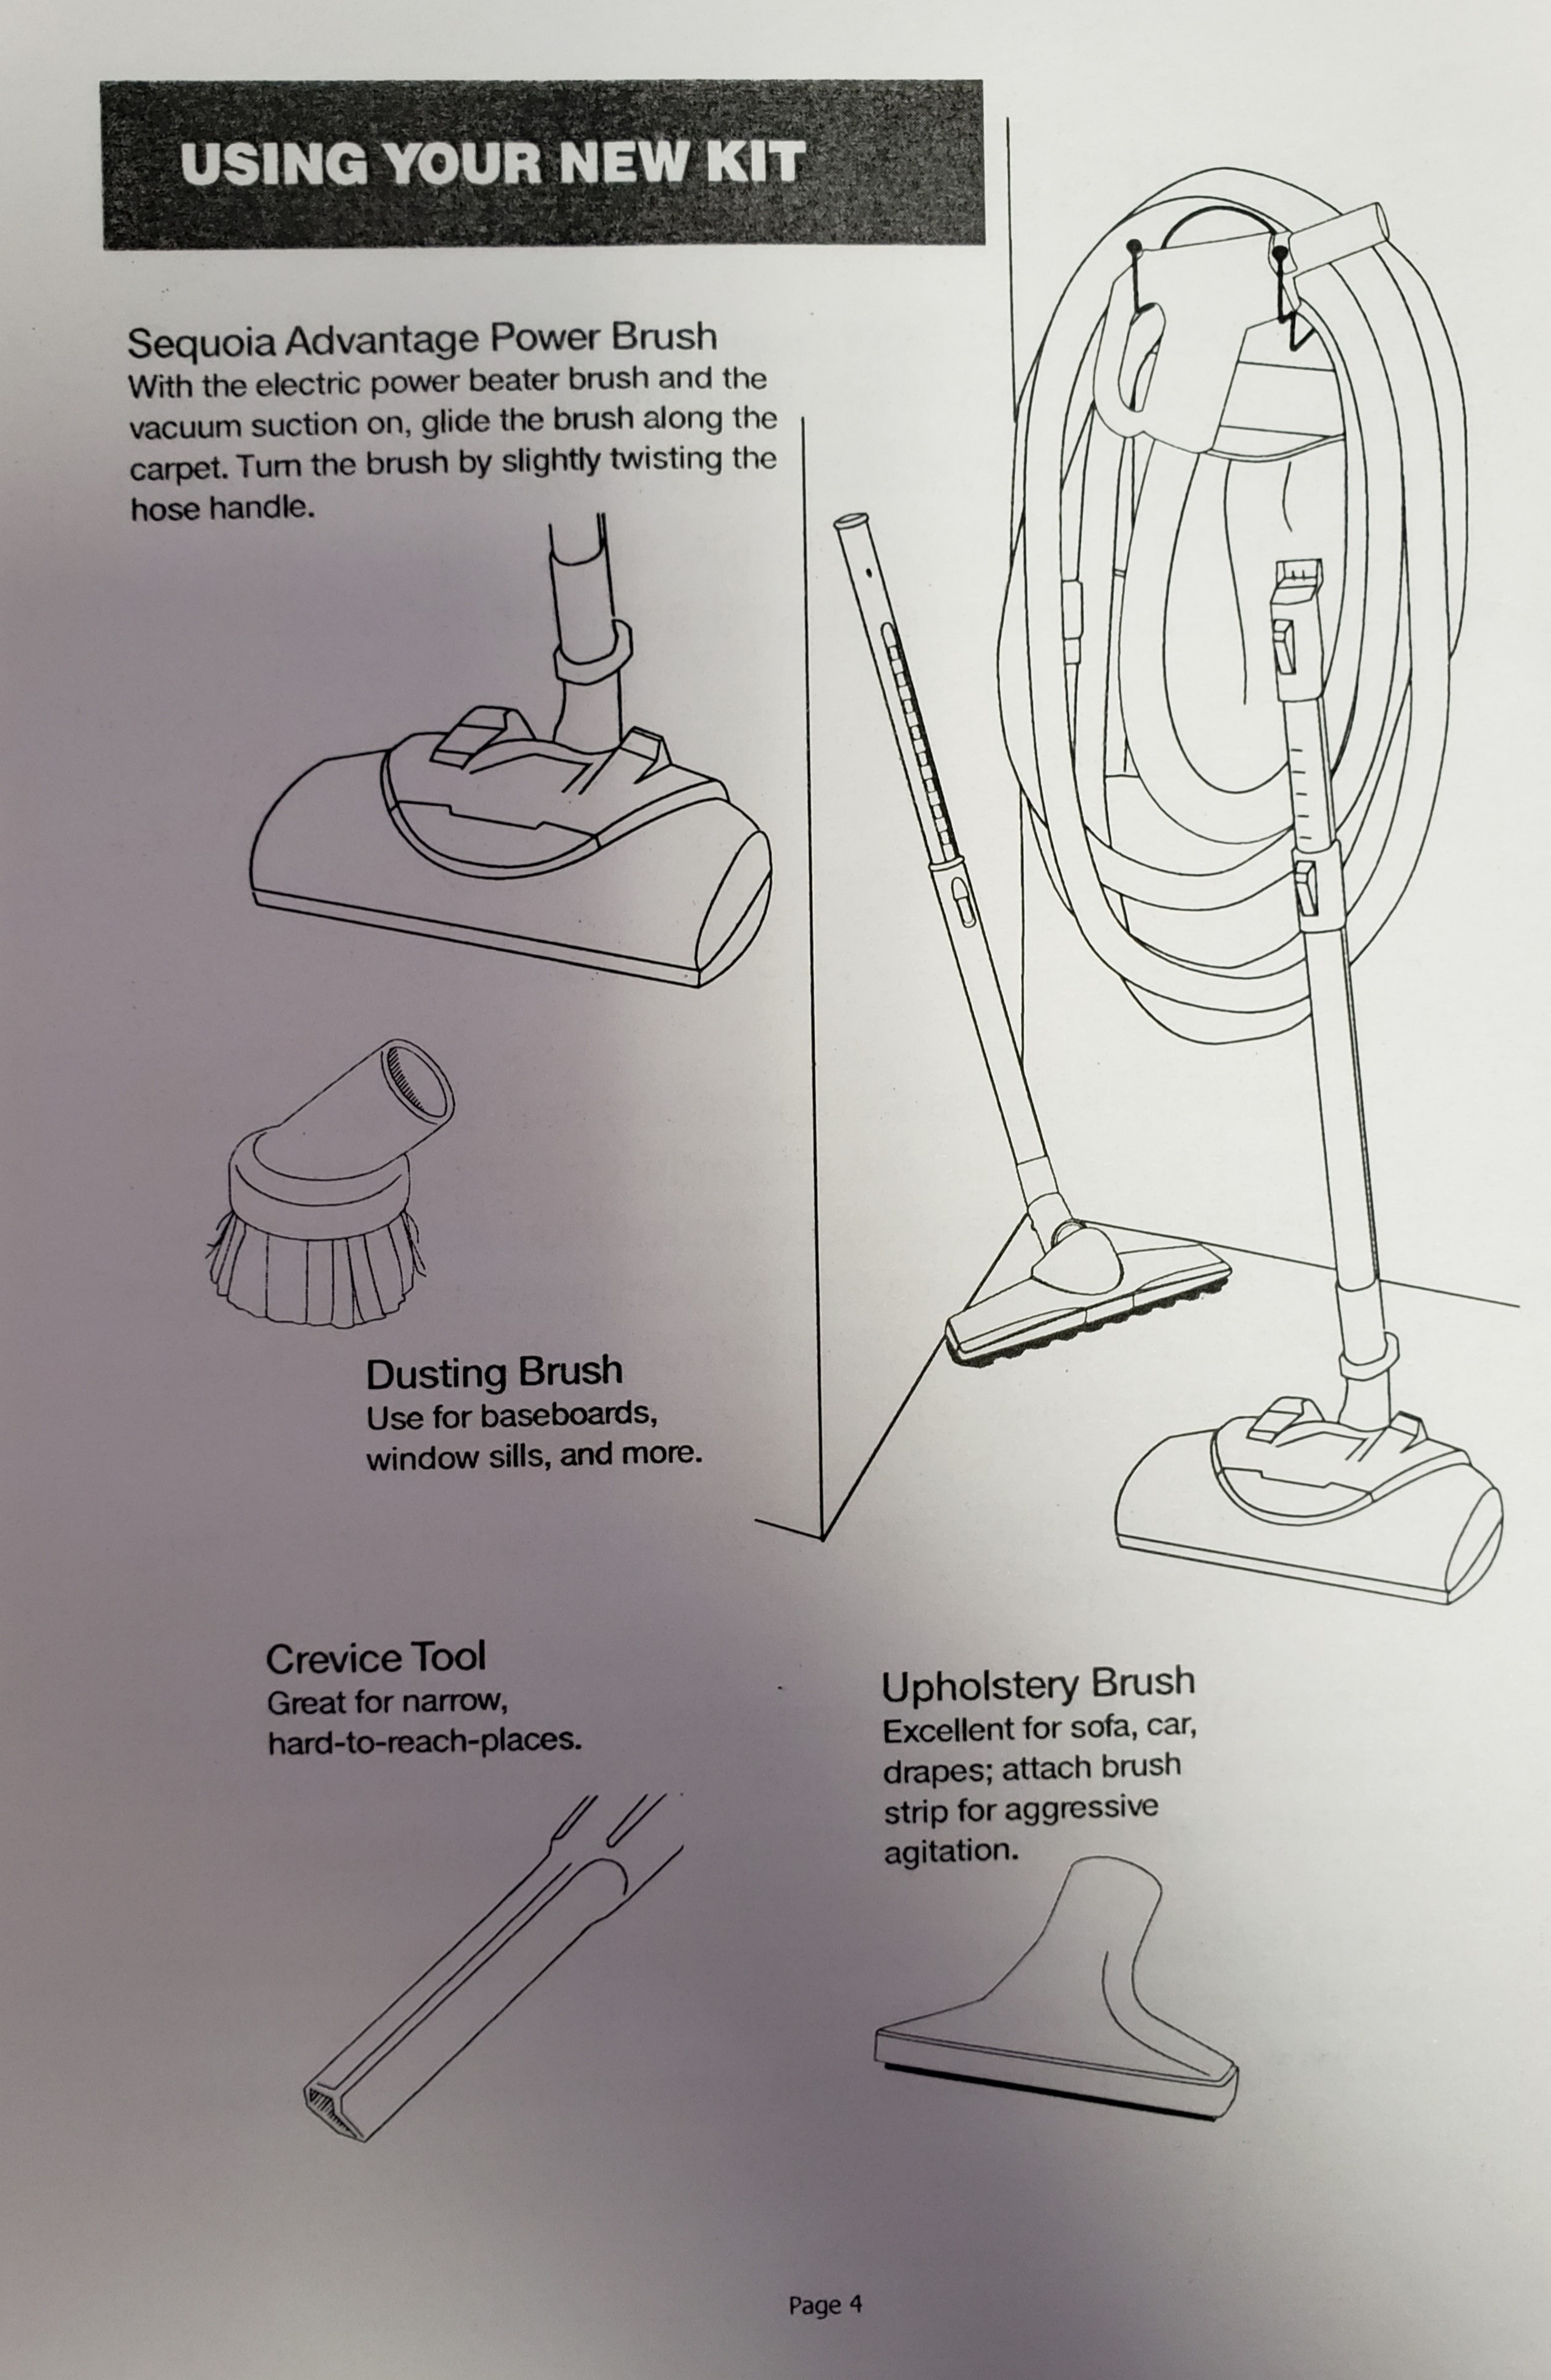
USING
YOUR
NEW
KIT
Sequoia
Advantage
Power
Brush
With
the
electric
power
beater
brush
and
the
vacuum
suction
on
,
glide
the
brush
along
the
carpet
.
Turn
the
brush
by
slightly
twisting
the
hose
handle
.
Dusting
Brush
Use
for
baseboards
,
window
sills
,
and
more
.
Crevice
Tool
Great
for
narrow
,
hard
-
to
-
reach
-
places
.
Upholstery
Brush
Excellent
for
sofa
,
car
,
drapes
;
attach
brush
strip
for
aggressive
agitation
.
/
Page
4

Installing
your
hose
hanger
Install
your
hose
hanger
close
to
your
general
use
area
.
The
most
common
installation
is
in
an
entry
or
utility
closet
.
Install
at
shoulder
/
chest
height
and
use
appropriate
wall
anchors
to
secure
the
hose
hanger
’
s
two
metal
back
posts
.
Installing
your
tool
caddy
on
the
hose
hanger
After
the
hose
hanger
is
mounted
,
simply
hang
the
caddy
’
s
handle
over
the
entire
hose
hanger
,
not
on
the
front
hooks
.
Install
your
wand
wall
clamp
on
a
stud
at
chest
level
using
drywall
mounting
anchors
.
Coiling
your
hose
Either
place
one
end
of
the
hose
on
the
ground
or
draped
over
the
hose
hanger
.
Grabbing
large
sections
of
hose
,
twist
it
as
you
lay
it
down
in
four
or
five
circles
.
For
best
results
disconnect
attachments
before
coiling
.
Assembling
and
starting
Step
1
:
Stretch
out
the
new
hose
and
let
it
relax
.
Extend
your
telescopic
wand
by
holding
the
plastic
lever
down
and
lifting
the
top
section
up
.
Step
2
:
Slide
the
tapered
end
of
the
wand
into
the
neck
of
the
power
brush
by
aligning
the
button
lock
with
the
button
hole
.
Step
3
:
Insert
the
short
metal
hose
end
into
the
inlet
valve
.
If
your
hose
has
a
cord
on
it
,
plug
it
into
the
nearest
electrical
outlet
.
Depress
hose
handle
rocker
switch
to
left
for
suc
-
tion
only
(
position
“
I
”
)
,
depress
to
right
for
suction
and
electric
power
brush
(
position
“
II
”
)
.
Both
are
turned
off
at
position
“
0
”
.
DETACHING
:
To
detach
hose
handle
simply
push
the
button
lock
in
and
pull
apart
.
How
to
switch
hose
to
direct
connect
:
If
your
vacuum
wall
inlet
plates
accommodate
direct
electrical
pin
connections
then
switch
the
hose
from
“
corded
”
to
“
direct
connect
”
using
the
included
two
pin
plug
.
Simply
slide
the
hose
cuff
off
the
end
of
the
hose
and
replace
the
cord
assembly
with
the
prong
assembly
.
Depress
the
plastic
tab
under
the
sticker
to
remove
cuff
.
Use
needle
nose
pliers
to
remove
and
reattach
the
wire
connections
.
*
*
*
TURN
POWER
OFF
(
HOSE
“
0
”
POSITION
)
BEFORE
DISCONNECTING
THE
HOSE
HANDLE
OR
THE
HOSE
FROM
THE
WALL
INLET
*
**
6
=
^
Direct
electrical
connection
Inlet
valves
may
be
installed
with
the
lid
in
other
posi
-
tions
.
Clip
-
on
Tool
Caddy
1
.
Attach
the
clip
-
on
tool
caddy
to
the
upper
wand
by
pressing
it
on
or
sliding
over
the
unattached
wand
.
2
.
Insert
up
to
three
attach
-
ments
.
f
'
f
'
ri
Corded
electrical
connection
—
Plug
into
closest
electrical
outlet
.
Page
5

CMW
Central
Vacuum
Service
Solutions
Also
available
online
at
builtinvacuum
.
com
/
flov
/
chrt
.
html
CENTRAL
VACUUM
cmwVacs
.
com
CMW
COMPANY
,
INC
.
f
AM
At
the
unit
will
it
turn
on
manually
?
Does
it
have
good
suction
at
the
unit
with
.
the
hose
?
f
Does
it
have
suction
at
the
unit
without
^
the
hose
?
Yes
Yes
No
Yes
(
No
No
(
*
Remove
inlet
.
Do
wires
leading
to
inlet
start
system
when
touched
together
?
i
When
you
turn
it
on
at
the
unit
do
you
near
a
click
?
Arc
across
the
contact
points
in
the
inlet
valve
neck
.
Does
the
power
unit
start
?
Does
the
hose
have
a
switch
on
the
handle
?
:
No
Is
it
always
running
?
Yes
(
\
j
^
Yes
No
/
SEE
\
Uiiy
No
Yes
Yes
Try
another
appliance
in
the
outlet
.
Does
it
work
?
Properly
plug
-
in
hose
to
inlet
.
Activate
the
switch
on
hose
handle
Does
power
unit
start
?
Disconnect
power
unit
from
pipes
.
Disconnect
house
low
voltage
system
.
Does
the
system
have
a
electric
brush
?
C
Yes
c
J
>
No
Ye
>
-
k
fSEE
\
(
SEE
\
ui
2
y
wmy
fSEE
\
J
No
Yes
Does
the
electric
brush
turn
on
when
activated
v
,
l
by
the
switch
?
)
,
,
,
J
^
Yes
NO
3
?
NqCCT
^
LYes
No
j
/
JU
,
Yes
No
-
L
/
SEE
\
/
SEA
(
SEE
\
/
SEE
\
SSEE
\
fSEE
\
fSEE
\
\
u
2
j
ts
#
3
>
J
Does
it
still
run
continuously
?
Good
suction
at
all
the
inlets
?
Does
the
unit
alone
have
good
suction
?
Yes
Copyright
©
10
/
2011
M
D
Manufacturing
Inc
Professional
Troubleshooting
Solutions
#
1
Electrical
failure
.
A
.
If
the
inlets
are
Supervalves
,
plug
the
power
brush
directly
into
the
valve
.
If
the
power
brush
works
,
the
problem
is
in
the
high
voltage
lines
in
the
hose
-
likely
a
blown
fuse
in
the
hose
.
Also
see
#
14
.
B
.
Check
brush
for
bad
neck
tilt
switch
or
reset
button
.
C
.
Put
power
directly
to
brush
motor
to
see
if
the
motor
is
bad
.
D
.
Check
cord
connections
from
hose
to
brush
.
E
.
Check
to
see
that
Supervalves
/
Electravalves
have
110
volts
.
clogged
spot
.
Cut
pipe
,
remove
clog
,
patch
back
access
.
)
K
.
Again
run
paper
towel
thru
each
inlet
.
L
.
If
only
one
inlet
is
clogged
and
cannot
be
fixed
,
relocate
new
pipe
via
existing
installation
method
.
M
.
Pipes
that
run
underground
can
sometimes
coagulate
with
debris
from
moisture
.
i
.
Route
out
with
long
blunt
object
.
ii
.
Run
10
pounds
of
rice
thru
system
into
unit
,
repeat
.
iii
.
Trench
old
lines
and
replace
.
iv
.
If
lines
run
under
concrete
driveway
,
relocate
power
unit
in
area
where
accessible
to
locate
.
N
.
Re
-
route
pipes
from
section
that
does
work
to
section
that
does
not
work
.
Abandon
any
un
-
necessary
lines
.
O
.
Check
for
"
wrong
way
”
Y
'
s
or
T
’
s
.
P
Any
recent
construction
or
workers
who
might
have
driven
nail
into
pipes
(
esp
.
closet
organiz
-
ers
,
phones
,
or
alarms
)
?
#
2
Clog
somewhere
else
in
the
system
.
A
.
Check
power
brush
.
B
.
Check
wands
.
#
3
Clog
in
vacuum
tubing
.
A
.
Check
fitting
just
inside
inlet
and
just
inside
of
power
unit
for
debris
.
B
.
Isolate
exactly
where
clog
is
—
by
running
1
styro
-
foam
ball
(
each
numbered
)
thru
each
inlet
.
Find
which
balls
made
it
to
the
power
unit
.
C
.
Reverse
vacuum
with
other
portable
vacuum
or
built
-
in
vacuum
(
first
disconnect
built
-
in
vacuum
from
vacuum
lines
.
)
Suck
from
the
inlet
that
is
bad
.
D
.
Run
electrician
’
s
fish
-
tape
thru
and
try
to
hook
object
.
E
.
Plug
into
inlet
,
put
hand
over
hose
end
to
build
pres
-
sure
,
then
suddenly
release
.
Try
this
multiple
times
from
various
inlets
.
F
.
Run
paper
towel
thru
as
a
“
pig
"
towards
motor
unit
,
then
reverse
suck
with
a
portable
to
jar
it
G
.
Run
paper
towel
thru
from
motor
unit
toward
portable
at
nonfunctioning
inlet
.
*
Very
important
:
Now
run
paper
towel
thru
all
inlets
and
make
sure
they
all
arrive
in
power
unit
.
If
they
don
’
t
,
repeat
steps
A
thru
F
.
*
If
these
solutions
will
still
not
free
up
the
line
-
approxi
-
mate
where
clog
is
and
locate
if
accessible
,
(
attic
,
crawlspace
,
closet
..
.
)
G
.
Cut
pipe
and
feel
suction
and
visually
inspect
.
FI
.
Run
paper
towel
through
and
listen
for
humming
or
vibration
-
possible
nail
in
pipe
or
picture
hung
with
toggle
bolt
into
pipe
.
I
.
Run
small
string
thru
from
motor
unit
to
inlet
w
/
portable
then
tie
heavier
string
-
attach
large
object
to
heavier
string
.
(
Always
tie
a
safety
line
to
large
object
to
pull
it
back
if
needed
)
.
J
.
Locate
exact
location
by
creating
noise
with
ping
-
pong
ball
.
Insert
in
inlet
and
turn
on
unit
(
remove
inlet
to
get
ball
in
)
.
(
Find
least
obvious
way
of
lifting
flooring
or
cutting
into
back
of
cupboard
or
ceiling
to
access
#
4
Bad
inlet
-
replace
inlet
&
plug
hose
in
again
.
A
.
Check
to
see
if
old
inlet
is
same
type
with
contact
points
.
If
not
;
it
may
have
a
push
button
that
requires
a
latching
relay
.
B
.
When
replacing
inlet
look
to
see
if
old
one
had
tape
on
inlet
neck
,
if
so
:
put
tape
in
approximate
same
location
on
new
inlet
.
When
re
-
installing
vacuum
,
test
for
air
leak
.
If
slight
hissing
coming
from
inlet
;
additional
tape
is
required
on
inlet
neck
.
#
5
Low
voltage
wire
cut
.
A
.
Recent
construction
done
?
B
.
Rats
?
C
.
Detached
garage
with
unit
located
in
garage
?
Recent
digging
?
D
.
Re
-
splice
broken
wire
(
coppers
together
and
tins
together
)
.
E
.
Wires
disconnected
at
unit
,
(
some
units
only
.
)
4
coming
from
unit
plus
at
least
2
coming
from
house
.
Should
be
(
1
back
,
1
red
,
1
from
house
)
and
(
1
black
,
1
yellow
or
red
,
1
from
house
)
.
F
.
Re
-
route
wire
from
any
working
inlet
or
power
unit
to
any
section
of
wire
of
the
inlet
that
does
not
work
.
(
Run
under
carpet
,
behind
baseboards
,
stapled
in
corners
or
closets
or
down
inside
of
walls
.
Try
to
tie
it
to
existing
bad
wire
and
pull
it
continued
on
page
8
through
)
.
Page
7
Professional
Troubleshooting
Solutions
,
con
’
t
.
#
6
Clog
in
hose
.
A
.
Reverse
the
hose
at
inlet
on
power
unit
.
Suck
it
out
.
B
.
Drop
kitchen
knife
01
heavy
object
thru
hose
-
sling
it
or
squeeze
hose
and
twist
to
get
through
.
C
.
Shove
garden
hose
thru
vac
hose
(
don
'
t
turn
water
#
9
Short
in
power
unit
.
A
.
Directly
isolate
low
voltage
leads
alone
(
discon
-
nect
all
auxiliary
switches
)
.
B
.
Short
in
relay
(
very
rare
)
.
on
!
)
.
#
10
Short
in
low
voltage
system
.
A
.
Recent
attic
work
or
someone
in
crawlspace
?
B
.
Rats
chewed
through
wire
?
C
.
Disconnect
any
spiices
you
can
find
and
check
continuity
ol
short
.
D
.
Worst
case
'
re
-
ioute
wire
from
any
other
working
inlet
or
wire
.
(
Possibly
running
wire
behind
base
-
boards
,
under
carpet
,
in
closets
,
or
in
ait
ducts
.
)
#
7
Unit
is
good
,
pipes
have
leaks
.
A
.
Recent
work
done
on
house
?
B
.
Recent
wallpapering
or
paneling
?
Inlet
removed
or
re
-
installed
wrong
?
C
.
Inlet
lid
broken
?
D
.
Hidden
or
forgotten
inlet
?
E
.
Inlets
installed
in
floor
;
pipe
fell
down
or
loose
.
F
.
Turn
unit
on
and
walk
around
house
listening
for
leak
.
G
.
Inlet
roughed
in
but
not
found
on
finish
?
H
.
Pipe
running
underground
has
break
in
it
.
I
.
Recent
gardening
or
tree
has
strangled
it
.
#
11
Relay
or
circuit
board
getting
power
but
not
starting
unit
.
A
.
Most
likely
motor
brushes
.
B
.
Isolate
motor
and
see
if
it
works
.
C
.
Check
wiring
from
relay
or
circuit
board
to
motor
.
D
.
Motor
can
fail
even
with
brand
new
brushes
.
#
8
The
Power
unit
has
bad
suction
.
A
.
If
multi
-
motored
unit
:
are
boih
working
?
3
.
Check
power
unit
gaskets
and
cracks
in
housing
.
C
.
Improper
voltage
into
power
unit
.
D
.
Loose
wires
.
E
.
Mini
-
breaker
has
malfunctioned
.
F
.
On
cyclonic
unit
:
1
)
Unit
and
debris
in
motor
fan
blades
;
2
)
Lint
and
debris
on
screen
on
intake
;
3
)
Too
much
back
pressure
from
exhaust
run
being
far
.
Something
is
blocking
exhaust
line
.
G
.
On
bag
type
unit
:
Excessive
amount
of
very
fine
plaster
dust
clogging
primary
or
secondary
filter
.
H
.
Motor
loose
.
Lid
not
tight
/
filter
in
the
way
.
#
12
The
power
unit
is
not
getting
electricity
.
A
.
Check
house
circuit
breaker
.
B
.
Try
vacuum
in
another
outlet
.
C
.
Is
the
circuit
breaker
the
right
size
for
the
power
unit
?
D
.
See
what
is
on
the
circuit
-
is
it
overloaded
?
E
.
Continually
recheck
the
system
after
you
get
power
to
see
if
it
was
the
vac
that
had
tripped
the
circuit
.
F
.
If
necessary
,
have
an
electrician
look
at
it
.
#
13
Transformer
and
motor
not
getting
power
.
A
.
Bad
circuit
board
?
Bad
cord
(
rare
)
?
B
.
Bad
transformer
,
check
for
spark
between
two
low
voltage
wires
out
of
transformer
.
C
.
Bad
relay
,
check
points
:
arc
across
to
see
if
it
solves
it
.
Available
Accessories
:
Vac
-
U
-
Reach
Garage
Hose
&
Tool
Kit
Miniblind
Tool
Ceiling
Fan
Tool
Micro
Attachments
Pet
Brushes
Unique
Brushes
Long
Thin
Flex
Tool
Vacuum
Bumpers
and
more
!
#
14
Low
voltage
in
hose
is
not
working
.
A
.
If
switch
feels
“
mushy
"
then
it
needs
to
be
replaced
.
B
.
Remove
hose
from
wall
and
take
apart
the
handle
end
.
Look
for
lint
or
other
debris
in
contact
points
.
C
.
Make
sure
hose
is
being
fully
inserted
into
inlet
.
D
.
Hose
may
need
to
be
replaced
.
Page
8


