SERRES Saga User manual

Serres Saga
quick installation
guide
serres.com
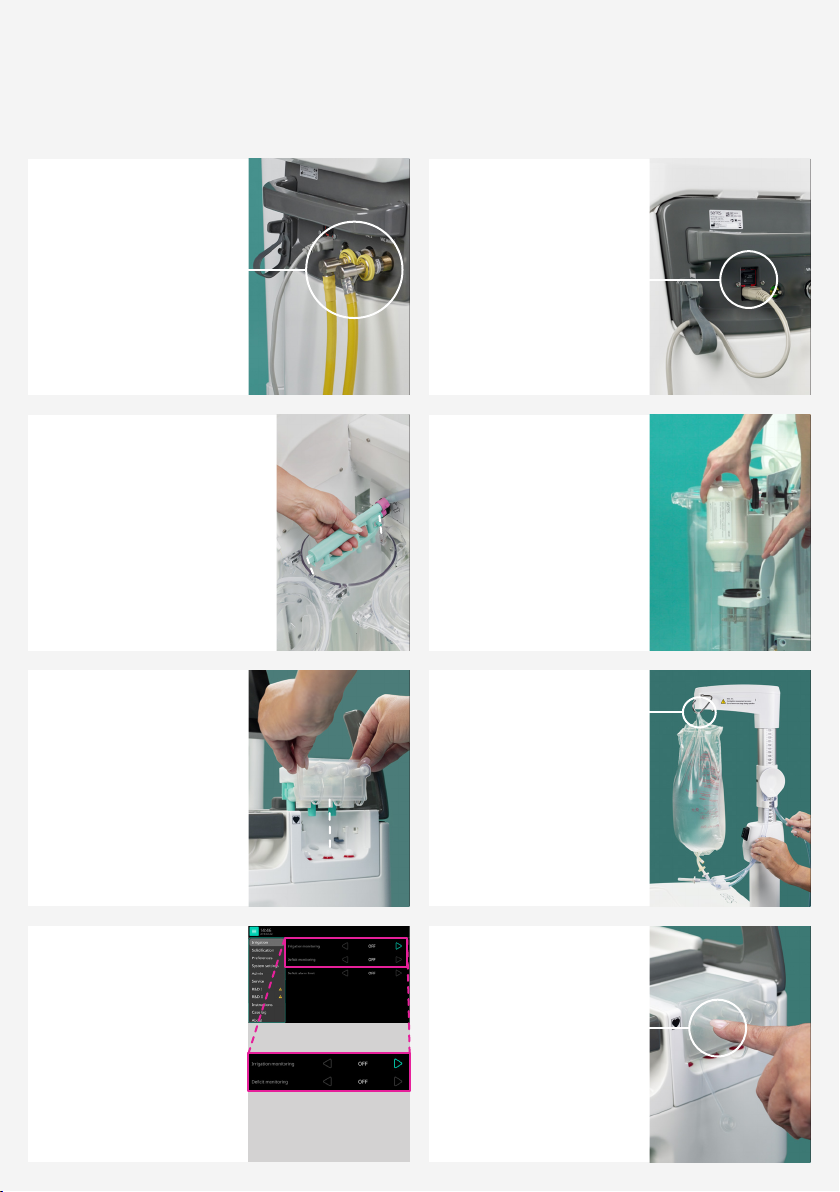
4.
Check that there is
solidifying agent left
above the index line;
otherwise install a new
cartridge. DO NOT REMOVE
the protective sealing
from the new cartridge
before installing it.
ALWAYS LEAVE a cartridge
attached to a container.
2.
Power ON the device. As
soon as the power is on,
the self-check sequence
will start.
6.
Hang 3 or 5 litre fluid
bags but not more than
10 litre per pole. Use
strain relief for irrigation
tubes. Raise the fluid bag
to the desired height.
8.
Test the suction by
placing a finger onto
an opened suction port.
Install 1 to 3 suction
tube(s) per manifold.
3.
Install 1 to 6 liners. DO NOT
OPEN the tape and unfold the
liner; liners will automatically
unfold with vacuum. Close
the canister lid and ensure
that you secure the locking
latches with a clicking sound.
Connect the liner tube to the
corresponding liner port inlet
of the cart.
1.
Connect the vacuum
hose to the VAC MAIN
inlet. Connect a second
vacuum hose to the VAC
2 if two channels are in
use simultaneously. If not
in use, make sure that the
VAC 2 inlet is capped.
5.
Install a new manifold
for each patient. Install
a second manifold if
both channels are in use
simultaneously. Installing
the manifold triggers the
unfolding of the installed
liners.
7.
Check the settings that
irrigation and deficit
monitoring are activated
if necessary.
Serres Saga quick installation guide
1/3.
Preparing the device

4.
Monitor liquid volumes,
remaining collection
capacity and liquid deficit.
2.
Select the suction limit
by moving the soft key to
the desired suction limit.
6.
Add irrigation fluid by
hanging the new bag on
one of the hooks. Max 10
litres per pole. DO NOT
REMOVE any bags (empty
or full) once placed
on the poles to secure
an accurate irrigation
volume.
3.
Start suction by tapping
START/STOP in each
channel to be used.
1.
Reset values to zero, if
necessary (only available
up to 500ml of collected
liquid).
5.
Add collection capacity
by changing the
channel, replacing liners
individually or installing a
new cart.
LIQUID DEFICIT =
IRRIGATION – COLLECTION
If collection is bigger than
irrigation, the liquid deficit
is dashed. Liquid deficit is
not a diagnostic tool.
Serres Saga quick installation guide
2/3.
During the procedure

4.
Remove irrigation fluid
bags.
DO NOT REMOVE fluids
bags before ending the
case.
2.
Dispensing of solidifying
agent in liners can also
be triggered from the
Solidification Menu.
DO NOT REMOVE
the manifold before
solidification or before
ending the case.
6.
Set the device into
standby mode or
shutdown the device at
the end of the day.
8.
Clean and disinfect the
device.
6003249 Rev. 001
3.
Remove used manifold(s)
by lifting the manifold
facing downward.
1.
Tap the END CASE key
to end a procedure.
Solidifying agent is
dispensed automatically
if this option is enabled.
5.
Remove liners if full or
if used at the end of the
day. DO NOT REUSE liners
removed from the device.
7.
Disconnect vacuum
hose(s) and the power
cord if necessary.
Serres Saga quick installation guide
3/3.
After the procedure
Other SERRES Medical Equipment manuals

Popular Medical Equipment manuals by other brands

Durr Dental
Durr Dental CAS 1 Nstallation and operating instructions

Nellcor
Nellcor OxiMax N 5500 Service manual

Otto Bock
Otto Bock 1K10 Instructions for use

Mindray
Mindray BeneHeart D3 Operator's manual

DeVilbiss Healthcare
DeVilbiss Healthcare 1025 Series Instruction guide

NeuroTherm
NeuroTherm NT1100 Operator's manual


