Servonaut SMX User manual

SMX
Technische Daten / Specifications
Akkuspannung: 7.2 ... 12V NiCd/NiMH
Operating voltage:2s ... 3s Li-Ion/Lipo
Ausgangsleistung:7.2V max. 4.5W @ 4 Ohm
Output power: 12V max. 8W @ 8 Ohm
Stromaufnahme: max. 2A kurzzeitig
Max. Current: 2A peak
Funktionsumfang: V6, V8 oder 6-Zylinder
Reihenmotor, Zündung, Anlasser,
Abstellen, 4 Fanfaren, Turbolader,
Druckluftbremse, Martinshorn
Features: V6, V8 or 6 cylinder in-line engine,
engine start/stop, 4 truck horns,
turbocharger, air brake,
German ‘Martinshorn’
Optional: Schaltgeräusche,Rückfahrwarnton
Gear sounds, reversing beeper
Abmessungen:
Dimensions: 70x43x18mm³
Truck Sound


SMX Truck-Soundmodul
Das SMX ist mit Originalaufnahmen von einem
V6, V8 und 6-Zylinder Truck-Reihenmotor pro-
grammiert und gibt diese mit hoher Qualität fahr-
situationsabhängig wieder.
Eigenschaften
·3 originale Motor-Sound-Aufnahmen
·Dynamische, fahrsituationsabhängige Ge-
räuschkulisse
·2 Fanfaren in je 2 Varianten
·Realistisches Turbolader-Pfeifen
·Bremsgeräusche, Martinshorn
·Rückfahrwarnton und Schaltgeräusche (ab-
hängig vom Fahrtregler)
·Akustische Simulation eines Nebenabtriebs
(Hydraulikpumpe) möglich
·Kein Zusatz-Akku nötig, kann direkt aus
Fahrakku versorgt werden
·Anlasser/Fanfare wahlweise über Empfän-
ger oder Multiswitch ansteuerbar
·Erweiterbar mit dem programmierbaren Ge-
räuschmodul SM+ von ServoNaut
SMX Sound Module for Trucks
The SMX is programmed with original sounds of
a V6, V8 and a 6-cylinder in-line truck engine. It
will replay these recordings with high quality and
realistically adapted to the state of driving.
Features
3 original motor sound recordings
Dynamically changing sound replay
2 types of horns, each of them in 2 variants
Realistic turbocharger effect
Compressed-air break, emergency siren
(‘Martinshorn’ as used in Germany)
Reversing beeper and gearbox sounds (de-
pending on the speed controller)
Acoustic simulation of auxiliary drive (e. g.
hydraulic pump) possible
No extra battery necessary, can directly be
powered from main battery
Ignition/horn activated via receiver channel
or multiswitch output
Expandable with the programmable sound
add-on module SM+ from ServoNaut

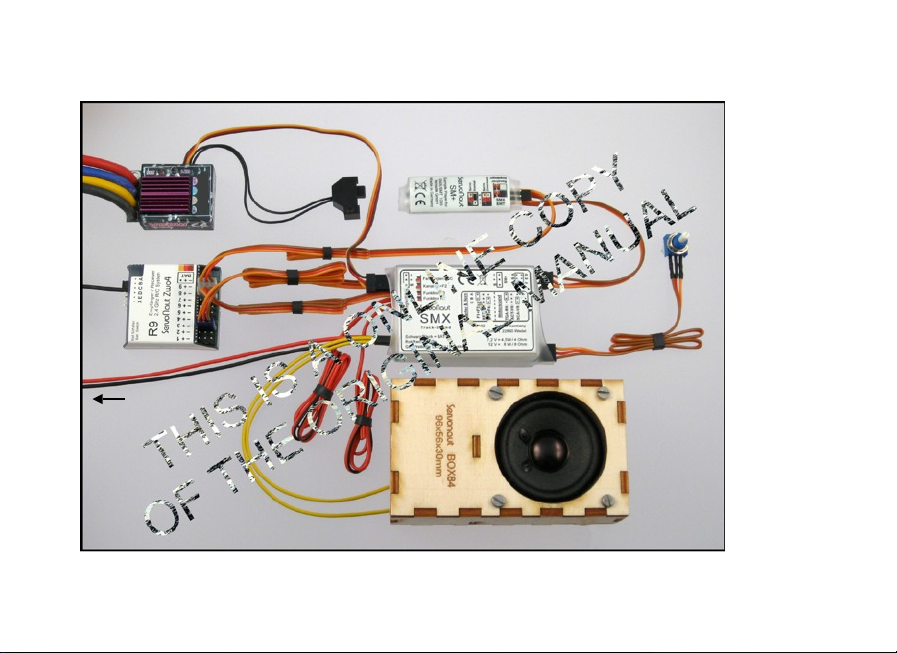
SMX mit Standard-Fahrtregler/MFR
Das Bild rechts zeigt den Anschluss des SMX an
einen Standard-Fahrtregler (gilt auch für den MFR).
Das SMX wird über das rote (+) und schwarze (-)
Kabel mit dem Fahr-Akku verbunden. Der Laut-
sprecher muss an die gelben Kabel angelötet wer-
den. Das im Bild als FR/ESC gekennzeichnete
Kabel (mit blauem Stecker-Gehäuse) wird in den
Empfänger-Steckplatz gesteckt, wo normalerweise
der Fahrtregler angeschlossen ist (hier: Kanal 3).
Das Servokabel des Fahrtreglers kommt an den
‚Regler/ESC’-Anschluss des SMX. Über einen zu-
sätzlichen Empfangskanal werden Anlasser und
Fanfare (F1+F2) aktiviert (hier: Kanal 8). Anschlüsse
F3 und F4 sind Schalteingänge, die von einem Mul-
tiswitch (z. B. Servonaut MM4) geschaltet werden
können. F3 schaltet normalerweise das Martinshorn,
F4 das Nebenantriebs-Geräusch. F4 kann auch di-
rekt mit einem Stellmotor verbunden werden. Die
Schaltfunktionen F1+F2 können mit den Funktionen
F3+F4 getauscht werden. (siehe Kapitel Schalt-
funktionen). Die SM+ Erweiterung wird wie abgebil-
det angeschlossen (kurzes Servokabel ans SMX,
langes Servokabel an freien Empfänger-Kanal, hier:
Kanal 9).
SMX with Standard ESC or MFR
The picture to the right shows the interconnec-
tion of the SMX to a standard speed controller
(also true for Servonaut MFR).
Connect the SMX to the battery via the red (+)
and the black (-) cable. The yellow cables have
to be soldered to the loudspeaker. Plug ‘FR/ESC’
(blue housing) into receiver position which nor-
mally holds the throttle channel (here: channel
3). Throttle cable goes into ‘Regler/ESC’ of SMX
instead . Starter and horn (F1+F2) are controlled
via another receiver channel (here: channel 8).
Connections F3 and F4 are normally used in
conjunction with a multiswitch (e. g. Servonaut
MM4). F3 switches the ‘Martinshorn’ (a special
sort of alarm siren used in Germany). F4 is used
to simulate an auxiliary drive. You can connect it
directly to the drive motor as well. Functions
F1+F2 and F3+F4 can be interchanged (see
chapter Switching Functions).The SM+ add on
is installed as shown (short cable plugged into
SMX, long cable plugged into free receiver chan-
nel, here for example: channel 9).
SM+
(Option)
Fahrtregler
ESC
SMX
Empfänger
Receiver
Lautstärke
Volume
F3
F4
FR/ESC
F1+F2
Akku
Battery
SMX mit Standard-Fahrtregler SMX with Standard ESC

SMX mit Servonaut-Regler
Auf der Abbildung rechts ist stellvertretend der S20
abgebildet. Die folgende Beschreibung gilt aber
ebenso für die Servonaut Regler-Familien E,K,M
und T.
Das SMX wird über das rote (+) und schwarze (-)
Kabel mit dem Akku verbunden. Der Lautsprecher
muss an die gelben Kabel angelötet werden. Das
im Bild als FR/ESC gekennzeichnete Kabel (mit
blauem Stecker-Gehäuse) wird in den passenden
Anschluss des Servonaut-Fahrtreglers gesteckt
(Anschluss ‚Sound’). Über einen zusätzlichen Emp-
fangskanal werden Anlasser und Fanfare (F1+F2)
aktiviert (hier: Kanal 8). Anschlüsse F3 und F4 sind
Schalteingänge, die von einem Multiswitch(z. B.
Servonaut MM4) geschaltet werden können. F3
schaltet normalerweise das Martinshorn, F4 das
Nebenantriebs-Geräusch. F4 kann auch direkt mit
einem Stellmotor verbunden werden. Die Schalt-
funktionen F1+F2 können mit den Funktionen
F3+F4 getauscht werden. (siehe Kapitel Schalt-
funktionen). Die SM+ Erweiterung wird wie abge-
bildet angeschlossen (kurzes Servokabel ans SMX,
langes Servokabel an freien Empfänger-Kanal,
hier: Kanal 9).
SMX with Servonaut ESC
The picture to the right shows the S20. The fol-
lowing description however is also true for Servo-
naut controller families E,K,Mand T.
Connect the SMX to the battery via the red (+)
and the black (-) cable. The yellow cables have
to be soldered to the loudspeaker. Plug ‘FR/ESC’
(blue housing) into matching port of the Servo-
naut speed controller (‘Sound’ connector). Starter
and horn (F1+F2) are controlled via another re-
ceiver channel (here: channel 8). Cables F3 and
F4 are normally used in conjunction with a multi-
switch (e. g. Servonaut MM4). F3 switches the
‘Martinshorn’ (a special sort of alarm siren used
in Germany). F4 is used to simulate an auxiliary
drive. You can connect F4 directly to the drive
motor as well. Functions F1+F2 and F3+F4 can
be interchanged (see chapter Switching Func-
tions). The SM+ add on is installed as shown
(short cable plugged into SMX, long cable
plugged into free receiver channel, here: receiver
channel 9).

SM+
(Option)
SMX
Empfänger
Receiver
Lautstärke
Volume
F3
F4
FR/ESC
F1+F2
Akku
Battery
S20
SMX mit Servonaut-Regler SMX with Servonaut ESC

Schaltfunktionen
Die Schaltfunktionen F1 und F2 können mit den Funk-
tionen F3 und F4 getauscht werden. Jeweils zwei
Funktionen werden über einen Empfängerkanal ge-
schaltet und zwei Funktionen über einen beliebigen
Multiswitch. Die Auswahl erfolgt mit der oberen Steck-
brücke:
·Obere Steckbrücke auf B-A (Standard):
Anlasser (F1) und Fanfare (F2) werden über einen
extra Empfängerkanal betätigt. Am Sender kann dazu
wahlweise ein freier Kanal mit Kreuzknüppel oder mit
Schalter/Taster verwendet werden (vorzugsweise Tas-
ter mit Ruhe-Mittelstellung).
Für F3 und F4 wird ein Multiswitch-Systeme mit Me-
mory- oder Tast-Funktion benötigt. Der Schalteingang
F3 steuert das Martinshorn, der Schalteingang F4 er-
höht die Leerlaufdrehzahl zur Simulation eines Neben-
antriebs. Der Eingang F4 kann auch direkt mit dem
Antriebsmotor einer Hydraulikpumpe oder eines Stell-
antriebs verbunden werden, sofern dieser Motor nur
an/aus betrieben wird. (Funktioniert nur in einer Dreh-
richtung)
·Obere Steckbrücke auf C-B:
Anlasser und Fanfare werden über die Schalteingänge
F3 und F4 betätigt. Benötigt wird ein Multiswitch-Sys-
tem mit Tastfunktion für die Fanfare und Memory-
Funktion für den Anlasser. Der Schaltkanal F1+F2 be-
tätigt das Martinshorn und die Simulation eines Ne-
benantriebs, kann aber auch ungenutzt bleiben.
Switching Functions
The switching functions F1 and F2 can be
swapped with functions F3 and F4. Two functions
are controlled by a receiver channel and two func-
tions are controlled by a multiswitch.
Setup is as follows:
Upper jumper in position B-A (standard setup):
Starter (F1) and Horn (F2) are activated via receiv-
er channel. Either use a stick channel or a switch
with three positions (momentary function would be
best). Switching input F3 controls the ‘Martin-
shorn’. Input F4 increases the pitch of the idling
sound, thus simulating an active auxiliary drive.
You can use multiswitch systems with memory or
momentary function. F4 can also be directly con-
nected to a motor of a hydraulic pump or actuator
drive motor, as long as this motor is switched on
and off only (works in one direction only).
Upper jumper in position C-B:
Starter and Horn are controlled by switching inputs
F3 und F4. You need a multiswitch system with a
momentary function for the horn and a memory
function for the starter. Receiver channel activates
the ‘Martinshorn’ (F1) and auxiliary drive simula-
tion (F2). If you don’t need any of these options
you can leave them unconnected as well.
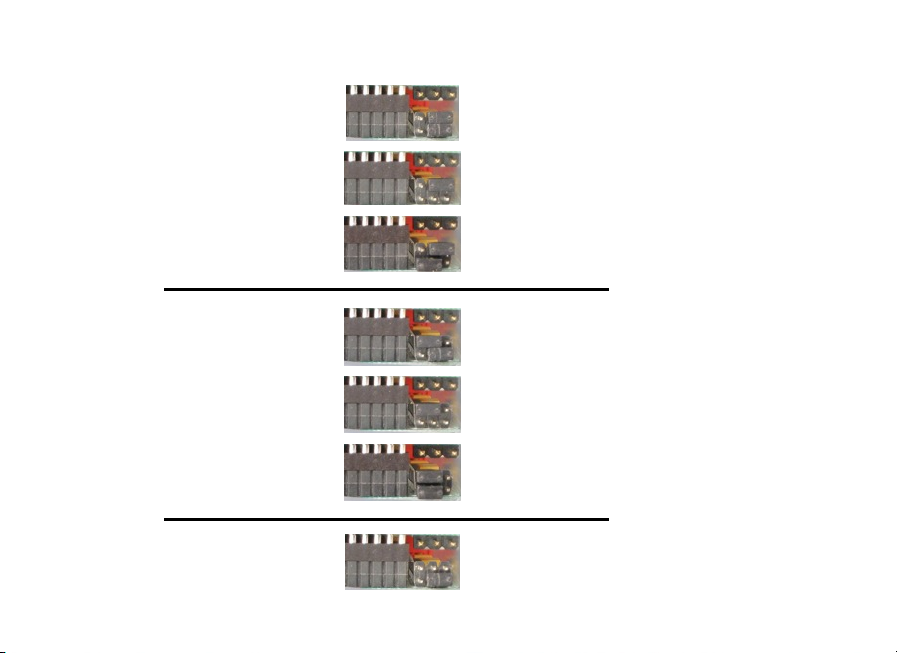
Jumper Settings
Jumper-Einstellungen
Anlasser/Horn: F1 + F2 Mo-
tor-Sound: Reihen-6
Starter/Horn: F1 + F2
Motor sound: 6 in-line
1
B A
E D
2
B A
Anlasser/Horn: F1 + F2 Mo-
tor-Sound: V6
Starter/Horn: F1 + F2
Motor sound: V6
3B A
F E
Anlasser/Horn: F1 + F2 Mo-
tor-Sound: V8
Starter/Horn: F1 + F2
Motor sound: V8
5C B
Anlasser/Horn: F3 + F4 Mo-
tor-Sound: V6
Starter/Horn: F3 + F4
Motor sound: V6
Anlasser/Horn: F3 + F4 Mo-
tor-Sound: Reihen-6
Starter/Horn: F3 + F4
Motor sound: 6 in-line
4C B
E D
Anlasser/Horn: F3 + F4 Mo-
tor-Sound: V8
Starter/Horn: F3 + F4
Motor sound: V8
6C B
F E
Setup - siehe ‚Setup-Menü’
(Motor-Jumper beliebig)
Setup - see ‘Setup Menu’
(Motor jumper arbitrary)
7

Setup-Menü
Weitere Einstellmöglichkeiten sind über ein Menü er-
reichbar. Für die Bedienung des Menüs muss der
Schaltkanal F1+F2 verwendet werden. Verbinden Sie
den Anschluss für diese Einstellungen falls erforderlich
vorübergehend mit einem Kanal der Kreuzknüppel.
·SMX vom Akku trennen
·Steckbrücke an C-B-A entfernen
·SMX einschalten, Bremsgeräusch ertönt
Mit dem Knüppel in eine Richtung werden jeweils vier
Stufen der Reihe nach ausgewählt. Eine Betätigung
des Knüppels in die andere Richtung bestätigt die Ein-
stellung und der nächste Menüpunkt wird angewählt.
Fünf Menüpunkte werden nacheinander angeboten:
·Lautst. der Druckluftgeräusche, leiseste Stufe=aus
·Lautst. des Rückfahrwarntons, leiseste Stufe=aus
·Schaltgeräusch, zwei Varianten in zwei Lautstärken
·Lautstärke des Turboladers, leiseste Stufe=aus
·Fanfare, vier Varianten
Mit der Bestätigung des letzten Menüpunkts ertönt kurz
das Martinshorn und die Einstellungen werden gespei-
chert. Zum Abschluss das SMX abschalten und die
Steckbrücke wieder einsetzen. Wird das SMX vorher
abgeschaltet, bleiben alle Einstellungen dagegen un-
verändert.
Setup Menu
There are even more options which are changed via
a built-in setup menu. In order to control this menu
you need switching function F1+F2. It would be best
to temporarily plug this connection into a receiver
channel with stick control by the radio.
Switch off SMX
Remove jumper C-B-A
Switch on SMX, air break will sound
Moving stick in one direction cycles through four set-
up levels. Moving stick in opposite direction advanc-
es to next menu item.
Following five successive items exist:
Volume of air break, lowest level=off
Volume of reversing beeper, lowest level=off
Gear sound, two variants with two volume levels
Volume of turbocharger, lowest level=off
Horn sound, four variants
After leaving the last menu item you will hear the
‘Martinshorn’ sound and changes will be saved. Fi-
nally, switch off SMX and reinstall jumper in last po-
sition. Switching off the SMX before leaving the
setup menu will discard all changes!

SMX am Servonaut-Bordcomputer
Über den Bordcomputer der Servonaut-Multi-
funktionsbausteine der K-Familie können die
Zusatz-Geräusche auch über das Menüsystem
eingestellt werden. Es können folgende fünf Ge-
räusche geändert werden:
·Extra 2: Lautstärke der Druckluftgeräusche
·Extra 3: Lautstärke des Rückfahrwarntons
·Extra 4: Schaltgeräusch in zwei Varianten
·Extra 5: Lautstärke des Turboladers
·Extra 6: Fanfare in vier Varianten
Für Extra 2 bis 6 sind Werte von 0 bis 4 zulässig.
Bei 0 wird die interne Einstellung im SMX ver-
wendet. Der Wert 1 bedeutet bei Extra 2, 3 und 5
abgeschaltet. Die Soundänderung erfolgt nach
einer kleinen Verzögerung und kann dann sofort
überprüft werden.
Der V8-Motor bietet als zusätzliches Geräusch
das Abblasen des Turbolader-Überdrucks beim
Hochschalten mit einem K15/30/40/60.
SMX with Servonaut On-Board Computer
Via on-board computer of Servonaut K-family
modules it is also possible to adjust the extra
sounds. Following five extra sounds can be ad-
justed:
Extra 2: Volume of compressed-air break
Extra 3: Volume of reversing beeper
Extra 4: Gear sound in two variants
Extra 5: Volume of turbocharger
Extra 6: Horn sound in four variants
Menu items Extra 2 to Extra 6 can be changed
from 0 to 4. A value of zero means internal ad-
justment of SMX (jumper) is used. A value of 1
in Extra 2, 3 and 5 means ‘sound off’. You can
directly test the adjustment after a small delay.
There is still another feature of the K15/30/40/60
in conjunction with the V8 motor: The SMX can
produce the noise you hear when the turbo-
charger pressure-relief valve opens after chang-
ing up the gear.

Einbauhinweise
Das SMX kann direkt mit dem Fahrakku ver-
bunden werden. Bei 7,2V verwenden Sie einen 4
Ohm/5W-Breitbandlautsprecher (z. B. Servonaut
LAUT45), bei 12V einen 8 Ohm/8W-Typ (z. B. Ser-
vonaut LAUT85). Für guten Klang ist der Lautspre-
cher so groß wie möglich zu wählen. Falls der
Platz es zulässt, ist eine zusätzliche Laut-
sprecherbox aus Holz optimal. Der Lautstärke-
regler (Poti) sollte an einer versteckten, aber gut
zugänglichen Stelle angebracht werden. Zum Tes-
ten der Lautstärke muss das Motorgeräusch mit-
tels Anlasser aktiviert werden. Denken Sie daran,
bei längeren Fahrpausen das Modell auszuschal-
ten, da die Ruhestromaufnahme nicht zu vernach-
lässigen ist!
Wichtig:
Das Ein- und Auschalten des Motorgeräuschs ist
nur im Stand bei Leerlaufdrehzahl möglich! Für
den Schaltkanal müssen am Sender, sofern vor-
handen, alle Zusatzfunktionen wie “Dual-Rate”,
“Expo”, Trimmung, Servoweg usw. ausgeschaltet
bzw. in der Normaleinstellung sein. Mit “Servo-Re-
verse” oder durch Umstecken im Sender (je nach
Fabrikat) kann die Belegung des Schaltkanals um-
gedreht werden. Für die beiden Schalteingänge
(F3 + F4) sind Eingangsspannungen bis 12V bzw.
10 Zellen NiXX zulässig, das schwarz markierte
Kabel ist Minus.
Installation Hints
You can power the SMX directly from the main
battery. If you’re using 7.2V take a 4 Ohm/5W
broadband loudspeaker (e. g. Servonaut
LAUT45), when using 12V take an 8 Ohm/8W
type (e. g. Servonaut LAUT85). The more diame-
ter the speaker has the better it will sound. If
space isn’t critical you can improve the sound
significantly by using a wooden cabinet. The vol-
ume control (potentiometer) should be installed
in a hidden place but nevertheless well accessi-
ble. In order to test the degree of loudness you
have to first activate the sound via starter. Keep
in mind to always switch off the scale model dur-
ing longer breaks, because the quiescent current
consumption is not negligible!
Important:
Switching on and off the motor sound is only pos-
sible while standing still and idling! Reset all
trimming, expo, dual-rate and scaling in your trans-
mitter to default values for the starter channel used
by the SMX. You can, however, use ‘servo-reverse’
or flip the encoder plug inside your transmitter (if
necessary) to change the direction of activation.
For the switching inputs F3 and F4 there is a maxi-
mum voltage limit of 12V resp. 10 cells NiXX.
Black wire is minus, red wire is plus.

Akku / Battery
Lautsprecher / Speaker
Fahrtregler (blauer Stecker)
Schaltkanal F1+F2 (klarer Stecker)
F3, F4 (rot/schwarze Litze)
Speed Controller (blue
connector)
Switch Channel F1+F2
(clear connector)
F3, F4 (small red and
black wires)
Lautstärkeregler
Volume Control
Erweiterung SM+ (oben)
Steckbrücken (unten)
Extension SM+ (top row)
Jumper (2 bottom rows)
SMX Anschluss-Übersicht SMX Cable and Wiring Overview
Das Typenschild auf der Oberseite ist auch
gleichzeitig Kühlkörper. Das SMX wird im Betrieb
warm und braucht ggf. etwas Kühlung, deshalb
für Belüftung sorgen und nicht mit Schaumstoff
o.ä. umwickeln!
The SMX type plate is also used as a heat sink.
The module might become warm and need some
cooling. Don’t cover it with foam!

Weitere Produkte von Servonaut:
S20
·Speziell für den Funktionsmodellbau ent-
wickelter Fahrtregler
·20A, 16kHz, BEC 5V (3A kurzzeitig)
·Zwei Ausgänge für Brems- und Rückfahrlicht
M20+
·Speziell für den Funktionsmodellbau ent-
wickelter Fahrtregler mit “Tempomat”
·20A, 16&32kHz, BEC 5V (3A peak)
·Integrierte Lichtanlage mit 6 Ausgängen
SM+
·Soundmodul-Erweiterung mit bis zu 4 frei
programmierbare Sounds
·Aufnehmen und Einstellen erfolgt an einem
Windows-PC
·Wiedergabe im Modell über ein SMX oder
SMT Soundmodul
AIR4, AIRU, AMO
·Anhänger/Auflieger-Lichtset mit drahtloser
IR Datenübertragung
Related Servonaut products
S20
Speed controller developed especially for
model trucks
20A, 16kHz, BEC 5V (3A peak)
Two outputs for reversing light and brake
light
M20+
Speed controller developed especially for
model trucks, with cruise control
20A, 16&32kHz, BEC 5V (3A peak)
Integrated light set with 6 outputs
SM+
Sound-modul add-on, up to 4 programmable
sound samples
Setup and recording via Windows-PC
Playback with SMX or SMT sound-module
AIR4, AIRU, AMO
Trailer lighting system with wireless infrared
data transmission

Safety Notes
Do not expose the module to water or oil. Do not
cover it with foam. Disconnect the battery imme-
diately after use. Do not connect the battery with
wrong polarity. Avoid any short circuits. Always
use caution when connecting the battery. Always
turn on the transmitter first.
Warranty Information
Warranty is granted for one year from date of
purchase. This warranty does not cover damage
due to incorrect handling or wiring, over voltage
or overloading. This warranty does not cover
consequential, incidental or collateral damage
under any circumstances. By the act of using this
product the user accepts all resulting liability.
Subject to change without notice.
02/2011 Software V103
Warnhinweise
Modul gegen Nässe, Feuchtigkeit und Schmutz
schützen. Nicht mit Schaumstoff umgeben, ev.
entstehende Wärme muss abgeführt werden
können. Akku niemals verpolt anschließen. Kurz-
schlüsse unbedingt vermeiden. Akku nach dem
Betrieb und zum Laden immer von der Modell-
elektronik trennen.
Haftung und Gewährleistung
Es gelten die zum Zeitpunkt des Kaufs gültigen
gesetzlichen Bestimmungen zur Gewährleistung.
Vorausgesetzt ist der bestimmungsgemäße Ge-
brauch im nichtgewerblichen Bereich. Schäden
durch unsachgemäße Behandlung wie fehler-
hafter Anschluss eines Akkus oder durch Wasser
sind ausgeschlossen, Eingriffe und Verände-
rungen lassen den Gewährleistungsanspruch
ebenfalls verfallen. Unsere Haftung bleibt in je-
dem Fall auf den Kaufpreis beschränkt. Die Haf-
tung für Folgeschäden ist ausgeschlossen.
Technische Änderungen vorbehalten. “Servo-
naut” ist eine eingetragene Marke der tematik
GmbH. Alle weiteren Produktnamen, Warenzei-
chen und Firmennamen sind Eigentum ihres je-
weiligen Besitzers.
06/2011 Software V103 www.servonaut.de

tematik GmbH
Feldstrasse 143
22880 Wedel
Germany
Fon: +49 (0) 4103 80 89 89 - 0
Fax: +49 (0) 4103 80 89 89 - 9
E-mail: [email protected]
Internet: www.servonaut.de
Ein wichtiger Hinweis zum Umweltschutz:
Elektro- und Elektronik-Altgeräte gehören
nicht in den Hausmüll!
Entsorgen Sie bitte diese Geräte bei den
kommunalen Sammelstellen. Die Abgabe dort
ist kostenlos.
Help us to protect the environment. Please do
not dispose electrical and electronic equip-
ment in domestic household waste.
tematik GmbH - Servonaut
WEEE-Reg.-Nr. DE 76523124
Table of contents
Other Servonaut Recording Equipment manuals


