Setma E06PE27003 User manual

E06PE27003
This interface can insert, on both the high and low
end Peugeot/Citroen C6 2017 screens, the live traffic
situation, MP5 display, Mirrorlink, Reverse image,
DVD/DTV, DVR, night view camera image and so on.
Features:
One interface is compatible with Peugeot/Citroen C6 2017, both the high and low end versions.
The DIP8 can be used to distinguish the different cars.
Plug-n-play connectors. Both power and video cable are converted behind CD, very convenient for
installation,
Reverse camera image is triggered automatically with CAN, no need to connect reverse signal wire
any more.
OEM touch screen is used to control the added MP5, Navigation or DVR.
E06PE27003 model is with built-in navigation and multimedia player. Both the audio and video
files that are stored in USB devices or SD card can be played directly. AUX is used for
sound.OEM touch screen is used to control without using remote controller.
Support mirror link function. The high-tech inner processor supports the high quality mirror
1/ 7
2/ 7
link image display on OEM screen, including the live traffic situation and Waze and so on.
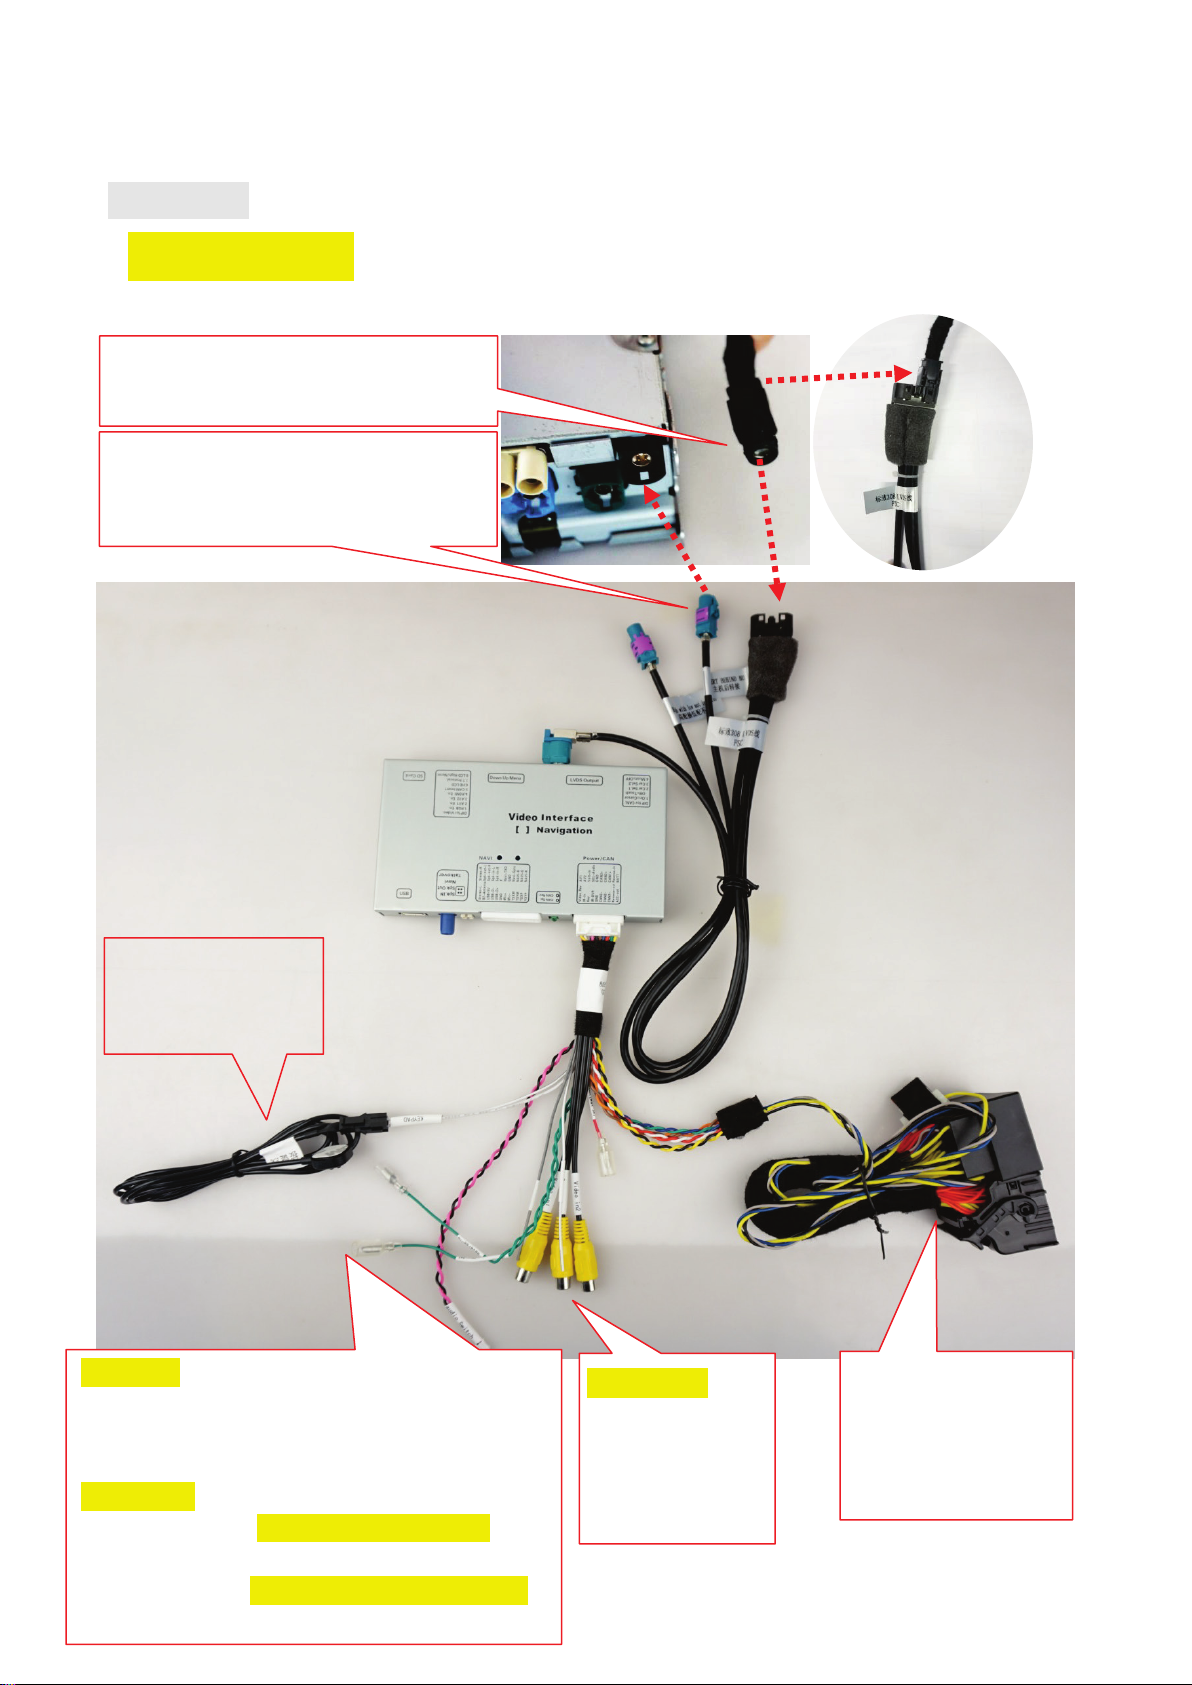
1. Connection
①Low-end cars
Connect OEM LVDS to the right side of the
LVDS converter.(see pictures)
Green wire:This wire is for reverse power output.
Camera can get power from this green wire.
When insert 360 bird view cameras or reverse camera,
please pull out this connector, and connect the
“Reverse_IN” part to reverse power.
This wire marked as “ACC-OUT” [red connector]: can
supply power [Max 1A].
This wire marked as “IR-OUT”[white with black wire]:
is for DTV and DVR signal output.
Connect this cable, marked as “convert
behind CD”, to the right edge port behind
CD
This harness is
connected behind CD,
for Power and reverse
signal.
Video input:with
multi video inputs.
The “REVERSE” one
is for reverse
camera.
External switch
keypad for manual
switch.

3/ 7
②High-end cars
Green wire:This wire is for reverse power output. Camera
can get power from this green wire.
When insert 360 bird view cameras or reverse camera,
please pull out this connector, and connect the
“Reverse_IN” part to reverse power.
This wire marked as “ACC-OUT” [red connector]: can
supply power [Max 1A].
This wire marked as “IR-OUT”[white with black wire]:is for
DTV and DVR signal output.
External switch
keypad for manual
switch.
Video input:
with multi
video inputs. The
“REVERSE”
one is for
reverse camera.
This connector marked as
“convert behind CD” should be
connected behind CD to the
right port of the socket.
And this connector marked with
“for high-end, no connect for
low-end”is connected behind
CD the left port of the socket.
High end car LVDS
connected here
directly.
This harness is
connected behind CD,
for Power and reverse
signal.
4/ 7
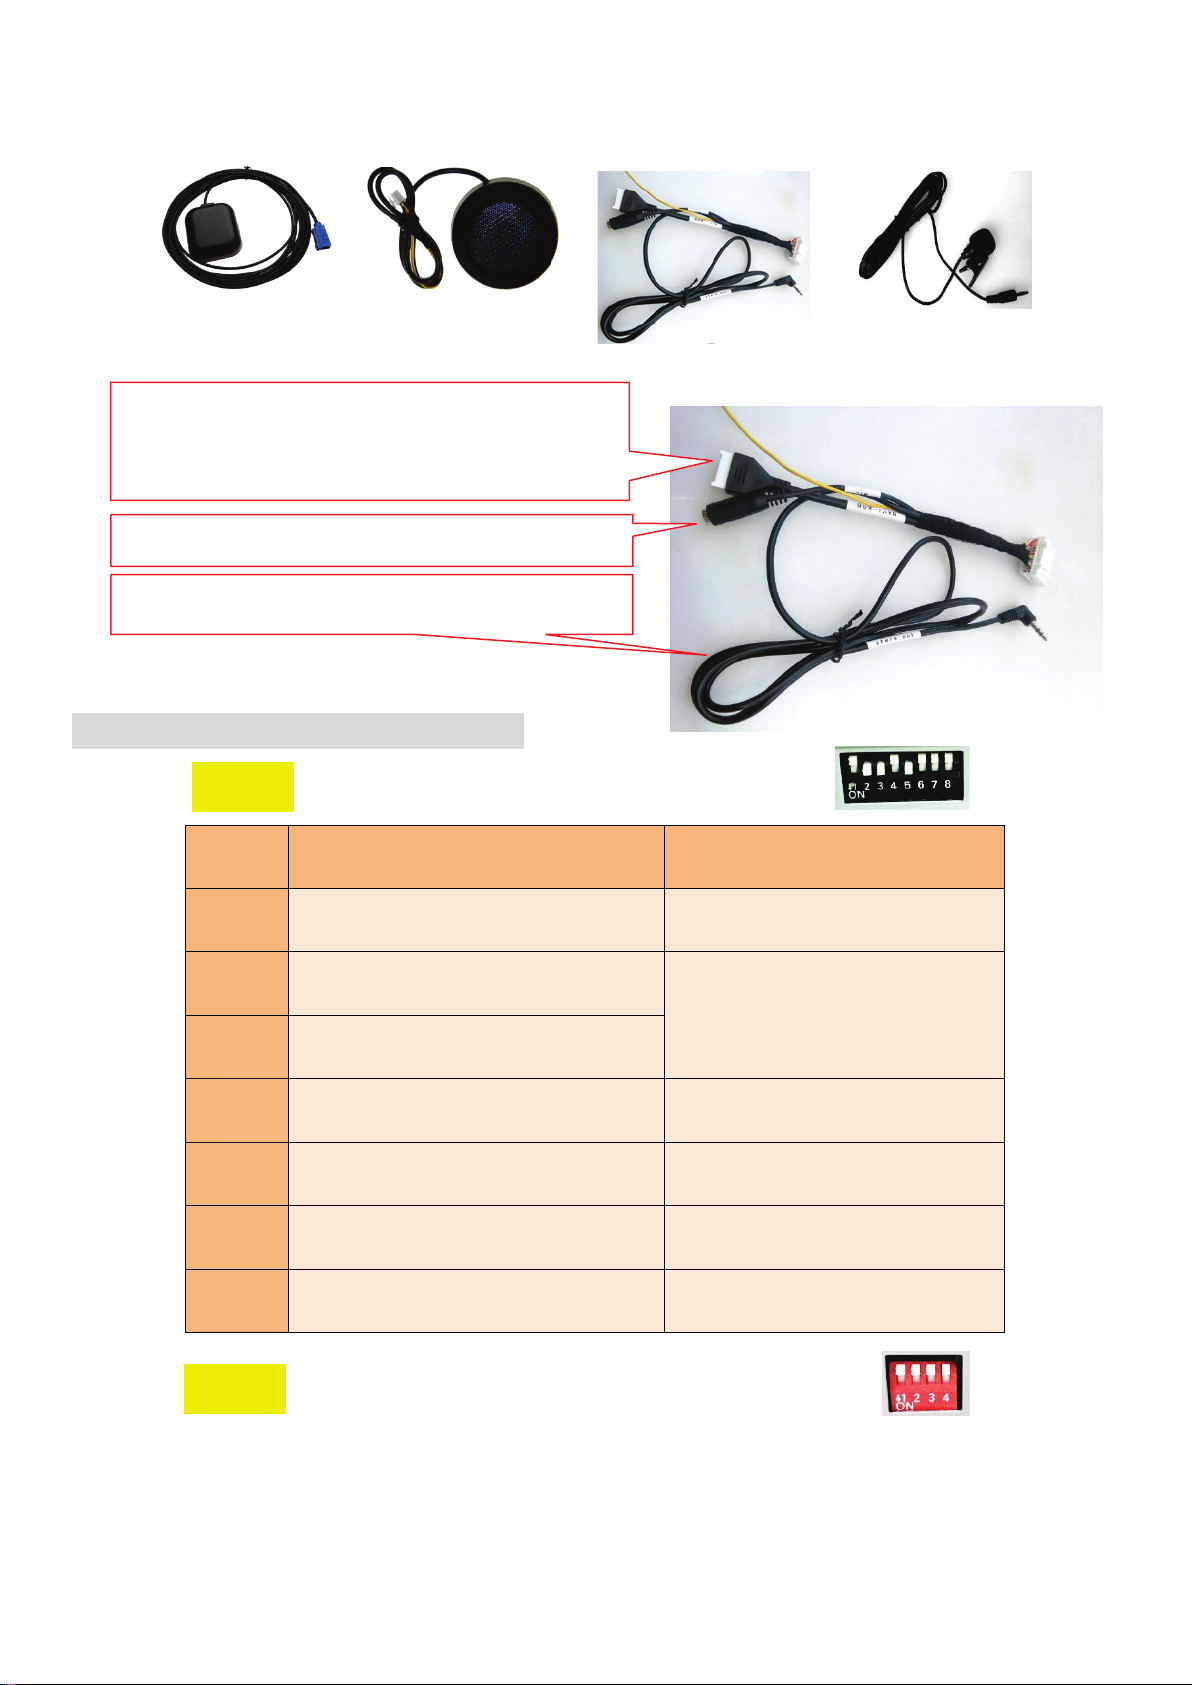
For E06PE27003 models[with built-in Win CE or Android navigation]:include below 4 accessories:
Navigation cable connection instruction:
8pin analogRGB input.
Special for SETMA external navigation box insertion. For
other navigation,need tocontact toaddthe touch protocol.
2. Interface box DIPs setting :
8-DIPs:
DIP Down UP
1 RGB input opened RGB input closed.
2 Down=V1 opened
Stay up if no devices connected.
3 Down=V2 opened
4 RGB input with high resolution RGB with low resolution
5 When reverse, show the inserted camera
V4 【Rev】
With OEM reverse camera, switch to
OEM camera image when reversing.
6,7 No function, should stay up.
8 Low-end cars High-end cars
4-DIPs:All should stay up.
Stereo output:Connect to OEM AUX.
MIC Input:sound for internal navigation.

This interface already included
many kinds of IR code inside.
The 3 side buttons can be
used to pop up
the OSD
manual and choose DTV, DVR
and different DVD protocol in
AV1
DTV and such devices can be set
in AV2, too. When set to “none”,
this display will be closed.
3. Operation instruction:
(1)Switch
Press NAVI key to switch among each inputs.
Also can use external keypad to switch.
When reversing, it will switch automatically to OEM
camera image【DIP5=up】, or inserted camera image
【DIP5=Down】。
Press Music/Air con/Telephone to return to OEM
image.
(2)DTV / DVD or DVR operation
White with gray wire[marked as “IR-out”]:It has large power output,
and can give power for Max 5 external devices. It can be connected to the
DVD or DVR control signal input wire at the same time.
(3)Navigation [WIN_CE/Android] operation
OEM touch screen is used to control inserted navigation.
(4)Reverse
When on reverse, the green wire will have 12V output,
and the reverse camera will be triggered directly. And at same
time, it will switch to OEM camera image [DIP5=OFF] or inserted
camera image [DIP5=ON].
Example on the right [DIP5=ON,Down],it switches to
inserted reverse camera image when reversing.
5/ 7

6/ 7
4.the 3 side key buttons
This interface has 3 side key buttons[near the SD card slot],the 3 keys are ’’MENU’’, ’’ + ’’ , ‘’ - ‘’. Installer can use
them to adjust the display value or set the touch function.
The last 2 options: “Size H” and “Size V” are for image horizontal and vertical size setting. When
on inserted navigation or mirror link [especially when connecting different phones, and the image
or control menu may go outside the screen ],we need to adjust the image to a suitable size. At this
time, need to adjust through these 2 options.
The 3rd option from last is for reverse guidelines setting. When setting it ON, the guidelines will come
out on reverse mode. When setting it OFF, guidelines will be turned off.
Guide-L:the left guide line’s offset on screen, when the value changes, the left guide moves its
location.
UI-CONTROL:
All-ON:both guidelines and PDC are displayed.
PDC-ON:Only PDC is displayed.
Guide-ON:Only guidelines are displayed.
ALL-Off:both guidelines and PDC are not displayed.
When “menu” is pressed, OSD strings will pop up on screen,
and the installer may adjust the value with keys of “+/-”.
The brightness/contrast/saturation tunes the color of the
current video input.
The “position H”,“position V” set the image position on
screen.
The first 5 points have the separate storage units when on
RGB,AV1,AV2 or CAM input. It will have nothing with each
other when changing the setting.
The options of“IR-AV1/IR-AV2 /IR.RGB”are for IR output
setting. There are already many IR options inside. Can use
OEM keys or touch screen to choose the suitable one.
When not set to“none”,can use the OEM knob to pop up
the control icons of “DVD/TV”, and users can use OEM
keys to control the inserted devices.
When set to “none”,the DVD control icons will not pop
up.
When set to “Prog”,the installer can use DIP6=Down
to program the IR code into the interface, so extra new
devices can be controlled.

5. Parameters
No.
Name
Parameters
1 Video input 0.7Vpp with 75 ohm impedance
2 Sync signal 3~5Vpp with 5K impedance,sync with negative pulse.
3 map resolution High resolution:800X480 or VGA(640X480)
4 Av1 , cam 0.7Vpp with 75 Ωimpedance
5 Av1 , cam version NTSC/PAL/SECAM auto switch
6 normal power consumption 2.4W [0.4A @5V]
7 Standby current < 10uA
8 Reverse trigger threshold >5V trigger
9 SD map SD card storage,support variant map versions,including NaviOne,
navitel,Sygic,Igo,Primo etc.
10 Work temperature -40 ~ +85C
11 size 15.22cm * 9cm * 2.1cm
12 Internal navi module
operation
4-wire touch or touch through CAN
13 USB port Max 3A output,with OTG
7/ 7
Other Setma Car Video System manuals


