Setma E09ME22007 User manual

!"#$%&'"%(#)"*+&,"-&.$-&/(0)"&1&2)03"&4*#3-,$53
Instruction Manual
Camera Interface for New Mercedes-BENZ NTG 5.0 5.1 5.2
Model name
E09ME22007
Released Date
2019-4-15
Manual Version
1.2
Language
English
All manuals and user guides at all-guidesbox.com
all-guidesbox.com

!"#$%&'"%(#)"*+&,"-&.$-&/(0)"&1&2)03"&4*#3-,$53
Contents
1.Warning ..........................................................................................................................................................................................3
2.Compatibility ..................................................................................................................................................................................5
3.Features..........................................................................................................................................................................................6
All manuals and user guides at all-guidesbox.com
!
!"#$%&'"%(#)"*+&,"-&.$-&/(0)"&1&2)03"&4*#3-,$53!
&!
&
&
!
! ! ! !
&
!
!
!
4.Specifications................................................................................................................................................................................7
5.Package Components ...................................................................................................................................................................8
6.Wiring Diagram ..............................................................................................................................................................................9
7.DIP Switch Settings .....................................................................................................................................................................11!
8.Operation Instruction ..................................................................................................................................................................13
9.DVR Switching .............................................................................................................................................................................16
!
All manuals and user guides at all-guidesbox.com
!
!"#$%&'"%(#)"*+&,"-&.$-&/(0)"&1&2)03"&4*#3-,$53!
&!
&
&
!
! ! ! !
&
!
!
!
△,!Warning:
!In order to protect the driving safety and avoid break the traffic law; please DO NOT operate the interface while driving.
!The reversing surveillance function just is used in reversing assistance. Please check the entire surroundings while
reversing.
!All steps of installation should be done by the well-trained specialist.
!During installation, the ignition key should be taken off and after all installation finished, connect power cable last.
!Please DO NOT plug or pull the connected cables in the state of power-on, in order to avoid damaged monitor or
accessory.
!Install wiring in a manner in which cables will not come in contact with metal parts. The wiring may be damaged by
contact with metal parts, resulting in fire and shocks. Avoid all contact with hot surfaces when wiring the main unit. High
temperatures may damage wiring, causing shorts, arcing and fires.
All manuals and user guides at all-guidesbox.com
!
!"#$%&'"%(#)"*+&,"-&.$-&/(0)"&1&2)03"&4*#3-,$53!
&!
&
&
!
! ! ! !
&
!
!
!
!Please DO NOT put the product in the damp environment or water, in order to avoid electric shock,damaged and fire
accident caused by a short circuit.
!Kindly check all components are in the box when receiving the product. If anything missing, inform to the
supplier/manufacturer.
!Start the engine before loading, check the interface whether have function displayed, key control whether correct, the
vehicle interface whether having a scratch. Please give the feedback to the supplier/manufacturer if there have any
questions.
!Please note that put the disassembled automotive components in a good way on the installation process, avoid
scratching the instrument panel, the leftovers of connecting cables need to handle and DO NOT leave it in the car. The
connecting plug must be insulated in order to short circuit.
!The cables should be connected in a good way, the vehicle installation space is a little small, so reduce space usage as
far as possible. There should be a good plan about connect cables, avoid affecting the active component of connecting,
such as control components of turning the steering wheel, throttle and brake pedal. There need to be fastened after
connecting cables in case of a drop.
All manuals and user guides at all-guidesbox.com

!
!"#$%&'"%(#)"*+&,"-&.$-&/(0)"&1&2)03"&4*#3-,$53!
&!
&
&
!
! ! ! !
&
!
!
!
2.Compatibility:
All manuals and user guides at all-guidesbox.com
all-guidesbox.com

!
!"#$%&'"%(#)"*+&,"-&.$-&/(0)"&1&2)03"&4*#3-,$53!
&!
&
&
!
! ! ! !
&
!
!
!
3.Features:
A. Support Intelligent Parking Assist System including PDC (Parking Distance Control) and FPG
(Flexible Parking Guidelines)
B. Support further software update by TF Card
C. Support power Supply for rear view camera
D. Support power supply for DVR device
E. Support automatically switched to front view camera, auto trigger after R to D gear
All manuals and user guides at all-guidesbox.com

!
!"#$%&'"%(#)"*+&,"-&.$-&/(0)"&1&2)03"&4*#3-,$53!
&!
&
&
!
! ! ! !
&
!
!
!
!
4.Specifications
A. Interface I/O Spec:
Input:CVBS*3(Front/RearViewCamera,360,Video),VGA*1(Specific 360 Panoramic System)
Output:LVDSOutput
B. Power Spec:
InputPower:9V-16V
All manuals and user guides at all-guidesbox.com

!
!"#$%&'"%(#)"*+&,"-&.$-&/(0)"&1&2)03"&4*#3-,$53!
&!
&
&
!
! ! ! !
&
!
!
!
!
Consumption:6W
C. Package Content:
InterfaceUnit*1
MainPowerHarness*1
LVDSCable*1
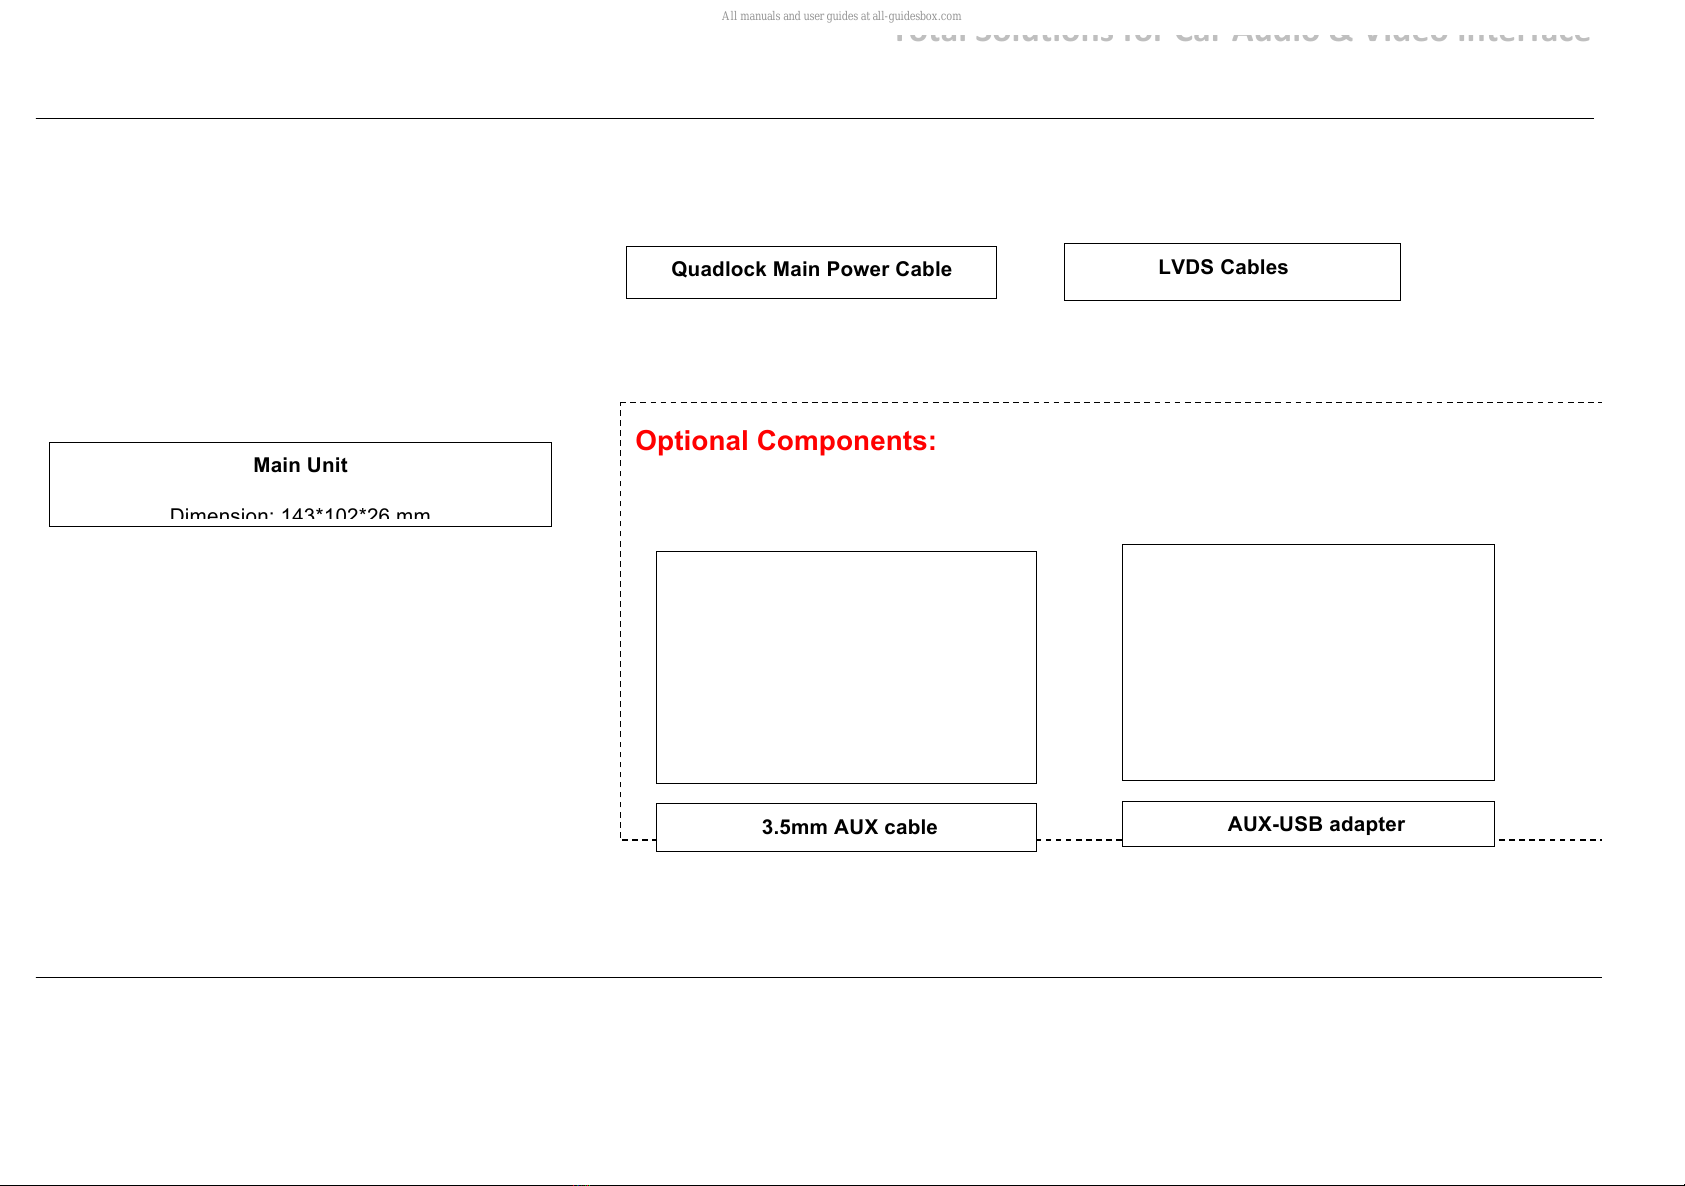
5.Package Components
!
!
All manuals and user guides at all-guidesbox.com
!
!"#$%&'"%(#)"*+&,"-&.$-&/(0)"&1&2)03"&4*#3-,$53!
&!
&
&
!
! ! ! !
&
!
!
!
6.
Main Unit
Dimension: 143*102*26 mm
&&&&&& LVDS Cables
Quadlock Main Power Cable
!
Optional Components:
!
!
3.5mm AUX cable !
AUX-USB adapter
!
All manuals and user guides at all-guidesbox.com

!
!"#$%&'"%(#)"*+&,"-&.$-&/(0)"&1&2)03"&4*#3-,$53!
&!
&
&
!
! ! ! !
&
.$-#)6$*&!357*"%"89&|!www.icartizan.com!
!
!
6.Wiring Diagram
!
!
!
!
!
!
All manuals and user guides at all-guidesbox.com
all-guidesbox.com

!
!"#$%&'"%(#)"*+&,"-&.$-&/(0)"&1&2)03"&4*#3-,$53!
&!
&
&
!
! ! ! !
&
.$-#)6$*&!357*"%"89&|!www.icartizan.com!
!
!
!!!
ACC_OUT! !
VCC 12V
360 Reverse DET
Supply power for DVR or other video devices. Just
connect the ACC_OUT (RED) when use
aftermarket front view camera
!
Supply 12V power for backup camera
!
Reverse detect (Connect to 360 reverse detect
when install 360, otherwise don’t have to )
Rear!View!Camera/360!(PAL/NTSC)!video!input!
Chart A
&
2.
All manuals and user guides at all-guidesbox.com
!
!"#$%&'"%(#)"*+&,"-&.$-&/(0)"&1&2)03"&4*#3-,$53!
&!
&
&
!
! ! ! !
&
.$-#)6$*&!357*"%"89&|!www.icartizan.com!
!
!
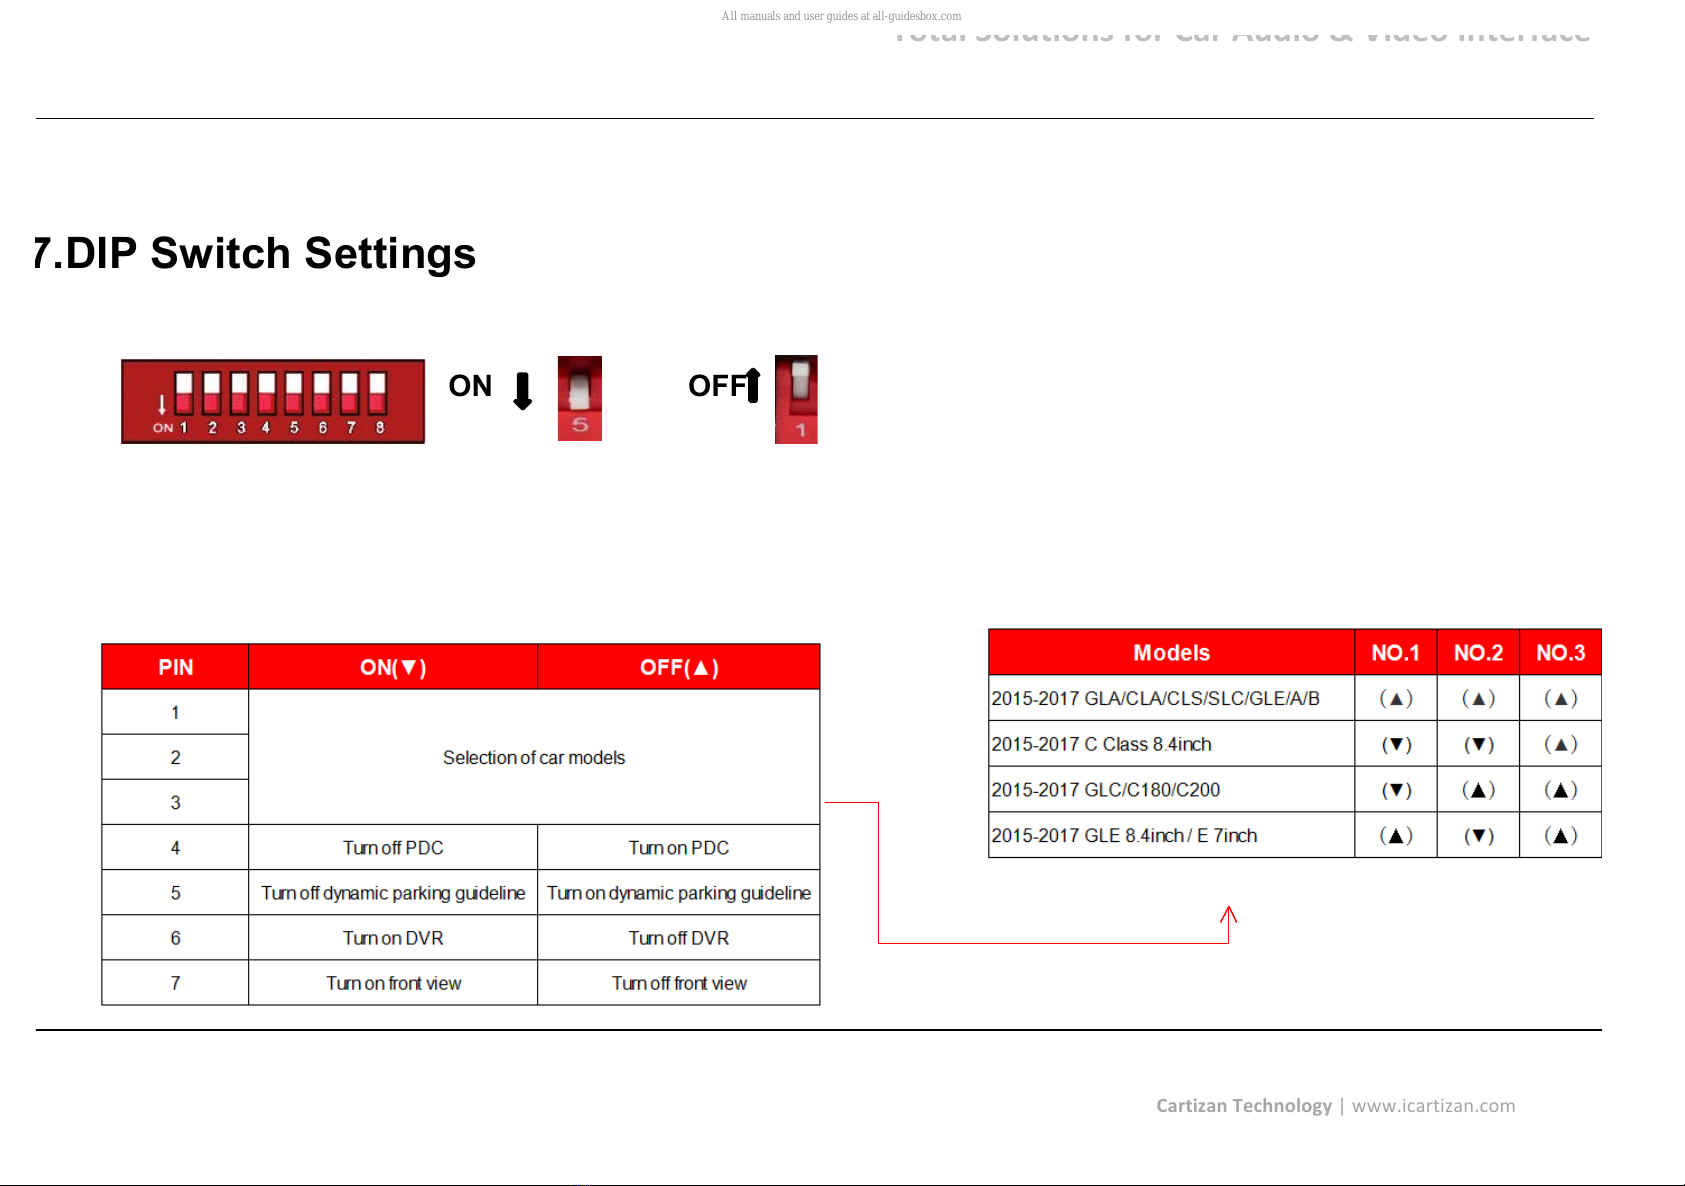
7.DIP Switch Settings
!!!!!!!!!!!!!!!!!!!!!!!!!!!!!!!!!!!!!!!!!!
ON OFF &
!
All manuals and user guides at all-guidesbox.com
!
!"#$%&'"%(#)"*+&,"-&.$-&/(0)"&1&2)03"&4*#3-,$53!
&!
&
&
!
! ! ! !
&
.$-#)6$*&!357*"%"89&|!www.icartizan.com!
!
!
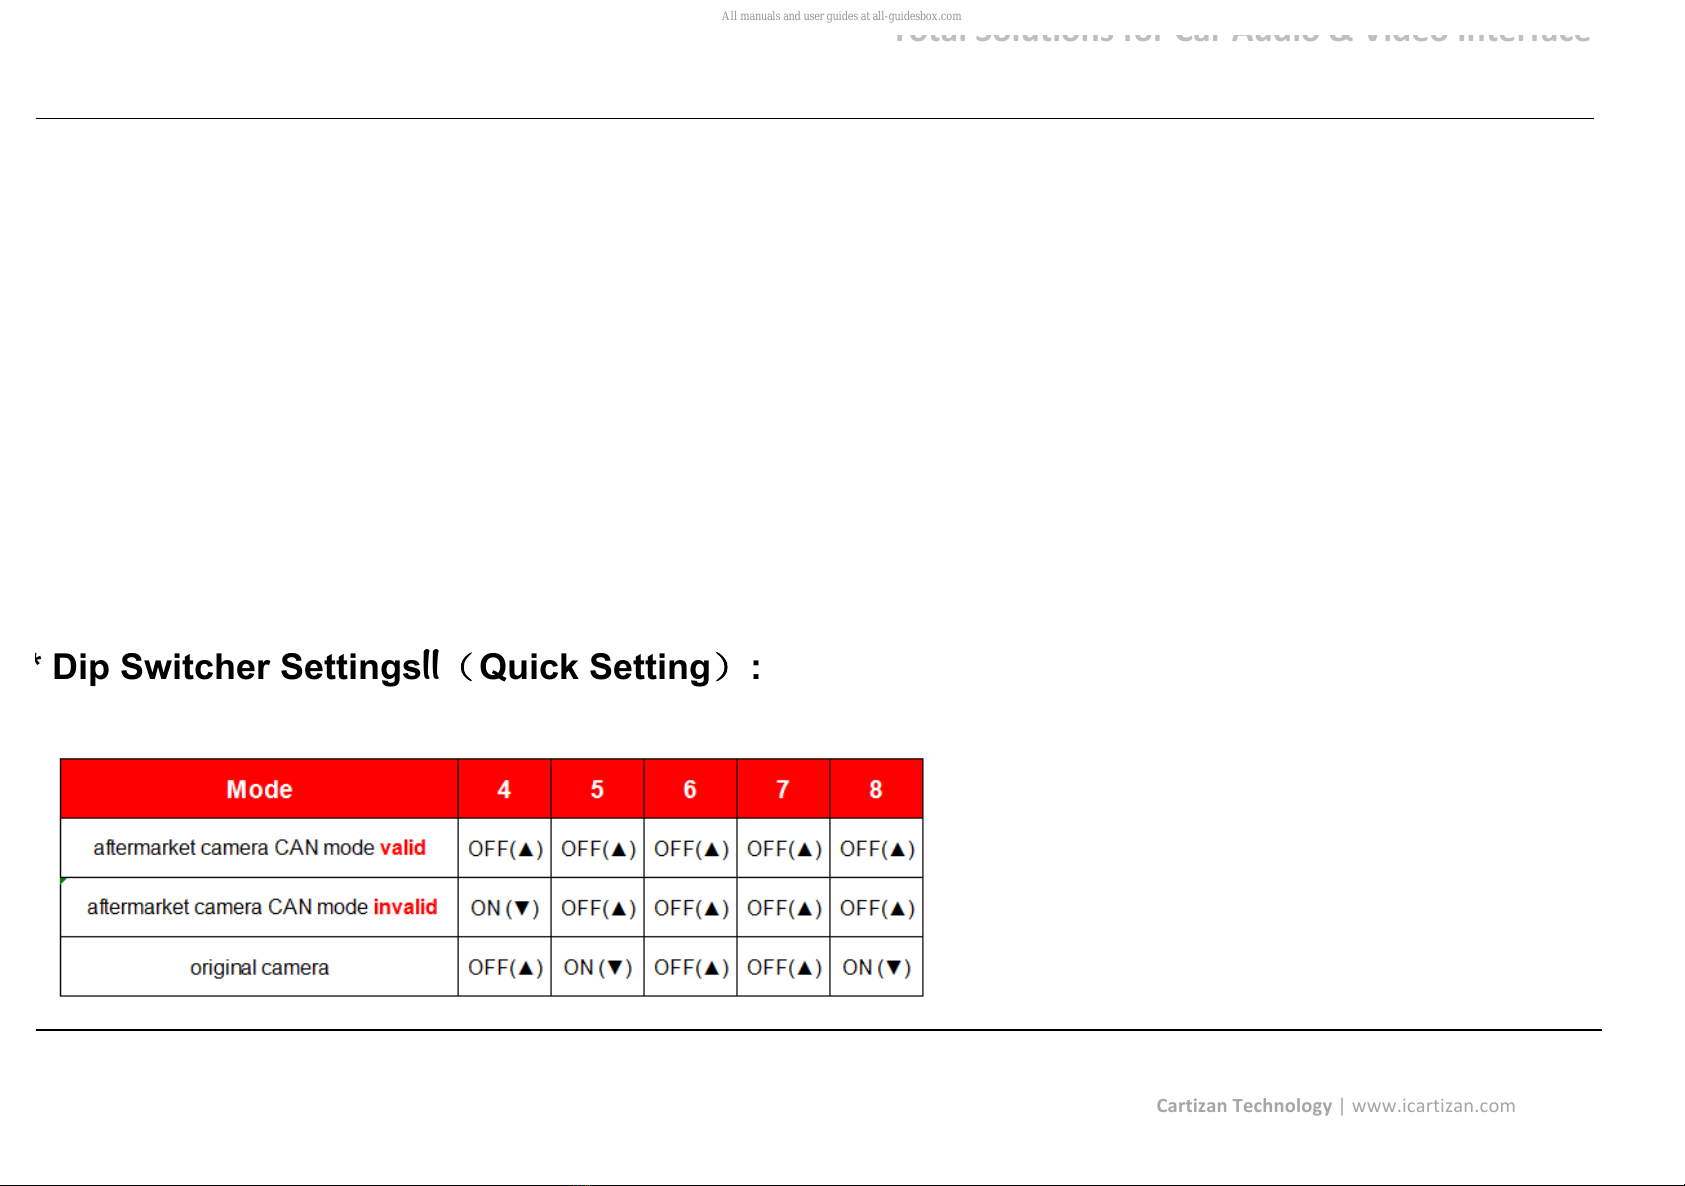
* Dip Switcher SettingsⅡ(Quick Setting):
All manuals and user guides at all-guidesbox.com

!
!"#$%&'"%(#)"*+&,"-&.$-&/(0)"&1&2)03"&4*#3-,$53!
&!
&
&
!
! ! ! !
&
.$-#)6$*&!357*"%"89&|!www.icartizan.com!
!
!
8. Operation Instruction
!
!Note: Please use the protective measures, avoid damaging the original car accessories
1. Please press the red circle position 2. Open the silver button panel 3. Remove the two screws
All manuals and user guides at all-guidesbox.com

!
!"#$%&'"%(#)"*+&,"-&.$-&/(0)"&1&2)03"&4*#3-,$53!
&!
&
&
!
! ! ! !
&
.$-#)6$*&!357*"%"89&|!www.icartizan.com!
!
!
4. Hold up with both hands,the center stack will appearance. 5. Plug the LVDS cables from the head unit
All manuals and user guides at all-guidesbox.com
all-guidesbox.com

!
!"#$%&'"%(#)"*+&,"-&.$-&/(0)"&1&2)03"&4*#3-,$53!
&!
&
&
!
! ! ! !
&
.$-#)6$*&!357*"%"89&|!www.icartizan.com!
!
!
6.Remove the screws from head unit 7. Connect to the power cables from head unit
All manuals and user guides at all-guidesbox.com
!
!"#$%&'"%(#)"*+&,"-&.$-&/(0)"&1&2)03"&4*#3-,$53!
&!
&
&
!
! ! ! !
&
.$-#)6$*&!357*"%"89&|!www.icartizan.com!
!
!
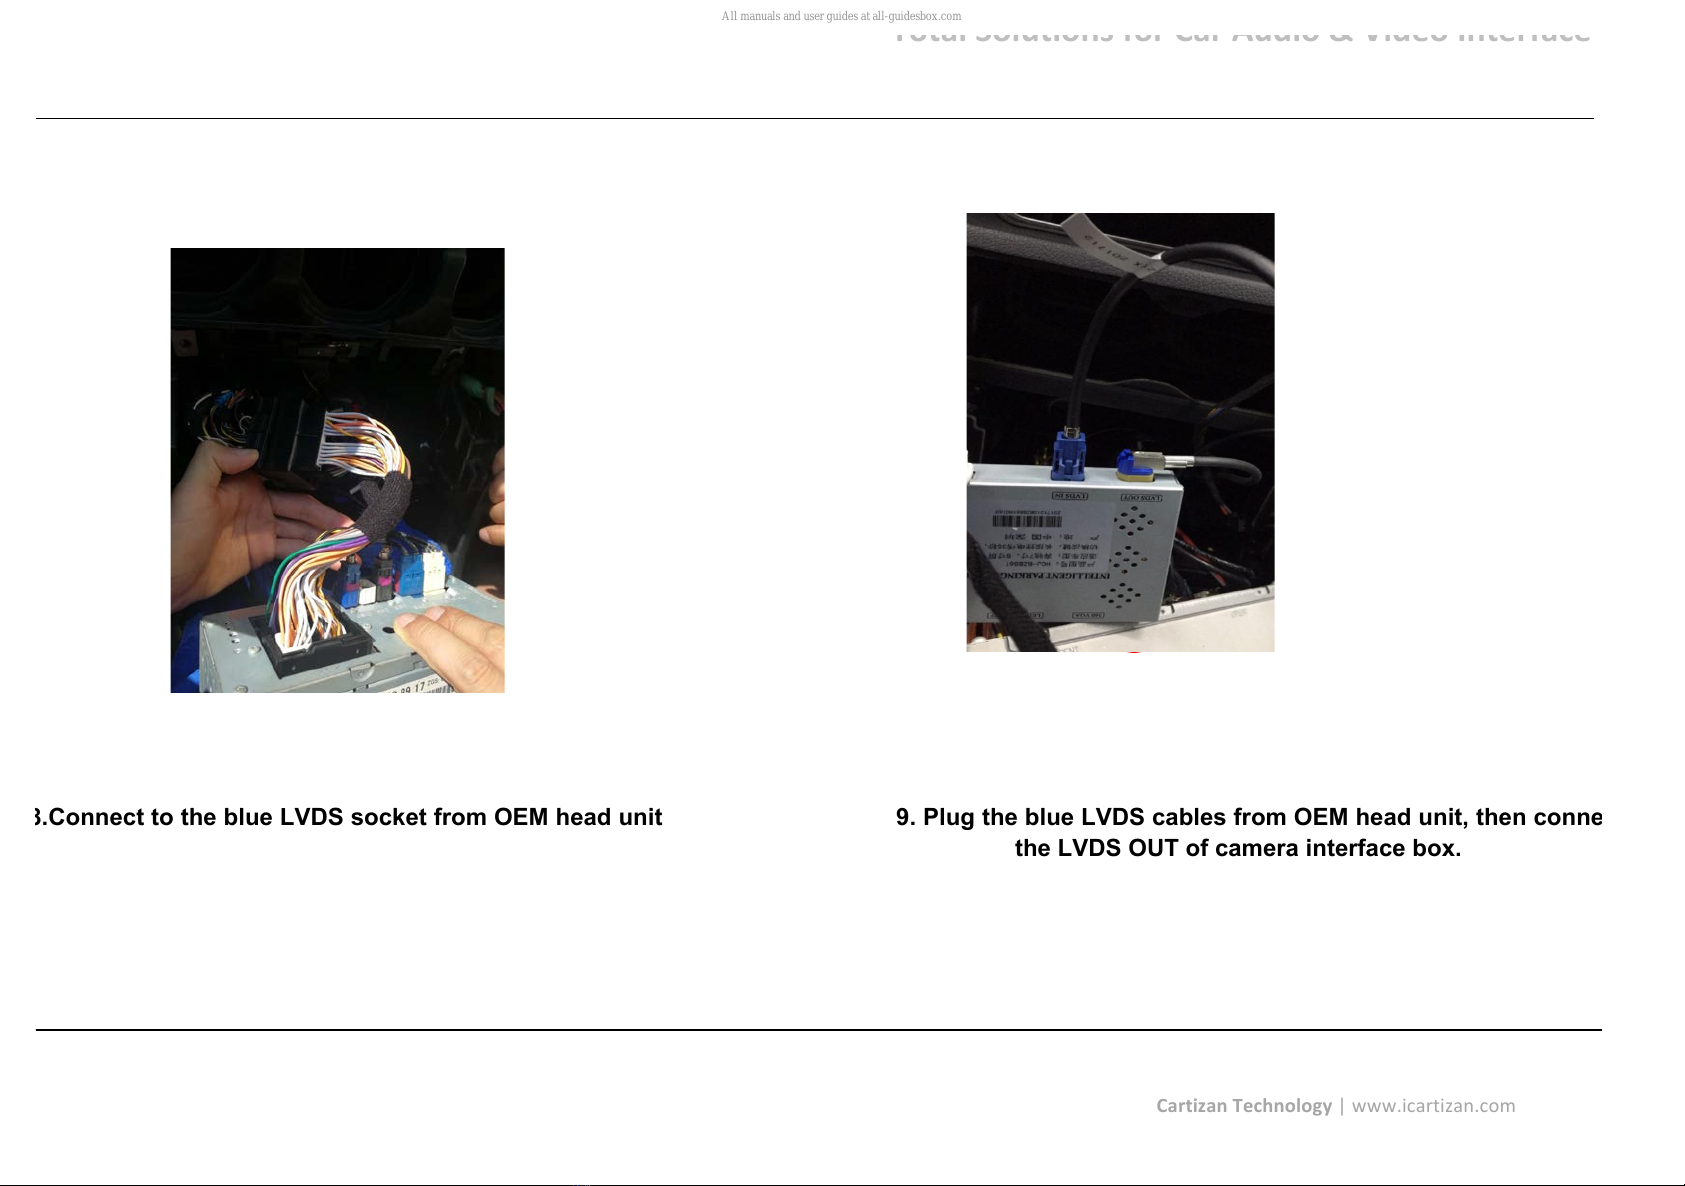
8.Connect to the blue LVDS socket from OEM head unit 9. Plug the blue LVDS cables from OEM head unit, then connect to
the LVDS OUT of camera interface box.
All manuals and user guides at all-guidesbox.com

!
!"#$%&'"%(#)"*+&,"-&.$-&/(0)"&1&2)03"&4*#3-,$53!
&!
&
&
!
! ! ! !
&
.$-#)6$*&!357*"%"89&|!www.icartizan.com!
!
!
9. DVR Switching
Please put on (▼) the dip switch No.6, turn on the DVR, then long press 2
seconds to enter DVR by press hang up button on steering wheel.
All manuals and user guides at all-guidesbox.com
Other manuals for E09ME22007
1
Table of contents
Other Setma Car Video System manuals


Popular Car Video System manuals by other brands


Hyundai
Hyundai ADC40S2AN manual

Jensen
Jensen VM9022 - DVD Player With LCD Monitor Installation and operation manual

Pioneer
Pioneer Super Tuner IIID AVH-P5100DVD Operation manual

TOP VEHICLE TECH
TOP VEHICLE TECH GRKAU04 installation manual

Pyle view
Pyle view PLBT72G manual

Innovatek
Innovatek IN-433B owner's manual

Pioneer
Pioneer AVH-P6800DVD - DVD Changer With LCD Monitor installation manual

Jensen
Jensen MVB85A - 8.5" LCD Overhead Monitor Operation manual

JVC
JVC KW-V420BT instruction manual

Pyle
Pyle PLTV64R owner's manual

Audiovox
Audiovox VOH681 Operation manual

INDIWORK
INDIWORK A-LINK For V-sensus instruction manual