Seuic UTouch User manual

SEUIC Technologies Co., Ltd.
SEUIC
Reference Manual
Instruction for Use of UTouch RFID Handheld
Terminal
Version 1.5

SEUIC Technologies Co., Ltd.
CopyrightAnnouncement
The information in this Manual is provided in the way of “maintaining its original
form” and subject to change without prior notice.
SEUIC Company makes no warranty for the contents of this Manual, including but
not limited to the warranty of implied merchantability and applicability for a
particular purpose. SEUIC Company is not responsible for errors contained in this
Manual and for accidental or incidental losses caused by the supply, implementation
or use of this Manual or the examples in it.
Software copyright 2019 -2021 SEUIC Company
This Manual contains ownership information protected by copyright. Copyright is
reserved. Except as permitted by copyright law, no part of this Manual may be
photocopied, reprinted, adapted or translated without the prior written permission of
SEUIC company.
The copyright of this Manual and related application software is owned by SEUIC
Company and protected by the Republic of China and international copyright law.
The brand names and product names mentioned in this Manual are the trade names,
service marks, trademarks or registered trademarks of their respective owners.
If you need more product information and support, please contact our sales
representative or inquire directly on our website.
SEUIC Technologies Co., Ltd.
No. 15, Xinghuo Road, High-tech Industrial Development Zone, Jiangsu Province
Post Code: 210061
Tel: 86-25-52261298
Fax: 86-25-52268995
Official Website of Enterprise: www.Seuic.com
Official Website of Products: www.ChinaAUTOID.com
Service Hotline: 400-677-0876
Service Email: AUTOID@seuic.com

SEUIC Technologies Co., Ltd.
Document Release History
Version
No.
Modification Content Date of
Modification
Modified by
V1.0 Initial release of Instruction in Chinese 20191104
V1.1 Modify six views 20200401 Yao Guobao
V1.2 Modify the name 20200413 Yao Guobao
V1.3 Update picture 20200718 Kai Wang
V1.4 Update picture 20210803 Raining
V1.5 Update picture 20210812 Raining

I
Contents
Chapter I Instructions for Use........................................................................................3
1.1 Precautions for Laser Scanning Engine............................................................ 3
1.2 Safety Precautions.............................................................................................3
1.3 Maintenance Precautions.................................................................................. 3
Chapter II Appearance Introduction...............................................................................5
Chapter III Keyboard..................................................................................................... 8
Chapter IV Quick Start.................................................................................................10
4.1 First Use................................................................................................10
4.2 Startup.............................................................................................................10
4.3 Shutdown.........................................................................................................10
4.4 Restart............................................................................................................. 10
4.5 Install SIM Card..............................................................................................10
4.6 Install Micro SD Card..................................................................................... 11
4.7 Install Battery..................................................................................................11
Chapter VAbout Charging...........................................................................................13
5.1 Charging Time.................................................................................................13
5.2 Charging Temperature.....................................................................................13
5.3 Battery Power Supply..................................................................................... 13
5.4 Precautions for Use of Battery........................................................................13
5.5 LED Indicator Lamp....................................................................................... 14
Chapter VI Main Screen...............................................................................................15
6.1 Status Bar Icon................................................................................................15
Chapter VII Settings.....................................................................................................17
7.1 WLAN.............................................................................................................17
7.2 Bluetooth.........................................................................................................19
7.3 SIM Card.........................................................................................................22
7.4 Traffic Usage Status........................................................................................22
7.5 More................................................................................................................23
7.5.1 Flight Mode...........................................................................................24
7.5.2 NFC.......................................................................................................24
7.5.3 Android Beam....................................................................................... 24
7.5.4 Network Sharing and Portable Hotspot.................................................24
7.5.5 VPN.......................................................................................................25
7.5.6 Mobile Network.................................................................................... 26
7.5.7 Reset Network Settings.........................................................................28
7.6 Display............................................................................................................ 29
7.7 Notification..................................................................................................... 32

II
7.8 Sound...............................................................................................................32
7.9 Application......................................................................................................33
7.10 Storage...........................................................................................................34
7.11 Battery...........................................................................................................35
7.12 Location Information.................................................................................... 36
7.13 Security......................................................................................................... 36
7.14 Account......................................................................................................... 37
7.15 Language and Input Method......................................................................... 38
7.16 Backup and Resetting....................................................................................39
7.17 Date and Time...............................................................................................40
7.18 Barrier Free................................................................................................... 40
7.20 Developer Option..........................................................................................41
7.21 About Cell Phone.......................................................................................... 42
Chapter VIII Introduction to Typical Application........................................................44
8.1 Scanning Tools................................................................................................44
8.2 UHF.................................................................................................................49
8.3 System Upgrade.............................................................................................. 55
8.4 Quick Configuration........................................................................................57
8.4.1 Import....................................................................................................58
8.4.2 Export....................................................................................................62
8.5 Feature Settings...............................................................................................64
8.5.1 Touch Screen Glove Mode....................................................................65
8.5.2 Disable Status Drop-down.................................................................... 65
8.5.3 Shield Virtual Key 1..............................................................................65
8.5.4 Shield Virtual Key 2..............................................................................66
Shield Virtual Key 3.......................................................................................66
8.5.6 Disable Transferring the Key Value of Scan Key to Application..........66
8.5.7 Display Scan Hover Button...................................................................66
8.5.8 Disable Drop Detection.........................................................................67
8.6 Digital Certificate White List..........................................................................67
Chapter IX Troubleshooting.........................................................................................71
Introduction to Optional Accessories...........................................................................73

3
Chapter I Instructions for Use
1.1 Precautions for Laser Scanning Engine
Laser radiation. Please do not look directly at the laser beam.
1.2 Safety Precautions
Only the battery and charger designated by our company can be used for your
device; the use of other products may cause battery liquid leakage, overheating,
burst and fire.
It is forbidden to short-circuit the charger; otherwise, it will cause electric shock,
smoking and damage to the charger.
Please do not use the charger when the power cord is damaged, or it will cause
fire and electric shock.
Please do not disassemble or modify the charger; otherwise, personal injury,
electric shock, fire and charger damage will be caused.
When pulling the plug, hold the charger. Pulling the power cord will damage the
wire and cause electric shock and fire.
Clean the device, battery and charger with a soft dry cloth.
Please do not use alcohol, diluent, benzene or other solution to wipe the device.
1.3 Maintenance Precautions
The product has the waterproof and dustproof function, but it shall be avoided to
operate in extremely high-temperature, extremely low-temperature or wet
environment. Please refer to the temperature and humidity standard of product
specification.

4
Press the screen hard, and the screen may be damaged. Please do not use the
resistive touchscreen touch pen to click on the screen to avoid scratching or
damaging the screen. To clean the screen, spray a small amount of commercial
LCD screen cleaner on a soft cloth. Avoid spraying the cleaner directly on the
screen.
Please do not use any chemical cleaner to wipe the LCD screen.
Keep the scanning window clean and free of stains, and do not use sharp objects
to carve on it.
If the product is not used for a long time, please download the data to the
computer for storage.
It takes quite a long time for the battery of the machine to complete charging
when it is first used or recovered after storage.
If any machine fault is found, please record the occurrence information and
contact the maintenance personnel.

5
Chapter II Appearance Introduction
Figure 2-1 Front View
Charging indicator lamp
Information indicator lamp
Light sensor
Front camera
BACK button
HOME button
MENU button
Scanning indicator lamp

6
Figure 2-2 Front View
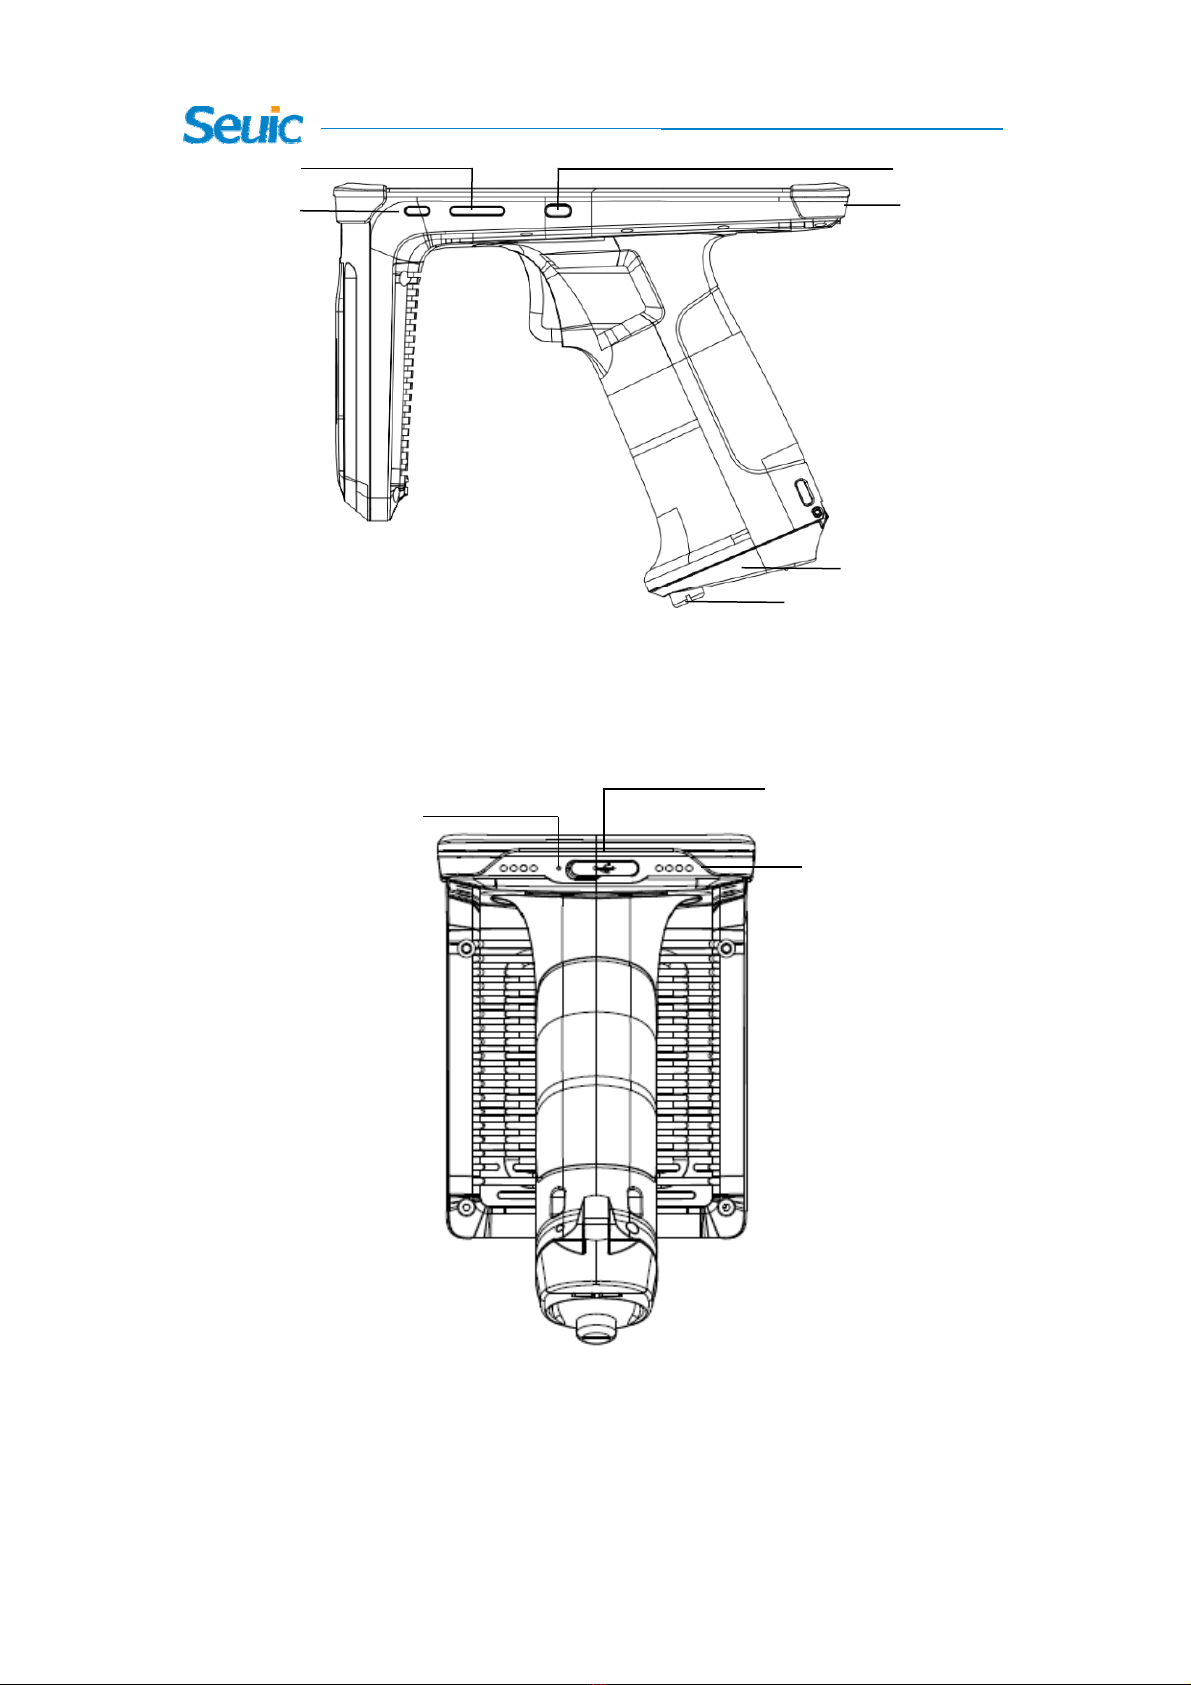
Figure 2-3 Side View
SIM card, MicroSD card
PSAM card slot
Right scan button
Handle scan
button
Headphone jack
Powe
r
b
utton
Camera Flashlight
UHF identifiable area
Secondary mic
7
Figure 2-4 Side View
Figure 2-5 Rear View
Custom button
Volume button Left scan button
Battery cover
Set screw of battery cover
USB interface
USB interface
Loudspeaker
Main mic

8
Chapter III Keyboard
UTouch RFID handheld terminal has 8 buttons in total, including 3 virtual buttons
(Back, Home, Menu) on the screen touchpad, 4 buttons on the side (PPT button,
volume button, left scan button and right scan button), and 1 scan button on the
handle.
Description of buttons:
Table 3-1 Introduction to Buttons
Button Main Function Function Introduction
Home button Click to go back to main screen.
Menu button Click to open the task manager.
Back button
Click to go back to previous interface or exit
the application.
In the character input interface, click to close
the screen keyboard.
Power button
Momentarily press button in the standby state
to put the device in sleep/wakeup mode; press and
hold button for 3S in shutdown state to start
the device.
Volume button
Press the upper half part of button to increase
the system volume; press the lower half part of
button to decrease the system volume.
Left scan button UHFscanning
Right scan button Barcode scanning
Custom button Reserve the custom button

9
Handle scan
button In barcode mode, start barcode scanning
In UHF mode, start/stop label stock-taking.
1. Screenshot shortcut key: Press power + volume down buttons at the same time.

10
Chapter IV Quick Start
4.1First Use
Press and hold the power button for 3S to start the machine. In the working state
of the system, press the Power buttonmomentarily, and the device will enter the
sleep state; in the sleep state, press the Power button momentarily, and the system
will wake up and light up the screen.
4.2 Startup
You can start the machine by pressing the Power button. In deep sleep mode,
press the Power button momentarily to wake up the system. If the machine is
powered by battery, it must be ensured that it has reliable contact with the battery.
4.3 Shutdown
When the machine is started, in non-sleep state, press and hold the Power button
for 2s, open the option menu, select Shutdown, click OK and the machine will be
shut down normally.
4.4Restart
When the machine is started, in non-sleep state, press and hold the Power button
for 2s, open the option menu, select Restart, click OK and the machine will be
restarted normally.
4.5 Install SIM Card
Please follow the following instructions to install SIM card:

11
Insert SIM card in the direction shown in the figure below.
Figure 4-1 Insert SIM Card (1: SIM card, 2: PSAM card)
4.6 Install Micro SD Card
Please follow the following instructions to install Micro SD card:
Insert SD card (microSD or microSDHC) in the direction shown in the figure
below.
Figure 4-2 Insert SD Card
Note: The machine supports hot swapping of SD card.
4.7 Install Battery
The battery of this product is of detachable design. Please follow the following
steps to install the battery:
Unscrew the battery cover screw, open the battery cover and replace the

12
battery.
Frequent battery replacement is not recommended.
Figure 4-3 Battery Cover
Battery cover
Set screw of battery cover

13
Chapter VAbout Charging
Since the battery only has a small amount of electricity for test when leaving the
factory, you must charge the machine before use.
5.1 Charging Time
Battery: It takes about 3 hours to charge the battery through the adapter at the first
time. During charging, the LED light will be on in red, and when the battery is
fully charged, the LED light will be on in green.
5.2 Charging Temperature
The best operating temperature is room temperature, 18 ~ 25 ℃.
The battery will not be charged when the temperature is lower than - 10℃or
higher than 55℃.
5.3 Battery Power Supply
If the wireless network service or data acquisition program is opened, the battery
power will be greatly lost. When these functions are not used, the power supply
of these programs must be turned off to save electricity.
Prompt: If the product is not used for a long time, please charge the whole
machine at least once every two months.
5.4 Precautions for Use of Battery
If the battery runs out, the machine may not be started immediately when the
charger is just plugged in, which is a normal phenomenon. Please keep charging
for a period of time, and then start the machine.
The battery can be recharged, but the battery is consumable. If the standby time

14
of the device is greatly reduced, please replace it with a new battery.
Battery charging time varies with temperature conditions and battery service
conditions. Please charge the battery within a reasonable temperature range.
When the battery power is insufficient, the low battery prompt will pop up by the
device. When the battery level is too low, the device will automatically shut
down.
5.5 LEDIndicator Lamp
The LED indicator lamp in the middle of the upper right corner of the machine
indicates the battery level and charging state of the machine by different colors:
When the USB, power adapter and charging connector are not plugged in, the
red light will flash, indicating that the battery level is too low; please charge in
time;
When the USB, power adapter and charging connector are plugged in, the red
light will be on, indicating that the battery is charging;
When the USB, power adapter and charging connector are plugged in, the
green light will be on, indicating that the battery has been fully charged.
If the LED indicator lamp in the middle of the upper right corner of the machine
flashes in blue (in the form of breathing light), it indicates that there is
information not read; please check it in time.
When scanning a barcode, the LED indicator lamp on the left of the upper right
corner of the machine, it will flash once in red; if not scanning any barcode, it
will not be on.
Remarks: When the system is charging, the blue indicator lamp will not give
prompts.

15
Chapter VI Main Screen
Find the icon, Settings – Application, click the Set button in the upper
right corner of the interface to enter the main screen of settings; there are two main
screens by default, which can be set at will.
Figure 6-1 Main Screen (Trebuchet)
Table 6-1 Items on Main Screen
①Status bar: Display the notification and status icons.
②Display area: Used to place application icons, desktop folders and window
widgets.
③Shortcut bar: Click it to enter the corresponding application.
④Application tray: Click it or slide up to enter the main interface to view all
programs.
6.1 Status Bar Icon
The status icon and notification bar icon are located in the status bar at the top of
the screen to display the device status information and notification, as shown in the
①
②
③
④

16
table below.
Icon Description Icon Description
Detected available WLAN
network Signal intensity
Connected to WLAN network No SIM card inserted
Uploading data Downloading data
Enabled portable WLAN Mobile network connected
Do not disturb mode Flight mode
Vibration mode Scan on
Missed calls Battery charging
New message Battery fully charged
Captured screen shot Low battery level
Alarm clock Headphone plugged in
Preparing microSD card Bluetooth
USB debugging, USB
connection
Table 6-2 Status Icon and Notification Bar Icon

17
Chapter VII Settings
7.1 WLAN
Find the icon:
->Settings
->Network and internet
->WLAN
Wi-Fi 2.4G provides wireless network access range of up to 450 feet (150m), and
5G provides wireless network access range of up to 300 feet (100m) (note: industrial
AP, in open area). To use Wi-Fi on your device, you must connect to a wireless access
point or [Hotspot].
Note: The availability and coverage of Wi-Fi signals depend on its number,
infrastructure, and other objects penetrated by signals.
Open Wi-Fi and connect to a wireless network.
1. Click WLAN Off/On button to open Wi-Fi. Automatically scan available
wireless networks.
2. Then the Wi-Fi network list will display the network name and security
settings (open network or encrypted network) of the found Wi-Fi network.
3. Touch one of the Wi-Fi networks to connect to it. When you select an open
network, the device will automatically connect to the network. If an encrypted
network is selected, it’s required to enter the corresponding password before touching
the connection.
Table of contents


