Sharp ZQ-2400 User manual

SHARR

Congratulations on purchasing the
ZQ-2000/ZQ-2200/ZQ-2400
Electronic
Organizer. Please read this operation manual carefully to familiarize
yourself with all the features of the Organizer and to ensure years of reliable
operation. Also, make it a point to keep this operation manual on hand
for reference.
Notes:
l
One of the models described in this manual may not be available in
some countries.
l
Unless otherwise specified, the text material applies to all three models.
NOTICE
l
SHARP strongly recommends that separate permanent written records be kept of
all important data. Data may be lost or altered in virtually any electronic memory
product under certain circumstances. Therefore, SHARP assumes no responsibility
for data lost or otherwise rendered unusable whether as a result of improper use,
repairs, defects, battery replacement, use after the specified battery life has expired,
or any other cause.
l
SHARP assumes no responsibility, directly or indirectly, for financial losses or claims
from third persons resulting from the use of this product and all of its functions, such
as stolen credit card numbers, the loss of or alteration of stored data, etc.
l
The information provided in this manual is subject to change without notice.
1

Features of the Organizer
Clock function
Displays current date and time.
+PAGE
19
Calendar function
Contains a calendar, which extends from the year 1901 to 2099. Important dates
on your monthly calendar will be flagged, so you can check what has been scheduled
for any designated day.
--+
PAGE 23
Schedule function
Allows you to store important dates and events. Important dates will also be flagged
on the calendar to remind you to check them. A schedule alarm can also be set.
+
PAGE 29
Anniversary function
Allows you to register wedding anniversaries, birthdays, etc. After registration, the
corresponding day is considered an anniversary for every year from 1901 to 2099.
+
PAGE 47
Telephone book function
Three telephone lists allow you to list business and private numbers separately.
Phone numbers can be recalled in alphabetical order using the sequential search
function, or directly Lecalled by entering.
+
PAGE 53
‘Memo function
Allows you to note important details, such as timetables and also store price lists,
etc.
+
PAGE 63
Calculator
Contains a lo-digit calculator with memory.
+
PAGE 71
Secret function
Protects personal information. A password is required to see the information you
mark as secret.
+
PAGE 75
Data transfer function
By using an optional cable, data can be transferred between two Organizers.
+
PAGE 89
3

Contents
BEFOREUSE........................................7
GETTING STARTED
................................. .9
Partnames
............................................ .
Display symbols
.......................................
.I0
Keynotations..........................................ll
Contrast adjustment
....................................
.I2
Turning the “beep” on and off
............................
.I2
BASIC ENTRY PROCEDURES
.........................
.I3
Entering characters
....................................
.I3
Making corrections
.....................................
.15
USING THE CLOCK
...............................
..I
9
Displaying the time
....................................
.I9
Settingtheclock .....................................
..I
9
USING THE CALENDAR FUNCTION
...................
.23
Displaying and changing the monthly calendar
..............
.23
Displaying the number of days and weeks between
January 1st or December 31 to a specified date
.............
.27
USING THE SCHEDULE FUNCTION
...................
.29
Entering data in the SCHEDULE mode
....................
.29
Recalling scheduled data
...............................
.33
Editing scheduled data
.................................
.40
Copyingscheduleddata ...............................
..4 1
Deleting scheduled data
.................. .............
.42
Using the schedule alarm
...............................
.45
USING THE ANNIVERSARY FUNCTION
................
.47
Entering anniversaries
..................................
.47
Recalling anniversaries
.................................
.48
Checking anniversaries
.................................
.48
Editing anniversaries
...................................
.49
Deleting anniversaries
..................................
-50
USING THE TELEPHONE DIRECTORY.
...............
..5
3
Designating the file names
.............................. 53
4

Entering listings
.......................................
54
Recalling listings
......................................
56
Editing listings
....................................... ..5
8
Deleting listings
.......................................
59
USING THE MEMO FUNCTION ........................63
Entering memos
....................................... .63
Recallingmemos.. ...................................
..6 4
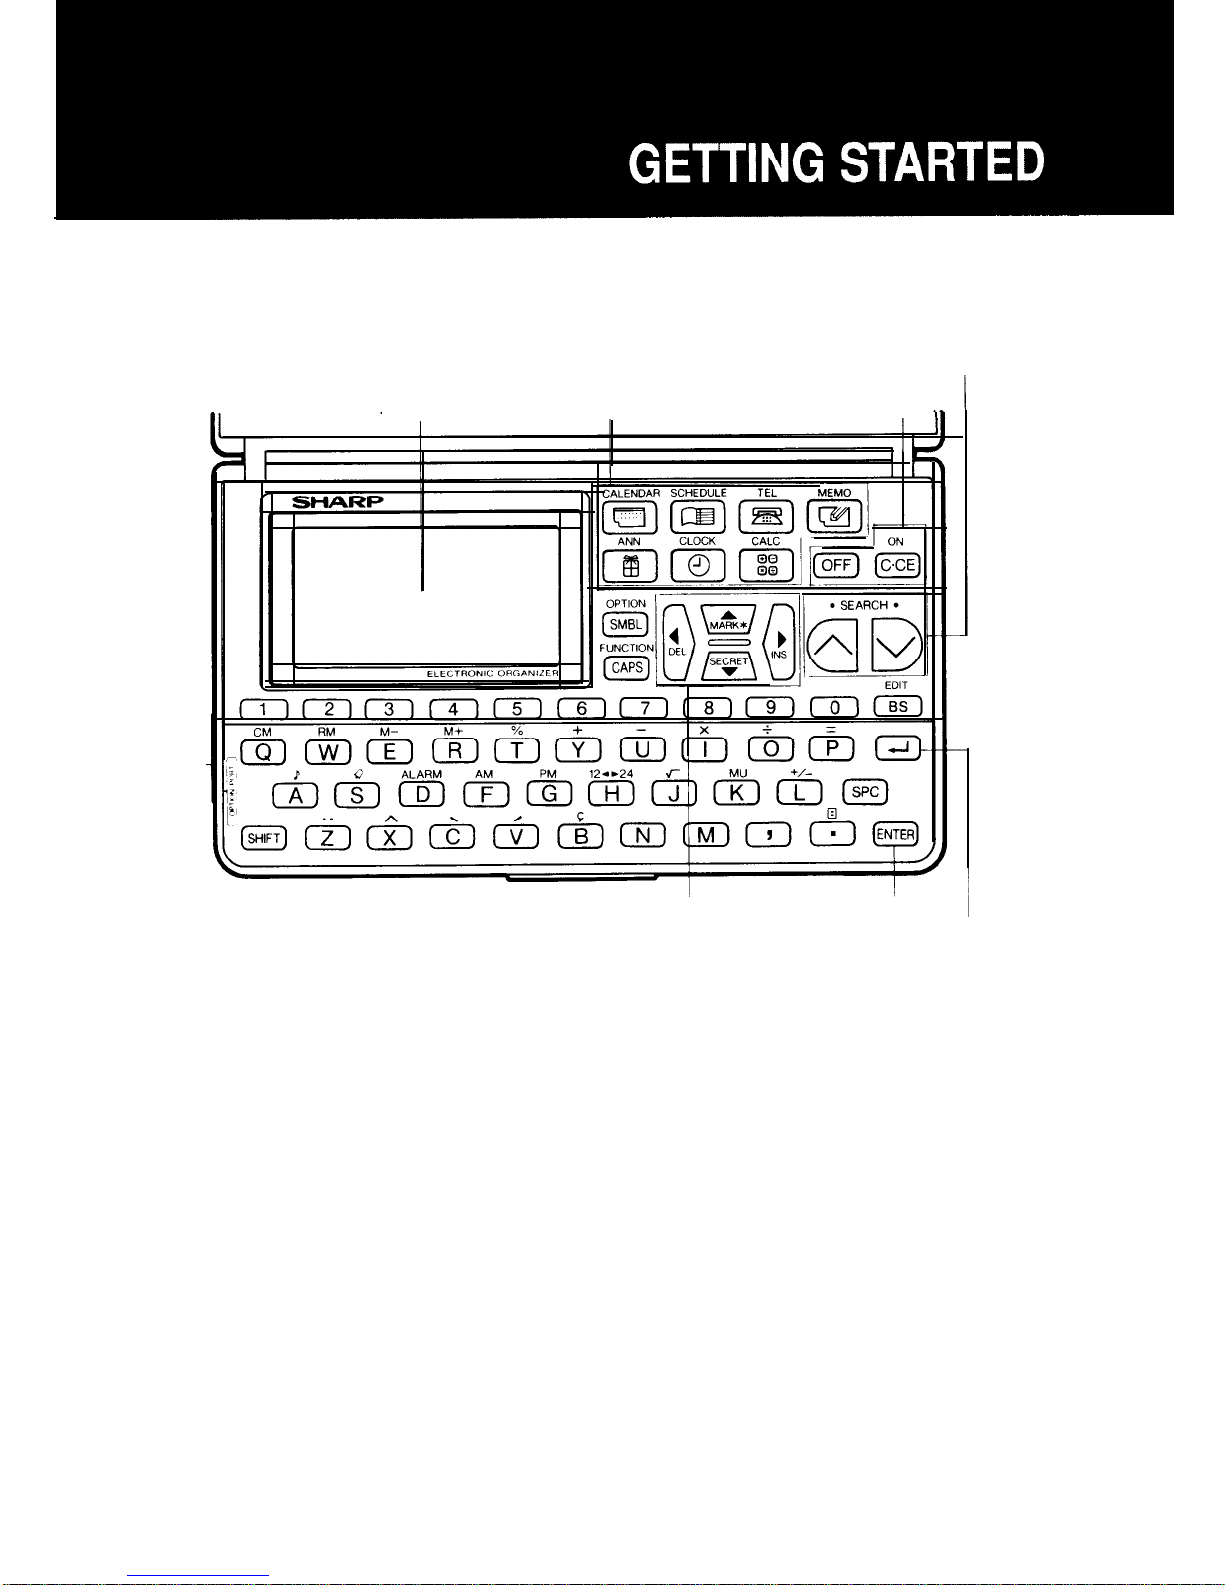
Editingmemos.........................................6
6
Deleting memos
....................................... .67
USING THE ORGANIZER AS A CALCULATOR ..........
.71
Using the Organizer in the CALC mode
....................
.71
When the error message appears
......................... .73
USING THE SECRET FUNCTION ...................... .75
Registering a password
................................. .75
Coding data as secret data
.............................. .76
Turning off the secret function
............................ .78
Turning on the secret function
............................ .79
Recalling secret data
................................... .79
Declassifying secret data by removing the secret code
........ .80
Deleting and changing the password
......................
.81
What to do if you forget the password
..................... .82
USING THE MISCELLANEOUS FUNCTIONS ............ .85
Checking the memory capacity
........................... .85
Setting the date format
................................. .86
USING THE DATA TRANSFER FUNCTION . . . . . . . . . . . . . . .89
Transferring data between ZQ-2000 series Organizers . . . . . . . .
.89
Transferring data with a ZQ-5000 series or IQ series Organizer .
.93
Transferring data with an EL series Organizer (including
Auto Dialer) . . . . . . . . . . . . . . . . . . . . . . . . . . . . . . . . . . . . . . . . . .
.94
APPENDIX ....................................... ..9 7
Caring for your Organizer
............................... .97
When trouble occurs
................................... .98
Replacing batteries
.................................... .99
Specifications
........................................
.I03
5

Be sure to perform the following procedures before using the Organizer
for the first time:
1. Remove the insulation sheet.
Note:
When you remove the insulation sheet, write down the date on
the label on the back of the Organizer (refer to page 101).
2. Initialize the Organizer.
While holding
[ml
, press the RESET switch on the back. Release
the RESET switch and then release
m]
. The following display
will appear:
Data has
been broken!
Clear all
CAPS
i’
Note:
Under certain conditions the message may appear as “DATA
ALL CLEAR OK (Y/N)?“. Proceed to the next step in either case.
Press
vi.
*
TEL 1 4
NAME
?
CAPS
i’
The Organizer is initialized and then the TEL1 directory is displayed.
,

Part names
Search keys
Display Command center Power on/off keys
Option port
(4-pin option jack) Cursor movement keys Enter key
Return key

Display symbols
m
EDIT
SHIFT
CAPS
*
El
a
Q
t+
This symbol appears when the operating battery level is low.
The entry on the display may be edited.
-1
has been pressed..
Capital letters will be entered. (To enter small letters, turn “CAPS”
off by pressing
I].)
The data appearing on the display is secret data accessible only
by password.
The secret function is in effect. (Secret data cannot be recalled
without the password.)
A “beep” will sound when a key is pressed.
The specified schedule alarm(s) will sound.
There is more data which is not on the display. The data can
be displayed by pressing
m[
or
pl
.
Note: In this manual, only the symbols necessary for explanation will be
shown.
10

Key notations
This manual uses the following notations for key operations and functions.
Key
I
Notation
CALENDAR
0
1
CALENDAR
1
. . . . . .
u
. . .
m
orwMARKlr]
Aor
w[
Note
Keys with only one function always
appear in the manual with the function
enclosed in a box.
Keys with multiple functions appear in
the manual with only the contextually
appropriate function boxed; i.e.,
1
&&*
1
will sometimes appear as
-1
and sometimes as
m.
Alphabetical keys with multiple func-
tions appear sometimes as unboxed
letters and sometimes as the boxed
function name, as per context.
Numerical keys and alphabetical keys
with single function are notated only
with unboxed numbers and letters.
Note: The blue functions and symbols are operated by press-
ing
-1
(“SHIFT” will be displayed) and the appropriate
key.
Example: Functions as a cursor movement
key.
m
-1
: Function as a delete
key.
Distinguishing between “0” and “0”
Zero is indicated as “0” on the display and also in this manual when it may
be confused with the letter “0”.
11

Contrast adjustment
Adjust the display contrast to make the display easier to read.
1. Press
-1
1FUNCTION 1.
<
FUNCTION
>
I
MEMORY CHK
LCD CONT
DATA DEL
2. Select “2 LCD
CONT”.
2
LCD CONT
A-DARK
V-LIGHT
3. Press
a
or
m
to darken or lighten the display as required.
The amount of contrast will change continuously when either
m
or
m
is held.
4. After adjusting the contrast, press
1-j
.
Turning the “beep” on and off
While
“
&”
is displayed, a “beep” will sound when a key is pressed. To
turn the “beep” on and off, press
-1
ml.
The “beep” will not
sound after
“a”
goes off. To turn the “beep” back on, repeat the process.
12

To practice entering characters and numbers, select the MEMO mode, for
example, and enter the characters as follows:
rMi3iaJ
The MEMO mode will be selected.
MEMO ?
CAPS
Entering characters
Entering the letters
1. Enter “ABCDE” in capital letters, for example.
ABCDE
-
I
CAPS
2.
To enter “abcde” in small letters, press
-1
. After “CAPS”
disappears, enter “abcde”.
-1
ABCDE
To enter capital letters again, turn “CAPS” back on by pressing
l7FSJ
again.
Note: To enter a hyphen, press
m
I-1.
13

Entering non-English characters
Enter “A”, “ii”,
‘W
and
‘W’,
for example.
L
II
IFIA
*
“$I is entered by pressing
m
El
. Non-English charac-
ters can also be entered as symbols.
Entering numbers
Enter
“12345”,
for example.
-1
12345
12345-
Entering graphic symbols and special characters
Press
-1
to select the symbol entry mode. A total of 33 symbol
displays may be selected. To select the symbol display containing the
desired characters, press
m
or
m
. When
the desired
symbol or
character appears, press the number corresponding to its symbol position.
5 symbols will be displayed.
MEMO ?
1.
Enter the symbol entry mode.
-1
j3mq

2. Switch to the next set of symbols.
ml
Each time
m[
is pressed, a new set of 5 symbols will appear in
sequence.
3. Enter
I‘?“.
Press
III
when a ‘I?” appears
next to the number one.
I
Note: When you press
mi
, the previous set of symbols reappears.
The initial symbol display is thus determined by your previous
choice. The 5 most recently used symbols and characters will
appear in the initial symbol display.
Nate:
To exit the symbol entry mode, press
-1
_
Entering the new-line character
‘2”
Enter the
“cl”
character to continue entry on the next line by
preS+SinCJ
F’J
, Then the cursor moves to the beginning of the next line.
Making corrections
Misspellings and incorrect entries can be corrected using
the cursor keys
as well as
-1
I]
and
I=
m
as follows:
Correcting misspellings
If you have entered “NEW
YARK”
for “NEW YORK”, for example, the entry
may be corrected as follows:
1.
Enter the incorrect spelling.
-1
NEW YARK
15

2. Now move the cursor to the incorrect letter “A”.
l3lmlrl
NEW YARK
3. Enter the correct letter “0”.
0NEW YORK
Inserting missing letters
To enter the missing
“0”
and correct “NEW
YRK”
to “NEW YORK”, for
example:
1. Enter the incorrect spelling.
-1
NEW YRK
2. Next move the cursor over the “R”.
3. Put the Organizer into insert mode.
NEW YRK
NEW YRK
16

4. Insert the missing letter.
0
When
m
-1
are pressed, the cursor mark changes from
“
n
”
to
“
4
”
indicating that the insert mode is set. Press
-1
II
again to exit the insert mode.
Deleting unwanted letters
To correct “NEW YOARK” to “NEW YORK”, for example:
1. Enter the incorrect spelling.
(1
NEW YOARK
2. Move the cursor to the letter “A” to be deleted.
lrllrllrl
NEW YOARK
3.
Delete the letter “A”.
L3iiiF-l
II
You can also delete “A” by pressing
m
m
II
Note; If
1-1
is pressed, the data currently being entered will be
deleted.
The following descriptions explain the functions.
l.3:
Moves the cursor to the right.
Moves the cursor
to the left.
Moves the cursor up to the previous line.
Moves the cursor down to the next line.
Puts the Organizer into insert mode. Pressing
these
keys again exits the insert mode.
17

rsiiiFq
I]:
[--El
:
Cursor:
“-”
designates the cursor.
Deletes the character at the cursor.
Deletes the character to the left of the cursor
(“backspace”).
Clears the data being entered.
The cursor is used to indicate the position where
the next letter, number, or symbol will be entered. When correcting an
entry, move the cursor to the position where a character is to be typed
over or deleted. The cursor changes to
“
m
“.
When inserting characters,
the cursor changes to
“
4
“.
-
t
18

The Organizer features a built-in clock which allows the Organizer to do
the following:
1. To display the current monthly calendar in the CALENDAR mode.
2.
To keep track of the items scheduled on the agenda for the current day
in the SCHEDULE mode (automatic tracking).
3. To sound the schedule alarm.
Displaying the time
Pressing
-1
displays the current date and time.
1CLoCKj
Day of the week
-
month/day/year*
-WE
1/
l/91
The display appears only while
-1
is pressed.
;
* The display can be changed to show the date in the format of
‘Iday.
month. year”. Refer to page 86.
Note: If
-1
is pressed continuously, the time when
-1
was initially pressed is displayed. The internal clock continues
working while
-1
is pressed, but the display does not
change.
Setting the clock
The time can be displayed using either the conventional
12-hour
AM/PM
system or the 24-hour system
(0:OO
to
2359
hrs.).
For example, set the clock to January IO, 1992, 1;30 PM.
19

Setting the clock on a
129hour
AM/PM basis
1. Press
-1
-1
.
TUE
l/
1/'91
JiiGG-j
2. Select the time system.
The number highlighted in the lower left corner of the screen indicates
the time system. Each time
11
is pressed, this alternates
between
‘I
m”
and
“m
“.
In this example,
I‘m”
is displayed.
Note:
To set the 24-hour system, display
“m”.
3. Set the time.
01 30
rRvq
TUE
l/
1/'91
q
Note: The hours and minutes must be entered using two digits each.
4. Enter the date.
p-j
01 10 1992
/
FRI 1/10/'92
j
Enter the
rrronth
and day using 2 digits and the year using 4 digits. For
single digit months or days, enter “0” before the single digit.
20

5. Enter the correct starting time.
ri%iTEq
Notes:
l
Use the beep of the time announcements given on the radio, on
T.V., or by telephone time services.
l The clock starts from 0 seconds.
6. Check the set time on the display.
FRI
1/10/'92
When the time is set with
12-hour
basis, noon and midnight changes are
displayed as below.
11:59AM
+
12:OOPM
(noon) -+
12:59PM
-+ 1 :OOPM -+
11:59PM
+
12:OOAM
(midnight)
+
12;59AM
+
1
;OOAM
+
11:59AM
Correcting the clock
To correct the time, reset the clock by following the procedure in ‘Setting
the clock”.
21

Monthly calendars covering the period from January, 1901 through Decem-
ber, 2099 can be displayed.
In addition, for a given day it is possible to determine the number of days
passed since January 1st of that year and the number of days remaining
until December 31st of the same year.
Displaying and changing the monthly
calendar
There are three methods of recalling dates and scanning the built-in
calendar.
1.
Displaying the calendar and changing the month with
Iv]
or
171.
2. Specifying the desired date, past or future, with the numerical keys.
3. Designating the year and month on the monthly calendar.
Changing the month with
w[
or
1/\1
Once the CALENDAR mode has been selected, the month can be changed
by pressing
Fl
(to display upcoming months) or
rl
(to display past
months) as follows:
1. Select the CALENDAR mode.
Notes:
I
‘*5
1
23
4
’6 7 8 9 10 11
12 13 14 15 18 17 18
19
20
21
22 23 24 25
26 27 28 29 30
31
, ,
l
If the above display does not appear, press 1SHIFT 1ICALENDAR]
to display the current monthly calendar. In this instance, if you set the
Organizer’s built-in clock for January 10, the calendar for January 1992
will be displayed.
l
In the year display, a
“
’
”
is attached to the years 1901 to
1999,
while
no mark is attached to the years 2000 to 2099.
23
This manual suits for next models
2
Table of contents
Other Sharp Organizer manuals

Sharp
Sharp ZQ-800 User manual

Sharp
Sharp EL-6985 User manual

Sharp
Sharp ZQ-P10 User manual

Sharp
Sharp EL-6910 User manual

Sharp
Sharp EL-6053S User manual

Sharp
Sharp YO-500 User manual

Sharp
Sharp YO-150 User manual

Sharp
Sharp ZQ-4400 User manual

Sharp
Sharp Wizard OZ-290HII User manual

Sharp
Sharp EL-6895 Quick start guide

Sharp
Sharp ZQ-P20 User manual

Sharp
Sharp EL-6850 User manual

Sharp
Sharp YO-290 User manual

Sharp
Sharp ZQ-P20A User manual

Sharp
Sharp OZ-590 User manual

Sharp
Sharp EL-6320 User manual

Sharp
Sharp YO-350CP User manual

Sharp
Sharp EL-6091 User manual

Sharp
Sharp YO-190P User manual

Sharp
Sharp YOP20HII - 1MB Electronic Organizer User manual