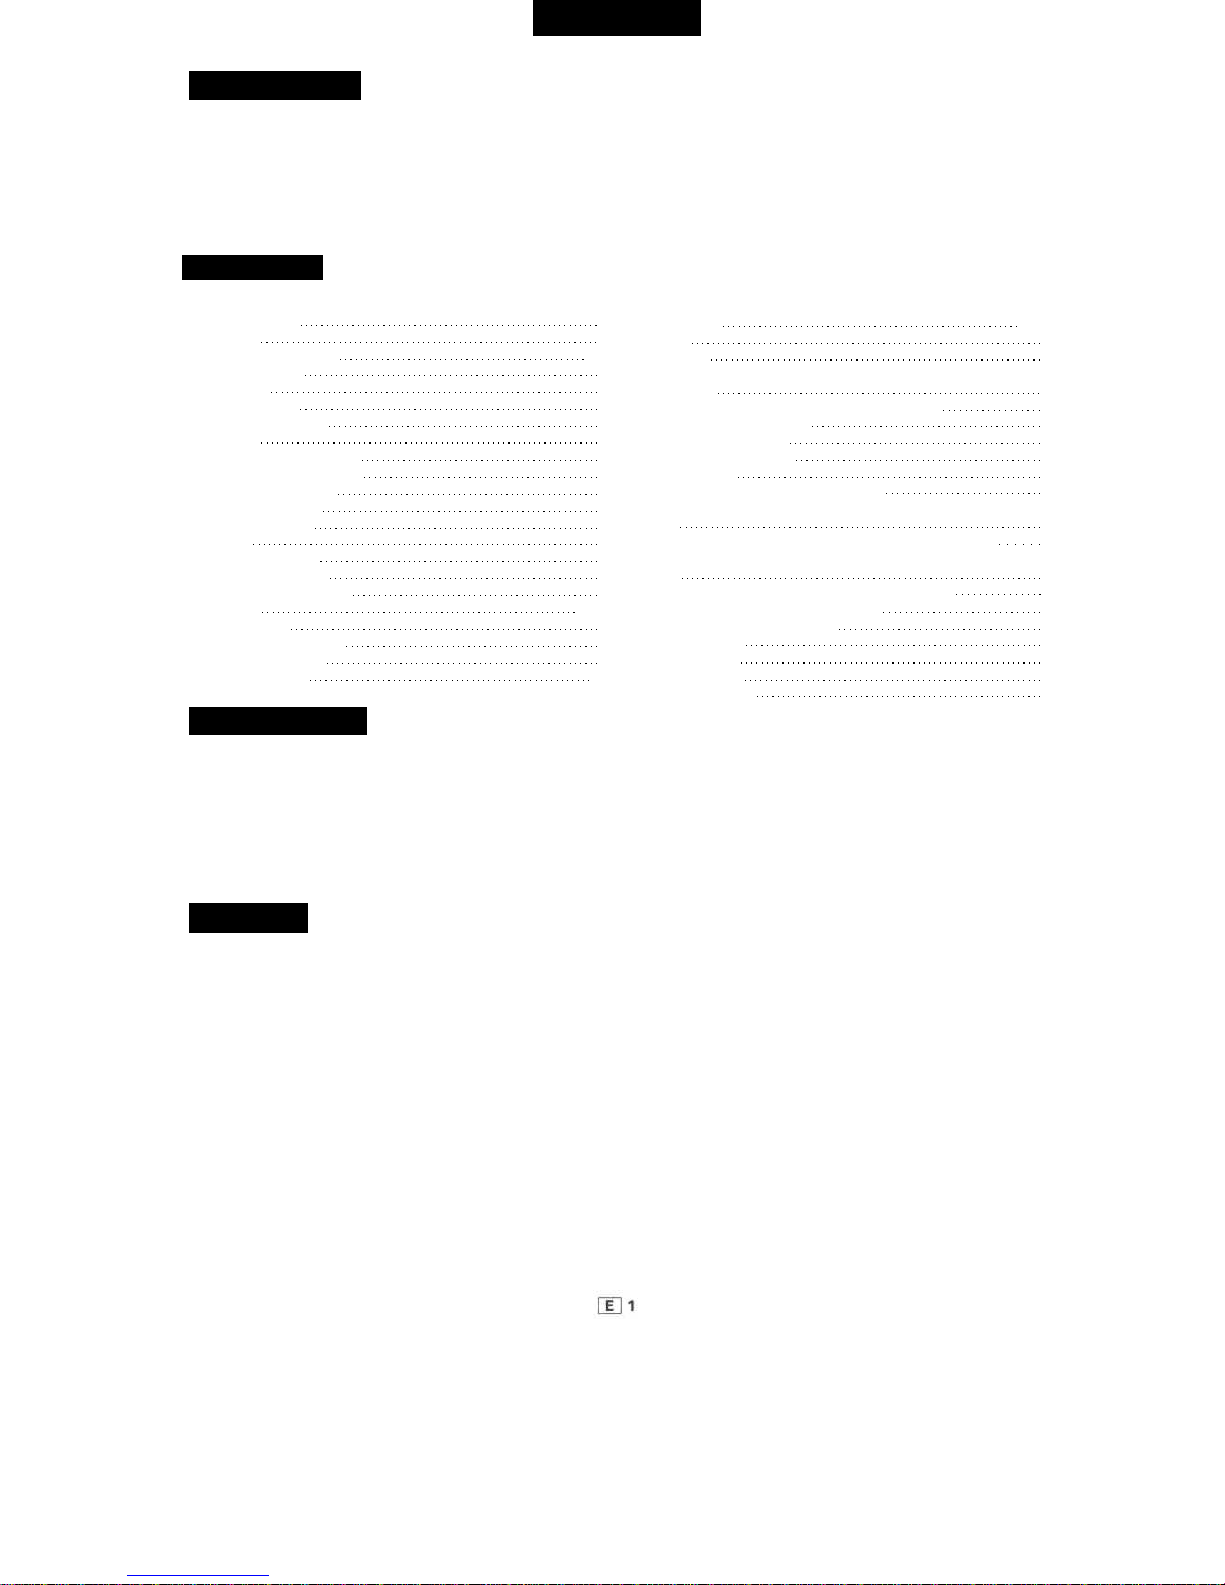
Sharp WF-939ZP User manual


ENGLISH
INTRODUCTION
ThankyouforpurchasingthisSHARPProduct.Wehopeitwill
giveyoumanyyearsoftrouble-freeenjoyment.Butforthebest
performance,readthisManualcarefully.Itwillguideyouin
operatingyourSHARPproduct.
CONTENTS
Page
SPECIALNOTES1
CAUTIONS1
NAMEOFCONTROLS2-3
POWERSOURCE4
•ACpower4
•Batterypower4
•Carbatterypower4
SPEAKERS5
•Mountingthespeakers5
•Removingthespeakers5
SETTINGTHECLOCK5
RADIOOPERATION6
SOUNDCONTROL6
•Volume6
•Graphicequalizer6
•Spectrumanalyzer6
CASSETTEOPERATION7
PLAYBACK8-10
•Autoreverse8
•Continuousplayback9
•APLD/APPS/APSS9
•Cueandreview10
SPECIALNOTES
Note:
Audio-visualmaterialmayconsistofcopyrightedworkswhich
mustnotberecordedwithouttheauthorityoftheownerof
thecopyright.Pleaserefertorelevantlawinyourcountry.
•Thelastletterofthemodelnameonthecatalogue,pack-
ingcase,etc.indicatesthecolouroftheproduct.Operations
andSpecificationsarethesameforallunitsregardlessofthe
cabinetcolour.
•Carbatteryadaptor,microphone,headphones,cottonswab
anddemagnetisermentionedinthisOperationManualarenot
includedinthisunit.
CAUTIONS
•Donotuseoil,solvents,benzine,paintthinnerandinsecti-
cidesonunit.
•Donotexposeunittomoistureortemperatureshigherthan
60°C(140°F).
•Keepunitawayfromstrongmagnetism,excessivedustor
humidity.
•HoldACpowerplugbyheadwhenremovingfromACout-
let,sincepullingleadcandamageinternalstrands.
•RemoveACpowerleadbeforecleaninginternals.Referall
servicingtoSharppersonnel,sinceremovingunit'scover
presentsshockhazard.
•Usingnon-specifiedACmainsvoltagesmaydamageunit.
SharpisNOTresponsiblefordamagefromimproperuse.
Page
RECORDING10-11
•Radio10
•Dubbing10
•ToskipanundesirableprogrammewithAPLDandAPPSdur-
ingdubbing11
•MakingblankspacesforAPLDandAPPS11
•Erasingrecordedtapes11
•Digitaltapecounter11
MIXINGMICROPHONE11
HEADPHONES11
HOWTOUSETHEBUILT-INTIMER12
•Listeningtotheradio,recordingradioprogrammes,playing
atape12
•Toturnoffata presettimelessthan64minutes12
•ToturntheradiooffwithSLEEPandonagainwiththe
TIMER12
USEWITHEXTERNALAUDIOCOMPONENTS13
•Turntableorcompactdiscplayer13
•Usinganexternalamplifier13
MAINTENANCE14
•Internalcare14
•Externalcare14
SPECIFICATIONS14

NAMEOFCONTROLS
1.Hour/SleepOffButton- HOUR/OFF
2.ClockAdjustButton-CLOCK
3.MinuteButton- MINUTE
4.Clock/TimerDisplay
5.TimerAdjustButton- TIMER
6.SleepOnButton- SLEEP/ON
7.Tape1)TapeSwitch- TAPE1
8.Tape2)TapeSwitches- TAPE2
9.DubbingSwitch- DUBBINGSPEED
10.FunctionSwitches- FUNCTION
(DonotpressmorethantwoFUNCTION
switchesatonce.)
11.RadioBandSelector- BAND
SELECTOR
12.FMModeSwitch- FMMODE
13.TuningControl- TUNING
14.FineTuningControl- FINETUNING
15.TimerOn/OffSwitch- TIMER
16.PowerSwitch-POWER
17.VolumeControls- VOLUME
18.TapeCounterandResetButton-
TAPECOUNTER
19.MicrophoneSockets- MIC
20.HeadphonesSocket- PHONES
21.Tape2)DirectionSwitch-
DIRECTION
22.Tape2)ReverseModeSwitch- REV
MODE
23.GraphicEqualizer- GRAPHIC
EQUALIZER
24.Tape1)DirectionSwitch-
DIRECTION
25.Tape1)ReverseModeSwitch- REV
MODE
26.DubbingStartButton- DUBBING
START
27.APLD/APPSClearButton- CLEAR
28.APLD/APPSSetButton- SET
29.APLD/APPSSetIndicators
30.APPSEndPauseIndicator- END
PAUSE
31.FMStereoIndicator- FMST
32.SleepIndicator- SLEEP
33.PowerIndicator- POWER
34.SpectrumAnalyzer- SPECTRUM
ANALYZER

35.SuperTweeter
36.Tweeter
37.Woofer
38.CassetteCompartment
39.PauseButton- PAUSEI I
40.Stop/EjectButton- STOP/EJECT•
41.FastWindButtons-
42.PlayButton- PLAY•
43.RecordButton- RECORD•
44.PauseButton- PAUSEII
45.Stop/EjectButton- STOP/EJECT•
46.FastWindButtons-
47.PlayButton- PLAY•
48.PlayButton(Auto-Reversecontinu-
ingtoTAPE2)
49.CassetteCompartment
50.SpeakerReleaseLever
51.FM/SW1/SW2TelescopicRod
Antenna
52.LineOutputSockets- LINEOUT
53.InputSelector- INPUT
54.LineInputSockets
55.EarthTerminal- GND(PHONO)
56.BeatCancelSwitch- BEATCANCEL
57.ExternalSpeakerTerminals-
SPEAKERS
58.SpeakerReleaseLever
59.ACPowerInput
60.ExternalDCPowerInput- DC15V
61.TimerandMainBatteryCom-
partment

POWERSOURCE
•ACPower
1SetACvoltageselectortothevoltageinyourarea.Loos-
enscrewsecuringvoltageselectorpanel,slidepaneluntilcor-
rectvoltagerangeappears,andtightenscrew.
2ConnectACpowerleadtoACpowerinput,thenconnect
ACpowerleadplugtoanACoutlet.
•Whenthisunitisnotinuse,alsobeforeattemptinganyin-
ternalexamination,pullthemainsplugoutoftheACoutlet.
•ACPlugAdaptor
Inareas(orcountries)whereanACoutletasshowninillustra-
tionisused,connecttheunitusingtheACplugadaptorsup-
pliedwiththeunitasillustrated.
•BatteryPower
1RemoveACpowerlead,andremovebatterycompartment
cover.
2Load10UM/SUM-1orR 20batteriesintothemainbat-
terycompartmentand1 UM/SUM-3orR 6 batteryintothetimer
batterycompartment,observingthepolarityshownontherear
panelandinsidethebatterycompartment.
3Replacebatterycompartmentcover.
Noteformainbatteries
•Replacebatteriesifrecordingsstartdistorting.
•Replaceall batteriesatsametime.
•Removebatteriesifunitisnotinuse.
•UsingACpowerleaddisconnectsbatteries.
•Don'tmixnormalbatterieswithNi-Cd,alkaline,orother
types.
•Whenthebatteriesbecomeweak,recordingmaybecome
impossible,eventhoughradiobroadcastsmaybe audible.All
batteriesshouldbereplacedatonce.
Notefortimerbattery
•Normalbatterylifeisapproximatelyoneyear.Replacethe
batterywhentheclock/timerdisplaydims.
•Besuretoinsertthebatterywithpolaritiesproperlyaligned.
Improperinsertionmaydamagethetimeranddisplay.
CarBatteryPower
Thisunitcanbeoperatedincarswitha DC12Vbatteryand
anegativeground.Forthispurpose,usecarbatteryadaptor
(notsupplied).ThecentrepinoftheDC1 5 V socketisa nega-
tivepolarity.
Attachthecarbatteryadaptorasshownatleft.
•Usingcarbatteryadaptordisconnectsbatteries.

SPEAKERS
1Alignthechannelsonthespeakerswiththeguidesonthe
mainunit.
2Slidethespeakersdownintopositionuntilthetopsofthe
speakersandmainunitareflush.
3Slidethereleaseleverasshownintheillustrationtolock
thespeaker.
4PullthespeakerleadsoutenoughtoreachtheSPEAKERS
terminals.Connecttheleadswiththestripetothe(-)andthe
otherleadstothe(+)terminals.Fitthespeakerleadsintothe
channelsinthespeakersandmainunit.
•Removingthespeakers
1DisconnecttheleadsfromtheSPEAKERSterminals.
2Slidethereleaseleverasshownintheillustrationtoun-
lockthespeaker,andthenpullthespeakersupandoffthemain
unit.
3Pullthespeakerleadsoutasfarasnecessaryandconnect
themtotheSPEAKERSterminals.
SETTINGTHECLOCK
TurnthePOWERswitchOFF/SLEEPbeforeconnectingthespeakers.
Caution
•Maximumspeakerinputis100W (PMPO)or26W (RMS).
Thespeakerscouldbedamagedifusedwithanamplifierproducinggreaterthan100W (PMPO)or26W (RMS).
•Donotshortcircuittheamplifierspeakeroutputsorspeakerinputsasthiscoulddamagetheamplifierand/orspeakers.
•Speakerswithlessthan8 ohmsimpedanceshouldnotbeusedastheamplifiercouldbedamaged.
1WhilepressingtheCLOCKbuttonwitha penciltiporsimi-
larobject,presstheHOURbuttontosetthehour.Nextpress
theMINUTEbuttontosettheminutes.
2PresstheCLOCKbuttonagaintostarttheclockfromthe
"00"second.
HOURandMINUTEbuttons
Pressoncetoadvanceonedigit.Holddepressedformorethan
twosecondstoadvancecontinuously.
•Mountingthespeakers

RADIOOPERATION
1Turnthepowerswitchon.
2SetFUNCTIONswitchtoRADIO.
3SetBANDswitchto FM,MW,SW1,or SW2.
4UseTUNINGcontroltotunethedesiredstation.
TheFINETUNINGcontrolfunctionsonlyforSW1andSW2
bands.
5ForFMbroadcasts,raiseandextendtelescopicrodanten-
na,thenadjustpositionandlengthforbestreception.ForSW1
orSW2,raiseantennaverticallytofullheight.ForMWorSW1,
moveandrotateunitforbestsound.
6SetFMMODEswitchtoSTEREOforFMstereo;ifsound
ispoor,setFMMODEswitchtoMONO.
7SetPOWERswitchtoOFF/SLEEP.
AerialAdjustmentInstructions
ForReceivingFMBroadcasts
Raiseandextendthetelescopic
rodantenna.Adjusttheposi-
tionandlengthoftheantenna
untilFMbroadcastreception
isbest.
ForReceivingSW1orSW2
Broadcasts
Raiseandextendthetelescopic
rodantennaverticallytoitsfull
length.
ForReceivingMWBroadcasts
Rotateorlocatetheunitto
receivepeaksignalstrengthof
theMWbroadcast.
SOUNDCONTROL
MovingVOLUMEcontrols(LEFTandRIGHT)towardsMAXin-
creaseslisteninglevel,andMINdecreaseslevel.
Theloudnesscircuitisactivatedwhenthevolumeislowto
emphasizehighsandlows.
Movinga controlforanyfrequencytoward+ 10boostslevel
forthatfrequency,and-10lowerslevel.
Thespectrumanalyzerindicatesthefrequencybandoftheplay-
backsource.Adjustmentsmadewiththegraphicequalizerwill
bereflectedinthespectrumanalyzer.
•Volume
•Graphicequalizer
•Spectrumanalyzer

CASSETTEOPERATION
•Besuretousequalitytapesforbestresults.
•TheuseoftapeslongerthanC-90(90minutes)isnot
recommended.
•Beforeloadingtapeintocassettecompartment,tighten
slacktapewithpenorpencil.
•Cassetteshaveremovabletabswhichallowrecordingto
takeplace.Removingtabontopleftprotectssidefacingup
fromerasure.Covertabholeswithadhesivetapetoeraseor
recordagain.
•TAPE1:Playbackonly.
TAPE2:Playbackorrecording.
(1)IfPLAYispressedandSTOP/EJECTisthenpressedwhile
thereisnopower(ACcordisnotconnected,nobatteriesin-
stalled)andthepoweristhenturnedonandFASTWINDis
pressed,thetapewillmomentarilyadvanceatnormalplay-
backspeedwithaudiooutputbeforefast-forwardingbegins.
(2)Whenbatterypowerdrops,thetapemaynotadvanceeven
ifRECORDorPLAYispressed.Also,thecassettecompart-
mentmaynotopenwhenSTOP/EJECTispressed.Replace
thebatteriesorusetheACcord.
TAPE1 andTAPE2 functionsdiffer.Refertothetablebelowforproperuseanddifferentia-
tionoftapefunctions.
FUNCTION
Auto-reversefromA-B
Singlesideplay
SwitchingsidesA-B
APLD/APPS/APSS
FASTWIND
Recording
FullAuto-Stop
Dubbing
ContinuousPlay
TAPE1
SidesA-Bareplayedcontinuouslyuntil
STOP/EJECTispressedwhentheREVMODE
switchisat
PressthebuttontoplaysidesA andВ andthen
stop.
PossiblewhentheREVMODEswitchisat
Playbackcanbeswitchedtoeitherdirection.
•Whenispressedforone-cycleautoreverse,
playbackwillnotproceed fromsideВ toA.
Possible
Possible
Impossible
TAPE2
SidesA-Bareplayedcontinuouslyuntil
STOP/EJECTispressedwhentheREVMODE
switchisat
PossiblewhentheREVMODEswitchisat
Eithersidecanbeselectedduringplayback;
switchingfromВ toA duringrecordingisnot
possible.
Impossible
Possible
Recordingandplaybackarepossible.
Allbuttonsareresetattheendofthetapeinallmodesexceptcontinuousautoreverse.
PossiblefromTAPE1 toTAPE2 (High/Normal).
Combinedauto-reverseispossiblefromTAPE1 toTAPE2.
Thefollowingmayoccurduetotheuseof
soft-touchcontrols.Notethatthesearenot
malfunctions.

PLAYBACK
•Whenplayinga tapeonTAPE1,settheDUBBINGSPEED
selectortoNORMAL.Theequalizercircuitforhighspeeddub-
bingwillattenuatethehighendwhenplayingtapeswiththe
DUBBINGSPEEDselectoratHIGH.
•PlaybackalwaysstartsfromsideA whenthetapeis
stopped.
1Turnthepoweron.
2SetFUNCTIONswitchtoTAPE.
3PressSTOP/EJECTbuttonandloadcassetteintoTAPE1
or2 cassettecompartment.
4SetTAPEswitchesforTAPE1 or2 totheproperposition.
•TurntheMETALselectoroffwhenusingnormalorchrome
tapeinTAPE2.
5PressPLAYbuttonofTAPE1 or2.
ОAdvancetapetotheplaceyouwantbypressing
STOP/EJECTbuttonfirst,thenFASTWINDbutton.
7PressSTOP/EJECTbutton,thenPLAYbutton.Ifyouwent
toofar,pressSTOP/EJECTbutton,thenFASTWIND
button.
ОRepeatsteps6 and7 untilthedesiredselectionislocated.
Whenyou'refinished,pressSTOP/EJECTbuttontostopand
toejecttape.Replacetapeincase.
Note:
Whilefastwindingoperationisinprogress,theFASTWIND
buttonwillnotbereleasedwhenthetapeendisreachedifthe
PAUSEbuttonispressed.Inthiscase,presstheSTOP/EJECT
button.
2TAPE2
PressPLAYandlifttheREVMODEswitchforone-way
playback.
PressPLAYandthenlowertheREVMODEswitchforcontinu-
ousautoreverse.
PressDIRECTIONtoselectsideB,andpressitagainforsideA.
•Autoreverse
•Alsofunctionsforrecording.
1ТАРЕ1
PressandlowertheREVMODEswitchforone-cycleauto
reverse.
PressPLAYandlowertheREVMODEswitchforcontinuous
autoreverse.
Forone-wayplayback,lifttheREVMODEswitch.
PressDIRECTIONtoselectsideB,andpressitagainforside
A.Inonecycleautoreverse,andPLAYwillpopupafterone
cycleiscompleted.IflisteningtosideB,sideA cannotbeplayed
byresettingtheDIRECTIONselector(thetapewillstopifDIREC-
TIONissettoA).

•Continuousplayback
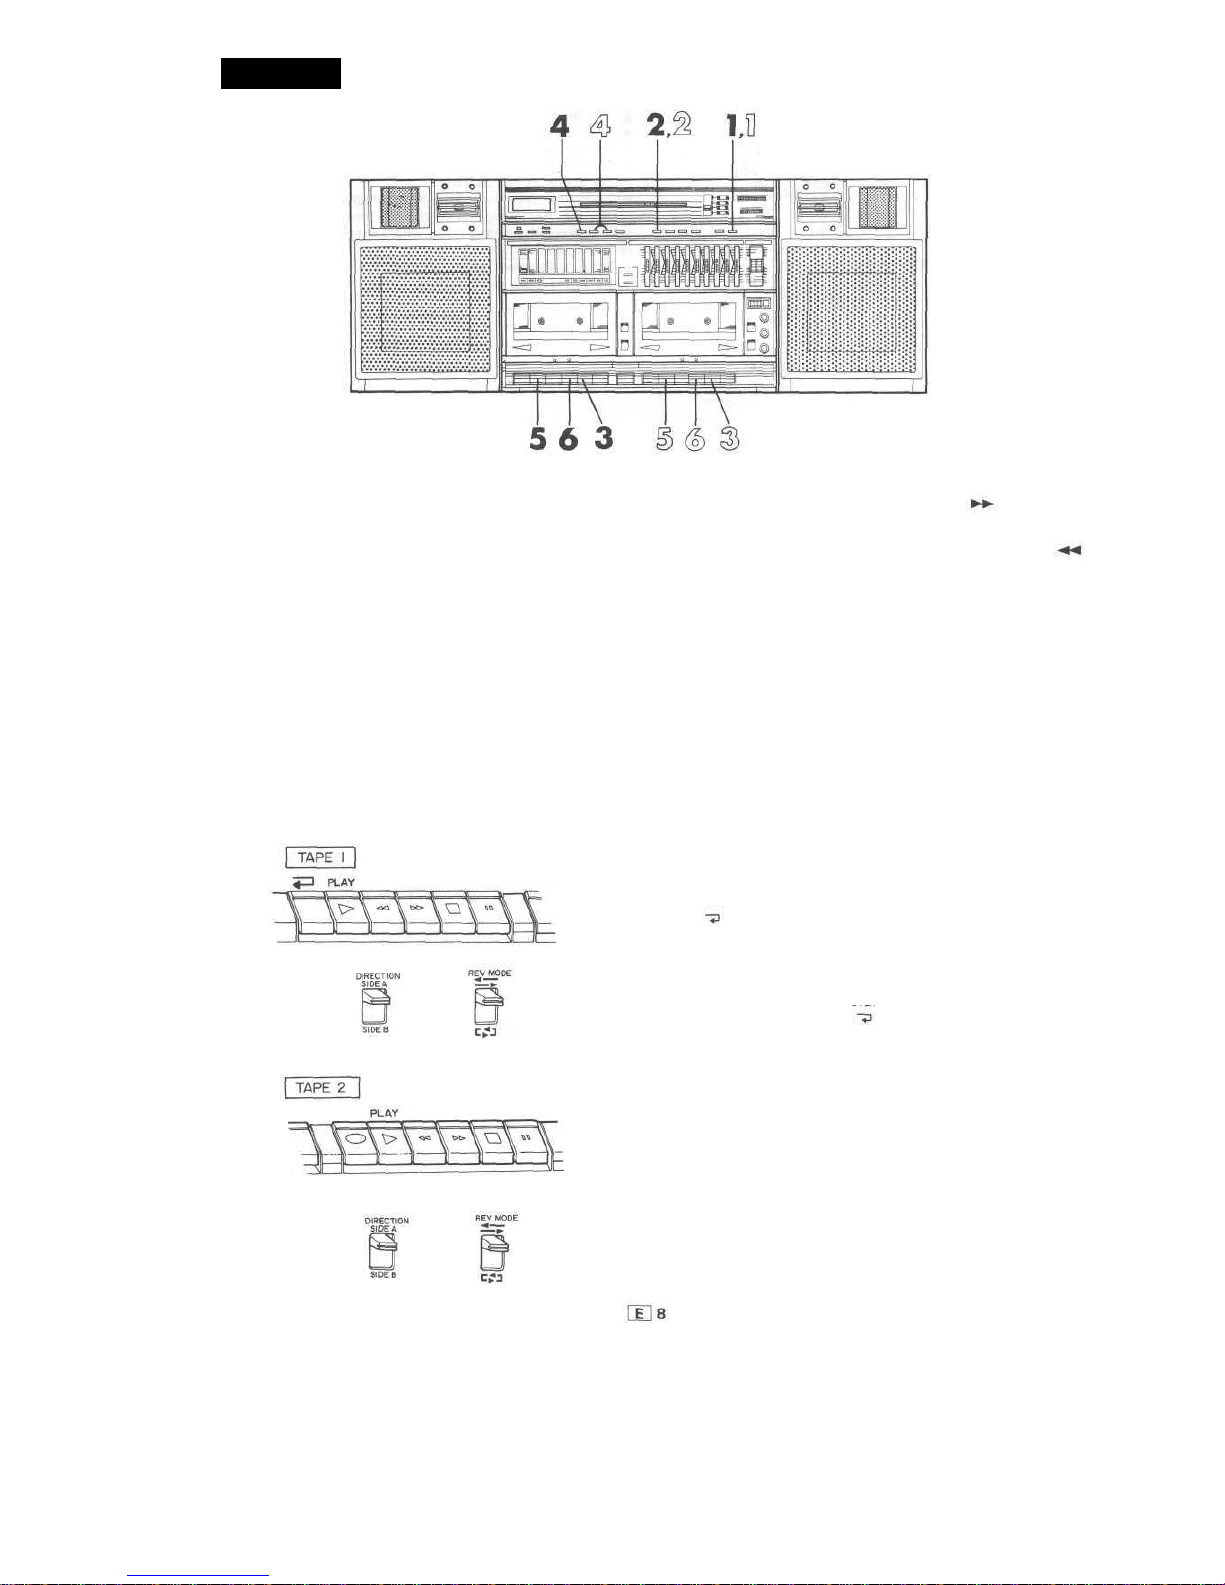
1PressforTAPE1.ThisalsoengagesthePLAYbutton.
2PressPLAYbuttonofTAPE2.
ОAutoreverseandcontinuousplaybackcancombine.
•PlaybackofTAPE2 willbeginautomaticallyifTAPE1 is
playedthroughsideA andtotheendofsideB.
•TheaudioofbothtapescanbemixedbypressingthePLAY
buttonofTAPE1 whilelisteningtoTAPE2.
•PressingthebuttonofTAPE1 willnotsetthecontinu-
ousplaymodeifTAPE2 playbackisalreadyinprogress.
AutomaticProgramLocateDevice(APLD)
1Countthenumberofgapsbetweenthecurrentselection
andthedesiredselection.PressSETthesamenumberoftimes.
TheAPLD/APPSindicatorwilllight.
•EntertheAPLDnumberonlytoskipmorethanone
selection.
2IfTAPE1 isnotintheplaybackmode,pressPLAY.
3DuringsideA playback,pressFASTWINDtosearch
forward,orFASTWINDtosearchback.
DuringsideВ playback,pressFASTWINDtosearchfor-
ward,orFASTWINDtosearchback.
4PressCLEARtocancelAPLDinprogress.Thedeckwillre-
turntotheplaybackmode.
5WhenTAPE1 reachesthedesiredspacebetweenselec-
tions,FASTWINDwillbereleasedandplaybackwill
resume.
•TochangethedirectionofAPLDsearch,pressSTOP/EJECT
tostopthetapeandcancel allsettings,andthenrepeatthe
aboveprocedure.
AutoProgramPauseSystem(APPS)
1PressPLAYonTAPE1 tobeginplayback.
2Countthenumberofselectionstobeplayedback.Press
SETthesamenumberoftimes.TheappropriateAPLD/APPS
indicatorwilllight.
Theindicatorswillalwaysshowthenumberofselectionsre-
mainingtobeplayedduringplayback.
3Whenthelastselectionends,thetapewillstopandthe
ENDPAUSEindicatorwilllight.PLAYwillnotbereleased.
4PressCLEARtoreleasetheENDPAUSEfunction.TAPE
1and2 willnotfunctionwhenENDPAUSEison.
ToejectthetapeorperformotheroperationsaftertheAPPS
operationiscompleted,pressSTOP/EJECTforTAPE1 tocan-
celtheAPPSmode.
•APLD/APPS/APSS(TAPE1 only)
APLDlocatesa desiredselectionbyskippingthenumberof
piecesfromthecurrenttothedesiredselection.
APPSplaysa specifiednumberofselectionsandautomatical-
ly entersthepausemode.
APSSlocatesthebeginningofthecurrentornextselectionand
automaticallybeginsplaybackfromthatpiece.
•APPSandAPLDcanlocatea maximumof fiveintervals.To
automaticallylocatea selectionmorethanfiveaway,moveto
selectionfiveandthenreactiveAPPS/APLDforthenumberof
remainingintervals.
•TheAPPS/APLDsettingcanbechangedwhileeitherisfunc-
tioning.
APPS
•DonotleavetheAPPSengagedforextendedperiodsasitmaydam-
agethetapeorpinchroller.PresstheSTOP/EJECTtoreleasePLAY
button.
•Bothdeckswillstopduringsimultaneousplaybackorwhendubbing
fromTAPE1 to2 ifAPPSisactivated.
•APPSmaynotdetectthe"end"ofa selectioniftherecordinglevel
isveryloworthemusicfades.
APLDandAPPS
•IfAPLD/APPSisactivatedneartheendofa selection,thefollowing
selectionmaybeskipped.Watchtheindicatortoconfirm.
•DonotchangethetapetransportmodeduringAPLD/APSSopera-
tion.TheAPLD/APSSmodewillbecancelledandplaybackwillbegin
fromtheothersideofthetape.
APLD,APPSandAPSS
Thesefeaturesmaynotfunctionnormallywiththefollowingtapes.
•Tapescontainingconversationorothermaterialwithlongpauses.
•Tapeswitha lowrecordinglevel.
•Whenthepausebetweenpiecesislessthan4 sec.
•Musiccontainingextendedquietpassagesorpartswhicharenot
recorded.
•Tapescontainingexcessivenoiseormaterialrecordedfromhumra-
diobroadcasts.
AutoProgramSearchSystem(APSS)
•FirstpressPLAY.
ToListentotheCurrentSelectionAgain(RewindAPSS)
SideA:PressFASTWIND
SideB:PressFASTWIND
ToListentotheNextSelection(FFAPSS)
SideA:PressFASTWIND
SideB:PressFASTWIND
•Playbackwillbeginwhenthebeginningofthecurrentor
nextselectionislocated.
IftheAPLD/APPS/APSSDoesNotFunctionNormally

CUE
PresstheFASTWINDbuttoncorrespondingtothedirection
oftapeplayback.
REVIEW
PresstheFASTWINDbuttonoppositetothedirectionoftape
playback.
•CUEandREVIEWwillcontinueaslongastheFASTWIND
buttonispressed.ReleasetheFASTWINDbuttontoresume
normalplayback.
RECORDING
•TheALC(AutomaticRecordLevelControl)circuitautomat-
icallycontrolsthelevelofinputsignalstrengthusedfor
recording.
•TheVOLUMEandGRAPHICEQUALIZERcontrolsmaybe
adjustedwithnoeffectontherecordinglevelinputsignal.(Vari-
ableSoundMonitor)
1Tuneindesiredstation.(Seepage6.)
2.LoadcassetteintoTAPE2 cassettecompartment.
3SetTAPEswitchesforTAPE2 totheproperposition.
•TurntheMETALselectoroffwhenusingnormalorchrome
tapeinTAPE2.
4SettheREVMODEswitchtowhenrecordingcon-
tinuouslyfromsideA toB.Setittowhenrecordingonly
oneside.
5PressPAUSEbutton,thenRECORDbutton,whichalsoen-
gagesPLAYbutton.
6SettheBEATCANCELswitchontherearpaneltoA,B,
orС (whichevergivesthebestreception)whenrecordingMW,
SW1orSW2.
7PressPAUSEbuttonagaintobeginrecording.
1Turnthepowerswitchon.
2SetFUNCTIONswitchtoTAPE.
3LoadrecordedcassetteintocassettecompartmentofTAPE
1.InserttheblanktapeintoTAPE2.
4SetTAPEswitchesforTAPE1 and2 totheproperpositions.
•TurntheMETALselectoroffwhenusingnormalorchrome
tapeinTAPE2.
5SetDUBBINGSPEEDswitchtoNORMALforequivalent-
speeddubbing,HIGHfordouble-speeddubbing.
6SettheREVMODEswitchtowhendubbingcontinu-
ouslyfromsideA toB.Setittowhendubbingonlyone
side.
7PressDUBBINGSTART.ThePLAYbuttonofTape1,PLAY
andRECORDbuttonsofTAPE2 willbeautomaticallyengaged.
•DonotchangethesettingoftheDUBBINGSPEEDswitch
duringdubbing.
•DonotconnectanyplugtotheMICsocketduringdubbing.
•Cueandreview(Possibleonlyon TAPE2)
CUEandREVIEWcanbeusedwhenfastforwardingorrewind-
ingthroughshortsectionsofthetape.CUEandREVIEWcan
onlybeusedduringplaybackonTAPE2.
•Radio
•Whenrecordingimportantselections,besuretomakea
preliminarytesttoensurethatthedesiredmaterialisbeing
properlyrecorded.
•Dubbing

•ToSkipanUndesirableProgrammewith
APLDandAPPSDuringDubbing
CertainmaterialscanbedubbedwiththeAPLDorAPPSfunc-
tionforquicklocationofdesiredselections.
1Performsteps1 through6 underDUBBING.
2UsetheAPLDfeaturetolocatethebeginningofthedesired
selection.(Seepage9.)
3PressSETtoinputthenumberofselectionstobedubbed.
(Seepage9 underAPPS.)
4PressDUBBINGSTART.
5BothTAPE1 and2 willstopafterdubbingthenumberof
presetselectionsandtheENDPAUSEindicatorwilllight.
6PressSTOP/EJECTforbothtapes.
7Toperformdubbingofsubsequentselections,repeatsteps
1through6.
•MakingBlankSpacesforAPLDandAPPS
Blanksofatleast4 secondsarerequiredforAPLDandAPPS
tofunction.Followtheprocedurebelowtoentertheseblanks
inyourownrecordings.
•MakesureTAPE1 isnotrunning.
1PressPAUSEonTape2 attheendofa recordingselection.
2SettheFUNCTIONselectortoTAPE.
•Disconnectanymicrophones.
3PressPAUSEagainonTape2 andrunthetapewithout
recordingforabout5 seconds.
4PressPAUSEagainonTape2 tostopthetape.Therequired
blankisnowonthetape.
5Resumerecordingasbefore.
•SimplyrepeattheaboveprocedureforallotherAPLD/APPS
blanks.
•IfdubbingfromTAPE1 toTAPE2,simplypauseTAPE1
andcontinuerunningTAPE2 for5 secondstoleavetheblank.
•ErasingRecordedTapes
Previouslyrecordedmaterialwillbeerasedautomaticallywhen-
evernewmaterialisre-recordedontothetape.Ifitisdesired
toerasea previouslyrecordedtapewithoutrecordingoverit,
followtheinstructions.
1Insertthetapetobeerasedintothecassettecompartment
ofTAPE2.
2SettheFUNCTIONswitchtoTAPE.
3SettheDUBBINGswitchtoHIGH.
4MakesureTAPE1 isstoppedanddepresstheRECORD
button.ThiswillautomaticallyengagethePLAYbuttonand
beginerasingthetape.
•DigitalTapeCounter(onlyTape2)
Pushthebuttonatthesideofthecountertoresetto"000".
Thecounterwilladvancewhilerecordingorplaybackisinpro-
gress.Thesereadingsprovidea usefulreferenceduringrecord-
ingandplayback.
MIXINGMICROPHONE
1Besureyourmicrophonehasa 6.3mm(1/4")diameter
plugand400ohmsto3 kohmsimpedance.
2ConnectmicrophoneplugtoL/MICsocket.
•Connecta microphonetobothleftandrightinputstorec-
ordinstereo.
3SetDUBBINGswitchtoNORMAL.
•MixingisnotpossibleatHIGH.
4Playtheradio,TAPE1,oranexternalaudiounit.
5RecordasdescribedinRadio.(Seepage10.)
•Placemicrophoneabout10- 1 5 cm(4- 6")awayfrom
source.
•Ifhowlingoccurs,lowervolumeorremovemicrophoneas
faraspossiblefromspeakers.
Ifthemicrophoneshowlduringrecording,theALCcircuitwill
momentarilydecreasethemicrophonelevel.
HEADPHONES
•Besureyourheadphoneshavea 6.3mm(1/4")diameter
plugand8 to32ohmsimpedance.•ConnectheadphonesplugtoPHONESsocket,whichdiscon-
nectsspeakers.AdjustvolumebyusingVOLUMEcontrols.

HOWTOUSETHEBUILT-INTIMER
•Listeningtotheradio,recordingradio
programmes,playinga cassette
Torecordorplaybacka tape,firstloada tapeintothecassette
compartment.Tolistentotheradio,turnthepoweronandtune
inthedesiredstation.
1PressTIMERbutton.Thelowerdotinthecolonbetween
thehourandminutesintheclockwillgoout.
2WhilepressingTIMERbutton,pressHOURandMINUTE
tosetthedesiredtime.
3SetTIMERswitchtoON.willappearonthedisplay.
4SetPOWERtoOFF.
Theradiowillcomeonautomaticallybycompletingstep4.
5Torecordradioprogrammes
PressRECORD.
Toplaybacka cassette
PressPLAYoneitherTAPE1 or2.
6Oncestep5 iscompleted,thetapedeckwillbeautomati-
callyactivatedatthepresettimetoeitherrecordorplayback.
7Theradioortapedeckisturnedoffautomatically64
minutesafterstartedbythetimer.
•Toturntheunitoff,simplysettheTIMERswitchtoOFF.
Thetimerwillnotbeactivatedagainunlessitisresetonceit
isturnedoff.Ifusingthecassettedeck,firstpressSTOP/EJECT,
andthenturnthetimeroff.
•SettheTIMERtoONforuseasa wake-uptimerforthenext
day.(Thetimerisnotcancelledeveniftheunitturnsoffauto-
maticallyafter64minutes.)
•Thepowerwillbecutoffandplaybackwillstopafter64
minutesbutthePLAYbuttonwillnotbereleased.Press
STOP/EJECT.
Thisisalsotruewhenusingthesleepfunction.
•Toturnoffata presettimelessthan64
minutes
•Theradioandcassettedeckcanallbeturnedoffautomat-
ically.
•Thetimercanbesetwhetherornototherfunctionsarebe-
ingused.
1PressSLEEP.Theupperdotinthecolonbetweenthehour
andminutesintheclockwillgoout,andtheSLEEPindicator
willlight.
2WhilepressingSLEEPbutton,pressMINUTEtosetthe
desiredtime.
•ThetimesettingdecreasesoneminuteeachtimeMINUTE
ispressed.
•HoldMINUTEpressedtoquicklydecreasethetimesetting.
•Skipthisstepifthedesiredtimesettingis64minutes.
3SetPOWERtoOFF/SEEP.
Theunitwillturnoffafterthepresettime.
SimplypressSLEEPtoresetthe64minutetimesettingafter
theunitturnsoffautomatically.
•PressSLEEPtodisplaytheremainingtimewhentheSLEEP
featureison.
•PressSLEEPandHOUR/OFFtocanceltheSLEEPfeatureand
resetthetimedisplayto"00"duringSLEEPmodeoperation.
•ToturntheradiooffwithSLEEPandonagainwiththeTIMER
1SettheTIMERasdescribedinsteps1 - 4 underTIMER.2 SettheSLEEPtimerasdescribedabove.
Note:
ThetapedeckandradioarenotturnedoffevenifPOWERis
settoOFFwhenthesleeptimerorautomaticONtimerisset.

USEWITHEXTERNALAUDIOCOMPONENTS
•Turnthepoweroffbeforeconnectingordisconnectingany
othercomponent.
•TurntableorCompactDiscplayer
1Makesuretheturntableusesa magneticcartridge.Con-
necttheturntableorCDplayeroutputstotheINPUTsockets
oftheunit.Iftheturntablehasa ground,connectittoGND.
2SettheINPUTselectorontherearpaneltotheproperpo-
sition.(CDorPHONO)
3SettheFUNCTIONswitchtoPHONO/CD/LINE.
4StarttherecordorsettheCDplayertoPLAY.
RecordingFromAnotherAmplifier
1ConnecttheLINEOUTPUTterminalsofyouramplifierto
theINPUTsocketsoftheunit.
2SettheINPUTselectorontherearpaneltoLINE.
3SettheFUNCTIONswitchtoPHONO/CD/LINE.
4Startrecordingasusual.(Seepage10.)
Torecord
Followtheinstructionsforrecordingonpage10.
•UsinganExternalAmplifier
Audiooutput
1ConnecttheLINEINterminalsofyouramplifiertotheLINE
OUTsocketsoftheunit.
2Selectthedesiredfeaturesonyouramplifier.
3Adjustthevolumeusingthevolumecontroloftheexter
nalamplifier.

MAINTENANCE
•Dirtyheads,capstansandpinchrollerscausepoorsound
andtapejams.Cleanthesepartswithcottonswabmoistened
withcommercialhead/pinchrollercleanerorisopropylalchohol.
•Afterlonguse,thedeck'sheadsandcapstanswillbecome
magnetised,whichcausespoorsound.Demagnetisethese
partsonceevery30hoursofplaying/recordingtimebyusing
commercialtapedeckdemagnetiser.Readdemagnetiser'sin-
structionscarefullybeforeusing.
•Periodicallywipecabinetcleanwithsoftclothanddilute
soapsolution,thenwipewithdry cloth.
•Donotusechemicallytreatedcleaningclothsorotherchem-
icals.(SeeCautions.)
SPECIFICATIONS
Themanufacturerreservestherighttovaryspecifications,design,orusealternativematerialsasmaybedeemednecessary
ordesirableatanytime,anysuchchangesorvariationsbeingofa kindasnottoreducethequality,performanceorappearance.
GENERAL
Powersource;
Outputpower:
AC110-127V and220- 240V,50/60
Hz
DC15V(UM/SUM-1orR20typex 10,
orexternal15V DC)
PMPO;200W (100W + 100W)(AC
operation)
MPO;40W (20W + 20W)(ACopera-
tion)
RMS;26W (13W + 13W)(DCoper-
ation,10%distortion)
Externalmic;600ohms
Phono/linein/CD;50kohms
Headphones;8-32ohms
Externalspeakers;8-16ohms
Lineout;0.6V/50kohms
Width;680mm
Height;250mm
Depth;180mm
9.3kgwithoutbatteries
RADIO
Frequencyrange:MW;526.5- 1606.5kHz
SW1;2.3- 7.3MHz
SW2;7.3- 22MHz
FM;64-74MHz
Compactcassettetape
30- 1 5,000Hz(normaltape)
30- 16,000Hz(CrO2tape)
30- 17,000Hz(metaltape)
55dB(Tape1,playback)
50dB(Tape2,recording)
•Internalcare
•Externalcare
Inputimpedance:
Loadedimpedance:
Dimensions:
Weight:
TAPERECORDER
Tape:
Frequencyresponse:
Signal/noiseratio:
SPEAKER
Speakers:
Impedance:
Input:
210cm2square-typeflatdiaphragm
wooferx 2
5cmtweeterx 2
Supertweeterx 2
8ohms
26W (RMS)
100W (PMPO)

MEMO

SHARPCORPORATION
Table of contents
Other Sharp Stereo System manuals

Sharp
Sharp CD-DH790N User manual

Sharp
Sharp CD-C430H User manual

Sharp
Sharp XL-30H User manual

Sharp
Sharp XL-60H User manual

Sharp
Sharp XL-DH229 User manual

Sharp
Sharp GF-7850H User manual

Sharp
Sharp CD-BK310V User manual

Sharp
Sharp CD-CH1500H User manual

Sharp
Sharp CD-PC671H User manual

Sharp
Sharp XL-UR2180H User manual

Sharp
Sharp Illustration XL-HP535E User manual

Sharp
Sharp CD-C605H User manual

Sharp
Sharp CD-SW440N User manual

Sharp
Sharp CD-CH1500H User manual

Sharp
Sharp XL-HF200P(BK) User manual

Sharp
Sharp CD-BH20 User manual

Sharp
Sharp XL-UH242 User manual

Sharp
Sharp SD-NX10H User manual

Sharp
Sharp XL-MP9H User manual

Sharp
Sharp CD-BA3100H User manual