Sharp AN-52AG2 User manual

11
11
1
ENGLISH
DEUTSCH FRANÇAIS
ESPAÑOL 日本語
AN-52AG2
液晶カラーテレビ用壁掛け金具
LCD Color TV Wall-Mount Bracket
Téléviseur couleur LCD et le support de
montage au mur
Wandhalter für LCD-Farbfernsehgerät
Ménsula de montaje el TV color de cristal
líquido en la pared
取扱説明書
OPERATION MANUAL
MODE D’EMPLOI
BEDIENUNGSANLEITUNG
MANUAL DE MANEJO
CAUTION:
Thisproduct(SHARP,AN-52AG2)isonlytobeusedfortheSHARPLCDTVasfollows.
Usingthebracketforanotherproductcouldcauseanaccident.
ご注意:本製品(SHARP,AN-52AG2)は、下記の SHARP 製液晶テレビ専用のものです。
これ以外の製品とともに使用すると、事故を引き起こすおそれがあります。

2
目次
安全に正しくお使いいただくために・・・・・・・・・・・・3
外形寸法図・・・・・・・・・・・・・・・・・・・・・・・4
同梱品・・・・・・・・・・・・・・・・・・・・・・・・・5
壁用金具を壁に取り付ける・・・・・・・・・・・・・・・・6
壁掛け金具ユニットを取り付ける・・・・・・・・・・・・・9
壁掛け金具ユニットの角度を設定する
・・・・・・・・・・・
11
液晶カラーテレビを壁に取り付ける
・・・・・・・・・・・・
13

3
安全に正しくお使いいただくために
■お買いあげありがとうございました
ご使用の前にこの取扱説明書をよくお読みください。特に「安全に正しくお使いいただくために」は必ず
お読みください。お読みになったあとは、いつでも取り出せる場所に必ず大切に保管してください。
この取扱説明書および商品には、安全にお使いいただくためにいろいろな表示をしていま
す。その表示を無視して誤った取り扱いをすることによって生じる内容を、次のように区
分しています。内容をよく理解してから本文をお読みになり、記載事項をお守りください。
図記号の意味
警告人が死亡または重傷を負うおそれがある内容を示しています。
注意
人が傷害を負ったり財産が損害を受けるおそれがある内容を示しています。
記号は、してはいけないことを表しています。
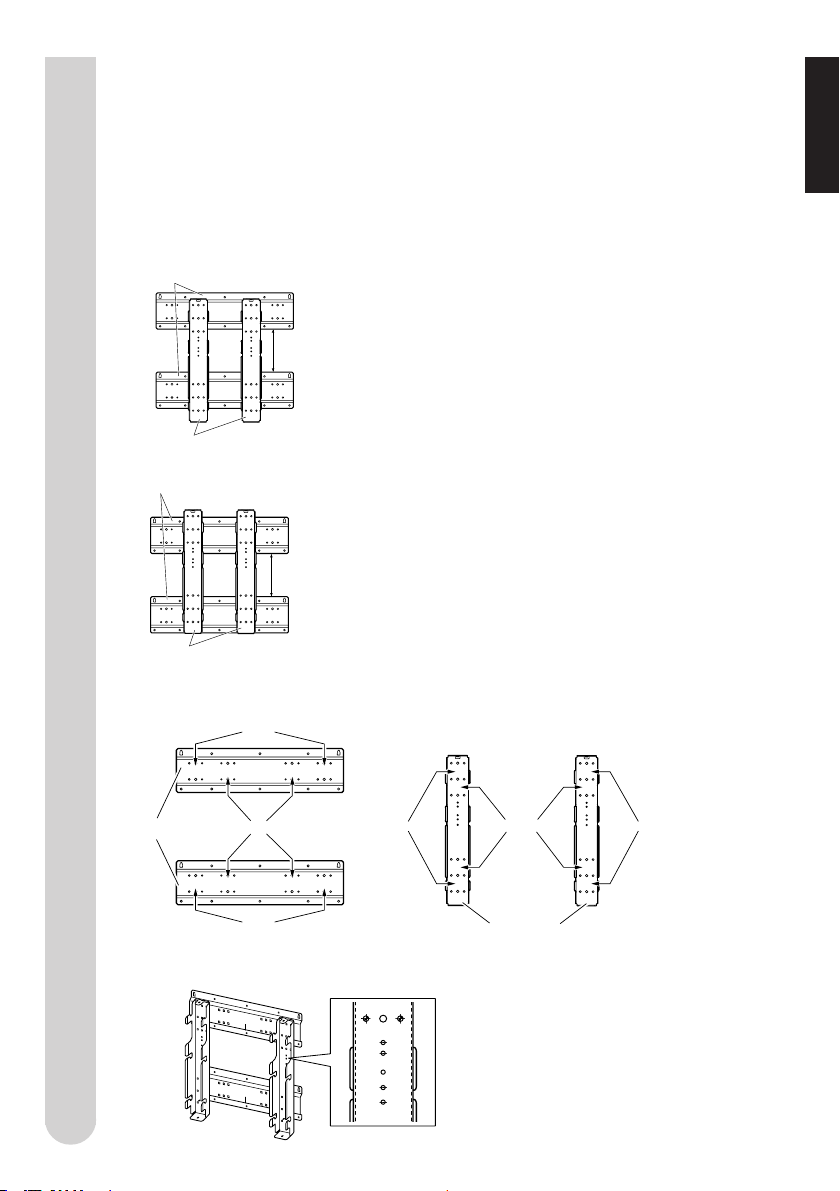
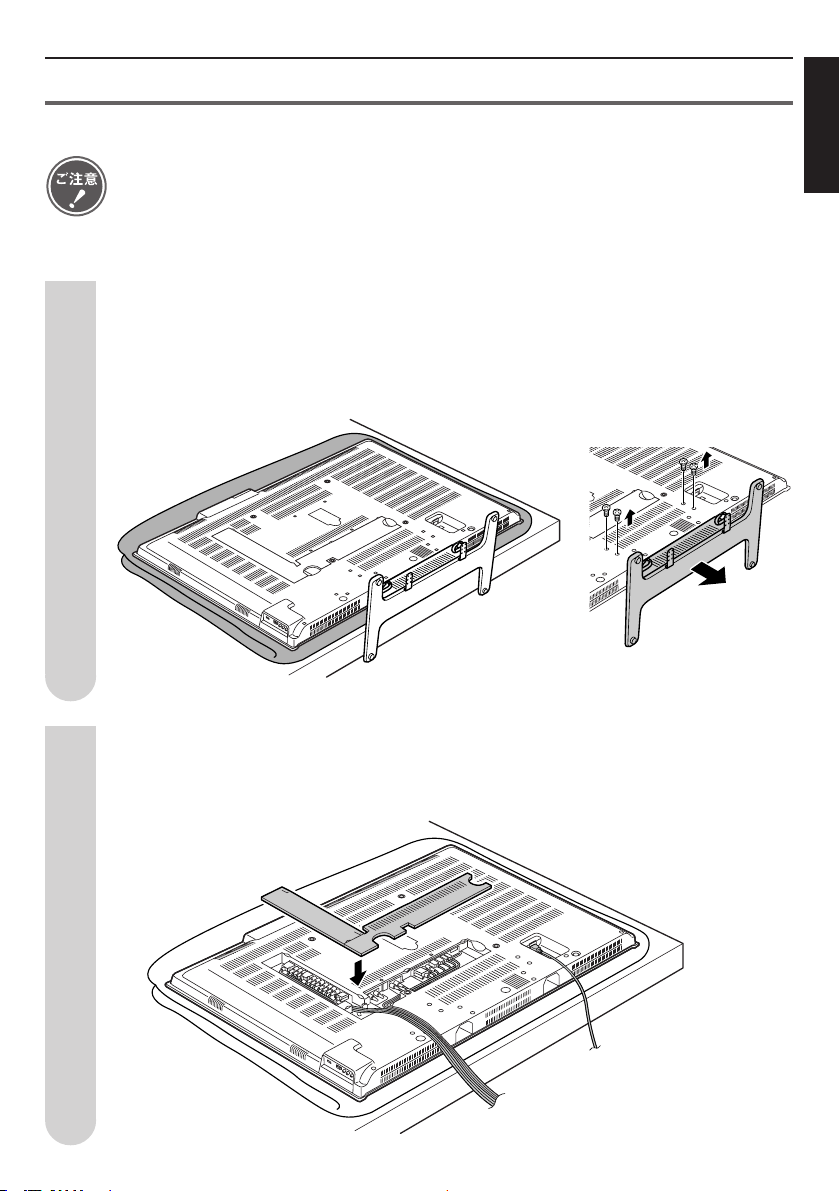
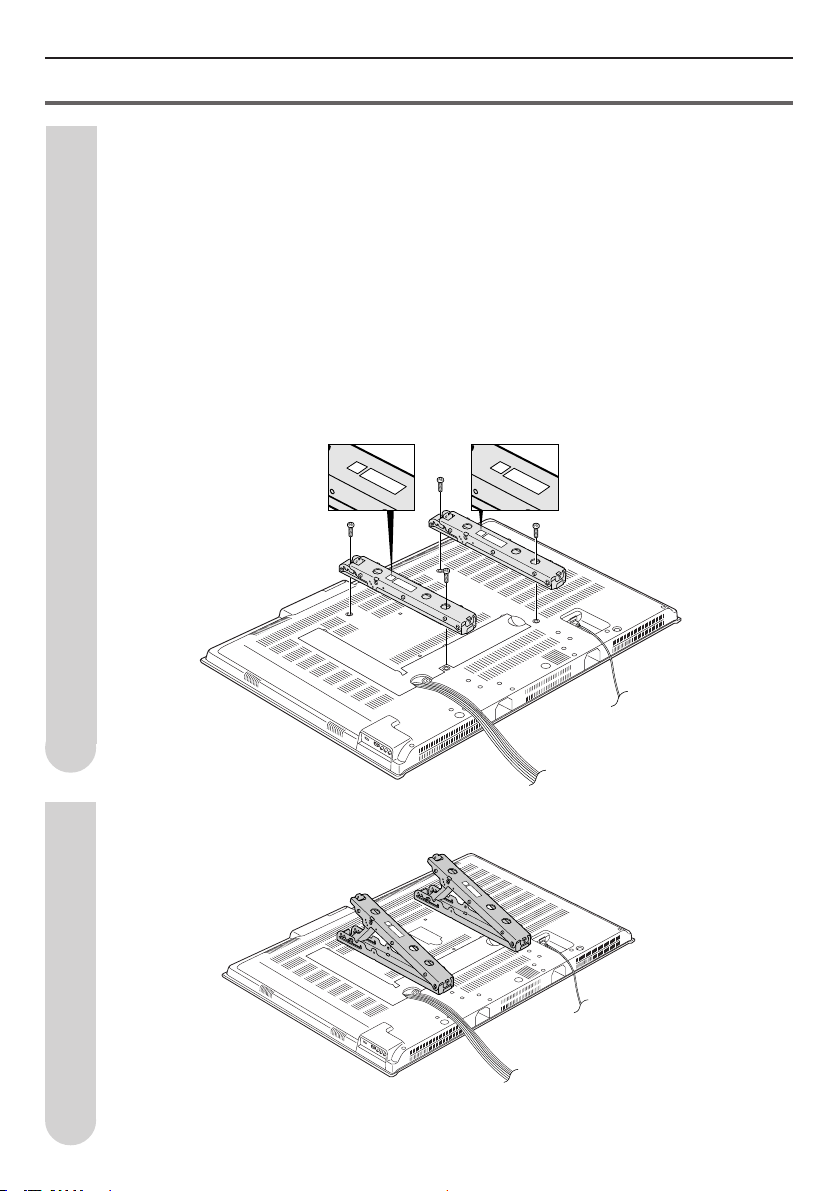
■取り付け方法、取り付け方向は、この説明書に従って施工してください。落下に
よるケガや破損の原因となります。
■
取り付け工事は、確実な作業が必要ですので、販売店や工事店にご相談ください。
■取り付けの際には、金具等に指などをはさまないようにご注意ください。
■取り付ける壁面は十分な強度があることを確認してください。(壁に補強材の入っ
ている部分に取り付けてください)
■取り付け金具には他の荷重をかけないでください。落下によるケガや破損の原因
となります。
■取り付け部品の改造・変更は行わないでください。落下によるケガや破損の原因
となります。
安全のため特に注意してください
警告
注意
湿気やほこりの少ない場所へ
●液晶カラーテレビのキャビネットの
通風孔をふさがないでください。通
風孔をふさぐと内部に熱がこもり、
火災の原因となることがあります。
●
次のような使い方はしないでください。
押し入れ、本箱など風通しの悪い狭
い所に設置する。設置した液晶カ
ラーテレビにテーブルクロスなどを
掛ける。
風通しのよい場所へ
●液晶カラーテレビは、湿気やほこり
の多い場所に設置しないでくださ
い。火災・感電の原因となることが
あります。
●液晶カラーテレビは、調理台や加湿
器のそばなど、油煙や湯気が当たる
ような場所に設置しないでくださ
い。火災・感電の原因となることが
あります。
・・・・・・・
日本語

4
外形寸法図
◎工事店様へ
・お客様の安全のため、取り付け場所の強度
には、液晶カラーテレビと壁掛け金具の荷
重に耐えるよう十分注意のうえ、設計施工
を行ってください。
・作業は必ず 2 名以上で行ってください。
・壁用金具に対する壁取付ねじは同梱されて
いません。壁に適合する市販のねじを選定
ください。
必ずお守りください
液晶カラーテレビの設置には特別な技術
が必要ですので、必ず専門の取り付け工
事業者へご依頼ください。お客様による
工事は一切行わないでください。取り付
け不備、取り扱い不備による事故、損傷に
ついては、当社は責任を負いません。
壁掛け金具ユニット(左/右) 壁用金具 A
壁用金具 B
UP
137
520 10.5
DDCC
515
48
64.5
82.5
69.4
77.4
42.3468
B
B
A
A
単位:mm

5
質量表(単位:kg)
同梱品
●壁取付用ねじ(市販品、径 6mm)20 本
取り付けの際は、販売店や工事店に必ずご相談ください。
●孔あき硬貨(5 円玉)などのおもりをつけた糸●画びょう等のピン
●クッション、やわらかい布など●工具(プラスドライバー・スパナ)
●液晶カラーテレビには視野角(映像が正しく見える範囲)があります。
ほぼ正面がもっとも正しく見える位置です。よくご覧になる姿勢や目
線、視聴範囲に合わせて設置位置を決めてください。
・取り付け強度の不十分、または取り付け不備が原因で液晶カラーテレビが落下する等に対す
る責任は、当社では一切負いかねますのでご了承ください。
※ねじの M5 はねじ部の径が
5mm であることを表します。
※使用しないねじも保管してください。
取扱説明書(本書)
ねじ A M5
長さ:8mm(2 本)
ねじ C M6
長さ:10mm(16 本)
設置位置について
ご用意ください
ねじ B M6
長さ:12mm(4 本)
壁掛け金具ユニット(左/右)・・・各 1 個
壁掛け金具固定用
壁用金具 A・B 組立用
テレビ取付用
日本語
同梱品
壁用金具 A・・・2 個 壁用金具 B・・・2 個
LC-37GX1W
LC-37GX2W
LC-37GH1
LC-37GH2
LC-37GS10
LC-37GS20
LC-42GX1W
LC-42GX2W
LC-42RX1W
LC-46GX1W
LC-46GX2W
LC-46RX1W
LC-52GX1W
LC-52GX2W
LC-52RX1W
総質量
31.4
31.9
31.4
31.9
31.4
31.9
37.4
38.4
31.9
42.9
43.4
37.9
47.4
48.4
43.9
金具
7.9
7.9
7.9
7.9
7.9
7.9
7.9
7.9
7.9
7.9
7.9
7.9
7.9
7.9
7.9
機種本体
(スタンドなし)
約23.5
約24.0
約23.5
約24.0
約23.5
約24.0
約29.5
約30.5
約24.0
約35.0
約35.5
約30.0
約39.5
約40.5
約36.0
仕向地 適合機種
日本
L
CAUTION------
--------------
R
CAUTION-------
--------------

6
壁用金具を壁に取り付ける
壁用金具を組み立てる
壁用金具A、Bを下記の手順に従ってイラストのように組み合わせ、ねじC(M6、10mm)
16本で固定します。
1
壁用金具の組み合わせについて
金具取付ピッチが 400mm の液晶テレビに取り付ける場合
対象機種:LC-52RX1W/LC-46RX1W/LC-42RX1W
液晶テレビを設置する高さに応じて、以下の組み合わせのいずれかで壁用金具
を組み立てます。壁用金具A・Bは、各組み合わせごとに、指定の刻印(下記参
照)を合わせて組み立ててください。
組み合わせ1
高さ:標準(壁に取付け後、+5cmの高さ変更可能)
壁用金具A:C刻印
壁用金具B:A刻印
組み合わせ2
高さ:+5cm(壁に取付け後、−5cmの高さ変更可能)
壁用金具A:C刻印
壁用金具B:B刻印
壁用金具A
壁用金具B
163mm
壁用金具A
壁用金具B
163mm
壁用金具A
壁用金具B

7
日本語
金具取付ピッチが 200mm の液晶テレビに取り付ける場合
対象機種:LC-52GX1W/LC-52GX2W/LC-46GX1W/LC-46GX2W
LC-42GX1W/LC-42GX2W/LC-37GX1W/LC-37GX2W
LC-37GS10/LC-37GS20/LC-37GH1/LC-37GH2
組み合わせ1
高さ:標準(壁に取付け後、+5cmの高さ変更可能)
壁用金具A:D刻印
壁用金具B:A刻印
組み合わせ2
高さ:+5cm(壁に取付け後、−5cmの高さ変更可能)
壁用金具A:D刻印
壁用金具B:B刻印
●
壁用金具B中央部の刻印b〜eは、液晶テレビ各機種の画面センター位置を示しています。
163mm
壁用金具A
壁用金具B
163mm
壁用金具A
壁用金具B
液晶テレビを設置する高さに応じて、以下の組み合わせのいずれかで壁用金具
を組み立てます。壁用金具A・Bは、各組み合わせごとに、指定の刻印(下記参
照)を合わせて組み立ててください。
●
壁用金具の刻印A〜Dの位置は、以下の図をご参照ください。
A
B
B
A
A
CD DC
CD DC
B
B
A
刻印A
壁用金具B
壁用金具A
刻印A
刻印B
刻印C
刻印C
刻印D
b
c
d
e
刻印bーLC-52RX1W
刻印cーLC-37GX1W/LC-37GX2W
LC-37GH1/LC-37GH2
LC-37GS10/LC-37GS20
LC-42GX1W/LC-42GX2W
LC-46GX1W/LC-46GX2W
LC-52GX1W/LC-52GX2W
刻印dーLC-42RX1W
刻印eーLC-46RX1W

8
壁用金具を壁に取り付ける(つづき)
2
3
壁用金具を設置する場所を決める
ご用意いただいた5円玉付きの糸を使って、壁用金具の垂直を合わせます。
垂直位置は、壁用金具のケガキ線で確認します。
2ヶ所のねじ孔の位置に、エンピツ等で印をつけます。
セロハンテープなど
形状のねじ孔
ねじ孔に合わせて、
エンピツなどで背面の
壁に印をつけます
ケガキ線(垂直基準線)と糸が重なる
ようにして水平・垂直を合わせます
ケガキ線
ねじを仮止めする
いったん壁用金具を壁から離し、壁につけたねじ孔のマーク位置に市販のねじ(径
6mm、2本)を仮止めします。このとき、ねじ頭は、壁用金具が掛けられるよう壁から
4mm以上浮いた状態にします。取り付けたねじに壁用金具を掛け、左右に傾いていな
いか確認後、しっかりとねじを締めます。残りのねじ孔も市販のねじ(径6mm、18本)を
使って固定します。
印のねじ孔(20ケ所)をねじで固定します
4mm以上
壁
壁

9
・壁掛け金具ユニットを液晶カラーテレビに取り付ける作業は、液晶カラーテレビの背面を上
側にして、やわらかい布やクッションなどの上に置いて行ってください。
・52型は立てた状態でもスタンドを外すことができますが、壁掛け金具が取り付けやすい寝か
せた状態での取り外し方を説明しています。
・テレビを起こすときは、スピーカー部分を持たないようにしてください。故障の原因となる
ことがあります。
テーブルスタンドを外す
テーブルスタンドを止めているねじ(4本)を外し、テーブルスタンドを外します。
(矢印方向に引いてから外します)
取り外したスタンド固定ねじ(4本)は保管してください。
ケーブルの処理をする
端子カバーを外し、ケーブルの配線をしたうえで再びカバーを取り付けます。
壁掛け金具ユニットを取り付ける
1
2
日本語

10
壁掛け金具ユニットを液晶テレビに取り付ける
角度設定していない状態(0°設定)の壁掛け金具ユニットを取り付けます。
z液晶カラーテレビ背面の孔(4ヶ所)に壁掛け金具ユニット(2個)のねじ
孔(4ヶ所)を合わせます。
x同梱のテレビ取付用ねじB(M6、長さ12mm)4本を使用してしっか
りと締め付けます。
※ 液晶カラーテレビ背面の孔(4ヶ所)にキャップが付いている場合は、あ
らかじめ取り外しておいてください。
※ 壁掛け金具ユニットは、角度固定用ねじのねじ頭が外側になるように
配置してください。壁掛け金具ユニットのラベル(L/R)は、テレビ
背面から見た場合の表示です。
3
4
※
角度設定の方法の詳細については、11ページ「壁掛け金具ユニットの角度を設定する」
をご参照ください。
L
CAUTION------
--------------
R
CAUTION------
--------------
壁掛け金具ユニットの角度を設定する
壁掛け金具ユニットを取り付ける(つづき)
L
CAUTION------
--------------
R
CAUTION------
--------------
L
CAUTION------
--------------
R
CAUTION------
--------------

11
1
2
壁掛け金具ユニットの角度を設定する
角度固定用ねじを外す
角度固定用ねじ(M5、長さ8mm)2本を外します。この2本のねじは、角度を設定
するとき(手順4)に使用します。ねじはなくさないよう、大切に保管してください。
壁掛け金具ユニットは、梱包状態では垂直設置用(0°)に組み立てられており、斜め設置
の場合は以下の手順で設置角度の設定が必要です。
(0°/5°/10°/15°/20°/の5つの角度に設定可能です。)
壁掛け金具ユニットを開く
角度設定用ねじ・ナットをゆるめ、壁掛け金具ユニットを矢印の方向に開きます。
日本語
角度固定用ねじ(黒色)
角度設定用ねじ

12
3
0
5
10
15
20
0
5
10
15
20
0
5
10
15
20
0
5
10
15
20
0
5
10
15
20
0
5
10
15
20
0゜ 5゜ 10゜ 15゜ 20゜
15°角度固定用ねじ孔
・壁掛け金具ユニットの角度調整の際、指などをはさまないようにご注意ください。
・角度設定部は確実にみぞの奥まではめ込み、十分に角度設定用ねじを締め付けて
ください。角度設定用ねじがみぞの奥まで入っていない場合や、締め付けが不十分
な場合、テレビが落下する危険性があります。
設定する角度にあわせる
設定角度刻印に従ってボルトを溝にはめ込み、ドライバー・六角スパナで締め付けます。
角度固定用ねじを締める
手順1で外した2本の角度固定用ねじ(M5、長さ8mm)を使い、角度を固定します。
20°に設定する場合は角度固定用ねじを使用しませんので、ねじはなくさない
よう、大切に保管してください。
(例:15°に設定する場合)
4
壁掛け金具ユニットの角度を設定する(つづき)

13
液晶カラーテレビを壁に取り付ける
・壁用金具への取り付けは必ず 2 人以上で行ってください。
・下記手順 1 と 2 は必ず行ってください。手順 1 のみでの設置は液晶カラーテレビが落下して
ケガの原因となります。
2
液晶カラーテレビに取り付けた壁掛け金具ユニットを、壁用金具に取り付ける
壁用金具の溝に、壁掛け金具ユニットの凸ピンを引っかけます。
1
壁掛け金具ユニットと壁用金具をねじで固定する
(必ず実施してください。)
金具の上部を、ねじA(M5、8mm)2本で固定します。
凸ピンの引っかかりを確認
日本語
ご注意ください。
じを締め付けて
締め付けが不十分

Contents
To Ensure Safe and Correct Use .................................... E-1
Outside Dimension Drawing............................................ E-2
Accessories Packaged with the TV ................................. E-3
Installing the Based Bracket to the Wall .......................... E-4
Installing the Wall-mount Brackets .................................. E-7
Setting the Angle of the Wall-mount Brackets ................. E-9
Installing the LCD Color TV on the Wall ........................ E-11
AN52AG2ENcontents.p65 06.12.19, 8:34 PMPage 1 AdobePageMaker6.5J/PPC

E-1
ENGLISH
The symbol means something that should not be done.
• Do not install the LCD color TV in a
location with high humidity and
much dust. Doing so could result in
fire or electric shock.
• Do not place the LCD color TV
where it will come into contact with
oily smoke or steam, such as near
a cooking range or humidifier.
Doing so could result in fire or
electric shock.
To Ensure Safe and Correct Use
• Thank you for purchasing a SHARP product.
Before using the product, please be sure to read this operation manual carefully. In particular, be sure to
read the section “To Ensure Safe and Correct Use.” After reading the manual, keep it in a convenient
location where it can be accessed at any time.
This operation manual and the product use various displays and labels to ensure safe use. Ignoring
these displays and labels and incorrectly using the product could have results as classified below.
Please read the following warning symbol information before reading the rest of this section, and be
sure to strictly observe all instructions.
Meaning of symbol
Warning:
Not following these instructions could result in death or serious injury.
Caution:
Not following these instructions could result in injury or property damage.
• Follow the instructions in this manual regarding the installation method and installation
orientation. Not following these instructions could results in injury or damage from falling parts.
• Accurate work is required for the installation work, so please have it done by the dealer or
qualified contractor.
• During installation, be careful not to pinch your fingers in the fixture, etc.
• Make sure the installation wall is sufficiently strong to support the weight of the TV. (Attach the
fixtures to the reinforcing material in the walls.)
• Do not apply any other loads to the installation fixtures. Doing so could cause the TV to fall
causing injury and damage.
• Do not modify or change the installation parts. Doing so could cause the TV to fall causing
injury and damage.
Special Precautions for Safety
Warning
Caution
Install in a location with low humidity and little dust
• Do not plug the air passage holes in
the LCD color TV cabinet. Plugging
the air passage holes could trap heat
inside the cabinet, causing a fire.
• Do not use the cabinet as follows.
Do not place the cabinet in a place
with poor air circulation, such as in a
closet or bookcase. Do not place a
drop cloth, etc., on the installed LCD
color TV.
Install in a well-ventilated area

E-2
Outside Dimension Drawing
Based bracket A
Based bracket B
To the contractor
• To ensure the safety of the customer, conduct the
design so that the strength of the installation
location is sufficiently strong to support the weight
of the LCD color TV and the wall-mount bracket.
• Be sure to use two or more people to conduct the
work.
• The wall installation screws for the wall-mount
brackets are not included with the fixtures. Select
off-the-shelf screws that match the wall.
Please strictly observe the following.
Special skill is required to install the LCD color
TV, so please have it installed by a contractor
specializing in such installation. The customer
should not attempt to install the TV. Sharp shall
not be responsible for improper installation or
any accidents, damage, or injury resulting from
improper installation.
515
48
64.5
82.5
U P
137
520 10.5
DDCC
69.4
77.4
42.3468
Wall-mount bracket
(Left/Right)
Unit: mm

E-3
ENGLISH
Accessories Packaged with the TV
*The screw notation M5 means that the diameter of the threads is 5mm.
*Please also store the screws that are not used.
Operation manual
(This manual)
Screws A
M5 length:
8mm (2 screws)
Screws B
M6 length:
12mm (4 screws)
Wall-mount bracket (Left/Right)…1 each
For holding the
wall-mount bracket
For based
brackets A and B
assembly
For TV
installation
Based bracket A…2 Based bracket B…2
• Wall installation screws (off-the-shelf screws, diameter 6mm) 20
Be sure to consult the dealership or a qualified contractor when installing the TV.
• A plumb bob of hole making hardness (coin), etc., with a string attached.
• A pin, such as a thumbtack • Cushion, soft cloth, etc. • Tool (Phillips head screwdriver
and spanner wrench)
• LCD color TVs have a viewing angle (range in which the image can be viewed
correctly). The best viewing position is from directly in front of the screen. Determine
the TV installation location after taking into consideration the viewing posture, line of
sight, and the visual and aural ranges.
• Sharp shall bear no responsibility for damages, etc., caused by the LCD color TV
falling due to insufficient installation strength or improper installation.
Caution
Weight table (Unit: kg)
Installation location
Please use the following
Screws C
M6 length:
10mm (16 screws)
LC-37GX1W
LC-37GX2W
LC-37GH1
LC-37GH2
LC-37GS10
LC-37GS20
LC-42GX1W
LC-42GX2W
LC-42RX1W
LC-46GX1W
LC-46GX2W
LC-46RX1W
LC-52GX1W
LC-52GX2W
LC-52RX1W
Total Weight
31.4
31.9
31.4
31.9
31.4
31.9
37.4
38.4
31.9
42.9
43.4
37.9
47.4
48.4
43.9
7.9
7.9
7.9
7.9
7.9
7.9
7.9
7.9
7.9
7.9
7.9
7.9
7.9
7.9
7.9
Fixture
Model unit
(no stand)
Approx. 23.5
Approx. 24.0
Approx. 23.5
Approx. 24.0
Approx. 23.5
Approx. 24.0
Approx. 29.5
Approx. 30.5
Approx. 24.0
Approx. 35.0
Approx. 35.5
Approx. 30.0
Approx. 39.5
Approx. 40.5
Approx. 36.0
Destination
market
Appropriate
Model
Japan

E-4
Installing the Based Bracket to the Wall
Based bracket assembly
Assemble based brackets A and B as shown in the illustration following the procedure given
below and secure the brackets with the 16 screws C(M6, 10mm).
1
Information Regarding Based Bracket Assembly
When installing in an LCD television with a bracket pitch of 400mm
Applicable models: LC-52RX1W, LC-46RX1W, LC-42RX1W
Use one of the following assembly configurations to assemble the based
bracket in accordance with the height of the LCD television to be installed. For
each configuration, follow the stamped instruction marks (See below) on based
brackets A and B to assemble the bracket.
Assembly configuration (1)
Height: Standard (The height can be changed +5cm
after the bracket is installed to the wall.)
Based bracket A: Stamped mark C
Based bracket B: Stamped mark A
Assembly configuration (2)
Height: +5cm (The height can be changed -5cm after
the bracket is installed to the wall.)
Based bracket A: Stamped mark C
Based bracket B: Stamped mark B
163mm
163mm
Based bracket B
Based bracket A
Based bracket A
Based bracket B
Based bracket A
Based bracket B

E-5
ENGLISH
When installing in an LCD television with a bracket pitch of 200mm
Applicable models: LC-52GX1W, LC-52GX2W, LC-46GX1W, LC-46GX2W
LC-42GX1W, LC-42GX2W, LC-37GX1W, LC-37GX2W
LC-37GS10, LC-37GS20, LC-37GH1, LC-37GH2
Assembly configuration (1)
Height: Standard (The height can be changed +5cm
after the bracket is installed to the wall.)
Based bracket A: Stamped mark D
Based bracket B: Stamped mark A
Assembly configuration (2)
Height: +5cm (The height can be changed -5cm after
the bracket is installed to the wall.)
Based bracket A: Stamped mark D
Based bracket B: Stamped mark B
•The stamped marks “b” to “e” in the center of the based bracket B show the screen
center positions for the various LCD television models.
163mm
163mm
Use one of the following assembly configurations to assemble the based
bracket in accordance with the height of the LCD television to be installed.
For each configuration, follow the stamped instruction marks (See below) on
based brackets A and B to assemble the bracket.
•Refer to the following figures for the locations of based bracket stamped marks A
to D.
A
B
B
A
A
CD DC
CD DC
B
B
A
b
c
d
e
Based bracket A
Based bracket B
Based bracket A
Based bracket B
Stamped
mark C
Stamped
mark D
Stamped
mark C
Stamped
mark A
Stamped
mark B
Stamped
mark A
Based
bracket B
Based
bracket A
Stamped mark b – LC-52RX1W
Stamped mark c – LC-37GX1W, LC-37GX2W
LC-37GH1, LC-37GH2
LC-37GS10, LC-37GS20
LC-42GX1W, LC-42GX2W
LC-46GX1W, LC-46GX2W
LC-52GX1W, LC-52GX2W
Stamped mark d – LC-42RX1W
Stamped mark e – LC-46RX1W

E-6
Installing the Based Bracket to the Wall (Continued)
2
3
Determine the location where the based bracket will be installed.
Take the coin with the string and align it perpendicular to the based bracket.
Use the vertical reference line on the based bracket to check the vertical position.
Use a pencil, etc., to mark the two screw hole locations.
Loosely screw in the screws.
Temporarily remove the based bracket from the wall and loosely screw in 2 off-the-shelf screws
(diameter 6mm) in the screw hole positions marked on the wall. At this time, the screw heads
should extend several mm above the wall so that the based bracket can be hung on the screw
heads. Hang the based bracket on the installed screws, check to make sure the bracket is not
sagging to the left or right, and then firmly tighten the screws. Use off-the-shelf screws to
secure the remaining screw holes (18 screws, diameter 6mm).
Align horizontally and vertically until
the string lies on top of the guide line
(vertical reference line).
shaped screw
holes
Use a pencil, etc., to
mark the screw hole
position on the wall
behind the bracket.
Cellophane tape, etc.
Guide lines
Wall
Min. 4mm
Fasten the screws in the circled screw
holes (20 holes).
Table of contents
Languages:
Other Sharp TV Mount manuals