Sharp 13VT-R100 User manual

PAGE
IMPORTANT INFORMATION .................................................. 2~3
IMPORTANT SAFEGUARDS .................................................. 3~4
Supplied Accessories ............................................................... 5
Before Operating Your TV/VCR Combination ......................... 5
Antenna Connections ............................................................... 6
Description Of Controls ............................................................ 7
Location Of Control’s Buttons (Remote Control) ...................... 8
Watching A TV Program .......................................................... 9~13
1POWER
2VOLUME
3CHANNEL SELECTION
4DISPLAY CALL
5MENU FUNCTIONS
6TRILINGUAL ON SCREEN DISPLAY
7EZ SETUP during First Use ........................................... 10
8WAKE-UP TIMER .......................................................... 10
9SLEEP TIMER ............................................................... 11
!VIDEO ADJUST ............................................................. 11
CLOSED CAPTION ....................................................... 11~12
#PRESETTING THE CHANNELS ................................... 12~13
EZ SETUP ..................................................................... 12
CH SETTING ................................................................. 13
V-CHIP BLOCK ........................................................................ 14~17
Tamper Proof Function ............................................................ 18
Setting The Clock ..................................................................... 18~19
1AUTOMATIC CLOCK SETTING .................................... 18
2MANUAL CLOCK SETTING .......................................... 19
PAGE
Playing A Cassette .................................................................... 20~22
ENERGY SAVE
BLUE SCREEN
AUTO REPEAT
S. PICTURE (SUPER PICTURE)
INSERTING A VIDEO CASSETTE
EJECTING THE CASSETTE TAPE
PLAYBACK
AUTOMATIC TRACKING CONTROL SYSTEM
FULLY AUTOMATIC PLAYBACK FUNCTION
STILL PICTURE
VIDEO SEARCH
FAST FORWARD AND REWIND
DPSS (DIGITAL PROGRAM SEARCH SYSTEM)
EZ PLAY
Recording A TV Program ......................................................... 23
RECORDING SPEEDS
CASSETTE ERASE PROTECTION
RECORDING A TV PROGRAM
TAPE COUNTER
Recording With The Timer ....................................................... 24~25
Tape Dubbing .......................................................................... 26
Pre-Service Call Checklist ....................................................... 27
Calling For Service ................................................................... 27
Specifications ........................................................................... 28
Limited Warranty ...................................................................... 31
7353 PE
TV • VCR COMBINATION
LOPERATION MANUAL L
HIGH QUALITY
CONTENTS
MODEL
13V T-R100
13V T-R150
A
s an
E
NERGY
S
TAR
®
P
artner, SHARP has determined that this product meets the
E
NERGY
S
TAR
®
guidelines
for energy efficiency.
E
NERGY
S
TAR
®
is a
U.S.
registered trademark.
01 13VT-R100/150[E]w/o E.pm65e 12/4/01, 6:50 PM1

2
Welcome to the SHARP Family. We are pleased that you are now the owner of a SHARP TV/VCR Combination – built for
outstanding quality, reliability and performance.
Every SHARP TV/VCR Combination set is properly tuned and adjusted for a proper color picture and sound, and has passed
through the most stringent quality control tests at the factory. We have prepared this OPERATION MANUAL so that you may
adjust the picture and color to your personal viewing preference.
We sincerely hope that you receive the utmost satisfaction and enjoyment from your new SHARP TV/VCR Combination set for
years to come.
Please read these instructions carefully, and keep them handy for your future reference.
IMPORTANT
To aid reporting in case of loss or theft, please record the TV’s model and
serial numbers in the space provided. The numbers are located at the rear of
the TV.
IMPORTANT INFORMATION
WARNING: TO REDUCE THE RISK OF FIRE OR ELECTRIC SHOCK, DO NOT EXPOSE THIS
APPLIANCE TO WET LOCATIONS.
The lightning flash with arrowhead within a triangle is
intended to tell the user that parts inside the product
are a risk of electric shock to persons.
The exclamation point within a triangle is intended to
tell the user that important operating and servicing
instructions are in the papers with the appliance.
“Note to CATV system installer: This reminder is provided to call the CATV system installer’s attention to Article 820-40 of
the National Electrical Code that provides guidelines for proper grounding and, in particular, specifies that the cable ground
shall be connected to the grounding system of the building, as close to the point of cable entry as practical.”
Model No.:
Serial No.:
WARNING OF DEW FORMATION
Whenever your TV is moved from a cold to a warm environment, it is important that you plug the unit in, turn the power on and
allow it to sit for about 2 hours before attempting to play a tape.
This period will allow any dew formation to evaporate. Failure to do so may result in tape and/or video head damage.
After the 2 hours evaporation period, you may witness a “snowy” picture for the first few minutes of VCR operation. This picture
noise will disappear shortly thereafter.
CAUTION: TO REDUCE THE RISK OF
ELECTRIC SHOCK,
DO NOT REMOVE COVER (OR BACK).
NO USER-SERVICEABLE PARTS INSIDE.
REFER SERVICING TO QUALIFIED SERVICE
PERSONNEL.
There are two important reasons for prompt warranty registration of your new SHARP TV/VCR Combination set. Use the
REGISTRATION CARD packed in with the set.
FIRST – WARRANTY
This is to assure that you will immediately receive the full consumer benefit of the parts, service and labor warranty applicable
to your purchase.
SECOND – CONSUMER PRODUCT SAFETY ACT
To assure that you will promptly receive any safety notification on inspection, modification or recall that SHARP may be required
to give under the 1972 Consumer Product Safety Act. PLEASE READ CAREFULLY THE IMPORTANT “LIMITED WARRANTY”
CLAUSE ON THE LAST PAGE.
WHAT IS ENERGY STAR ®
TVs and VCRs use energy both when they are on and when they are off. Americans spend more than $1 billion a year on energy
consumed by TVs and VCRs when they are not in use. The new ENERGY STAR ®models will reduce that energy “leakage”by
up to 75 percent. Ultimately, this will mean more than $500 million a year in energy savings for consumers.
The energy savings will help reduce the burning of fossil fuels and the related carbon dioxide pollution that contributes to global
warming. If every American family replaced their TVs and VCRs with ENERGY STAR ®models, it would reduce carbon dioxide
emissions by five million tons every year —equivalent to eliminating the pollution from more than one million cars.
By using ENERGY STAR ®products, you will save money on your electric bills and use less energy. That makes good economic
sense and its good for our environment.
02-04 13VT-R100/150[E].pm65e 4/11/90, 10:12 AM2

3
WARNING - FCC Regulations state that any unauthorized changes or modifications to this equipment not expressly
approved by the manufacturer could void the user’s authority to operate this equipment.
PRODUCT DISPOSAL
This product utilizes a Cathode Tube (CRT) containing lead and tin lead solder.
Disposal of these materials may be regulated due to environment considerations. For disposal or recycling information,
please contact your local authorities or the Electronics Industries Aliance:www.eiae.org
CAUTION : Please read all of these instructions before you operate your television and save these instructions
for later use.
Electrical energy can perform many useful functions. This unit has been engineered and manufactured to assure your personal
safety. BUT IMPROPER USE CAN RESULT IN POTENTIAL ELECTRICAL SHOCK OR FIRE HAZARDS. In order not to defeat
the safeguards incorporated in this equipment, observe the following basic rules for its installation, use and servicing.
1. Unplug this television equipment from the wall outlet before cleaning.
2. Do not use liquid cleaners or aerosol cleaners. Use a damp cloth for cleaning.
3. Do not use attachments not recommended by the television equipment manufacturer as they may cause hazards.
4. Do not use this television equipment near water — for example, near a bathtub, washbowl, kitchen sink or laundry tub, in a
wet basement, or near a swimming pool, etc.
5. Do not place this equipment on a unstable cart, stand, or table. The television equipment may fall, causing serious injury to
a child or an adult, and serious damage to the equipment. Use only with a cart or stand recommended by the manufacturer
or sold with the television equipment.
6. Television equipment and cart combination should be moved with care. Quick stops, excessive force,
and uneven surfaces may cause the equipment and cart combination to overturn.
7. Wall or shelf mounting should follow the manufacturer’s instructions, and should use a mounting kit
approved by the manufacturer.
8. Slots and opening in the cabinet and the back or bottom are provided for ventilation. To insure reliable operation of the
television equipment and to protect it from overheating, these openings should not be blocked or covered. This television
equipment should not be placed in a built-in insulation such as a bookcase unless proper ventilation is provided.
9. The openings should never be covered with a cloth or other material, and the bottom openings should not be blocked by
placing the television equipment on a bed, sofa, rug, or other similar surface. This television equipment should never be
placed near or over a radiator or heater register.
10. This television equipment should be operated only from the type of power source indicated on the marking label. If you are
not sure of the type of power supplied to your home, consult your television dealer or local power company.
For television equipment designed to operate from battery power, refer to the operating instructions.
11. As a safety feature, television equipment is equipped with a 2-wire polarized plug (one plug blade bigger than the other.)
The 2-wire polarized plug will fit only one way into the power outlet.
If the plug does not fit in, ask your electrician to replace your obsolete outlet. Do not modify the plug and defeat this safety
feature.
12. Do not allow anything to rest on the power cord. Do not locate this television equipment where the cord will be abused by
persons walking on it.
13. Follow all warnings and instructions marked on the television equipment.
IMPORTANT INFORMATION (Continued)
IMPORTANT SAFEGUARDS
02-04 13VT-R100/150[E].pm65e 11/4/01, 7:25 PM3

4
ELECTRICAL
SERVICE
EQUIPMENT
ANTENNA LEAD-IN WIRE
GROUND CLAMP
ANTENNA DISCHARGE UNIT
(NEC SECTION 810-20)
GROUNDING CONDUCTORS
(NEC SECTION 810-21)
GROUND CLAMPS
POWER SERVICE GROUNDING ELECTRODE SYSTEM
(NEC PART 250, PART H)
14. If an outside antenna is connected to the television equipment, be sure the antenna system is grounded so as to provide
some product protection against voltage surges and built-up static changes. Section 810 of the National Electrical Code
provides information with respect to proper grounding of the mast and supporting structure, groundings of the lead-in wire
to an antenna discharge unit, size of grounding conductors, location of antenna-discharge unit, connection to grounding
electrodes, and requirements for the grounding electrode.
EXAMPLE OF ANTENNA GROUNDING
ACCORDING TO NATIONAL ELECTRICAL CODE
NEC- NATIONAL ELECTRICAL CODE
15. For added protection for this television equipment during a lightning storm, or when it is left unattended and unused for long
periods of time, unplug it from the wall outlet and disconnect the antenna. This will prevent damage to the equipment due to
lightning and power-line surges.
16. An outside antenna system should not be located in the vicinity of overhead power lines or other electric light or power
circuits, or where it can fall into such power lines or circuits. When installing an outside antenna system, extreme care
should be taken to keep from touching such power lines or circuits as contact with them might be fatal.
17. Do not overload wall outlets and extension cords as this can result in fire or electric shock.
18. Never push objects of any kind into this television equipment through cabinet slots as they may touch dangerous voltage
points or short out parts that could result in a fire or electric shock. Never spill liquid of any kind on the television equipment.
19. Do not attempt to service this television equipment yourself as opening or removing covers may expose you to dangerous
voltage or other hazards. Refer all servicing to qualified service personnel.
20. Unplug this television equipment from the wall outlet and refer servicing to qualified service personnel under the following
conditions:
A. When the power cord or plug is damaged or frayed.
B. If liquid has been spilled into the television equipment.
C. If the television equipment has been exposed to rain or water.
D. If the television equipment does not operate normally by following operating instructions. Adjust only those controls that
are covered by the operating instructions as improper adjustments of other control may result in damage and will often
require extensive work by a qualified technician to restore the television equipment to normal operation.
E. If the television equipment has been dropped or the cabinet has been damaged.
F. When the television equipment exhibits a distinct change in performance — this indicates a need for service.
21. Upon completion of any service or repairs to this television equipment, ask the service technician to perform routine safety
checks to determine that the television is in safe operating condition.
22. When replacement parts are required, be sure the service technician has used replacement parts specified by the manufacturer
that have the same characteristics as the original part. Unauthorized substitutions may result in fire, electric shock, or other
hazards.
IMPORTANT SAFEGUARDS (Continued)
02-04 13VT-R100/150[E].pm65e 27/4/01, 4:36 PM4

5
123
4 6
789
0
100
POWER
INPUT DISPLAY MUTE
VOL
TAPE
SPEED
REC
REW FF
PLAY
STOP
PAUSE/STILL
COUNTER
RESET
DPSS
FLASHBACK
TAMPER
PROOF
TV • VCR COMBINATION
+
SET
PROG
MENU
TIMER
ON/OFF
CONFIRM
–
ed
e
TR
•
•
•
•
d
RETURN
CH
5
•
Location
• For normal operation, your TV should be located in an area of the room where cool adequate ventilation is provided. Do not
place the back of the television set in a place where free airflow will be restricted.
• Any magnetic force may disturb the color picture. Make sure that magnets, electric clocks, toys using magnets or any other
magnetic substance, such as iron are kept well away from the TV set.
Power
Your TV operates on 120 Volts, 60 Hz (normal household current) and has a polarized plug. If you are unable to insert the
plug fully into the outlet, try reversing the plug. Should it fail to fit, contact an electrician. Do not defeat the safety feature of
the polarized plug.
Note:
• If the set will not be used for a long period, such as during a vacation, unplug the set from the wall outlet to economize
power. (If the TV set is plugged in, a slight current still flows, even with the POWER BUTTON in the OFF position.)
• Lines and other noise may appear in TV broadcast images when an FM tuner or radio is located near the TV and both radio
and TV broadcasts are being received. Should such noise appear, turn off either the TV or the radio.
• If you are listening to an AM broadcast, turn the TV off. AM broadcast signals may not be received due to interference from
the TV.
LBefore using the television, prepare the Remote Control
To use the remote control, insert batteries first.
Insert the batteries
• With your thumb nail, pull up the slit as indicated by the arrow to remove the back cover. Insert two batteries (size “AA”). Be
sure to match the battery e/dterminals with the e/dmarks inside the compartment.
Battery
Cover
Pull up
Before Operating Your TV/VCR Combination
Size AA
Dry Batteries
Infrared Remote Control/Part Number
RRMCG1330PESA (13VT-R100)
RRMCG1330PESB (13VT-R150)
Supplied Accessories
05-06 13VT-R100/150[E].pm65e 12/4/01, 2:13 PM5

6
75-ohm
coaxial
cable
300-ohm
twin-lead
VHF/UHF
ANTENNA
VHF/UHF ANTENNA
REAR OF TV
300/75-ohm
ADAPTOR
(not supplied)
or
A. Combination VHF/UHF Antennas
OUTDOOR ANTENNA CONNECTION
•Use one of the following two diagrams if you connect an outdoor antenna.
A: Using a VHF/UHF combination outdoor antenna.
B: Using separate VHF and/or UHF outdoor antenna.
•Connect an outdoor antenna cable lead-in to the COAXIAL CABLE CONNECTOR on the rear of the TV set.
CABLE TV (CATV) CONNECTION
•A 75 ohm coaxial cable connector is built into the set for easy hookup. When connecting the 75 ohm coaxial cable to the set,
screw the 75 ohm cable to the COAXIAL CABLE CONNECTOR.
•Some cable TV companies offer “premium pay channels”. Since the signals of these premium pay channels are scrambled,
a cable TV converter/descrambler is generally provided to the subscriber by the cable TV company. This converter/descrambler
is necessary for normal viewing of the scrambled channels. (Place your TV on channel 3 or 4, typically one of these
channels is used. If this is unknown, consult your cable TV company.) For more specific instructions on installing cable TV,
consult your cable TV company. One possible method of utilizing the converter/descrambler provided by your cable TV
company is explained below.
Please note: RF switch equipped with position A/B (not provided) is required.
“A”position on the RF switch (not supplied) : You can view all unscrambled channels using the TV’s channel keys.
“B”position on the RF switch (not supplied) : You can view the scrambled channels via the converter/descrambler using
the converter’s channel keys.
Note:
•Consult your SHARP Dealer or Service Center for the type of splitter, RF switch or combiner that might be required.
B. Separate VHF/UHF Antenna
Antenna Connections
REAR OF TV
300-ohm
twin-lead
300-ohm
twin-lead
75-ohm coaxial
cable
IN OUT
VHF
ANTENNA
UHF
ANTENNA
COMBINER
(not supplied)
or
OUT
B IN A
Cable TV converter/
descrambler
(not supplied)
Two-set
signal
splitter
(not
supplied)
Cable TV Line
RF switch (not supplied)
OUT IN
1. A 75 ohm system is generally a round cable with F-type
connector that can easily be attached to a terminal
without tools (not supplied).
2. A 300 ohm system is a flat “twin-lead”cable that can be
attached to a 75 ohm terminal through a 300-75 ohm
ADAPTOR (not supplied).
Antennas
•The antenna requirements for good color television reception are more important than those for black & white television
reception. For this reason, a good quality outdoor antenna is strongly recommended.
The following is a brief explanation of the type of connections that are provided with the various antenna systems:
F-type connector
75-ohm coaxial cable (round)
300-ohm twin-lead cable (flat)
05-06 13VT-R100/150[E].pm65e 12/4/01, 2:13 PM6

7
Description Of Controls
FRONT
REAR
POWER
POWER/
WAKE-UP
TIMER
REC
PROGRAM
TIMER TAMPER
PROOF
VIDEO/AUDIO
Input Jacks
POWER button
POWER indicator
REC indicator
PROGRAM TIMER indicator
TAMPER PROOF indicator CHANNEL
UP/DOWN
buttons
PLAY
button
SENSOR AREA FOR REMOTE CONTROL
ANT/CABLE
TERMINAL
(75 )
POWER/
WAKE-UP
TIMER
REC
PROGRAM
TIMER TAMPER
PROOF
EZ
PLAY
button
REC
button
STOP/EJECT
button
FF (Forward
Video Search)
button
REW (Reverse
Video Search)
button
VOLUME
UP/DOWN
buttons
07-09 13VT-R100/150[E].pm65e 12/4/01, 2:15 PM7

8
Location Of Control’s Buttons (Remote Control)
INPUT
TV/VIDEO Select
POWER ON/OFF
CHANNEL SELECT
FLASHBACK
Returns to previously viewed
channel.
COUNTER RESET
• Used to reset the tape counter.
TAPE SPEED
• Used to select the recording
tape speed.
PLAY
• Used for tape playback.
• Used to cancel the PAUSE/STILL
mode and return to normal
playback operation.
REW
• Used to rewind the tape or to
conduct Reverse Video Search
during playback mode.
REC
• Used to record a program.
–
, +
TIMER ON/OFF
CONFIRM
• Used to confirm the program
setting.
RETURN
SET
123
456
789
0
100
POWER
INPUT DISPLAY MUTE
VOL
TAPE
SPEED
REC
REW FF
PLAY
STOP
PAUSE/STILL
COUNTER
RESET
DPSS
FLASHBACK
TAMPER
PROOF
TV •VCR COMBINATION
+
SET
PROG
MENU
TIMER
ON/OFF
CONFIRM
–
ed
e
TR
•
•
•
•
d
RETURN
CH
•
Infrared Transmitter Window
DISPLAY
• Used to change the On Screen
Display.
MUTE
Press
→
Mutes sound.
Press again
→
Restores sound
to previous level.
Press the MUTE button to enter
the CLOSED CAPTION mode
automatically if the signal contains
CC information.
VOLUME UP/DOWN
CHANNEL UP/DOWN
(TRACKING
e
/
d
)
• Used to select the CHANNEL.
• Used to adjust the TRACKING
while playing the tape.
TAMPER PROOF
• Used to block changes to current
operating mode.
FF
• Used to fast forward the tape or
to conduct Forward Video Search
during playback mode.
STOP
• Used to stop the tape.
PAUSE/STILL
• Used to temporarily stop the tape
during recording mode.
• Used to display a still picture
during playback mode.
DPSS (
e
/
d
)
• Press the (e/ d) button to search
for the index signal and begin
playback automatically.
PROGRAM
• Press the button to enter the Timer
Recording mode.
MENU
• Used to select the menu screen.
07-09 13VT-R100/150[E].pm65e 12/4/01, 2:15 PM8

9
Watching A TV Program
1POWER
•Press the POWER button to turn on the TV.
(The POWER indicator will be lit in RED.)
Sound will start instantly and picture will appear 5 to 10
seconds later.
•Press the POWER button again to turn off the TV.
(The POWER indicator will be turned off.)
2VOLUME
•Press the VOL UP (8) button to increase the sound to the
desired level, and then release.
•Press the VOL DOWN (9) button to decrease the sound
level.
LTo turn the sound off temporarily
•Press the MUTE button on the Remote Control to turn the
sound off.
“MUTE”will appear on the screen to confirm that this fea-
ture is in effect.
•Press the MUTE button again to restore the sound to its
previous level.
3CHANNEL SELECTION
•The desired channel can be selected instantly by press-
ing the CHANNEL SELECT buttons (0 ~ 9, 100) on the
Remote Control, or CHANNEL UP (8)/DOWN (9) but-
tons on the Remote Control or on the TV.
•To select cable channel numbers greater than “99 ”. First
press “100 ”button on the Remote Control; then the two
other numbers buttons to complete your total channel
number selection.
•The selected channel number will appear on the screen.
Example:
(1) To select channel 2 :
Press the “0”and “2”buttons.
To select channel 69 :
Press the “6”and “9”buttons.
To select channel 125 (CATV mode only) :
Press the “100 ”, “2”and “5”buttons.
(2) The memorized channel selection will change in sequence
from the low preset channel to the high preset channel
when the CH UP (8) button is pressed, and vice versa
when the CH DOWN (9) button is pressed after you pre-
set the desired channels into the memory.
Note:
•For channel memory, please refer to page 13.
4DISPLAY CALL
•Pressing the DISPLAY button on the Remote Control will
change the display on the screen in the following sequence.
Note:
•When CLOSED CAPTION is turned ON, the ON SCREEN
DISPLAY turns off automatically after about 3 seconds.
•For CLOSED CAPTION information, please refer to
pages 11 ~ 12.
Press Once* •Time and Date
•Channel Number
•(Tape Operation Display)
•(Tape Speed Mode —SP, LP, EP)
•(Tape Counter)
After about 3 •Channel Number
seconds •(Tape Operation Display)
•(Tape Speed Mode —SP, LP, EP)
•(Tape Counter)
Press Twice •Cleans Display
DISPLAY
Items in ( ) will be displayed when a cassette is loaded in the
VCR.
5MENU FUNCTIONS
LCalling up the Functions
(1) Press the MENU button on the Remote Control to call the
MENU screen.
(2) Press the + or –button on the Remote Control to select
the desired function mode. Each time that you press the +
or –button, the “:”mark moves down or up.
(3) Press the SET button on the Remote Control to access
desired function mode.
•To leave the MENU screen, press the MENU button on
the Remote Control.
MENU
TIMER
VIDEO ADJUST
CLOSED CAPTION
FUNCTION
CLOCK
LANGUAGE
CH SETTING
V-CHIP BLOCK
SELECT + / – : SET SET
PREVIOUS RETURN : QUIT MENU
(MENU screen)
6TRILINGUAL ON SCREEN DISPLAY
LThe language for this unit’s ON SCREEN DISPLAY can
be set to ENGLISH, SPANISH or FRENCH.
LSetting the ON SCREEN DISPLAY Language
(1) Select “LANGUAGE”from
the MENU screen by
pressing + or –button,
then press the SET
button.
(2) Press the + or –button
to select the language
(English, Spanish or
French) you wish to
display, then press the
SET button.
SELECT + / –: SET SET
PREVIOUS RETURN : QUIT MENU
MENU
TIMER
VIDEO ADJUST
CLOSED CAPTION
FUNCTION
CLOCK
LANGUAGE
CH SETTING
V-CHIP BLOCK
LANGUAGE
SELECT + / —: SET SET
PREVIOUS RETURN : QUIT MENU
ENGLISH
ESPANOL
FRANCAIS
07-09 13VT-R100/150[E].pm65e 12/4/01, 2:15 PM9

10
Watching A TV Program (Continued)
7EZ SETUP during First Use
When you turn on the TV for the first time, it will automatically
memorize the broadcast channels.
Please perform the following before pressing the power button.
1) Insert the batteries into the remote control. (See page 5)
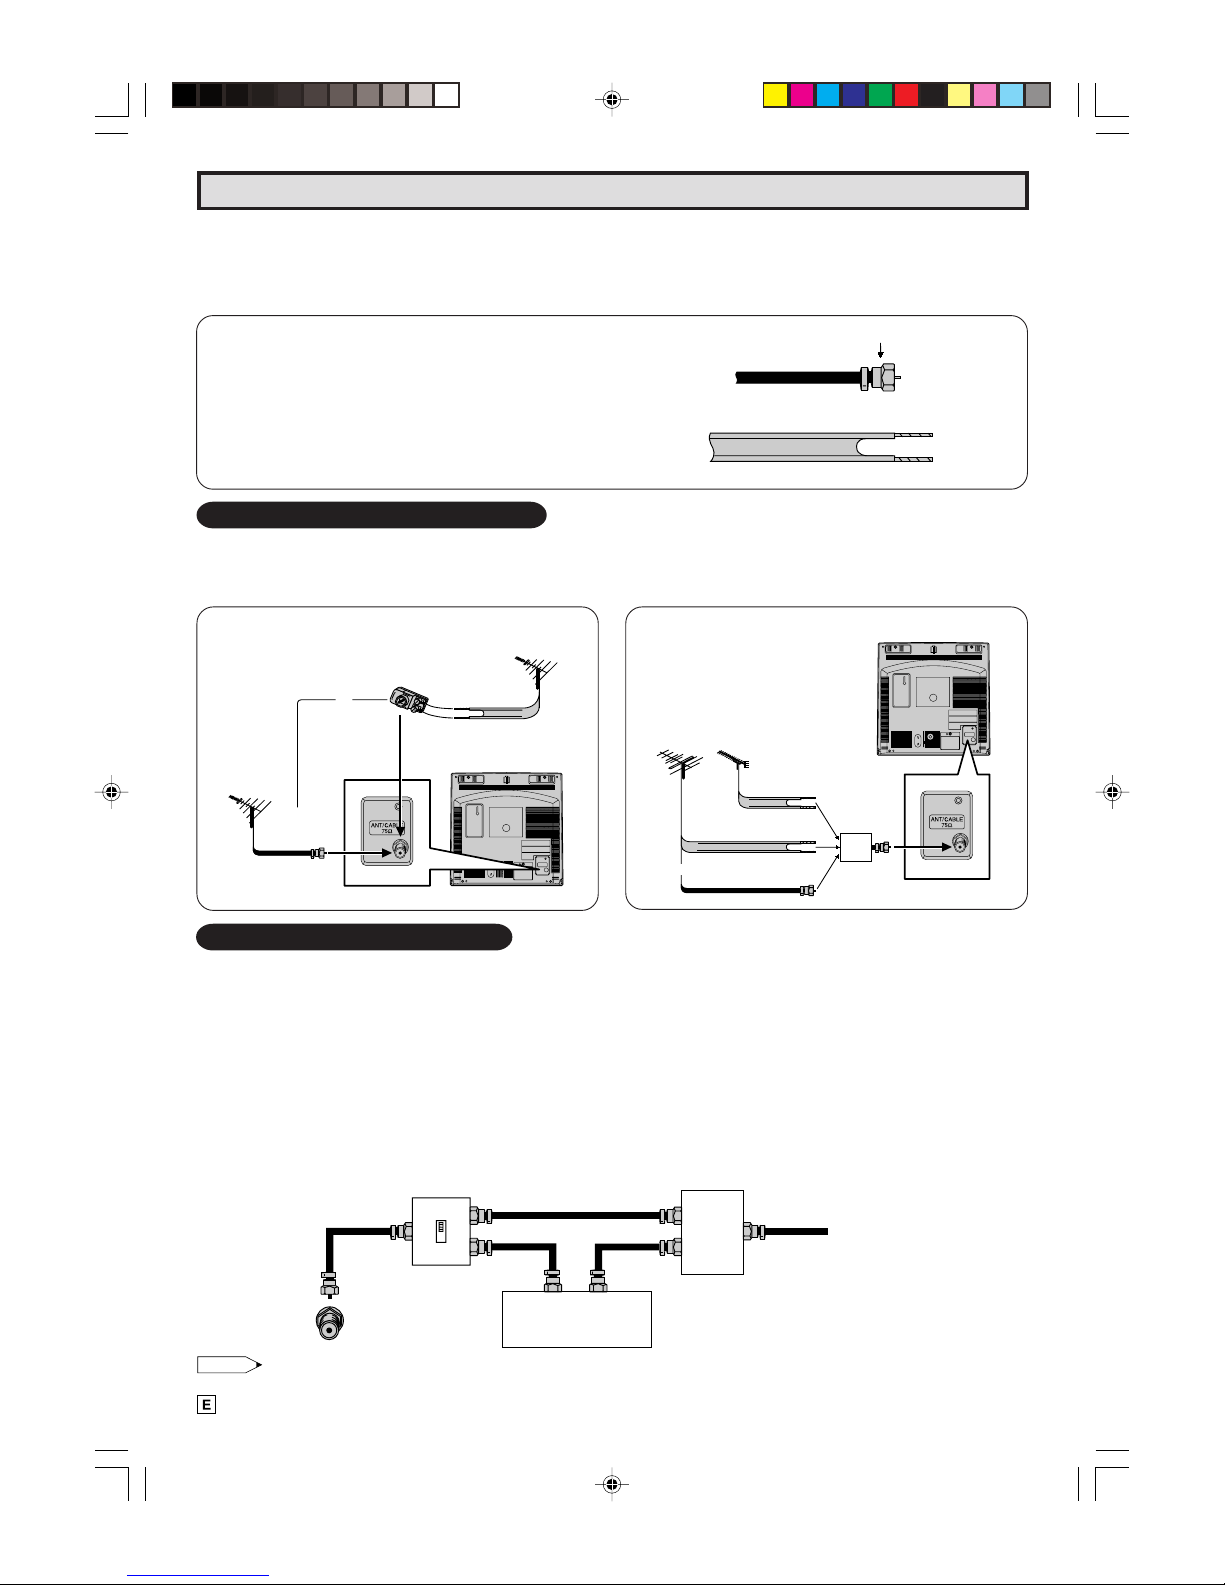
2) Connect the antenna cable to the TV set. (See page 6)
3) Plug in the AC POWER cord to the wall outlet.
(1) Press the POWER button
on the TV set or on the
Remote Control to turn on
the TV. The SELECT
LANGUAGE mode will be
displayed.
(2) Press + or – button on the
Remote Control to select
“ENGLISH”, “SPANISH”
(ESPAÑOL) or “FRENCH”
(FRANÇAIS). Then press
+ or – button to SET
LANGUAGE.
(3) Press the SET button on
the Remote Control to
access EZ SETUP mode.
(4) Press the SET button on
the Remote Control.
The tuner will automatically search for the broadcast and cable
TV channels. (The CH No. will automatically increase when it
appears.)
To cancel EZ SETUP, press the SET button on the Remote
Control.
If you want to SETUP again, please refer to page 12 on SETUP.
(5) The “CLOCK SET” screen
will be displayed, then set
the clock same as step (2),
(3) on page 18.
Note:
• If EZ SETUP does not memorize all the channels in your
region, please refer to page 12 for more information on
manual memorizing the channels using CHANNEL
SETTING.
• It may be difficult to use the PRESET function when the
broadcast signals are weak, the channel cycle frequency
is incorrect or frequency jamming is occuring in the area.
Please refer to page 13 for more information on manual
memorizing the channel using CHANNEL SETTING.
SELECT LANGUAGE
SELECT + / – : SET SET
ENGLISH
ESPANOL
FRANCAIS
(SELECT LANGUAGE mode)
SELECT LANGUAGE
SELECT + / –: SET SET
ENGLISH
ESPANOL
FRANCAIS
CONNECT ANTENNA
OR CABLE.
START EZ SETUP?
NO MENU
YES SET
(EZ SETUP mode)
PLEASE WAIT
AIR 2
AUTO PROGRAMMING
STOP SET
SELECT + / –: SET SET
PREVIOUS RETURN : QUIT MENU
CLOCK SET
AUTO CLOCK
EDS CH
MONTH
DAY
YEAR
TIME
ON
AUTO
---
--
----
--:----
8WAKE-UP TIMER
LSetting the Wake-up Timer automatically turns on the
TV or VCR at a preset time.
(1) Press the MENU button
on the Remote Control to
call up the MENU screen.
(2) Press the + or – button on
the Remote Control to
select “TIMER”, and press
the SET button. If the
clock is not set, the clock
set menu will appear.
Please set the clock first.
(3) Press the + or – button to
select “WAKE-UP”, and
press the SET button.
(4) Press the Remote’s + or
– button to select the
“hour”, then press the SET
button. The yellow position
will move to the “minute”
portion. Again, press the
Remote’s + or – button to
select the “minute”, then
press the SET button.
(5) Press the + or – button to
select turning on the TV or
VCR.
(6) Press the SET button, then
press the MENU button.
Note:
• To clear the Wake-up Timer setting, select “OFF” in step
(5).
• After the TV and/or VCR is on, and no operation is activated
and none of its functions here been used for 2 hour period,
the power will shut off as a safety feature.
• When you have selected “VIDEO ON” in step (5) and no
cassette is loaded the TV turns on instead of the VCR.
SELECT + / –: SET SET
PREVIOUS RETURN : QUIT MENU
MENU
TIMER
VIDEO ADJUST
CLOSED CAPTION
FUNCTION
CLOCK
LANGUAGE
CH SETTING
V-CHIP BLOCK
SELECT + / –: SET SET
PREVIOUS RETURN : QUIT MENU
MENU
TIMER
VIDEO ADJUST
CLOSED CAPTION
FUNCTION
CLOCK
LANGUAGE
CH SETTING
V-CHIP BLOCK
TIMER
WAKE-UP
SLEEP
12:00AM
OFF
OFF
10:00AM SEP.15(FRI)
SELECT + / —: SET SET
PREVIOUS RETURN : QUIT MENU
TIMER
WAKE-UP
SLEEP
10:20AM
OFF
OFF
10:00AM SEP.15(FRI)
SELECT + / —: SET SET
PREVIOUS RETURN : QUIT MENU
The Wake-up Timer indicator
changes from red to orange.
The Wake-up Timer indicator
changes to green in standby
mode.
TIMER
WAKE-UP
SLEEP
10:20AM
VIDEO ON
OFF
10:00AM SEP.15(FRI)
SELECT + / —: SET SET
PREVIOUS RETURN : QUIT MENU
10-13 13VT-R100/150[E].pm65e 12/4/01, 2:18 PM10

11
9SLEEP TIMER
LSetting the Sleep Timer automatically turns off the
power at a preset time.
(1)
Select “TIMER” from the
MENU screen, and press
the SET button.
If the clock is not set, the
clock set menu will appear,
set the clock first (refer to
page 18)
(2) Press the + or – button to
select “SLEEP”, and press
the SET button.
(3) Select the desired timer by pressing the + or – button, and
press the SET button. Each time you press the + or –
button, the display changes as follows:
Note:
• The Sleep Timer function is cancelled if “OFF” is selected
in the operation step (2).
• The Sleep Timer function is cancelled if you turn the set
off by pressing the POWER ON/OFF button on the Remote
Control or the front panel.
SELECT + / —: SET SET
PREVIOUS RETURN : QUIT MENU
MENU
TIMER
VIDEO ADJUST
CLOSED CAPTION
FUNCTION
CLOCK
LANGUAGE
CH SETTING
V-CHIP BLOCK
TIMER
WAKE-UP
SLEEP
10:20AM
VIDEO ON
OFF
10:00AM OCT.15(FRI)
SELECT + / —: SET SET
PREVIOUS RETURN : QUIT MENU
+ button; OFF
30 M. REMAIN
60 M. REMAIN
90 M. REMAIN
120 M. REMAIN
–button; OFF
120 M. REMAIN
90 M. REMAIN
60 M. REMAIN
30 M. REMAIN
!VIDEO ADJUST
(PICTURE, TINT, COLOR, BRIGHT, SHARP, FAVORITE COLOR)
(1) Select “VIDEO ADJUST”
from the MENU screen
and press the SET button.
SELECT + / —: SET SET
PREVIOUS RETURN : QUIT MENU
MENU
TIMER
VIDEO ADJUST
CLOSED CAPTION
FUNCTION
CLOCK
LANGUAGE
CH SETTING
V-CHIP BLOCK
REC
REW FF
PLAY
STOP
PAUSE/STILL
DPSS
TV • VCR COMBINATION
+
SET
PROG
MENU
TIMER
ON/OFF
CONFIRM
–
ed
RETURN
MENU button
+/–button
SET button
RETURN button
Watching A TV Program (Continued)
(2) Press the + or –button
on the Remote Control to
select the item you wish to
adjust, then press the SET
button. (Pressing the + or
–button moves the “:”
mark.)
(3) Press the + or –button to
adjust the “brightness”to
a favorite picture.
(4) Press the SET button. The
screen will return to the (2)
above.
•
To continue any additional
adjustment, repeat the
steps from (2) to (4) above.
(5) Press the MENU button
anytime to exit VIDEO
ADJUST.
< Description of Adjustment Items >
Selected
+ button – button
Item
PICTURE To increase contrast To decrease contrast
TINT Skin tones become greenish Skin tones become purplish
COLOR For more color intensity For less color intensity
BRIGHT For more brightness For less brightness
SHARP For more sharpness For less sharpness
F. COLOR Warmer picture Cooler picture
(Favorite color)
(Whites reddish) (Whites bluish)
RESET
All VideoAdjustments are returned to the factory preset
level.
VIDEO ADJUST
PICTURE
TINT
COLOR
BRIGHT
SHARP
F.COLOR
RESET
SELECT + / —: SET SET
PREVIOUS RETURN : QUIT MENU
- +
BRIGHT
CLOSED CAPTION
LHow to set Closed Caption
•Your TV is equipped with an internal closed caption
decoder. “Closed Caption”is a system which allows you
to view conversations, narration, and sound effects in TV
programs and home videos as subscript on your TV screen
as shown below.
•Not all the programs
and videos will offer
closed caption.
Please look for the
“ ” symbol to
ensure that captions
will be shown.
•Closed Caption broadcast can be viewed in two modes:
CAPTION and TEXT. For each mode, two channels are
available, CH1 and CH2:
The [CAPTION] mode subscripts dialogues and
commentaries of TV dramas and news programs while
allowing clear view of the picture.
The [TEXT] mode displays over the picture other various
information (such as TV program schedule, weather
forecast, etc.) that is independent of the TV programs.
Example:
Adjusting the “brightness”.
10-13 13VT-R100/150[E].pm65e 12/4/01, 2:18 PM11

12
(1) Press the Remote’s
MENU button to access
the MENU screen.
(2) Press + or –button to
move the “:”mark to
“CLOSED CAPTION”.
(3) Press the SET button.
(4) Press + or –button to
move the “:”mark to
either “MODE”or “DATA”,
then press the SET
button.
Watching A TV Program (Continued)
(5) Press + or –button to
change the “CLOSED
CAPTION”setting.
(6) Press the SET button.
(7) Press the MENU button to
exit.
Note:
•When receiving closed caption signals, a white line may
appear in place of the captions. This is due to poor signal
conditions or problems at the broadcast source, and does
not indicate a problem with your TV.
•When viewing in TEXT mode, if no TEXT broadcast is being
received the screen may become dark and blank. Should
this occur, set the Closed Caption mode to “OFF”.
•If a TV program has Closed Caption and the MUTE button
is pressed, the set enters Closed Caption mode auto-
matically. Pressing MUTE again will return the set to its
previous condition.
•If any button is pressed to call up the ON SCREEN
DISPLAY while viewing a CLOSED CAPTION broadcast,
the closed captions will disappear momentarily.
SELECT + / —: SET SET
PREVIOUS RETURN : QUIT MENU
CLOSED CAPTION
MODE
DATA
CAPTION
CH2
MODE :
DATA :
CAPTION
TEXT
OFF
CH 1
CH 2
SELECT + / —: SET SET
PREVIOUS RETURN : QUIT MENU
MENU
TIMER
VIDEO ADJUST
CLOSED CAPTION
FUNCTION
CLOCK
LANGUAGE
CH SETTING
V-CHIP BLOCK
SELECT + / —: SET SET
PREVIOUS RETURN : QUIT MENU
MENU
TIMER
VIDEO ADJUST
CLOSED CAPTION
FUNCTION
CLOCK
LANGUAGE
CH SETTING
V-CHIP BLOCK
SELECT + / —: SET SET
PREVIOUS RETURN : QUIT MENU
CLOSED CAPTION
MODE
DATA
CAPTION
CH2
SELECT + / —: SET SET
PREVIOUS RETURN : QUIT MENU
CLOSED CAPTION
MODE
DATA
CAPTION
CH2
#PRESETTING THE CHANNELS
LEZ SETUP
By operating the channel preset functions, you can preset
your TV to the desired channels for viewing.
(1) Press the Remote’s
MENU button to access the
MENU mode.
(2) Press + or –button to
move the “:”mark to the
“CH SETTING”mode.
(3) Press the SET button on
the Remote Control to
access CH SETTING mode.
(4) Press the + or –button on
the Remote Control to
move the “:”to “EZ
SETUP”mode.
(5) Press the SET button on
the Remote Control to
access EZ SETUP mode.
(6)
Press the SET button.
The tuner will automatically
search for the broadcasting
and cable TV channels.
(The CH No. will automatically
increase when it appears.)
To cancel EZ SETUP. Press
SET button on the Remote
Control.
(7) Once EZ SETUP is
completed, the smallest
channel number memo-
rized will be displayed.
SELECT + / —: SET SET
PREVIOUS RETURN : QUIT MENU
MENU
TIMER
VIDEO ADJUST
CLOSED CAPTION
FUNCTION
CLOCK
LANGUAGE
CH SETTING
V-CHIP BLOCK
CH SETTING
EZ SETUP
AIR/CABLE
CH SEARCH
CH MEMORY
SELECT + / —: SET SET
PREVIOUS RETURN : QUIT MENU
CONNECT ANTENNA
OR CABLE.
START EZ SETUP?
NO MENU
YES SET
PLEASE WAIT
AIR 2
AUTO PROGRAMMING
STOP SET
2
AIR
TV-PG
(CH SETTING mode)
(EZ SETUP mode)
DPSS
TV •VCR COMBINATION
+
SET
PROG
MENU
TIMER
ON/OFF
CONFIRM
–
ed
RETURN
MENU button
+/–button
SET button
RETURN button
10-13 13VT-R100/150[E].pm65e 12/4/01, 2:18 PM12

13
LCH SETTING
If EZ SETUP does not memorize all the channels in your
region, follow the instructions below to manually memorize
the channel.
1Selecting the TV Signal mode.
(1) Select “CH SETTING”in
the MENU screen by
pressing + or –button,
then press the SET button.
(2) Select “AIR/CABLE”from
the CH SETTING screen
by pressing + or –button,
then press the SET button.
(3) Press the + or –button on
the Remote Control to
select the TV signal mode,
then press the SET button.
2Auto-programming broadcast TV channels into memory.
(1) Select “CH SEARCH”
from the CH SETTING
screen by pressing + or –
button, then press the
SET button.
(2) Press the SET button. The
tuner will automatically
cycle through available
channels in your area and
preset them into the
memory. If all available
channels are of reasonable
signal strength and you
prefer not to add or erase
any channels from memory,
presetting is completed.
Note:
•Receivable channels of your TV set are:
AIR channels —
VHF; 2 through 13,
UHF; 14 through 69.
CABLE channels —
1 (HRC and IRC mode only)
2 through 125 (STD, HRC, and IRC)
(TV signal mode)
VHF/UHF antenna
AIR
Cable TV
CABLE STD
CABLE HRC
CABLE IRC
SELECT + / —: SET SET
PREVIOUS RETURN : QUIT MENU
MENU
TIMER
VIDEO ADJUST
CLOSED CAPTION
FUNCTION
CLOCK
LANGUAGE
CH SETTING
V-CHIP BLOCK
CH SETTING
EZ SETUP
AIR/CABLE
CH SEARCH
CH MEMORY
SELECT + / —: SET SET
PREVIOUS RETURN : QUIT MENU
AIR/CABLE
AIR
CABLE STD
CABLE HRC
CABLE IRC
SELECT + / —: SET SET
PREVIOUS RETURN : QUIT MENU
CH SETTING
EZ SETUP
AIR/CABLE
CH SEARCH
CH MEMORY
SELECT + / —: SET SET
PREVIOUS RETURN : QUIT MENU
CH SEARCH
AIR 2
START
START SET
PREVIOUS RETURN : QUIT MENU
3Adding weak or additional channels from TV memory.
(1) Select “CH MEMORY”
from the CH SETTING
screen by pressing + or –
button, then press the
SET button.
(2)
Use either the CH UP/DOWN
(
8/9
) buttons or the CHA-
NNEL SELECT buttons (0~9,
100) to select the desired
channel. The selected cha-
nnel number will appear on
the screen.
•If any channel is stored in the memory, the “ADD”is
displayed.
•If any channel is not stored in the memory, the “ERASE”is
displayed.
(3) Use the + or –to select
“ADD”; confirm that the
“ADD”is displayed. If
additional channels are to
be preset, repeat step (2).
(4) Press the SET or MENU
key to exit CH MEMORY.
Use the CH UP/DOWN
(8/9) buttons to assure
channel presetting is
correct.
4Erasing unwanted channels from TV memory.
(1) Select “CH MEMORY”
from the CH SETTING
screen.
(2) Select the channel to be
erased.
(3) Use the + or –to select
“ERASE”; confirm that the
“ERASE”is displayed. If
additional channels are to
be erased, repeat step (2).
(4) Press the SET or MENU
key to exit CH MEMORY.
Use the CH UP/DOWN
(8/9) buttons to assure
channel(s) are erased.
CH MEMORY
AIR 54
ADD
START
SELECT + / —: SET SET
PREVIOUS RETURN : QUIT MENU
CH MEMORY
AIR 54
ADD
START
SELECT + / —: SET SET
PREVIOUS RETURN : QUIT MENU
CH MEMORY
AIR 54
ERASE
START
SELECT + / —: SET SET
PREVIOUS RETURN : QUIT MENU
Watching A TV Program (Continued)
10-13 13VT-R100/150[E].pm65e 12/4/01, 2:18 PM13

14
V-CHIP BLOCK
LV-CHIP
• This function allows you to restrict TV programs and also allows you to control TV usage based on FCC data. This function is
to prevent your children from watching violence or sexual scenes that may be harmful.
• Restriction of TV programs includes two characters that contain information about the program’s MPAA rating and the TV
Parental Guidelines. MPAA is restricted by age. TV Parental Guidelines are restricted by age and contents.
• Since a TV program may use either the MPAA rating or the TV Guidelines you should adjust both for complete control.
LMPAA RATING
RATING
G GENERAL AUDIENCES. All ages admitted.
PG PARENTAL GUIDANCE SUGGESTED. Some material may not be suitable for children.
PG-13 PARENTS STRONGLY CAUTIONED. Some material may be inappropriate for children under 13.
R RESTRICTED. Under 17 requires accompanying parent or adult guardian.
NC-17 NO ONE 17 AND UNDER ADMITTED.
X X Rating is an older rating that is unified with NC-17 but may be encoded on older movie data.Note:
•MPAA RATING (Example)
Example 1.
“PG-13” in the age based RATING is blocked, this will
automatically block the high ratings “R”, “NC-17”, “X” also.
Example 2.
“R” in the age based RATING is blocked, this will automatically
block the high rating “NC-17”, “X” also.
age
base
1. User setting 2. Block table
PG
age
base
Not to block
Not to block
Select block
Auto-block
Auto-block
Auto-block
GG
PG
PG-13
R
NC-17
X
– –
– –
BLOCK
BLOCK
BLOCK
BLOCK
PG-13
R
NC-17
X
1. User setting 2. Block table
PG
age
base
Not to block
Not to block
Not to block
Select block
Auto-block
Auto-block
GG
PG
PG-13
R
NC-17
X
––
––
––
BLOCK
BLOCK
BLOCK
R
NC-17
X
PG-13
RATING
E
age
base
D
Note:
• MPAA RATING is a rating based only on age.
LTV PARENTAL GUIDELINES
ycontent base x
AGE D L S V FV
(Sexually (Adult (Sexual (Violence) (Fantasy
Suggestive Language) Situation) Violence)
Dialog)
TV-Y (All children) V–––––
TV-Y7 (Direct to Older Children) V––––V
TV-G (General Audience) V–––––
TV-PG (Parental Guidance VVVVV –
Suggested)
TV-14 (Parents Strongly VVVVV –
Cautioned)
TV-MA (Mature Audience Only) V–VVV –
V: Content Rating can be set.
–: Content Rating can not be set (not normally broadcast by TV station).
14-17 13VT-R100/150[E].pm65e 12/4/01, 2:21 PM14

15
V-CHIP BLOCK (Continued)
•TV-PARENTAL GUIDELINES (Example)
Example 1.1 : Age Based setting
Go through all select ratings and select unblocked for “AGE”.
This will automatically unblock everything.
Example 1.2 : Age Based setting
For “TV-G” select “BLOCK” for “AGE”. This will automatically block the higher age ratings “TV-
PG”, “TV-14” and “TV-MA” as well as “TV-G”.
Furthermore, the content ratings “D”, “L”, “S”, “V”, “FV” are automatically blocked as well for
“TV-PG”, “TV-14” and “TV-MA” as well as “TV-G”.
Example 2.1 : Content Based setting
For “TV-PG”, “TV-14” and “TV-MA” select unblock for each content rating (“D”, “L”, “S”, “V”,
“FV”) by leaving “AGE” unblocked for “TV-PG”, “TV-14” and “TV-MA”. If you choose to unblock
each one by content base.
Example 2.2 : Content Based setting
For “TV-PG” select “BLOCK” for only “V” (Violence). This will automatically block the higher
ratings “TV-14-V” and “TV-MA-V” (“TV-14” and “TV-MA” for Violence content only).
Please note that with these settings blocking does NOT occur. If a program is rated only “TV-
MA”; it must be rated “TV-MA-V” to be blocked.
Example 3 : Reset an Age Based setting
For “TV-14” select again “BLOCK” for “AGE”.
This will again automatically block the content ratings “D”, “L”, “S”, “V”, “FV” for “TV-MA” as well
as “TV-14”.
Please note that the lower age rating “TV-PG” did not change from its previous settings.
Note:
• Content ratings can be modified but only in the combinations indicated by an Vin the table on page 14.
• Changing a lower age rating’s content setting to “BLOCK” automatically changes the same higher age rating’s content setting
to “BLOCK” regardless of their previous settings.
• Changing a lower rating’s “AGE” setting to “BLOCK” automatically changes all higher ratings to “BLOCK” regardless of their
previous settings.
• Any rating’s “AGE” set to unblocked must have its content settings individually set.
[3] ADDITIONAL MODE
Besides the above “MPAA RATINGS” and “TV PARENTAL GUIDELINES” new rating system’s data can be downloaded
when they become available. (See page 17.)
TV–Y
TV–Y7
TV–G
TV–PG
TV–14
TV–MA
G
AE
–
–
–
–
D
–
–
–
L
–
–
–
S
–
–
–
V
–
–
–
–
–
V:
:
BLOCK
VIE
W
FV
SELECT + / — : SET SET
PREVIOUS RETURN : QUIT MENU
TV–Y
TV–Y7
TV–G
TV–PG
TV–14
TV–MA
G
AE
–
–
–
D
–
–
–
L
–
–
–
S
–
–
–
V
–
–
–
–
–
VVVV
VVVV
VVV
V
V
V
V
FV
–
V:
:
BLOCK
VIE
W
SELECT + / —: SET SET
PREVIOUS RETURN : QUIT MENU
TV–Y
TV–Y7
TV–G
TV–PG
TV–14
TV–MA
G
AE
–
–
–
–
D
–
–
–
L
–
–
–
S
–
–
–
V
–
–
–
–
–
FV
V:
:
BLOCK
VIE
W
SELECT + / —: SET SET
PREVIOUS RETURN : QUIT MENU
TV–Y
TV–Y7
TV–G
TV–PG
TV–14
TV–MA
G
AE
–
–
–
–
D
–
–
–
L
–
–
–
S
–
–
–
V
–
–
–
–
–
FV
V
V
V
V:
:
BLOCK
VIE
W
SELECT + / —: SET SET
PREVIOUS RETURN : QUIT MENU
TV–Y
TV–Y7
TV–G
TV–PG
TV–14
TV–MA
G
AE
–
–
–
–
D
–
–
–
L
–
–
–
S
–
–
–
V
–
–
–
–
–
FV
V
V
V
V
V
V
VV
V
V:
:
BLOCK
VIE
W
SELECT + / —: SET SET
PREVIOUS RETURN : QUIT MENU
14-17 13VT-R100/150[E].pm65e 12/4/01, 2:21 PM15

16
V-CHIP BLOCK (Continued)
LMPAA RATING
(1) Press the MENU button.
Press the + or –button to
select “V-CHIP BLOCK”
from the MENU screen, then
press the SET button.
(2) “INPUT SECRET No.”will
be displayed.
(3)
Enter a 4-digit SECRET No.
using the CHANNEL SELECT,
then press the SET button.
If you already registered the 4-
digit SECRET No., enter the
same No. as registered.
(4) Press the + or –button to
select “MPAA”, then press
the SET button to access
“MPAA”.
(5)
Press the + or –button to select
“PG”(for EX.), then press the
SET button. Press the + or –
button to select “BLOCK”or
“– –” (unblock), then press the
SET button. If you set “PG”to
“BLOCK”, “PG-13”, “R”, “NC-
17”and “X”are automatically
blocked.
(6) Press the MENU button to
exit.
Note:
•If the wrong SECRET No. is
chosen in above step (3),
“INCORRECT”will be displayed.
Input the right SECRET No.
again in this case.
•If you set “G”to BLOCK in
above step (5), all RATINGS
are automatically blocked.
•If you set “X”to BLOCK in
above step (5), “G”, “PG”,
“PG-13”, “R”and “NC-17”are
not blocked.
LTV GUIDELINES
(1) Repeat steps (1) to (3) of
LMPAA RATING.
(2) Press the + or –button to
select “TV GUIDELINES”,
then press the SET button
to access “TV GUIDELINES”.
(3) Press the + or –button to
select “TV-Y7”(for EX.),
then press the SET button.
(4) To change the CONTENT
SETTING, Press the + or -
button to select the desired
rating then Press the SET
button. Press the + or –
button to select “BLOCK”or
“– –” (unblock), then Press
the SET button.
(5) Press the “RETURN”button
to access “TV GUIDELINES”.
(6) Repeat steps (3) to (5) until
all ratings and their
contents are set.
(7)
Press the MENU button to exit.
SELECT + / —: SET SET
PREVIOUS RETURN : QUIT MENU
MENU
TIMER
VIDEO ADJUST
CLOSED CAPTION
FUNCTION
CLOCK
LANGUAGE
CH SETTING
V-CHIP BLOCK
INPUT SECRET NO.
————
INPUT 0—9 : SET SET
PREVIOUS RETURN : QUIT MENU
INPUT SECRET NO.
✱✱✱✱
INPUT 0—9 : SET SET
PREVIOUS RETURN : QUIT MENU
V-CHIP BLOCK
MPAA
TV GUIDELINES
DOWNLOAD OFF
STATUS ON
SELECT + / —: SET SET
PREVIOUS RETURN : QUIT MENU
MPAA
G --
PG BLOCK
PG-13 BLOCK
R BLOCK
NC-17 BLOCK
X BLOCK
SELECT + / —: SET SET
PREVIOUS RETURN : QUIT MENU
INPUT SECRET NO.
✱✱✱✱
INCORRECT
INPUT 0—9 : SET SET
PREVIOUS RETURN : QUIT MENU
MPAA
G BLOCK
PG BLOCK
PG-13 BLOCK
R BLOCK
NC-17 BLOCK
X BLOCK
SELECT + / —: SET SET
PREVIOUS RETURN : QUIT MENU
MPAA
G --
PG --
PG-13 --
R --
NC-17 --
X BLOCK
SELECT + / —: SET SET
PREVIOUS RETURN : QUIT MENU
V-CHIP BLOCK
MPAA
TV GUIDELINES
DOWNLOAD OFF
STATUS ON
SELECT + / —: SET SET
PREVIOUS RETURN : QUIT MENU
DPSS
TV •VCR COMBINATION
+
SET
PROG
MENU
TIMER
ON/OFF
CONFIRM
–
ed
RETURN
MENU button
+/–button
SET button
RETURN button
TV GUIDELINES
AGE D L S V FV
TV-Y
TV-Y7
TV-G
TV-PG
TV-14
TV-MA
:VIEW
v:BLOCK
-----
v----v
v-----
v vvvvv
v vvvvv
v-vvvv
SELECT + / —: SET SET
PREVIOUS RETURN : QUIT MENU
TV-Y7
AGE BLOCK
D --
L --
S --
V --
FV BLOCK
SELECT + / —: SET SET
PREVIOUS RETURN : QUIT MENU
TV GUIDELINES
AGE D L S V FV
TV-Y
TV-Y7
TV-G
TV-PG
TV-14
TV-MA
:VIEW
v:BLOCK
-----
v----v
v-----
v vvvvv
v vvvvv
v-vvvv
SELECT + / —: SET SET
PREVIOUS RETURN : QUIT MENU
(TV GUIDELINES mode)
(CONTENT RATING mode)
14-17 13VT-R100/150[E].pm65e 12/4/01, 2:21 PM16

17
V-CHIP BLOCK (Continued)
LTurning On (Activating) the V-Chip Blocks
(1) Repeat steps (1) to (3) of
LMPAA RATING.
(2) Press the + or –button to
select “STATUS”, then press
the SET button.
Press the + or –button to
select “ON”, then press
the SET button to activate
the V-CHIP BLOCK.
(If STATUS is OFF, V-CHIP
BLOCK will not operate.)
(3) Press the MENU button to
exit.
LTo cancel the V-CHIP BLOCK screen while V-CHIP
BLOCK has been activated.
(1)
“
V-CHIP HAS BEEN ACTIVATED
”
will be displayed if you view
a Program containing
Program Rating data the
same as you configured.
Note:
•“V-CHIP HAS BEEN ACTIVATED”will not be displayed if
the STATUS is not configured to “ON”.
(2) Press the MENU button,
then “INPUT SECRET No.”
will be displayed.
(3)
Enter the 4-digit SECRET
No.
using CHANNEL SELECT,
then
V-CHIP BLOCK temporarily
will be canceled.
If the wrong SECRET No.
is
chosen, “INCORRECT”
will
be displayed. Input the right
SECRET No. again in this
case.
LIf you forget or need to change the Secret No., clear
the original Secret No. and set up new one.
(1) Unplug the TV.
(2) Press and hold both VOL
UP (8) and STOP/EJECT
buttons on the TV set.
(3) Plug in the TV and release
the buttons after 2 seconds.
LAdditional mode (DOWNLOAD)
There will be an additional new rating system. In that
case, please set up as follows. Subsequently the new
rating system will set automatically.
(1) Repeat steps (1) to (2) of
LMPAA RATING.
(2) Press the + or –button to
select “DOWNLOAD”, then
press the SET button.
(3) Press the + or –button to
select “ON”or “OFF”, then
press the SET button.
(4) Press the MENU button to
exit.
LDOWNLOAD V-CHIP DATA
(1) If you watch the program
containing “New Rating
System
Data”, the
DOWNLOAD screen
will be
displayed.
(2) The DOWNLOAD screen
will disappear, once the
downloading is finished.
Note:
•DOWNLOAD will not start, if you do not watch a program
containing “New Rating System Data”.
LHow to set Additional mode (Example)
(1) Repeat steps (1) to (2) of
L
Additional mode (DOWNLOAD).
(2) Press the + or –button to
select “Cdn. English Ratings”,
then press the SET button.
(3)
You can select “BLOCK”or
“– –” (unblock) from each
RATING mode by pressing
the + or –button and the SET
button.
(4)
You can select “BLOCK”or
“– –” (unblock) from each
RATING mode by pressing
the + or –button and the SET
button, if you select “Cdn.
French Ratings”in step (2).
Note:
•In additional mode
Including two types (English mode, French mode), altogether
you are able to download 4 different modes.
V-CHIP BLOCK
MPAA
TV GUIDELINES
DOWNLOAD OFF
STATUS ON
SELECT + / —: SET SET
PREVIOUS RETURN : QUIT MENU
V-CHIP HAS BEEN
ACTIVATED
TV-PG L V
DE-ACTIVATE V-CHIP MENU
54
INPUT SECRET NO.
————
INPUT 0—9 : SET SET
PREVIOUS RETURN : QUIT MENU
INPUT SECRET NO.
✱
✱
✱
✱
INPUT 0—9 : SET SET
PREVIOUS RETURN : QUIT MENU
V-CHIP BLOCK
MPAA
TV GUIDELINES
DOWNLOAD OFF
STATUS ON
SELECT + / —: SET SET
PREVIOUS RETURN : QUIT MENU
V-CHIP BLOCK
MPAA
TV GUIDELINES
DOWNLOAD ON
STATUS ON
SELECT + / —: SET SET
PREVIOUS RETURN : QUIT MENU
PLEASE WAIT
NOW DOWNLOADING
V-CHIP DATA
V-CHIP BLOCK
MPAA
TV GUIDELINES
Cdn. English Ratings
Cdn. French Ratings
DOWNLOAD ON
STATUS ON
SELECT + / —: SET SET
PREVIOUS RETURN : QUIT MENU
Cdn.English Ratings
C --
C8+ BLOCK
G --
PG BLOCK
14+ --
18+ BLOCK
INDIVIDUAL BLOCK
SELECT + / —: SET SET
PREVIOUS RETURN : QUIT MENU
Cdn.French Ratings
G --
8+ BLOCK
13+ --
16+ BLOCK
18+ --
INDIVIDUAL BLOCK
SELECT + / —: SET SET
PREVIOUS RETURN : QUIT MENU
STOP/EJECT
button
VOL UP (8)
button
14-17 13VT-R100/150[E].pm65e 12/4/01, 2:21 PM17

18
1AUTOMATIC CLOCK SETTING
• To set the clock automatically, follow the procedure below:
(1) Press the MENU button on
the Remote Control.
Press the +/– button to
move “ :” mark to
“CLOCK”, then press the
SET button.
(2) The “CLOCK SET”
screen
will be displayed. Press
the +/– button to select
“AUTO CLOCK ON” and
press the SET button.
(3) The “ :” mark will move
to “EDS CH AUTO”. If the
EDS channel in your area
is known, use the +/–
button to select the
channel. Otherwise, select
“AUTO”. Press the SET
button.
(3.1)
Turn off the power.
The clock is set
automatically
using EDS
signals while the power is
off.
• If the EDS channel is
selected, it takes only a
few minutes for the clock
to set.
Tamper Proof Function
Note:
• If you move to other location, try to preset the channels
again (See page 12 for presetting the channels) and set
the clock again following the procedure above.
• If the Auto Clock setting is still not completed even a few
hours after turning off the power, EDS signals may not be
broadcast in your area. In this case, set the clock manually.
(See page 19 for manual clock setting.)
• If the antenna signal is weak, the AUTO CLOCK SETTING
function may not operate.
• The AUTO CLOCK SET will not function if there is no EDS
signal broadcast.
• Select a channel that carries EDS signals with the eor d
button.
SELECT + / — : SET SET
PREVIOUS RETURN : QUIT MENU
MENU
TIMER
VIDEO ADJUST
CLOSED CAPTION
FUNCTION
CLOCK
LANGUAGE
CH SETTING
V-CHIP BLOCK
SELECT + / —: SET SET
PREVIOUS RETURN : QUIT MENU
CLOCK SET
AUTO CLOCK
EDS CH
MONTH
DAY
YEAR
TIME
ON
AUTO
---
--
----
--:----
SELECT + / —: SET SET
PREVIOUS RETURN : QUIT MENU
CLOCK SET
AUTO CLOCK
EDS CH
MONTH
DAY
YEAR
TIME
ON
AUTO
---
--
----
--:----
THE CLOCK IS
AUTOMATICALLY SET WHEN
THE UNIT IS TURNED OFF.
“TV” AUTO 2 3 4 .......... 68 69 AUTO
“CATV-STD” AUTO 2 3 4 .......... 124 125 AUTO
“CATV-HRC”, “CATV-IRC” AUTO 1 2 3 .......... 124 125 AUTO
• If “AUTO” is selected for
clock setting, it may take
a few hours to complete
the clock setting as your
TV has to search for the
EDS channel.
(If you want to use the
clock functions immedi-
ately, proceed to step (2)
for
MANUAL CLOCK SET-
TING.
Please refer to page
19.)
(3.2)
Press the power on.
Once the Auto Clock
setting is completed, the
time is displayed on the
bottom right corner of the
TV screen.
123
456
789
0
100
POWER
INPUT DISPLAY MUTE
VOL
TAPE
SPEED
REC
REW FF
PLAY
STOP
PAUSE/STILL
COUNTER
RESET
DPSS
FLASHBACK
TAMPER
PROOF
TV • VCR COMBINATION
+
SET
PROG
MENU
TIMER
ON/OFF
CONFIRM
–
ed
e
TR
•
•
•
•
d
RETURN
CH
•
MENU button
RETURN button
POWER button
SET button
TAMPER
PROOF
button
CHANNEL
UP/DOWN
buttons
Setting The Clock
LOperation Mode Lock
• If the TAMPER PROOF Lock is on during operation of this
product, the current operation mode will not change until
the TAMPER PROOF Lock is released, even if another
operation button is pressed.
LPower-Off Mode Lock
• If the TAMPER PROOF button is pressed to engage the
TAMPER PROOF Lock while the POWER button is set to
off, the power cannot be turned on even if the POWER
button is pressed.
Example: Engaging the Tamper Proof Lock during playback.
1Press and hold down the TAMPER PROOF button on the
Remote Control for about 3 seconds. The “ TAMPER
PROOF” indicator on the front panel of this product will
flash, and then remain lit to indicate that the lock is
engaged.
2Regardless of any operation buttons pressed, the current
operation mode will not change.
The TAMPER PROOF Lock can be disengaged by the
following method:
• Press the TAMPER PROOF button on the Remote Control
for about 3 seconds. The “ TAMPER PROOF” indicator
on the front panel of this product will flash, and then go
out to indicate that the lock is disengaged.
10:20AM OCT.15
2
AIR
TV-PG
18-21 13VT-R100/150[E].pm65e 12/4/01, 2:23 PM18

19
2MANUAL CLOCK SETTING
• If the EDS signal is not available in your area, set the clock
manually:
(1) Press the MENU button
on the Remote Control.
Select “CLOCK” from the
menu, then press the SET
button.
(2) Press the + or – button to
select “AUTO CLOCK
OFF”, then press the SET
button.
Example: Setting the clock to 10:20 a.m. on October 15, 2000.
(3) Press the + or – button to
select the “MONTH”, then
press the SET button. The
“:” mark will move to the
next item “DAY”.
The month will change as
follows using the + or –
button.
(4) Press the + or – button to
select the “DAY”, then
press the SET button. The
“:” mark will move to the
next item “YEAR”.
The day will change as
follows using the + or –
button.
REC
REW FF
PLAY
STOP
PAUSE/STILL
DPSS
TV •VCR COMBINATION
+
SET
PROG
MENU
TIMER
ON/OFF
CONFIRM
–
ed
RETURN
MENU button
+/– button
SET button
RETURN button
MENU
TIMER
VIDEO ADJUST
CLOSED CAPTION
FUNCTION
CLOCK
LANGUAGE
CH SETTING
V-CHIP BLOCK
SELECT + / —: SET SET
PREVIOUS RETURN : QUIT MENU
SELECT + / —: SET SET
PREVIOUS RETURN : QUIT MENU
CLOCK SET
AUTO CLOCK
EDS CH
MONTH
DAY
YEAR
TIME
OFF
AUTO
---
--
----
--:----
SELECT + / —: SET SET
PREVIOUS RETURN : QUIT MENU
CLOCK SET
AUTO CLOCK
EDS CH
MONTH
DAY
YEAR
TIME
OFF
AUTO
OCT
--
----
--:----
SELECT + / —: SET SET
PREVIOUS RETURN : QUIT MENU
CLOCK SET
AUTO CLOCK
EDS CH
MONTH
DAY
YEAR
TIME
OFF
AUTO
OCT
15
----
--:----
+ button; JAN FEB MAR - - NOV DEC
– button; JAN DEC NOV - - MAR FEB
+ button; 1 2 3 - - - 30 31
– button; 1 31 30 - - - 3 2
(5) Press the + or – button to
select the “YEAR”, then
press the SET button. The
“:” mark will move to the
next item “TIME”.
The year will change as
follows using the + or –
button.
(6) Press the + or – button to
select the “hour”, then
press the SET button. The
yellow position will move
to the “minute” portion.
The hour will change as
follows using the + or –
button.
(7) Press the + or – button to
select the “minute”, then
press the SET button.
The minute will change as
follows using the + or –
button.
Note:
1. To correct any erroneous data entry made during “clock”
setting work.
(1) Press the RETURN button on the Remote Control to
return to the item you wish to correct.
(2) Press the + or – button to enter the correct data.
(3) To advance operation, press the SET button.
2. If a button is not pressed within 60 seconds during the
setting procedure, the screen will return to its previous
source.
3. If the TV loses power for a short period of time, the clock
will have to be reset.
+ button; 12:- -AM 1:- -AM • • • 10:- -PM 11:- -PM
– button; 12:- -AM 11:- -PM • • • 2:- -AM 1:- -AM
SELECT + / —: SET SET
PREVIOUS RETURN : QUIT MENU
CLOCK SET
AUTO CLOCK
EDS CH
MONTH
DAY
YEAR
TIME
OFF
AUTO
OCT
15
2001
--:----
SELECT + / —: SET SET
PREVIOUS RETURN : QUIT MENU
CLOCK SET
AUTO CLOCK
EDS CH
MONTH
DAY
YEAR
TIME
OFF
AUTO
OCT
15
2001
10:--AM
SELECT + / —: SET SET
PREVIOUS RETURN : QUIT MENU
CLOCK SET
AUTO CLOCK
EDS CH
MONTH
DAY
YEAR
TIME
OFF
AUTO
OCT
15
2001
10:20AM
Setting The Clock (Continued)
+ button; 01 02 03 - - - 58 59 00
– button; 01 00 59 - - - 04 03 02
10:20AM OCT.15
2
AIR
TV-PG
+ button; 2001 2002 2003 - - - 1999 2000
– button; 2001 2000 1999 - - - 2003 2002
18-21 13VT-R100/150[E].pm65e 12/4/01, 2:23 PM19

20
Playing A Cassette
LENERGY SAVE
This feature lets you lower the power consumption of your
TV set which in turn saves you money and minimizes the
impact on the environment. When this feature is turned
on, it reduces the brightness of the TV to a level that
consumes approximately 20% less energy than when the
feature is turned off.
The reduction in brightness will be less noticeable under
low room lighting conditions.
(1) Press the MENU button and
press the + or –button
to select “FUNCTION”
from the MENU screen.
Then press the SET
button.
(2) Press the + or – button to
select “ENERGY SAVE”,
then press the SET button.
(3) Press the + or – button to
the ON position, then
press the SET button.
LBLUE SCREEN
This function eliminates monitor noise and mutes sound
during playback of unrecorded positions of a tape or
channels without signals.
(1) Repeat step (1) of the
above “ENERGY SAVE”.
(2)
Press the + or – button
to select “BLUE SCREEN”,
then press the SET button.
(3) Press the + or – button to
the ON position, then
press the SET button.
Note:
• BLUE SCREEN does not function during Still Picture and
Video Search.
• BLUE SCREEN does not function during playback of a
tape with noise recorded.
• BLUE SCREEN cannot be recorded.
LAUTO REPEAT
This feature is used to repeatedly play the same cassette
tape. You can select the function that rewinds and plays
back the tape from the beginning automatically when the
tape reaches the end, or the function that rewinds and
plays back the tape from the beginning automatically when
the recorded portion of the tape ends and the blank portion
begins.
(1) Repeat step (1) of the
above “ENERGY SAVE”.
(2) Press the + or – button
to select “REPEAT PLAY”,
then press the SET button.
(3) Press the + or – button to
select the REPEAT PLAY
mode you want to use,
then press the SET
button.
To clear the Auto Repeat,
select the OFF position in
above.
OFF
TAPE BLANK
TAPE END
------------
-------
--------
Disengage the “REPEAT PLAY”.
In playback, when the recorded portion
of the tape ends and the blank portion
begins, the tape will automatically
rewind and played back from the
beginning.
In playback, when the tape reaches the
end, it is automatically rewound and
played back from the beginning.
LS. PICTURE (SUPER PICTURE)
This function obtains a clearer playback screen.
(1) Repeat step (1) of the
above “ENERGY SAVE”.
(2)
Press the + or – button
to select “S. PICTURE”,
then press the SET button.
(3) Press the + or – button to
the ON position, then
press the SET button.
SELECT + / —: SET SET
PREVIOUS RETURN : QUIT MENU
MENU
TIMER
VIDEO ADJUST
CLOSED CAPTION
FUNCTION
CLOCK
LANGUAGE
CH SETTING
V-CHIP BLOCK
FUNCTION
ENERGY SAVE
ON
BLUE SCREEN
OFF
REPEAT PLAY
OFF
S.PICTURE
OFF
SELECT + / —: SET SET
PREVIOUS RETURN : QUIT MENU
SELECT + / —: SET SET
PREVIOUS RETURN : QUIT MENU
MENU
TIMER
VIDEO ADJUST
CLOSED CAPTION
FUNCTION
CLOCK
LANGUAGE
CH SETTING
V-CHIP BLOCK
FUNCTION
ENERGY SAVE
ON
BLUE SCREEN
ON
REPEAT PLAY
OFF
S.PICTURE
OFF
SELECT + / —: SET SET
PREVIOUS RETURN : QUIT MENU
SELECT + / —: SET SET
PREVIOUS RETURN : QUIT MENU
MENU
TIMER
VIDEO ADJUST
CLOSED CAPTION
FUNCTION
CLOCK
LANGUAGE
CH SETTING
V-CHIP BLOCK
FUNCTION
ENERGY SAVE
ON
BLUE SCREEN
ON
REPEAT PLAY
TAPE BLANK
S.PICTURE
OFF
SELECT + / —: SET SET
PREVIOUS RETURN : QUIT MENU
SELECT + / —: SET SET
PREVIOUS RETURN : QUIT MENU
MENU
TIMER
VIDEO ADJUST
CLOSED CAPTION
FUNCTION
CLOCK
LANGUAGE
CH SETTING
V-CHIP BLOCK
FUNCTION
ENERGY SAVE
ON
BLUE SCREEN
ON
REPEAT PLAY
TAPE BLANK
S.PICTURE
ON
SELECT + / —: SET SET
PREVIOUS RETURN : QUIT MENU
18-21 13VT-R100/150[E].pm65e 12/4/01, 2:23 PM20
Other manuals for 13VT-R100
1
This manual suits for next models
1
Table of contents
Other Sharp TV VCR Combo manuals

Sharp
Sharp VT-3448X User manual

Sharp
Sharp 13VT-N200 User manual

Sharp
Sharp VT-G14 User manual

Sharp
Sharp 25VT-K100 User manual

Sharp
Sharp VT-3428X User manual

Sharp
Sharp 13VT-N100 User manual

Sharp
Sharp 37VT-26H User manual

Sharp
Sharp 25VT-J100 User manual

Sharp
Sharp 13VT-CR10 User manual

Sharp
Sharp 13VT-K100 User manual