Sharp 21LS-90C User manual


- 1 -
Contents
Teletext ................................................................... 15
To operate Teletext ......................................................... 15
To select a page of Teletext ............................................ 15
To Select Index Page ..................................................... 15
To Select Teletext with a TV Programme ........................ 15
Searching for a page while watching TV ......................... 15
To Select Double eight Text ......................................... 15
To Reveal concealedInformation ................................... 15
To Stop Automatic Page Change .................................... 15
To Select a Subcode Page ............................................. 15
To exit Teletext ............................................................... 15
To Display the Time........................................................ 15
Connecting external equipment .......................... 16
Via the Euro connector .................................................. 16
RGB mode ..................................................................... 16
Via the ANT (aerial) socket ............................................. 16
Decoder ......................................................................... 16
TV and Video Recoder (VCR) ......................................... 16
NTSC Playback ............................................................. 16
Search for and store the test signal of the
video recorder ................................................................. 16
Camera and Camcorder ................................................. 16
Connect the decoder to the video recorder...................... 16
Connecting eadphones ................................................ 16
Connecting external equipment .......................... 17
Typical Connections .............................................. 18
Typical Connections (Continued) ........................ 19
Typical Connections (Continued) ........................ 2
Typical Connections (Continued) ........................ 21
Typical Connections (Continued) ........................ 22
21-pin Euro connector and 21-pin Audio/Video .. 23
Troubleshooting .................................................... 24
Specifications......................................................... 25
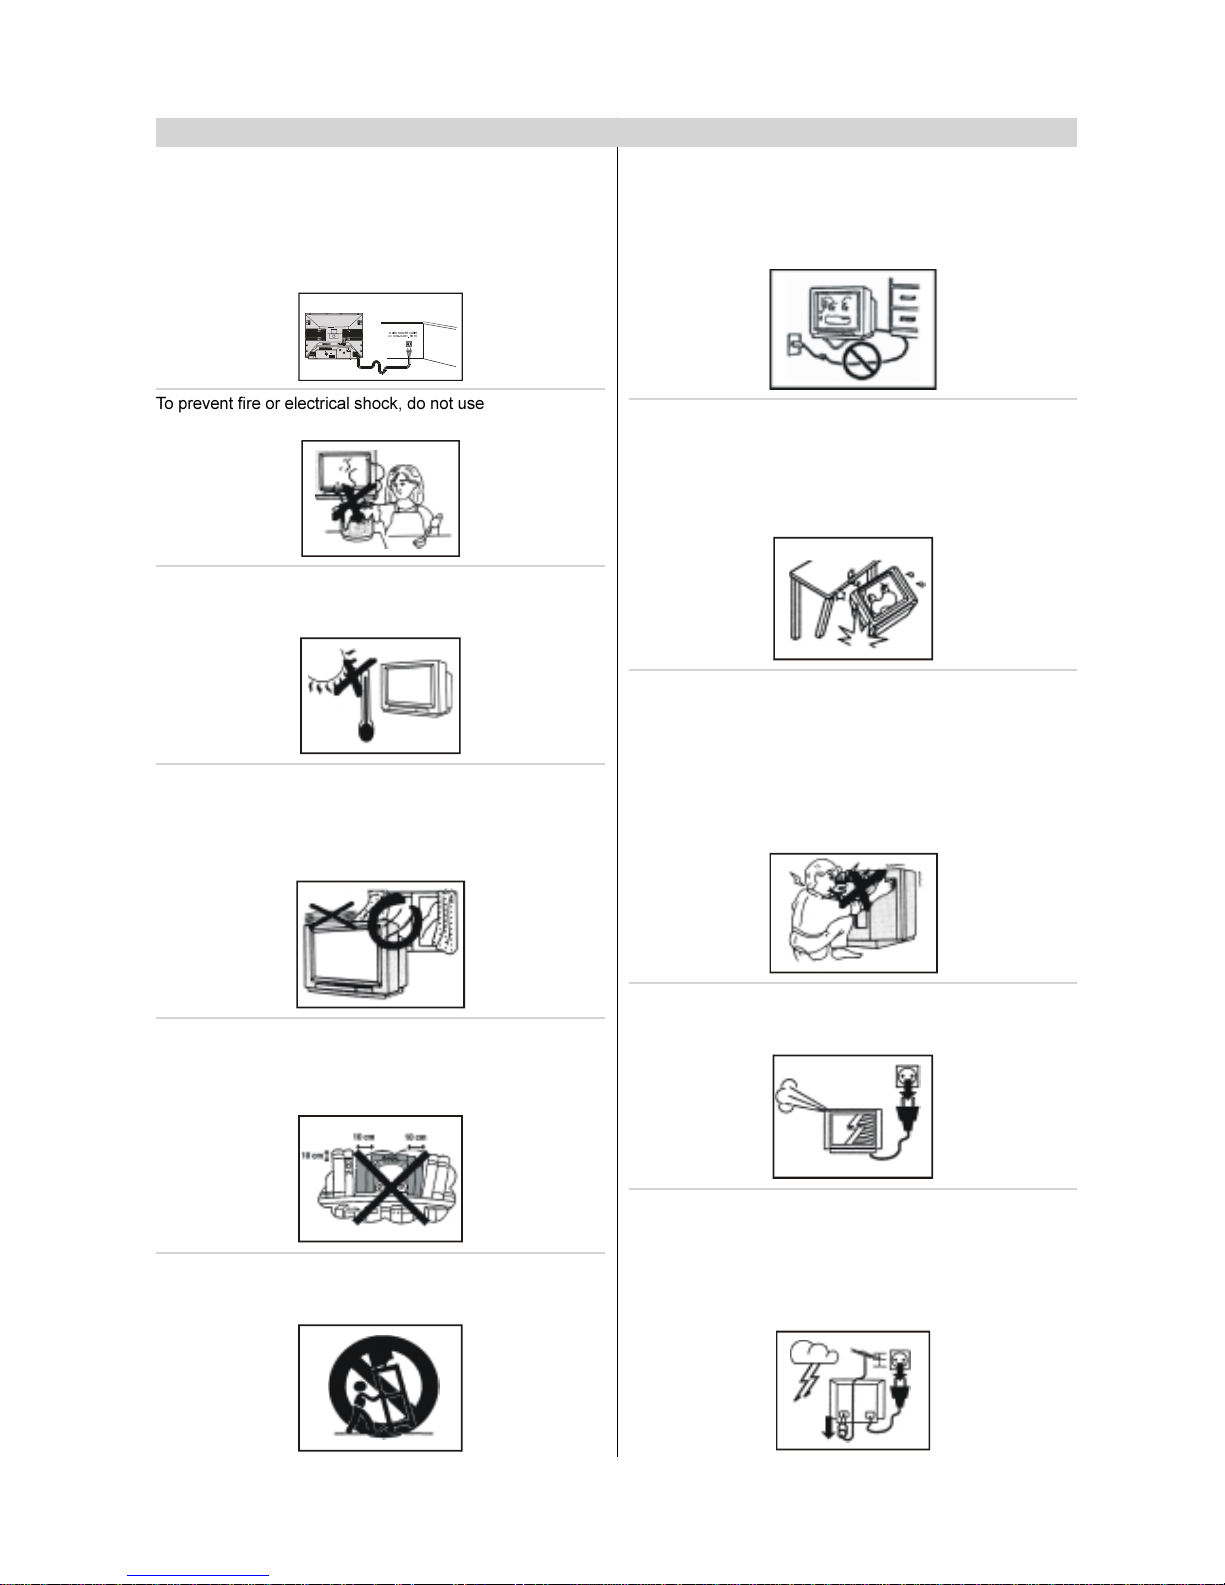
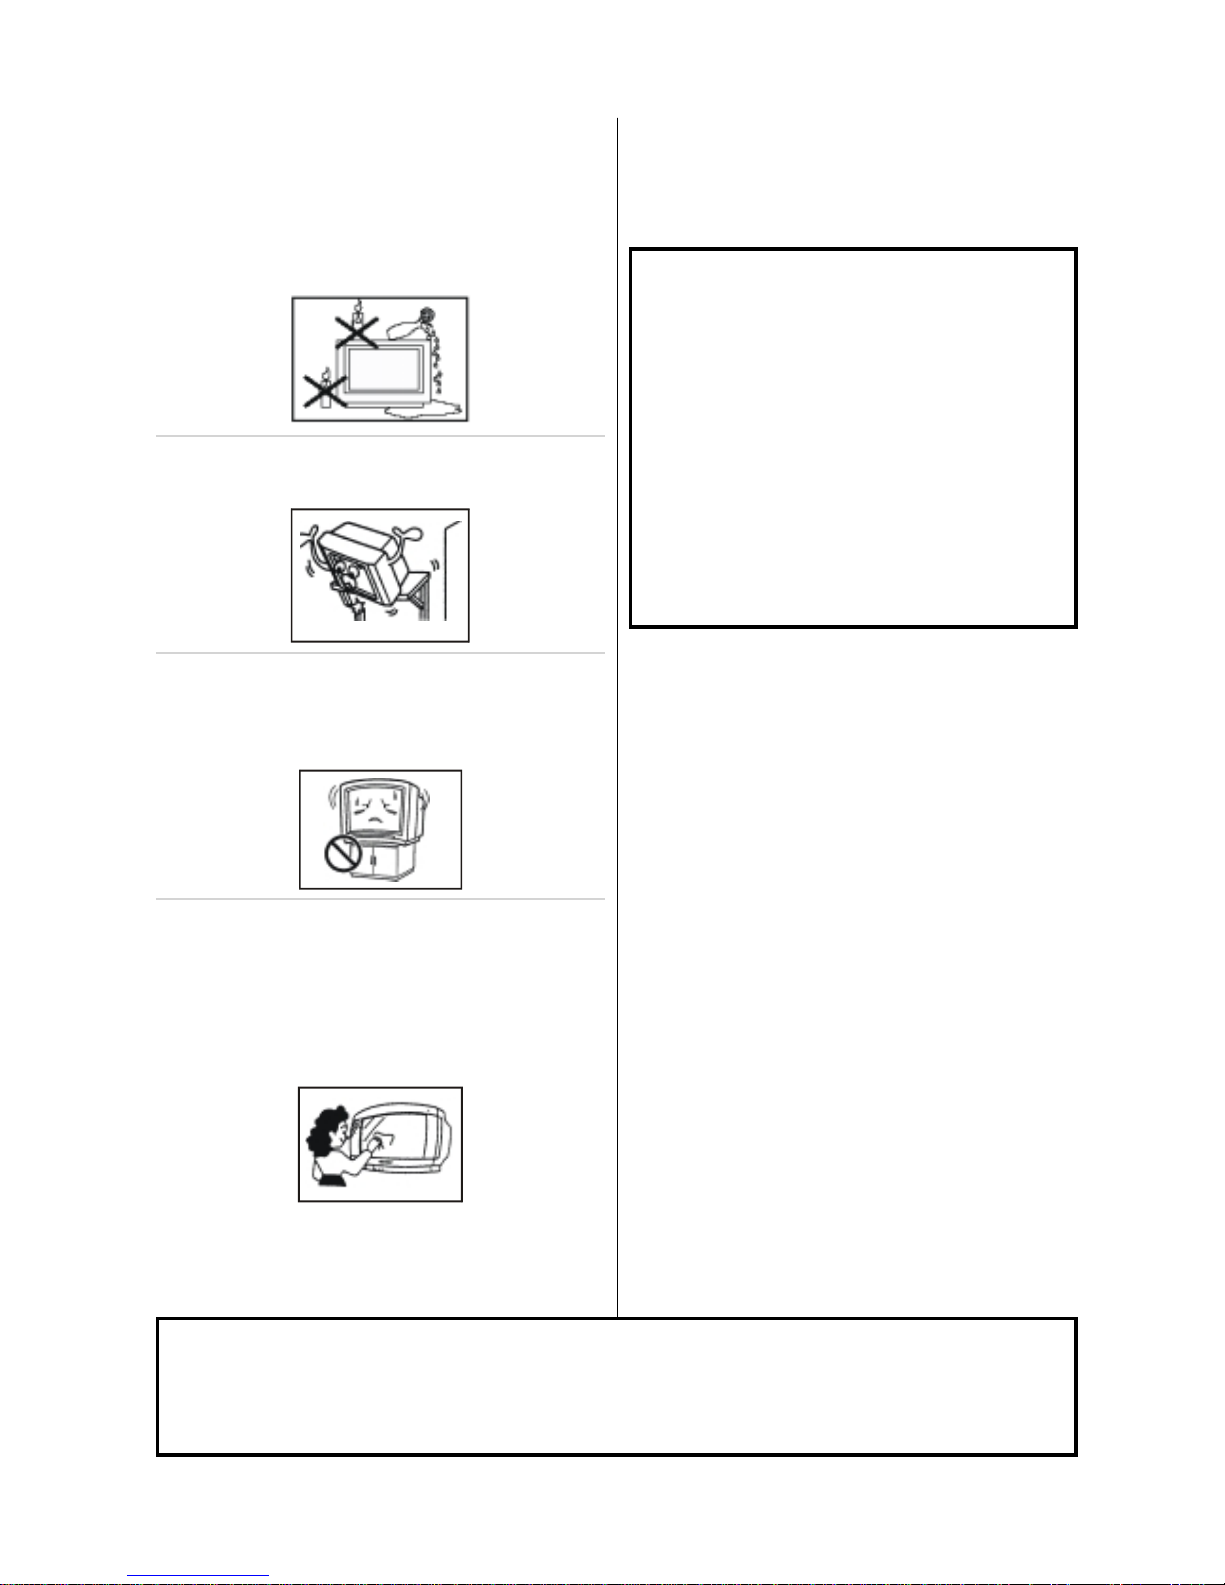
Safety Precautions ............................................... 2-3
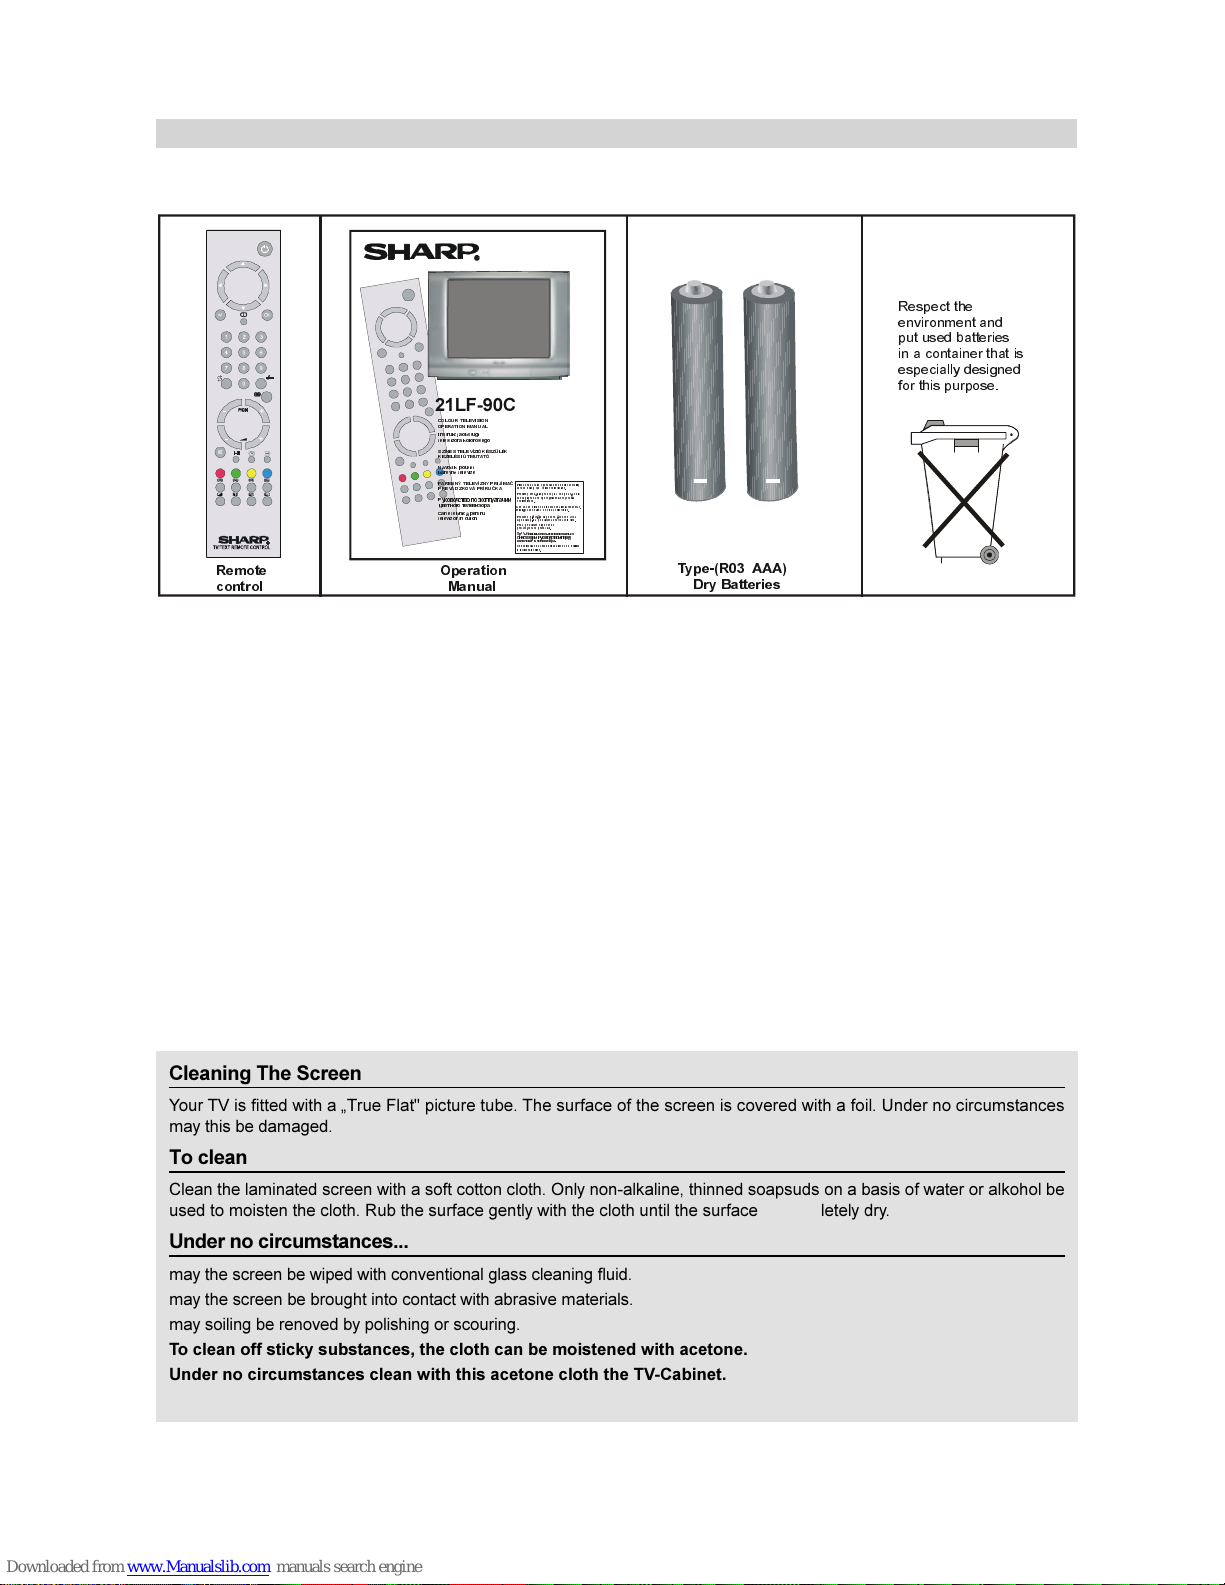
Supplied Accessories .............................................. 4
Remote Control Buttons ......................................... 5
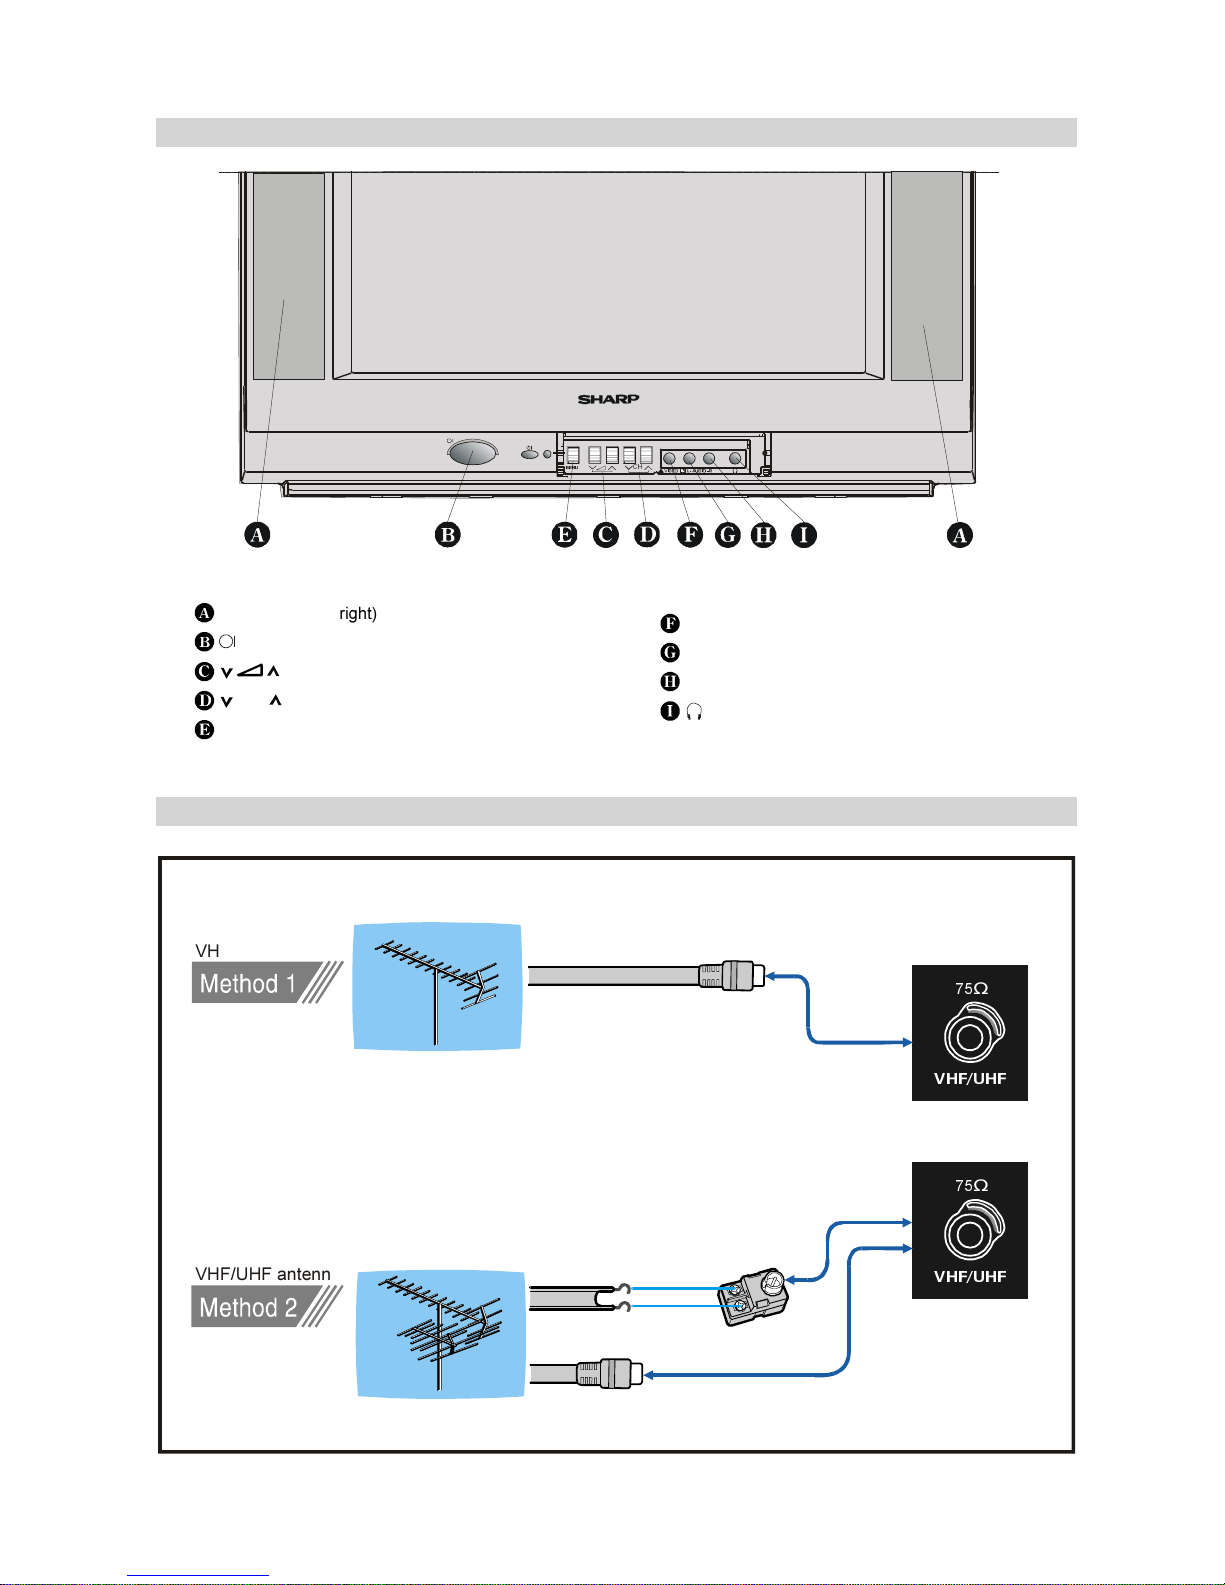
Control Panel Buttons ............................................. 6
Antenna Connections .............................................. 6
Preparation ............................................................... 7
Features .......................................................................... 7
Before Switching on your TV ................................. 7
Power connection ............................................................. 7
Aerial Connections ........................................................... 7
ow to connect external equipment ................................ 7
Remote Control Battery Installation .................................. 7
Switching the TV ON/OFF ....................................... 7
To switch the TV on .......................................................... 7
To switch the TV off .......................................................... 7
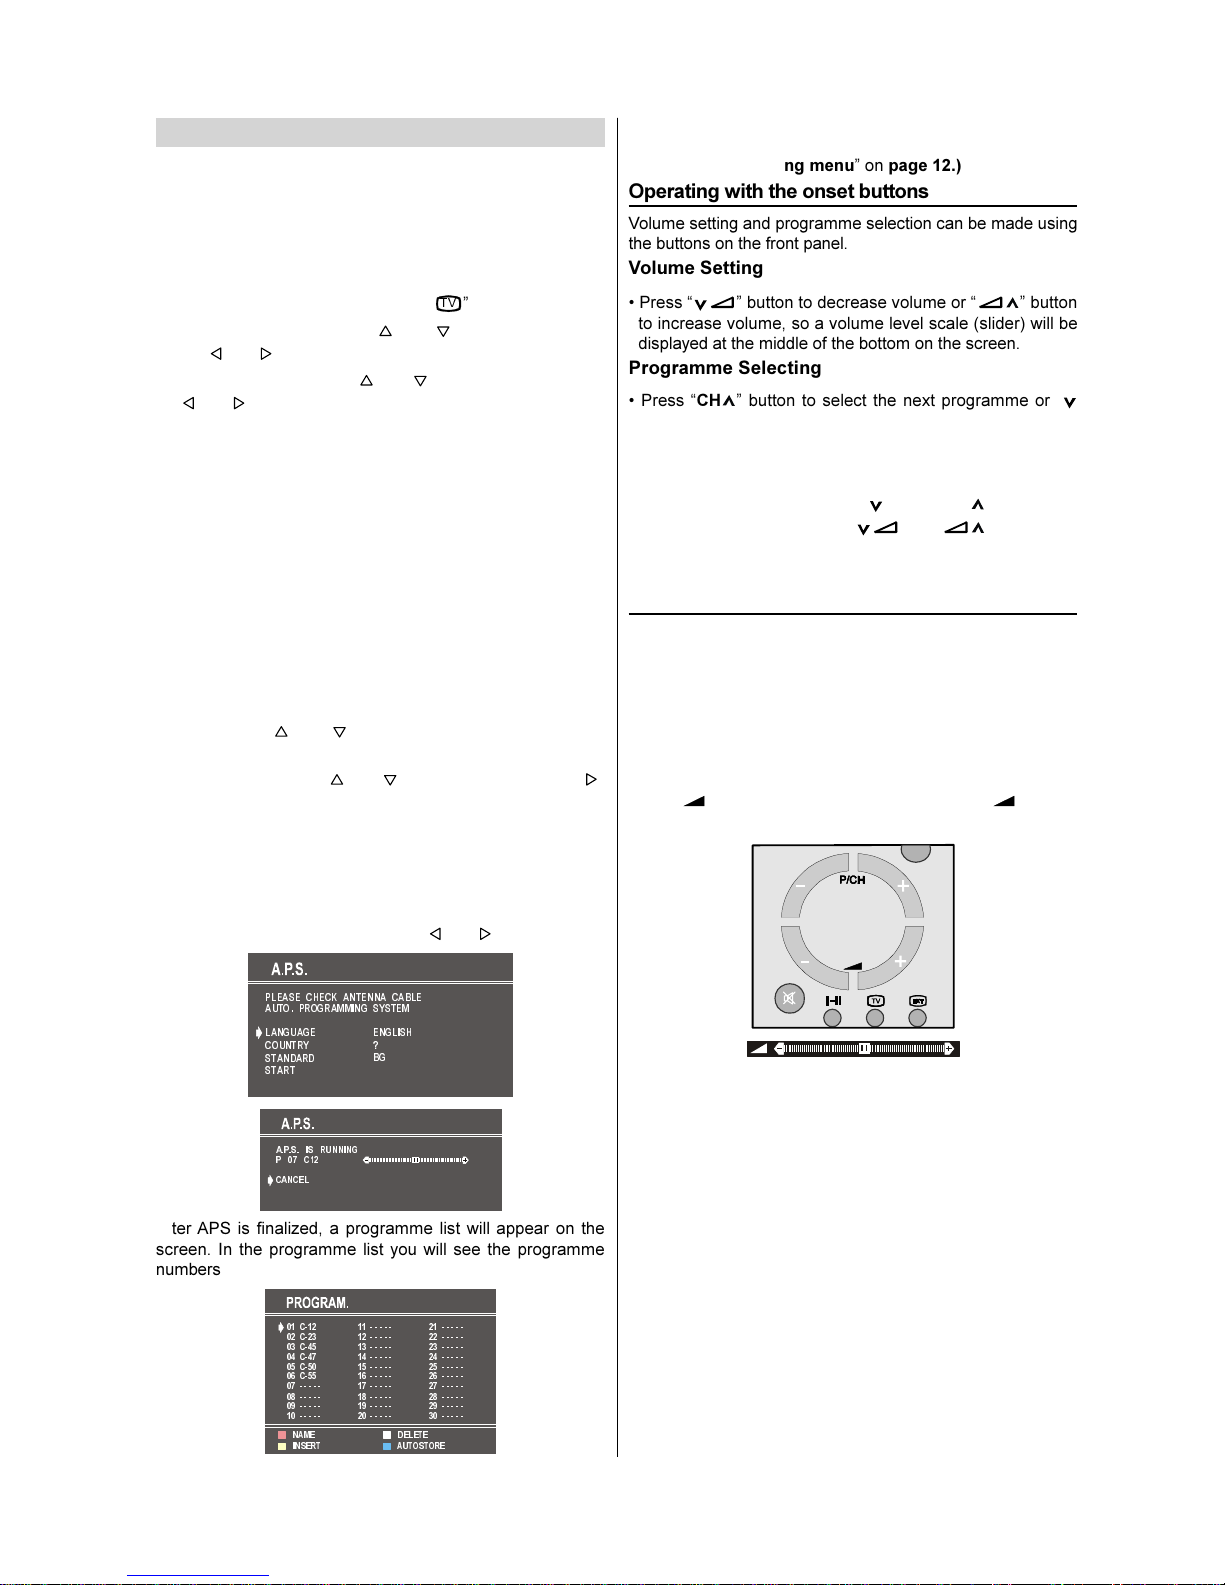
Initial Settings .......................................................... 8
Operating with the onset buttons ...................................... 8
Operating with Remote Control ......................................... 8
Menu System ............................................................ 9
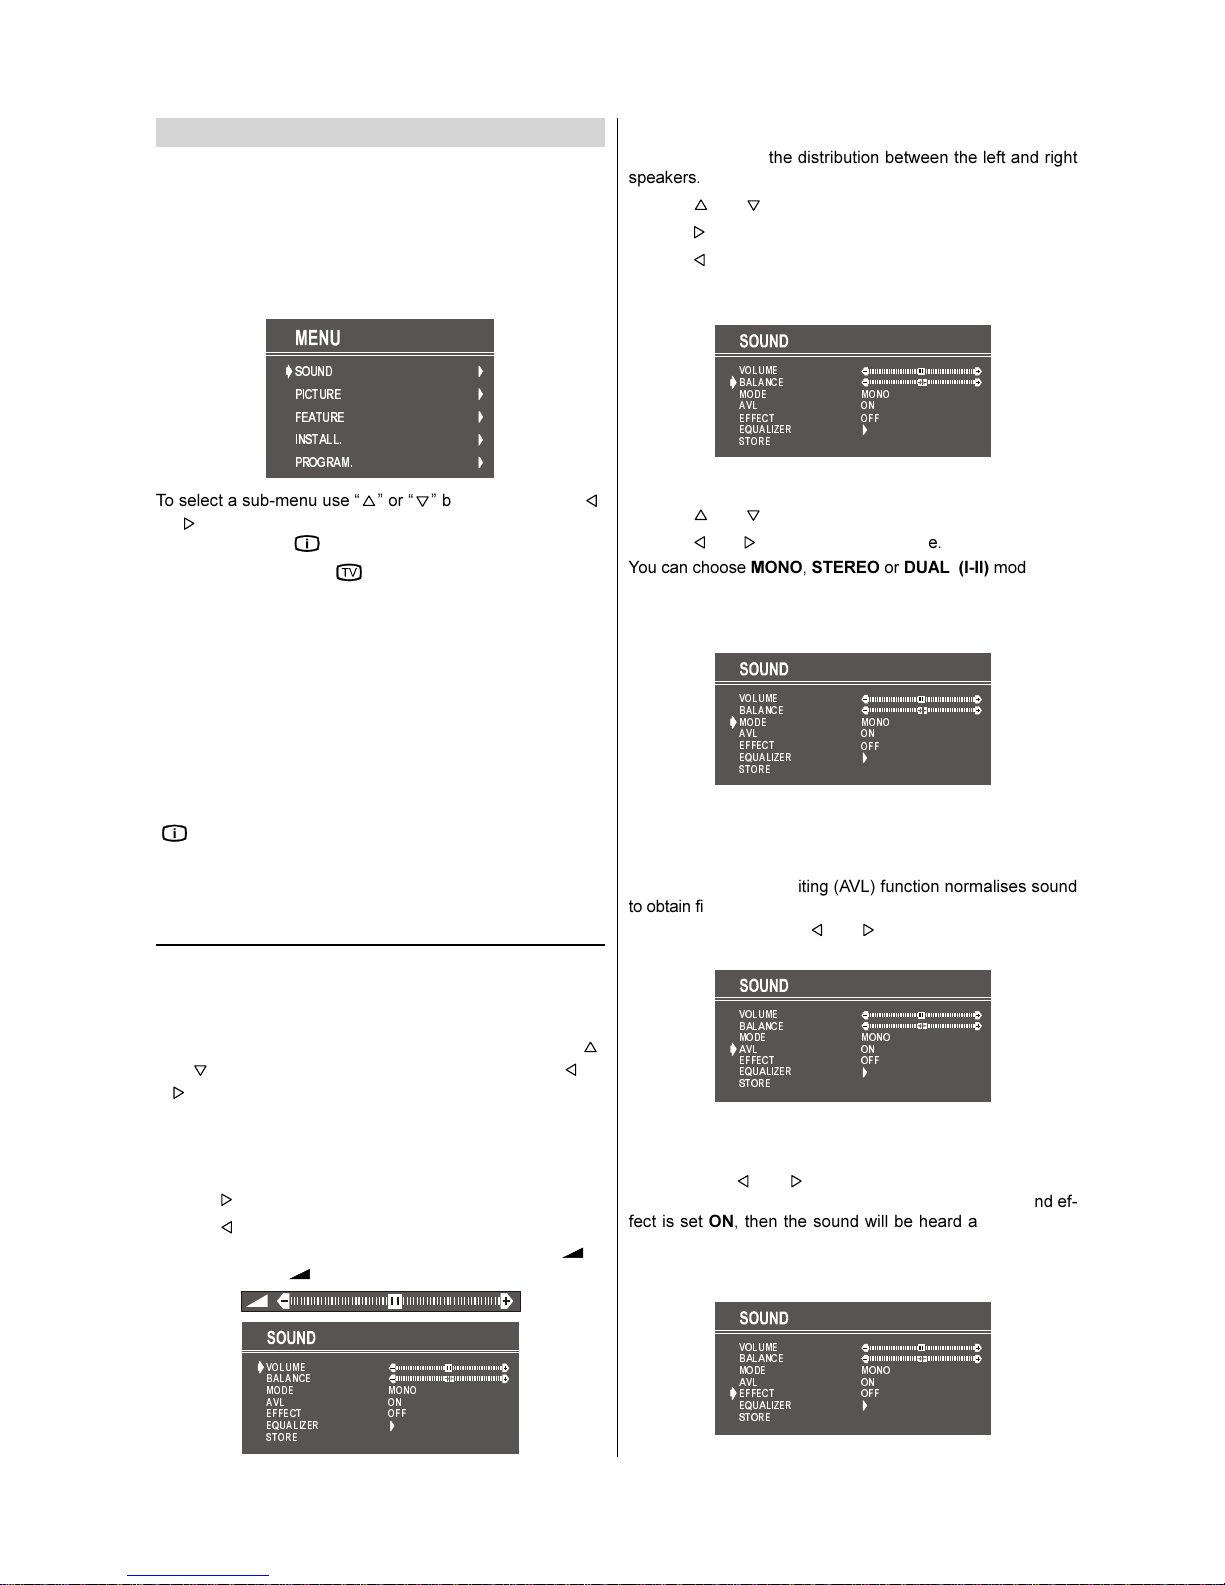
Sound Menu ..................................................................... 9
Picture Menu ................................................................. 10
Feature Menu ................................................................. 11
Install. Menu .................................................................. 11
Program. Menu .............................................................. 12
Other Features....................................................... 13
TV Status ....................................................................... 13
Flash back ( ) ............................................................ 13
Double-digit (- / - -) ......................................................... 13
Sound Indicator .............................................................. 13
Picture Mode ................................................................. 14
Sleep Timer Last Minute Indicator .................................. 14
Sound Mute ................................................................... 14
No-Signal ....................................................................... 14
Blue Background During No-Signal................................. 14
Volume Bar .................................................................... 14
AV Modes ...................................................................... 14

- 2 -
Safety Precautions
This equipment complies with the requirements of Directives
89/336/EEC, 92/31/EEC and 73/23/EEC as amended by 93/
68/EEC.
This receiver should only be operated from a 220-240V AC,
50 Hz outlet. Ensure you select the correct voltage setting
for your convenience.
0DLQV6RFNHW2XWOHW
$&a9+]
6&$57
$17
To prevent fire or electrical shock, do not use the TV set in an
excessively damp place.
Position the TV set out of direct sunlight and away from heat,
as high temperatures can damage the cabinet, CRT, or other
electronic parts.
Do not cover ventilation slots with objects such as newspa-
pers, tablecloths, curtains, etc.
Do not cover the ventilation holes at the back of the TV set,
this can cause fire or other serious problems. Leave an ade-
quate open space behind the TV set for good ventilation.
In order to ensure that the television is properly ventilated,
leave a space of at least 10 cm around the set.
Do not install this equipment in a confined space such as a book-
case or a built-in cabinet.
Television equipment and cart combination should be moved
with care. Quick stops, excessive force, and uneven surfaces
may cause the equipment and cart combination to overturn.
To prevent electrical shock, do not subject the AC power cord
to damage by bending or twisting it, or by placing heavy items
on top of it and do not place the AC power cord under the TV
set. If the AC power cord becomes damaged, unplug it from
the wall outlet immediately and call your dealer for service.
Do not place this television equipment on an unstable cart,
stand, or table. The television equipment may fall, causing
serious injury to a child or an adult, and serious damage to
the equipment.
Use only with a cart or stand recommended by the manufac-
turer, or sold with the television equipment.
Never remove the back of the cabinet, as there is high volt-
age in the TV set.
Please call for service.
When replacement parts are required, be sure the service
technician has used replacement parts which are specified
by the manufacturer or have the same specifications as the
original one. Unauthorized substitutions may result in fire,
electrical shock, or other hazards.
Unplug the power cord from the wall outlet immediately if the
TV set begins to make unusual noises or give off smoke or
an odd smell, then call your dealer for service.
Always disconnect your television from the mains and the
aerial cables during thunderstorms.
Even if your television is switched off, it can still be damaged
by lightning striking the mains and/or aerial cable.
Do not leave your TV set in Stand-by or operating mode when
you leave the house.

- 3 -
In order to prevent electrical shocks and fires, ensure that the
television is not subjected to splashes or spills of water, and
avoid inserting objects or pouring any type of liquid into the
set.
To prevent fire, never place any type of candle or naked
flames on the top or near the TV set.
If an object or liquid enters the set, disconnect the mains
supply and contact technical service.
Wall or shelf mounting should follow the manufacturers in-
structions, and should use a mounting kit approved by the
manufacturer.
Do place the TV set onto an even stand, table or track which
size is bigger than the TV set.
If the TV set is put onto a smaller size or uneven stand, table
or track may cause the TV cabinet distort. Do not put or in-
sert anything between TV set and the stand, table or track.
The tube of your TV has a special coating. Do not knock or
rub on the tube face with sharp or hard surfaces, otherwise
you will damage the coating.
To prevent damaging the surface of the television screen, re-
move finger prints only with a soft cloth dampened with glass
cleaner. Do not use any abrasive cleaners.
Do not use thinner, benzene or other strong chemical clean-
ers.
Warning!
Any intervention contrary to regulations, in particular, any
modification of high voltage or a replacement of the pic-
ture tube may lead to an increased concentration of
x-rays. Any television modified in this way no longer com-
plies with license and must not be operated.
Instructions for waste disposal
Packaging and packaging aids are recyclable and should
principally be recycled. Packaging materials, such as foil
bag, must be kept away from children.Batteries, including
tho se which are heavy metal-free, should not be dis-
posed of with household waste. Please dispose of used
batteries in an environmentally sound manner.
Find out about the legal regulations which apply in your
area.
CAUTION For environmental and safety reasons, it is recommended that this television set is not left in stand-
by mode whilst not in use. Switch it off using the main switch. During periods of absence from home
it is also wise to disconnect the set by unplugging the mains plug.

- 4 -
Supplied Accessories
5HVSHFWWKH
HQYLURQPHQWDQG
SXWXVHGEDWWHULHV
LQDFRQWDLQHUWKDWLV
HVSHFLDOO\GHVLJQHG
IRUWKLVSXUSRVH
5HPRWH
FRQWURO 2SHUDWLRQ
0DQXDO 7\SH5$$$
'U\%DWWHULHV
3OHDVHUHDGWKLVRSHUDW LRQPDQXD OFDUHIXOO\
EHI RUH X VLQJ WKH FRO RX UWHO HY LVL RQ
3URVtPHS HþW WHVLSR]RUQ WHQWRQ iYRG
NSRXåLWtS HGSRX åLW tPEDUHY QpWHOHY L]H
3UHGSRXåLWtPVLS R]RUQH
SUHþtWDMWHW~WRSUtUXþNX
RF
H
/)&
&2/285 7(/(9,6 ,21
23(5$7,210$18$/
,QVWUXNFMDREVáXJL
WHOHZL]RUDNRORURZHJR
6=Ë1(67(/(9Ë=,Ï.e6=h/e.
.(=(/e6,Ò7087$7Ï
1iYRGNSRXåLWt
EDUHYQpWHO HYL]H
)$5(%1é7(/(9Ë=1<35,-Ë0$ý
35(9È'=.29È35Ë58ý.$
3
&DUWHWHKQLF SHQWUX
WHOHYL]RUvQFXORUL
*RQGRVDQ ROYDV VDHOD+DV]QiODW L~WPXWDWyW
PLHO WWKDV]QiOQ iDV]tQHVW HOHYt]LyW
3URVLP\XZD QLHSU]HF]\WDüWHQSRGU F]QLN
REVáXJLSU]HGUR]SRF] FLHPNRU]\VWDQLD
]WHOHZL]RUD
&RQVXOWD WLDFHV WPDQXDOvQ DLQWHGHDXWLOL]D
WHOHYL]RUXOFRORU
Cleaning The Screen
Your TV is fitted with a True Flat" picture tube. The surface of the screen is covered with a foil. Under no circumstances
may this be damaged.
To clean
Clean the laminated screen with a soft cotton cloth. Only non-alkaline, thinned soapsuds on a basis of water or alkohol be
used to moisten the cloth. Rub the surface gently with the cloth until the surface is completely dry.
Under no circumstances...
may the screen be wiped with conventional glass cleaning fluid.
may the screen be brought into contact with abrasive materials.
may soiling be renoved by polishing or scouring.
To clean off sticky substances, the cloth can be moistened with acetone.
Under no circumstances clean with this acetone cloth the TV-Cabinet.

- 5 -
Remote Control Buttons
CAUTION
RISK OF ELECTRIC SHOCK
The lightning flash with arrowhead symbol, within an equilateral triangle, is intended to alert the user to the
presence of uninsulated "dangerous voltage" within the product's enclosure that may be of sufficient magnitude
to constitute a risk of electric shock of persons.
The exclamation point within an equilateral triangle is intended to alert the user to the presence of important
operating and maintenance (servicing) instructions in the literature accompanying the appliance.
= Stand By
= Cursor Up
= Cursor Right
OK = OK
= Info (Program Menu)
0 - 9 = Direct Program
-/-- = Double Digit
= Wide mode button
P/CH+ = Program +
+ = Volume +
= TV / Quit Menu
(;7
= EXT button (SCART, F- AV, RGB)
Yellow = Feature Menu
Blue = Installation Menu
= old
= Update
= Index Page
= Reveal
= Expand
= Mix
= Teletext
= Time
Red = Sound Menu
Green = Picture Menu
= Mute
I-II = Mono/Stereo - Dual I-II
- = - Volume
- P/CH = -Program
= Flash back button
M = Menu
= Cursor Down
= Cursor Left

- 6 -
Control Panel Buttons
Antenna Connections
9+)8+)
9+)8+)
Ω
Ω
9+)8+)DQWHQQD
9+)DQWHQQD 5RXQGRKPFRD[LDOFDEOH
5RXQGRKPFRD[LDOFDEOH
)ODWRKPWZLQOHDGFDEOH
5HDURI79
5HDURI79
2XWGRRU$QWHQQD&RQQHFWLRQV
&+
0(18
Speakers (left + right)
= Power On / Off
= Volume -/+
CH = Program -/+
MENU = Menu
VIDEO = VCR
AUDIO L = Audio left
AUDIO R = Audio right
= eadphone 3,6 mm Ø

- 7 -
Preparation
Place TV on a solid surface.
For ventilation, leave a space of at least 10 cm free all around
the set. To prevent any fault and unsafe situations, please do
not place any objects on top of the set.
Use this apparatus in tropical and moderate climates.
Features
Remote Control Colour Television.
100 U F / V F / Cable channel presets.
Cable Channel Compatible.
Menu Driven functions.
One Euro connector Socket.
German+ Nicam Stereo
Front Audio /Video Input Terminal.
1 Page Simple Teletext .
It is possible to connect headphone.
Direct Channel access.
APS (Automatic Programming system) Tuning.
Program custom name feature.
Automatic search tuning.
Sleep Timer.
Child lock.
Audio mute on no video signals.
Auto switch off after 5 minutes of no signal.
WSS (wide screen signal decoding).
NTSC playback.
Before Switching on your T
Power connection
Important The TV set is designed to operate on 220-240V
AC, 50 Hz.
After unpacking, allow the TV set to reach the ambient
room temperature before you connect the set to the mains.
Aerial Connections
Connect the aerial plug to the aerial input socket located at
the back of the TV.
How to connect external equipment
See Connecting external equipment on page 17.
See the instruction manuals provided with the external de-
vices too.
Remote Control Batter Installation
Before using the TV set for the first time, install the supplied
dry batteries in the remote control.
1. With your thumb nail, pull up the slit as indicated by the
arrow to remove the battery cover.
2. Insert two batteries 1.5 V (R03 AAA size). Be sure to
match the battery +/- terminals with the +/- marks inside
the compartment.
9$$$5
3. Replace the battery cover.
Notes
Remove batteries if weak or if the unit is not in use for long
periods.
Do not mix old and new batteries.
Incorrect installation of the batteries may damage the re-
mote control.
Switching the T ON/OFF
You can operate your TV both using the remote control
handset and onset buttons.
To switch the TV on
Your TV will switch on in two steps:
1- Press the power button located on the front of the TV.
Then the TV switches itself to standby mode and the RED
LED located below the TV turns on.
2- To switch on the TV from stand-by mode either:
Press a digit button on the remote control so that a pro-
gramme number is selected,
or,
Press Power button and CH or CH buttons on the TV
or -P/CH or P/CH+ buttons on the remote control respec-
tively, so the TV will switch on and the RED Led will turn
GREEN.
To switch the TV off
Press the stand-by button on the remote control, so the TV
will switch to stand-by mode and the GREEN LED will be-
come RED,
or,
Press the power button located on the front of the TV.

- 8 -
Initial Settings
The message PLEASE CHECK ANTENNA CABLE AUTO.
PROGRAMMING SYSTEM will be displayed when you turn
on your TV for the first time.
Note If you connect Video Recorder to your TV via antenna in-
put (ANT socket); totune the VCR channel automaticallyyou
must set the VCR in play mode before you start APS.
To cancel APS before starting, press
79
button.
1- Select LANGUAGE with or button, then press
the or button to select a menu language.
2- Select COUNTRY with or button, then press the
or button to select the correct country.
? : OT ER NL : NET ERLANDS
D : GERMANY P : PORTUGAL
A : AUSTRIA E : SPAIN
C : SWITZERLAND TR : TURKEY
I : ITALY EIR : IRELAND
F : FRANCE L : LUXEMBOURG
B : BELGIUM CZ : CZEC REPUBLIC
DK : DENMARK PL : POLAND
S : SWEDEN : UNGARY
N : NORWAY BG : BULGARIA
SF : FINLAND GR : GREECE
UK : UNITED KINGDOM RV : CROATIA/ RVATSKA
3 - Press the or buttons to selectSTANDARD.
This, will effect the sort process in APS.
4 -Select START with or button, then press the
button to start A.P.S.
A.P.S., (Automatic Programming System) automatically pro-
grammes the received channels in your TVs programme
numbers. During A.P.S., A.P.S. IS RUNNING will be dis-
played. After A.P.S. is finalized, the PROGRAM. menu ap-
pears.
To cancel APS during running press or button.
3/($6( &+(&. $17(11$ &$%/(
$872 352*5$00,1* 6<67(0
/$1*8$*(
67$1'$5'
67$57
&28175< (1*/,6+
"
%*
$36 ,6 5811,1*
3 &
&$1&(/
After APS is finalized, a programme list will appear on the
screen. In the programme list you will see the programme
numbers and names assigned to the programmes.
&
&
&
&
&
&
$8726725(,16(57 '(/(7(1$0(
If you do not accept the locations and / or the programme
names of programmes, you can change them in PRO-
GRAM. (Programming menu on page 12.)
Operating with the onset buttons
Volume setting and programme selection can be made using
the buttons on the front panel.
Volume Setting
Press button to decrease volume or button
to increase volume, so a volume level scale (slider) will be
displayed at the middle of the bottom on the screen.
Programme Selecting
Press CH button to select the next programme or
CH button to select the previous programme.
Entering Main Menu
Press "MENU" button to enter Main menu. In the Main
menu select sub-menu using CH or CH button and
enter the sub-menu using or button. To
learn the usage of the menus, refer to the Menu System
section.
Operating with Remote Control
The remote control handset of your TV is designed to control
all the functions of the model you selected. The functions will
be described in accordance with the menu system of your
TV.
Functions which you can use out of menu system are de-
scribed below.
Volume Setting
Press + button to increase volume. Press - button
to decrease volume.
Programme Selecting (Previous or next
programme):
Press -P/CH button to select the previous programme.
Press P/CH+ button to select the next programme.
Programme Selecting (direct access):
Press digit buttons on the remote control handset to select
programmes between 0 and 9. TV will switch to the selected
programme.
For a two digit program number press -/-- button. Press
the first digit and then second digit of the programme chan-
nel you want to watch.

- 9 -
Menu System
Your TV has been designed with a menu system. Display
MENU (main menu) and enter one of five menus (SOUND,
PICTURE, FEATURE, INSTALL. and PROGRAM.).
Press the M button. The Main menu will be displayed at the
middle on the screen.
All the selected items in this menu system is indicated with
CYAN characters and with an arrow on the leftside of items.
6281'
3,&785(
)($785(
,167$//
352*5$0
To select a sub-menu use or button, and press
or button. Each option can also be selected with the co-
loured button and button on the remote control.
To exit a menu, press button.
To go to the previous menu, press M button.
MAIN MENU
The menu system is described below.
The short way in order to enter the menus, press :
M Button, Main Menu.
Red Button, Sound Menu.
Green Button, Picture Menu.
Yellow Button, Feature Menu.
Blue Button, Install Menu.
"" Button, Program Menu.
Menu button has two functions; first is opening or closing the
"MAIN MENU", and the second is closing the sub-menu and
then opening its parent menu.
Sound Menu
To change sound settings
Enter the Sound Menu directly, pressing the Red button or,
As you enter the main menu, sound will be the first se-
lected option. In the main menu, select SOUND using
or button, then enter the sound menu pressing or
button.
Setting Volume:
As you enter the sound menu, Volume will be the first select-
ed option.
Press button to increase volume.
Press button to decrease volume.
Or you can directly change the volume settings using +
(to increase) or - (to decrease) button.
92/80(
%$/$1&(
())(&7
6725(
02'(
$9/
(48$/,=(5
0212
21
2))
Setting Balance
It allows adjusting the distribution between the left and right
speakers.
Using or button select Balance.
Press button to change balance rightward.
Press button to change balance leftward.
When balance control is in mid position, the cursor is dis-
played with the two reciprocal arrows.
92/80(
%$/$1&(
$9/
())(&7
6725(
02'(
(48$/,=(5
0212
21
2))
Selecting Mode
Using or button select Mode.
Press or button to change Mode.
You can choose MONO, STEREO or DUAL (I-II) mode, only
if the selected channel supports that mode.
You can also change sound mode directly pressing I-II but-
ton on your remote control.
92/80(
%$/$1&(
$9/
())(&7
6725(
02'(
(48$/,=(5
0212
21
2))
In case of bilingual broadcast (Dual Sound), you can select
original or dubbed language using mode option.
Setting AVL
Automatic Volume Limiting (AVL) function normalises sound
to obtain fixed output level between programs, having different
sound levels. Pressing or button will turn on and off
this feature.
92/80(
%$/$1&(
$9/
())(&7
6725(
02'(
(48$/,=(5
0212
21
2))
Setting Effect
You can use this feature to switch the sound effect on and
off. Pressing or button will turn on and off this fea-
ture. If the current sound system is MONO and the sound ef-
fect is set ON, then the sound will be heard as if it is STE-
REO. If the current sound system is STEREO, switching this
effect on will make the sound deeper. Switching it off will
make no change in MONO and STEREO.
92/80(
%$/$1&(
$9/
())(&7
6725(
02'(
(48$/,=(5
0212
21
2))

- 10 -
Equalizer
To enter Equalizer sub-menu, select Equalizer using or
button, then enter Equalizer menu pressing or
button.
92/80(
%$/$1&(
$9/
())(&7
6725(
02'(
(48$/,=(5
0212
21
2))
02'(86(5
+]
+]
N+]
N+]
N+]
6725(
In MODE item there are five predefined and one user defined
options. These are USER, CLASSIC, JAZZ, ROCK, POP and
FLAT. The predefined options can not be changed by the
user. The USER option may be adjusted by the user.
The 5 items below the MODE are available to adjust the-
sound settings in 5 frequency values: 120 z, 500 z, 1.5
k z, 5 k z and 10 k z. To change the values of
5 frequency options, select one of the options by or
button, and then press to increase the value, or to
decrease the value. In mid position, cursor is displayed with
the two reciprocal arrows.
To store the Equalizer settings, press or button on
STORE option.
During the store process all the items are stored, moreover,
the USER mode information would not be lost. In other
words, when the user mode is selected again, after storing
the MODE with one of the predefined options, the user de-
fined frequency values would be set.
To Store the Settings
Press or button on STORE option to store Sound
menu settings.
92/80(
%$/$1&(
$9/
())(&7
6725(
02'(
(48$/,=(5
0212
21
2))
Picture Menu
To enter the Picture menu directly, press the GREEN but-
ton, or
Press M button, now you are in Main menu. In the Main
menu, select PICTURE using or button, then en-
ter the Picture menu pressing or button.
6281'
3,&785(
)($785(
,167$//
352*5$0
Setting Brightness
As you enter the picture menu, Brightness will be the first
selected option.
Press button to increase brightness.
Press button to decrease brightness.
%5,*+71(66
&2175$67
&2/285
6+$531(66
02'(
6725(
Setting Contrast
Using or button select Contrast.
Press button to increase contrast level.
Press button to decrease contrast level.
%5,*+71(66
&2175$67
&2/285
6+$531(66
02'(
6725(
Setting Colour
Using or button select Colour.
Press button to increase colour level.
Press button to decrease colour level.
%5,*+71(66
&2175$67
&2/285
6+$531(66
02'(
6725(
Setting Sharpness
Using or button select Sharpness.
Press button to increase sharpness level.
Press button to decrease sharpness level.
%5,*+71(66
&2175$67
&2/285
6+$531(66
02'(
6725(
Setting Hue
(During Playback NTSC system, this will appear in AV mode
only when NTSC video source is applied. Otherwise, UE
option is invisible in Picture menu.):
Using or button select ue.
Press button to increase hue level.
Press button to decrease hue level.
Center value is indicated with the two reciprocal arrows.

- 11 -
%5,*+71(66
&2175$67
&2/285
6+$531(66
+8(
02'(
6725(
Mode
This item is used to change the picture size.
By pressing or button you may choose one of three
options. These are, 4:3, 16:9 and AUTO.
4 3 This option forces the picture ratio to 4:3 mode.
16 9 This option forces the picture ratio to 16:9 mode.
AUTO Your TV changes the picture mode automatically,
according to the transmission of the selected channel. For
example, your TV is 4:3 mode, but the transmission of that
channel is in 16:9 mode. If you select the AUTO mode, the
TV is switched to 16:9 mode automatically. If the TV is in
4:3 mode and the picture ratio of the channel is also 4:3,
there will be no affect selecting the picture mode to AUTO
mode.
WSS feature is only used in TV and FAV modes. For the
Picture Mode selection in AV1 the pin 8 (of Scart) value is
used. In RGB modes the Picture Mode can be 4:3 or 16:9
(Auto mode is not available.).
%5,*+71(66
&2175$67
&2/285
6+$531(66
02'(
6725(
Note:
In the Picture menu if you press Flashback ( ) button the
adjustments switch themselves to the factory settings.
To Store the Settings
Press or button on STORE option to store Picture
menu settings.
The stored picture mode setting will be valid only in current
program. owever, the other stored values in Picture Menu
will be valid for all the programmes.
%5,*+71(66
&2175$67
&2/285
6+$531(66
02'(
6725(
2.
Feature Menu
To enter the Feature menu directly, press the YELLOW
button, or
Press M button, now you are in Main menu. In the Main
menu, select FEATURE using or button. Then en-
ter the Feature menu pressing or button.
6281'
3,&785(
)($785(
,167$//
352*5$0
Sleep Timer
As you enter the Feature menu, SLEEP TIMER will be the
first selected option. Use or button to change the
Sleep Timer values between OFF, 0 15 00, 0 30 00, 0 45 00,
1 00 00, 1 15 00, 1 30 00, 1 45 00 and 2 00 00.
It is displayed on the upper right of the screen. If sleep timer
is activated it is displayed with the TV status and erased with
it after 3 seconds.
6/((37,0(5
&+,/'/2&.
/$1*8$*(
2))
2))
(1*/,6+
If there is left only one minute of the down counting of the
timer, it is displayed automatically on the upper left of the
screen, and stayed there until finishing. Then TV goes auto-
matically to stand-by.
Child Lock
You can use this feature to prevent children turning on TV or
changing programs or adjustments etc. without remote con-
trol.
The CHILD LOCK feature can be set by or button to
either ON or OFF. When OFF is selected, there will be no
difference in the operation of your TV. When ON is selected,
the TV can only be controlled by the remote control handset.
In this case, the front panel buttons (except the Power On/
Off button) will not work.
6/((37,0(5
&+,/'/2&.
/$1*8$*(
2))
2))
(1*/,6+
Selecting Menu Language
Menu language can be chosen by pressing or button
on LANGUAGE item.
6/((37,0(5
&+,/'/2&.
/$1*8$*(
2))
2))
(1*/,6+
To Store Settings
In Feature menu all settings are stored automatically.
Install. Menu
To enter the Install. menu directly, press the BLUE button,
or

- 12 -
Press M button, now you are in Main menu. In the Main
menu, select INSTALL. using or button. Then en-
ter the Install menu pressing or button.
6281'
3,&785(
)($785(
,167$//
352*5$0
Selecting Programme
To select programme number, you can use or button,
Digit Buttons or The Double Digit button with digit buttons.
Selecting Band
BAND can be chosen as V F1, V F3 or U F by or
button.
Selecting Frequency
The frequency value is,
044 - 890 M z for band V F1 - V F3 - U F.
352*5$00(
%$1'
)5(48(1&<
67$1'$5'
6($5&+
),1(781,1*
6725(
9+)
%*
FREQUENCY can be changed by or button, by the
Digit buttons or by the Double Digit button with digit buttons.
The decimal value in frequency can not be changed by the
digit buttons, it can be changed only by the or but-
ton. The value can be 00, 25, 50 and 75. Also changing
Fine Tuning changes the decimal part.
Selecting Standard
Using or button on STANDARD, you can change the
standard to B/G, D/K, L/L.
Selecting Search
To start the search process, press button for forward
search or button for backward search. SEARCH item
blinks during search process, since the process is stopped
or signal is found. During search process the semi-transpar-
ent menu background becomes "BLUE". To stop the search
process or button must be pressed again.
Selecting Fine Tuning
You can use the Fine Tuning process for fine adjustment (af-
ter coarse adjustment), if you are not happy about the image
on the screen.
Use or button on FINE TUNING item, until getting
the best image on the screen.
To Store Settings
Press or button on STORE option to store Install
menu settings.
Program. Menu
To enter Program. menu directly, press the " " button, or
Press M button, now you are in Main menu. In the Main
menu, select PROGRAM. using or button. Then
enter the Programme menu pressing or button.
6281'
3,&785(
)($785(
,167$//
352*5$0
Moving cursor to four direction you can reach 30 programmes
in the same page. By scrolling the pages up or down by
pressing the navigation buttons you can select all the pro-
grammes in TV mode (except the AV mode).
In menus, and buttons are working like "Direction
Up" and "Direction Down".
By cursor action, programme selection is done automatical-
ly. Selected programme is displayed with CYAN charac-
ters. In order to select programme is also possible by using
digit or double-digit button. In this way programme selection
gets also automatically and after selection the selected pro-
gramme is displayed with cyan characters. The TV Status is
changed by the programme selection too. When using dou-
ble-digit button in order to select a programme, the Pro-
gramme Number in TV Status OSD is displayed in "P --"
form, and by pressing digit buttons they are displayed in it.
Programme Number is between 00 and 99. Programme
Name has a name string with 5 characters. After autostore
process the Programme Names are set to:
"PR01" (programme number).
At the bottom of the menu there is a programme sort func-
tions section. Each function is activated by color button
(seen above). NAME allows changing the programme name.
By DELETE you can delete programmes that you decided.
INSERT section is for inserting programmes into another pro-
gramme spaces. By selecting AUTOSTORE section, Au-
tostore menu will be available.
To change the name of a decided programme, that pro-
gramme is selected and pressed to the RED button (NAME).
The first letter begins to blink on the selected name. To
change that letter or button can be used, and to se-
lect the other letters, or button can be used. If the
cursor is at the last letter of the Programme Name, pressing
button moves the cursor at the beginning. On the con-
trary, if the cursor is at the beginning of the Programme
Name, pressing button moves the cursor at the end.
&
&
&
&
&
&
$8726725(,16(57 '(/(7(1$0(

- 13 -
After changing the name by pressing the RED button
(STORE) it is stored. After activating the name process the
INSERT, DELETE and AUTOSTORE processes will be
inactive and "CANCEL" option will be valid. This option can-
cels the name process, if the new name do not want to be
stored.
&$1&(/
6725(
When it is pressed to GREEN button (INSERT), "NAME",
"AUTOSTORE" and "DELETE" functions are erased, the se-
lected programme (A) is displayed with green characters.
From now on, the automatic selection is canceled. Cursors
moves are indicated with CYAN characters. With navigation
buttons, the decided program space (B) can be selected and
by pressing the green button again inserting is occurred to
that space (B).
It should be thought that Prog-00 is the lowest programme
(like Prog-100). If any programme is inserted to Prog-00, the
programmes under that programme space shift one up, and
Prog-99 is adjusted to the first frequency value of V F1 (44
M z).
If Prog-00 is inserted to any programme space, all the pro-
grammes under that space shift one down and Prog-99 is
erased, and Prog-00 is adjusted to the first frequency value of
V F1 (44 M z).
"CANCEL" function cancels the activated "INSERT" process.
For "DELETE" process it is pressed to yellow button,
(NAME, INSERT and AUTOSTORE functions are inac-
tive). Pressing yellow button again erases the selected pro-
gramme from the programme list, and the programmes below
shift one up. Prog-00 is adjusted to the first frequency value
of V F1 (44 M z). Pressing blue button cancels the activat-
ed DELETE process.
To enter Autostore menu, press to the blue button. To learn
the features of this function see "A.P.S." below.
A.P.S., searches and stores all channels automatically on
your TV, according to the transmission of programme sys-
tems in your area.
3/($6( &+(&. $17(11$ &$%/(
$872 352*5$00,1* 6<67(0
/$1*8$*(
67$1'$5'
67$57
&28175< (1*/,6+
"
%*
$36 ,6 5811,1*
3 9+)
&$1&(/
If your TV has more then one Standard option (It depends to
your country) you may change it by using or button
to BG, DK or L/L on STANDARD item.
To cancel APS before starting, press
79
or M button.
First of all choose the COUNTRY and the STANDARD.
This, will effect the sort process in APS. To select START
use or button and press or button. To can-
cel APS during running press or button.
After APS is finalized, a programme list will apper on the
screen. In the programme list you will see the programme
numbers and names assigned to the programmes.
If you do not accept the locations and / or the programme
names of programmes, you can change them in Programme
menu.
Other Features
TV Status
Programme Number, Programme Name (or AV), (they
are displayed on the upper left of the screen) and Sleep
Timer (shows the time left on the upper right screen if en-
abled). In stereo options the sound indicator is displayed with
them too. They are displayed after programme change during
3 seconds.
Programme Number
Programme Name (5 characters)
These OSDs are displayed when a new programme is en-
tered by digit button, by pressing " " button, or by P/CH+
or - P/CH button, or by
79
button.
Flash back ( )
This button is used to return to the previous viewed preset.
By pressing the " " button repeatedly it is possible to tog-
gle between two presets.
Double-digit (- / - -)
This OSD is displayed when the "- / - -" button pressed in
place of the programme number indicator.
After then, in order to enter a programme it must be pressed
to two digit consecutively. When it is late to press any digit
button this function will be ignored and the display will be
erased. In the same way it must not be late to press any dig-
it button after entering the first digit. The limit of the delay
time is 3 seconds.
Sound Indicator
This is a stereo option. The alternatives of the indicator are
Mono, Stereo, Dual I and Dual II. This indicator is displayed
under the programme number indicator on the screen. "I-II"
button is used to select Mono or Stereo, or Dual I or Dual II.
In Mono broadcast or in forced-mono (for stereo broadcast).
In Stereo broadcast.

- 14 -
If dual broadcast detected. Dual I is selected in default and
also can be selected after Dual II by Remote Control.
If Dual II selected by Remote Control.
Picture Mode
The picture mode OSD is displayed below the sound indica-
tor, by TV Status OSDs. According to the WSS data, inside
of the OSD box 4:3 , 16:9 or Auto is written.
By pressing wide mode button. (if Teletext is not active)
the picture mode can be switched into 4:3, 16:9 or Auto
Mode.
Sleep Timer Last Minute Indicator
It is displayed on the upper right of the screen. If sleep timer
is activated it is displayed with the TV status and erased with
it after 3 seconds.
If there is left only one minute of the down counting of the
timer, it is displayed automatically on the upper left of the
screen, and stayed there until finishing. Then TV goes auto-
matically to stand-by.
Sound Mute
To cut off the sound from the TV press button. To restore
the sound press the button again or use the + or
- buttons, in this case the volume will start from mini-
mum setting.
No-Signal
No-Signal Timer Indicator
It is displayed in the middle of the screen when no valid sig-
nal detected. It shows the remained time for the switching to
the Stand-By mode (it takes 5 minutes when any signal de-
tected or no any Remote Control command is accessed).
The indicator is displayed in 3 seconds when there is no valid
signal.
After an Remote Control command (if No-Signal Timer is ac-
tive) the timer stops and if no signal detected again the timer
is initialized to 5 minutes and starts 3 seconds later again to
count down.
It is not valid in AV mode.
Blue Background During No-Signal
In case, no valid signal is detected (inTV or AV mode) Blue
Background is activated.During search process Blue Back-
ground is not active. But instead of it there is another feature
given; the semi-transparent menu background is made blue.
Volume Bar
It is displayed in the lower middle of the screen. When a vol-
ume command is received (pressing + or - by Re-
mote Control or Front panel) and no menu is active, it stays
on the screen for 3 seconds, after the last volume command
or until another command is received in between.
AV Modes
By pressing the
(;7
button you can switch your TV to AV
modes (except being in Teletext). Pressing this button con-
secutively will switch the TV in one off the AV modes:
SCART, F- AV (Front AV ) or RGB.
SCART supports the RGB mode. But if there is some colour
problem in SCART modes, please force the AV mode to RGB
mode.
In order to quit the AV mode press the
79
button.

- 15 -
Teletext
Teletext is an information system that displays text on your
TV screen. Using the Teletext information system you can
view a page of information on a subject that is available in the
list of contents index).
On screen display is not available in text mode.
Contrast, brightness or colour control is not available, but vol-
ume control is available in text mode.
To operate Teletext
Select a TV station on which Teletext is being transmitted.
Press TELETEXT) button. Usually the list of contents
index) is displayed on the screen.
To select a page of Teletext
Press the appropriate digit buttons for the required Teletext
page number.
The selected page number is displayed at the top left cor-
ner of the screen. The Teletext page counter searches until
the selected page number is located, so that the desired
page is displayed on the screen.
Press P/CH+ button to move the Teletext screen forward
one page at a time.
Press -P/CH button to move the Teletext screen backward
one page at a time.
To Select Index Page
To select the page number of the index generally page
100), press button.
To Select Teletext with a TV Programme
Press button. The text is now superimposed over the
programme on the screen.
Press button again to return to the Teletext page.
Searching for a page while watching TV
To search for a specific page whilst viewing the TV picture,
whilst viewing teletext enter the desired Page number,
thenpress the button will restore the TV picture. Once
the desired page is found the Header of this page will ap-
pear on the screen. Press the button to view the full
page.
To Select Double Height Text
Press button for the top half of the information page to
be displayed in double height text.
Press button again for the bottom half of the informa-
tion page to be displayed in double height text.
Press button once more for the full page of normal
height text.
To Reveal concealed Information
Pressing button once will reveal answers on a quiz or
games page.
Pressing button again will conceal the revealed an-
swers.
To Stop Automatic Page Change
The teletext page you have selected may contain more infor-
mation than can be displayed on one screen, in such cases
the page will update periodically.
Press button to stop the automatic page change.
Press button again to allow the next page to be dis-
played.
To Select a Subcode Page
Subcode pages are subsections of long Teletext pages that
can only be displayed on the screen one section at a time.
Select the required Teletext page.
Press button.
Select the required subcode page number by pressing four
digit buttons e.g. 0001).
If the selected subcode page is not displayed in a short
time, press button. TV programme will be displayed on
the screen.
Teletext page number will be displayed on the upper left
corner of the screen when the selected page is found.
Press button to display the selected Teletext page.
To exit Teletext
Press
79
button. The screen will switch to TV mode.
To Display the Time
While watching a TV programme with Teletext transmission
press button. The current time information, captured
from Teletext will be displayed at the upper middle of the
screen.
If the programme being watched does not have Teletext
transmission, no iformation will be displayed.

- 16 -
Connecting external equipment
There is a wide range of audio and video equipment that can
be connected to your TV.
The following connection diagrams show you where the differ-
ent equipment should be connected at the back or the front
side of the TV.
Via the Euro connector
Your TV set has one Euro connector (SCART) socket. If you
want to connect external equipment e.g. video, decoder,
etc.) which have Euro connectors, to your TV, use SCART
terminal.
If an external device is connected via Euroconnector socket
the TV will be switched to AV mode automatically.
RGB mode
If a piece of equipment outputs RGB signals use the SCART
socket as this is RGB ready.
Via the ANT (aerial) socket
If you want to connect to your TV, peripherals like video re-
corders or decoders, but the device you want to connect
does not have Euroconnector, you should connect it to the
ANT input of your TV set.
If the VCR is connected via antenna input it is suggested
to use the Programme 0.
Decoder
Cable TV offers you a wide choice of programs. Most of them
are free, others are to be paid for by the viewer. This means
that you will need to subscribe to the broadcasting organisa-
tion whose programmes you wish to receive. This organisa-
tion will supply you a corresponding decoder unit to allow the
programmes to be unscrambled.
For further information ask your dealer. See also the booklet
supplied with your decoder.
Connect a decoder with an aerial socket to the TV
Connect the aerial cable.
Connect a decoder without an aerial socket to the
TV
Connect the decoder to your TV with a eurocable RCA
Jack Cable) to SCART socket. When your decoder has a
Euro connector / RCA Jack you can obtain better picture
quality if you connect a eurocable RCA Jack Cable) to
SCART socket.
TV and Video Recoder (VCR)
Connect the aerial cables.
Better picture quality can be obtained if you also connect a
eurocable to SCART socket.
NTSC Playback
Connect NTSC VCR player through SCART socket at the
back of the TV or through RCA Jack at the front of the TV.
Then, press
(;7
button to select SCART or F-AV.
Search for and store the test signal of the video
recorder
Unplug the aerial cable from the aerial socket ANT of
your video recorder.
Switch on your TV and put the video recorder on the test
signal. See the handbook for your video recorder.)
Enter the Tuning menu via the Install menu.
Search for the test signal of your video recorder in the same
way as you searched for and stored the TV signals. See
Tuning, Search and Store TV channels. Store the test sig-
nal under programme number 0.
Replace the aerial cable in the aerial socket ANT of your
video recorder once you have stored the test signal.
Camera and Camcorder
To connect to Front-AV input (F- AV) :
Connect your camera or camcorder at the front side of your
TV.
Connect your equipment to the TV via VIDEO yellow), AU-
DIO R red) and AUDIO L white) inputs. You should con-
nect the jacks to the input in the same colour.
Connect the decoder to the video recorder
Some video recorders have a special euroconnector for de-
coder.
Connect a eurocable to the euroconnector of your decoder
and to the special eurocon-nector of your video recorder.
See also the handbook of your video recorder.
To connect your video recorder to the TV, see TV and Video
Recorder section.
If you want to connect more equipment to your TV, consult
your dealer.
Connecting Headphones
Use the stereo headphone socket HP) on the lower front /
right side of your TV, to connect headphones.

- 17 -
Connecting external equipment
Before connecting anything
Switch off all equipment.
Read the manuals provided with the equipments.
To select n AV mode
Pressing
(;7
button on the remote control selects one of AV modes SCART, F-AV, RGB)
To return to the TV mode, repeatedly press
(;7
button.
SCART termin l: 21-pin Euro connector.
Video input, Audio L/R inputs and RGB inputs are available.
TV broadcast outputs Video and Audio L/R) are available.
Front AV (F-AV) termin l :
Video input and Audio L/R inputs are available.
6&$57
21 REAR PANEL
+($'3+21(
9,'(2,1387
7(50,1$/
$8',2,1387
7(50,1$/
$17,1
&$0&25'(5
,1 287
,1 287
DECODER FOR SATELLITE RECEIVER
VIDEO
HEADPHONE
AUDIO
$17(11$
6FDUW

- 18 -
Typical Connections
Note: For further details, please refer to operation manual of your VCR.
$HULDOFRQQHFWLRQ79VHWRQO\
$HULDO,1
%$&.2)79
$HULDO
1RWVXSSOLHG
$HULDO/HDG
1RWVXSSOLHG
$17
6&$57
6&$57
$17
$HULDO&RQQHFWLRQV79DQG9&5
$HULDO
1RWVXSSOLHG
$HULDO/HDG
1RWVXSSOLHG
$17
6&$57
$HULDO/HDG
1RWVXSSOLHG
6FDUW/HDG
1RWVXSSOLHG
%$&.2)79
$HULDO,1
%$&.2)9&5
$XGLR9LGHR
5)287
$HULDO,1
$97(50,1$/

- 19 -
Typical Connections (Continued)
Note: For further details, please refer to operation manuals of your DVD Player, DECODER and VCR.
&RQQHFWLRQV79'9'3OD\HU'(&2'(5DQG9&59LGHRUHFRUGHU
'9'3/$<(5
'(&2'(5
6FDUW/HDG
1RWVXSSOLHG
6FDUW/HDG
1RWVXSSOLHG
$HULDO,1
6FDUW/HDG
1RWVXSSOLHG
$HULDO/HDG
1RWVXSSOLHG
$HULDO
1RWVXSSOLHG
$HULDO/HDG
1RWVXSSOLHG
$HULDO,1
$XGLR9LGHR
%$&.2)9&5
5)287
6&$5 7
$17
%$&.2)79
$97(50,1$/
Other manuals for 21LS-90C
1
Table of contents
Other Sharp TV manuals

Sharp
Sharp 27U-S50 User manual

Sharp
Sharp AN-37AG2 User manual

Sharp
Sharp 54CS-03S User manual

Sharp
Sharp 21F-A30 User manual

Sharp
Sharp 21H1-FRU User manual

Sharp
Sharp 25R-M100 User manual

Sharp
Sharp Aquos LC-20AD5E User manual

Sharp
Sharp 27U-S650 User manual

Sharp
Sharp 29FL94 User manual

Sharp
Sharp LC52LE600E User manual

Sharp
Sharp Aquos LC-46D82U User manual

Sharp
Sharp 42CJ1K Technical manual

Sharp
Sharp 27F830 User manual

Sharp
Sharp 29MU70 User manual

Sharp
Sharp Aquas LC-52LE920UN User manual

Sharp
Sharp 29H-FG5RU User manual

Sharp
Sharp 81GF-63E User manual

Sharp
Sharp LC-46LE810E User manual

Sharp
Sharp 70AS-06S User manual

Sharp
Sharp AQUOS LC-40LE820UN User manual