Sharp Aquos LC-32M400X User manual

MODEL
LC-32M400X
LCD COLOUR TELEVISION
OPERATION MANUAL
Cover_LC-32M400X_CS2_A5.indd 1Cover_LC-32M400X_CS2_A5.indd 1 6/8/2011 5:36:17 PM6/8/2011 5:36:17 PM

Cover_LC-32M400X_CS2_A5.indd 2Cover_LC-32M400X_CS2_A5.indd 2 6/8/2011 5:36:17 PM6/8/2011 5:36:17 PM

1
Supplied accessories
Remote control unit “AA” size battery (g1) Stand unit
Stand base Screws (g4)
Safety restrains Operation manual
Restraining
band
Screw for band
Screws for
clamps
Clamps
Contents
Page
Supplied accessories..........................................1
Dear SHARP customer........................................2
Important Safety Precautions ............................2
Important information .........................................3
Trademarks..........................................................3
Attaching the stand .............................................4
Antenna connection ............................................4
Connecting external devices..............................5
Remote control unit ............................................6
Part names ...........................................................7
Turning the TV on/off ..........................................8
Supplying electric power to the antenna ..........8
Initial auto installation.........................................8
Checking Signal information ..............................8
Auto installation...................................................9
Programme setup................................................9
Selecting a preset AV mode .............................11
Menu operation .................................................11
Picture menu......................................................12
Audio menu ........................................................12
ECO menu ..........................................................13
Page
Setup menu........................................................13
Option menu ......................................................15
Digital setup menu ............................................17
Programme Guide .............................................18
Info......................................................................18
ATV (Analogue)/DTV/RADIO buttons...............19
Switching the analogue audio format .............19
EPG .....................................................................21
Picture and still image ......................................22
Wide Mode .........................................................22
Teletext function................................................23
PC Control of the TV .........................................23
PC compatibility chart ......................................24
RS-232C commands list ...................................24
USB Media Player..............................................25
Appendix ............................................................28
Specifications ....................................................29
Protection against overturning ........................30
Dimensional drawings ......................................31
CLEARING THE PASSWORD............................32
LC32M400X_EN_CS2_A5.indd 1LC32M400X_EN_CS2_A5.indd 1 6/9/2011 2:35:00 PM6/9/2011 2:35:00 PM

2
Dear SHARP customer
Thank you for your purchase of the SHARP LCD colour TV product. To ensure safety and many
years of trouble-free operation of your product, please read the Important Safety Precautions
carefully before using this product.
Important Safety Precautions
• Cleaning — Unplug the AC cord from the AC outlet before cleaning the product. Use a soft damp cloth to clean the
product. Do not use liquid cleaners, aerosol cleaners or chemical cloth to clean it, as such materials may damage the
product.
• Water and moisture — Do not use the product near water, such as bathtub, washbasin, kitchen sink, laundry tub,
swimming pool and in a wet basement.
• Do not place vases or any other water-filled containers on this product.
The water may spill onto the product causing fire or electric shock.
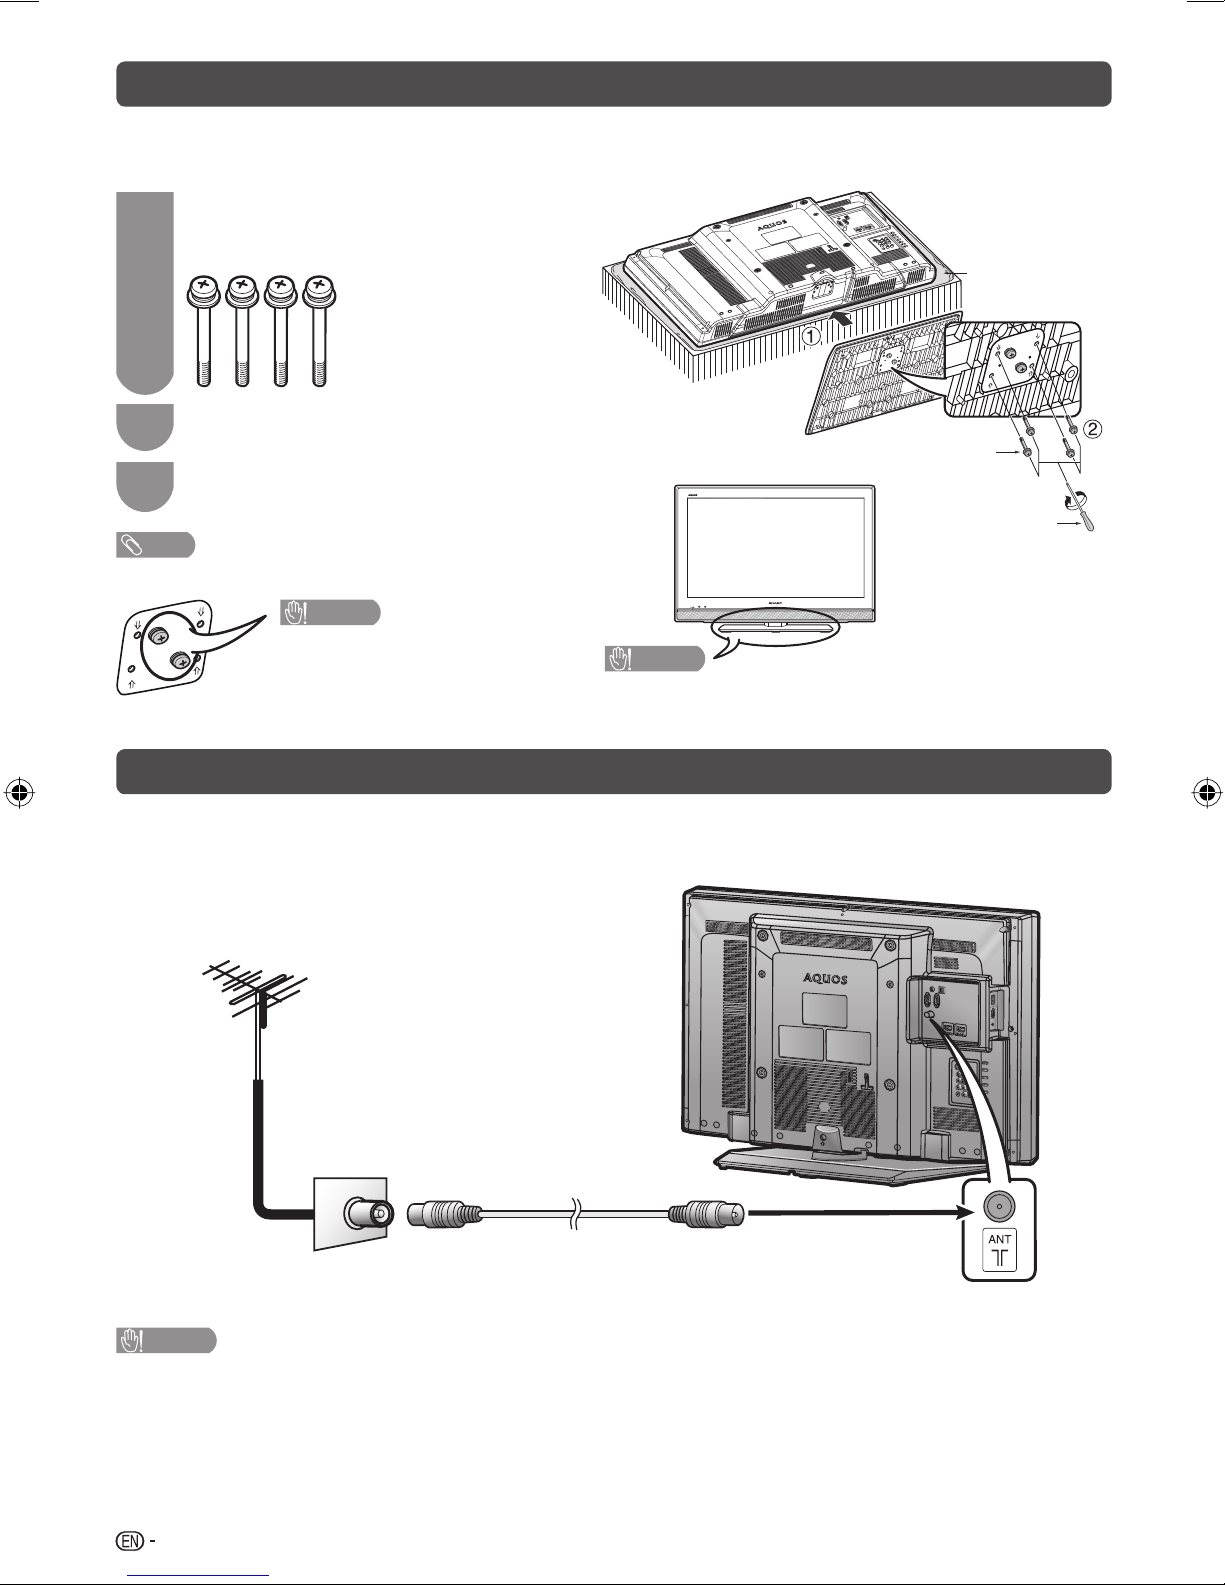
• Stand — Do not place the product on an unstable cart, stand, tripod or table. Doing so can cause the product to fall,
resulting in serious personal injuries as well as damage to the product. Use only a cart, stand, tripod, bracket or table
recommended by the manufacturer or sold with the product. When mounting the product on a wall, be sure to follow the
manufacturer’s instructions. Use only the mounting hardware recommended by the manufacturer.
• When relocating the product placed on a cart, it must be moved with utmost care. Sudden stops, excessive force and
uneven floor surface can cause the product to fall from the cart.
• Ventilation — The vents and other openings in the cabinet are designed for ventilation. Do not cover or block these vents
and openings since insufficient ventilation can cause overheating and/or shorten the life of the product. Do not place the
product on a bed, sofa, rug or other similar surface, since they can block ventilation openings. This product is not designed
for built-in installation; do not place the product in an enclosed place such as a bookcase or rack, unless proper ventilation
is provided or the manufacturer’s instructions are followed.
• The LCD panel used in this product is made of glass. Therefore, it can break when the product is struck forcefully or with a
sharp object. If the LCD panel is broken, be careful not to be injured by broken glass.
• Heat sources — Keep the product away from heat sources such as radiators, heaters, stoves and other heat-generating
products (including amplifiers).
• To prevent fire, never place any type of candle or naked flames on the top or near the TV set.
• To prevent fire or shock hazard, do not place the AC power cord under the TV set or other heavy items.
• Do not place heavy objects on this product or stand on it. Doing so could cause injury if the product overturns. Take
special care near children and pets.
• The LCD panel is a very high technology product with 1,049,088 pixels, giving you fine picture details.
Due to the very large number of pixels, occasionally a few non-active pixels may appear on the screen as a fixed point of
blue, green or red.
This is within product specifications and does not constitute a fault.
• Precautions when transporting the TV
When transporting the TV, never carry it by holding or otherwise putting pressure onto the display. Be sure to always carry
the TV by two people holding it with two hands — one hand on each side of the TV.
• Do not display a still picture for a long time, as this could cause an afterimage to remain.
• Install the product on the place where the AC cord can be unplugged easily from the AC outlet, or from the AC INPUT
terminal on the rear of the product.
• If a television is not positioned in a sufficiently stable location, it can be potentially hazardous due to falling. Many injuries,
particularly to children, can be avoided by taking simple precautions such as:
• Using cabinets or stands recommended by the manufacturer of the television.
• Only using furniture that can safely support the television.
• Ensuring the television is not overhanging the edge of the supporting furniture.
• Not placing the television on tall furniture (for example, cupboards or bookcases) without anchoring both the furniture
and the television to a suitable support.
• Not standing the televisions on cloth or other materials placed between the television and supporting furniture.
• Educating children about the dangers of climbing on furniture to reach the television or its controls.
LC32M400X_EN_CS2_A5.indd 2LC32M400X_EN_CS2_A5.indd 2 6/9/2011 2:35:02 PM6/9/2011 2:35:02 PM

3
Important information
This product qualifies for ENERGY STAR when “Home” is selected for “TV location”.
Setting “TV Location” to “Home” allows the TV to achieve an energy-saving status for household use.
Trademarks
• “HDMI, the HDMI logo and High-Definition Multimedia Interface are trademarks or registered trademarks of HDMI
Licensing LLC in the United States and other countries.”
• Manufactured under license from Dolby Laboratories. Dolby and the double-D symbol are trademarks of Dolby
Laboratories.
• Products that have earned the ENERGY STAR® are designed to protect the environment through energy efficiency.
• DivX®, DivX Certified® and associated logos are trademarks of Rovi Corporation or its subsidiaries and are used under
license.
• ABOUT DIVX VIDEO: DivX® is a digital video format created by DivX, LLC, a subsidiary of Rovi Corporation. This is an
official DivX Certified® device that plays DivX video. Visit divx.com for more information and software tools to convert
your files into DivX videos.
• ABOUT DIVX VIDEO-ON-DEMAND: This DivX Certified® device must be registered in order to play purchased DivX
Video-on-Demand (VOD) movies. To obtain your registration code, locate the DivX VOD section in your device setup
menu. Go to vod.divx.com for more information on how to complete your registration.
LC32M400X_EN_CS2_A5.indd 3LC32M400X_EN_CS2_A5.indd 3 6/9/2011 2:35:02 PM6/9/2011 2:35:02 PM

4
Attaching the stand
• Before attaching (or detaching) the stand, unplug the AC cord from the AC outlet.
• Before performing work spread cushioning over the base area to lay the TV on. This will prevent it from
being damaged.
1Confirm the screws supplied with the TV.
Screw driver
Screw
Soft cushion
CAUTION
• To prevent injury, please do not insert a finger or
hand into the opening between TV stand and TV.
Screws (m4)
(used in step 3)
2Insert the stand base to the stand post on
the bottom of the TV. (1)
3Insert and tighten the 4 screws into the 4
holes on the bottom of the stand base. (2)
NOTE
• To detach the stand, perform the steps in reverse order.
CAUTION
• To prevent disassemblement of
the stand base, do not unfasten
these two screws.
Antenna connection
Connecting the antenna cable
To enjoy a clearer picture, use an outdoor antenna.
Standard DIN45325 plug (IEC169-2)
75-ohm coaxial cable (round cable)
Room antenna terminal
(75-ohm type)
Antenna cable
(commercially available)
To antenna terminal
CAUTION
• TO PREVENT RISK OF ELECTRIC SHOCK, DO NOT TOUCH UN-INSULATED PARTS OF ANY CABLES WITH
THE AC CORD CONNECTED.
LC32M400X_EN_CS2_A5.indd 4LC32M400X_EN_CS2_A5.indd 4 6/9/2011 2:35:02 PM6/9/2011 2:35:02 PM

5
Connecting external devices
You can connect many types of external equipment to your TV, like a VCR, game console, camcorder, DVD
player, Digital TV STB (Set Top Box) and PC. To view external source images, select the input source from
INPUT on the remote control unit or INPUT on the TV.
CAUTION
• To protect all equipment, always turn off the TV before connecting to a VCR, game console, camcorder, DVD player,
Digital TV STB (Set Top Box), PC or other external equipment.
• Refer to the relevant operation manual (VCR, DVD player, etc.) carefully before making connections.
Connecting a VCR, game console or camcorder
A VCR, game console, camcorder and some other audiovisual equipment can be conveniently connected using
the INPUT 4/INPUT 5 or INPUT 6 terminals.
When using component cable
(commercially available)
When using composite cable or S-VIDEO cable
(commercially available)
VCR/Game console/Camcorder VCR/Game console/Camcorder
or
Connecting a DVD player/Digital TV STB (Set Top Box)
You can use the INPUT 1/INPUT 2/INPUT 3 (HDMI), INPUT 6 terminals when connecting to a DVD player/
Digital TV STB (Set Top Box) and other audiovisual equipment.
When using HDMI-certified cable
(commercially available)
When using component cable
(commercially available)
DVD player/
Digital TV STB
(Set Top Box)
DVD player/Digital TV STB (Set Top Box)
Connecting a PC Using Digital Audio Output
You can use the INPUT 7 (PC) terminals when
connecting to a PC.
PC
It is possible to output audio through the DIGITAL
AUDIO OUTPUT terminal. PCM audio outputs from
the terminal.
To optical digital input of external audio devices
Optical fibre cable
(commercially
available)
NOTE
• The DIGITAL AUDIO OUTPUT terminal usually outputs the same audio from the speakers. (The audio of the content you
are viewing is output from the terminal.)
• The DIGITAL AUDIO OUTPUT terminal does not output some signals, depending on devices and software.
• The DIGITAL AUDIO OUTPUT terminal does not output any signal during HDMI digital input.
LC32M400X_EN_CS2_A5.indd 5LC32M400X_EN_CS2_A5.indd 5 6/9/2011 2:35:03 PM6/9/2011 2:35:03 PM

6
Remote control unit
13
14
15
16
17
18
19
20
21
22
23
24
1
2
3
4
5
6
7
8
9
10
11
12
25
26
9 EPG
DTV mode: To display EPG (Electronic Programme
Guide) screen. (See pages 21 to 22.)
10 GUIDE
DTV mode: Display the programme list. (See page 18.)
11 INFO
DTV mode: Display the programme information. (See page 18.)
12 RADIO
Press to access RADIO mode. (See page 19.)
13 POWER (STANDBY/ON)
To switch the power on and off. (See page 8.)
14 DISPLAY
Display the channel or input information.
15 SLEEP
Set the Sleep timer.
0 hr. 30 min. 1 hr. 00 min.
2 hr. 30 min.
1 hr. 30 min.
2 hr. 00 min.Off
16 AV MODE
Select an audio and video setting. (See page 11.)
17 MPX
Select the sound multiplex mode.
18 INPUT (INPUT SOURCE)
Select an input source.
19 CHr/CHs
TV input mode: Select the channel.
(CHr) Increase the channel number.
(CHs) Decrease the channel number.
TELETEXT mode: Select the page. (See page 23.)
20 PC
Directly select the PC terminal.
21 MENU
Display the menu screen.
22 a/b/c/d(Cursor)
Select a desired item on the setting screen.
ENTER
Execute a command.
23 RETURN
MENU mode: Return to the previous menu screen.
24 m(TELETEXT), k(Reveal hidden for TELETEXT),
[(SUBTITLE for TELETEXT), 3(Hold),
1(Subpage), v(Top/Bottom/Full)
Use for TELETEXT mode. (See page 23.)
25 DTV
Press to access DTV mode. (See page 19.)
26 ATV
Press to access ATV mode. (See page 19.)
1 e(Mute)
Press
esMutes sound.
Press
eagain sRestores sound.
Mute will be cancelled after 30 minutes. However, the
TV will not suddenly output loud sound as the volume
level will be set to 0 automatically. Increase the volume
level by pressing VOL k.
2 0 – 9
Set the channel.
TELETEXT mode: Set the page. (See page 23.)
3 A(Flashback)
Press
Ato return to the previous selected channel or
external input mode.
4 WIDE
Change the wide image mode. (See page 22.)
5 VOLk/VOLl
Set the volume.
(VOLk) Increase the volume.
(VOLl) Decrease the volume.
6 FREEZE
Freeze a motion picture on the screen. (See page 22.)
7 EXIT
Return to the default screen.
8 Colour (Red/Green/Yellow/Blue)
TELETEXT mode: Select a page. (See page 23.)
Inserting the battery
Before using the TV for the first time, insert a “AA” size battery (supplied). When the battery become depleted
and the remote control fails to operate, replace the battery with new “AA” size battery.
1Open the battery cover. 2Insert the supplied “AA” size battery. 3
Close the battery cover.
•
Place battery with their terminals corresponding to the (e)
and (f) indications in the battery compartment.
CAUTION
• Battery (battery pack or batteries installed) shall not be exposed to excessive heat such as sunshine, fire or the like.
LC32M400X_EN_CS2_A5.indd 6LC32M400X_EN_CS2_A5.indd 6 6/9/2011 2:35:04 PM6/9/2011 2:35:04 PM

7
Part names
TV (Front)
POWER indicator
Light off Power off
Lighted (Red) The TV is in standby mode.
Lighted (Green) The TV is on.
Remote control sensor
OPC sensor
TV (Rear)
9
8
7
6
10
12
13
11
14
15
1
2
3
4
5
18
16
17
1POWER (On/Off) button
2MENU button
3INPUT button
4Channel up (r)/down (s) buttons
5Volume up (e)/down (f) buttons
6 DIGITAL AUDIO OUTPUT terminal
7INPUT 7 (PC) terminals*
8 RS-232C terminal
9Antenna input terminal
10 INPUT 4 terminals
11 INPUT 5 terminals
12 INPUT 6 terminals
13 AUDIO OUT terminal
14 INPUT 2 (HDMI) terminal
15 INPUT 1 (HDMI) terminal*
16 USB terminal**
17 INPUT 3 (HDMI) terminal
18 Headphone jack
* The INPUT 1 and INPUT 7 terminals can both use the same analogue audio input terminal. However, the proper item
must be selected in the “PC audio select” menu. (See page 15.)
** USB terminal use for USB Media Player. (See page 25.)
• The illustrations in this operation manual are for explanation purposes and may vary slightly from the actual operations.
Regarding the headphone jack
• Use headphones with a stereo mini plug ( 3.5 mm).
• Be sure to unplug headphones from the jack when they are not
in use.
• The speakers do not output volume when headphones are
plugged in.
• The “Audio” menu cannot be operated when headphones are
plugged in.
Volume display when headphones are plugged in
20
LC32M400X_EN_CS2_A5.indd 7LC32M400X_EN_CS2_A5.indd 7 6/9/2011 2:35:04 PM6/9/2011 2:35:04 PM

8
Turning the TV on/off
Turning on/off the power
• To turn on the power
Press POWER on the TV. (After a few seconds, an image
appears with sound.)
• To turn off the power
Switch it off by pressing POWER on the TV.
Standby mode
• To standby mode
If the TV is switched on, you can switch it to standby by
pressing POWER on the remote control.
• Switching on from standby
From standby, press POWER on the remote control.
NOTE
• If you are not going to use this TV for a long period of
time, be sure to remove the AC cord from the AC outlet.
• Minor power is consumed when the unit is in standby
mode.
Supplying electric power to
the antenna
When you set-up the DTV antenna for the first time,
or connect the antenna to a community antenna,
you need to proceed to set the antenna by following
this manual.
1Press DTV to access DTV mode.
2Press MENU and the MENU screen
displays.
3Press c/dto select “Setup”.
4Press a/bto select “Digital Programme
Setup” and then press ENTER.
5Press a/bto select “Antenna power” and
then press ENTER.
6Press c/dto select “Yes” and then press
ENTER.
Selected item Description
Yes Select “Yes” when your antenna is
set-up and connected independently.
No Select “No” when you do not need to
supply voltage to your antenna, i.e.
when your antenna is connected to
a community antenna. (The factory
default setting of this function is “No”.)
Initial auto installation
When the TV powers on for the first time after
purchase, the initial auto installation wizard appears.
Follow the menus and make the necessary settings
one after another.
1Press POWER on the TV.
• The initial auto installation wizard appears.
2Press c/dto select “HOME” or “STORE”,
and then press ENTER.
Press c/dto select your country channels
listed on the screen, and then press ENTER.
Press a/b/c/d to select “DTV”, “ATV” or
“ATV + DTV”, and then press ENTER.
Press a/bto select the desired sound
system, and then press ENTER.
• Sound system is selectable when the signal
search is set to “ATV” or “ATV + DTV” mode only.
• Auto installation will be executed.
• You do not need to do anything during the auto
search.
• HOME: “STANDARD” will be the default value for
the “AV mode” setting.
• STORE: “DYNAMIC (FIXED)” will be the default
value for the “AV mode” setting. If the “AV mode”
is changed, the TV will automatically switch back
to “DYNAMIC (FIXED)” when there is no further
change to TV setting for 30 minutes.
• To change the STORE mode to HOME mode,
please refer to page 15 to reset the unit.
Checking Signal information
If you install a DVB-T antenna for the first time or
relocate it, you should adjust the alignment of the
antenna to receive a good reception while checking
the antenna setup screen.
1Press MENU and the MENU screen
displays.
2Press c/dto select “Setup”.
3Press a/bto select “Digital Programme
Setup”, and then press ENTER.
LC32M400X_EN_CS2_A5.indd 8LC32M400X_EN_CS2_A5.indd 8 6/9/2011 2:35:05 PM6/9/2011 2:35:05 PM

9
Programme setup
Digital settings
You can reconfigure DTV services settings
automatically or manually.
1Press MENU and the MENU screen
displays.
2Press c/dto select “Setup”.
3Press a/bto select “Digital Programme
Setup”, and then press ENTER. If you have
already set the password, enter it here.
• See page 13 for setting a password.
4Press a/bto select the desired menu item,
and then press ENTER.
5Press c/dto select “Yes”, and then press
ENTER.
HAuto search (Digital)
Use this menu to add new services automatically
after auto installation has been completed.
HManual search (Digital)
Add new services within a specified frequency band.
•
Press c/dto select the frequency and then press ENTER.
HManual adjust (Digital)
Configure various settings for each service using the
Colour (R, G, B) buttons.
Digital Programme Setup]
1Press a/bto select desired service.
2Press the Colour button on the remote
control corresponding with the item you
want to reconfigure.
• Each time the Colour button is pressed, you can
switch the corresponding operation on/off.
Buttons for Manual adjust operation
Menu
items
Remote
control
buttons
Description
Lock
R
When the service is locked, you must enter
your password whenever you tune to the
service.
CH
Skip
G
Services with “Skip” are passed over when
pressing r/sin the TV/remote control
unit.
Sort
B
The item position of services can be sorted.
Checking Signal
information (Continued)
HChecking Signal information
Press a/bto select “Signal information”.
Signal information
Auto search
Manual search
Manual adjust
Antenna power
Signal strength
Signal quality
Current Maximum
Channel number
100
Current Maximum 98
100
98
68
4Position and align the antenna so that
the maximum possible values for “Signal
strength” and “Signal quality” are obtained.
NOTE
• The values of “Signal strength” and “Signal quality”
indicate when to check the appropriate alignment of the
antenna.
Auto installation
You can run auto installation again, even after setting
up the preset channels.
1Press MENU and the MENU screen
displays.
2Press c/dto select “Setup”.
3Press a/bto select “Auto installation”, and
then press ENTER.
4If you have already set the password, enter
it here.
• See page 13 for setting a password.
5Press c/dto select “Yes”, and then press
ENTER.
6Press a/b/c/dto select “DTV”, “ATV” or
“ATV + DTV”, and then press ENTER.
Press a/bto select the desired sound
system, and then press ENTER.
• Sound system is selectable when the signal
search is set to “ATV” or “ATV + DTV” mode only.
You do not need to do anything during the
auto search. Press MENU to exit.
LC32M400X_EN_CS2_A5.indd 9LC32M400X_EN_CS2_A5.indd 9 6/9/2011 2:35:05 PM6/9/2011 2:35:05 PM

10
5Press a/bto select the desired menu, and
then press ENTER.
6Press a/bor c/dto select the desired
item or adjust the item to the desired level.
Press ENTER if necessary.
Search
The next channel will be search in order.
Fine
You can adjust the frequency to your desired position.
NOTE
• Adjust while checking the background picture as a
reference.
• Instead of pressing c/dto adjust the frequency, you can
set by directly entering the frequency number of the channel
with 0 — 9.
a
• 179.25 MHz: Press 1 s7 s9 s2 s5.
• 49.25 MHz: Press 4 s9 s2 s5 sENTER.
Colour system
Select the optimum colour system to receive. (Auto,
PAL, SECAM, NTSC 4.43, PAL-60)
Sound system (Broadcasting system)
Select the optimum sound system (Broadcasting
system) to receive. (B/G, D/K, I)
Label
To enter the name of the channel. Maximum 5
alphanumeric can be input.
• Press a/b/c/d: To select a desired alphanumeric, and
then press ENTER.
Repeat until the name is fully spelt out.
Sound system
Search
Fine
Colour system
Label
Broadcasting station name settings
CLEAR
BACK
END
ABCDEFGHIJ
UVWXYZ+–._
[ ]
Auto
[ ]
B/G
[ ]
Off
[ ]
Off
[ ]
Off
Booster
Skip
Lock
KLMNOPQRST
0123456789
[ ]
• To exit, select END and then press ENTER.
• If the wrong alphanumeric is entered, select CLEAR to
clear, and then press ENTER.
Booster
Enhance the picture quality during weak signal. It is
not recommended to turn on during strong signal
condition. It may induced unwanted noise. (On, Off)
Skip
Channels with “Skip” set to “On” are passed
over when using CHr/seven if selected while
watching the image from the TV. (On, Off)
Lock
You can block the viewing of any channel. (On, Off)
NOTE
• See “Child lock” for setting a password.
• If “Lock” is set to “On” for a channel, “Child lock has been
activated” is displayed when you select the channel, and
the image and sound of the channel is blocked.
• When pressing ENTER while “Child lock has been
activated” is displayed, password input menu will be
displayed. Inputting the correct password lifts the child
lock temporarily until the power is turned off.
Programme setup (Continued)
The item position of services can be sorted
1Press a/bto select the service whose item
position you want to move, and then press B.
DTV 005 Maori Television
DTV 022 Parliament TV
DTV 100 Freeview I HD
2Press a/bto move it to the desired position,
and then press ENTER.
DTV 005 Maori Television
DTV 022 Parliament TV
DTV 100 Freeview I HD
3Repeat steps 1and 2until all desired service
items are sorted.
Analogue settings
HAuto search (Analogue)
You can also automatically search by performing
the procedure below. This is the same function as
programme auto search in auto installation.
1
Press MENU and the MENU screen displays.
2Press c/dto select “Setup”.
3Press a/bto select “Analogue programme
setup”, and then press ENTER.
4If you have already set the password, enter it
here.
• See page 13 for setting a password.
5Press a/bto select “Auto search”, and
then press ENTER.
6Press c/dto select “Yes”, and then press
ENTER.
Press a/bto select the desired sound
system, and then press ENTER.
You do not need to do anything during the
auto search. Press MENU to exit.
HManual adjust (Analogue)
You can set some channel item manually.
1Repeat steps 1 to 4 in Auto search.
2Press a/bto select “Manual adjust”, and
then press ENTER.
3Press c/dto select “Yes”, and then press
ENTER.
4Press a/b/c/dto select the channel you
want to edit, and then press ENTER.
• The selected channel information displays.
LC32M400X_EN_CS2_A5.indd 10LC32M400X_EN_CS2_A5.indd 10 6/9/2011 2:35:06 PM6/9/2011 2:35:06 PM

11
Selecting a preset AV mode
“AV mode” gives you several viewing options to
choose from to best match the system environment,
which can vary due to factors like room-brightness,
type of programme watched or the type of image
input from external equipment.
1Press AV MODE.
2Each time you press AV MODE, the mode
changes.
• You can also switch the mode in the “AV mode”
menu on the “Picture” menu screen.
Selected item Description
STANDARD For a highly defined image in a normally
bright room.
MOVIE For a movie.
GAME For game play.
PC For PC. (Available only when inputting an
HDMI or PC signal.)
USER Allows the user to customise settings as
desired. You can set the mode for each
input source.
DYNAMIC
(FIXED)
Changes the image and sound settings to
the factory preset values. No adjustments
are allowed.
DYNAMIC For a clear-cut image emphasising high
contrast for sports viewing.
NOTE
• You can select a different AV mode item for each input
mode. (For example, select STANDARD for TV input and
DYNAMIC for VIDEO input.)
• During PC input mode, only “STANDARD”, “PC” and
“USER” can be selected under the AV mode selection.
Menu operation
1Press MENU and the MENU screen
displays.
2Press c/dto select the desired menu.
(Picture, Audio, ECO, Setup, Option, Digital
setup)
3Press a/bto select the desired menu item.
Press ENTER to proceed if necessary.
4Press a/bor c/dto select the desired
item or adjust the item to the desired level.
Press ENTER if necessary.
Programme setup (Continued)
HSort (Analogue)
Channel position can be sorted freely.
1Repeat steps 1 to 4 in Auto search.
2Press a/bto select “Sort”, and then press
ENTER.
3Press c/dto select “Yes”, and then press
ENTER.
4Press a/b/c/dto select the channel you
want to move, and then press ENTER.
5Move it to the desired position by pressing
a/b/c/d, and then press ENTER.
6Repeat the steps 4 and 5 until all desired
channels are sorted.
HErase programme (Analogue)
The individual programme can be erased.
1Repeat steps 1 to 4 in Auto search.
2Press a/bto select “Erase programme”,
and then press ENTER.
3Press c/dto select “Yes”, and then press
ENTER.
4Press a/b/c/dto select the channel you
want to erase, and then press ENTER.
5Press ENTER to erase the channel.
6Repeat the step 4 and 5 until all desired
channels are erased.
LC32M400X_EN_CS2_A5.indd 11LC32M400X_EN_CS2_A5.indd 11 6/9/2011 2:35:06 PM6/9/2011 2:35:06 PM

12
Active contrast
Automatically adjusts the contrast of an image according
to the scene. (On, Off)
3D-Y/C
Provides high quality images with minimal dot crawl and
cross colour noise. (On, Off)
NOTE
• 3D-Y/C is not selectable depending on the input signal
type.
• 3D-Y/C may not operate depending on the input signal
type or noisy input signal.
Monochrome
For viewing images in monochrome. (On, Off)
DNR (Digital Noise Reduction)
Reduces noise on screen and produces a clearer video
image. (Off, High, Low, Auto)
NOTE
• For resetting all Picture adjustment items to factory preset
values, press a/bto select “Reset”, press ENTER, press
c/dto select “Yes”, and then press ENTER.
Audio menu
–15
–15
[ 0 ]
L
[ 0 ]
+15
+15
R
[Off]
[ 0 ]
Audio ECO
STANDARD
Treble
Bass
Balance
Surround
Reset
Setup
HAudio adjustments
Selected item c button d button
Treble For weaker treble For stronger treble
Bass For weaker bass For stronger bass
Balance Decrease audio
from the right
speaker
Decrease audio
from the left
speaker
HSurround
When you set to “On”, you can enjoy surround
sound, the same as if you were in a movie theatre.
Selected item Description
On Makes it possible to enjoy natural,
realistic surround sound.
Off Outputs the normal sound.
NOTE
• For resetting all Audio adjustment items to the factory
preset values, press a/bto select “Reset”, press
ENTER, press c/dto select “Yes”, and then press
ENTER.
Picture menu
+16
+40
+30
+30
+30
+10
Picture Audio ECO
AV mode
OPC
Backlight
Contrast
Brightness
Colour
Tint
Sharpness
Advanced
Reset
[STANDARD]
[Off]
0
–16
+
+30
0
0
4
+
[
[
[
[
[
+16
[]
]
]
]
]
]
2
–30
–30
–30
–10
HOPC (Optical Picture Control) setting
You can set the TV to automatically adjust the
screen to suitable backlight brightness according to
the lighting conditions.
Selected item Description
On:Display Displays the OPC effect on the screen
while adjusting the brightness of the
screen.
On Automatically adjusts.
Off The brightness is fixed at the value set in
“Backlight”.
NOTE
• Make sure no object obstructs the OPC sensor, which
could affect its ability to sense surrounding light.
HPicture adjustments
Selected item c button d button
Backlight The screen dims The screen
brightens
Contrast For less contrast For more contrast
Brightness For less brightness For more brightness
Colour For less colour
intensity
For more colour
intensity
Tint Skin tones become
reddish
Skin tones become
greenish
Sharpness For less sharpness For more sharpness
HAdvanced
Colour temp. (Colour Temperature)
Adjusts the colour temperature to give the best white
image.
Selected item Description
High
Mid-High
Middle
Mid-Low
Low
White with bluish tone
White with reddish tone
Film mode
Automatically detects a film-based source (originally
encoded at 24/25 frames/second, depending on the
vertical frequency), analyses it then recreates each still
film frame for high-definition picture quality. (On, Off)
LC32M400X_EN_CS2_A5.indd 12LC32M400X_EN_CS2_A5.indd 12 6/9/2011 2:35:06 PM6/9/2011 2:35:06 PM

13
ECO menu
[3hr.]
No operation off
Ecology
Option
Power management
4
Setup
[Enable]
No signal off
ECO
HNo signal off
You can set the TV to automatically power off in
about 15 minutes after the TV goes into a state of
receiving no programme signals. (Enable, Disable)
• Five minutes before the power shuts down, the remaining
time displays every minute.
NOTE
• When a TV programme finishes, and the TV receives
signal input, this function may not operate.
HPower management (PC input mode only)
You can set the TV to automatically power off when
no image is displayed on PC.
Selected item Description
Off • No power management.
• Factory preset value.
Mode1 • If no signal inputs for approximately
8 minutes, the power shuts down.
• Even if you start using the PC and the
signal inputs again, the TV stays off.
• You can turns on manually by pressing
POWER.
Mode2 • If no signal inputs for approximately
8 seconds, the power shuts down.
• When you start using the PC and the
signal inputs again, the TV turns on
automatically.
• You can turns on manually by pressing
POWER.
HNo operation off
You can set the TV to automatically power off when
no TV operation is performed for more than 3 hours.
(30min., 3hr., Disable)
• Five minutes before the power shuts down, the remaining
time displays every minute.
HEcology
When set to “Yes”, the TV activates the following
power saving mode.
• “OPC” set to “On” (Page 12)
• “No signal off” set to “Enable” (Page 13)
• “Power management” set to “Mode1” (Page 13)
• “No operation off” set to “3hr.” (Page 13)
• “Quick start” set to “Off” (Page 15).
NOTE
• Ecology mode cannot be deactivated by selecting “No”.
Each setting must be changed individually to deactivate
Ecology mode.
Setup menu
Auto installation
Analogue programme setup
Digital Programme Setup
Input skip
Input label
4
4
Position
4
Text language
Identification
Reset
[On]
[Panorama]
[Off]
[West Europe]
Setup Option
HDMI auto view
WSS
4:3 mode
Quick start
Child lock
Digital setup
HChild lock (ATV and DTV input mode only)
Allows you to use a password to protect certain
settings from being accidentally changed.
Setting a password
1Repeat steps 1 to 2 in Menu operation.
2Press a/bto select “Child lock”, and then
press ENTER.
3If you already set the password, enter it here.
4Press a/bto select “Change password”,
and then press ENTER.
5Enter the 4-digit number as a password
using 0 — 9.
New password
– – – –
Reconfirm
Change password
Clear password
Parental rating
– – – –
Enter your new password. Use 4 digits
6Enter the same 4-digit number as in step 5
to confirm.
NOTE
• To view a locked channel (Lock setting in Analogue
programme setup “Manual adjust” is set to “On”), you
must enter a password. When you select a locked
channel, “Child lock has been activated” is displayed.
• Press ENTER to display the password input window.
Clearing the password
Allow you to clear your password.
1Repeat steps 1 to 3 in Setting a password.
2Press a/bto select “Clear password”, and
then press ENTER.
3Press c/dto select “Yes”, and then press
ENTER.
LC32M400X_EN_CS2_A5.indd 13LC32M400X_EN_CS2_A5.indd 13 6/9/2011 2:35:08 PM6/9/2011 2:35:08 PM

14
HInput label
You can assign each input source a label as you
prefer.
1Press INPUT to select the desired input
source.
2Press MENU and the MENU screen
displays.
3Press c/dto select “Setup”.
4Press a/bto select “Input label”, and then
press ENTER.
5Press a/b/c/dto select a desired
alphanumeric, and then press ENTER.
Repeat until the name is fully spelt out.
Maximum 6 alphanumeric can be input.
External equipment name settings
CLEAR
BACK
END
UVWXYZ+–._
KLMNOPQRST
0123456789
ABCDEFGHIJ
To exit, select END and then press ENTER.
If the wrong alphanumeric is entered, select
CLEAR to clear, and then press ENTER.
NOTE
• You cannot change labels if the input source is ATV and
DTV.
HPosition
For adjusting a picture’s horizontal and vertical
position.
Selected item
Description
H-Position Centres the image by moving it to the left
or right.
V-Position Centres the image by moving it up or
down.
Reset Reset position to factory preset values.
HHDMI auto view (HDMI input mode only)
Selected item
Description
Enable/
Disable
Set whether or not to use the Auto
Selection of WIDE MODE based on signal
recognition received from the HDMI
signal.
HWSS
WSS allows a television to switch automatically
among the different screen formats. (On, Off)
NOTE
•Try to set the WIDE MODE manually if an image does not
switch to the correct screen format. When the broadcast
signal contains no WSS information, the function will not work
even if enabled.
• Not available for COMPONENT, PC and HDMI signal.
Setup menu (Continued)
Parental rating
This function allows TV channels to be restricted.
It prevents children from watching violent or sexual
scenes that may be considered inappropriate.
1Repeat steps 1 to 3 in Setting a password.
2Press a/bto select “Parental rating”, and
then press ENTER.
3Press a/bto select your desired rating,
and then press ENTER.
When the country setting is set to “Australia”.
Selected item Description
General and
above (G)
Content is not offensive to most viewers.
Parental
guidance and
above (PG)
Content is such that parents may
not want their children to view the
programme.
Mature and
above (M)
Mature audience only. This programme
is specifically designed to be viewed by
adults and therefore may be unsuitable
for children under 15.
Mature adult
and above
(MA)
Mature adult only. Mature audience only.
This programme is specifically designed
to be viewed by adults and therefore may
be unsuitable for children under 15.
Adult
violence and
above
(AV)
Not for children under age 15. Strong
elements of sex and/or violence.
Restricted
and above (R)
Not for children under age 18. Strong
elements of sex and/or violence.
No block (–) Cancel the blocking.
When the country setting is set to “New Zealand” or
“Singapore”.
Block 5 age and below
Block 11 age and below
Block 13 age and below
Block 15 age and below
Block 17 age and below
Block 18 age and below
No block
HInput skip
This setting allows you to skip the HDMI or RGB
input on the input source selection operation.
INPUT1(HDMI)
INPUT2(HDMI)
INPUT3(HDMI)
INPUT7(RGB)
Yes No
Skip input selection of HDMI
LC32M400X_EN_CS2_A5.indd 14LC32M400X_EN_CS2_A5.indd 14 6/9/2011 2:35:09 PM6/9/2011 2:35:09 PM

15
Setup menu (Continued)
H4:3 mode
The WSS signal has 4:3 auto-switching that allows
you to select between Panorama and Normal.
Selected item Description
Panorama Wide image without side bars.
Normal Normal range keeping 4:3 or 16:9 aspect
ratio.
WSS signal 4:3 screen
4:3 mode “Panorama” 4:3 mode “Normal”
HQuick start
You can reduce the TV’s start-up time after turning
on the power with the remote control unit.
Selected item Description
On The TV quickly starts up from standby,
more of power consumption is required
during standby.
Off Power consumption is less than 1W.
HText language
Select from among 3 kinds of language: West
Europe, Arabic, Farsi.
NOTE
• Teletext can display only when it is sent by a network. Not
used to convert between languages.
HIdentification
You can check the current version of the software on
the screen.
HReset
If complex adjustments are made and the settings
cannot be restored to normal, you can reset the
settings to the factory preset values.
NOTE
• If you execute “Reset”, all the settings such as Picture,
Audio and Programme will be reset to the factory preset
values.
Option menu
Option
Input select
PC audio select
Output volume select
Digital audio output
Audio only
[HDMI1]
[Fixed]
Auto volume [On]
[PCM]
Digital setup
Game play time
4
Colour system
4
Fine sync.
4
DivX(R) Reg. Code
Version up
HInput select
For setting the signal type of external equipment.
Input source Selectable item
INPUT4 Auto, S-VIDEO, VIDEO
HPC audio select
When using the INPUT 7 terminal or HDMI 1
terminal, you must select which terminal uses the
AUDIO IN (R/L) jack for analogue audio input.
Selected item Description
HDMI1 When connecting devices (including a
PC) with DVI/HDMI cable to the INPUT
1 terminal and inputting analogue audio
signals from the AUDIO IN (R/L) jack.
INPUT7(RGB) When connecting a PC to the INPUT 7
terminal, and inputting analogue audio
signals from the AUDIO IN (R/L) jack.
NOTE
• When connecting devices (including a PC) with digital
audio signal by using HDMI-certified cable to INPUT 1
terminal, you must set to “INPUT7(RGB)”. If “HDMI1” is
set, there will be no sound output.
HOutput volume select
Allows you to select what controls the audio output.
Selected item Description
Fixed • Sound via speakers is adjusted with
VOL k/lon the remote control unit
or the TV.
• Sound via the AUDIO OUT terminal is
not adjustable and constantly outputs.
Variable • Sound via the AUDIO OUT terminal is
adjusted with VOL k/lon the remote
control unit or the TV.
• Sound via speakers is muted.
NOTE
• During “Output volume select” is set to “Variable”, all Audio
menu item cannot be adjusted.
HAuto volume
Different sound sources, fairly often do not have the
same volume level, for example the changing from
movie to the advertisements. Auto volume solves this
problem and equalises the volume levels. (On, Off)
LC32M400X_EN_CS2_A5.indd 15LC32M400X_EN_CS2_A5.indd 15 6/9/2011 2:35:09 PM6/9/2011 2:35:09 PM

16
NOTE
• Auto sync. is likely to succeed when an input PC image
has wide vertical stripes (e.g. pattern with high contrast
stripes, or cross-hatched).
It may fail when an input PC image is solid (low contrast).
Adjusting the PC image manually
Ordinarily you can easily adjust the picture as
necessary to change image position using Auto
sync. In some cases, however, manual adjustment is
needed to optimise the image.
Selected item Description
H-Position Centres the image by moving it to the left
or right.
V-Position Centres the image by moving it up or
down.
Clock Adjusts when the image flickers with
vertical stripes.
Phase Adjusts when characters have low
contrast or when the image flickers.
NOTE
• For resetting all adjustment items to the factory preset
values, press a/bto select “Reset”, press ENTER, press
c/dto select “Yes”, and then press ENTER.
• Images may not be displayed properly depending on the
settings and/or input signals.
Input signal
• Some input signals may have to be registered
manually to display properly.
• The pairs of input signals (resolutions) in the list
below are not distinguishable when received.
In such case, you have to set the correct signal
manually. After setting once, it will display when the
same signal (resolution) is input again.
1280 g768 1360 g768
HDivX(R) Reg. Code
Please see USB Media Player on page 27.
HVersion up
This function is only for service personnel to use for
software updates.
Option menu (Continued)
HDigital audio output
This function allows you to select your favourite
audio output system.
Selected item Description
Dolby Digital Dolby Digital audio will be output when
there is a Dolby Digital audio signal. The
output will be in PCM when there is no
Dolby Digital audio signal.
PCM The optical output format is normally in
PCM.
HAudio only
When listening to music from a music programme,
you can set the display off and enjoy audio only.
Selected item Description
On Audio is output without screen image.
Off
Both screen images and audio are output.
NOTE
• When you make operations that change the picture on the
TV such as by changing the input source, the Audio only
function is set to “Off”.
HGame play time
This function displays the elapsed game time so you
do not lose track of the time.
To display the elapsed time, select “GAME” under “AV
mode” for the input mode of the terminal connected
to the game console before starting the game.
Selected item Description
On The elapsed time is displayed every
30 minutes when you switch to GAME
mode in external input mode.
Off Hides the time.
HColour system
You can change the colour system to one that is
compatible with the image on the screen. (Auto,
PAL, SECAM, NTSC 3.58, NTSC 4.43, PAL-60)
NOTE
• If “Auto” is selected, colour system for each channel is
automatically set. If an image does not display clearly,
select another colour system (e.g. PAL).
• “Colour system” is selectable only when inputting an
S-VIDEO or composite signal.
HFine sync. (PC input mode only)
Adjusting the PC image automatically
Auto sync.
This function enables the screen to be automatically
adjusted to its best possible condition when the
analogue terminals of the TV and PC are connected
with a commercially available RGB cable, etc.
LC32M400X_EN_CS2_A5.indd 16LC32M400X_EN_CS2_A5.indd 16 6/9/2011 2:35:09 PM6/9/2011 2:35:09 PM

17
HSwitching subtitle languages (DVB Subtitle)
Each time you press [on the remote control,
the subtitle switches when the broadcast contains
subtitle information.
Set “Hearing impaired” to “On”
(Hearing impaired) 1st Language
2nd Language
Off ••••••••
Set “Hearing impaired” to “Off”
1st Language 2nd Language
(Hearing impaired)
Off ••••
NOTE
• This function is valid only if broadcaster is transmitting
multilingual subtitles.
HTime zone
This function enables you to select your local time
zone.
1Press MENU and the MENU screen
displays.
2Press c/dto select “Digital setup”.
3Press a/bto select “Time zone”, and then
press ENTER.
4Press c/dto select the desired time zone
and then press ENTER.
• This function lets you select the right time zone in case the
time displayed in the EPG does not match the local time of
your area.
HSummer time
When the Summer time is set to “On”, the Standard
Time is plus one hour. (Auto, On, Off)
HOAD setup
• This function is for automatically download the
data for the version update software over digital
broadcasts when the “OAD setup” is set to “On”.
• To download, follow the instructions when the
download message appears during a digital
broadcast.
CAUTION
• Do not disconnect the AC cord when the software
upgrade is in progress, as this may cause the
upgrade to fail. If problem arises ask a qualified
service personnel before the software upgrade
period expires.
Digital setup menu
Option
Audio language
Subtitle language
Hearing impaired
Time zone
Summer time
OAD setup
[Off]
[Off]
[Off]
Digital setup
HSelecting the language
Set up to two preferred multi audio languages to
display if the audio languages are available.
1Press MENU and the MENU screen
displays.
2Press c/dto select “Digital setup”.
3Press a/bto select “Audio language”, and
then press ENTER.
4Press a/bto select “1st Language” or “2nd
Language”, and then press ENTER.
5Press a/b/c/d to select the desired
language, and then press ENTER.
NOTE
• If audio for the selected languages is not included in
a received broadcast, audio will not be output for that
language.
HDisplaying subtitles for the hearing impaired
You can display subtitles for the hearing impaired in
the Teletext broadcast if the subtitle languages are
available.
1Press MENU and the MENU screen
displays.
2Press c/dto select “Digital setup”.
3Press a/bto select “Subtitle language”,
and then press ENTER.
4Press a/bto select “1st Language” or “2nd
Language”, and then press ENTER.
5Press a/b/c/d to select the desired
language, and then press ENTER.
NOTE
• If subtitles for the selected language are not included in
a received broadcast, subtitles will not be shown for that
language.
LC32M400X_EN_CS2_A5.indd 17LC32M400X_EN_CS2_A5.indd 17 6/9/2011 2:35:09 PM6/9/2011 2:35:09 PM

18
Info
While watching DTV you can check the extended
programme information on the screen using INFO
on the remote control.
Input Info.
ABC2
People Dimensions
15:30 - 16:00 (30min.)
[Mon.] 18 Jun 2007
Video : 576i
Audio : MPEG
Age : G
7
6
5
1
4
3
2
General INFO screen
1Station name
2Title
3Date
4Time for the current programme
5Video system
6Audio system (Dolby Digital or MPEG)
7Parental rating
• If there is more information, pressing a/ballows you to
go to the next page or return to the previous page.
• You can cancel this info by pressing INFO or EXIT.
Programme Guide
You can check the current schedule of DTV events
and view detailed information about current events.
1Press GUIDE to display the programme
guide list.
2Press a/bto display your desired
programme, and then press ENTER.
• When you press ENTER, the TV jumps to the
channel.
Channel list [Mon.] 18/6 2007 15:30
020 ABC HDTV
Dorothy The Dinosaur
002 ABC TV Sydney
020 ABC HDTV
021 ABC2
: Page up/down
: Select channel : Enter
: Program information
: Back : Exit
022 ABC TV
Dorothy The Dinosaur
Gardening Australia
Dorothy The Dinosaur
13:23 - 13:30
R
ENTER MENU
RETURN
3Press Rto view programme information.
4Press RETURN or MENU to exit.
LC32M400X_EN_CS2_A5.indd 18LC32M400X_EN_CS2_A5.indd 18 6/9/2011 2:35:09 PM6/9/2011 2:35:09 PM
Table of contents
Other Sharp TV manuals

Sharp
Sharp LC-40FI5122E User manual

Sharp
Sharp LC-50LE650V Manual

Sharp
Sharp LC-43SFE7331E User manual

Sharp
Sharp 14V-R70M User manual

Sharp
Sharp LC-43P3000U+ User manual

Sharp
Sharp LC-60UI7652K Technical manual

Sharp
Sharp 20PL84 User manual

Sharp
Sharp 29H-FX3P User manual

Sharp
Sharp 72GF-66E User manual

Sharp
Sharp 42CG2K Technical manual

Sharp
Sharp LD-26SH1U User manual

Sharp
Sharp Aquos LC 22SV2U User manual

Sharp
Sharp 34N-WF5H User manual

Sharp
Sharp 28LW-92H User manual

Sharp
Sharp LC-32HI5232E User manual

Sharp
Sharp 27J-S100 User manual

Sharp
Sharp 21N52-E1 User manual

Sharp
Sharp LC-32BD6X User manual

Sharp
Sharp ES-M1904I0 User manual

Sharp
Sharp R771M-006 User manual