Quick Start Set Up Guide
For information on using the TV’s features, please refer to the operating Instructions.
Quick & easy guide for setting up your TV
What is included in the box
Using the remote control
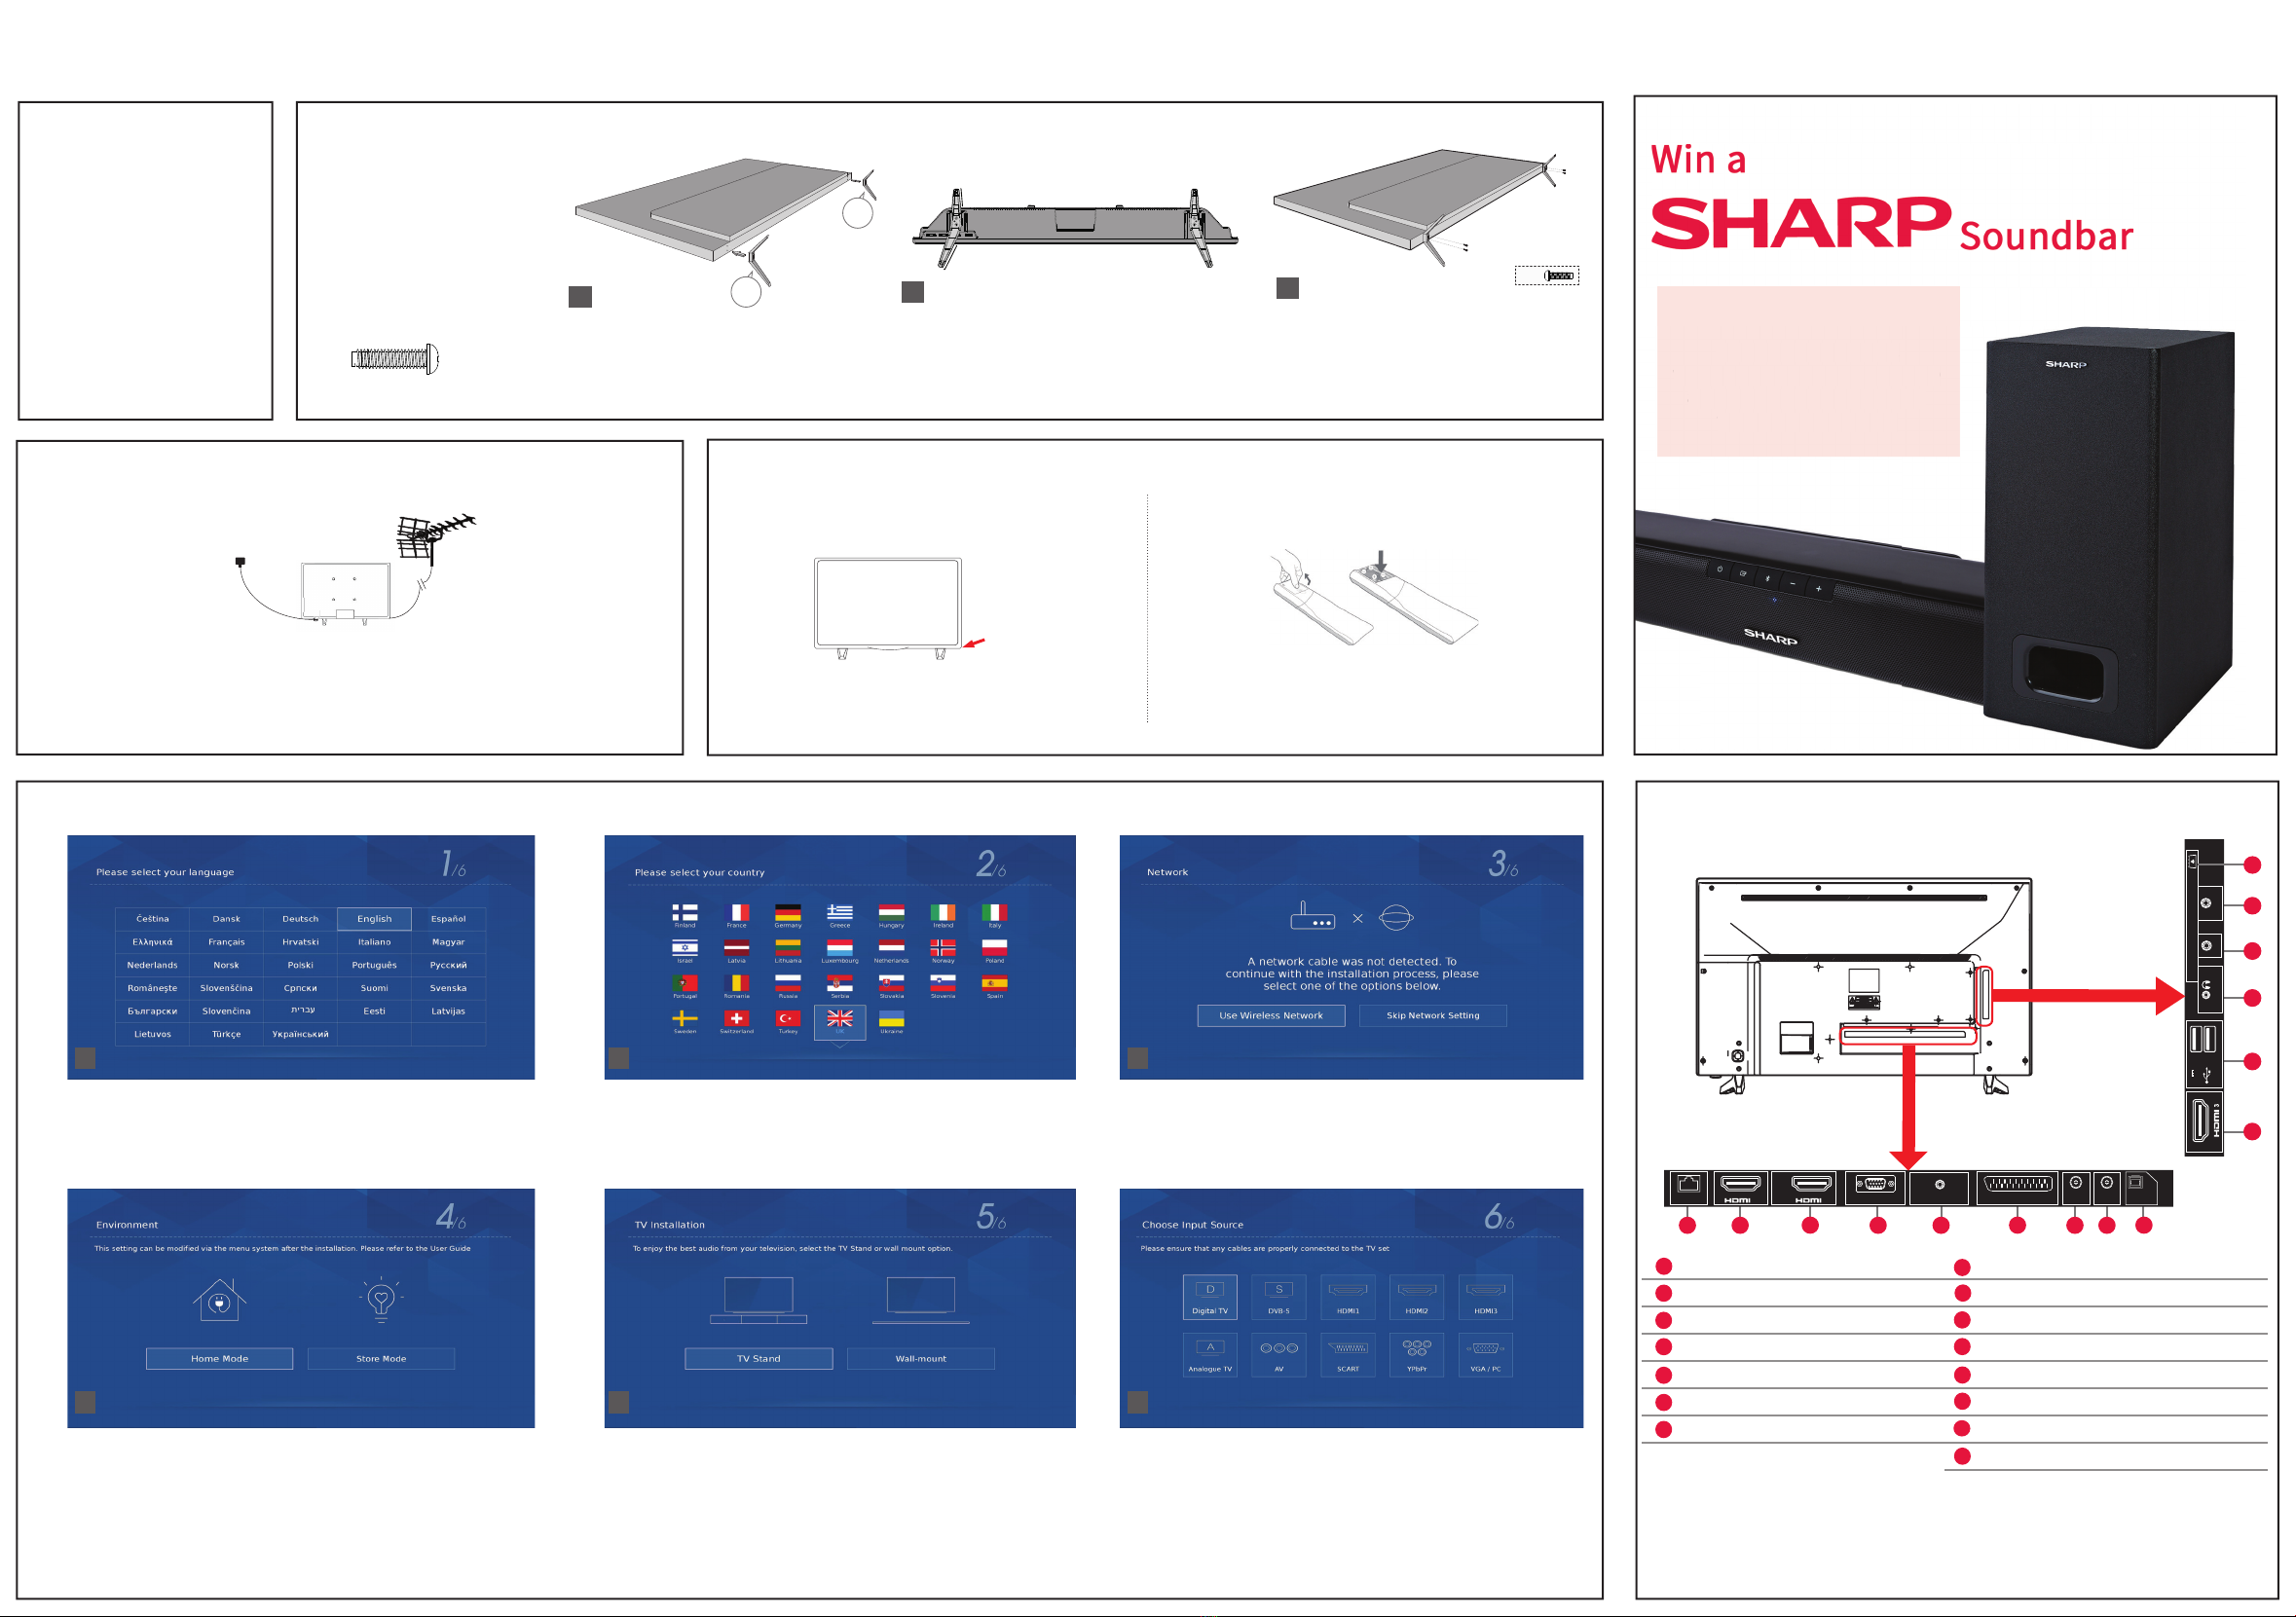
Setting up the TV for the rst time - including attaching the stand
Connecting other devices to the Television
Need help setting up or using your TV?
Please contact the UK & ROI Helpline*
Telephone UK 0330 024 0803 or ROI 01443 3323
Online support at: www.umc-uk.co.uk
*Calls to 0330 numbers are charged at standard call rates and are included as part of any bundled minutes with your
phone provider.
Calls to the ROI number are charged at the local call rate.
The telephone opening hours are Monday to Friday 8.30am to 6pm, Saturday 9am – 5pm.
Bank Holidays - 10am to 4pm
Closed Christmas and New Years day
Model Numbers
LC-40FG2241KF
LC-40FG5241KF
LC-40FG5242KF
LC-40FG5341KF
LC-40FG5342KF
Trademark Sharp
Model ID LC-40FG2241KF
LC-40FG5241KF
LC-40FG5242KF
LC-40FG5341KF
LC-40FG5342KF
Energy eciency class A+
Visible screen size (diagonal) 102 cm / 40 inches
On-mode power consumption 45.0 W
Annual energy consumption *1 66 kWh
Standby power consumption *2 <0.50 W
O mode power consumption n/a
Screen resolution 1920 (H) x 1080 (V)
*1: Energy consumption XYZ kWh per year, based on the power consumption of the television operating 4
hours per day for 365 days. The actual energy consumption will depend on how the television is used.
*2: When the TV is turned o with the remote control/standby button and no function is active.
LC-40FG2241KF
LC-40FG5241KF
LC-40FG5242KF
LC-40FG5341KF
LC-40FG5342KF
RF 75 ohm Antenna / Analog / DVB / Satellite *
Inputs 3 x HDMI, 2 x USB, 1 x SCART,
1 x RJ45 LAN/Ethernet, 1 x Mini Component/YPbPr,
1 x Mini AV IN - Composite Video/CVBS and L/R Audio shared for Composite Video and
Component/YPbPr,
1 x VGA/PC, 1 x 3.5mm jack for PC audio input
Sound Outputs 1 x Digital Optical Audio output, 1 x 3.5mm Headphone
Speaker** / Amplier
Watts (RMS)
2 x 10 / 2 x 8
Voltage and power
consumption
AC 220V ~ 240V; 50Hz
45/65/80W (home mode/standard/max)
(<0.5W in Standby)
Dimensions including
stand (mm)
921W x 576H x 199D
Net weight (Kgs) 8.0
Wall Mounting VESA 200 x 300 (mm)
Using the remote control
Technical Specication
Please save your box/packaging as you will need this in the event of warranty/service repair or support.
We are unable to carry out warranty/service if you are unable to package it correctly. The safest way to
package your item in the event of warranty/service repair is in it’s original box/packaging.
**Built-in Harman Kardon speaker systems (Full-range speaker and tweeter).
Harman Kardon is trademark of HARMAN International Industries, Incorporated, registered in the United States and/or other countries.
789
0
123
456
TV
GUIDE
VOL CH
SOURCE
SOUND
PICTURE
ON/OFF
TEXT
SUBTITLE
INFO
TV
BACK
FAV
APPS
GOTO
A-B
3D
REPEAT
REC LIST
PVR/MEDIA
EXIT
MENU
OK
Freeview Play
1
4
2
3
STANDBY - Switch on the TV when in standby or vice versa.
FREEVIEW PLAY - Access the Freeview Play app.
NUMBER BUTTONS - 0–9 to select a TV channel directly.
MUTE - Mute the sound or vice versa.
TV GUIDE - Opens the 7 day TV guide (digital TV mode).
VOL (+/-) - To increase/decrease the sound level.
PICTURE - Scrolls through picture mode options.
SOUND- Scrolls through sound mode options.
SOURCE - To display the input/source menu.
CH (+/-) - To increase or decrease the channel being watched.
MENU - To display OSD menu.
EXIT - To exit all menus.
- Allows you to navigate the on-screen menus and adjust
the system settings to your preference.
BACK - To go back a previous step.
FAV - To display favourites menu.
INFO - Press once for now/next channel information.
- Press twice for information about the current programme.
TEXT - To enter/exit Text.
SUBTITLE - To switch the dialogue at the bottom of the screen (on/off).
TV - To switch to Digital Channels.
YOUTUBE - Access the Youtube App.
NETFLIX - Access the Netflix App.
APPS - Access the APPS menu.
RECORD - Access the USB record function.
REC LIST - Opens the list of previously recorded items.
GOTO - To go to a specific chapter.
A-B - Press once to set point, press a second time to return to point.
ANGLE/3D - Select different angle of DVD.
REPEAT - To repeat playback.
- To restart the current chapter
- To advance forward to the next chapter
- To stop the playback/Eject Disc
(To EJECT the disc press/hold the button for 4 seconds)
- To play in fast rewind mode
- To play in fast forward mode
- To play/pause
Key
3
2
1
For models with integrated DVD players.
For models with PVR Function.
For models with USB Playback.
For models with 3D functions.
4
Win a
Soundbar
Register your manufacturers guarantee online within 14 days of purchase at
www.registertoday.co.uk/sharp and enter into a prize draw to
Terms and conditions apply. Online registration only.
y.
Sky Remote Code
If you wish to use your Sky remote to operate the TV’s basic
functions, you will need a Sky remote control (Revision 9 or later) and
you will need to program it with the code 2134. If you wish to use
your Sky Q remote to operate the TV’s basic functions, you will need
to program it with the code 4170.
*The satellite input is for the LC-40FG5242KF and LC-40FG5342KF models only.
Freeview Play brings together live TV viewing
with ‘‘catch up’’ TV services such as BBC iPlayer,
ITV player, More4 and Demand 5. The Freeview
Play Explore app features a carousel of genres to
select from when searching for programmes, such
as sport, comedy, dramas and soaps, etc. Content
is made up from recommendations of the major
broadcasters and offers an
alternative means of searching.
Note that to use the full functionality of Freeview
Play your set must be connected
to the internet.
To receive Freeview channels, in particular
Freeview HD channels, you will need a
Digital TV aerial and be in a good
Freeview coverage area.
You can check coverage for your postcode
at www.freeview.co.uk.
Please note that any Freeview HD channels
found during tuning will be placed in
channel positions above 100. For
example, 101 (BBC1 HD) 102 (BBC2 HD) etc.
Re-packing the Television
If you need help setting up your TV or you require any technical support, in the rst instance please
contact the helpline.
In the unlikely event you need to return the product to the store/retailer from where it was purchased or
you need warranty/service support, please ensure you package the item adequately in order that it does
not get damaged.
The best way to package it is in the original box.
Please take the following steps:
1) Remove the stand/feet from the TV.
2) Put all of the accessories that came with the TV in the box ensuring they are placed at the back of the
TV. (not near the screen/panel side) Note: In the event of warranty/service support, you do not need to
send the accessories/stand/feet.
3) Ensure the power cable / plug is located at the back of the TV (not on the screen/panel side)
4) Never put anything in the box on the screen/panel side of the TV as it’s likely to damage it.
1. 2.
1. Plug
2. Accessories pack
TV Panel/Screen
Both the plug and accessories pack must be
placed at the rear of the TV.
Rear of TV
LC-40FG5241KF SHA-QSW-0024.indd 1LC-40FG5241KF SHA-QSW-0024.indd 1 17/07/2018 15:07:1217/07/2018 15:07:12


 User manual")