Sharp Aquos LED LC-32LE550M User manual

1 2
Printed in Malaysia
TINS-F767WJZZ
13P01-MA-NF
Dear SHARP customer
Thank you for your purchase of the SHARP LCD colour TV product. To ensure safety and many
years of trouble-free operation of your product, please read the Important Safety Precautions
carefully before using this product.
Important Safety Precautions
• Stand base must be attached to prevent the TV set from falling down and cause injuries.
• Cleaning — Unplug the AC cord from the AC outlet before cleaning the product. Use a soft damp cloth to clean the
product. Do not use liquid cleaners, aerosol cleaners or chemical cloth to clean it, as such materials may damage the
product.
• Water and moisture — Do not use the product near water, such as bathtub, washbasin, kitchen sink, laundry tub,
swimming pool and in a wet basement.
• Do not place vases or any other water-filled containers on this product.
The water may spill onto the product causing fire or electric shock.
• Stand — Do not place the product on an unstable cart, stand, tripod or table. Doing so can cause the product to fall,
resulting in serious personal injuries as well as damage to the product. Use only a cart, stand, tripod, bracket or table
recommended by the manufacturer or sold with the product. When mounting the product on a wall, be sure to follow the
manufacturer’s instructions. Use only the mounting hardware recommended by the manufacturer.
• When relocating the product placed on a cart, it must be moved with utmost care. Sudden stops, excessive force and
uneven floor surface can cause the product to fall from the cart.
• Ventilation — The vents and other openings in the cabinet are designed for ventilation. Do not cover or block these vents
and openings since insufficient ventilation can cause overheating and/or shorten the life of the product. Do not place the
product on a bed, sofa, rug or other similar surface, since they can block ventilation openings. This product is not designed
for built-in installation; do not place the product in an enclosed place such as a bookcase or rack, unless proper ventilation
is provided or the manufacturer’s instructions are followed.
• The LCD panel used in this product is made of glass. Therefore, it can break when the product is struck forcefully or with a
sharp object. If the LCD panel is broken, be careful not to be injured by broken glass.
• Heat sources — Keep the product away from heat sources such as radiators, heaters, stoves and other heat-generating
products (including amplifiers).
• To prevent fire, never place any type of candle or naked flames on the top or near the TV set.
• To prevent fire or shock hazard, do not place the AC power cord under the TV set or other heavy items.
• Do not place heavy objects on this product or stand on it. Doing so could cause injury if the product overturns. Take
special care near children and pets.
• The LCD panel is a very high technology product with 1,049,088 pixels, giving you fine picture details.
Due to the very large number of pixels, occasionally a few non-active pixels may appear on the screen as a fixed point of
blue, green or red.
This is within product specifications and does not constitute a fault.
• Precautions when transporting the TV
When transporting the TV, never carry it by holding or otherwise putting pressure onto the display. Be sure to always carry
the TV by two people holding it with two hands — one hand on each side of the TV.
• Do not display a still picture for a long time, as this could cause an afterimage to remain.
• Install the product on the place where the AC cord can be unplugged easily from the AC outlet, or from the AC INPUT
terminal on the rear of the product.
Trademarks
• The terms HDMI and HDMI High-Definition Multimedia Interface, and the HDMI Logo are trademarks or registered
trademarks of HDMI Licensing LLC in the United States and other countries.
• Manufactured under license from Dolby Laboratories. Dolby and the double-D symbol are trademarks of Dolby
Laboratories.
• DivX®, DivX Certified® and associated logos are trademarks of Rovi Corporation or its subsidiaries and are used under
license.
• ABOUT DIVX VIDEO: DivX® is a digital video format created by DivX, LLC, a subsidiary of Rovi Corporation. This is an
official DivX Certified® device that plays DivX video. Visit divx.com for more information and software tools to convert
your files into DivX videos.
• ABOUT DIVX VIDEO-ON-DEMAND: This DivX Certified® device must be registered in order to play purchased DivX
Video-on-Demand (VOD) movies. To obtain your registration code, locate the DivX VOD section in your device setup
menu. Go to vod.divx.com for more information on how to complete your registration.
LC-32LE550M
LCD COLOUR TELEVISION
OPERATION MANUAL
Supplied accessories
Remote control unit “AAA” size battery (g2)
Operation manual Stand unit
Stand base Screws (g4)
Contents
Page
Supplied accessories.......................... 1
Dear SHARP customer ....................... 2
Important Safety Precautions ............ 2
Trademarks.......................................... 2
Attaching the stand ............................. 3
Antenna connection ............................ 3
Connecting external devices.............. 4
Remote control unit ............................ 5
Part names ........................................... 6
Turning the TV on/off .......................... 6
Initial auto installation......................... 7
Selecting a preset Picture mode ....... 7
Menu operation.................................... 7
Channel menu...................................... 7
Page
Picture menu........................................ 8
Sound menu......................................... 8
Time menu............................................ 9
Lock menu ........................................... 9
Setup menu........................................ 10
Screen menu
(PC input mode only) ........................ 11
Colour adjustment and still image... 11
ECO mode .......................................... 11
Teletext function................................ 12
PC compatibility chart ..................... 12
USB Media Player.............................. 12
Appendix ............................................ 15
Specifications .................................... 16
LC-32LE550M _EN767.indd 1LC-32LE550M _EN767.indd 1 12/5/2012 10:12:56 AM12/5/2012 10:12:56 AM

3 4
Attaching the stand
• Before attaching (or detaching) the stand, unplug the AC cord from the AC outlet.
• Before performing work spread cushioning over the base area to lay the TV on. This will prevent it from
being damaged.
1Confirm the screws supplied with the TV.
DIGITAL
AUDIO
OUTPUT
INPUT2
INPUT1
AUDIOIN
(R/L) INPUT6
PC
ANTENNA
1
3
3
6
6
ANT
Soft cushion
Screw driver
Screw
Stand base
guide pins
Guide pin holes Table edge
Screws (m4)
(used in step 3)
2Insert the stand base guide pins to the
stand holes on the rear of the TV. (1)
• Make sure the symbol on the stand base is
parallel with the triangle symbol located at
the back of the TV.
3Insert and tighten the 4 screws into the 4 holes
on the rear of the stand base. (2)
NOTE
•
To detach the stand, perform the steps in reverse order.
•
The TV position setting is set to 7˚ backward after attaching
the stand.
•
Do not remove the plastic wrap before attaching the stand
base to protect it from scratches.
•
The bottom area of the set (curvy area) must be beyond the
table’s edge to prevent the TV from damage.
Antenna connection
Connecting the antenna cable
To enjoy a clearer picture, use an outdoor antenna.
ANT
DIGITAL
AUDIO
OUTPUT
INPUT2
INPUT1
AUDIOIN
(R/L) INPUT6
PC
ANTENNA
33
300-ohm twin-
lead flat feeder
(not supplied)
VHF/UHF
antenna
VHF/UHF
antenna
or
75-ohm coaxial
cable (round cable)
(not supplied)
Standard DIN45325 plug (IEC 169-2)
75-ohm
impedance
converter
(not supplied)
To antenna terminal
If your outdoor antenna uses a 75-ohm coaxial
cable with a standard DIN45325 plug (IEC 169-
2), plug it into the antenna jack at the rear of the
set.
If your outdoor antenna uses a 300-ohm twin-
lead flat feeder, connect a 300-ohm to 75-ohm
impedance converter and plug it into the antenna
jack at the rear of the set.
CAUTION
• TO PREVENT RISK OF ELECTRIC SHOCK, DO NOT TOUCH UN-INSULATED PARTS OF ANY CABLES WITH
THE AC CORD CONNECTED.
NOTE
•
Place the TV close to the AC outlet, and keep the power plug within reach.
Connecting external devices
You can connect many types of external equipment to your TV, like a VCR, game console, camcorder, DVD
player, Digital TV STB (Set Top Box) and PC. To view external source images, select the input source from
INPUT on the remote control unit or INPUT on the TV.
CAUTION
• To protect all equipment, always turn off the TV before connecting to a VCR, game console, camcorder, DVD player, Digital
TV STB (Set Top Box), PC or other external equipment.
• Refer to the relevant operation manual (VCR, DVD player, etc.) carefully before making connections.
Connecting a VCR, game console or camcorder
A VCR, game console, camcorder and some other audiovisual equipment can be conveniently connected
using the INPUT 4 or INPUT 5 terminals.
When using component cable
(commercially available)
When using composite cable
(commercially available)
ANT
DIGITAL
AUDIO
OUTPUT
INPUT2
INPUT1
AUDIOIN
(R/L) INPUT6
PC
ANTENNA
33
4
INPUT 4
R-AUDIO-L Y PB(CB)PR(CR)
VCR/Game console/Camcorder
ANT
DIGITAL
AUDIO
OUTPUT
INPUT2
INPUT1
AUDIOIN
(R/L) INPUT6
PC
ANTENNA
33
INPUT 5
R-AUDIO-L VIDEO
5
VCR/Game console/Camcorder
Connecting a DVD player/Digital TV STB (Set Top Box)
You can use the INPUT 1/INPUT 2/INPUT 3 (HDMI), INPUT 4 terminals when connecting to a DVD player/
Digital TV STB (Set Top Box) and other audiovisual equipment.
When using HDMI-certified cable
(commercially available)
When using component cable
(commercially available)
ANT
DIGITAL
AUDIO
OUTPUT
INPUT2
INPUT1
AUDIOIN
(R/L) INPUT6
PC
ANTENNA
33
INPUT 1
AUDIO IN
(R/L)
1
DVD player/Digital TV
STB (Set Top Box)
ANT
DIGITAL
AUDIO
OUTPUT
INPUT2
INPUT1
AUDIOIN
(R/L) INPUT6
PC
ANTENNA
33
4
INPUT 4
R-AUDIO-L Y PB(CB)PR(CR)
DVD player/Digital TV STB (Set Top Box)
Connecting a PC Using Digital Audio Output
You can use the INPUT 6 PC terminals when
connecting to a PC of ANALOGUE RGB terminal.
ANT
DIGITAL
AUDIO
OUTPUT
INPUT2
INPUT1
AUDIOIN
(R/L) INPUT6
PC
ANTENNA
33
AUDIO IN
(R/L)
INPUT 6
PC
ANALOGUE
6
PC
ANALOGUE RGB
It is possible to output audio through the DIGITAL
AUDIO OUTPUT terminal. PCM audio outputs from
the terminal.
ANT
DIGITAL
AUDIO
OUTPUT
INPUT2
INPUT1
AUDIOIN
(R/L)INPUT6
PC
ANTENNA
33
DIGITAL
AUDIO
OUTPUT
Optical fibre cable
(commercially
available)
To optical digital input of external audio devices
NOTE
•
The DIGITAL AUDIO OUTPUT terminal usually outputs the same audio from the speakers. (The audio of the content you are
viewing is output from the terminal.)
• The DIGITAL AUDIO OUTPUT terminal does not output some signals, depending on devices and software.
• The DIGITAL AUDIO OUTPUT terminal does not output any signal during HDMI digital input.
LC-32LE550M _EN767.indd 2LC-32LE550M _EN767.indd 2 12/5/2012 10:12:56 AM12/5/2012 10:12:56 AM

5 6
Remote control unit
1
2
5
7
8
9
11
6
3
4
12
13
14
15
16
17
18
10 19
20
8 e(Mute)
Press
esMutes sound.
Press
eagain sRestores sound.
Mute will be cancelled after 30 minutes. However, the TV
will not suddenly output loud sound as the volume level will
be set to 0 automatically. Increase the volume level by
pressing VOL k.
9 a/b/c/d(Cursor)
Select a desired item on the setting screen.
ENTER
Execute a command.
10 WIDE
Change the wide image mode. (See page 10.)
11 Colour (Red/Green/Yellow/Blue)
The coloured buttons are correspondingly used to select the
coloured items on the screen.
TELETEXT mode: Select a page. (See page 12.)
12 ECO
Reduce overall power consumption based on user
preferences. (See page 11.)
13 COLOUR ADJ. (FREEZE)
Freeze a motion picture on the screen and adjust the colour
tone of the still image. (See page 11.)
14 PHOTO
Display your pictures directly on the TV screen. (See page 13.)
15 INPUT (INPUT SOURCE)
Select an input source.
16 CHr/CHs
TV input mode: Select the channel.
(CHr) Increase the channel number.
(CHs) Decrease the channel number.
TELETEXT mode: Select a page. (See page 12.)
17 MENU
Display the menu screen.
18 MPX
Select the sound multiplex mode.
19 RETURN
MENU mode: Return to the previous menu screen.
20 m(TELETEXT), k(Reveal hidden for TELETEXT),
3(Hold), [(SUBTITLE for TELETEXT), 1(Subpage)
Use for TELETEXT mode. (See page 12.)
1 POWER (STAND BY/ON)
To switch the power on and off. (See page 6.)
2 DISPLAY
Display the channel or input information.
3 SLEEP
Set the Sleep timer. (See page 9.)
10 min. 20 min. 30 min. 60 min.
90 min.120 min.180 min.
240 min.
Off
4 0 – 9
Set the channel.
TELETEXT mode: Set the page. (See page 12.)
5 A(Flashback)
Press
Ato return to the previous selected channel
or external input mode.
6 P-MODE
Select a video setting. (See page 7.)
7 VOLk/VOLl
Set the volume.
(VOLk) Increase the volume.
(VOLl) Decrease the volume.
Inserting the batteries
Before using the TV for the first time, insert two “AAA” size batteries (supplied). When the batteries become
depleted and the remote control fails to operate, replace the batteries with new “AAA” size batteries.
1Open the battery cover. 2Insert the two supplied “AAA” size
batteries.
3Close the battery cover.
• Place batteries with their terminals corresponding to
the (e) and (f) indications in the battery compartment.
CAUTION
• Batteries (battery pack or batteries installed) shall not be exposed to excessive heat such as sunshine, fire or the like.
Part names
TV (Front)
POWER indicator
Light off Power off.
Lighted (Red) The TV is in stand by mode.
Lighted (Green) The TV is on.
Remote control sensor
TV (Rear)
ANT
DIGITAL
AUDIO
OUTPUT
INPUT2
INPUT1
AUDIOIN
(R/L) INPUT6
PC
ANTENNA
33
DIGITAL
AUDIO
OUTPUT
INPUT 2
INPUT 1
AUDIO IN
(R/L) INPUT 6
INPUT 5
R-AUDIO-L
R-AUDIO-L R-AUDIO-L VIDEO
Y
AUDIO OUT
INPUT 4
PC
ANTENNA
1
3
6
4
5
10
9
6
12
11
87
1
2
3
6
4
5
1
2
3
4
5
14
13
1POWER (On/Off) button
2MENU button
3INPUT button
4Channel up (r)/down (s) buttons
5Volume up (e)/down (f) buttons
6 INPUT 1*/INPUT 2/INPUT 3 (HDMI)
terminal
7INPUT 4 terminals
8AUDIO OUT terminals
9INPUT 5 terminals
10 Antenna input terminal
11 INPUT 6 PC terminal*
12 DIGITAL AUDIO OUTPUT terminal
13 USB terminal**
14 Headphone jack ( 3.5 mm)
• The speakers do not output volume
when headphones are plugged in.
* The INPUT 1 and INPUT 6 PC terminals can both use the same analogue audio input terminal. However, the proper item
must be selected in the “HDMI audio select” menu. (See page 10.)
** USB terminal use for USB Media Player. (See page 12.)
• The illustrations in this operation manual are for explanation purposes and may vary slightly from the actual operations.
Turning the TV on/off
Turning on/off the power Stand by mode
• To turn on the power
Press POWER on the TV. (After a few seconds, an image
appears with sound.)
• To turn off the power
Switch it off by pressing POWER on the TV.
• To stand by mode
If the TV is switched on, you can switch it to stand by by
pressing POWER on the remote control.
• Switching on from stand by
From stand by, press POWER on the remote control.
NOTE
• If you are not going to use this TV for a long period of time, be sure to remove the AC cord from the AC outlet.
• Minor power is consumed when the unit is in stand by mode.
LC-32LE550M _EN767.indd 3LC-32LE550M _EN767.indd 3 12/5/2012 10:12:57 AM12/5/2012 10:12:57 AM

7 8
Channel menu (Continued)
Colour system
Select the optimum colour system to receive. (PAL,
SECAM, NTSC 3.58, NTSC 4.43, PAL 60).
Sound system
Select the optimum sound system (Broadcasting
system) to receive. (BG, DK, I, M).
Fine-tune
Start searching from current channel.
• Instead of pressing c/dto adjust the frequency, you
can set by directly entering the frequency number of the
channel with 0 — 9.
Search
Tune the frequency of the stored channel to your
desired position.
• Adjust while checking the background picture as a
reference.
HProgramme edit
Use this menu to set up a channel individually.
1Repeat steps 1 and 2 in Auto tuning.
2Press a/bto select “Programme edit”, and
then press ENTER.
3If you have already set the password, enter it
here.
• See page 9 for setting a password.
4Press a/b
to select the channel you want to
edit, and then press R, G, Y, B on the remote
control if necessary or
press RETURN to MENU
screen
.
Delete
Channels can be erased individually.
Press Rto erase the selected channel.
Label
To enter the name of the channel. Maximum 5
alphanumeric can be input. Press Gto start labelling.
• Pres
s
a/b
: To select a desired alphanumeric.
•
P
r
ess
c/d
: To move to the desired alphanumeric
position.
Press ENTER to save.
Move
Channel positions can be moved freely.
Press Yto select the channel you want to move.
Press a/bto move it to the desired position, and
then press Y
again or ENTER
to save.
Skip
Channels with “Skip” set to “ ” are passed over
when using CHr/seven if selected while
watching the image from the TV.
Press Bto skip the selected channel.
Press Bagain to cancel the skip.
Initial auto installation
When the TV powers on for the first time after
purchase, the initial auto installation wizard appears.
Follow the menus and make the necessary settings
one after another.
1Press POWER to turn on the TV.
2The language screen appears, and then press
ENTER.
Press c/dto select “Home” or “Store”, and
then press ENTER.
Home:
• “Standard” will be the default value for the “Picture
mode” setting.
Store:
• “Dynamic” will be the default value for the “Picture
mode” setting. If the “Picture mode” is changed,
the TV will automatically switch back to “Dynamic”
when there is no further change to TV setting for
30 minutes.
• The confirmation screen appears only when selecting
“Store”.
Press
c/d
to select “Yes” or “No”.
• To change the Store mode to Home mode, please
refer to page 11 to reset the unit.
• Auto installation will be executed.
• You do not need to do anything during the auto
search.
NOTE
• You can set initial auto installation manually in the
“First time installation” on the “Setup” menu screen.
(See page 11.)
Selecting a preset Picture mode
“Picture mode” gives you several viewing options to
choose from to best match the system environment,
which can vary due to factors like room-brightness,
type of programme watched or the type of image
input from external equipment.
1Press P-MODE.
2Each time you press P-MODE, the mode
changes.
• You can also switch the mode in the “Picture mode”
menu on the “Picture” menu screen.
Selected item Description
Dynamic For a clear-cut image emphasising high
contrast for sports viewing.
Standard For a highly defined image in a normally
bright room.
Mild For a softer picture brightness.
Personal Allows the user to customise settings as
desired. You can set the mode for each
input source.
NOTE
• You can select a different Picture mode item for each input
mode. (For example, select Standard for TV input and
Dynamic for AV input.)
Menu operation
1Press MENU and the MENU screen displays.
2Press c/dto select the desired menu.
(Channel, Picture, Sound, Time, Lock, Setup)
3Press a/bto select the desired menu item.
Press ENTER to proceed if necessary.
4Press a/bor c/dto select the desired item
or adjust the item to the desired level. Press
ENTER if necessary.
Channel menu
Channel
Auto tuning
Manual tuning
Programme edit
HAuto tuning
You can run auto tuning again, even after setting up
the preset channels.
1Press MENU and the MENU screen displays.
2Press c/dto select “ ” (Channel).
3Press a/bto select “Auto tuning”, and then
press ENTER.
4If you have already set the password, enter it
here.
• See page 9 for setting a password.
5You do not need to do anything during the auto
search. Press MENU to exit.
HManual tuning
You can set some channel items manually.
1Repeat steps 1 and 2 in Auto tuning.
2Press a/bto select “Manual tuning”, and then
press ENTER.
3If you have already set the password, enter it
here.
• See page 9 for setting a password.
4Press a/b
to select your desired item, and
then press
c/d
to adjust the settings.
Current CH
Select the channel you want to edit.
• Selected channel will be automatically reflected in the
background.
Picture menu
Picture
Picture mode
Backlight
Contrast
Brightness
Colour
Tint
Sharpness
Active contrast
Noise reduction
Standard
+8
30
0
+7
0
+2
Off
Middle
HPicture adjustments
Selected item c button d button
Backlight The screen dims The screen
brightens
Contrast For less contrast For more contrast
Brightness For less brightness For more brightness
Colour For less colour
intensity
For more colour
intensity
Tint Skin tones become
reddish
Skin tones become
greenish
Sharpness For less sharpness For more sharpness
NOTE
• Picture adjustments cannot be changed during “Dynamic”,
“Standard” or “Mild” mode.
HActive contrast
Automatically adjusts the contrast of an image
according to the scene. (On, Off)
HNoise reduction
Reduces noise on screen and produces a clearer
video image. (Off, Low, Middle, High, Auto)
Sound menu
Sound
Sound mode
Treble
Bass
Balance
Auto volume
Output volume select
Surround
Standard
0
0
0
Off
Fixed
Off
HSound mode
This function gives you several sound options to
choose from to best match the type of programme
watched. (Standard, Movie, Music, Personal,
Dynamic)
LC-32LE550M _EN767.indd 4LC-32LE550M _EN767.indd 4 12/5/2012 10:12:57 AM12/5/2012 10:12:57 AM

9 10
Lock menu
(Continued)
1Repeat steps 1 and 2 in Lock system.
2Press a/bto select “Set password”, and then
press ENTER.
3Enter the old 4-digit number as a password
using 0 — 9,and then enter the new 4-digit
number as a password.
4Enter the same 4-digit number in step 3 to
confirm.
HBlock programme
Allows you to prevent unauthorized user such a child
from watching unsuitable programmes.
1Repeat steps 1 and 2 in Lock system.
2Press a/b to select “Block programme”, and
then press ENTER.
The “Block programme” screen will appear.
3Press a/bto select the programme you want
to lock, and then press G.
Setup menu
Setup
Language
Text language
Wide mode
First time installation
DivX ( R ) VOD
Demo Off
Identification
Software update (USB)
Reset
English
West europe
Auto
HLanguage
Select from among 10 languages: English, Simplified
Chinese, Arabic, French, Portuguese, Russian,
Persian, Thai, Vietnamese and Indonesian.
HText language
Select from among 5 kinds of language: West
europe, East europe, Cyrillic, Arabic, Farsi.
NOTE
• Teletext can display only when it is sent by a network. Not
used to convert between languages.
HWide mode
You can manually select the size of a picture
appeared on your screen.
Selectable picture size varies with the type of signal
received.
Press a/bwhile the Wide mode menu displays on
the screen.
• As you toggle down the options, each mode is immediately
reflected on the TV.
Selected item Description
Auto Keeps the original aspect ratio and
enlarges the picture as much as possible.
4:3 For 4:3 “standard” pictures. A side bar
appears on each side.
Sound menu (Continued)
HSound adjustments
Selected item c button d button
Treble For weaker treble For stronger treble
Bass For weaker bass For stronger bass
Balance Decrease audio
from the right
speaker
Decrease audio
from the left
speaker
HAuto volume
Different sound sources, fairly often do not have the
same volume level, for example the changing from
movie to the advertisements. Auto volume solves this
problem and equalises the volume levels.
(On, Off)
HOutput volume select
Allows you to select what controls the audio output.
Selected item Description
Fixed • Sound via speakers is adjusted with
VOL k/lon the remote control unit
or the TV.
• Sound via the AUDIO OUT terminal is
not adjustable and constantly outputs.
Variable • Sound via the AUDIO OUT terminal is
adjusted with VOL k/lon the remote
control unit or the TV.
• Sound via speakers is muted.
NOTE
• When “Output volume select” is set to “Variable”, all Sound
menu item cannot be adjusted.
HSurround
When you set to “On”, you can enjoy surround
sound, the same as if you were in a movie theatre.
(On, Off)
Time menu
Time
Sleep timer
No operation off
No signal off
Off
30 min.
Enable
HSleep timer
This function is conveniently used when, for instance,
going to bed while watching TV.
(Off, 10 min., 20 min., 30 min., 60 min., 90 min.,
120 min., 180 min., 240 min.)
NOTE
• When the time has been set, countdown automatically
starts.
• Select “Off” to cancel the Sleep timer.
• You can also select “Sleep timer” by pressing SLEEP.
HNo operation off
You can set the TV to automatically power off when
no TV operation is performed for more than 3 hours.
(30 min., 3 hours, Disable)
• Five minutes before the power shuts down, the remaining
time displays every minute.
HNo signal off
You can set the TV to automatically power off in
about 15 minutes after the TV goes into a state of
receiving no programme signals. (Enable, Disable)
• Five minutes before the power shuts down, the remaining
time displays every minute.
NOTE
• If the input source is PC, the TV will automatically power
off in about 5 minutes after the TV goes into a state of
receiving no signal.
• When a TV programme finishes, and the TV receives signal
input, this function may not operate.
Lock menu
Lock
Lock system
Set password
Block programme
Off
HLock system
You can block the viewing of any selected channel.
(On, Off)
Password must be set first to allow “Lock system” to
function.
1Press MENU and the MENU screen displays.
2Press c/dto select “ ” (Lock).
3Press a/b to select “Lock system”, and then
press ENTER.
4If you have already set the password, enter it
here.
5Press c/dto select “On” or “Off”, and then
press ENTER.
NOTE
• See “Set password” for setting a password.
• If “Lock system” is set to “On” for a channel, “Please enter
password” is displayed when you select the channel, and
the image and sound of the channel is blocked.
HSet password
Allows you to use a password to protect certain
settings from being accidentally changed.
Wide mode (Continued)
Selected item Description
16:9 For 16:9 squeeze pictures.
Zoom1 Normal image size will be slightly
enlarged.
Zoom2 Further enlarge the Zoom1 image size.
Just Scan Display with Just Scan image. Noise may
appear on the edge of the screen with
some programmes.
HHDMI audio select (HDMI input mode only)
You must select Analogue if uses the AUDIO IN (R/L)
jack for analogue audio input when using INPUT 1
(HDMI) terminal.
Option Description
Digital Select “Digital” if the Devices (DVD,
Blu ray Player, Set Top Box or etc) is
connected using HDMI cable to INPUT 1
(HDMI) terminal.
Analogue Select “Analogue” if the Devices (PC
or etc) is connected using DVI/HDMI
convert cable to INPUT 1 (HDMI) terminal
and AUDIO IN (R/L) jack is used to input
Analogue Audio Signals.
Digital
ANT
DIGITAL
AUDIO
OUTPUT
INPUT2
INPUT1
AUDIOIN
(R/L) INPUT6
PC
ANTENNA
33
INPUT 1
1
DVD player
Analogue
ANT
DIGITAL
AUDIO
OUTPUT
INPUT2
INPUT1
AUDIOIN
(R/L) INPUT6
PC
ANTENNA
33
DVI-I
AUDIO IN
(R/L)
INPUT 1
1
PC
HDivX ( R ) VOD
Please see USB Media Player on page 12.
HDemo
When “Demo” is set to “On”, after all the settings are
completed, the Demo screen is displayed if there is
no operation for several minutes. (On, Off)
HIdentification
You can check the current version of the software on
the screen.
HSoftware update (USB)
This function allows you to update the TV to the
latest software using a USB device. You must
update the software through the USB terminal.
LC-32LE550M _EN767.indd 5LC-32LE550M _EN767.indd 5 12/5/2012 10:12:57 AM12/5/2012 10:12:57 AM

11 12
Setup menu (Continued)
HFirst time installation
You can set initial auto installation manually.
1Press MENU and the MENU screen displays.
2Press c/dto select “ ” (Setup).
3Press a/bto select “First time installation”,
and then press ENTER.
4If you have already set the password, enter it
here.
• See page 9 for setting a password.
5The language screen appears, and then press
ENTER.
6Press c/dto select “Home” or “Store”, and
then press ENTER.
• The confirmation screen appears only when selecting
“Store”.
Press c/dto select “Yes” or “No”.
7Auto installation will be executed.
You do not need to do anything during the auto
search.
HReset
If complex adjustments are made and the settings
cannot be restored to normal, you can reset the
settings to the factory preset values.
NOTE
• If you execute “Reset”, all the settings such as “Picture”,
“Sound” and “Setup” will be reset to the factory preset
values.
Screen menu (PC input mode only)
Adjusting the PC image automatically
Auto adjust
This function enables the screen to be automatically
adjusted to its best possible condition when the
analogue terminals of the TV and PC are connected
with a commercially available RGB cable, etc.
NOTE
• Auto adjust is likely to succeed when an input PC image
has wide vertical stripes (e.g. pattern with high contrast
stripes, or cross-hatched).
It may fail when an input PC image is solid (low contrast).
contrast). Adjusting the PC image manually
Ordinarily you can easily adjust the picture as
necessary to change image position using Auto
adjust. In some cases, however, manual adjustment
is needed to optimise the image.
Selected item Description
H-offset Centres the image by moving it to the left
or right.
V-offset Centres the image by moving it up or
down.
Size Adjusts the image size to shrink or
expand.
Phase Adjusts when characters have low
contrast or when the image flickers.
Position reset Reset all adjustment items to factory
preset values.
Colour adjustment and still image
Allows you to adjust the colour tone of a still image.
1Press COLOUR ADJ. (FREEZE), the moving
image will be captured and colour adjustment
screen displays.
2Press a/b/c/dto adjust the colour to your
desired setting.
• When “Picture mode” is “Dynamic”, “Standard” or
“Mild”, it will automatically change “Picture mode” to
“Personal”.
Button Description
aWhite with greenish tone.
bWhite with reddish tone.
cWhite with bluish tone.
dWhite with yellowish tone.
RReveal/hide the setting screen.
GReset setting.
BClose the setting screen and unfreeze
image.
ENTER Save/exit setting.
NOTE
• The colour adjustment screen and still image will
automatically goes out after 30 minutes.
ECO mode
This function enables you to reduce the backlight
brightness in order to decrease the power
consumption and increase the backlight life span as
shown in the following table.
Selected item Description
ECO 1 Reduces the backlight brightness.
ECO 2 Reduces the backlight brightness more
than “ECO 1”.
ECO Off Normal setting of backlight brightness.
ECO status will be displayed on the channel
information window.
Teletext function
What is Teletext?
Teletext broadcasts pages of information and
entertainment to specially equipped television sets.
News, weather reports, sports information, stock
exchange prices and programme previews are
among the many services available.
Turning on and off Teletext
1Select a TV channel or external input source
providing the Teletext programme.
2Press mto display the Teletext.
3Each time you press m, the screen switches
as shown below.
TELETEXT
NOTE
• If you select a programme with no Teletext signal,
“No Teletext” is displayed.
• The same message displays during other modes if
no Teletext signal is available.
Button functions
Buttons Description
CH (r/s)Increase or decrease the page number.
Colour (Red/
Green/
Yellow/Blue)
You can select a group or block of pages
displayed in the coloured brackets at
the bottom of the screen by pressing
the corresponding Colour (Red/Green/
Yellow/Blue) on the remote control unit.
0 — 9 Directly select any page from 100 to 899
by using 0 — 9.
k(Reveal
hidden for
TELETEXT)
To reveal hidden information such as an
answer to a quiz.
3(Hold) To stop updating Teletext pages
automatically or release the hold mode.
[(Subtitle
for
TELETEXT)
Display the subtitle during Teletext page.
• Subtitle will not be displayed when
the service does not contain subtitle
information.
1(Subpage) Display the subpage during Teletext page.
NOTE
• Teletext can display only when it is sent by a network. Not
used to convert between languages.
PC compatibility chart
Resolution Horizontal
Frequency
Vertical
Frequency
VESA
Standard
VGA 640 g480 31.5 kHz 60 Hz
SVGA 800 g600 37.9 kHz 60 Hz
XGA 1024 g768 48.4 kHz 60 Hz
WXGA 1360 g768 47.7 kHz 60 Hz
VGA, SVGA, XGA and WXGA are registered trademarks of
International Business Machines Corporation.
USB Media Player
DivX® setup
This is the function to confirm your registration code.
1Press MENU and the MENU screen displays.
2Press c/dto select “ ” (Setup).
3Press a/bto select “DivX ( R ) VOD”, and then
press ENTER.
• Copy the 10 digit code down.
DivX ( R ) VOD Register
You need to visit the DivX main page to register your
TV. Please follow the online instruction to create DivX
account and DivX registration video download.
Your registration is complete when you play the DivX
registration video on TV.
DivX ( R ) VOD Deregister
You can find the deregistration code (8~10 digit).
Please use this code to deactivate on DivX website.
NOTE
• Visit vod.divx.com for more information about DivX® VOD.
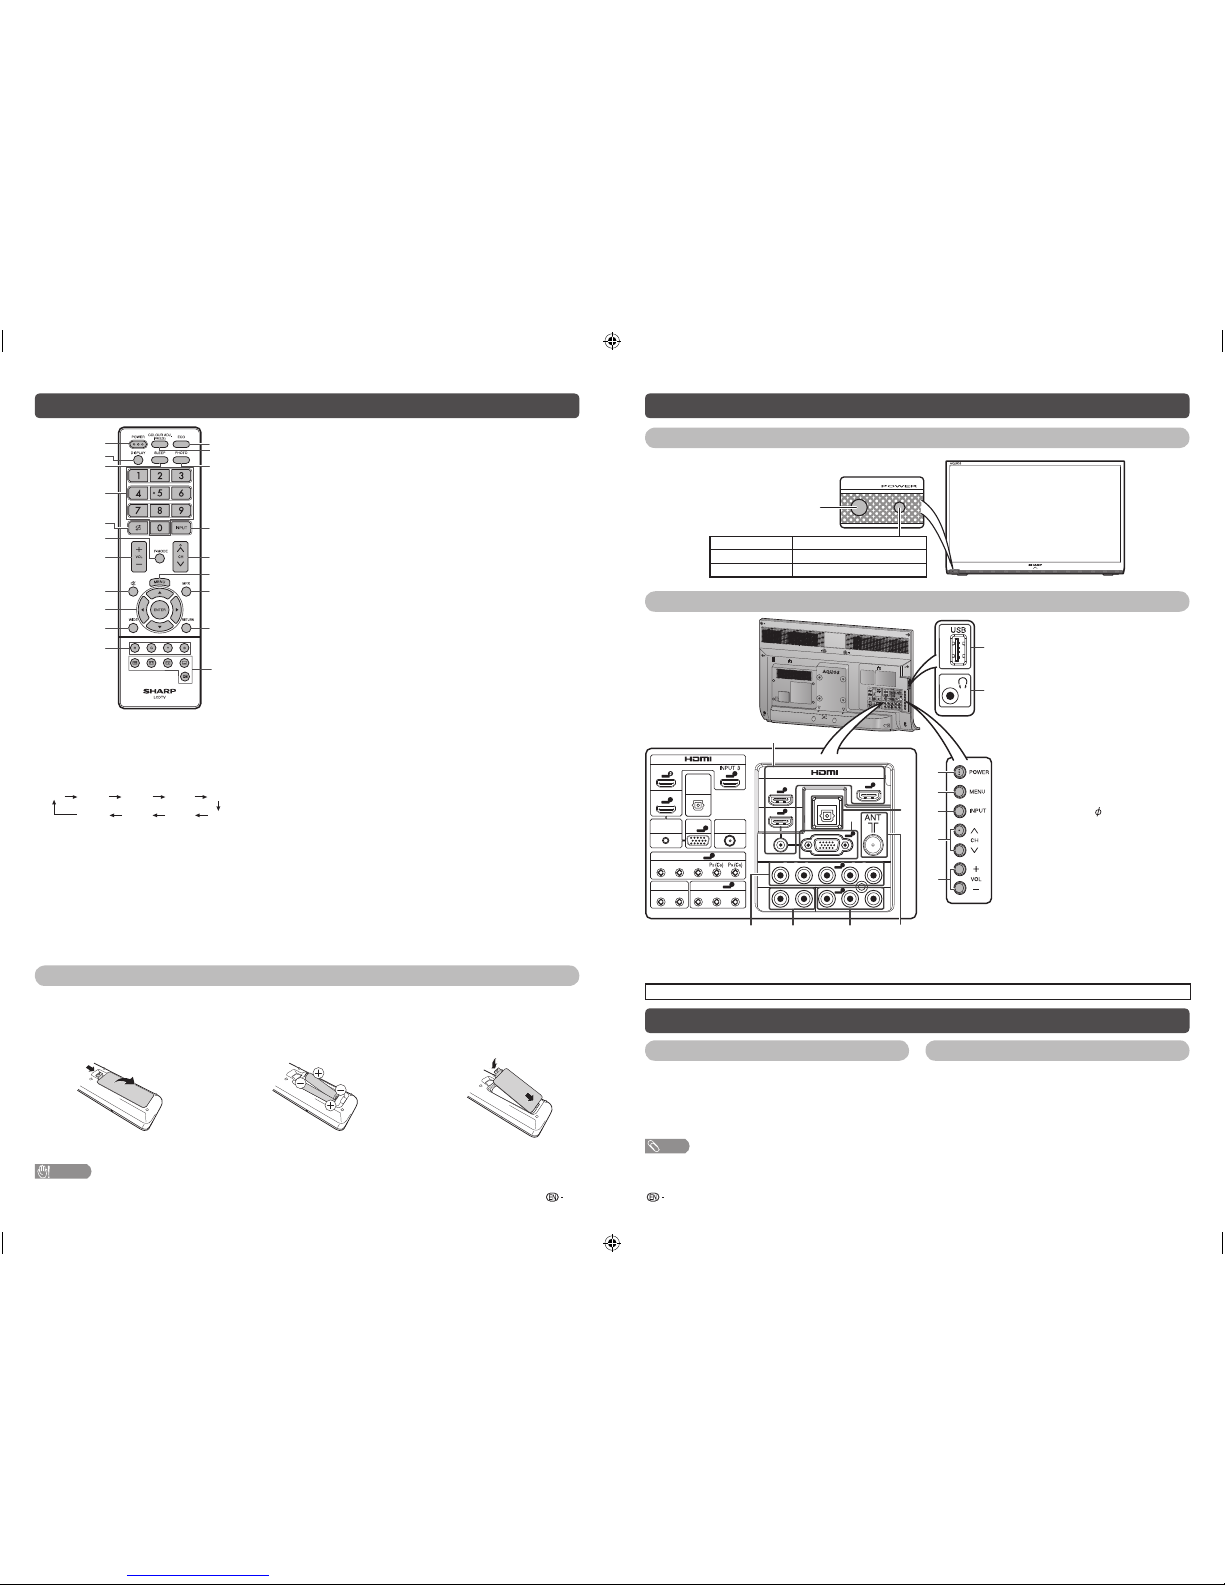
Connecting a USB device
Connect a USB device to the TV.
ANT
DIGITAL
AUDIO
OUTPUT
INPUT2
INPUT1
AUDIOIN
(R/L) INPUT6
PC
ANTENNA
33
CAUTION
• Do not disconnect a USB device from the TV while
transferring files, when a screen is in “USB” mode.
H Selecting modes
PHOTO MUSIC MOVIE
USB
1Press INPUT to select the “Media” mode.
2Press c/dto select “PHOTO”, “MUSIC” or
“MOVIE”, and then press ENTER.
3Press c/dto select your USB directory, and
then press ENTER.
4Press a/b/c/dto select the desired folder,
and then press ENTER.
LC-32LE550M _EN767.indd 6LC-32LE550M _EN767.indd 6 12/5/2012 10:12:57 AM12/5/2012 10:12:57 AM

13 14
USB Media Player (Continued)
Control panel for PHOTO/MUSIC/MOVIE mode operations
• Press Bto display the control panel below.
Button/menu Description PHOTO MUSIC MOVIE
ENTER When selecting a folder icon: Enter this directory.
When selecting a thumbnail:
Play the selected file.
Play/Pause.
Fast-backward.
Each time you press fast-
backward
,
the speed will change (2x, 4x, 8x, 16x). –
Fast-forward. Each time you press fast-forward, the
speed will change (2x, 4x, 8x, 16x). –
Play the previous file.
Play the next file.
G / Stop playback and return to the list of files.
Repeat all the files. Each time you press ENTER, the
mode will switch between:
Repeat none
Repeat all
Repeat 1
Select photo display interval. ––
Select playback length of a slide show. ––
Play/cancel the background music. ––
Mute. Press ENTER to toggle between mute and
unmute. ––
Two loop. Press ENTER to set the current playback
time starting point. Press ENTER to set the loop end
of the current playing time and start loop playback.
Press ENTER button to cancel the loop.
––
Show playlists. Select a file from the playlists to start
playback.
Display information about the file.
Slow-forward.
Each time you press slow-forward, the speed will
change.
––
Step-forward.
Each time you press ENTER, the picture will change
to the next still picture.
––
Set time for music/movie playback. –
Rotate clockwise 90º. ––
Rotate counterclockwise 90º. ––
Zoom in an image. Select to display larger image
size. ––
Zoom out an image. Select to display smaller image
size. ––
Pan image up, down, left or right after you zoom in.
Press ENTER to exit. ––
NOTE
• Press Yto change subtitle for “MOVIE” mode.
• Files in folder which are not related to a selected mode cannot be accessed.
• “Unsupported file” alert will pops up for a selected file of invalid format.
USB Media Player (Continued)
NOTE
•
“Wide mode” is fixed during “PHOTO”, “MUSIC” and “MOVIE”.
• Depending on the USB device, the TV may not be able to
recognise the contained data.
• Use only alphanumeric characters for naming files.
• A file name with more than 10 characters may not be
displayed all (depending on the character set).
• Files in USB 1.1 devices may not be played properly.
• Operation using USB hubs is not guaranteed.
• The compatibility of USB HDDs may not be guaranteed.
• Multi drive USB is not supported.
PHOTO slide show
C:\Ski Action 1/2
PHOTO
Return
Fireworks.jpg
Switzerland.jpg
Ski Action.jpg
Ski Action.jpg Japan-hokkaid.. Island.jpg
Resolution:
4416 g3312
Size:
3595 KBytes
Date:
2012 / 04 / 29
Time:
19: 38: 18
Delete Back
R
RETURN
When you press PHOTO, the TV screen will
automatically play the photo slide show.
• During photo slide show, press a/bto select the next/
previous photo or press c/d to rotate the photo.
• If there is no USB drive, the TV will switch to Selecting
modes screen.
• Photo slide show will autoplay only for the photos located
on the top layer of USB drive. To enable autoplay for
photos located in a subfolder, you need to manually select
the subfolder, and then press PHOTO.
You can select the duration for each photo to
display, and also the duration for the slide show to
play.
Duration for photos to display
1 min.10 sec.5 sec.3 sec.
Duration for slide show to play
Continuous3 hr.1 hr.
• The TV will automatically power off after the
selected playtime ends.
NOTE
•
Background music will autoplay during a slide show only if the
music file is located in the same folder with the photo files.
•
If you want to stop the photo slide show, press RETURN to
exit.
List of files compatible with USB mode
USB device USB Memory, USB card reader
(Mass Storage class)
File system FAT/FAT32/NTFS*
Photo file format JPEG (.jpg) (DCF2.0 compliant),
BMP, PNG
Music file format MP3 (.mp3)
Bitrate: 32 k, 40 k, 48 k, 56 k, 64
k,
80 k, 96 k, 112 k, 128 k, 160 k,
192 k, 224 k, 256 k, 320 kbps
Sampling frequency: 32 k, 44.1 k,
48 kHz
* NTFS compressed file is not supported.
Video file format
File extension Container Video Audio
*.avi AVI
DivX 3.11/4/4.12/5.x/6
XviD
H.264
MPEG4
Motion Jpeg
MP3
MP2
Dolby Digital
LPCM
ADPCM
AAC
*.mkv MKV H.264
MPEG4
MP2
Dolby Digital
AAC
*.mp4
*.mov MP4 H.264
MPEG4
MP3
LPCM
ADPCM
AAC
*.vob VOB MPEG2 Dolby Digital
MP2
*.mpg/*.mpeg PS MPEG2
MPEG1
Dolby Digital
MPEG
LPCM
*.ts/*.trp/*.tp TS H.264
MPEG2
Dolby Digital
MP2
*.asf ASF VC-1
Dolby Digital
LPCM
ADPCM
*.divx DivX DivX 3.11/4/4.12/5.x/6 MP3
NOTE
• Files may not be playable depending on the bitrate or resolution.
LC-32LE550M _EN767.indd 7LC-32LE550M _EN767.indd 7 12/5/2012 10:12:57 AM12/5/2012 10:12:57 AM

15 16
Appendix
Troubleshooting
The problems described below are not always caused by malfunctions. Check the TV again before having the
TV serviced.
Problem Possible Solution
• No power. • Check if you pressed POWER on the remote control unit. (See page 6.)
If the indicator on the TV lights up red, press POWER.
• Is the AC cord disconnected?
• Has the power been turned on? (See page 6.)
• Unit cannot be operated. • External influences such as lightning, static electricity, etc., may cause improper
operation. In this case, operate the unit after first turning the power off the TV or
unplugging the AC cord and re-plugging it in after 1 or 2 minutes.
• Remote control unit does not
operate.
• Are batteries inserted with polarity (e, f) aligned? (See page 5.)
• Are batteries worn out? (Replace with new batteries.)
• Are you using it under strong or fluorescent lighting?
• Is a fluorescent light shining on the remote control sensor?
• Picture is cut off. • Are screen mode adjustments such as picture size made correctly?
(See pages 7, 11.)
• Strange colour, light colour, or
dark, or colour misalignment.
• Adjust the picture tone. (See page 8.)
• Is the room too bright? The picture may look dark in a room that is too bright.
• Check the “Colour system” setting. (See page 8.)
• Power is suddenly turned off. • The unit’s internal temperature has increased.
Remove any objects blocking the vent or clean.
• Is the “Sleep timer” set? (See page 9.)
• No picture. • Is the connection to external equipment correct? (See page 4.)
• Is the correct input selected?
• Is the picture adjustments correct? (See page 8.)
• Is the antenna connected properly? (See page 3.)
• No sound. • Is the volume too low? (See page 5.)
• Make sure that headphones are not connected.
• The TV sometimes makes a
cracking sound.
• This is not a malfunction. This happens when the cabinet slightly expands and
contracts according to changes in temperature. This does not affect the TV’s
performance.
Cautions regarding use in high and low temperature environments
• When the unit is used in a low temperature space (e.g. room, office), the picture may leave trails or appear slightly
delayed. This is not a malfunction, and the unit will recover when the temperature returns to normal.
• Do not leave the unit in a hot or cold location. Also, do not leave the unit in a location exposed to direct sunlight or near
a heater, as this may cause the cabinet to deform and the LCD panel to malfunction.
Storage temperature: f20°C to e60°C.
Clearing the password
If you forget the password, clear the password using the following procedure.
1Repeat steps 1 to 2 in Lock system. (See page 9.)
2Press a/b to select “Set password”, and then press ENTER and the password input screen displays.
3Enter “3001” using 0–9to clear your password.
4Enter the 4-digit number as a password using 0 – 9. The new password is now set.
Specifications
Item Model LC-32LE550M
LCD panel 80 cm
Resolution 1,049,088 pixels (1366 g768)
Video Colour System PAL/SECAM/NTSC 3.58/NTSC 4.43/PAL 60
TV
Function
TV-Standard PAL: B/G, D/K, I SECAM: B/G, D/K, K/K1NTSC: M
Receiving
Channel
VHF/UHF 43.25—863.25 MHz
CATV S1—S41ch (including Hyperband)
TV-Tuning System Auto Preset 99 ch
STEREO/BILINGUAL NICAM: B/G, I, D/K A2 stereo: B/G
Viewing angles H : 176º V : 176º
Audio amplifier/Speakers 10 W g2 / 4 g10 cm 2pcs
Terminals Antenna input UHF/VHF 75 qDIN type
INPUT 1 HDMI (HDMI input), AUDIO in ( 3.5 mm jack)
INPUT 2/INPUT 3 HDMI (HDMI input) / HDMI (HDMI input)
INPUT 4 AUDIO in, COMPONENT in
INPUT 5 VIDEO in, AUDIO in
INPUT 6 PC 15 pin mini D-sub, AUDIO in (common use with INPUT 1) ( 3.5 mm jack)
AUDIO OUT AUDIO out
USB USB
DIGITAL AUDIO
OUTPUT
Optical Digital Audio Output
Headphone 3.5 mm stereo
OSD language English/Simplified Chinese/Arabic/French/Portuguese/Russian/Persian/Thai/
Vietnamese/Indonesian
Power Requirement AC 110—240 V, 50/60 Hz
Power Consumption 53 W (0.8 W Stand by)
Dimensions without stand 735 (W) g471 (H) g113 (D) mm
with stand 735 (W) g463 (H) g167 (D) mm
Weight 8.0 kg (without stand) / 8.5 kg (with stand)
Operating Temperature 0°C — 40°C
• As a part of policy of continuous improvement, SHARP reserves the right to make design and specification changes for
product improvement without prior notice. The performance specification figures indicated are nominal values of production
units. There may be some deviations from these values in individual units.
Optional accessory
Some of the listed optional accessories may not be available
depending on the region.
Please check with your nearest Sharp Authorised Dealer for current
optional accessories as we may add more optional accessories
from time to time.
Part name Model number
Wall mount bracket AN-130AG1
LC-32LE550M _EN767.indd 8LC-32LE550M _EN767.indd 8 12/5/2012 10:12:58 AM12/5/2012 10:12:58 AM
Table of contents
Other Sharp TV manuals

Sharp
Sharp LC-40FG5241KF User manual

Sharp
Sharp LC-60LE925E User manual

Sharp
Sharp AQUOS LC-75N8000U User manual

Sharp
Sharp Aquos LC 32GD6U User manual

Sharp
Sharp 54GS-61S User manual

Sharp
Sharp 25R S100 User manual

Sharp
Sharp 25WF30 User manual

Sharp
Sharp 27R-S100 User manual

Sharp
Sharp LC-26BD1 User manual

Sharp
Sharp LC-32D42U User manual

Sharp
Sharp LC-32CHF4041E User manual

Sharp
Sharp AQUOS LC-80LE657KN User manual

Sharp
Sharp 29V-FT450S User manual

Sharp
Sharp 20F540 XFlat User manual

Sharp
Sharp 20LK61M User manual

Sharp
Sharp 20F540 L User manual

Sharp
Sharp 27C24 User manual

Sharp
Sharp DV-3750S User manual

Sharp
Sharp 25N21-D1 User manual

Sharp
Sharp LC-24CHG6132EM User manual