Sharp AQUOS LC-55N7004U User manual

USER MANUAL
Before using the TV, please read this manual
thoroughly and retain it for future reference.
ENGLISH

1
ENGLISH FRANÇAIS ESPAÑOL
Copyright Statement
© 2019 Hisense Company Ltd. All Rights Reserved.
All material in this User Manual is the property of Hisense Company Ltd. and its subsidiaries, and is protected under
US, CANADA, MEXICO and International copyright and/or other intellectual property laws. Reproduction or transmission
of the materials, in whole or in part, in any manner, electronic, print, or otherwise, without the prior written consent of
Hisense Company Ltd. is a violation of Hisense Company Ltd. rights under the aforementioned laws.
No part of this publication may be stored, reproduced, transmitted or distributed, in whole or in part, in any manner,
electronic or otherwise, whether or not for a charge or other or no consideration, without the prior written permission of
Hisense Company Ltd.
Requests for permission to store, reproduce, transmit or distribute materials may be made to one of the following
addresses:
USA: Hisense USA Corporation
7310 McGinnis Ferry Road
Suwanee, GA 30024
CANADA: Hisense Canada Co., Ltd
2283 Argentia Road, Unit 16
Mississauga, ON, Canada
L5N 5Z2
MEXICO: Hisense Mexico S. de R.L. de C.V.
Blvd. Miguel de Cervantes Saavedra No 301
Torre Norte Piso 2, Col. Ampliación Granada
Miguel Hidalgo, Ciudad de México, C.P. 11520
Hisense, and any and all other Hisense product names, logo’s, slogans or marks are registered trademarks of Hisense
Company Ltd. and its subsidiaries. All other trademarks are the property of their respective holders.
©2019. All rights reserved. Hisense and the Hisense logo are registered trademarks of Hisense. Other brand and
product names are registered trademarks of their respective owners.

2
ENGLISH FRANÇAIS ESPAÑOL
Disclaimer Page
**Notwithstanding anything to the contrary, including in any or all descriptions, representations, statements or other
communications related to this Hisense device (hereinafter “Device”) made in any form whatsoever and at any time,
some or all of the pre-installed, or subsequently installed Application Services may not be available or capable of
functioning as intended by the provider of the Application Services in any or all usage areas for reasons outside of
Hisense’s control, including but not limited to, Internet access, local service limitations, etc. Any purchase or use
of the Device, including any Application Services, is purely at the user’s risk. Application Services are provided on
an as-available basis without warranties of any kind, either expressed or implied, that the Application Service will be
uninterrupted or error-free, including but not limited to vagaries of weather, disruption of Service, acts of God, warranties
of title, local or regional limitations, no infringement, NOR IMPLIED WARRANTIES OF MERCHANTABILITY OR FITNESS
FOR A PARTICULAR PURPOSE. No advice or information given by Hisense, providers, affiliates, or contractors or
their respective employees shall create such a warranty. Hisense specifically disclaims responsibility for any or all
Application Services from functioning at any time, and by purchasing the Device, you accept such disclaimer without
any claim on Hisense. You are solely responsible for providing an active and working connection to the Internet, along
with any and all hardware and/or software necessary to use the Hisense Device as intended.
Disclaimer:
Images throughout this document are for illustrative purposes only and may differ from the actual product.

3
ENGLISH FRANÇAIS ESPAÑOL
Content
Content ...............................................................................................................3
Connecting Devices to your TV........................................................................5
Connecting an antenna, cable set-top box or satellite receiver ................................................5
Connecting a satellite receiver, DVD player or other audio visual (AV) devices with a
composite video cable (yellow/red/white)..................................................................................5
Connecting an AV device with an HDMI cable..........................................................................6
Connecting a headphone ..........................................................................................................6
Connecting speakers or other audio receivers..........................................................................6
Connecting a digital sound bar to use Audio Return Channel (ARC)........................................7
Connecting a USB device..........................................................................................................7
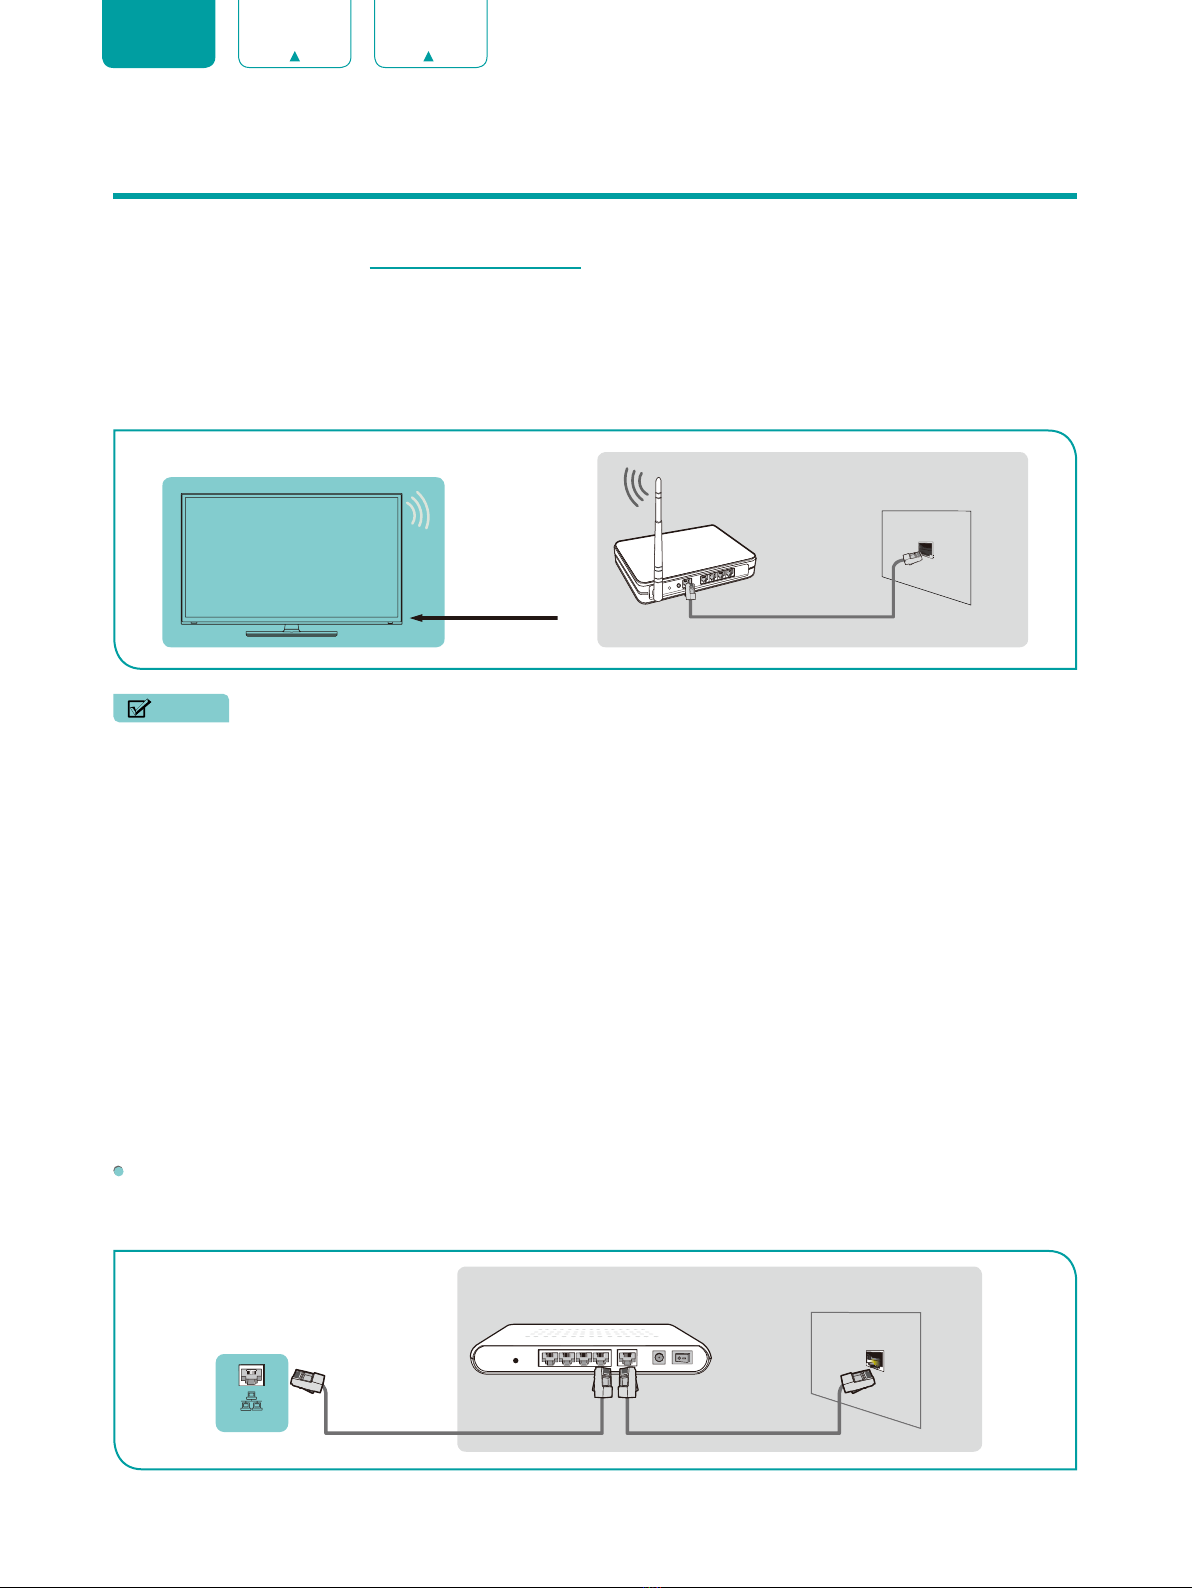
Connecting Your TV to a Wireless or Wired Network.....................................8
Connecting to a wireless network ..............................................................................................8
Connecting to a wired (Ethernet) network..................................................................................8
Using Your TV Remote Control.......................................................................10
Buttons on your TV remote.......................................................................................................10
Remote control range information............................................................................................11
Completing the First-Time Setup Menu .........................................................12
Shortcuts Instructions.....................................................................................13
Turning your TV on or off..........................................................................................................13
Selecting the input source .......................................................................................................13
Using the Live TV .....................................................................................................................13
Using the Menu Function .........................................................................................................15
Basic Settings ..................................................................................................16
Using the Settings Menu..........................................................................................................16
Picture Menu ............................................................................................................................17
Sound Menu.............................................................................................................................17
Network Menu ..........................................................................................................................18
Channel Menu..........................................................................................................................19
Accessibility .............................................................................................................................19
System Menu ...........................................................................................................................19
Support Menu ..........................................................................................................................21
Parental Control .......................................................................................................................22
Advanced TV Settings .....................................................................................24

4
ENGLISH FRANÇAIS ESPAÑOL
Getting familiar with the Home screen.....................................................................................24
Notifications .............................................................................................................................24
Apps.........................................................................................................................................25
Media .......................................................................................................................................26
Using Anyview Cast to mirror content from your device to the TV screen...............................27
Software updates for your TV...................................................................................................27
Quick Problem-Solving Tips ...........................................................................28

5
ENGLISH FRANÇAIS ESPAÑOL
Connecting Devices to your TV
You have several options for connecting your TV to different devices. The method you choose will be based upon the
type of cables you have and the available outputs on your device.
Connecting an antenna, cable set-top box or satellite receiver
To connect an antenna,cable set-top box or satellite receiver:
1. Connect one end of a coaxial cable (not provided) to the RF OUT port on the antenna, cable or satellite box. If you
are using an antenna with twin-lead cable, you may need a 300-75 Ohm adapter (not provided) to connect it to the
back of your TV. Likewise, if you are using several antennas, you may need a combiner (not provided).
2. Connect the other end of the cable to the ANT/CABLE port on the side of TV.
3. Using your remote, press the [INPUT] button and select ANT/CABLE as the input source.
Connecting a satellite receiver, DVD player or other audio visual (AV)
devices with a composite video cable (yellow/red/white)
To connect an AV device with a composite video cable (not provided):
1. Use the audio and video cables to connect the composite video/audio ports of the external AV device to the AV IN
ports of the TV. (Video = yellow, Audio Left = white, and Audio Right = red)
2. Plug the connected devices into the AV connectors on the TV before switching it on.
3. Using your remote, press the [INPUT] button and select AV as the input source.
or ANT OUT
Cable Set top box
RF Out
EXTERNAL DEVICE
TV PORT
ANT/CABLE
AV OUT
Video
L
R
White (L)
White (L)
Yellow (Video)Yellow or Green (Video)
Video Cable
Red (R)Red (R)
Audio Cable
TV PORTS
EXTERNAL DEVICES
DVD Player/Recorder
Video
Camera Set-top box
Satellite Receiver
Satellite
antenna
cable
VCR
VIDEOL
R
AV IN

6
ENGLISH FRANÇAIS ESPAÑOL
Connecting an AV device with an HDMI cable
This 4K TV has three high-powered HDMI version 2.0 inputs that enable you to connect 4K Ultra-HD external devices.
For example,if you have an X-box or Blu-ray player that supports the 2.0 standard,more details will be transmitted to the
TV screen to maximize your entertainment experience.
Please refer to the User Manual that came with your device for step-by-step instructions.
To connect an AV device with an HDMI cable (not provided):
1. Use an HDMI cable to connect the HDMI output port of the AV device to the HDMI port of the TV.
2. Plug the connected devices into the HDMI port on the TV before switching it on.
3. Using your remote, press the [INPUT] button and select the corresponding HDMI input.
NOTES
• Because the HDMI connector provides video and audio signals, it is not necessary to connect an audio cable.
• We strongly recommend to use HDMI Cable with 2 cores as shown in the figure.
Connecting a headphone
You can connect headphone (not provided) to
the port on your TV. While the headphone is
connected, the sound from the built-in speakers will
be disabled.
NOTES
• Headphones with microphones are not supported.
• If "Headphone with Speakers" in the sound menu is selected manually, the headset and the whole machine will
have sound at the same time.
Connecting speakers or other audio receivers
To connect speakers or other audio receivers with an audio cable (not provided):
1. Use an audio cable to connect the digital audio in port of the audio receiver device to the DIGITAL AUDIO OUT port
of the TV.
2. Plug the connected devices into the main power socket before switching on the TV.
HDMI
HDMI
EXTERNAL DEVICES
DVD
Set-top Box
TV PORT
HDMI Cable
TV PORT EXTERNAL DEVICE
Headphone
EXTERNAL DEVICES
Powerless
Bass Speaker
Speaker
Digital Sound Bar
Audio Amplifier
DIGITAL
AUDIO OUT
TV PORT
Audio Cable

7
ENGLISH FRANÇAIS ESPAÑOL
• TIP: If you prefer to use Audio Return Channel, then see Connecting a digital sound bar to use Audio Return Channel
(ARC) on page 7.
NOTES
• When a digital audio system is connected to the DIGITAL AUDIO OUT port, decrease the TV and system volume.
• 5.1 CH (channel) audio is available when the TV is connected to an external device that supports a 5.1 CH
surround sound.
• You can receive 5.1 CH audio in one of two ways. The first way is to connect the DIGITAL AUDIO OUT port from
the device to the Amplifier. The second way is to connect the DIGITAL AUDIO OUT port on the back of the TV
to the Optical port on the Amplifier. After you’ve completed one of the two methods then be sure to go into the
Settings->Sound->Speakers->Digital Audio Out to select RAW to receive the 5.1 CH audio. You will also need to
go into the sound or audio settings of your device to ensure it is set to 5.1 CH output. It may read ‘Bitstream’, ‘RAW’
or ‘Digital’.
Connecting a digital sound bar to use Audio Return Channel (ARC)
If you’d like to use the Audio Return Channel (ARC) feature to have sound sent from the TV back down an HDMI cable
to a digital sound bar, then you will need to connect the cable to the HDMI / ARC port. By using this feature, you will
also be able to control the sound bar with your TV remote instead of using multiple remotes for each device.
To connect a digital sound bar with an HDMI cable (not provided):
1. Connect the cable that’s attached to the sound bar to the HDMI / ARC port on the TV.
2. Turn on the sound bar by pressing the Power button.
3. Press the [ ] button on your remote and press the [ ˅] button of your remote to select Settings, then press [OK]
to enter the Settings menu, go to System > HDMI-CEC.
4. Turn on the HDMI-CEC setting.
NOTES
• Only digital sound bars that require a wired connection are compatible with the TV.
• If the device has an Input Selector feature, make sure to change it to TV.
Connecting a USB device
You can connect the USB devices such as hard
drives, USB sticks and digital cameras for browsing
photos, listening to music and watching recorded
movies.
1. Connect a USB device into the USB port.
2. Select the Media type on the Media screen or
Home screen. For more information, see Media on page 26.
NOTES
• When connecting a hard disk or a USB hub, always connect the mains adapter of the connected device to the
power supply. Exceeding a total current consumption may result in damage. The USB1.1 and USB2.0 devices
maximum current consumption are 500mA.
• For individual non-standard high-capacity mobile hard disk, if its impulse current is greater than 500mA, it may
cause TV-rebooting or self-locking. So the TV does not support it.
• The USB port supports a voltage of 5V.
HDMI
ARC
HDMI
EXTERNAL DEVICE
TV PORT
HDMI Cable
Digital Sound Bar
TV PORT EXTERNAL DEVICE
USB
DC 5V 0.5A(MAX)

8
ENGLISH FRANÇAIS ESPAÑOL
Connecting your TV to a Wireless or Wired Network
You have the option to connect your TV to a wireless or wired network to access the Internet. For more information about
the network settings on TV, see Network Menu on page 18.
Connecting to a wireless network
Our built-in wireless LAN adapter supports the IEEE 802.11 ac/b/g/n communication protocols and we recommend that
you use an IEEE 802.11n or IEEE 802.11ac router. When you play a video over an IEEE 802.11 b/g connection, the
video may not play smoothly.
NOTES
• You must use the built-in Wireless LAN Adapter to use a wireless network because the set does not support an
external USB network adapter.
• To use a wireless network, your TV must be connected to a wireless IP sharer. If the wireless IP sharer supports
Dynamic Host Configuration Protocol (DHCP), your TV can use a DHCP or static IP address to connect to the
wireless network.
• Select a channel for the wireless IP sharer that is not currently being used. If the channel set for the wireless IP
sharer is currently being used by another device nearby, this will result in interference and communication failure.
• If you apply a security system other than the systems listed below, it will not work with the TV.
• If Pure High-throughput (Greenfield) 802.11N mode is selected and the Encryption type is set to WEP, TKIP or
TKIP-AES (WPS2 Mixed) for your Access Point (AP), then the TV will not support a connection in compliance with
these Wi-Fi certification specifications.
• If your access point (AP) supports Wi-Fi Protected Setup (WPS), you can connect to the network via Push Button
Configuration (PBC) or PIN (Personal Identification Number). WPS will automatically configure the SSID and WPA
key in either mode.
Connecting to a wired (Ethernet) network
You can attach your TV to your LAN in one of the three following ways:
Option 1
You can attach your TV to your LAN by connecting the LAN port on the back of your TV to an external modem using a
Cat 5 LAN cable. See the illustration below.
Wireless Adapter
built-in the TV set LAN Cable
Wireless Router The LAN Port on the Wall
External Modem
(ADSL / VDSL / Cable TV)
The Modem Port on the Wall
Ethernet Cable Modem Cable
LAN
TV PORT

ENGLISH FRANÇAIS ESPAÑOL
9
Option 2
You can attach your TV to your LAN by connecting the LAN port on the back of your TV to an IP Sharer which is
connected to an external modem. Use an Ethernet cable for the connection. See the illustration below.
Option 3
Depending on how your network is configured, you may be able to attach your TV to your LAN by connecting the LAN
port on the back of your TV directly to a network wall outlet with an Ethernet cable. See the diagram below.
If you have a Dynamic Network, you should use an ADSL modem or router that supports Dynamic Host Configuration
Protocol (DHCP). Modems and routers that support DHCP automatically provide the IP address, subnet mask, gateway,
and DNS, so you don’t have to enter them manually. Most home networks are Dynamic Networks.
Some networks require a Static IP address. If your network requires a Static IP address, you must enter the IP address,
subnet mask, gateway, and DNS values manually on your TV’s Cable Setup Screen when you set up the network
connection. To get the IP address, subnet mask, gateway and DNS values, contact your Internet Service Provider (ISP).
NOTE
• You can use ADSL modems that support DHCP if your network requires a static IP address. ADSL modems that
support DHCP also let you use static IP addresses.
External Modem
(ADSL / VDSL / Cable TV)
The Modem Port on the Wall
Modem Cable
IP Sharer (Router)
(with DHCP server)
Ethernet Cable
Ethernet Cable
LAN
TV PORT
The LAN Port on the Wall
Ethernet Cable
LAN
TV PORT

10
ENGLISH FRANÇAIS ESPAÑOL
Using your TV Remote Control
Buttons on your TV remote
APP
APPAPP
APP
APPS
TV
NRT MTS
SearchNOW shortcut
Dash button
Select a digital sub-channel
Mute and restore sound
Infrared transmitter
Change TV input source
Channel (up/down)
The button for the Quick setup menu
Special function buttons
Display the Home screen
Confirm button
Quick access buttons to apps
Media content control function buttons
Power on / off
Enter Channels / input numbers
D-pad (up/down/left/right
navigation buttons)
Volume (up/down)
Adjust Sleep timer setting
All Apps
Return to the previous place in
the menu or app
Live TV
Turn Closed Caption On/Off
Choose to leave the Video description
feature On or Off
Set the audio language(MTS)
NOTE
• Check information according to the actual remote control in the accessory bag.

11
ENGLISH FRANÇAIS ESPAÑOL
Remote control range information
The remote control can work at a distance of up to 26 feet in front of the TV set.
It can work at a 30 degree horizontal or vertical angle.
Begin using your remote
1. Slide the back cover to open the battery compartment of the remote control.
2. Insert two AAA size batteries. Make sure to match the (+) and (-) ends of the batteries with the (+) and (-) ends
indicated in the battery compartment.
3. Replace the battery compartment cover.
NOTES
• Discard batteries in a designated disposal area. Do not throw them into a fire.
• Remove old batteries immediately to prevent them from leaking into the battery compartment.
• If you do not intend to use the remote control for a long time, remove the batteries.
• Battery chemicals can cause a rash. If the batteries leak, clean the battery compartment with a cloth. If chemicals
touch your skin then wash it immediately.
• Do not mix old and new batteries.
• Do not mix alkaline, standard (carbon-zinc) or rechargeable (NiCd, NiMH, etc.) batteries.
• Do not continue using the remote if it gets warm or hot.
• Call our Support Center immediately on the support website.
Program your universal cable or satellite remote control to operate your new television (only for
USA)
If you would like to program your other household remote controls to your new television, please refer to the User’s
Manual supplied by your Cable or Satellite provider. The Cable or Satellite providers’ User’s Manuals should include
instructions on how to program their remote to your television.
A list of codes for the most common Cable and Satellite providers are listed below. Use the code that is associated with
your Cable or Satellite provider (if applicable).
DIRECTV
0178, 10178, 10019, 10748, 11314, 11660, 11710, 11780, 12049, 10171, 11204, 11326, 11517, 11564, 11641, 11963,
12002, 12183
Time Warner Cable
386, 0178, 10178, 400, 450, 461, 456, 0748, 1463, 0463, 10463
Comcast
0178, 10178, 10463, 11463, 10748, 11314, 11660, 10171, 11204, 11326, 11517, 11641, 11780, 11785, 11892, 11963,
12002
Cox Communications
0178, 10178, 1326, 1463
Dish Network
505, 627, 538, 720, 659
If the code associated with your Cable or Satellite provider is not listed, does not work or you cannot locate the
instructions to program your remote, call your local Cable or Satellite provider’s customer service center.
If your Cable or Satellite provider does not have a code available, please contact us.
Using your cable set-top box or satellite receiver remote as a ‘universal’ remote
If you prefer to use your Cable Set-top Box or Satellite Receiver Remote as a ‘universal remote’, then visit the Support
page to view a list of the codes.

12
ENGLISH FRANÇAIS ESPAÑOL
Completing the First-Time Setup Menu
Press the [ ] button on the remote to turn on the TV.
After the splash screen that displays the logo appears, begin the first-time setup menu.
Screen Task
Language and
Location Using the D-pad arrows of your remote, choose your Language, Region and Time Zone.
End User License
Agreement Choose Decline or Agree.When choose Agree, select Continue icon and press [OK].
Usage Mode
• Select Home Mode(which appears by default).
NOTE
• Store Mode and Store Mode (Video Demo Only) should only be selected by Retailers who
plan to demonstrate the TV.
Network
Connection
If your TV does not automatically detect an Ethernet connection, use a wireless network.
Select your network from the list that displays, and input the password.
Also you can add a hidden network.
Product
Registration Register to stay up-to-date with news and updates about your TV.
Last step of TV
setup
You are at the last step of TV setup. If you have not connected network, you can select ‘Set up
network’ or ‘Use without network’. If you have connected network, congratulations! You have
completed TV setup. Start to use.

13
ENGLISH FRANÇAIS ESPAÑOL
Shortcuts Instructions
You can use shortcuts on the remote control for fast operation.
Turning your TV on or off
To turn your TV on:
1. Connect the power cord to the back of the TV, then plug the power cord into an AC outlet.
2. When the TV is powered on, press the [ ] button on the remote to turn on TV.
To turn your TV off, press the [ ] button on the remote.
NOTES
• When your TV is in standby mode, it is still consuming power. To completely disconnect power, please remove the
plug from the AC outlet.
• If your TV does not receive an input signal for several minutes, it automatically goes into standby mode.
Selecting the input source
Select the Input Source depending on the video device you have connected to your TV.
To select the input source:
1. Turn on your TV, then press the [INPUT] button on the remote, the list of Source appears.
2. Press the D-pad arrows of your remote to select the input source.
3. Press the [OK] button to confirm your selection.
Using the Live TV
To view broadcast programs, press the [TV] button on your remote.
Channel search guide
When you select ANT/CABLE as input, if no TV channels were saved before, you will be prompted to do a channel
search. You can also go to Settings menu > Channel to change the channel settings.
Launch Live TV
After channel tuning is done for the first time, the screen will display Live TV operating tips, including: how to load the
channel list, how to Load info Bar and so on.
[ ] Load more functions
[OK] Load Channel List
[
v
]Load Info Bar
[ ]Load previous channel
Viewing channel information
As you use the [CH ] buttons on your remote to scroll through channels, an information banner appears on the top
of the screen.
10:10 PM 06-30-2004
Antenna │CC │DTV │16:9 │1080i
│ │Unknown 5.1CH
1:00 AM 01 Jul. - 4:00 AM 01 Jul. AT06 1080i
AT05 1080i
10:00 PM30 jun. 1:00 AM 01 Jul.
1
6
7
2 3 4 5
8 9
AT05-2
5-2
10

14
ENGLISH FRANÇAIS ESPAÑOL
The information banner displays the following information:
1. Channel number
2. Lock status
3. Input
4. Program name
5. Show identification
6. Channel name
7. Current date and time
8. Beginning and end time of the next program
9. Start/Stop time progress bar of the current program
10. Prompt
If you are watching a particular channel, you can also press the up arrow button of your remote to view channel
information.
Viewing a channel list
After you have done an automatic channel scan (if you’re using an antenna) or receiving your channels through a cable
provider, you can view your list of channels by pressing [OK] on your remote.
You will see the channel list display on the right side of the screen.
Creating a Favorite List
To quickly access your most-watched channels, you can create a Favorite List.
To create your Favorite List:
1. Press the [ ] button on your remote.
2. Press the [v]button to select Settings, and then press [OK] button to enter the Settings menu.
3. Select Channel > Favorite List.
4. Using the [
v
/ v ] buttons of your remote, select a channel and press [OK] button.
A heart-shaped indicator will appear beside the channel as confirmation that it has been successfully added.
Viewing your Favorite list
To view channels that you’ve added to your Favorite List simply press [OK] on your remote to call out the channel list.
The channel list appears on the right side of the screen and heart-shaped icons are shown next to the channels that
make up your Favorite List. You can press [</>]buttons to switch the channel list (Antenna or Cable) , Favorite and
History list.

15
ENGLISH FRANÇAIS ESPAÑOL
Using the Menu function
To quickly access Menu function, press the [ ] button on your remote.
Accessibility
You can set Menu Audio, Video Description and High Contrast Menu on or off. The function can be used to meet the
needs of visually impaired people.
When the Menu Audio is set on, the contents of each menu displayed can be broadcast out.
When the Video Description is set on, you can hear the introduction of relevant programs.
When the High Contrast Menu is set on, the comparison of menu items is more vivid.
Picture Mode
If you’d like to configure the settings for your picture, then there are seven types of picture modes available: Vivid,
Standard, Energy Saving, Theater, Game, Sports and Calibrated.
Sound Mode
Select a preset sound mode to suit the type of content you are listening to: Standard, Speech,Late Night, Music,
Theater and Sports.
Picture Size
Adjust the Aspect Ratio to stretch or zoom in on your picture. You can choose from the following settings: Auto,
Normal, Zoom, Wide, Direct,Dot-By-Dot, Panoramic and Cinema.
Closed Captioning
You can switch between CC Off, CC On and CC On When Mute in ANT/CABLE mode.
Audio Language(MTS)/SAP
You can choose the audio language in DTV mode and set SAP for Mono, Stereo or SAP in ATV mode.
Audio Only
When you select this option, the screen will not display the picture. You can only listen the audio. Press any button
except the [ ] button, [VOL ]buttons and [ ] button to restore operation.
HDMI 2.0 Format
Match the connected device output format. You can select Standard format and Enhanced format in HDMI mode.
Settings
The Settings Menu consists of the following settings: Picture, Sound, Network, Channel, Accessibility, System and
Support.

16
ENGLISH FRANÇAIS ESPAÑOL
Basic Settings
Your TV comes with many TV setting features to allow you to customize the picture based on your viewing preference
and environment. As you navigate throughout different screens to access settings, some of the indicators appear as
words On and Off.
Using the Settings Menu
You can press the [ ] button to access the Menu, press the [v]button on the D-pad to select Settings, and then
press [OK] button to enter the Settings Menu.
The Settings Menu consists of the following settings:
• Picture
• Sound
• Network
• Channel
• Accessibility
• System
• Support
In each menu, you can:
Press the [
v
/ v ] buttons to select an item.
Press the [OK] buttons to enter the sub-menu or to set on or off.
Press the [ < / > ] buttons to adjust the value.
Press the [ ]button to return to the previous menu.

17
ENGLISH FRANÇAIS ESPAÑOL
Picture Menu
Picture Mode: Select a preset mode that best suits your
preference and viewing environment, there are some types
of picture modes available: Vivid, Standard, Energy Saving,
Theater, Game, Sports and Calibrated.
Picture Size: Adjust the picture aspect ratio based on the content
you are watching. You can choose from the following settings:
Auto,Normal, Zoom, Wide, Direct, Dot-By-Dot, Panoramic or
Cinema.
Picture Mode Settings: Customize selected Picture Mode.
• Apply Picture Settings: Remember customized settings when using the Picture Mode on current source or all
sources.
• Backlight: Adjust Local Dimming, Backlight Level, and Minimum Backlight to change the overall brightness of the
screen.
NOTE
Some models don’t support the function of Local Dimming.
• Contrast: Increase or decrease contrast between light and dark colors.
• Brightness: Adjust the Brightness level to generate lighter or darker images.
• Color: Adjust the color intensity level.
• Tint: Adjust the colors from a green to magenta tint to view the natural skin tones of people on the screen.
• Sharpness: Improve sharpness of the picture edges.
• Overscan: Turn on if you are receiving analog antenna or cable input.
• Color Temperature: Adjust the white color shade.
• Motion Enhancement: This setting minimizes afterimages that are left on the screen when viewing fast-moving
objects. You can adjust it from Smooth, Standard, Clear, Film, Custom or Off. A Smooth setting will produce a
smoother picture whereas a Clear setting will result in a picture that has less judder (shaking).
NOTE
• Some models don’t support the function of Motion Enhancement.
• Digital Noise Reduction: Improve picture clarity by reducing video noise.
• HDMI Dynamic Range: Select Limit for 480p DVD players and select Full for Blu-ray.(HDMI mode only)
• Active Contrast: Automatically adjust contrast according to video content to improve detail.
• Expert Settings: Adjust the color space and Gamma to best suit the content you're viewing.
• Reset Picture Settings: Reset all picture settings to factory default.
Sound Menu
Sound Mode: Select a preset mode that best suits your audio
environment: Standard, Speech,Late Night, Music,Theater and
Sports.
Set the sound effects to suit your preference.
Configure your audio settings for your sound preferences. Once you
choose the mode, you can adjust the audio based on the following
settings:
Speakers: Switches the sound from the TV speakers to Optical or
HDMI ARC output connectors.
• Speakers: Switches the sound from the TV speakers to Optical or HDMI ARC output connectors.
• Digital Audio Out: Select the digital audio output format for your external audio device. For example, choose
RAW (which is uncompressed audio in RAW form) if you have 5.1 CH Surround Sound Speaker set up. Choose
PCM if you have an amplifier that does not support Dolby Digital technology.
Picture Mode: Standard
Picture
Select a preset mode that best
suits your preference and viewing
environment.
Picture Size: Wide
Picture Mode Settings
Sound Mode: Standard
Reset Audio Settings
Sound
Select a preset mode that best
suits your audio environment.
Speakers
Sound Mode Settings
Headphone
Advanced Audio Settings

18
ENGLISH FRANÇAIS ESPAÑOL
• Digital Audio Delay: Adjust the digital audio output delay time to sync sound from an external speaker with the
images on the TV.
• Lip Sync: Synchronize the displayed image with the audio output.
• Balance: Emphasizes sound from the left or right speaker.
Sound Mode Settings: Customize selected Sound Mode.
• Bass Boost: Bass Boost uses DTS TruBassTM to enhance the perception of bass frequencies to provide deep,
rich bass response from the TV's internal speakers.
• Surround Sound: Surround sound uses DTS TruSurroundTM to deliver an immersive surround sound experience
from the TV's internal speakers.
• Dialog Clarity: Dialog Clarity uses DTS Dialog ClarityTM to boost the frequency range of the human voice so dialog
is clearly understood and heard above audio or surround effects.
• Equalizer: Adjust low to high pitch sounds.
• Wall Mount setup: Improves sound for wall-mount position.
Headphone: Customize headphone audio.
• Headphone Mode: Disable the TV speaker when you are using a sound bar, ARC or any other external audio
amplifiers.
• Headphone Volume: Change the way audio is sent through the type of device that's connected to your TV Audio
Out port.
Advanced Audio Settings: Tune the audio settings and quality of the TV.
• Auto Volume Control: Activate to prevent the volume from changing when you switch TV channels.
• Preferred Audio Language: Set the audio language based on your preference.(The preferred language must be
supported by the broadcaster.)
Reset Audio Settings: Reset all of the Audio settings in current audio mode to the factory default values.
Network Menu
Network Configuration: Configure network settings to connect to
an available network.
When the Connection Type is Wired LAN, means you choose a
wired network connection to access the Internet.
• IP Settings: Most devices obtain an IP address automatically.
Set an IP address manually if you do not have a router, or if your
router does not assign IP addresses for you.
When the Connection Type is Wireless, means you choose a
wireless network connection to access the Internet.
• Refresh: Refresh wireless network.
• Add: You can add wireless network.
• Advanced Settings: Configure the advanced wireless network settings for the TV.
Connection Test: Tests the status of your network connection.
Network Information: View information about your network connection.
Bluetooth: Connects to external devices via Bluetooth.
NOTE
• Bluetooth function varies by model.
Network Information
Network Conguration: Connected
Connection Test
Network
Configure network settings to
connect on an available network.
Bluetooth

19
ENGLISH FRANÇAIS ESPAÑOL
Channel Menu
Tuner Mode: Select if you receive TV channels over the air
(antenna) or through a cable set-top box.
Auto Channel Scan: Automatically scan for channels.
Add A Channel: Type in a channel to add it manually to your TV.
Channel Skip: Skip selected channels from your Channel List.
Favorite List: Add Channels to your Favorite List.
Accessibility
Closed Captioning: Displays closed captions.
Video Description: Enables broadcasted descriptive audio for
visually impaired.
Menu Audio: Reads the menu items for visually impaired.
High Contrast Menu: Improves contrast for visually impaired.
Closed Caption Settings: Allows customization of closed caption
text display.
• Analog Caption: Select an Analog Caption setting from Off,
CC1-CC4, Text 1-Text 4.
CC1-CC4: Closed captioning appears in a small banner across the bottom of the screen. CC1 is usually the
“printed” version of the audio. CC2-CC4 display content provided by the broadcaster.
Text1-Text4: Closed captioning that covers half or all of the screen. Text1-Text4 display content provided by
the broadcaster.
Off: To turn off the Analog Caption.
• Digital Caption: Select a Digital Caption setting: Off, CS1-CS6.
• Digital CC Settings: There are two caption styles. One is the Automatic function set as the broadcaster, while
the other is the Custom style where you can adjust the Size, Font, Text Color, Text Opacity, Background Color
etc.
Menu Audio Settings: Allows customization of spoken menu language.
• Volume: Sets the volume level of the spoken menu language.
• Language: Selects the spoken menu language.
• Rate: Changes the rate of speech.
• Pitch: Changes the audio menu pitch.
• Focus Menu Audio: Lowers the background volume when menu audio is spoken.
System Menu
Parental Control: Turn on Parental Control to block children from
being able to view certain programs. The password is required
to be set when you use this function for the first time. For more
information about Parental Control, See Parental Control on page
22.
Language and Location: Select the language used for this TV and
your location.
• Language: Select the language used for this TV.
• Keyboard Layout: Select a language to match your external
keyboard.
• Location: Select your location.
Time Settings: Configure time and date.
Channel
Select if you receive TV channels
over the air (antenna) or through a
cable set top box.
Tuner Mode Antenna
Auto Channel Scan
Add A Channel
Channel Skip
Favorite List
Menu Audio Settings
Accessibility
Display closed captions
Closed Captioning < CC On When Mute >
Video Description
Menu Audio
High Contrast Menu
Closed Caption Settings
Amazon Alexa Service
System
Turn On Parental Controls to block
children from being able to view
certain programs.
Parental Control
Language and Location
Time Settings
Timers
HDMI-CEC
Application Manager
This manual suits for next models
1
Table of contents
Other Sharp TV manuals

Sharp
Sharp LC-19LE320 User manual

Sharp
Sharp LC-40FI5122E User manual

Sharp
Sharp 32BC2I User manual

Sharp
Sharp C-2890EES User manual

Sharp
Sharp LC-50U35T User manual

Sharp
Sharp 50DJ1K User manual

Sharp
Sharp 32SF560 User manual

Sharp
Sharp 29FL94 User manual

Sharp
Sharp 21LF-90RU User manual

Sharp
Sharp Aquos LC-52SE94U User manual

Sharp
Sharp 27R-S400 User manual

Sharp
Sharp 29L-FG1L User manual

Sharp
Sharp DV-5465S User manual

Sharp
Sharp 29V-FT450S User manual

Sharp
Sharp 27J-S100 User manual

Sharp
Sharp LC-40UG7252E User manual

Sharp
Sharp LC-32SH130E Manual

Sharp
Sharp 29H-FX3P User manual

Sharp
Sharp CL32S40 User manual

Sharp
Sharp 21LF-90C User manual