Sharp LC-80LE960X User manual

LC-80LE960X
LC-70LE960X
LC-60LE960X
LED BACKLIGHT TV
OPERATION MANUAL
LC80LE960X_EN_book.indb 1LC80LE960X_EN_book.indb 1 4/4/2014 1:07:57 PM4/4/2014 1:07:57 PM

LC80LE960X_EN_book.indb 2LC80LE960X_EN_book.indb 2 4/4/2014 1:07:58 PM4/4/2014 1:07:58 PM

1
OPERATION MANUAL ENGLISH
Dear SHARP customer
Thank you for your purchase of the SHARP LCD colour TV product. To ensure safety and many years of trouble-free
operation of your product, please read Important safety precautions carefully before using this product.
Contents
ENGLISH
Introduction.................................................................3
Precautions For Daily Use .......................................3
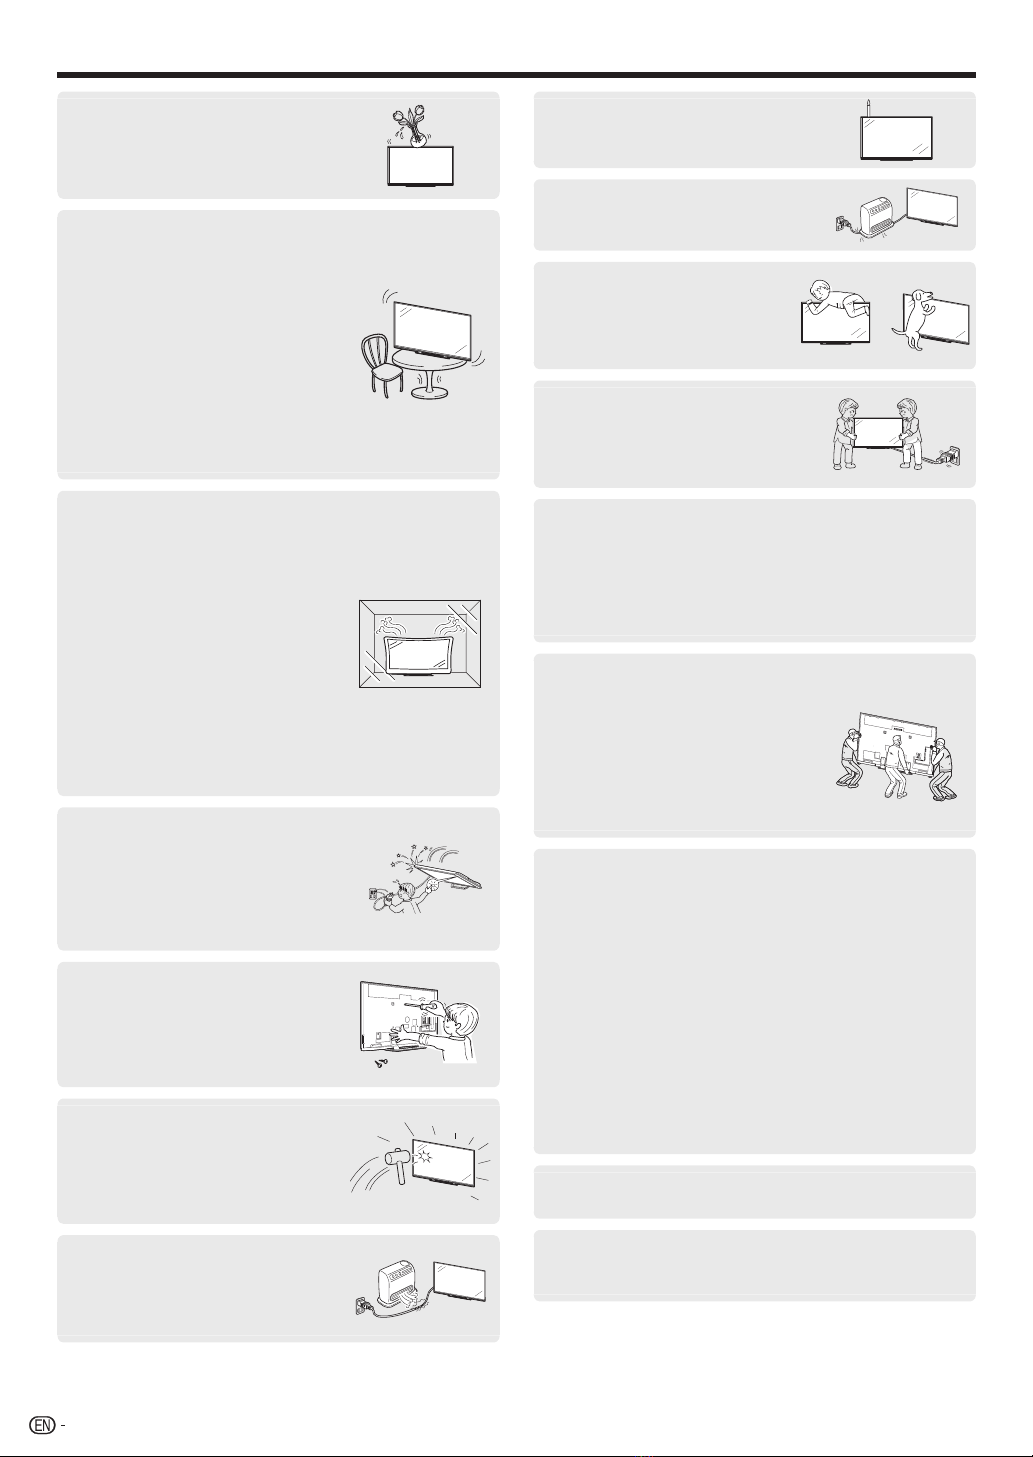
Important safety precautions...................................3
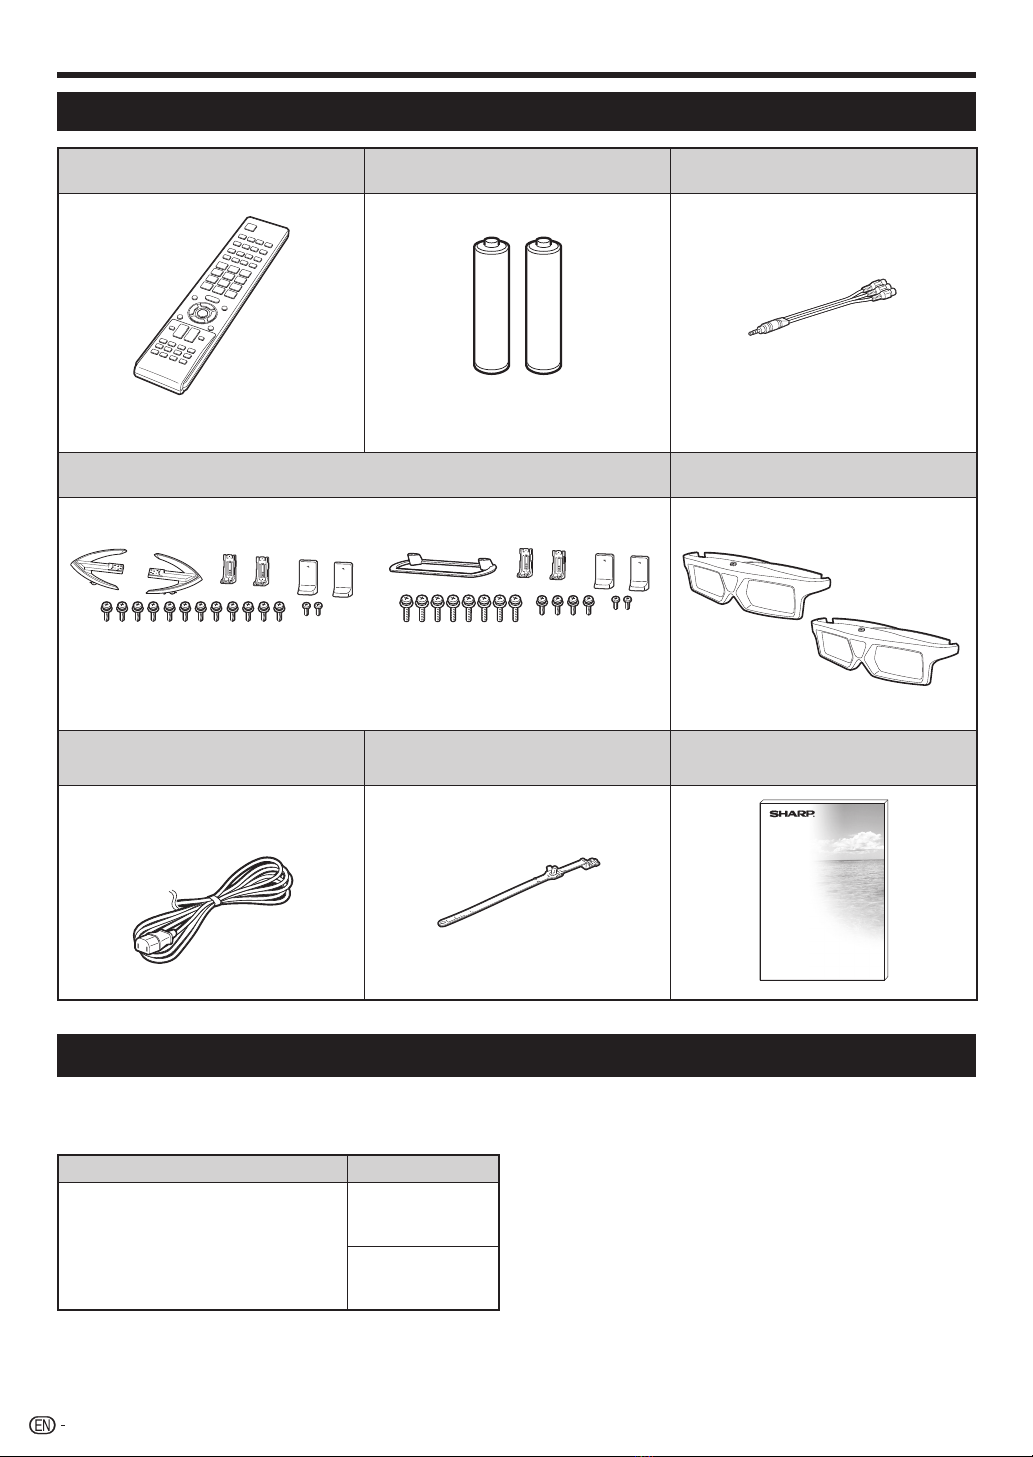
Supplied accessories..............................................6
Optional accessories ..............................................6
Preparation .................................................................7
Protection against overturning ................................7
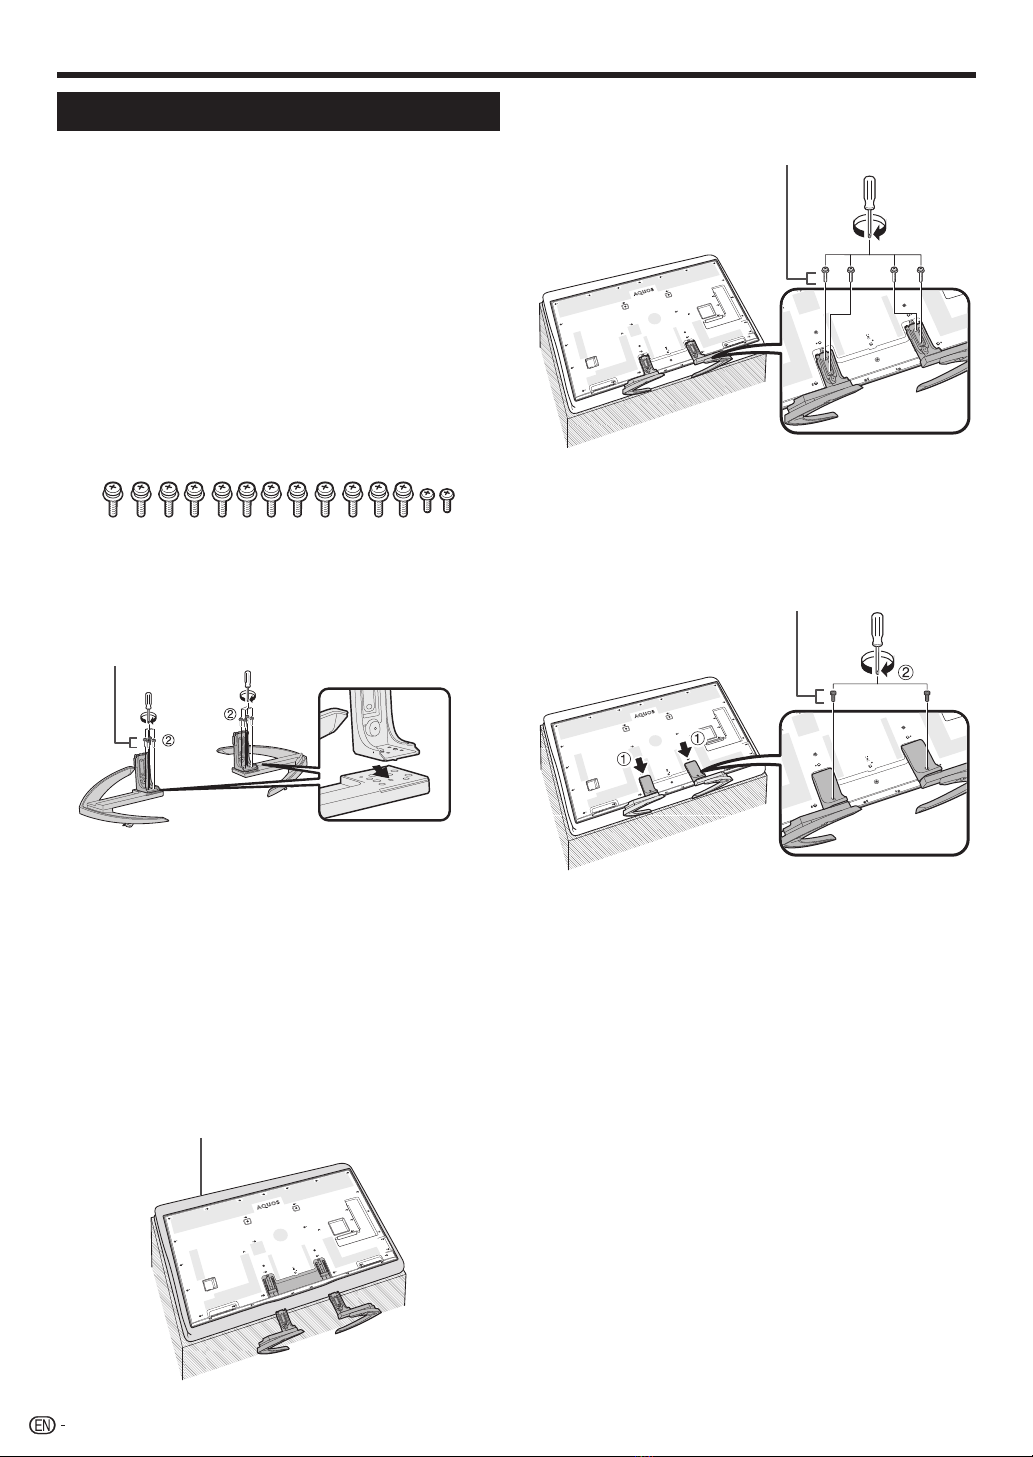
Attaching the stand unit – 70/60LE960X.................8
Attaching the stand unit
–
80LE960X ......................9
Connecting the TV................................................10
Using the remote control unit ................................11
Inserting the batteries....................................... 11
Angle of the remote control unit........................ 11
Cautions regarding the remote control unit .......11
Part names and functions........................................12
TV (front view).......................................................12
TV (rear view) ........................................................ 12
Remote control unit ..............................................14
Quick guide ...............................................................15
Inserting the CA card into the CI module...............15
Recording CAM PIN setting .................................. 15
CI plus 1.3 Standard.............................................15
What is the HOME? .............................................. 16
Basic operation ................................................16
Initial auto installation ............................................ 18
Checking signal strength and channel strength
(DTV only)........................................................... 18
Watching TV ..............................................................19
Daily operation......................................................19
Turning on/off the power – using the control
panel of the TV............................................... 19
Turning on/off the power – using the remote
control unit.....................................................19
Watching TV (DTV only) .................................... 20
CH list ..............................................................20
Programme information (DTV only) ...................20
Selecting an external video source ...................20
Switching the digital audio format (DTV only) ....21
Switching the analogue audio format................ 21
Favourite Channel Information...............................22
Operator profile..................................................... 22
Teletext .................................................................23
EPG (DTV only) .....................................................25
Useful settings for using EPG ...........................25
Selecting a programme using EPG (DTV only) ..26
Timer setup using EPG ....................................28
Cancelling the timer setup ................................28
Connecting external devices...................................29
Video connections ................................................30
HDMI connection .............................................30
Component connection.................................... 31
VIDEO connection............................................ 31
Audio connections................................................32
Speaker/amplifier connection ...........................32
AQUOS LINK .............................................................33
Controlling HDMI devices using AQUOS LINK.......33
AQUOS LINK connection...................................... 34
Regarding “Select recording device” ..................... 34
Operating an AQUOS LINK device........................35
Using a Smartphone with the TV........................... 36
Basic adjustment...................................................... 38
Picture settings..................................................... 38
Audio settings.......................................................40
Power save settings.............................................. 42
Channel settings ................................................... 43
Digital setting (DTV only)................................... 43
Analogue setting ..............................................44
Sort..................................................................45
Erase programme ............................................45
Useful viewing functions..........................................45
TV Start-up time setting ........................................45
Individual setting – Password................................46
Individual setting – Time........................................47
Individual setting – Language................................ 47
Optional features settings ..................................... 48
Selecting the picture size manually ...................48
Selecting the picture size automatically.............48
Setting audio input ...........................................49
Skipping specified inputs..................................49
Selecting the HDMI picture size automatically...50
Adjusting image position .................................. 51
Additional features ................................................51
Bluetooth setup ....................................................53
Miracast setup...................................................... 54
Network function...................................................... 55
Playing Back Files from a Portable Device or PC... 55
Easy share setting ............................................55
Device name setting ............................................. 55
Connecting to the network....................................55
Wired installation ..............................................55
Wireless installation ..........................................56
Specifications (Wireless LAN)................................ 58
Specifications (Bluetooth)...................................... 58
Using AQUOS.NET...............................................59
Clear browser setting............................................60
About links............................................................ 60
Other useful features ............................................... 62
USB-recording......................................................62
Connecting a USB HDD ...................................62
USB HDD registration.......................................62
How to operate USB-recording............................. 63
USB-recording .................................................64
USB-recording timer setting .............................64
Timer list .......................................................... 64
USB-recording playback ..................................64
Time shift playback ..........................................65
Multimedia/Home network.................................... 66
Photo mode .....................................................67
3D mode..........................................................67
LC80LE960X_EN_book.indb 1LC80LE960X_EN_book.indb 1 4/4/2014 1:07:58 PM4/4/2014 1:07:58 PM

2
Music mode .....................................................68
Video mode......................................................69
USB device/SD memory card compatibility...........70
Home network server compatibility .......................70
Connecting a PC....................................................... 71
Connecting a PC ..................................................71
Displaying a PC image on the screen....................71
Selecting the picture size.................................. 71
Adjusting the PC image automatically...............72
Adjusting the PC image manually ..................... 72
PC control of the TV ............................................. 73
Command list................................................... 74
Enjoying 3D image viewing......................................75
Before using the 3D glasses ................................. 75
Preparing for the 3D glasses.................................76
Part Names...................................................... 76
Using the 3D glasses ............................................77
Before using the 3D Glasses ............................77
Attaching the Nose Pad ................................... 77
Using the 3D glasses........................................77
Usage Range of the 3D Glasses....................... 77
Replacing the Battery.......................................78
Cautions for 3D image viewing.............................. 79
Display format for 3D and 2D images ...................79
Viewing 3D images ............................................... 80
Receiving a 3D image signal that can be
detected automatically ...................................80
Switching 3D to 2D mode ................................ 80
Receiving a 3D image signal that cannot be
detected automatically ...................................80
Watching 2D images in 3D ............................... 81
Switching to the previous mode ....................... 81
3D Menu ..........................................................81
Configuring the TV settings to enhance 3D image
viewing ...............................................................81
3D picture adjustments .................................... 81
3D setup ..........................................................82
Specifications — 3D glasses................................. 83
Troubleshooting — 3D Images..............................84
Appendix ...................................................................85
Troubleshooting ....................................................85
Troubleshooting — Digital broadcasting................ 85
Reset....................................................................86
Updating your TV via DVB-T (DTV only)................. 86
Getting information ...............................................87
Updating your TV via USB/Network ......................87
Information on the software licence for this
product ..............................................................88
Software licence...............................................88
Specifications .......................................................90
Removing the stand.............................................. 91
Mounting the TV on a wall.....................................92
Dimensional drawings........................................... 94
CLEARING THE PASSWORD ............................... 96
This product qualifies for ENERGY STAR when “HOME”
is selected for “TV Location”.
Setting “TV Location” to “HOME” allows the TV to
achieve an energy-saving status for household use.
NOTE
• The illustration and on-screen displays in this operation manual are for explanation purposes and may vary slightly from the
actual operation.
• The illustrations used throughout this operation manual are based on LC-80LE960X.
LC80LE960X_EN_book.indb 2LC80LE960X_EN_book.indb 2 4/4/2014 1:07:58 PM4/4/2014 1:07:58 PM

3
Precautions For Daily Use
Observe the following items
Maintenance of the cabinet
• When cleaning the cabinet, use a soft cloth (made of cotton, floss, etc.) to clean gently.
• Do not use a dry or damp rag mixed with chemicals, as this could cause the ingredients of the cabinet body to deteriorate or
crack.
• Be careful not to use an abrasive cloth for cleaning or clean with excessive force, as this could scratch the surface of the
cabinet.
• If the cabinet is greatly soiled, clean with a soft cloth (made of cotton, floss, etc.) soaked with a small amount of diluted neutral
detergent and wrung out, and then clean with a soft dry cloth.
• Solvents such as benzene or thinner could cause the cabinet to deteriorate, or make its coating come off. Therefore do not use
such solvents to clean the cabinet.
• Because plasticizer is included in the plastics, deterioration or the coating peeling off could occur when the cabinet comes into
contact with some substances. Therefore keep it away from volatile substances such as insecticide. In addition, do not let it
come into contact with objects made of rubber, resin, etc. for a long time.
Maintenance of the LCD panel
• Before cleaning the LCD panel, be sure to turn off the TV set and unplug the power cord from the outlet.
• When cleaning the LCD panel, use a dry and soft cloth (made of cotton, floss, etc.) to clean the surface of the LCD panel gently.
For protecting the LCD panel, do not clean with a dirty cloth, detergent, or a dry or damp rag mixed with chemicals, as this
could cause peeling of the panel surface.
• Be careful not to clean with an abrasive cloth or with excessive force, as this could cause the panel surface to be scratched.
• If the LCD panel is greatly soiled, clean it gently with a soft cloth (made of cotton, floss, etc.) soaked with a small amount of
water (Do not clean with excessive force, so as to avoid the scratch of the panel surface).
• If dust sticks on the surface of the LCD panel, clean the panel with a commercially available cleaning brush (anti-static brush).
Important safety precautions
Caring for the cabinet
• Use a soft cloth (cotton, flannel, etc.) and gently wipe the
surface of the cabinet.
• Using a chemical cloth (wet/dry sheet type cloth, etc.) may
deform the components of the main unit cabinet or cause
cracking.
•Wiping with a hard cloth or using strong force may scratch
the surface of the cabinet.
• If the cabinet is very dirty, wipe with a soft cloth (cotton,
flannel, etc.) soaked in neutral detergent diluted with water
and thoroughly wrung out, and then wipe with a soft dry
cloth.
• The cabinet is primarily made of plastic. Avoid using
benzene, thinner, and other solvents, as these may deform
the cabinet and cause the paint to peel off.
• Do not apply insecticides or other volatile liquids.
• Also, do not allow the cabinet to remain in contact
with rubber or vinyl products for a long period of time.
Plasticizers inside the plastic may cause the cabinet to
deform and cause the paint to peel off.
• When relocating the product
placed on a cart, it must be moved
with utmost care. Sudden stops,
excessive force and uneven floor
surface can cause the product to fall
from the cart.
Caring for the front panel
• Turn off the main power and unplug
the AC cord from the wall outlet
before handling.
• Gently wipe the surface of the front
panel with a soft cloth (cotton,
flannel, etc.).
• To protect the front panel, do not
use a dirty cloth, liquid cleaners, or
a chemical cloth (wet/dry sheet type
cloth, etc.). This may damage the
surface of the front panel.
• Wiping with a hard cloth or using
strong force may scratch the surface
of the front panel.
• Use a soft damp cloth to gently wipe
the front panel when it is really dirty
(It may scratch the surface of the
front panel when wiped strongly).
• If the front panel is dusty, use
an anti-static brush, which is
commercially available, to clean it.
• Water and moisture — Do not use
the product near water, such as
bathtub, washbasin, kitchen sink,
laundry tub, swimming pool and in a
wet basement.
Introduction
LC80LE960X_EN_book.indb 3LC80LE960X_EN_book.indb 3 4/4/2014 1:07:58 PM4/4/2014 1:07:58 PM

4
Introduction
• Do not place vases or any other
water-filled containers on this
product.
The water may spill onto the product
causing fire or electric shock.
• Stand — Do not place the product
on an unstable cart, stand, tripod
or table. Doing so can cause the
product to fall, resulting in serious
personal injuries as well as damage
to the product. Use only a cart,
stand, tripod, bracket or table
recommended by the manufacturer
or sold with the product. When
mounting the product on a wall, be
sure to follow the manufacturer’s
instructions. Use only the mounting
hardware recommended by the
manufacturer.
• Ventilation — The vents and other
openings in the cabinet are designed
for ventilation. Do not cover or block
these vents and openings since
insufficient ventilation can cause
overheating and/or shorten the life
of the product. Do not place the
product on a bed, sofa, rug or other
similar surface, since they can block
ventilation openings. This product is
not designed for built-in installation;
do not place the product in an
enclosed place such as a bookcase
or rack, unless proper ventilation
is provided or the manufacturer’s
instructions are followed.
• In case the product is dropped and
the cabinet is damaged, be sure to
turn off the power of the product,
and unplug the power cord. If you
continue to use the product, it may
cause fire or electric shock. Contact
your dealer.
• Do not open the rear cover of the
cabinet to reconstruct the circuits.
There exists high voltage within the
cabinet and it may cause electric
shock and injury. If maintenance is
required, contact your dealer.
• The LCD panel used in this product
is made of glass. Therefore, it can
break when the product is struck
forcefully or with a sharp object. If
the LCD panel is broken, be careful
not to be injured by broken glass.
• Heat sources — Keep the product
away from heat sources such as
radiators, heaters, stoves and other
heat-generating products (including
amplifiers).
• To prevent fire, never place any type
of candle or naked flames on the top
or near the TV set.
• To prevent fire or shock hazard, do
not place the AC power cord under
the TV set or other heavy items.
• Do not place heavy objects on
this product or stand on it.
Doing so could cause injury if the
product overturns. Take special
care near children and pets.
• Unplug the power cord before you
move the TV set. If not unplugged
beforehand, the power cord may
become damaged and cause
electric shock.
The LCD panel is a very high technology product with
2,073,600 pixels, giving you fine picture details.
Due to the very large number of pixels, occasionally a few
non-active pixels may appear on the screen as a fixed point
of blue, green, red or yellow.
This is within product specifications and does not constitute
a fault.
Precautions when transporting the TV
• When transporting the TV, never
carry it by holding or otherwise
putting pressure onto the display.
Be sure to always carry the TV by
two or more people (80 inch: three
or more people) holding it with two
hands — one hand on each side of
the TV.
If a television is not positioned in a sufficiently stable location,
it can be potentially hazardous due to falling.
Many injuries, particularly to children, can be avoided by
taking simple precautions such as:
• Using cabinets or stands recommended by the
manufacturer of the television.
• Only using furniture that can safely support the television.
• Ensuring the television is not overhanging the edge of the
supporting furniture.
• Not placing the television on tall furniture (for example,
cupboards or bookcases) without anchoring both the
furniture and the television to a suitable support.
• Not standing the televisions on cloth or other materials
placed between the television and supporting furniture.
• Educating children about the dangers of climbing on
furniture to reach the television or its controls.
• Do not display a still picture for a long time, as this could
cause an afterimage to remain.
• Install the product on the place where the AC cord can
be unplugged easily from the AC outlet, or from the AC
INPUT terminal on the rear of the product.
NOTE
• The above are pictures for reference only; the actual item
might be different.
LC80LE960X_EN_book.indb 4LC80LE960X_EN_book.indb 4 4/4/2014 1:07:58 PM4/4/2014 1:07:58 PM

5
Introduction
3D Glasses
Prevention of accidental ingestion
• Keep the accessory out of the reach of small children. Small children can accidentally swallow these parts.
– If a child accidentally swallows any of these parts, seek immediate medical attention.
Do not disassemble
• Do not disassemble or modify the 3D Glasses except when recycling the batteries. Do not modify the 3D Glasses.
Caution for lithium battery
• Do not expose the 3D Glasses to excessive heat, such as direct sunlight, fire or in an area with high humidity.
• Replace only with the same or equivalent type of battery. The battery may explode if improperly replaced.
• Take care not to reverse the battery poles (+ and -) when loading the battery. Loading the battery incorrectly may damage the
battery of cause it to leak battery fluid, which could result in a fire, injury or damage.
Handling the 3D Glasses
• Do not drop, exert pressure on, or step on the 3D Glasses. Doing so may damage the glass section, which may result in the
risk of injury.
• Be careful not to trap your finger in the hinge section of the 3D Glasses. Doing so may result in injury.
– Pay special attention when children are using this product.
Using the 3D Glasses
• Use of the 3D Glasses should be limited to a maximum of 3 hours, and in any case no more than one movie.
• Use only the 3D Glasses recommended for this TV.
• Use the 3D Glasses only for the specified purpose.
• Do not move around while wearing the 3D Glasses. The surrounding area may appear dark, which may result in falling or other
accidents that may cause injury.
Viewing 3D images
• If you experience dizziness, nausea, or other discomfort while viewing 3D images, discontinue use and rest your eyes.
• Do not use the 3D Glasses if they are cracked or broken.
LC80LE960X_EN_book.indb 5LC80LE960X_EN_book.indb 5 4/4/2014 1:07:59 PM4/4/2014 1:07:59 PM

6
Supplied accessories
Introduction
Remote control unit ( x 1) “AAA” size battery ( x 2) AV cable ( x 1)
Pages 11 and 14 Page 11 Page 31
Optional accessories
Some of the listed optional accessories may not be available depending on the region.
Please check with your nearest Sharp Authorised Dealer for current optional accessories as we may add more optional
accessories from time to time.
Part name Part number
3D glasses
AN-3DG20-B
AN-3DG30
AC cord ( x 1) Cable tie ( x 1) Operation manual
LC-80LE960X only
Stand unit 3D glasses ( x 2)
LC-70/60LE960X LC-80LE960X
Page 8 Page 9
LC80LE960X_EN_book.indb 6LC80LE960X_EN_book.indb 6 4/4/2014 1:07:59 PM4/4/2014 1:07:59 PM

7
Protection against overturning
There is a danger of the product overturning in the case of a disaster or sudden collision. Carry out the following tip-
resistant measurement for your safety.
Anchoring the TV to the wall or a pillar
1Affix the TV to the wall or a pillar using
extra strong ties and cup hooks. View from the top
no
Wall
Cup hook (commercially available)
Tie (commercially available)
Fixing the TV to the table
1Place the TV on the table.
2Pull the attached restraining bracket out so that it
is at a 90 degrees angle.
3Insert commercially available screw in the hole of
the restraining bracket and tighten the screw to
secure the TV to the table.
• Use commercially available screw to firmly secure the TV.
CAUTION
• As this product is heavy, use a table that is wide
enough to support the product and capable of
withstanding the product’s weight. The table should be
set where it will not be overturned.
• Be sure to use at least two people when moving the TV.
Stand
Screw
(commercially
available)
Preparation
Restraining bracket
LC80LE960X_EN_book.indb 7LC80LE960X_EN_book.indb 7 4/4/2014 1:07:59 PM4/4/2014 1:07:59 PM

8
Attaching the stand unit – 70/60LE960X
• Before attaching (or detaching) the stand, unplug the AC
cord.
• Before performing work, spread cushioning over the surface
on which you will be laying the TV. This will prevent it from
being damaged.
• Be sure that two or more persons attach the stand.
CAUTION
• Attach the stand in the correct direction.
•
Be sure to follow the instructions. Incorrect installation
of the stand may result in the TV falling over.
•
After attaching the stand to the TV, do not hold the stand
when you put up, set up, move or lay down the TV.
•
Do not remove the stand from the TV unless using a wall
mount bracket to mount it.
1Confirm that there are 14 screws (twelve M5
screws and two M4 screws) supplied with the
stand unit.
2Attach the supporting post to the stand base.
1Insert the claws of the supporting post into the stand
base.
2Secure the post and the base using the M5 screws
(length: 60"/70" (14 mm)) and a screwdriver.
M5 screws
NOTE
• Tighten the screws to the holes of the mark “B”.
3Insert the stand into the openings on the bottom
of the TV (hold the stand so it will not drop from
the edge of the base area).
• Make sure that the stand is firmly inserted into the TV.
Improper installation may result in tilting of the TV set.
•
Instead of using a soft cushion, the cardboard box
that the TV is packed in can be assembled and used
as a work table (refer to the instructions on the box to
assemble the work table).
Soft cushion
4Insert and tighten the M5 screws (length: 14 mm)
into the holes on the rear of the TV.
M5 screws
5Attaching the stand cover.
1Insert the stand cover.
2Insert and tighten the M4 screws (length: 8 mm) into
the holes of the stand cover.
• Tighten the screws by pressing the bottom of the
stand base to the TV side.
M4 screws
Preparation
LC80LE960X_EN_book.indb 8LC80LE960X_EN_book.indb 8 4/4/2014 1:08:00 PM4/4/2014 1:08:00 PM

9
Attaching the stand unit
–
80LE960X
•
Before attaching (or detaching) the stand, unplug the AC cord.
•
Before performing work, spread cushioning over the surface
on which you will be laying the TV. This will prevent it from
being damaged.
•
Be sure that two or more persons attach the stand.
CAUTION
•
Attach the stand in the correct direction.
•
Be sure to follow the instructions. Incorrect installation
of the stand may result in the TV falling over.
•
After attaching the stand to the TV, do not hold the
stand when you put up, set up, move or lay down the TV.
•
Do not remove the stand from the TV unless using a wall
mount bracket to mount it.
1Confirm that there are 14 screws (eight M6
screws, four M5 screws and two M4 screws)
supplied with the stand unit.
2Attach the supporting post to the stand base.
1
Insert the claws of the supporting post into the stand base.
2
Secure the post and the base using the M6 screws (length:
20 mm) and a screwdriver.
M6 screws
NOTE
• Tighten the screws to the holes of the mark “B”.
3Insert the stand into the openings on the bottom
of the TV (hold the stand so it will not drop from
the edge of the base area).
•
Make sure that the stand is firmly inserted into the TV.
Improper installation may result in tilting of the TV set.
•
Instead of using a soft cushion, the cardboard box
that the TV is packed in can be assembled and used
as a work table (refer to the instructions on the box to
assemble the work table).
Soft cushion
4Insert and tighten the M5 screws (length: 14 mm)
into the holes on the rear of the TV.
M5 screws
5Attaching the stand cover.
1Insert the stand cover.
2Insert and tighten the M4 screws (length: 8 mm) into
the holes of the stand cover.
• Tighten the screws by pressing the bottom of the
stand base to the TV side.
M4 screws
NOTE
• To detach the stand unit, perform the steps in reverse order.
• A screwdriver is not supplied with this product.
• In the installation procedure, be careful not to catch your
fingers between the TV set and the floor.
Preparation
LC80LE960X_EN_book.indb 9LC80LE960X_EN_book.indb 9 4/4/2014 1:08:01 PM4/4/2014 1:08:01 PM

10
Preparation
Connecting the TV
Notes on installing the TV
• Avoid direct sunlight and place the TV in a well-ventilated
location.
• Place the TV in a level location.
• Do not turn on the power of the TV before connecting the AC
cord.
LC-80LE960X only
p
n
o*
Plug the standard DIN45325 plug (IEC 169-2)
75-ohm coaxial cable.
Insert a CA card into the CI slot to watch scrambled
broadcasts (Page 15).
Plug the AC cord in to the AC outlet (product shape
varies in some countries).
NOTE
* This function applicable for certain countries only.
• The cable tie can be moved from to .
• Place the TV close to the AC outlet, and keep the power plug
within reach.
• Disconnect the AC cord from the AC outlet if the TV will not
be used for a long period of time.
LC80LE960X_EN_book.indb 10LC80LE960X_EN_book.indb 10 4/4/2014 1:08:01 PM4/4/2014 1:08:01 PM

11
Using the remote control unit
Inserting the batteries
Before using the TV for the first time, insert two supplied “AAA” size batteries. When the batteries become depleted
and the remote control unit fails to operate, replace the batteries with new “AAA” size batteries.
1Open the battery cover. 2Insert the two supplied “AAA”
size batteries.
3Close the battery cover.
• Place batteries with their terminals
corresponding to the (e) and (f)
indications in the battery compartment.
CAUTION
Improper use of batteries can result in chemical leakage or explosion. Be sure to follow the instructions below.
• Do not mix batteries of different types. Different types of batteries have different characteristics.
• Do not mix old and new batteries. Mixing old and new batteries can shorten the life of new batteries or cause chemical leakage in
old batteries.
• Remove batteries as soon as they have worn out. Chemicals that leak from batteries can cause a rash. If you find any chemical
leakage, wipe thoroughly with a cloth.
• The batteries supplied with this product may have a shorter life expectancy due to storage conditions.
• If you will not be using the remote control unit for an extended period of time, remove the batteries from it.
• Batteries shall not be exposed to excessive heat such as sunshine, fire or the like.
Angle of the remote control unit
Use the remote control unit by pointing it towards the remote control sensor. Objects between the remote control unit
and sensor may prevent proper operation.
30° 5 m
30°
30°
30°
Remote control sensor
*When mounting the TV on the wall.
Cautions regarding the remote control unit
• Do not expose the remote control unit to shock. In addition, do not soak the remote
control unit to liquids, and do not place in an area with high humidity.
• Do not install or place the remote control unit under direct sunlight. The heat may cause
deformation of the unit.
• The remote control unit may not work properly if the remote control sensor of the TV is
under direct sunlight or strong lighting. In such cases, change the angle of the lighting or
the TV, or operate the remote control unit closer to the remote control sensor.
Preparation
LC80LE960X_EN_book.indb 11LC80LE960X_EN_book.indb 11 4/4/2014 1:08:02 PM4/4/2014 1:08:02 PM

12
TV (front view)
POWER
MENU
INPUT
VOL + /−
CH
POWER
REC
TIMER
3D infrared emitter*1
Remote control
sensor
OPC
sensor*2
POWER
indicator
TIMER
indicator
REC
indicator
*1 This panel emits infrared signal towards the 3D glasses you wear when viewing 3D images. Do not place anything between the 3D infrared emitter on
the TV and the infrared receiver on the 3D glasses. Refer to page 79 for details.
*2 OPC: Optical Picture Control (Page 39)
TV (rear view)
RS-232C terminal
INPUT 6 (COMPONENT/AUDIO (L/R)/VIDEO)
terminal
PC terminal
7
INPUT 6
6
COMPONENT
Part names and functions
LC80LE960X_EN_book.indb 12LC80LE960X_EN_book.indb 12 4/4/2014 1:08:02 PM4/4/2014 1:08:02 PM

13
TV (rear view) — continued
C.I.
SD/
SDHC
USB 1
AUDIO(L/R)
(DC 5V 900mA)
ARC
OUTPUT
DIGITAL
AUDIO
OUTPUT
USB 2
AUDIO IN
(HDMI 2/PC)
AV IN
AUDIO (L/R)
INPUT 5
5
SD/SDHC card slot
OUTPUT
(Headphones/AUDIO
(L/R)) terminal*1
USB 1 port
HDMI 3 (HDMI/ARC)
terminal (INPUT 3)
HDMI 2 (HDMI)
terminal (INPUT 2)
HDMI 1 (HDMI)
terminal (INPUT 1)*4
HDMI 4 (HDMI/MHL)
terminal (INPUT 4)
C.I.
(COMMON INTERFACE)
slot*3
AUDIO IN (HDMI 2/PC)
jack*2
Antenna terminal
USB 3 (HDD) port
ETHERNET
(10/100) terminal
USB 2 port
DIGITAL AUDIO
OUTPUT terminal
INPUT 5 (AV IN)
AUDIO (L/R) terminal
*1 Refer to page 50 for details.
*2 The HDMI 2 and PC terminals can both use the same audio input terminal (AUDIO IN (HDMI 2/PC)). However, the proper item must be selected in the
“Audio select” menu (refer to page 49 for details).
*3 This function applicable for certain countries only.
*4 HDCP 2.2 copy protected signal can be viewed via HDMI 1 only.
WARNING
• Excessive sound pressure from earphones and headphones can cause hearing loss.
• Do not set the volume at a high level. Hearing experts advise against extended listening at high volume levels.
Part names and functions
LC80LE960X_EN_book.indb 13LC80LE960X_EN_book.indb 13 4/4/2014 1:08:02 PM4/4/2014 1:08:02 PM

14
Part names and functions
Remote control unit
EXT MEDIA
TV INFO
MENU
GUIDE
SLEEP
5
6
15
16
2
11
12
8
9
10
7
1
27
28
13
4
17
*
18
14 25
26
22
23
20
19
21
24
3
1 <(Standby/On)
To switch the power on and off (Page 19).
2 EXT MEDIA buttons
AQUOS LINK
If external equipment such as a AQUOS BD player
is connected via HDMI cables and is AQUOS LINK
compatible, you can use these EXT MEDIA buttons. See
pages 33 and 36 for details.
USB-recording
Record a programme you are watching. (Pages 62–66).
3 >
Press to access analogue and digital TV mode.
4 INFO
DTV : Display the programme information (Page 20).
ATV : Display the channel information.
5 0–9*
Set the channel (Page 19).
6 A(Flashback)*
Press to return to the previously selected channel or
external input.
7 HOME
Display the “HOME” screen to enjoy Internet connection
and Home network function and to perform settings for the
TV (Page 16).
8 3D
Select between 3D and 2D image viewing (Pages 75–84).
9 a/b/c/d(Cursor)
Select a desired item on the setting screen.
?(ENTER)
Execute a command.
10 B
Turn off the On-Screen Display (Page 16).
11 e(Mute)
Mute the sound.
12 Y+/–
Set the volume.
13 MPX
Select a sound multiplex mode (Page 21).
14 WIDE
Change a wide image mode (Pages 48, 69, 70 and 71).
15 CONTROL
Press to display the panel to operate some functions on the
screen.
16 FREEZE/3(Hold)
Freeze a motion picture on the screen.
Teletext mode : Stop updating teletext pages automatically.
Press 3again to release the hold mode (Page 23).
17 m(Teletext)
Select the teletext mode (All TV image, all text image and
TV/text image) (Page 23).
18 [(Subtitle)
Switch subtitle languages on/off (Page 23).
19 b(INPUT SOURCE)*
Select an input source (Pages 20, 30, 49, 50, 53, 54, 71 and
72).
20 @/k(Reveal hidden teletext)
Displays the menu screen (Page 16).
Teletext mode: Display hidden characters (Page 23).
21 C/v(Top/Bottom/Full)
Menu mode : Return to the previous menu screen (Page 16).
Teletext mode : Set the area of magnification (Page 23).
22 GUIDE/1(Subpage)
DTV : To display EPG (Electronic Programme Guide) screen
(Pages 25–28).
ATV : Display the channel list.
Teletext mode : Display the teletext subpage directly
(Page 23).
23 CHr/s
TV input mode : Select the channel (Page 19).
AQUOS.NET : Select the page (Page 59).
24 R/G/Y/B (Colour) buttons
The coloured buttons are correspondingly used to select
the coloured items on the screen (e.g., AQUOS LINK,
Multimedia, Home network, teletext).
25 DISPLAY
Display the channel or input information.
Reveal/hide the guide display for Multimedia mode (Pages
67–69).
26 #
Select audio/video settings (Page 38).
27 ECO
Select “Energy save” setting (Page 42).
28 SLEEP
Set the sleep timer.
NOTE
* “0 − 9”, “A”, “b” are used by string input like a mobile
phone.
LC80LE960X_EN_book.indb 14LC80LE960X_EN_book.indb 14 4/4/2014 1:08:02 PM4/4/2014 1:08:02 PM

15
Quick guide
Inserting the CA card into the CI
module
In order to receive coded digital stations, a common
interface module (CI module) and a CA card must be
inserted in the CI slot of the TV.
1Carefully insert the CI module in the CI slot with
the contact side forward.
2The logo on the CI module must be facing outward
from the rear of the TV.
EChecking CI module information
Go to “HOME” > “TV Menu” > “Setup” >
“Option” > “CI setting” > “CI menu”.
• This menu is only available for digital stations.
• The content of this menu depends on the provider of the
CI module.
Module
General information on CI module displays.
Menu
Adjustment parameters of each CA card displays.
Enquiry
You can input numerical values such as passwords here.
NOTE
• It takes a few minutes to certify the licence key when you
insert a CA card into the CI+ compatible CI module for the
first time. This process may fail when there is no antenna
input or you have never run “Auto installation”.
• The CI+ compatible CI module sometimes upgrades its
firmware. You may not receive any TV images before
upgrading. You can only use the POWER during upgrading.
• Copy protected content may not be output or may be output
with a copy control signal. The protect icon* is displayed
when INFO is pressed while watching copy protected
contents.
*Protect icon: X
• If the TV displays an update confirmation message for the CA
card while receiving CI+ compatible broadcasts, follow the
screen prompts.
• Make sure that the CI module is properly inserted.
• If the old CAM is used, authentication may fail. In such cases,
contact the contracted service provider.
Recording CAM PIN setting
When a CAM PIN code is required for recording a
programme, it is necessary to enter the CAM PIN code
in advance.
1Go to “HOME” > “TV Menu” > “Setup” >
“Option” > “CI setting” > “Recording CAM PIN
setting”.
2Enter the CAM PIN code.
NOTE
• If a PIN code is not entered or is entered incorrectly, the
programme will not be able to be recorded/played back.
• Because recording is not possible when channel lock (page
45) and parental rating (page 46) settings are active, it is
necessary to deactivate both of these settings.
CI plus 1.3 Standard
CI Plus is an advanced development of the DVB
Common Interface Standard.
1Regarding security
There are some regulations in recording functions.
The playback of encrypted programmes is strongly
dependent on which CA module is used. The playback
of encrypted recordings may sometimes not be possible,
or only during limited time. Programme providers, who
use the CI Plus standard, can assign different rights for
their broadcast programmes.
Exercise caution when using USB-recording to record
broadcast programmes (Pages 52–66).
2Operator service list management (Operator
profile)
Under the 1.3 specification the CAM may provide the
channel listing parameters (channel number, frequency
etc.) and these can be updated while in use.
Refer to “Operator profile” on page 22.
LC80LE960X_EN_book.indb 15LC80LE960X_EN_book.indb 15 4/4/2014 1:08:02 PM4/4/2014 1:08:02 PM

16
What is the HOME?
You can easily launch to enjoy Internet connection and Home network function and to perform settings for the TV from
this “HOME” screen.
By connecting the TV to the internet you can enjoy a variety of broadband content.
Internet browsing on a TV behaves differently to a PC (Personal Computer). PC’s have greater web browsing
capabilities and memory plus support a wider range of functionalities and add ons – some PC viewing capability may
not be possible on a TV. In such cases an application may close or an exclamation mark (“!”) or an error message may
be displayed.
To maximise the performance of YouTube content it is highly recommended that the user can access the content via
the dedicated YouTube application on this TV.
Sharp recommends that from time to time you update your TV’s software via the internet or by downloading updates
onto a USB. Go to www.sharp.net.au and click on Customer Support, then follow the appropriate links.
Basic operation
Display/exit the HOME screen
Press HOME and the “HOME” screen
displays. The operation will exit the
“HOME” screen if you press HOME before
it is completed.
MENU
MENU
Select an item
Selecting in the HOME.
Press a/b/c/d to select the desired service or menu, and then press ?.
1 AQUOS.NET
By connecting the TV to the Internet (Page 59).
2 Multimedia (Page 66)
3 Home network (Page 66)
Record list (Page 64)
CH list (Page 20)
4 Input change
5 YouTubeTM
You can enjoy YouTube on your AQUOS.
6 TV Menu
Call up the OSD (On-screen Display) to perform settings
for the TV. The OSD (On-screen Display) for the settings
is called “TV Menu”. The “TV Menu” enables various
settings and adjustments.
NOTE:
You can call up “TV Menu” screen by press
@.
MENU
Network
Setup
Skype
TM
Home netwo
AQUOS.NET
Multimedia
1/7
Menu status
Select recording device
Quick start
No signal off
No operation off
Sleep timer
[USB-HDD]
[Off]
[Disable]
[Disable]
[Off]
: LAN/Storage status : Menu status
: Enter : End
1
2
3
8
11
4
6
9 10
7
5
put change
put change
7 Network setup (Pages 55 – 57)
8 IP Control (Page 73)
9 Display or Exit “LAN/Storage status”
10 Display or Exit “Menu status”
11 “LAN/Storage” or “Menu” status
Regarding the instruction on the manual
On this manual, the following expression is often used in order to simplify instructions.
• Go to “HOME” > “TV Menu” > “Setup” > ...
This indicates how to navigate through the HOME screen using a/b/c/d and ?buttons.
Quick guide
LC80LE960X_EN_book.indb 16LC80LE960X_EN_book.indb 16 4/4/2014 1:08:03 PM4/4/2014 1:08:03 PM

17
Quick guide
Using software keyboard
Use the software keyboard when you need to input text.
Char.Set
Caps
Cancel
Done
Delete
Clear
Cursor Left Caps Char.Set Cursor Right
1 Char. Set
Changes character set into the
alphabet, numbers, symbols, etc.
2 Caps
Changes characters to capital/lower
case.
3 Done
Confirm the entry.
4 Cancel
Abort input and close the software
keyboard.
5 R/G/Y/B (Colour) buttons
Selects the coloured items on the
screen.
6 Input cursor
Press c/dto move the cursor when
highlighted.
7 Input field
The text you enter is displayed as you
type it in.
8 Character
Input characters by using these
buttons.
9 ?
Put a line break.
10 Clear
Erases the character string.
• When the cursor is somewhere in a
line: the character string to the right
of the cursor will be erased.
• When the cursor is at the right
end of a line: the entire line will be
erased.
11 Delete
If the cursor is at the right end of a
line, this erases text one character at
a time.
• You can also delete text by
pressing Con the remote
control unit.
NOTE
• Depend on application, there might has a different software keyboard with above indication.
Using software keyboard (Web browser)
hello
43556 Hello Aiello Helen
Language : English
: EXIT: Enter: Select
Input Method : XT9
Move keyboard display
Cello Gallo Gekk
EXITENTER
1
.?!,-'@:/
2
abc
3
def
4
ghi
5
jkl
6
mno
7
pqrs
[ ab ]
8
0
tuv
9
wxyz
RETURN
x
b
1 Input field
The text you enter is displayed as you type it in.
2 Input candidate
While you are entering text, likely input conversion
candidates are displayed based on what you typed in.
• You can also enter text by pressing a/b/c/don
the remote control unit.
3 0 – 9 keys
Input characters by using these buttons.
4 Shift key
Changes characters to capital/lower case by pressing
on the remote control unit.
EXAMPLE
AB Ab ab
5 (space)
You can input a space by pressing bon the remote
control unit.
6 Back space key
Erases the character string by pressing Con the
remote control unit.
7 Key guidance
• Select the coloured item on the screen.
R: Language selection
G: Changes character set into the alphabet, numbers,
symbol, etc.
Y: Changes the display position of the software
keyboard.
NOTE
• If input method select to “XT9”, a word can be inputted by few numbers with push a button.
For example input hello
XT9 : 43556
ABC : 4433555 I555666
LC80LE960X_EN_book.indb 17LC80LE960X_EN_book.indb 17 4/4/2014 1:08:03 PM4/4/2014 1:08:03 PM

18
Initial auto installation
W
hen the TV is powered on for the first time after purchase,
the initial auto installation wizard appears. Follow the menus
and make the necessary settings one after another.
Confirm the following before turning on the
power
EIs the antenna cable connected?
EIs the AC cord plugged in?
1Press <on the TV.
• The initial auto installation wizard appears.
2Setting the OSD language.
Press a/b/c/dto select the desired language, and then
press ?.
3Selecting the location of the TV.
Press c/dto select where you will use this TV, and then
press ?.
HOME:
• Settings are optimised for normal home viewing and
energy efficiency.
• “STANDARD” will be the default value for the “AV mode”
setting.
STORE:
• Settings are designed for maximum impact in retail store
displays.
• “DYNAMIC (Fixed)” will be the default value for the “AV
mode” setting. If the “AV mode” is changed, the TV will
automatically switch back to “DYNAMIC (Fixed)” when
there is no operation using the TV or remote control unit
for 30 minutes.
• The confirmation screen pops up only when selecting
“STORE”. Press c/dto select “Yes” or “No”.
* This product qualifies for ENERGY STAR in “HOME” mode
default setting.
* ENERGY STAR qualification is based on “STANDARD” in the “AV
mode” menu.
NOTE
• STORE: A demonstration image will be displayed after initial
auto installation is completed. If you have chosen “STORE”
by mistake, go to “Setup” > “View setting” > “Reset” > select
“HOME” again.
4Setting the country.
Press a/b/c/dto select your country or area, and then
press ?.
• This setting screen only appears during the initial auto
installation.
NOTE
• DTV concerned menu may not displayed in some
country.
5Press c/dto select “Digital Search” or “Analogue
Search”, and then press ?.
6The TV searches for, sorts and stores all the
receivable TV stations according to their settings
and the connected antenna.
• To abort the initial auto installation in progress, press
C.
NOTE
• If you turn off the power on the TV while performing a channel
search in Step 5, the initial auto installation wizard may not
appear. The auto installation function allows you to execute
the installation again from “Setup” > “View setting” (Page 43).
• The initial auto installation wizard will abort if you leave the TV
unattended for 30 minutes before searching for channels in
Step 6.
• Selecting menu of “Digital Search” or “Analogue Search” may
not be displayed in some country.
Checking signal strength and
channel strength (DTV only)
If you install a DTV antenna for the first time or relocate it,
you should adjust the alignment of the antenna to receive
a good reception while checking the antenna setup
screen.
1Go to “HOME” > “TV Menu” > “Setup” > “View
setting” > “Channel settings” > “Antenna setup-
DIGITAL”.
EChecking signal strength
2Press a/bto select “Signal strength”, and then
press ?.
Supply voltage
CH No.
Current Max.
Signal strength
Signal strength
Channel strength
Current Max.
Quality
97 97
99 99
EChecking channel strength
3Press a/bto select “Channel strength”, and then
press ?.
• You can input a specified frequency band using the 0–9
numeric buttons.
Supply voltage
CH No.
Current Max.
Signal strength MHz
Signal strength
Frequency
Channel strength
Current Max.
Quality
97 97
99 99
4Position and align the antenna so that the
maximum possible values for “Signal strength”
and “Quality” are obtained.
NOTE
• The values of “Signal strength” and “Quality” indicate when to
check the appropriate alignment of the antenna.
Supplying power to the antenna (DTV only)
You can supply power to the antenna in order to receive
digitally/terrestrially broadcast stations after connecting
the antenna cable to the antenna terminal on the rear of
the TV.
1Go to “HOME” > “TV Menu” > “Setup” > “View
setting” > “Channel settings” > “Antenna setup-
DIGITAL” > “Supply voltage”.
2Press c/dto select “On”, and then press ?.
Quick guide
LC80LE960X_EN_book.indb 18LC80LE960X_EN_book.indb 18 4/4/2014 1:08:03 PM4/4/2014 1:08:03 PM
This manual suits for next models
2
Table of contents
Other Sharp TV manuals

Sharp
Sharp 27SC26BR User manual

Sharp
Sharp 37AM-12S User manual

Sharp
Sharp LC-28HM2U Operation User manual

Sharp
Sharp LC32DV24U - 31.5" LCD TV User manual

Sharp
Sharp 21F-PA18 User manual

Sharp
Sharp LC-19LE320 User manual

Sharp
Sharp UI7352E User manual

Sharp
Sharp 14GT-16C User manual

Sharp
Sharp 28HW-53E User manual

Sharp
Sharp LC-19A33X-BK User manual

Sharp
Sharp 21FL91 User manual

Sharp
Sharp 9Q-FG1A User manual

Sharp
Sharp 36F830 User manual

Sharp
Sharp LC-49UI8652E User manual

Sharp
Sharp 21HF2-SF User manual

Sharp
Sharp 21L-FG1RU User manual

Sharp
Sharp 70AS-03S User manual

Sharp
Sharp 21H-FG5RU User manual

Sharp
Sharp 81GF-66E User manual

Sharp
Sharp Aquos LC-20AD5E User manual