Shaunwhite Supply Co BMX User manual

Bike Owner’s Manual

01
CONGRATULATIONS ON THE PURCHASE OF YOUR NEW BIKE! OUR SERVICE
DEPARTMENT IS DEDICATED TO MAKING SURE THAT YOU GET THE MOST
ENJOYMENT POSSIBLE FROM OUR PRODUCTS.
DO NOT RETURN THIS ITEM TO THE STORE. PLEASE CONTACT D6 SPORTS
FOR ASSISTANCE WITH ANY PROBLEMS THAT YOU HAVE
For questions regarding assembly, operation
or warranty please feel free to contact our
Service Representatives
by calling: (888) 909-3652
or
e-mailing [email protected]
WWW.SHAUNWHITESUPPLYCO.COM
02
INDEX
WWW.SHAUNWHITESUPPLYCO.COM
INTRODUCTION 03 - 11
Your New Bike, Note to Parents, The BMX Bike, Safety Checklist, Riding Safely, Helmets
ASSEMBLY 12 - 36
Tools Required, Getting Started, Front Wheel Assembly, Handlebar and Stem Assembly,
Seat Installation, Pedal and Crank Assembly, Brake Set Up, Training Wheel Installation,
Peg Installation
BIKE CARE 37 - 53
Maintenance, Storage, Security, Recommended Tools, Handlebar and Stem Information,
Headset Information, Brake Information, Seat and Seatpost Information, Wheel and Tire
Information, Pedal and Crank Information
TROUBLESHOOTING 54 - 55
Drivetrain Problems, Brake Problems, Wheel Problems
IMPORTANT INFORMATION 56 - 57
Brakes, Tires and Tubes
WARRANTY 58 –59

03
INTRODUCTION
WWW.SHAUNWHITESUPPLYCO.COM
ALL OF THE ORIGINAL PARTS ON THIS BIKE ARE COMPATIBLE WITH YOUR FRAME. CERTAIN
AFTERMARKET PARTS OR COMPONENTS MAY NOT BE COMPATIBLE WITH YOUR BIKE OR FRAME.
PLEASE CONSULT YOUR LOCAL BIKE SHOP BEFORE INSTALLING ANY NON-FACTORY SPECIFIED
PRODUCT TO YOUR BIKE. USE OF ANY COMPONENT THAT IS NON-FACTORY SPECIFIED COULD RE-
SULT IN DAMAGE TO THE BIKE. THIS DAMAGE WILL NOT BE COVERED UNDER WARRANTY. MORE
IMPORTANTLY, IT COULD CAUSE YOU TO LOSE CONTROL OF THE BIKE AND FALL, WHICH COULD
CAUSE SERIOUS INJURY TO THE RIDER.

04
INTRODUCTION
WWW.SHAUNWHITESUPPLYCO.COM
OWNER’S MANUAL FOR BMX BIKES
THIS MANUAL CONTAINS IMPORTANT SAFETY, PERFORMANCE AND MAINTENANCE INFORMATION. READ THE
MANUAL AND ALL WARNINGS BEFORE TAKING YOUR FIRST RIDE ON YOUR NEW BIKE, AND REFER TO THE
MANUAL FOR FUTURE REFERENCE.
UNSAFE OR IMPROPER USE OF THE BIKE BY FAILING TO READ AND FOLLOW ALL OF THE SAFETY,
PERFORMANCE AND MAINTENANCE REQUIREMENTS AND WARNINGS COULD RESULT IN SERIOUS INJURY OR
DEATH. WEAR A HELMET EVERY TIME YOU RIDE YOUR BIKE, AND ALWAYS RIDE IN A SAFE AND CAUTIOUS
MANNER.

05
YOUR NEW BIKE
WWW.SHAUNWHITESUPPLYCO.COM
CONGRATULATIONS ON THE PURCHASE OF YOUR NEW BKE.
THIS MANUAL IS DESIGNED TO PROVIDE INFORMATION ABOUT THE SAFE OPERATION AND MAINTENANCE OF
YOU NEW BIKE. PLEASE READ THIS MANUAL THOROUGHLY BEFORE RIDING YOUR BIKE. THE SERIAL NUMBER
FOR YOUR BIKE IS LOCATED ON THE BOTTOM BRACKET SHELL OF THE FRAME. PLEASE RECORD THE SERIAL
NUMBER BELOW IN CASE YOUR BIKE IS EVER LOST OR STOLEN. YOU MIGHT WANT TO
REGISTER THE SERIAL NUMBER WITH YOUR LOCAL POLICE DEPARTMENT AS WELL. PLEASE KEEP YOUR
SALES RECEIPT AS PROOF OF PURCHASE OF THE BKE.
MODEL NAME _____________________________
SERIAL NUMBER ___________________________
COLOR ___________________________________
DATE OF PURCHASE ________________________
PLACE OF PURCHASE _______________________
INTRODUCTION

06
NOTE TO PARENTS
WWW.SHAUNWHITESUPPLYCO.COM
NOTE TO PARENTS
UNFORTUNATELY, MANY BIKE ACCIDENTS INVOLVE CHILDREN.
AS A PARENT OR LEGAL GUARDIAN, YOU ARE RESPONSIBLE FOR THE SAFETY OF YOUR CHILD. PLEASE MAKE SURE
THAT THE BIKE YOUR CHILD IS RIDING HAS BEEN PROPERLY ADJUSTED AND FITS YOUR CHILD AND IS IN SAFE OPER-
ATING CONDITION.
IT IS ALSO IMPORTANT THAT YOUR CHILD UNDERSTANDS AND FOLLOWS THE LOCAL TRAFFIC LAWS, AND RIDES IN A
SAFE MANNER. AS A PARENT/GUARDIAN, YOU SHOULD READ THIS MANUAL BEFORE ALLOWING YOUR CHILD TO RIDE
THEIR NEW BIKE. PLEASE MAKE SURE THAT YOUR CHILD WEARS AN APPROVED HELMET EVERY TIME THEY RIDE
THEIR BIKE.
INTRODUCTION
INTRODUCTION
07
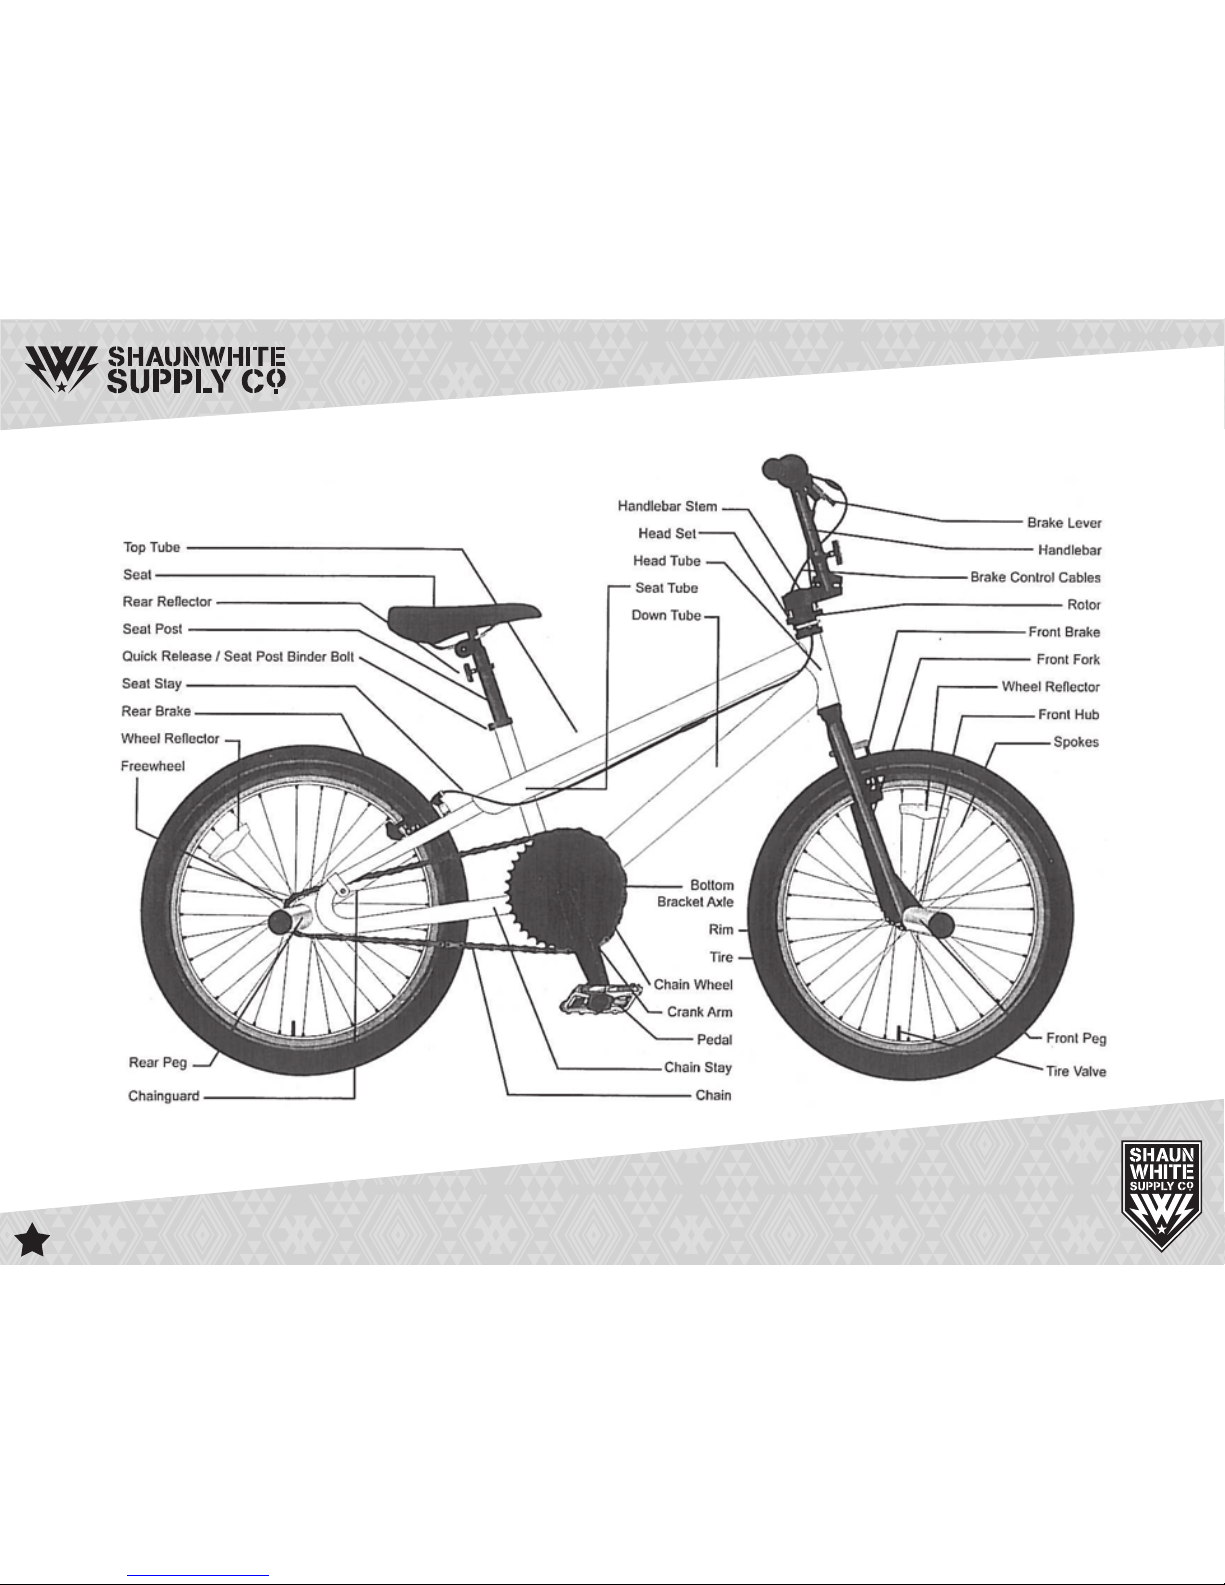
THE BMX BIKE
WWW.SHAUNWHITESUPPLYCO.COM
BASIC BIKE PARTS
INTRODUCTION

08
SAFETY CHECKLIST
WWW.SHAUNWHITESUPPLYCO.COM
1.) Brakes
SAFETY CHECKLIST TO BE PERFORMED PRIOR TO EVERY BIKE RIDE
2.) Wheels and Tires
• Make sure that the front and rear brakes work properly
• Make sure that the brake pads are in good condition, and contact to the rim correctly
• Make sure that the brake cables are in good condition and do not look worn out
• Make sure that the brake levers are securely adjusted on the handlebars
• Makesurethatthetiresareproperlyinatedtothelimitlistedonthesideofthetire
• Make sure that the tires tread appear to be in good condition and are not worn out
• Make sure that the rims are straight, and do not have any wobbles or hops
• Make sure that the spokes are tensioned correctly, and that there are no spokes broken
• Check to make sure that the wheels are seated correctly in the fork and in the frame
• Make sure that the axle nuts are tight
INTRODUCTION
INTRODUCTION

09
SAFETY CHECKLIST
WWW.SHAUNWHITESUPPLYCO.COM
3.) Steering
4.) Chain
5.) Seat/Seatpost
6.) Cranks and Pedals
7.) Frame and Fork
• Make sure that the handlebars and stem are correctly adjusted and tightened
• Make sure that the handlebars are in the correct position in regards to the fork
• Check to see if the headset is adjusted properly, and the steering is not hindered at all
• Make sure that the chain is lubricated, clean, and works smoothly
• Makesurethattheseatisrmlyattachedtotheseatpost,andisnotloose
• Make sure the seatpost height is adjusted correctly and not above the limit line for height
• Make sure that the cranks are securely tightened and are not loose or bent
• Make sure that the pedals are securely tightened to the cranks
• Make sure that there are no cracks on the frame, especially on or around the welds
• Make sure that the frame and fork are not bent or broken
INTRODUCTION

10
HELMETS
WWW.SHAUNWHITESUPPLYCO.COM
RIDING SAFELY/GENERAL RULES
ALWAYS WEAR A CERTIFIED HELMET
When riding always obey the same motor laws as other vehicles- give way to pedestrians, stop at all red lights and stop signs,
ridewiththeowoftrafc,obeyspeedlimits,etc..
Use correct hand signals to indicate turning or stopping
Look ahead. Avoid bumps, potholes, gravel, wet roads, oil, drains, and other obstacles in the road
Walk your bike across train tracks after you have checked to make sure it is safe
Do not carry passengers on your bike- it is unsafe and illegal
Ride smart
INTRODUCTION
INTRODUCTION

11
HELMETS
WWW.SHAUNWHITESUPPLYCO.COM
RULES FOR CHILDREN
• Alwayswearaproperlyttedhelmet
• Do not ride in driveways or out in the road
• Do not ride on busy streets
• Do not ride in wet weather
• Do not ride at night
• Obeyalltrafclaws
• Use caution when entering intersections- make sure that it is clear before you proceed
• Maintain safe speeds when riding down hills
• Never take your hands off the handlebars, or your feet off the pedals when riding.
THE CONSUMER PRODUCT SAFETY COMMISSION ADVISES THAT RIDING SMALL DIAMETER WHEEL
BIKES AT HIGH SPEED CAN LEAD TO INSTABILITY AND RECOMMENDS AGAINST DOING SO. CHIL-
DREN SHOULD BE MADE AWARE OF ALL POSSIBLE RIDING HAZARDS PRIOR TO RIDING THEIR BIKE.
INTRODUCTION

12
BIKE SIZE AND FOREWORD
WWW.SHAUNWHITESUPPLYCO.COM
INTRODUCTION
ASSEMBLY
SINGLE SPEED AND BMX Includes:
• 12” BMX bikes
• 16” BMX bikes
• 18” BMX bikes
• 20” BMX bikes
Assembly is the same for boys and girls bikes.
Foreword:
Assembling a bike is an important responsibility. Proper assembly not only gives the rider more enjoyment of the bike,
it also offers an important measure of safety.
13
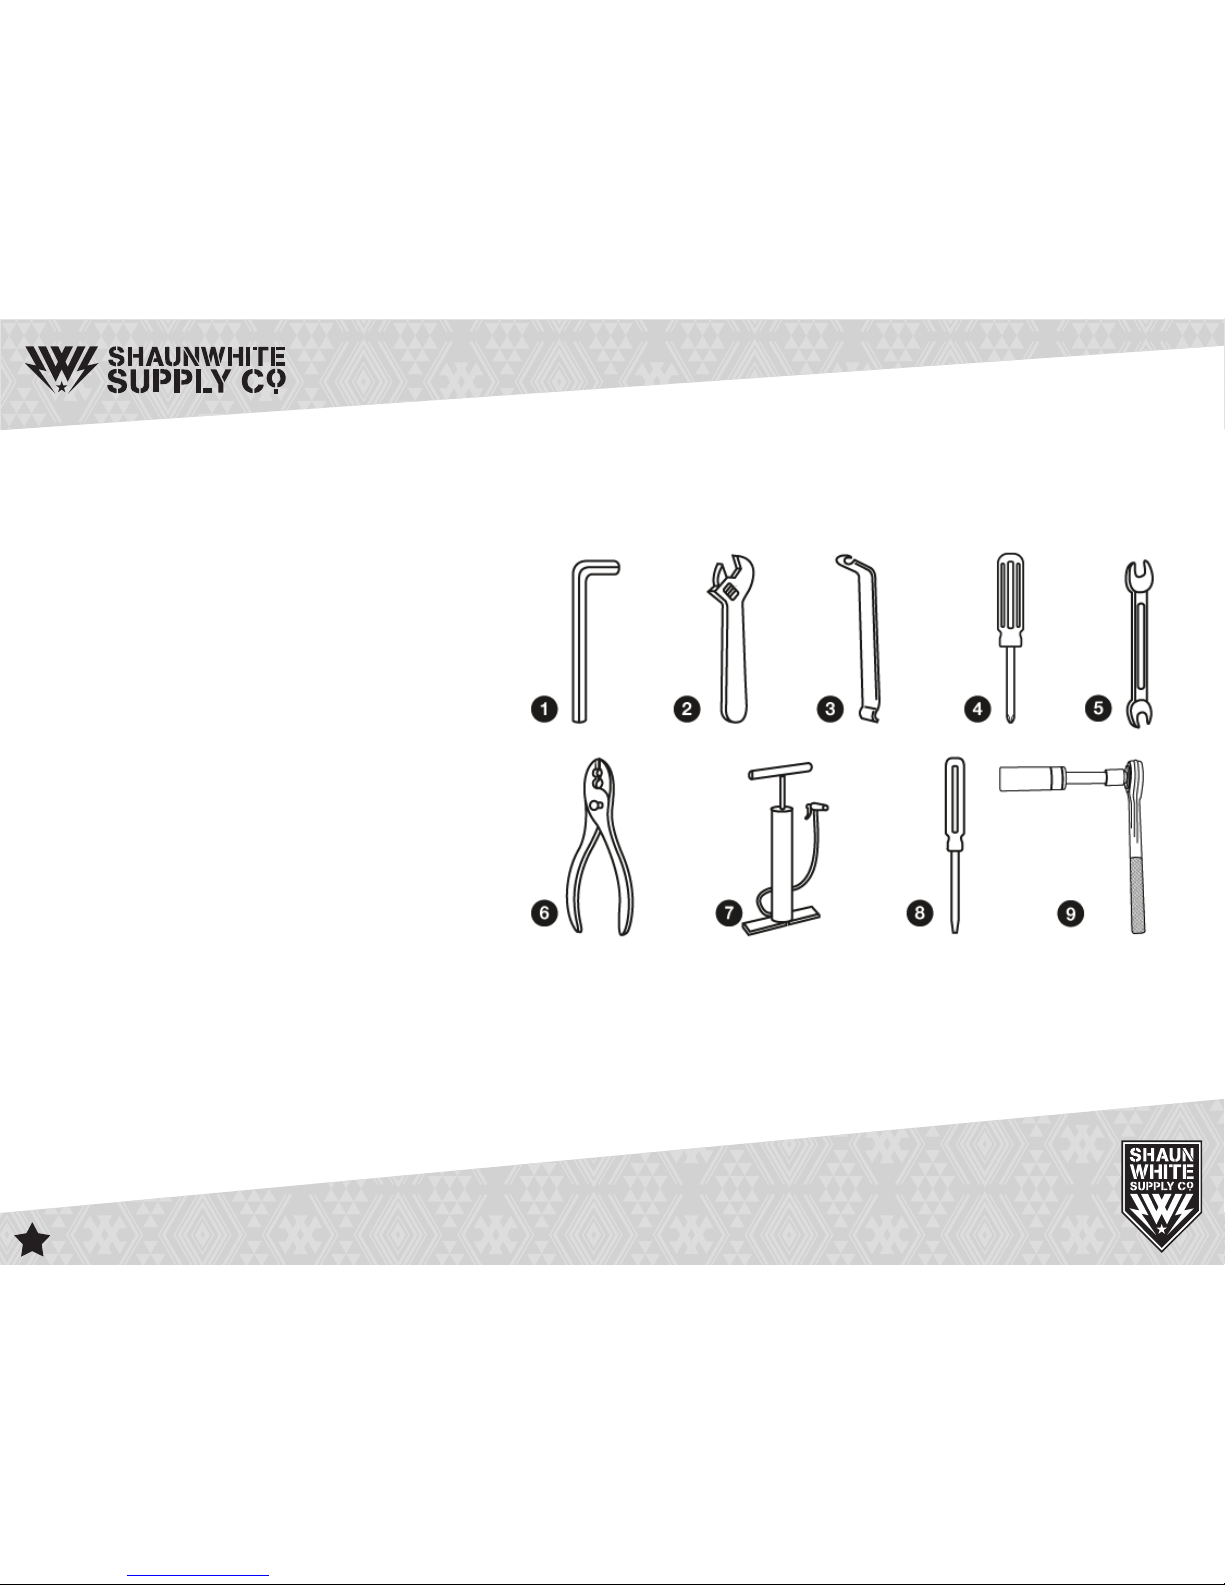
TOOLS REQUIRED
WWW.SHAUNWHITESUPPLYCO.COM
TOOLS REQUIRED:
1.) 4mm, 5mm, 6mm and 8mm Allen key wrenches
2.) An adjustable size wrench
3.) Tire levers
4.) Standard Phillips head screwdriver
5.) An open end 15mm box wrench
6.) Adjustable pliers that have cable cutting ability
7.) A tire pump
8.)Astandardatheadscrewdriver
9.) 15mm socket wrench with extension
ASSEMBLY

14
GETTING STARTED
WWW.SHAUNWHITESUPPLYCO.COM
GETTING STARTED
Open the carton from the top and remove the bike. Remove the straps and protective wrapping from the bike.
Inspect the bike and all accessories and parts for possible shortages. It is recommended that the threads and all
moving parts in the parts package be lubricated prior to installation. Do not discard packing materials until assembly
is complete to ensure that no required parts are accidentally discarded. Assemble your bike following the steps
that pertain to your model.
NOTE: Your bike may be equipped with different style components than the ones illustrated.
ASSEMBLY
ASSEMBLY
15
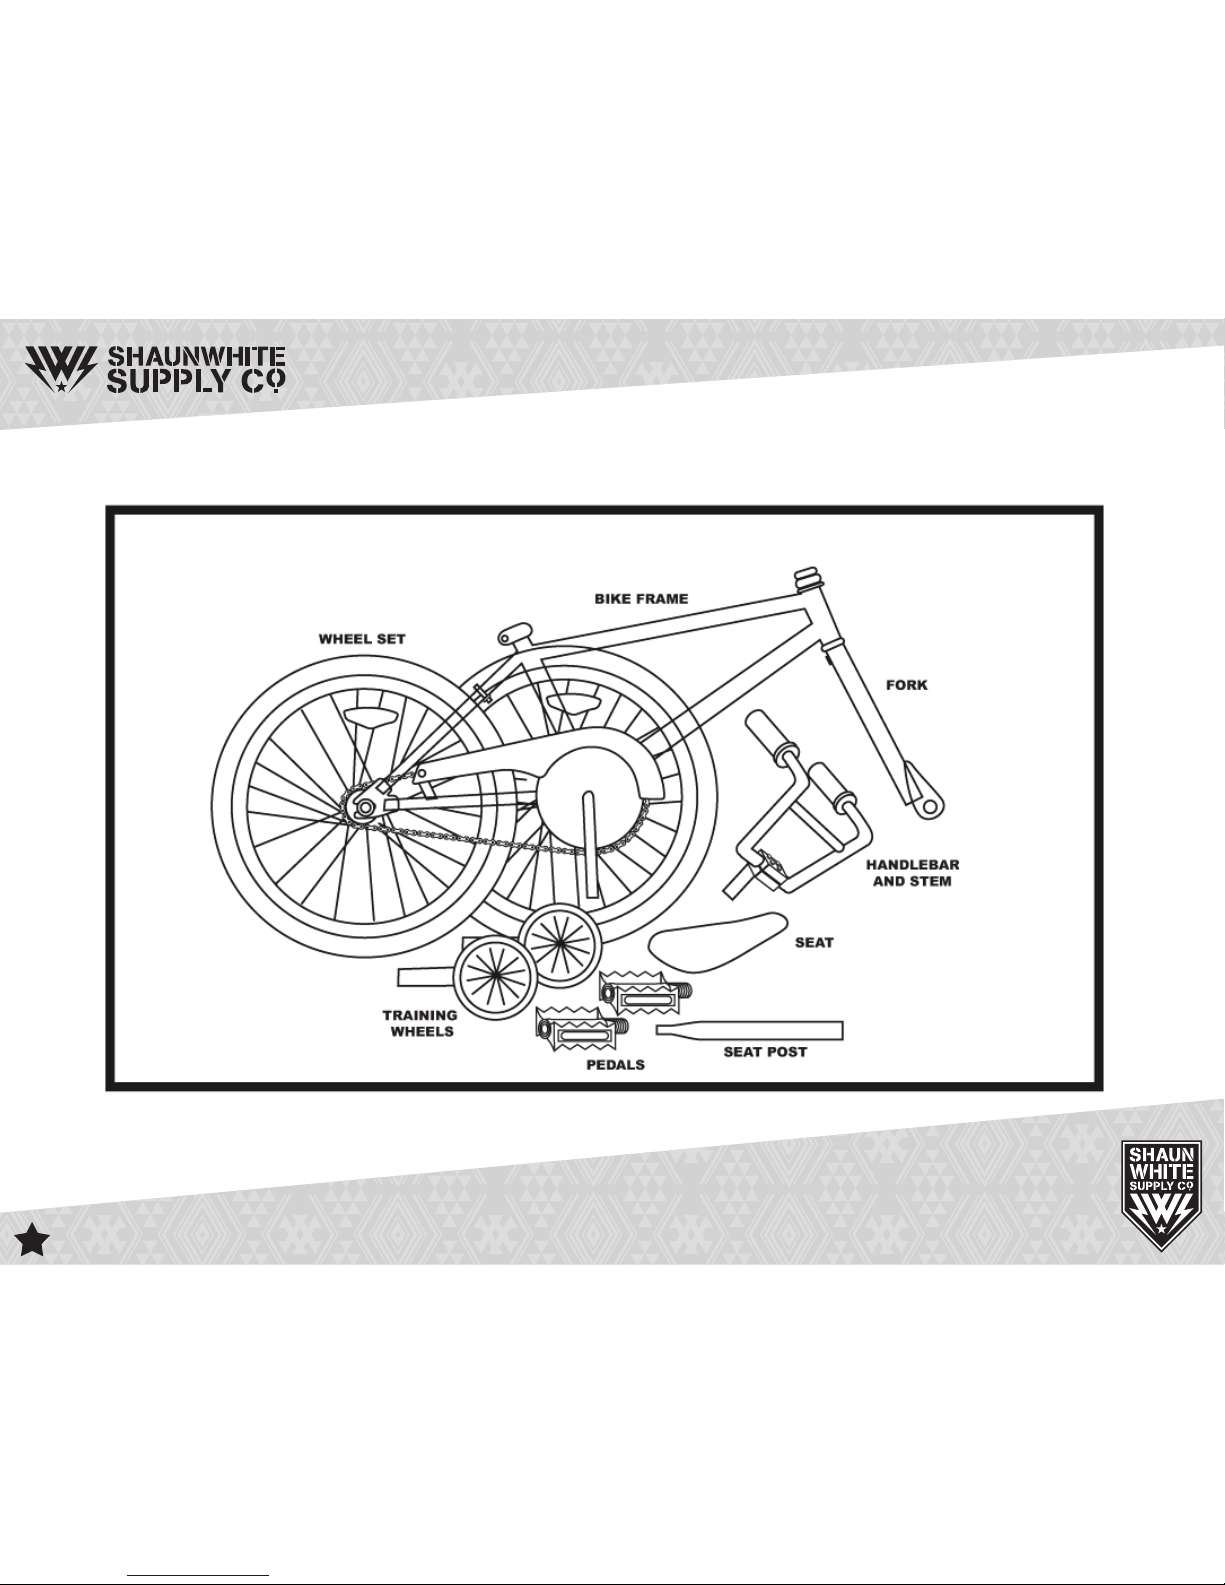
BOX CONTENT
WWW.SHAUNWHITESUPPLYCO.COM
BOX CONTENT
ASSEMBLY

16
BOX CONTENT
WWW.SHAUNWHITESUPPLYCO.COM
REMOVING AND INSTALLING BOLT ON WHEELS
A.) Removing a Bolt-On Front Wheel
1.) Open up the brake shoes.
2.) Loosen the axle nuts on the wheel.
3.) Unfasten the safety retention washers/hooks.
4.) Lift the front end of the bike a few inches off the ground and tap downward on the tire.
B.) Installing a Bolt-On Front Wheel
1.)Withtheforkfacingforward,insertthewheelbetweentheforklegssothattheaxlesitsrmlyinsideofthedropouts/axle
slots on the fork legs. The axle nuts and axle washers should both be on the outside of the dropout. If there is a secondary
safety/retention system on the wheel, engage it at this time.
2.)Whilepushingthewheelrmlyupintotheforkdropouts,andatthesametimecenteringthewheelinsideoftheforklegs,
tighten the axle nuts as tight as you can.
3.) Lift the front wheel off the ground and spin it to make sure that it is centered and clears the brakes on bikes with front brakes.
ASSEMBLY
ASSEMBLY

17
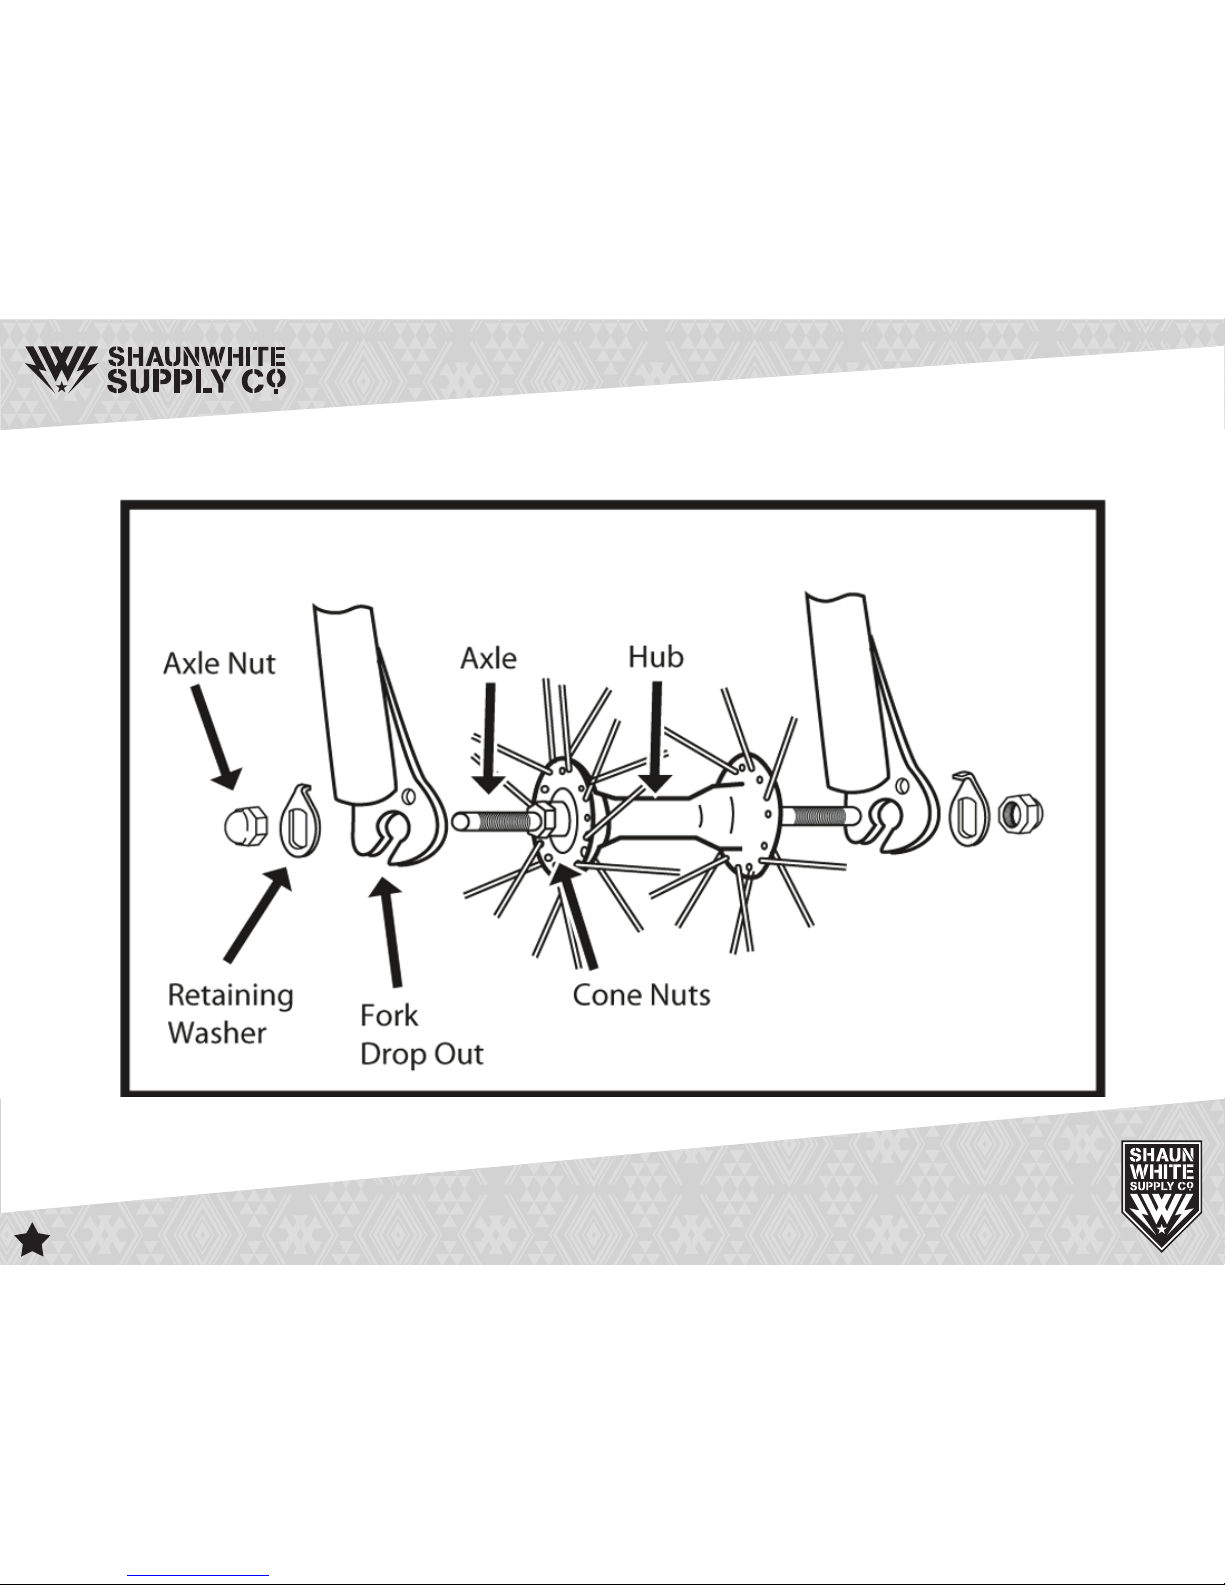
FRONT WHEEL ASSEMBLY
WWW.SHAUNWHITESUPPLYCO.COM
FRONTWHEEL
1. Make sure the brakes are loose enough to allow the wheel to pass through the brake pads easily.
2. Place wheel into fork drop outs.
3. Install retaining washers with raised lip pointed towards the fork, and insert into the small hole
of the fork blade.
4. Install axle nut and tighten. Make sure the wheel is centered between the fork blades.
5. Spin the wheel to make sure that it is centered and clears the brake shoes. Tighten the brakes
if necessary.
6. Turn the bike upright using the kickstand to support it.
WARNING
It is very important to check the front wheel connection to the bike. Failure to properly tighten
may cause the front wheel to dislodge causing serious injury or death.
ASSEMBLY
ASSEMBLY
18
FRONT WHEEL ASSEMBLY
WWW.SHAUNWHITESUPPLYCO.COM
FRONT WHEEL ASSEMBLY
ASSEMBLY

19
HANDLEBAR ASSEMBLY
WWW.SHAUNWHITESUPPLYCO.COM
ASSEMBLY
C.) Removing a Bolt-On Rear Wheel
1.) Open/undo the rear brake.
2.) Loosen the axle nuts on the wheel.
3.) Slide the wheel forward in the axle slot and while the chain has some slack to it, remove the chain from the
freewheel/cassette.
4.) Pull the rear wheel out of the frame.
D.) Installing a Bolt-On Rear Wheel
1.) Insert the rear wheel all the way up in the axle slot of the frame.
2.) Place the chain on the freewheel/cassette and chainring/sprocket.
3.) Pull the rear wheel back so the chain is properly tensioned.
4.) While pulling the rear wheel back, hold the wheel so that it is centered and tighten the axle nuts as tight as you can.
5.) Close/re-engage the rear brake
6.) Lift the rear wheel off the ground and spin the wheel to make sure that it is centered and clears the brake and frame.
Table of contents
Popular Bicycle manuals by other brands


EVBIKE
EVBIKE EVBIKE-SET-CMS installation manual

Evelo
Evelo Aurora Limited Edition Assembly

Spry
Spry Knee cruzer basic user manual

Daymak
Daymak Harley 36V user manual

Cycling Sports Group
Cycling Sports Group cannondale QUICK FULL CARBON 2012 Owner's manual supplement

C2G
C2G Schindelhauer Oskar Original operating instructions