Shell SH916WC User manual
User Guide ▪Guide de l'utilisateur ▪Guía de Usuario
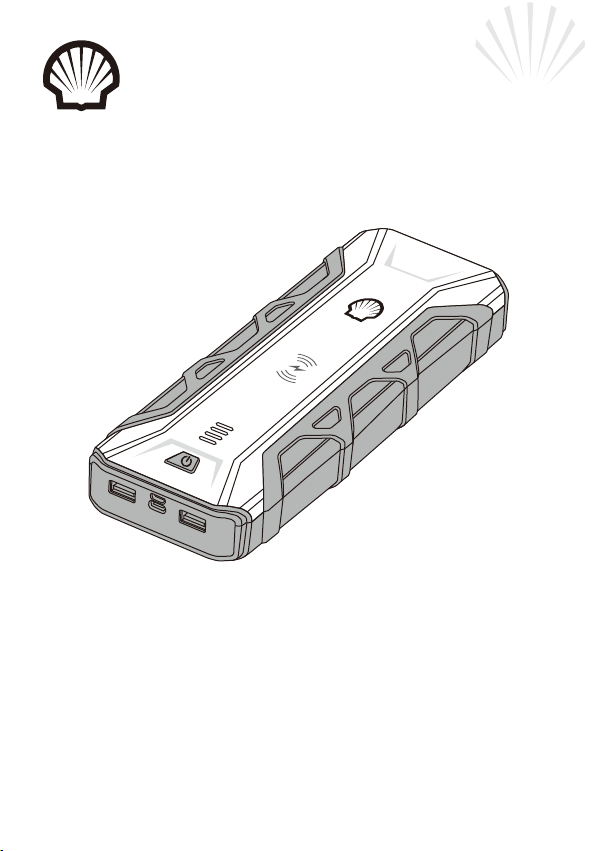
SH916WC
Jump Starter
Démarreur D’Appoint
Arrancador para Automóvil
Portable Power ▪Chargeur Portatif ▪Batería Portátil

Contents
English ---------------------------------------------------------- 1 - 15
Français ----------------------------------------------------- 16 - 30
Español ------------------------------------------------------ 31 - 45
Thank you for choosing this Shell product. Please read the following
instructions and keep them for future reference. This instruction manual
contains important information on safe operation and use. To ensure
long life and performance reliability, please operate and maintain as
per the instructions on this sheet.
For Your Safety
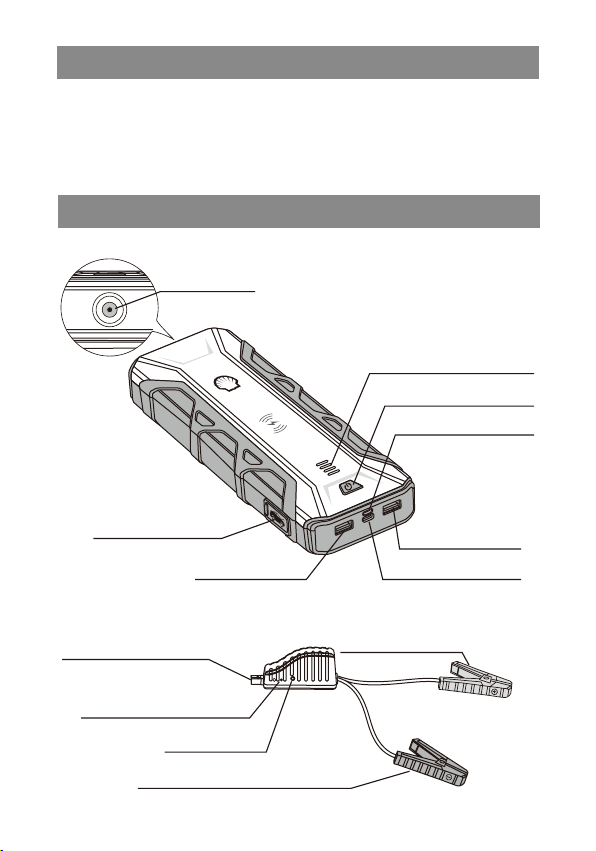
Product Details
LED Battery Level Indicator
12V Jump Start Port Output: USB-A 2
Output: USB-A 1 In/Output: Type-C
Jump Starter
Smart Jumper Cable
Positive Battery Clamp (Red)
Jump Starter Connector (Blue)
Jump Start Status Indicator
BOOST Button
Negative Battery Clamp (Black)
ON/OFF Switch
Micro USB Input Port
LED Flashlight
1

• Designed for vehicles with 7.0 L gasoline and 3.0 L diesel engines
• 10 levels of safety protection
• Integrated with dual USB output ports, Type-C fast charging
input/output port, and 10W wireless charging
• Integrated LED flashlight with 4 light settings: Flashlight, SOS, White
Flood Light, Red Alert Strobe
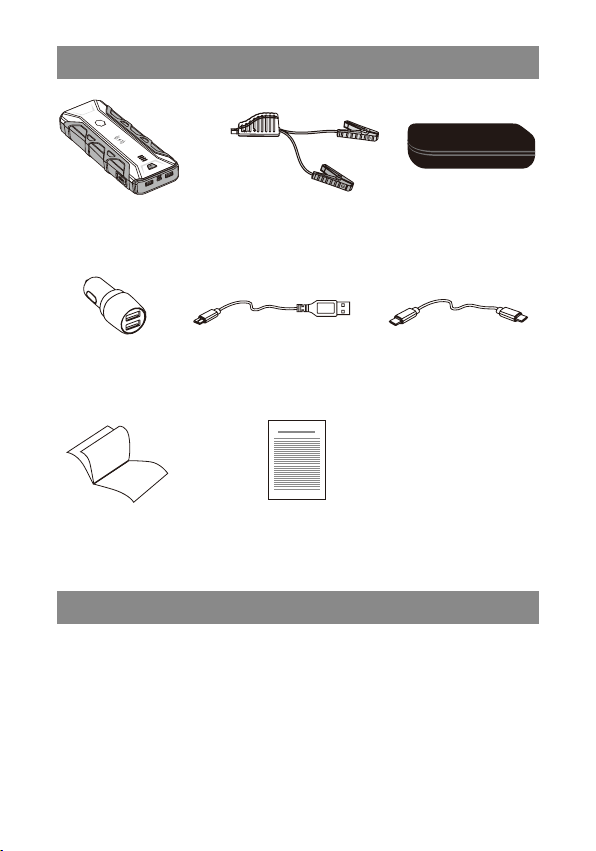
Package Includes
Product Features
• 1 x Jump Starter • 1 x Smart Jumper Cable
with Safety Protection • 1 x EVA Case
• 1 x Car Charger
(2.4A Output) •1 x USB A to Micro
USB Cable •1 x Type-C to Type-C
USB Cable
• 1 x User Guide • 1 x Product Warranty
Registration Card
2

IMPORTANT! CHARGE IMMEDIATELY AFTER PURCHASE, AFTER EACH
USE AND EVERY THREE MONTHS, OR WHEN THE BATTERY LEVEL
FALLS BELOW 50%, TO PROLONG THE INTERNAL BATTERY LIFE.
1. Connect the Type-C cable
provided in this package to the
Type-C port of the jump starter
or connect the Micro USB cable
provided in this package to the
Micro USB port of the jump starter.
Operating Instructions
Charging the Jump Starter
2. Connect the other end of the Type-C cable/Micro USB cable to
a certified USB power adaptor or the car charger that is provided in
this package to begin charging.
Note: Use a PD18W adaptor (sold separately) to quickly recharge the
jump starter. PD 18W adaptor is 3 times faster than a regular charger
(compared with 5W charger).
3
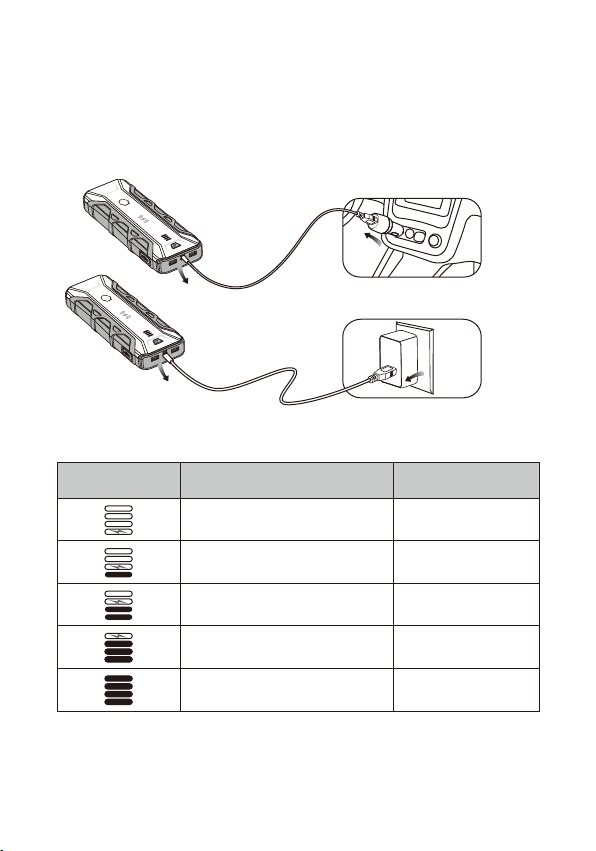
3. The LED will start flashing. The charging level is indicated by the LED
battery level indicator. (Please refer to the following table for
charging status)
4. When charging is completed, the LED indicator will stop flashing.
5. Disconnect the charger from the outlet and remove the charging
cable from the charger and the jump starter.
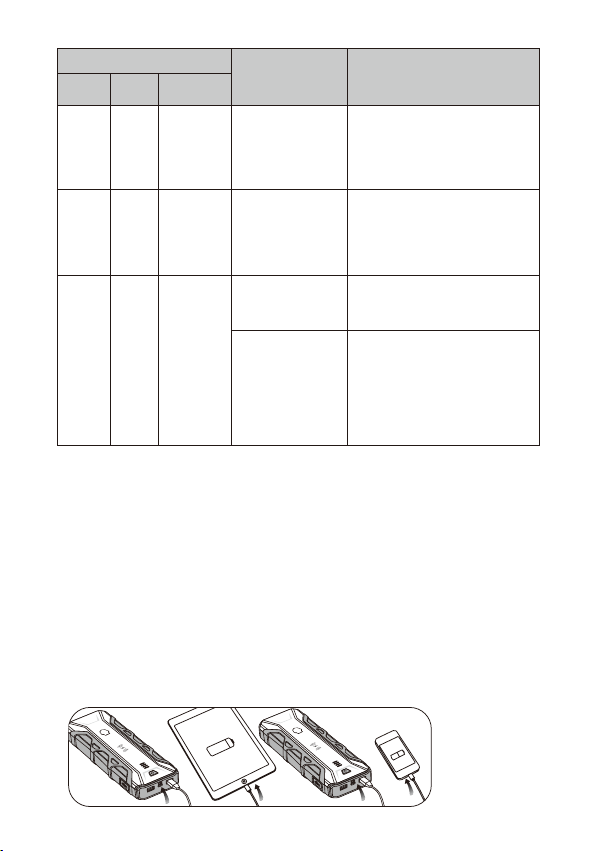
LED Battery Level
Indicator LED Status
First light flashing
Battery Capacity
0% to 25%
First light solid, and the second
light flashing 25% to 50%
First two lights solid, and the
third light flashing 50% to 75%
First three lights solid, and the
forth light flashing 75% to 100%
All four lights are solid 100% fully charged
4
1. Verify the voltage of the battery.
The information can be found in the vehicle's owner's manual.
2. Make sure the power loads such as headlamps,
air-conditioning and radio are turned off.
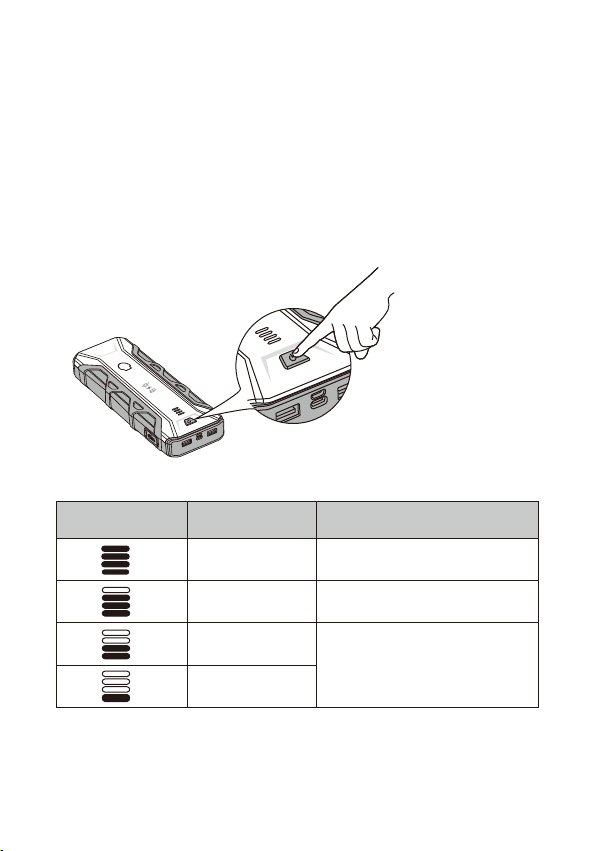
3. Press the switch to check the internal battery level to ensure that there
is sufficient battery capacity to jump start a vehicle. (Refer to the
following table for more information)
LED Battery Level
Indicator Battery Capacity Indications
Best condition to jump start
a vehicle
The minimum capacity required
to jump start a vehicle
Recharge the jump starter
before use
Jump Starting Vehicle
Note: Required capacity to jump start a vehicle
Before connecting to the battery
The jump starter is intended to jump start vehicle with gasoline/diesel
engine using a 12V battery.
75% to 100%
50% to 75%
25% to 50%
0% to 25%
5
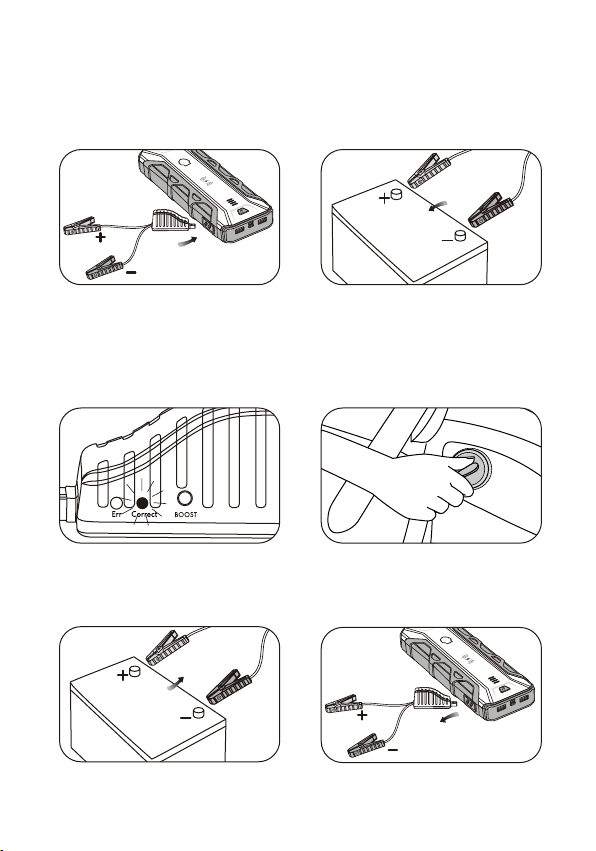
1. Connect the blue connector of
the jumper cable to the 12V jump
start port of the jump starter.
2. Connect the RED battery clamp
to the positive (+) and the BLACK
battery clamp to the negative (-)
terminal on your vehicle’s battery.
3. A) Once connection is made, the green status indicator light in the
jumper cable will turn solid. Only then can you attempt to jump start
your vehicle. (Do not jump start more than 4 consecutive times)
B) If the green light does not turn solid or the red light is on or beeping
sound is heard, refer to the troubleshooting table for further actions.
4. After the engine starts,
A) Disconnect the battery clamps from the battery terminals and
B) Unplug the jumper cable from the jump starter.
Connecting to the vehicle battery
6

Jump Start Troubleshooting
Green LEDRed LED
Troubleshooting:
Off Jump start the vehicle
Beeping
continuously
1. Low voltage
protection/over
discharge protection.
Voltage of jump
starter is too low.
Charge the jump starter
2. Reversed polarity
protection. Battery
clamps are
connected to the
wrong polarities of
the vehicle battery.
Disconnect the clamps from the
vehicle’s battery. Unplug the jumper
cable from the jump starter.
Follow jump starting vehicle
instructions to jump start the vehicle.
3. Jumper cable not
connected to jump
starter
Connect jumper cable to the jump
starter before connecting the
clamps to the vehicle battery.
Jumper cable signal
Cause Solutions
Solid
Off
Green
LED
Off
Solid
Red
LED Sound
4. High temperature
protection
Disconnect the clamps from the
vehicle’s battery. Unplug the jumper
cable from the jump starter. Let the
jump starter cool down by putting it
in a cool and ventilated place.
7
*Warning
Use “BOOST” with extreme care. Clamps must be tightly connected to the
correct polarities of the vehicle’s battery before pressing boost button. Spark
proof and other safety protections will be disabled after pressing boost
button. This mode generates very high current. Sparks will generate when
clamps touch or are connected to each other. It may cause damage to the
product and the vehicle’s electrical system if not used properly. Seek
professional assistance if you are not sure about using this mode.
1. Connect your portable device with one end of the correct USB cable,
and insert the other end to one of the output ports (USB-A 1, USB-A 2 or
Type-C port) of the jump starter. (Note: connect the USB PD compatible
device to Type-C port for fast charging. )
Jumper cable signal
Cause Solutions
Sound
Off Jump started 4
consecutive times
within 10 minutes
Do not jump start more than 4 times.
Disconnect the clamps from the
vehicle's battery. Unplug the
jumper cable from the jump starter.
Consult a mechanic.
Beeping
with
intervals
Over-current
protection/
short- circuit
protection
Disconnect the jump starter and
jumper cable from the vehicle.
Wait 30 seconds. Follow jump
starting vehicle instructions to
jump start the vehicle.
Off
Green
LED
Flashing
Off
Flashing
Red
LED
Flashing
Flashing
Off
1. Clamps are not
connected to the
vehicle battery
Make sure the clamps are securely
connected to the correct polarities
of the vehicle’s battery.
2. Vehicle’s battery
voltage is too low or
cannot be detected
Make sure the clamps are securely
connected to the correct polarities
of the vehicle’s battery.
Press “BOOST” on the jumper cable.
Solid green LED light will turn on.
Jump start the vehicle.
*seeing warning below
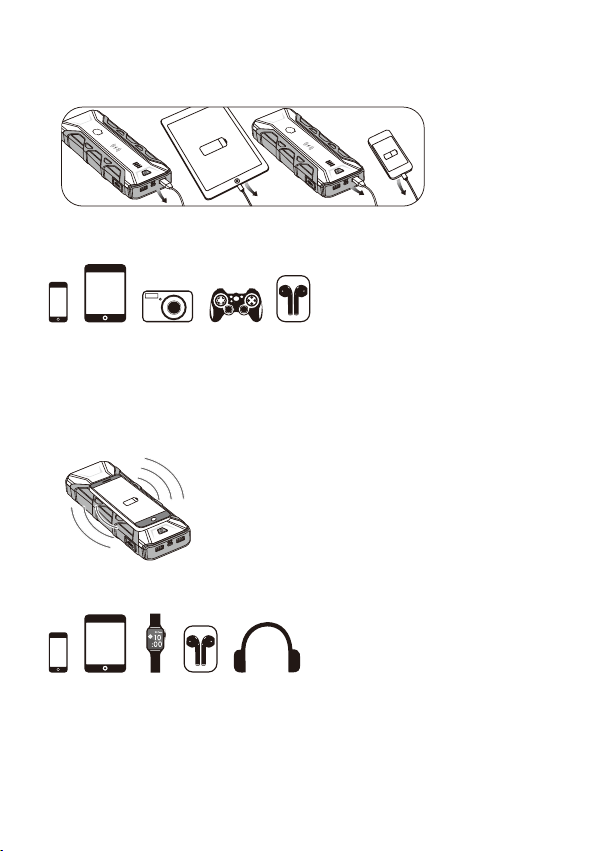
Charging Portable Devices
8
Wireless Charging
2. Charging will begin as soon as the connections are made.
3. Once the charging is completed, disconnect your portable device and
unplug the USB cable from the jump starter.
Compatible with: smart phones, tablets, digital cameras, mobile gaming
devices, wireless earphones and more
Compatible with: smart phones, tablets, smart watches, bluetooth earbud charging
cases and bluetooth headphones
1. Press the ON/OFF switch on the jump starter.
2. Align your portable device to the wireless charging symbol of the jump
starter. (Note: Please ensure that your portable device supports wireless
charging when using this function)
3. Once charging is completed, remove your portable device.
Note: Charging time will vary depending on the portable device and
the device's battery capacity.
9

2. Press the ON/OFF switch once to toggle through 4 light settings:
flashlight, SOS, white floodlight, and red alert strobe.
3. Press and hold ON/OFF switch for 2 seconds to switch off the flashlight.
Using the Flashlight
1. To switch on the flashlight, press and hold the ON/OFF switch for 2 seconds
Specifications
Start Voltage: 12V
Start Current: 600A
Peak Current: 1200A
Input:
Micro USB: 5V 2A
Type-C: 5V 3A 9V 2A 12V 1.5A
Output:
USB-A 1: 5V 2.4A
USB-A 2: 5V 2.4A
Type-C: 5V 3A 9V 2A 12V 1.5A
Wireless Charger: 10W
Battery Type: Lithium-Polymer
Battery Capacity: 16000mAh, 59.2Wh
Operating Temperature: - 20ºC ~ 60ºC
Storage Temperature: - 20ºC ~ 40ºC
Charging Temperature: 0ºC ~ 45ºC
Dimensions: 9.17×3.46×1.42 inches/233×88×36 mm
Weight: 1.42 lb/645 g (without clamp and USB cable)
The symbol indicates direct current (DC)
10

Safety Instructions
Failure to follow the instructions may cause serious injury, death or
property damage
Risk of electric shock, explosion and fire
Risk of explosive gases
• Do not attempt to jump start your vehicle more than four consecutive times. If
the vehicle does not start after four consecutive attempts, consult a mechanic.
• The product may become warm under extended high-power operation.
• Do not disassemble, modify or repair this product.
• Do not destroy product by crushing or cutting.
• Do not expose the product to fire, rain, snow, sunlight and heat.
• Keep this product away from water and other liquids.
• Keep this product in a dry place. Do not allow the product to get wet.
• Use the product in a well-ventilated area. Do not operate in explosive
atmospheres such as areas of flammable gas, dust and liquid.
• Do not use this product in the event of electrolytic liquid leaks, strange odours,
overheating, color change or when any other peculiar occurrence is detected.
• Handle the product with care. Do not use the product when it is damaged. Do
not operate with damaged jumper cable or clamps.
• Clean this product only with a dry cloth. Avoid using cleaning product with
rough or chemical substances.
• Do not look directly into the light as it may cause serious eye injuries.
• This car jump starter is for use with gasoline or diesel engine vehicles using a
12V battery only. The use of this jump starter on a vehicle that does not have a
12V battery may cause serious damage to the vehicle, the jump starter, and/or
serious injury to the user. Refer to the owner's manual of the vehicle for the
battery voltage.
• The product should not be charged while in contact with flammable material
like textiles.
• When charging the jump starter, use the USB cable and car charger/adapter
that are provided in the package (accessories included in the package vary
depending on the model). When using a different USB cable, charger, or
adapter, make sure it is certified according to the safety standards in your
country/region.
• Use the accessories that are provided in the package. Shell is not responsible
for any damage or injury when using accessories that are not provided by us.
• Connect the jump starter only with the jumper cable provided in this package.
• Do not put the jump starter directly above the vehicle battery during jump
starting.
• Do not jump start a vehicle while recharging the internal battery.
• Do not allow the clamps to touch each other.
• Keep out of reach of children.
11

Personal Precautions
Battery Disposal
• Wear adequate eye protection and protective clothing when working near a
vehicle battery.
• Do not smoke or allow a spark or flame near the battery or engine.
• Remove all metal objects such as rings, bracelets, and watches.
• Have plenty of fresh water and soap nearby in case of battery acid contact
with eyes, skin or clothing.
• If battery acid comes in contact with the skin or clothing, immediately wash with
soap and water. If the acid enters the eye, immediately flood eye with running
cold water for at least 10 minutes and seek immediate medical attention.
• Beware not to drop metal items on the battery. It might cause sparks or short
circuit the battery.
• Consider having someone nearby to come to your aid in case of emergency.
• Incompatible or damaged vehicle batteries may explode when used with this
product.
This product contains a rechargeable battery which must be recycled or
disposed of separately from household waste. Dispose of batteries according to
your local environmental laws and guidelines.
12

Cautions
This device complies with part 15 of the FCC Rules. Operation is subject to the
following two conditions: (1) this device may not cause harmful interference, and
(2) this device must accept any interference received, including interference that
may cause undesired operation. This equipment has been tested and found to
comply with the limits for a Class B digital device, pursuant to part 15 of the FCC
Rules. These limits are designed to provide reasonable protection against harmful
interference in a residential installation. This equipment generates, uses and can
radiate radio frequency energy and, if not installed and used in accordance with
the instructions, may cause harmful interference to radio communications.
However, there is no guarantee that interference will not occur in a particular
installation. If this equipment does cause harmful interference to radio or television
reception, which can be determined by turning the equipment off and on, the user
is encouraged to try to correct the interference by one or more of the following
measures: reorient or relocate the receiving antenna; increase the separation
between the equipment and receiver; connect the equipment into an outlet on a
circuit different from that to which the receiver is connected; consult the dealer or
an experienced radio/TV technician for help. Any changes or modifications not
expressly approved by the manufacturer could void the user’s authority to
operate the equipment.
WARNING: This product can expose you to chemicals including lead, which is
known to the State of California to cause cancer and birth defects or other
reproductive harm. For more information, go to www.p65warnings.ca.gov.
13
CONFORMS TO UL STD.2743
ENERGY PERFORMANCE VERIFIED
Made in China
FCC ID:2AQNC-SH916WC
IC ID:26337-SH916WC
CAN ICES-3(B)/NMB-3(B)
This device complies with part 15 of the FCC rules and contains licence-exempt
transmitter(s)/receiver(s) that comply with Innovation, Science and Economic
Development Canada’s licence-exempt RSS(s). Operation is subject to the
following two conditions:
(1) This device may not cause interference.
(2) This device must accept any interference, including interference that may
cause undesired operation of the device

Shell Two (2) Years Limited Warranty
Shell warrants that this product (the "Product") will be free from defects in
material and workmanship for a period of two (2) years from the date of
purchase (the "Warranty Period"). For defects reported during the
Warranty Period, Shell will, at its discretion, and subject to Shell’s product
support analysis, either repair or replace defective Product. Replacement
parts and products will be new or serviceably used, comparable in function
and performance to the original part and warranted for the remainder of the
original Warranty Period. SHELL’S LIABILITY HEREUNDER IS EXPRESSLY
LIMITED TO REPLACEMENT OR REPAIR OF THE PRODUCT. TO THE
MAXIMUM EXTENT PERMITTED BY LAW, SHELL SHALL NOT BE LIABLE
TO ANY PURCHASER OF THE PRODUCT OR ANY THIRD PARTY FOR
ANY SPECIAL, INDIRECT, CONSEQUENTIAL OR EXEMPLARY
DAMAGES, INCLUDING BUT NOT LIMITED TO, LOST PROFITS,
PROPERTY DAMAGE OR PERSONAL INJURY RELATED IN ANY WAY
TO THE PRODUCT HOWSOEVER CAUSED, EVEN IF SHELL HAD
KNOWLEDGE OF THE POSSIBILITY OF SUCH DAMAGES. THE
WARRANTIES SET FORTH HEREIN ARE IN LIEU OF ALL OTHER
WARRANTIES, EXPRESS, IMPLIED, STATUTORY OR OTHERWISE,
INCLUDING, WITHOUT LIMITATION, THE IMPLIED WARRANTIES OF
MERCHANTABILITY AND FITNESS FOR A PARTICULAR PURPOSE, AND
THOSE ARISING FROM COURSE OF DEALING, USAGE OR TRADE
PRACTICE. IN THE EVENT THAT ANY APPLICABLE LAWS IMPOSE
WARRANTIES, CONDITIONS OR OBLIGATIONS THAT CANNOT BE
EXCLUDED OR MODIFIED, THIS PARAGRAPH SHALL APPLY TO THE
GREATEST EXTENT ALLOWED BY SUCH LAWS.
This Limited Warranty is made solely for the benefit of the original
purchaser of the Product from Shell or its approved reseller or distributor
and is not assignable or transferable. To make a warranty claim, the
purchaser must: (1) request and obtain a return merchandise authorization
("RMA") number and return location information (the "Return Location")
calling 1.833.990.2624 ; and (2) send the Product, including RMA number
and receipt to the Return Location provided. DO NOT SEND IN
PRODUCT WITHOUT FIRST OBTAINING AN RMA FROM SHELL
SUPPORT. THE ORIGINAL PURCHASER IS RESPONSIBLE (AND MUST
PREPAY) ALL PACKAGING AND TRANSPORTATION COSTS TO SHIP
PRODUCTS FOR WARRANTY SERVICE. NOTWITHSTANDING THE
ABOVE, THIS LIMITED WARRANTY IS VOID AND DOES NOT APPLY
14

TO PRODUCTS THAT: (a) were misused, mishandled, subjected to abuse
or careless handling, accident, improperly stored, or operated under
conditions of extreme voltage, temperature, shock, or vibration beyond
Shell's recommendations for safe and effective use; (b) improperly
installed, operated or maintained; (c) are/were modified without the
express written consent of Shell; (d) have been disassembled, altered or
repaired by anyone other than Shell; (e) had defects which were reported
after the Warranty Period. THIS LIMITED WARRANTY DOES NOT
COVER: (1) normal wear and tear; (2) cosmetic damage that does not
affect functionality; or (3) Products where the Shell serial and/or lot
number is missing, altered, or defaced.
For any questions regarding your warranty or product contact Shell
Support at:
1.833.990.2624
M-F 9am to 5pm
Eastern Standard Time
Camelion North America Inc.
2572 Daniel-Johnson Blvd. | 2nd Floor
QC H7T 2R3 Canada
(North America)
15

Merci d'avoir choisi ce produit Shell. Veuillez lire les instructions suivantes
et les conserver pour référence ultérieure. Ce manuel d'instructions
contient des informations importantes sur le fonctionnement et l'utilisation
en toute sécurité. Pour garantir une longue durée de vie et des
performances fiables, veuillez utiliser et entretenir conformément aux
instructions figurant sur cette fiche.
Pour votre sécurité
Détails du produit
Indicateur de l'état de la batterie
Port 12V du démarreur
d'appoint Sortie: USB-A 2
Sortie: USB-A 1 Entrée/Sortie: Type-C
Démarreur d'appoint
Interrupteur marche/arrêt
Port d'entrée micro USB
Lampe de poche DEL
16
Câble de démarrage intelligent
Pince positive de la batterie (rouge)
Connecteur de démarreur
d'appoint (bleu)
Indicateur de l'état du
démarrage d'appoint
Bouton "BOOST"
Pince négative de la batterie (noire)
• Conçu pour des véhicules avec un moteur à essence de 7.0L ou au
diesel de 3.0L maximum
• Dix niveaux de protection
• Conçu avec deux ports USB, entrée et sortie Type C pour charge
rapide et chargeur sans fil de 10W
• Lampe de poche DEL intégrée avec 4 modes d'éclairage: lampe de
poche, SOS, projecteur blanc, alerte rouge stroboscopique
L'emballage inclut
Charactéristiques du produit
17
• 1 x Démarreur d'appoint
& chargeur portatif • 1 x Câble de démarrage
intelligent avec protection
• 1 x Chargeur
d'automobile USB 2.4A
• 1 x Étui EAV
•1 x Câble USB A
à micro USB •1 x Câble Type C
à Type C
• 1 x Guide de l'utilisateur • 1 x Carte d'enregistrement de
la garantie du produit

IMPORTANT! CHARGER IMMÉDIATEMENT APRÈS L'ACHAT, APRÈS
CHAQUE UTILISATION ET TOUS LES TROIS MOIS OU SI LE NIVEAU
DE LA BATTERIE SE TROUVE SOUS 50%, POUR PROLONGER LA
DURÉE DE VIE DE LA BATTERIE INTERNE.
1. Raccordez le câble de Type-C
inclus dans l'emballage dans le port
de Type-C du démarreur ou raccordez
le câble micro-USB dans le port
micro -USB du démarreur.
Instructions d'utilisation
Recharger le démarreur d'appoint
2. Raccordez l'autre bout du câble de Type-C ou micro-USB à un
adaptateur USB certifié ou au chargeur automobile inclus
dans l'emballage.
Note: Utilisez un chargeur PD18W (vendu séparément) pour charger le
démarreur d'appoint rapidement. Un adaptateur PD18W est trois fois
plus rapide qu'un chargeur régulier (en comparaison avec un chargeur
de 5W).
18
Table of contents
Languages:
Other Shell Automobile Accessories manuals

Shell
Shell NewMotion Home Advanced 2.1 User manual

Shell
Shell NewMotion Business Pro 2.1 User manual

Shell
Shell newmotion Home Advanced Edition 7 User manual

Shell
Shell Recharge Basic User manual

Shell
Shell newmotion Home Advanced Edition 7 User manual

Shell
Shell NewMotion Home Advanced 2.1 User manual

Shell
Shell NewMotion Business Pro 2.1 User manual
Popular Automobile Accessories manuals by other brands


Accuride
Accuride Gunite Series Installation procedures

Meyer
Meyer Lot Pro Assembly and installation

Jensen
Jensen BTM10 - Add-On Bluetooth Module owner's manual

Redarc
Redarc Tow-Pro Liberty EBRH-ACCNA manual

Front Runner
Front Runner SLIMLINE II quick start guide

walser
walser KIDS EXPERTS Noemi User instructions