Shelti Blue Line Hockey Thunderdome User manual

Assembly Instructions
Thank you for purchasing a Shelti product. All of us at Shelti want you to be completely satisfied with
your Thunderdome Dome Hockey game, so feel free to contact us for help with the assembly of your
product, Shelti parts, or other information you may require.
Tools Required:
14mm Wrench or Socket (Included)
12mm Wrench or Socket (Included)
4mm Hex Wrench (Included)
Phillips Head Screw Driver
Level
Step #1 - Remove Parts from Box
Remove the pedestal from its box. Locate and remove the leg levelers and bolt package.
Contents Part Number Quantity
Dome Hockey Cabinet TD-DPA-0 1
Split Pedestal TD-PDA-1 1
Accessory Package TD-ASA-0 1
Assembly Instructions 210-0144-0 1
Accessory Package Contents
Leg Levelers 201-0074-0 4
Cabinet Bolt - Hex Head M8x55mm (1 Extra) 301-0043-0 11
Cabinet Washer - M8 (1 Extra) 303-0025-0 11
Hex Wrench - 4 mm 205-0057-0 1
Electronic Scoring Unit 210-0145-0 1
Flat Head Screw - Phillips Head M5x12mm 301-0044-0 2
9/16 Washer - M6 (Not needed) 303-0026-0 2
Nut - M5 302-0016-0 2
Rounded Head Screw - Phillips Head M3x14mm 301-0045-0 1
Washer - M5 303-0027-0 1
Dome Hockey Puck (1” Dia.) 210-0131-0 3
Pedestal Bolt 301-0058-0 8
Pedestal Washer 303-0030-0 16
Pedestal Nut 302-0022-0 8
Thunderdome Side Label 217-0002-0 2
K4
© Copyright 2004, Shelti Inc., Bay City • Michigan SPECIFICATIONS SUBJECT TO CHANGE WITHOUT NOTICE
ABC
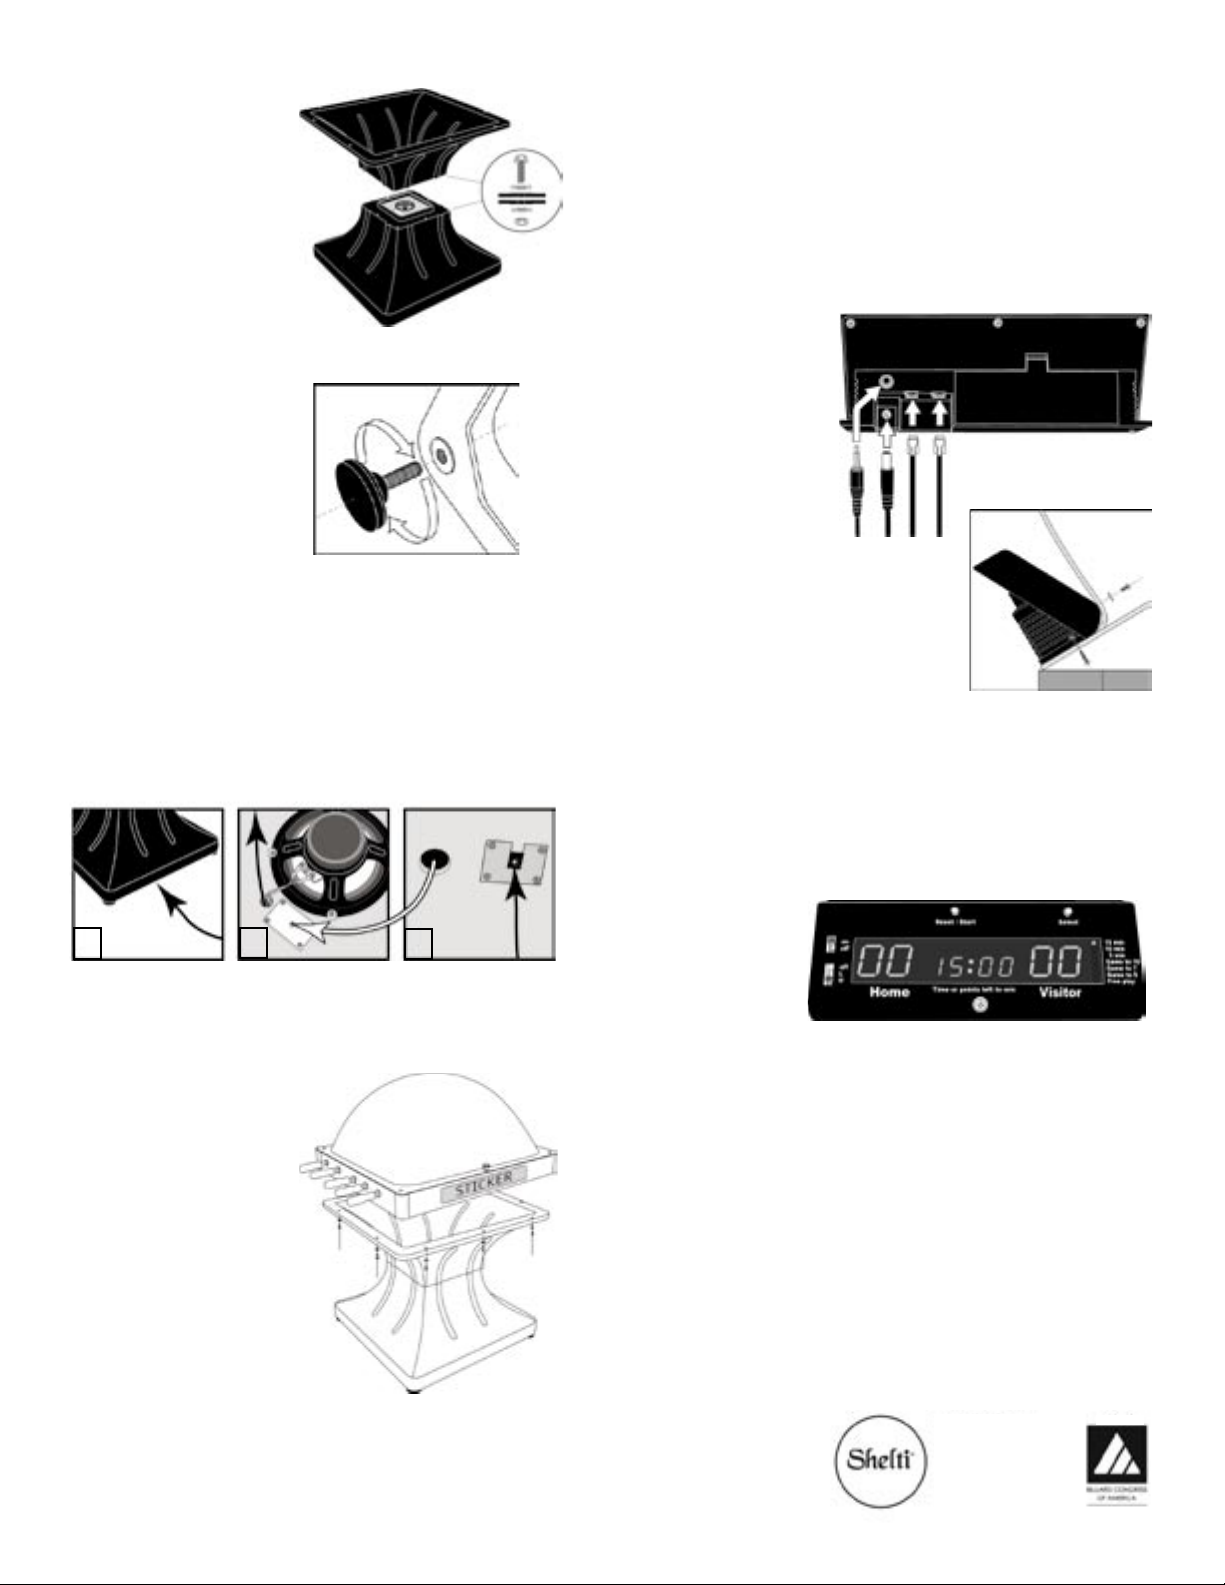
Step #2 - Assemble the Pedestal
Bolt both pedestal halves
together with a bolt,
two washers and a nut
for each of the eight holes as
shown. Lay the pedestal on
its side and have someone
hold the bolt from the
opposite side while you
over tighten the nut.
Step #3 - Attach the Leg Levelers
Attach all four leg level-
ers into the bottom of
the assembled pedestal.
Screw them in clockwise
all the way, but do not
tighten them.
Step #4 - Hook up the Power Cords
Thread the AC adapter cord (black arrow below)
through the bottom of the pedestal (fig. A) and
through the hole drilled into the wooden speaker
bracket (fig. B). Carefully place the top half of the
game on to the pedestal. Have someone hold it at an
angle so you can access the inside. Take the power
cord and plug it in to the hole located on the under-
side of the playfield cabinet (fig. C).
Take the wire that is taped to the bottom of the
playfield cabinet and plug it in to the hole located
by the speaker (shown above with the white arrow).
Step #5 - Attach Cabinet
Carefully move the top
half of the game on to
the pedestal. Note that
the end with the handles
lines up with the side
of the pedestal with (2)
bolt holes. Using (10) hex
head bolts and washers,
secure both halves together.
Step #6 - Attach Optional Stickers
Attach one sticker on each side of the cabinet as
shown above. Peeling away half of the back at a time
makes it a little easier to locate the center.
Step #7 - Level the Playfield
Using the provided Hex wrench, remove the two bolts on the
corners of the dome on the handle side. Lift the dome to access
the inside by pulling up on the handle. Do not allow the dome
to swing all the way open without supporting it. Place a level
across, lengthwise, and diagonally into the four corners. Raise
and lower the appropriate leg leveler.
Step #8 - Attach the Electronic Scoring Unit
Locate the four wires com-
ing out of the hole located
on the hinge side of the
dome. Plug them into the
scoring unit as shown. Note
that two wires look identi-
cal. Switch locations if you
score and it credits the op-
posing team.
Bolt the scoring unit to the edge of the
dome using the (2) nuts and bolts pro-
vided. Slip the bolt through the bottom
of the dome and scoring unit and tighten
with the bolt and a phillips head screw-
driver. Be careful not to pinch the wires
for the scoring unit in the dome when lifting it. Attach the
final screw and washer through the front of the unit. Slip the
screw through the small hole in the dome from the inside and
tighten.
Step #9 - Operating the Scoring Unit
Turn the power switch
to “on”. Select desired
game option. By de-
fault, it begins with the
15 minute game option.
To change the game
option, push the “select” button. There are seven total options
including “Free play” which has no time limit or scoring limit.
After choosing a game option, push the “Start” button to be-
gin. To start over, press the” Reset / Start” button again. The
volume switch has three settings: High, Low and Off.
Step #10 - Ejecting Puck Into Play
Push the green button located at either playing position to
eject the puck. Do not put more than one puck in the game at
a time as the puck ejection mechanism will jam. Push the Red
button to play a sound effect.
333 Morton Street
Bay City, Michigan 48706
Phone: 989-893-1739
Fax: 989-893-1809
www.shelti.com
Member of:
This manual suits for next models
1
Other Shelti Video Gaming Accessories manuals


Popular Video Gaming Accessories manuals by other brands

J.Burrows
J.Burrows TYPHOON ELITE SETYPE15BB Assembly instructions

Atomic
Atomic A3 Assembly & instruction manual

Gametrix
Gametrix JetSeat user manual

Mightymast Leisure
Mightymast Leisure WHIRLWIND 4FT AIR HOCKEY TABLE Assembly instruction

PIMAX
PIMAX Portal quick guide

Presidential Billiards
Presidential Billiards FORD installation instructions

Carl's Place
Carl's Place Golf Room Panel Kit Assembly instructions & user manual

VKB
VKB T-Rudder Installation and setup manual

Schiit
Schiit HEL manual

5DT
5DT HMD 800-26 Series user manual

Insignia
Insignia NS-URSS22 Quick setup guide

Diamond Multimedia
Diamond Multimedia HD Game Capture GC500 installation manual


