Shengmilo MX05 User manual

1
www.shengmilo-bikes.com
MX05
Owner's Manual

2
About Manual
This manual contains details of the product, information on its operation and maintenance, and other helpful tips for owners. Read it
carefully and familiarize yourself with the Shengmilo MX05 before using it to ensure safe use, reduce the risk of damage and
premature wear, and prevent accidents. Be sure to retain this manual as your convenient Shengmilo MX05 information source.
This manual contains many Warnings and Cautions concerning safe operation, and consequences if proper setup,
operation and maintenance guidelines are not followed. All information in this manual should be carefully reviewed.
The safety grade color of Caution is orange, and if
not avoided, may result in moderate or serious injury.
Users should also pay special attention to the information. Marks in this manual beginning with” NOTICE ”
The safety grade color of Warning is red, and if not
avoided will likely result in serious injury or death.

3
Because it is impossible to anticipate every situation or condition which can occur while riding, this manual makes no representations about
the safe use of our bicycles under all conditions. There are risks associated with the use of any bicycle which cannot be predicted or avoided,
and which are the sole responsibility of the rider. You should keep this manual, along with any other documents that were included with your
bicycle, for future reference, however all content in this manual is subject to change or withdrawal without notice.
Visit www.shengmilo-bikes.com to download the latest version. Assembly and first adjustment of your Shengmilo MX05 require special
tools and skills, and it is recommended that this be performed
by a trained bicycle mechanic if possible.

4
Content s
About Manual ........................................................................................................................................................................................................ 2
Bike Specication .................................................................................................................................................................................................... 5
Bike Assembly Guide ............................................................................................................................................................................................ 8
Recommended Torque Values ...............................................................................................................................................................................9
Assembly Instructions ..........................................................................................................................................................................................10
Front Wheel Installation ...................................................................................................................................................................................... 11
Headlight & Front Fender Installation .................................................................................................................................................................13
Adjust the Seat Height ......................................................................................................................................................................................... 16
Pedals Installation ................................................................................................................................................................................................ 17
Safety Checklist ................................................................................................................................................................................................... 18
Shengmilo E-Bike Use and Care ......................................................................................................................................................................... 19
Basic Display Settings ......................................................................................................................................................................................... 19
Battery Charging ..................................................................................................................................................................................................21
Riding Limitations ............................................................................................................................................................................................... 29
Maintenance ......................................................................................................................................................................................................... 30
Limited Warranty .................................................................................................................................................................................................32
WARRANTY WILL COVER .............................................................................................................................................................................32
Parts & Components ............................................................................................................................................................................................ 33
Contact us .............................................................................................................................................................................................................35

5
Bike Specication
Power Switch & Information
LCD Display
Shimano Shift Lever
Throttle
Saddle
Head Tube
LED Headlight
Front Suspension Fork /
Front Shock
Front Brake
Motor
Rear Brake
Rear Derailleur
Battery
Horn
Controller

6
A - Total Length
70
in
B - Handlebar Height
44
in
C - Wheelbase
45
in
D - Min Seat Height
33
in
E - Max Seat Height
39
in
F - Chain Stay Length
19
in
G - Standover Height
18
i n
H - Wheel Diameter
26
i n
I - Head Tube Length
9
i n
J - Handlebar Length
27
i n

7
Battery
48V 15Ah lithium battery
Charger
48V 2.0 A smart charger
Range
Throttl e mode 30-35 KM; 50-60 KM
pedal assist mode
Controller
Sine wave brushless motor controller
Motor
500W BAFANG Geared Hub Motor
Display
KING-METER waterproof LCD display
Total Payload
Capacity
400 lbs (180kg)
Weight
70.5 lb (32KG)
Recommen
ded Rider
Heights
5′5″ ~ 6′6″ (170-200cm)
Pedal Assist
Intelligent
0~5 level pedal assist
Tires
26" x 3" non-slip fat tires
Throttle
Half twist throttle
Brake
Dual hydrulic disc brakes
Front Fork
Double Shoulder Fork
Horn
Super loud electric horn
Pedal
Wellgo Alloy pedals with reflectors
Freewheel
Shimano 7-speed gear shift system
Bike Frame
6061 Aluminum frame
Brake
Dual hydrauli disc brakes
Headlight
Bright motorcycle light
Chain
KMC chain
Saddle
Thick and comfortable leather seat
Stem
Promax MA-400 SSABK
Seatpost
Diameter 3 0 . 4 mm length 3 5 0 mm
Crankset
170 mm forged alloy
Kickstand
Heavy-duty aluminum
Gearing
Shimano, TX55/7 speed rear puller
Spokes
Front wheel 13G*255/Rear wheel
13G*218

8
Bike Assembly Guide
◆Preparation Checklist
NOTICE: Before assembling your bike, it’ s recommended to remove the battery for the reasons outlined below:
1 . Determine if there’ s battery drain or damage during shipping.
2 . Reduce the weight of the e-bike to make it easier to maneuver the bike while assembling.
3 . Avoid battery damage during the assembly process.
Go to page 21 to learn about removing and charging the battery.
Headlight
Bike repair tool
Quick-release
skewer
Keys(2x, identical)
Charger
Wrench
Pedals
Screws
Extra tools needed: (1)1 3mm Wrench (2)15mm Wrench
* Please go to our YouTube channel “ Shengmilo Ebike” to watch our assembly tutorial
videos!

9
Recommended Torque Values
Hardware Location
Recommended Torque( NM)
Handlebar
12-18
Stem
12-18
Saddle
12-18
Front Wheel(For bikes with bolts on front wheel)
15-22
Rear wheel
30-38
Bottom Bracket Parts
30-50
Pedals
28-33
Disk Mounting Bolts
3-5
Disk Caliper Mount
6-8
Crank Bolts
32-36
Rear Derailleur Cable Pinch
3-5
Front Derailleur Clamp
3-6
Saddle Post Clamp
3-6
NOTICE: Using an impact driver to achieve the required torque is not recommended as it might cause damage. We suggest
you use the wrench set we provided and extra tools to manually adjust nuts and bolts.

10
Assembly Instructions
◆Handlebar Installation ( 4mm Hex Wrench )
Step 1: Loosen the bolts on your bike stem.
Step 2 : Center your handlebars and rotate them to align to the marking pointed to in the below image.
Step 3:: Tighten bolts to handlebar stem, but don’t tighten completely as you may want to further adjust the angle later to align more precisely. After determining the best
position, completely tighten all the bolts on the stem.

11
◆Front Wheel Installation
Step 1: Prepare your quick-release skewer for the next step by removing the thumb nut and one of the cone spring.
Step 2: Install the quick-release skewer starting from the brake rotor side of the wheel, inserting the quick-release skewer through the hub and then
replacing the second cone spring on the other side.Ensure both springs are pointed narrow-side-in towards the wheel hub.
cone spring
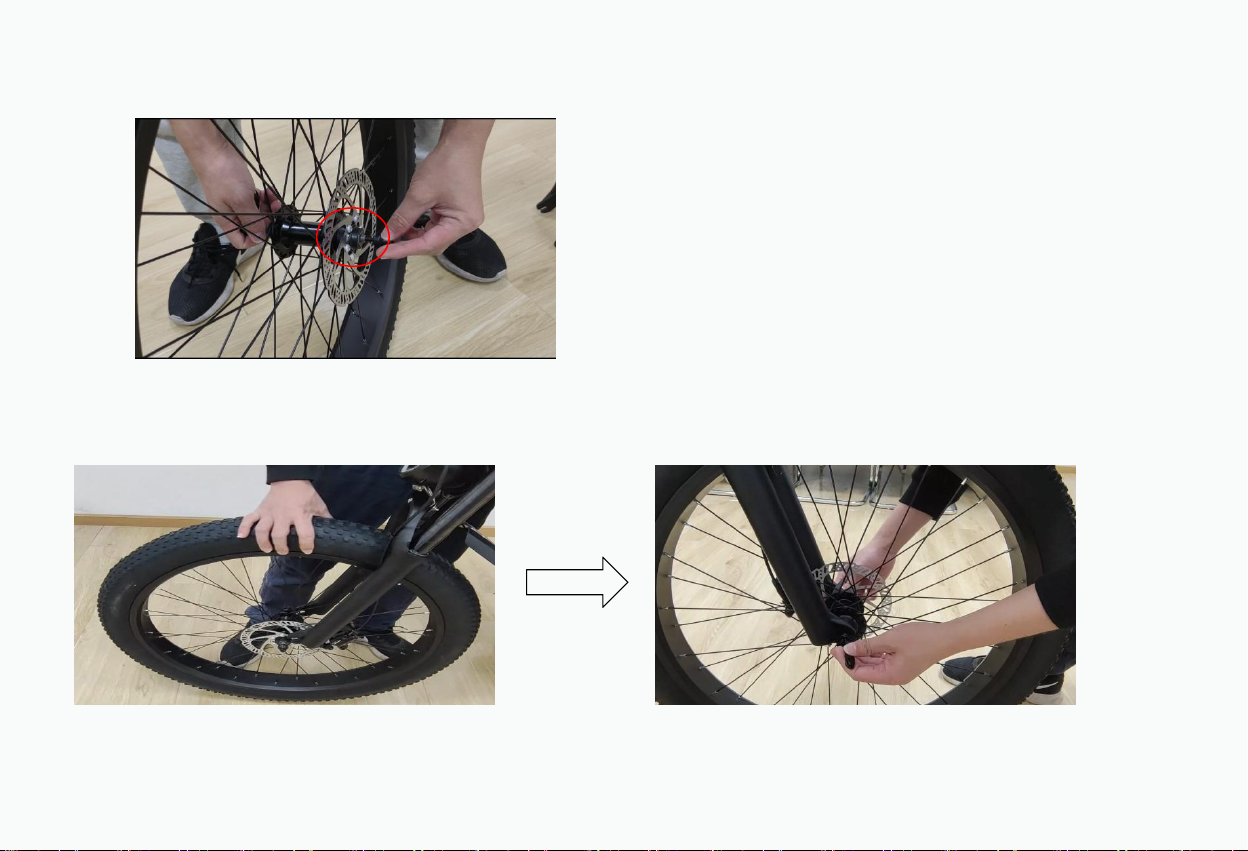
12
Step 3 : Tighten the thumb.
Step 4 : Align the fork dropouts with the axle of the wheel hub, making sure the dropouts are securely positioned on the axle. Also ensure the brake rotor is
properly inserted into the caliper.
Step 5 : Tighten the thumb nut until the quick-release lever is held in line with the axle, and then use your palm of your hand to close the quick-release lever.
13
Step 6 : Rotate the front wheel. Make sure the quick release skewer lever on the front wheel is fully closed, and check the wheel balance in Pedal- Only Mode. If you notice
the riding is imbalanced or the rotation of the front wheel makes noise, it means the bolts were not completely tightened or not aligned horizontally.
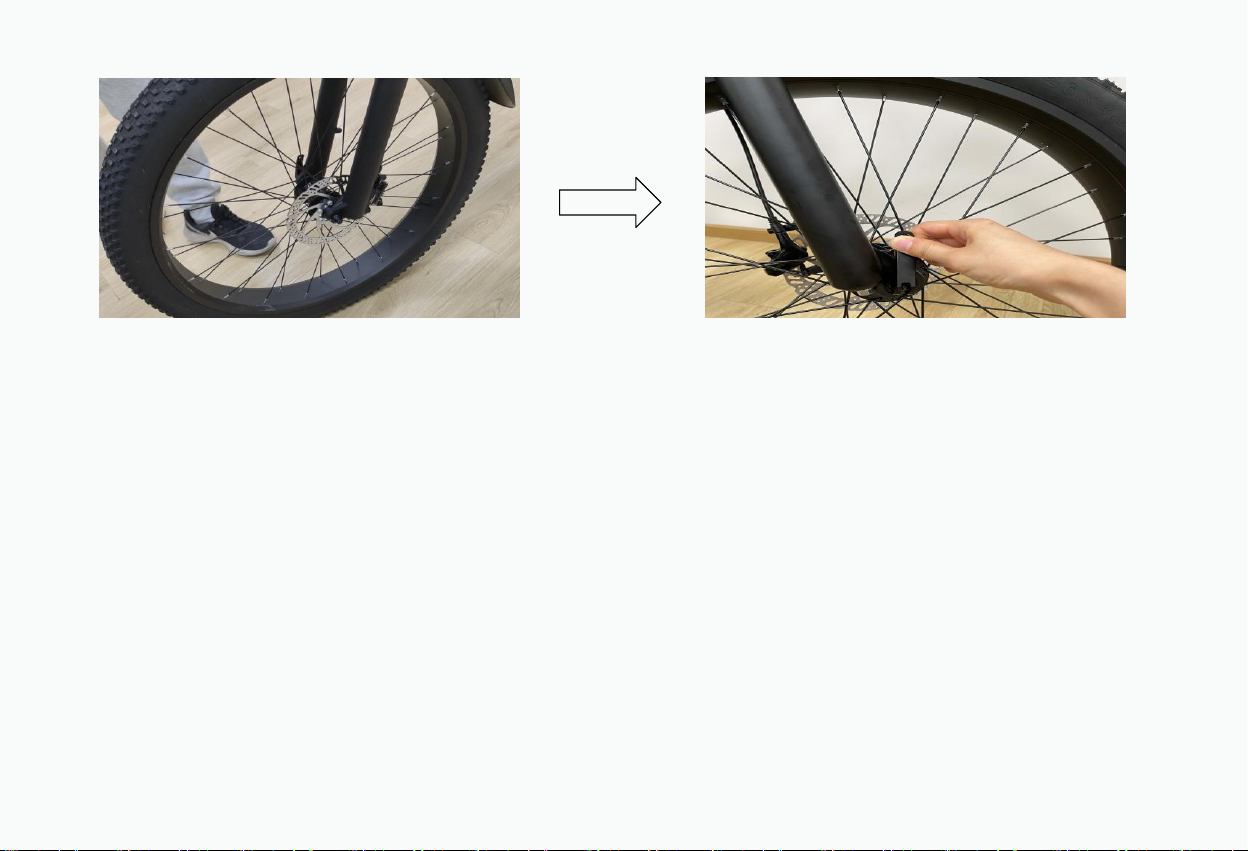
◆Headlight & Front Fender Installation
The headlights are attached with a bolt, and you'll need a 4mm wrench to tighten its nut
Step 1 : Loosen the bolts on the headlight. Align the headlight bolt holes with the holes on the fork bracket, then re-thread the
bolts through all holes and tighten the bolts with a 4mm wrench extractor retaining nut.

14
1. Loosen the bolts on the headlights with a PH1 wrench 2. Align the headlight bolt holes with the holes on the fork bracket
3. Set the nut to tighten the bolt
NOTICE: The bolt
extractors can be found in
the Shengmilo folding hex
key set.

15
Step 2 : Loosen the bolts on the front fender holder. Align the front fender bolt holes with the holes in the holder, then re-thread the bolts
through all holes and tighten the bolts with 6mm wrench retaining nuts.
1. Loosen the bolts on the front fender holder with a 6mm hex wrench. 2.Tighten the bolts with 6mm wrench retaining nuts.

16
Adjust the Seat Height:
Open the seatpost quick release lever. Adjust the seatpost height by sliding the seatpost up or down to a height appropriate for your leg
length and preferred riding position. Do not extend the seatpost beyond the minimum insertion marking etched onto the seatpost.
NOTICE: The seat angle has been preadjusted to factory safety standards. Please make note of
original settings, and only adjust if necessary.

17
◆Pedals Installation (15mm wrench)
Make sure your pedals are installed on the correct side, as installing on the wrong side will damage the threads. Indicators for the right pedal (R) and the left pedal (L) can
be found in two places: the stickers on the plastic cover, and the bottom of the pedal threads.
Before you install the pedals, apply a small amount of waterproof grease onto the spindle. Start threading the pedal on by hand to ensure the pedal is going in perfectly
straight, rotating in the direction of the pointer shown on the crank. If it is not spinning smoothly, make doubly sure that you have the correct left or right pedal. After
initial hand-tightening, finish tightening the pedals with a standard 15mm wrench .

18
Safety Checklist
Safety Check
Basic Steps
Brakes
o Test front and rear brakes for proper function.
o Ensure brake pads are not overworn and are correctly positioned in relation to rims.
o Make sure brake control cables are lubricated, correctly adjusted and display no obvious wear.
o Check that brake control levers are lubricated and tightly secured to handlebars.
Wheels and Tires
o Inflate tires to within recommended limits displayed on sidewalls.
o Check for bulges or signs of excessive wear.
o Clean tires to ensure tread is exposed.
o Ensure rims run true and have no obvious wobbles or kinks.
o Check that all wheel spokes are tight and not broken.
o Check the wheel balance in Pedal Only Mode. If you notice the riding is imbalanced or the rotation of the front wheel makes
noise, it means the bolts were not completely tightened or not aligned horizontally.
Chain
o Check that chain is oiled, clean and runs smoothly.
o Use extra care in wet or dusty conditions.
Cranks and Pedals
o Securely tighten pedals to cranks.
o Ensure cranks are securely tightened and are not bent.
Derailleurs
o Check that derailleur(s) are adjusted and functioning properly.
o Ensure shift and brake levers are attached to handlebar securely.
o Check all brake and shift cables for proper lubrication..
Motor Drive
o Ensure hub motor is spinning smoothly and motor bearings are in good working order.
o Check that all power cables running to hub motor are secured and undamaged.
o Make sure hub motor axle bolts are secured and all torque arms and torque washers are in palce.
Battery Pack
o Ensure battery is charged before use.
o Check for any visible damage to battery pack.
o Lock battery securely to frame.

19
Shengmilo E- Bike Use and Care
The following table of contents provides general guidance on Shengmilo e-bike variable power assist settings and their effects on both range
and perfor- mance. This content will apply broadly to most riders, but multiple factors will affect individual results including rider fitness
and weight, terrain, proper maintenance, etc. While Shengmilo hopes and believes you will thoroughly enjoy your e-bike, no guarantees of
universal performance characteristics for all owners can be given.
Basic Display Settings
◆Control Panel
+ Pedal Assist level
Information
- Pedal Assist level

20
◆Display Screen
Battery Level
Speed
Speed Uint
Range/Time Unit
Text Indication
Push-assistance Level
Indication Area
Function List
(Check form 1
down below)
Lighting Indication
Function List
Table of contents
Other Shengmilo Bicycle manuals


Popular Bicycle manuals by other brands


SWAGTRON
SWAGTRON T3 user manual

WINDGOO Technology
WINDGOO Technology T8 user manual

O2Feel Bikes
O2Feel Bikes iSwan City user manual

Kettler
Kettler BOSCH B-750 FS1 operating instructions

PLAYTIVE JUNIOR
PLAYTIVE JUNIOR 323252-1901 Instructions for use

DARTMOOR
DARTMOOR E-THUNDERBIRD CF 2022 Assemble Instruction