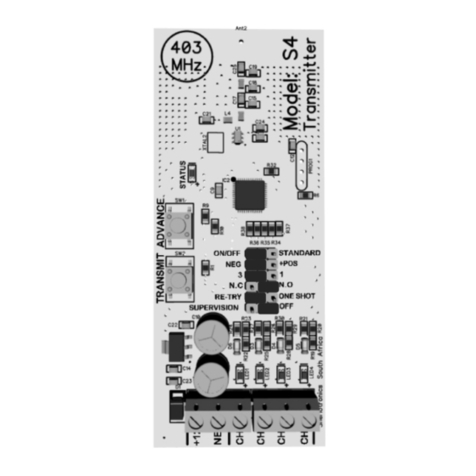
Sherlotronics S4 User manual

Programming a receiver with ON / OFF functionality
+12V High Level
Low Level
COM
NEG
Model: S4
Code-Hopping Encryption
4 Independent Inputs
Positive or Negative triggering
Normally Open / Closed
Weather-proof ABS housing
Frequency stability controlled +/- 75KHz
Order Codes:
This product is approved for use in Residential, commercial and
Light Industrial Environment and Complies with the essential
protection requirements of the R&TTE Directive 1999/EC on the
approximation of the laws of the Member states relating to
electromagnetic compatibility and radio spectrum.
Certifications:
ETSI EN300 220-V2.4.1
ETSI EN301-489-3 V1.4.1
ETSI EN301-489-1 V1.9.2
IEC 60950-1:2005 + A1:2009
Model No: S4
4 Channel Stand-alone Transmitter
Approvals:
Installation Instructions - For Service Persons Only
III
Model:
Encryption type:
Transmission frequency:
Transmission method:
Modulation
Transmission range:
Voltage range:
Standby current consumption:
Current consumption on TX:
Operating Temperature:
Dimension (lxbxh)
Gross weight:
S4
Code hopping
403MHz (Local) 433MHz (Export)
OOK
AM
1500m “Line of sight”
10V to 16VDC
< 20mA
< 110mA
-3°C to 49°C
145 x 66 x 40mm
135g
Technical Specifications:
Features:
For more info visit our web site: www.sherlotronics.com
4 Channel Stand-alone Transmitter S4
English
S4
Please follow the relevant Receivers Installation instructions to programming the unit to a receiver.
The S4 is compatible to the following Receiver models:
Model: RX1-150; Model: RX2-150; Model: RX3-150; Model: RX1-500; Model: RX4-500; Model: MB4000
Compatible receivers
Warranty
This product is sold subject to our standard warranty conditions and is warrantied against defects in workmanship
for a period of two years.
1. Select the ON OFF function jumper on both the receiver you are programming and the S4.
Note: Make sure the receiver is defaulted & remove any wires from the S4 channel inputs.
2. Press the ADVANCE button on the S4. Channel 1 LED will switch on.
3. Press the LEARN button on the receiver. The receiver beeps once.
4. Press the TRANSMIT button on the S4. This activates the ON signal. The LED will flash 5 times.
The receiver will beep a few times acknowledging that it is learning the signal.
5. Press the LEARN button on the Receiver again. The receiver beeps twice.
6. Press the ADVANCE Button on the S4. The LED will flash continuously.
7. Press the TRANSMIT button to learn in the OFF signal on to the receiver. The receiver will beep a
few times acknowledging that it is learning the signal.
9. Follow steps 2 to 7 for each Channel following or just keep pressing the ADVANCE button until
the unit steps past Channel 4 and the LED’s start to running to indicate the unit is in standby.
10. Test that the ON /OFF function is working correctly by triggering the channel inputs with a wire
connected to either POSITIVE or NEGATIVE
ON / OFF functionality explained
Once the ON/OFF jumper is connected, the transmitter will transmit a signal encoded to switch a receivers relay contact
either ON or OFF depending on the transmitters trigger input condition. The function will only work on ON / OFF
(enabled receiver units). This functionality ensures the unit does not get out of sequence with the receiver as with
normal latching/unlatching functions. If you are using a different 12V power-source to that of the transmitter, then it is
recommended to common up on the Ground / Negative so that all the devices have a common negative reference.
TA-2017/1572
APPROVED
Supervision functionality explained
The SUPERVISION Jumper enables the unit to transmit out a system alive signal every 60 minutes.
This function will only be compatible to receivers that have SUPERVISION enabled firmware.
Please refer to the relevant receivers installation manual for a more info.
By enabling the RE-TRY jumper the unit will re-transmit out a signal every 10 minutes. This ensures the system
works reliably and does not miss any ON or OFF signals. This function will only work when the ON/OFF function
jumper is enabled.
RE-TRY jumper setting explained
NEG & POS jumper setting explained
By enabling the NEG jumper the unit will trigger when a Negative input or ground reference. The +POS jumper enables
the unit to trigger from a Positive voltage reference input.
1 & 3 jumper setting explained
By enabling the 1jumper the unit will trigger one RF signal when its input is triggered.
Jumper 3will enable the unit to trigger 3 x RF signals every time the input is triggered. We recommend setting the unit
to 3for all alarm applications.
N.C & N.O jumper setting explained
By enabling the N.C jumper the unit will trigger from Normally Closed inputs. All un-used inputs must be bridged out
when using the N.C setting. N.O will enable the unit to trigger from Normally Open inputs.

For more info visit our web site: www.sherlotronics.com
Opening the unit
Note: If Alarm panel is programmed to squawk when
armed/dissarmed, do not use the Siren output and rather
use a PGM output
Note: Link all un-used channels to NEGATIVE(-)
if the unit is set to Normally Closed (NC)
Note: Link all un-used channels to NEG(-)
if the emergency switches are wired to
Normally Closed (NC)
Wiring diagram
The plastic housing is splash proof, and may be mounted externally if
required. The unit should be mounted vertically for best performance.
Ensure that you do not mount the unit close to electric fence cables or
energizers, as these products produce extreme levels of interference
and may reduce the performance of the receiver. If mounting indoors
try and centralise the unit in the middle of the building, and keep it at
least 3 metres away from armed response company’s alarm radio
transmitters.
We recommend you mount the unit more than 3 metres above the
floor height or just above the trap door. For large properties that
require exceptional range, mount the unit externally.
Always conduct a signal range test before you hand over the
product to the client, ensuring that the systems works reliably. You
may need to move the unit if you encounter dead spots. In rare cases
you may need to install a booster repeater unit for coverage around
large multi levelled sites.
Remove the aerial and make sure the screw on the bottom side is removed.
Carefully lift the lid up from the back end and unclip the top.
Screw hole
Mounting advice
A
B3m
For more info visit our web site: www.sherlotronics.com
Terminal blocks
Status
LED
Advance
Switch
Transmit
Switch
Aerial
YEL
GRN
Z1
BLK
AUX -
RED
AC
AC
AUX +
BELL+
BELL-
COM
Z2
COM
Z3
COM
Z4
COM
Z5
Z6
Z7
Z8
N.C
COM
+12V DC
NEG
+
RED
BLACK
Connecting a static panic switch
Connecting a siren alarm panel output Connecting a motion beam
ELECTRIC FENCE
ENERGIZER
POS+ OUTPUT
NEG
BATTERY
12V 7A/H +
_
RELAY
Note: Channel 4 has a 2 second de-bounce delay.
This prevents spikes generated from the electric fence
system from false triggering the unit. All other channels
have a 0,5 second de-bounce delay.
Install a separate relay board to isolate any spikes.
Connecting a electric fence energizer
ON/OFF = Pump control
STANDARD = Alarm signals
POS = Positive trigger
NEG = Negative trigger
N.C = Normally Closed input
N.O = Normally Open input
RE-TRY = Re-triggers every 10min
ONE SHOT = Triggers once
1 = Transmits (1) one signal
3 = Transmits (3) three signals
SUPERVISION = Signals every hour
OFF = Supervision is off

For more info visit our web site: www.sherlotronics.com
Opening the unit
Note: If Alarm panel is programmed to squawk when
armed/dissarmed, do not use the Siren output and rather
use a PGM output
Note: Link all un-used channels to NEGATIVE(-)
if the unit is set to Normally Closed (NC)
Note: Link all un-used channels to NEG(-)
if the emergency switches are wired to
Normally Closed (NC)
Wiring diagram
The plastic housing is splash proof, and may be mounted externally if
required. The unit should be mounted vertically for best performance.
Ensure that you do not mount the unit close to electric fence cables or
energizers, as these products produce extreme levels of interference
and may reduce the performance of the receiver. If mounting indoors
try and centralise the unit in the middle of the building, and keep it at
least 3 metres away from armed response company’s alarm radio
transmitters.
We recommend you mount the unit more than 3 metres above the
floor height or just above the trap door. For large properties that
require exceptional range, mount the unit externally.
Always conduct a signal range test before you hand over the
product to the client, ensuring that the systems works reliably. You
may need to move the unit if you encounter dead spots. In rare cases
you may need to install a booster repeater unit for coverage around
large multi levelled sites.
Remove the aerial and make sure the screw on the bottom side is removed.
Carefully lift the lid up from the back end and unclip the top.
Screw hole
Mounting advice
A
B3m
For more info visit our web site: www.sherlotronics.com
Terminal blocks
Status
LED
Advance
Switch
Transmit
Switch
Aerial
YEL
GRN
Z1
BLK
AUX -
RED
AC
AC
AUX +
BELL+
BELL-
COM
Z2
COM
Z3
COM
Z4
COM
Z5
Z6
Z7
Z8
N.C
COM
+12V DC
NEG
+
RED
BLACK
Connecting a static panic switch
Connecting a siren alarm panel output Connecting a motion beam
ELECTRIC FENCE
ENERGIZER
POS+ OUTPUT
NEG
BATTERY
12V 7A/H +
_
RELAY
Note: Channel 4 has a 2 second de-bounce delay.
This prevents spikes generated from the electric fence
system from false triggering the unit. All other channels
have a 0,5 second de-bounce delay.
Install a separate relay board to isolate any spikes.
Connecting a electric fence energizer
ON/OFF = Pump control
STANDARD = Alarm signals
POS = Positive trigger
NEG = Negative trigger
N.C = Normally Closed input
N.O = Normally Open input
RE-TRY = Re-triggers every 10min
ONE SHOT = Triggers once
1 = Transmits (1) one signal
3 = Transmits (3) three signals
SUPERVISION = Signals every hour
OFF = Supervision is off

Programming a receiver with ON / OFF functionality
+12V High Level
Low Level
COM
NEG
Model: S4
Code-Hopping Encryption
4 Independent Inputs
Positive or Negative triggering
Normally Open / Closed
Weather-proof ABS housing
Frequency stability controlled +/- 75KHz
Order Codes:
This product is approved for use in Residential, commercial and
Light Industrial Environment and Complies with the essential
protection requirements of the R&TTE Directive 1999/EC on the
approximation of the laws of the Member states relating to
electromagnetic compatibility and radio spectrum.
Certifications:
ETSI EN300 220-V2.4.1
ETSI EN301-489-3 V1.4.1
ETSI EN301-489-1 V1.9.2
IEC 60950-1:2005 + A1:2009
Model No: S4
4 Channel Stand-alone Transmitter
Approvals:
Installation Instructions - For Service Persons Only
III
Model:
Encryption type:
Transmission frequency:
Transmission method:
Modulation
Transmission range:
Voltage range:
Standby current consumption:
Current consumption on TX:
Operating Temperature:
Dimension (lxbxh)
Gross weight:
S4
Code hopping
403MHz (Local) 433MHz (Export)
OOK
AM
1500m “Line of sight”
10V to 16VDC
< 20mA
< 110mA
-3°C to 49°C
145 x 66 x 40mm
135g
Technical Specifications:
Features:
For more info visit our web site: www.sherlotronics.com
4 Channel Stand-alone Transmitter S4
English
S4
Please follow the relevant Receivers Installation instructions to programming the unit to a receiver.
The S4 is compatible to the following Receiver models:
Model: RX1-150; Model: RX2-150; Model: RX3-150; Model: RX1-500; Model: RX4-500; Model: MB4000
Compatible receivers
Warranty
This product is sold subject to our standard warranty conditions and is warrantied against defects in workmanship
for a period of two years.
1. Select the ON OFF function jumper on both the receiver you are programming and the S4.
Note: Make sure the receiver is defaulted & remove any wires from the S4 channel inputs.
2. Press the ADVANCE button on the S4. Channel 1 LED will switch on.
3. Press the LEARN button on the receiver. The receiver beeps once.
4. Press the TRANSMIT button on the S4. This activates the ON signal. The LED will flash 5 times.
The receiver will beep a few times acknowledging that it is learning the signal.
5. Press the LEARN button on the Receiver again. The receiver beeps twice.
6. Press the ADVANCE Button on the S4. The LED will flash continuously.
7. Press the TRANSMIT button to learn in the OFF signal on to the receiver. The receiver will beep a
few times acknowledging that it is learning the signal.
9. Follow steps 2 to 7 for each Channel following or just keep pressing the ADVANCE button until
the unit steps past Channel 4 and the LED’s start to running to indicate the unit is in standby.
10. Test that the ON /OFF function is working correctly by triggering the channel inputs with a wire
connected to either POSITIVE or NEGATIVE
ON / OFF functionality explained
Once the ON/OFF jumper is connected, the transmitter will transmit a signal encoded to switch a receivers relay contact
either ON or OFF depending on the transmitters trigger input condition. The function will only work on ON / OFF
(enabled receiver units). This functionality ensures the unit does not get out of sequence with the receiver as with
normal latching/unlatching functions. If you are using a different 12V power-source to that of the transmitter, then it is
recommended to common up on the Ground / Negative so that all the devices have a common negative reference.
TA-2017/1572
APPROVED
Supervision functionality explained
The SUPERVISION Jumper enables the unit to transmit out a system alive signal every 60 minutes.
This function will only be compatible to receivers that have SUPERVISION enabled firmware.
Please refer to the relevant receivers installation manual for a more info.
By enabling the RE-TRY jumper the unit will re-transmit out a signal every 10 minutes. This ensures the system
works reliably and does not miss any ON or OFF signals. This function will only work when the ON/OFF function
jumper is enabled.
RE-TRY jumper setting explained
NEG & POS jumper setting explained
By enabling the NEG jumper the unit will trigger when a Negative input or ground reference. The +POS jumper enables
the unit to trigger from a Positive voltage reference input.
1 & 3 jumper setting explained
By enabling the 1jumper the unit will trigger one RF signal when its input is triggered.
Jumper 3will enable the unit to trigger 3 x RF signals every time the input is triggered. We recommend setting the unit
to 3for all alarm applications.
N.C & N.O jumper setting explained
By enabling the N.C jumper the unit will trigger from Normally Closed inputs. All un-used inputs must be bridged out
when using the N.C setting. N.O will enable the unit to trigger from Normally Open inputs.
Other manuals for S4
1
Table of contents
Other Sherlotronics Transmitter manuals
Popular Transmitter manuals by other brands

RKI Instruments
RKI Instruments 65-2643XL-05-04 Operator's manual

Nulaxy
Nulaxy NX09 user manual

Nautel
Nautel VX150 Operation & maintenance manual

Consult IX
Consult IX CellWizard WTX-35-B user manual

Monacor
Monacor AVM-252TX instruction manual
Endress+Hauser
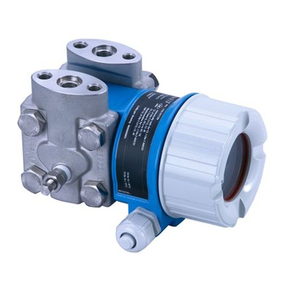
Endress+Hauser Deltabar M PMD55 Brief operating instructions

