Shinco SAD-2401S User manual
Air purifier user
manual SAD-2401S
2101080004变更文件号不印出

NOTE:
Pls replace your filter every 3-6 months according to your
environment and frequency of use.
Pls take out the replacement filter and remove from the plastic bag
before running.
You can contact me or go to Shinco official website:shincoglobal.com
to buy it yourself.

CONTENT
1
Safety Warnings---------------------------------------02
Overview---------------------------------------------------04
Design Features---------------------------------------05
Installing the Filter------------------------------------07
Accessory Storage-------------------------------------09
How to Run your Unit--------------------------------10
Maintenance----------------------------------------------14
Warranty---------------------------------------------------18

1.
Please read this user manual carefully before using the appliance and save it for future
reference.
2.
Do not clean the appliance with water or any other liquid or (flammable) detergent to
avoid electric shock and
fire hazard.
3.
Check if the voltage indicated on the rating label corresponds to the local mains voltage
before you connect the appliance.
4.
Do not use the appliance if the plug, the power cable or the appliance itself is damaged.
contact your dealer or similarly qualified persons to replace it in order to avoid a hazard.
5.
Children should be supervised to ensure that they do not play with the appliance.
6.
Do not block the air inlet and outlet, e.g. by placing items on the air outlet or in front of
the air inlet.
7.
This appliance is not a substitute for the proper ventilation, regular vacuum cleaning or
use of an extractor hood or fan while cooking.
8.
If the wall socket used to power the appliance has poor connections, the plug of the
appliance could become hot. Make sure you plug the appliance into a properly
connected wall socket.
9.
Always place and use the appliance on a dry, stable, and level surface.
10.
Leave at least 20 cm free space behind and on both sides of the appliance and leave
at least 30 cm free space above.
11.
Do not place anything on top of the appliance and do not sit on it.
12.
Do not place the appliance where condensation could drip onto it.
13.
Ensure all filters are properly installed before switching on the appliance ..
14.
Always lift or move the appliance by the handle at the rear.
15.
Do not insert foreign objects into the air outlet.
16.
Do not use this appliance when you have used indoor smoke-type insect repellents
or in places with oily residues, burning incense or chemical fumes.
2
SAFETY WARNINGS
CAUTION: Failure to follow these precautions could result in personal
injury or damage to property.

17. Do not use near gas appliances,heaters or fireplaces.
18. Always unplug the appliance after use and before you clean it.
19. Do not use in a room with major temperature changes as this may
cause condensation inside the appliance.
20. To prevent interference, place the appliance at least 2 m away from
electrical appliances that use airborne radio waves such as TVs,
radios and radio-controlled clocks.
21. The appliance is only intended for household use under normal
operating conditions.
22. Do not use the appliance in wet surroundings or in surroundings
with high ambient temperatures, such as the bathroom, toilet or
kitchen.
23. The appliance does not remove carbon monoxide (CO) or radon (Rn).
It cannot be used as a safety device in case of accidents with
combustion processes and hazardous chemicals.
3
The first stage: The pre-filter is treated with antibacterial substances
to filter out large particles such as hair and pet hair.
The second stage: the H13 HEPA filter can filter out dust, allergens
and tiny particles larger than 20 nanometers.
The third stage : activated carbon filtration can effectively absorb
formaldehyde, toluene, volatile organic compounds (VOC), ammonia,
acetaldehyde, acetic acid and other odors and harmful gases.
THE FILTRATION SYSTEM
The air purifier has a unique multiple filtration system to ensure
the best air quality:
PACKAGE CONTENTS
1.The Unit;
2.Two filters:
The pre-filter ;
High efficiency composite filter
(Activated carbon and H13 HEPA filter).
3.A remote control.
4
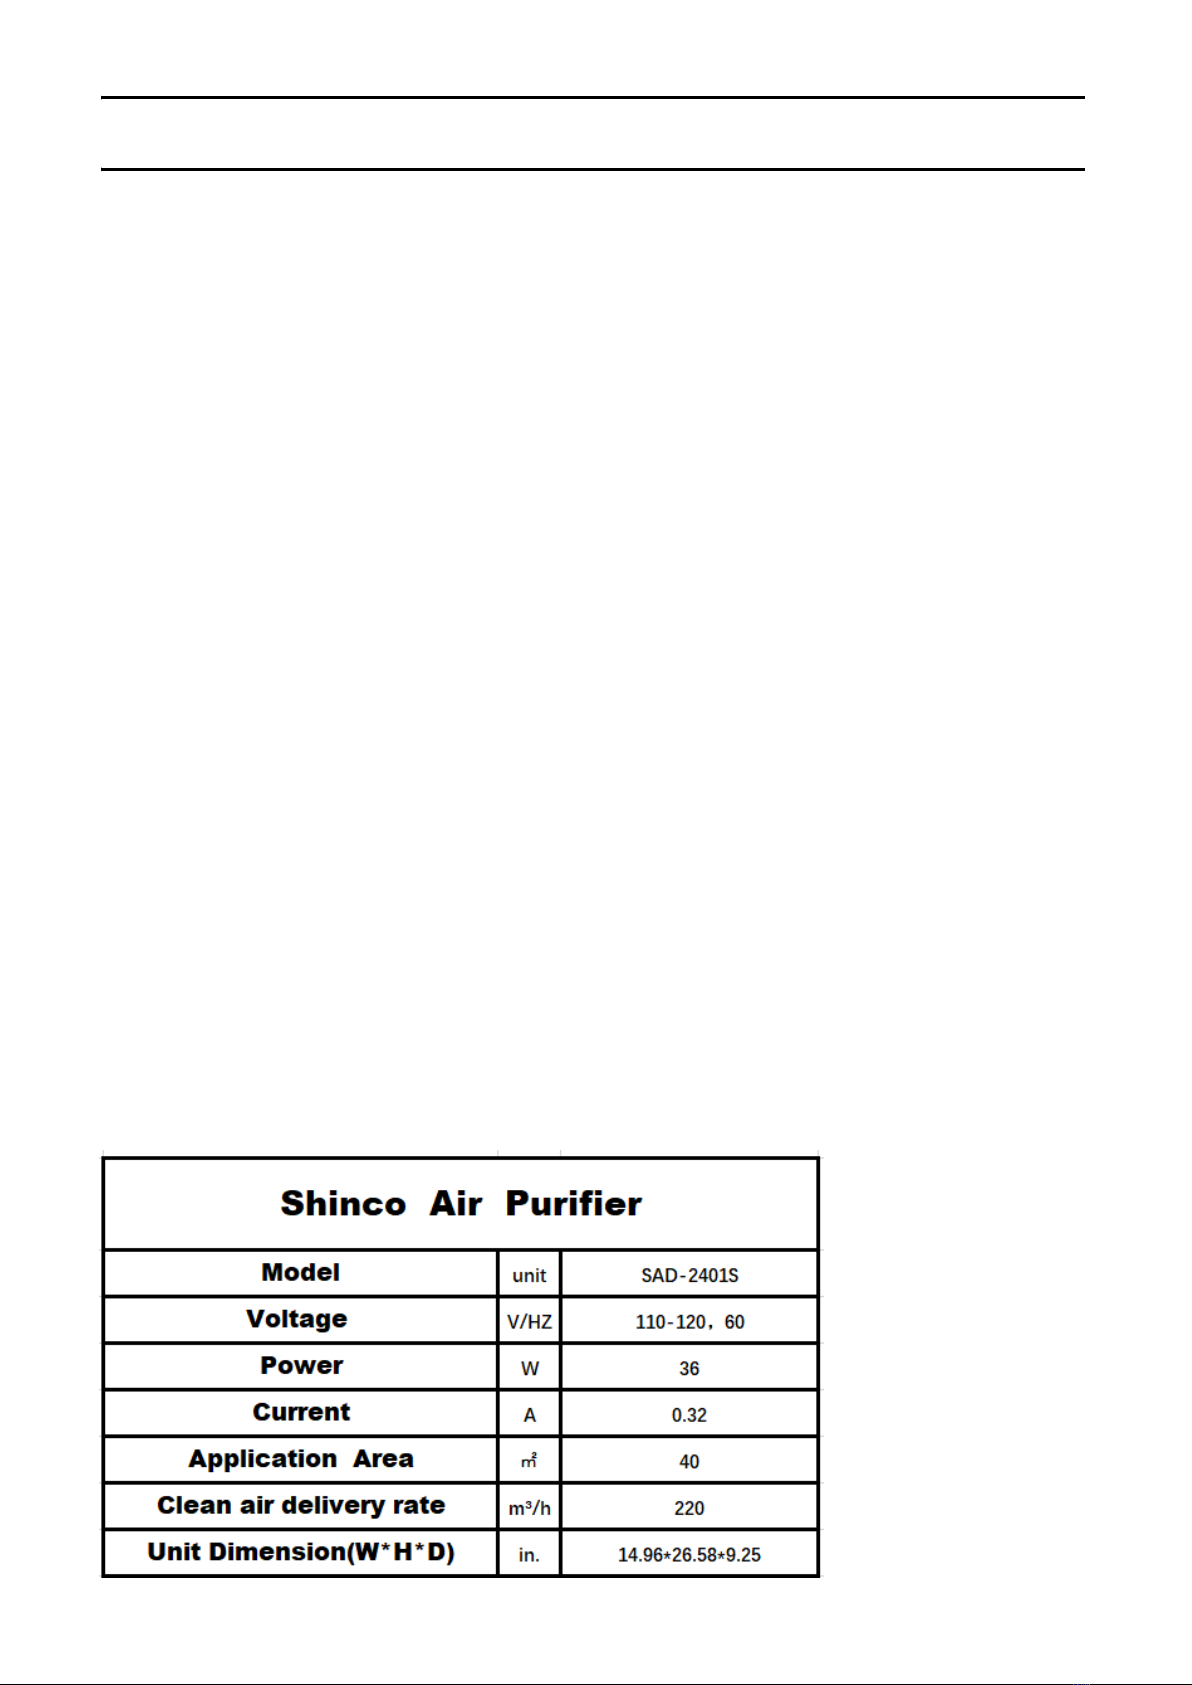
OVERVIEW
DATA
4.A user's manual.

5
DESIGN FEATURES
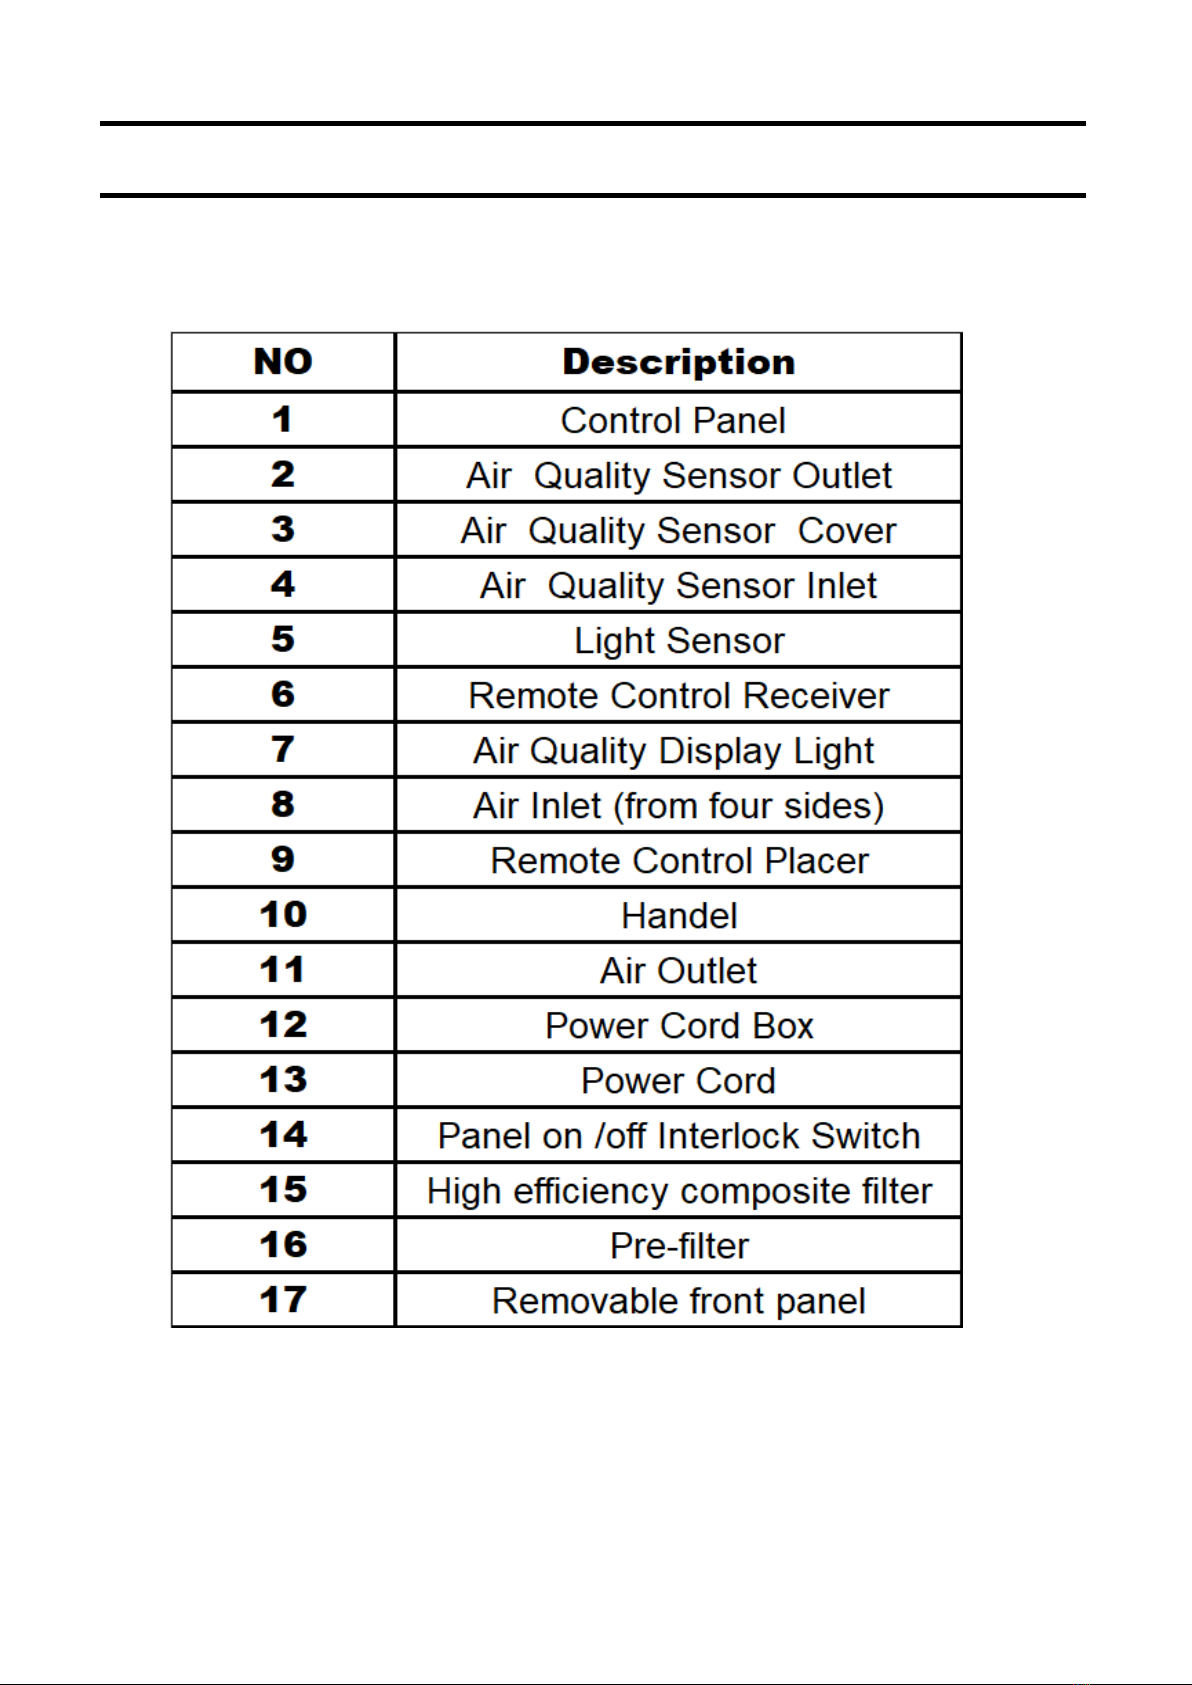
DESIGN FEATURES
6
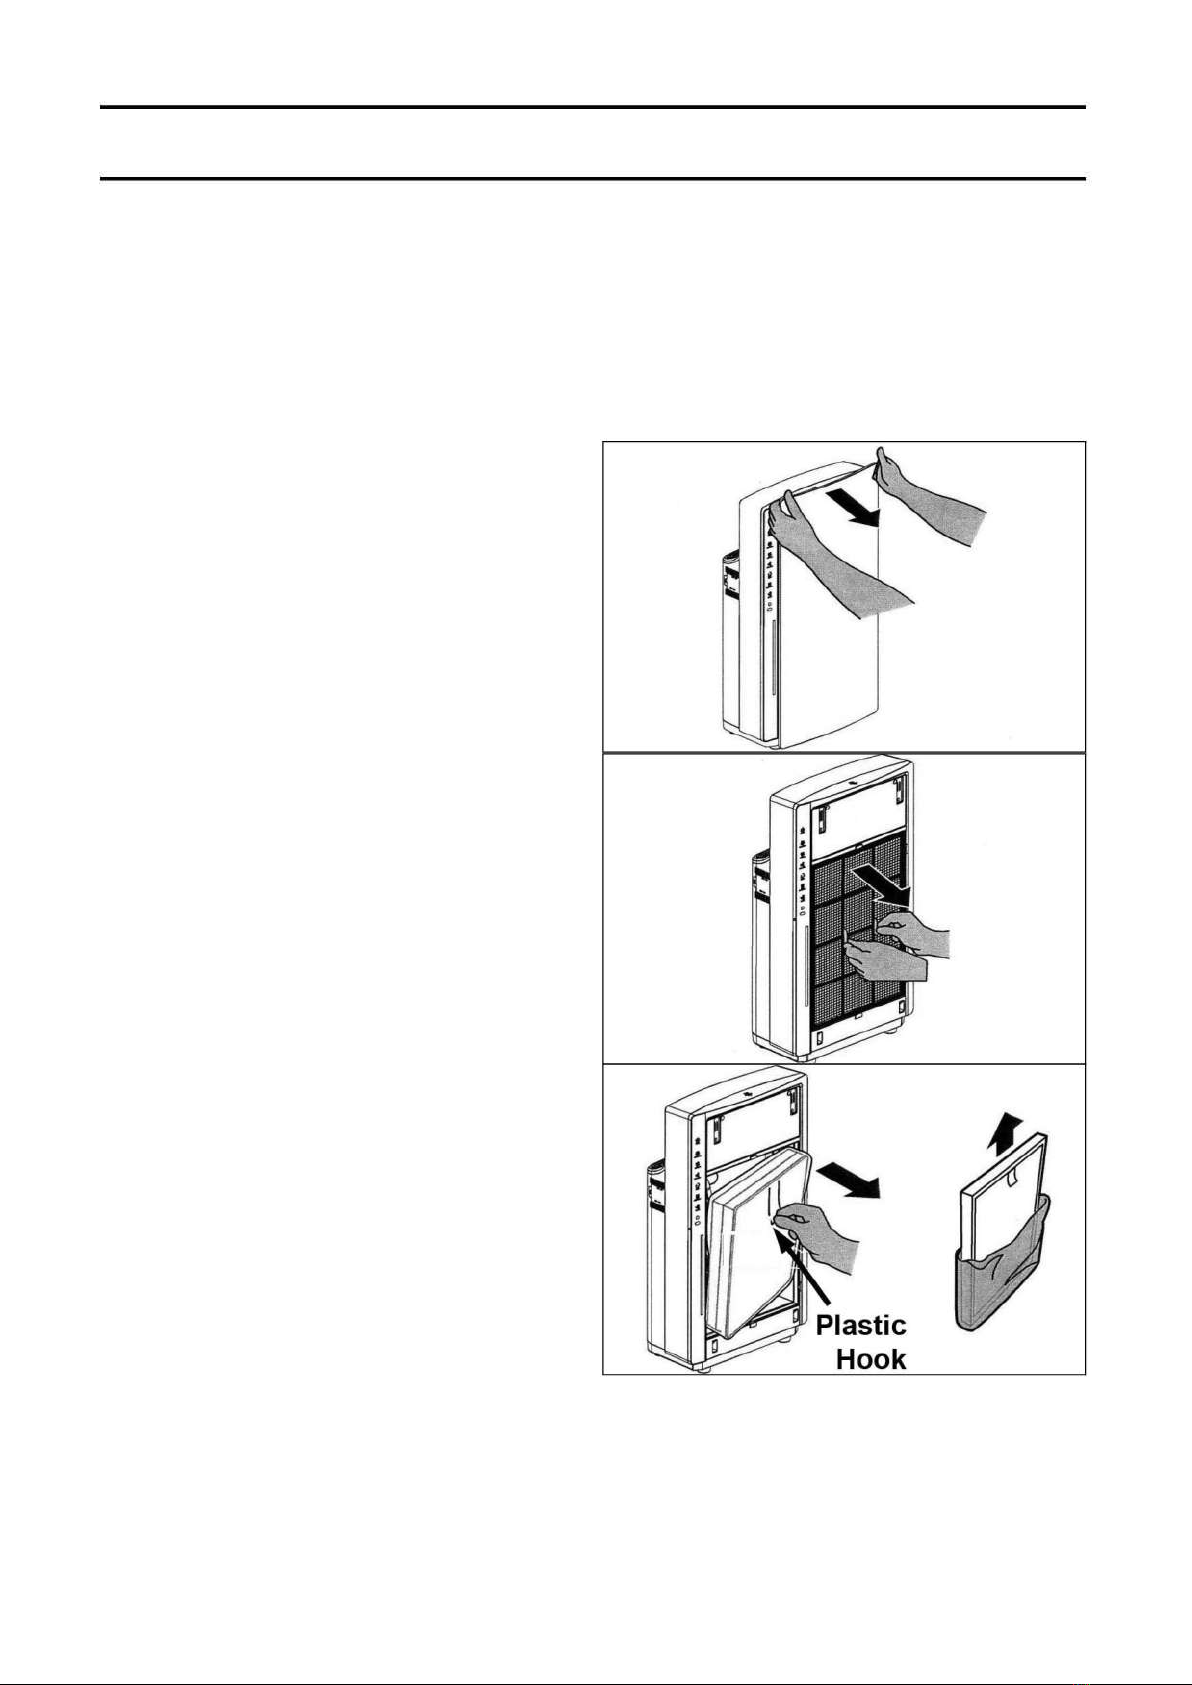
INSTALLING THE FILTERS
The appliance comes with all filters fitted inside, but you must remove the
packaging from each one before using the appliance. Remove the filters,
discard the packaging and re-fit to the appliance as follows:
NOTE: Make sure you insert each filter in the correct position.
1. Gently pull the top of the
front panel towards you before
lifting the hooks at the bottom of
the panel away from the bottom
of the appliance.
2. Remove the pre-filter by
gripping the two flanges and
pulling the filter towards you.
3. Remove all packing
materials from the new filters.
7

High efficiency
composite filter
8
4.Refit the High efficiency composite
filter into the appliance .
NOTE:Ensure that the side with the
tab is pointing towards you.
5.Refit the pre-filter back into
the appliance.
6.To re-attach the front
panel ,insert the bottom hooks into
the bottom of the appliance ,then
press the panel against the body of
the appliance.
NOTE:The appliance will not
operate without the front panel in its
correct position.

ACCESSORY STORAGE
POWER CABLE USE
1.Remove the power cord and push down the arrowhead on the flap to open
the compartment and preserve it.
2.Always store the cable in the compartment when not in use.
REMOTE CONTROL STORAGE
1.Remove the remote control from its
magnetic storage compartment if required.
It should be stored here when not in use.
9
1.Push down the arrowhead on the flap to open the compartment.
2..Extend the cable and close the flap with the cable passing through the gap
provided in the flap.
3.Plug the power supply into the socke.
POWER CABLE STORAGE
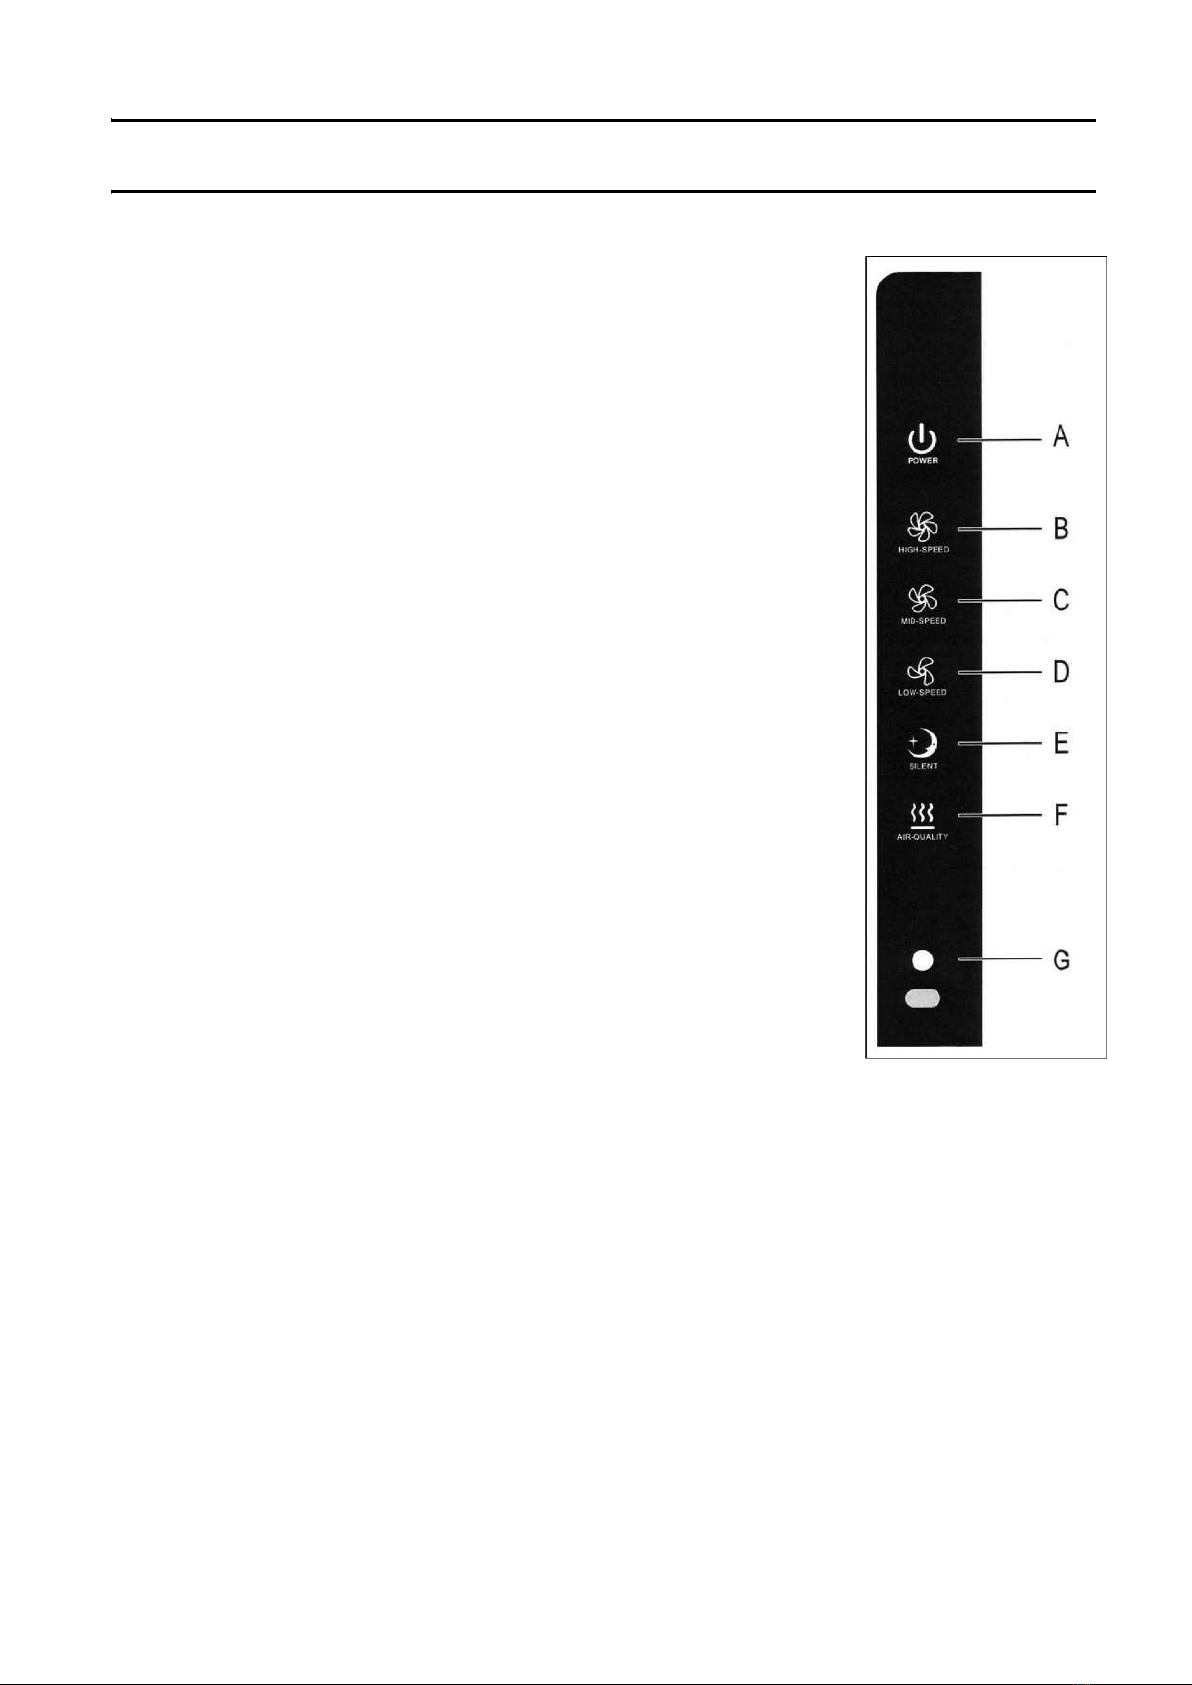
HOW TO RUN YOUR UNIT
•HIGH SPEED (B): The fan will run at high speed.
•MID SPEED (C): The fan will run at mid speed.
•LOW SPEED (D): The fan will run at low speed.
•SILENT-MODE(E): The unit will run at its slowest speed
as for night-time running .
•AIR QUALITY(F) :When you press it,the unit will show
different colors to indicate different room air quality,which
is detected by the Air Quality Sensor.
Red light stands for poor air quality .
Green light stands for fair air quality.
Blue light stands for very good air quality.
Attention: If the Air Quality indicator flashes ,it means that
the filters are blocked which need to be replaced.
•Item G is the light sensor which can sense the intensity of
light. After power on, when using the remote control to
select "AUTO" mode, the machine will automatically select
day mode or night mode to operate according to the
intensity of the detected light.
CONTROL PANEL OPERATION
When the appliance is plugged into the power socket,the
POWER button (A) lights up in red.
Press the POWER button to start the appliance and the light
will change to blue.Press again to return to the standby mode.
When the appliance is running ,press the appropriate indicator
to select the function which you want:
10

When the appliance is first plugged in, you will hear a beep, indicating
that the appliance is operating normally.
If required,set the appliance running at high speed for fast initial
cleaning of the air before adjusting the control to a slower speed.
NORMAL OPERATING MODE
When the appliance is on, it will enter the NORMAL operating mode by
default. press the fan speed button (H, M, L, SILENT) as required. The
operating status will be as follows:
•Press the fan speed button to adjust the fan speed as required, the related
fan speed light will be on.
AUTO MODE
•Set the appliance in Auto mode by using the AUTO button in the
remote control.
•The high, mid, or low fan speed indicator will all flash in turn, showing that
the appliance is running in AUTO mode.
11
REMOTE CONTROL OPERATION
All the controls on the machine control panel are
replicated on the remote control unit with the addition
of the Auto-Mode.Press AUTO to select AUTO-
MODE.
When the Air Quality indicator flashes, the filters are
becoming blocked and need replacement.(See
Maintenance on pages 14-16). After replacing all the
filters, press the RESET button on the remote control
for 2- seconds and the filter service interval time will
be re-set.
OPERATING MODES
•The air quality indicator will be on by default. press the air quality button to
set the air quality indicator on or off.
POWER
AIR-QUALITYSILENT
HIGH-SPEED MID-SPEED LOW-SPEED
AUTO
RESET

3.When set in AUTO mode, the appliance will switch to NIGHT or DAY
Mode automatically, (DAY Mode by default) according to the light level in the
room. When the light in the room is beginning to fade for more than 3
minutes, the appliance will switch to Night Mode. Likewise, when the light
has become brighter for more than 5 minutes, the appliance will switch back
to the Day Mode.
In DAY Mode, the operating status will be as follows:
The Air Quality indicator will be on by default. Press the
"AIR QUALITY"button to switch the air quality indicator on or off.
According to the air quality detected, the fan speed will be adjusted
automatically. When the air quality is poor, the fan will run at high speed; if
fair quality,mid speed and if good, will run at low speed.
In NIGHT Mode, the operating status will be as follows:
The air quality indicator will be OFF by default. Press "AIR QUALITY"
button to switch the air quality indicator on or off.
According to the air quality detected, the fan speed will be adjusted
automatically. When the air quality is poor, the fan will run at mid
speed; if fair quality,low speed and if good, will switch to silent mode
automatically.
AIR QUALITY INDICATION
AIR QUALITY INDICATION
『『
Attention: In order to display the air quality in a precise way, the air quality is
divided into 32 grades and each is displayed by corresponding colours.
With changing air quality, the air quality indicator will change colour accordingly.
12

ADJUSTING T H E AIR QUALITY SENSOR SENSITIVITY
The appliance allows you to adjust the sensitivity of the air quality sensor for
the benefit of people with allergies or asthma. When it is set to a higher
sensitivity level, the appliance starts cleaning the air at lower pollution levels
to make the air cleaner. There are four sensitivity levels:
•Common
•Standard
The pollution sensor is set to "standard"sensitivity but you can adjust the
sensitivity of the air quality sensor in the following way:
1. If the appliance is already plugged in, unplug and wait for 3-5 minutes
before plugging back in.
2. IN STAND-BY mode, press AIR-QUALITY+ HIGH-SPEED buttons. After
the buzzer sounds twice, the air quality sensor sensitivity has been set to
extra sensitive. This should be indicated by the corresponding indicator
flashing five times and confirmed immediately after pressing the power
button to turn on the appliance.
3. IN STAND-BY mode, press AIR-QUALITY+MID-SPEED buttons. After the
buzzer sounds twice, the air quality sensor sensitivity has been set to
sensitive level.
4. IN STAND-BY mode, press AIR-QUALITY+LOW-SPEED buttons. After the
buzzer sounds twice, the air quality sensor sensitivity has been set to
standard level.
5. IN STAND-BY mode, press AIR-QUALITY+SILENCE buttons. After the
buzzer sounds twice, the air quality sensor sensitivity has been set to
common level.
Note:The sensitivity level can be confirmed by the corresponding indicator
flashing five times immediately after pressing the power button to turn on
the appliance.
NOTE: The appliance automatically starts operating at the pre-set sensitivity
level when switched on again.
SENSITIVITY SETTING INQUIRY
IN STAND-BY mode, press the air quality indicator button to check the
sensor sensitivity setting. Exit after the corresponding sensitivity indicate light
flashes five times or exit by pressing other buttons (except for the reset
button).
• Sensitive
• Extra Sensitive
13

14
1.Remove the air quality sensor cover.
2.Clean the air quality sensor, the air inlet and air outlet with a lightly moistened
cotton swab.
3.Dry them with a dry cotton swab.
4.Reattach the air quality sensor cover.
MAINTENANCE
WARNING: ALWAYS UNPLUG T H E APPLIANCE BEFORE PERFORMING
ANY CLEANING OR MAINTENANCE OPERATIONS.
CLEANING
Regularly clean the body of the appliance to prevent dust from collecting.
1. Wipe away dust with a soft dry cloth from the body and air inlet area of the appliance.
IMPORTANT: Never immerse the appliance in water or any other liquid. Never use
aggressive or flammable cleaning agents such as bleach or alcohol to clean any part of
the appliance.
IMPORTANT: Only the pre-filter is washable. The other filters should be replaced
and can't be reused if heavily contaminated or indicated by the machine.
PRE-FILTER
1.If the pre-filter is very dirty, use a soft brush to brush away the dust while it is dry.
You can alternatively remove the dust with a vacuum cleaner.
2.Remove the pre-filter and wash it under a running tap.
3.Air-dry the pre-filter and make sure it is completely dry(Please do not use hair dryer).
4.Re-fit the pre-filter into the appliance.
AIR QUALITY SENSOR
Clean the air quality sensor every 2 months for optimum functioning of the appliance.
Clean it more frequently if you use the appliance in a dusty environment.
NOTE: When the humidity level in the room is very high, it is possible that
condensation can develop on the air quality sensor. As a result, the AIR QUALITY
light on the control panel may indicate that the air quality is poor even though the
air quality is good. In this case, it is necessary to clean the air quality sensor.

FILTER REPLACEMENT
This appliance is equipped with a feature to ensure that the filters are in good
condition when the appliance is operating. When one of the filters is almost full
and has to be cleaned or replaced, the"Air Quality"light starts to flash. If you do
not replace the Multi-function, HEPA and Activated Carbon filters, the appliance
stops operating and is locked off.
FIRST ALERT TO CHANGE THE FILTERS
The filter function will be relatively poor near the end of its working life. The air
quality light will flash to remind the user to change the filters.
SECOND ALERT TO CHANGE THE FILTERS
If you do not replace the filters in time after the first alert, approximately 3 weeks
later the Air Quality light will flash and the buzzer sound every 30 minutes to
remind you to replace the filters.
FILTER REPLACEMENT LOCK
If you do not replace the filters in time during the first and second alerts, the
appliance will be locked off. After operating for approx 3 weeks, the appliance will
stop working and the Power light and Air Quality light will flash with a continuous
beep.
•How long it takes before the appliance is locked out depends on the room air
quality after the filter replacement alert.
•When the appliance is locked out, you will hear a beep when you press any
button. You can shut down the appliance by pressing and holding the on/off
button.
15

REPLACING THE FILTERS AND RESETTING THE APPLIANCE
REPLACING THE FILTERS
Remove and re-fit the filters as shown on page 8.
RESETTING THE APPLIANCE
1. After filter replacement, plug in and turn back on.
•The "Power On" sound will be heard when the appliance reaches
STAND-BY status.
2. Press the RESET button on the hand controller for 2 seconds. When the
buzzer sounds once, the service scheduling of the filters has been cleared
and re-set. The Air Quality light will be ON, indicating that the re-set has
been successful.
NOTE:
The RESET button at the Air Quality Sensor inlet can clear the filter
service schedule and restart it at any time. Do not press the Reset button
when the filter replacement light is not flashing.
Only replace the filters when the "Air Quality" light flashes. If you replace
the filters before the "Air Quality" light starts flashing, the service
schedule will not be reset but will continue counting the lifetime of the
previous filters. As a result, the "Air Quality" will start flashing and the
appliance be locked off far too soon.
16
If the appliance is locked out:
1.Switch off the appliance and unplug it.
2.Replace the appropriate filters as follows:

TROUBLESHOOTING
Problem
No air coming from the outlet.
Appliance is not switched on or plugged in
.
If the room becomes dark, the night mode is
automatically activated when the appliance is in
AUTO mode. In this case, the fan speed is set to a
low level. To re-set the fan speed, select it
manually using the Low, Medium and High buttons.
The fan speed does not
change when the AUTO
mode is activated.
Weak airflow coming from
the air outlet.
Air quality does not improve
although the appliance has
been running for some time.
Packing material still attached to the filters.
Check that it is all removed.
The appliance still indicates
that the filter needs replacing
but this has already been
done.
The filter re-set bu
廿
on was not pressed after changing
the filters.
With the appliance running, press the reset bu
廿
on on
the controller, or the reset bu
廿
on at the air inlet of the
air quality sensor for 2 seconds.
17
The colour of the Air
Quality display remains
the same.
The appliance is noisy.
No operation.The filters have not been replaced, so that the
appliance is now locked and must be reset
following the installation of the new filter(s).
Solution
The pre-filter may be dirty and require cleaning.
Packing material attached to the filters which should
have been removed.
Check all the filters have been installed in the
appliance and are correctly installed in
the following order: l) Pre-filter 2)High efficiency
composite filter.
The Air Quality Sensor is damp. The humidity level
in the room is very high and is causing
condensation. Confirm that the sensor is clean and
dry. The room in which you are using the appliance
is too large(over 50㎡), which is the maximum
recommended room size.
The air quality sensor is dirty and requires
cleaning. Insufficient ventilation in the room.
Open a window to improve ventilation.

WARRANTY
TO OBTAIN WARRANTY SERVICE:
WARRANTY PERIOD:
Labor: 1 Year from the Date of Purchase.
Parts: 1 Year from the Date of Purchase.
Shinco Electric Co., Ltd reservesrights to upgrade
products without user notice.
18
Table of contents
Other Shinco Air Cleaner manuals


 manual")


