b-mola NCCO1702/DMA User manual
Air Treatment Unit
Operation Manual
Model:
NCCO1702 / DMA
Please read and retain this manual prior to usage

1
Table of Contents
SAFETY INSTRUCTIONS 2
PARTS AND COMPONENTS 4
INSTALLATION GUIDE 6
OPERATION GUIDE 7
OPERATION INSTRUCTION 8
FILTER CARE AND REPLACEMENT 10
CLEANING AND MAINTENANCE 11
TROUBLE SHOOTING 12
PRODUCT SPECIFICATION 13
DEAR VALUED CUSTOMER,
Thank you for your purchase of the Air Treatment Unit NCCO1702/DMA. For your safety
and to optimize the capabilities of this appliance, please read and retain this manual before
operating the appliance; please keep it in a convenient and safe location for future reference.

2
SAFETY INSTRUCTIONS
Please read the following instructions before use.
The appliance is designed for domestic usage and may only be operated in accordance with
the following instructions.
Warning
1. Do not expose the product to water and do not unplug the product with wet hands.
2. Do not clean or spray the appliance with water, liquid, detergent, or any flammable
liquids.
3. Do not obstruct the air inlet and outlet.
4. Do not use extension power cord set unless with approval by local authority.
5. Do not use the appliance when it is damaged.
6. Do not disassemble, repair, or modify the appliance on your own.
7. Do not use the appliance in the presence of burning incense and chemical fumes.
8. Do not use the appliance near heat generating devices such as stove, oven,
fireplace, heater etc. or direct sunlight.
9. Unplug the appliance if it is not being used.
10. Do not use the appliance in a location subject to significant changes in temperature.
11. Do not use the appliance in hot and humid environments such as bathrooms or
kitchens.
12. If the appliance produces a strange noise, burning smell or smoke, immediately
remove the power plug from the electric socket and call the service center.

3
Safety Precautions
1. Ensure that the power plug is connected to a correctly designated electric
socket as specified on the rating plate.
2. If the power cord is damaged, it must be replaced by the manufacturer or a
qualified service agent.
3. The appliance is not intended for usage by people with reduced physical, sensory or
mental capabilities unless they are under the supervision of or have been given
instruction by a person who is responsible for their safety.
4. When in the presence of the appliance, children should be supervised.
5. The appliance is not a substitute for proper ventilation or regular vacuuming and
should not be used in place of an extractor hood or stove top range hood.
6. Ensure the power socket is in good condition and properly connected. Ensure that the
appliance is properly connected and that the plug is not over-loaded or over-heated.
7. Only use the appliance on a dry, stable and level surface.
8. Ensure that the appliance operates at a minimum distance of 10 cm adjacent to walls
or objects.
9. Do not push, lean against or exert excessive force on any part of the appliance. Do not
stick sharp objects into any part of the appliance.
10. If the HEPA Filter or/and NCCO Reactor is not installed properly, the appliance would
not operate.
11. Maintain good air circulation when using the appliance.
12. Prior to cleaning and maintenance, the appliance must be disconnected from the power
supply.
13. When the appliance is turned on for the first time, warm air with mineral smell may be
released from the air outlet. This is normal as catalytic oxidation is taking place inside
the NCCO Reactor.
14. The appliance is equipped with a special protection feature. It will stop operating with
indicating light off for 30mins. for every 8 hours’ non-stop operation. After that the
appliance will resume operating automatically.
4
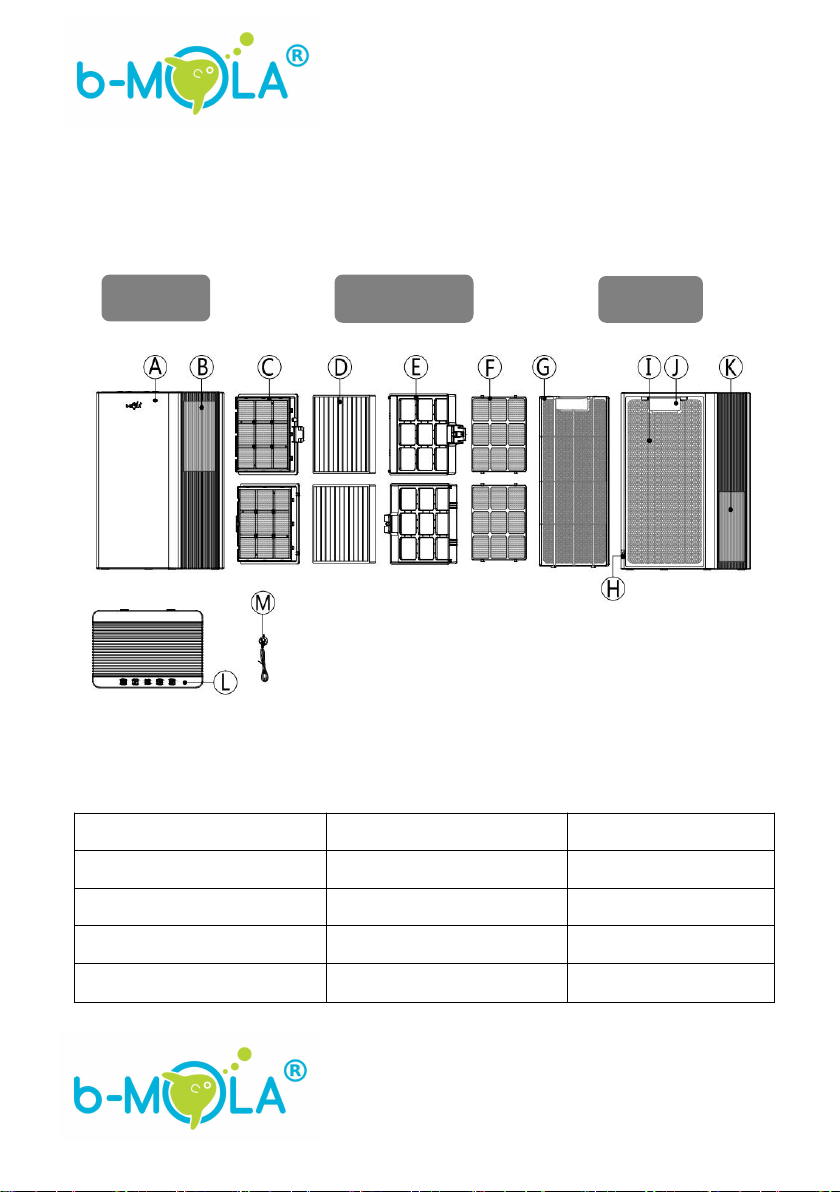
PARTS AND COMPONENTS
Illustration Diagram
A. Main Body
F. Pre-filter
K. Left-side air Outlet
B. Right-side air Outlet
G. Back Panel
L. Control Panel
C. NCCO Reactor
H. Power Cord Inlet
M. Power Cord
D. HEPA Filter
I. Air Inlet
E. HEPA Filter Frame
J. Carrying Handle
Front
Back
Filter

5
①
②
③
④
⑤
Control Panel
1. Power Button
4. Fan Speed Up Button
2. Fan Speed Down button
5. ECO Mode Button
3. Fan Speed Display
6
INSTALLATION GUIDE
Using the appliance for the first time:
1. Read the instruction manual and retain for future reference.
2. Remove all packaging, use a soft dry cloth to clean all the parts then re-assemble parts
back together.
3. Position the appliance on a dry, solid, level surface and ensure the appliance is
provided is with reasonable space of at least 10 cm to operate effectively
4. Check power sockets and any extension cords to confirm compliance with product
requirements. Ensure that the appliance is plugged in before usage.
5. When the appliance is turned on for the first time, warm air may be released from the
air outlet. This is normal as catalytic oxidation is taking place inside the NCCO
Reactor.
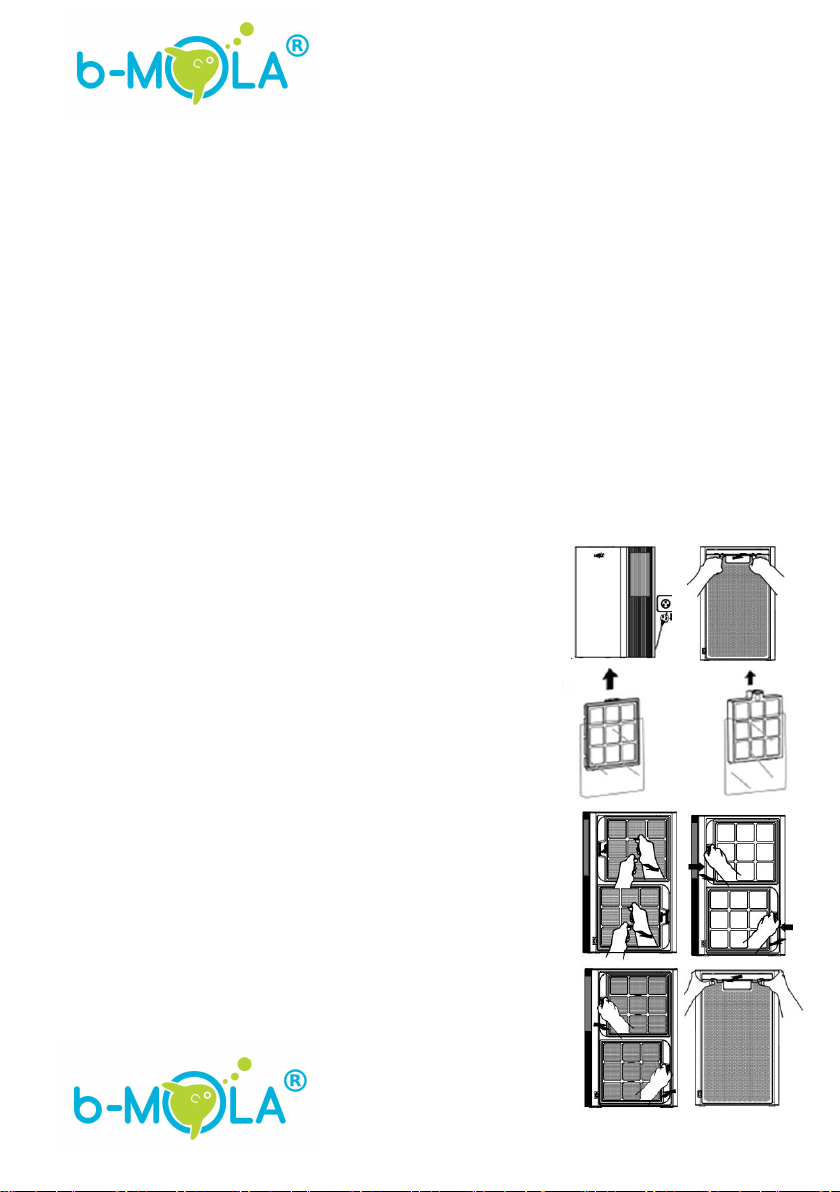
1. Open Back Panel
Unplug the power switch, press the back button with both
hands and remove the back panel.
2. Remove Filter plastic package
Before using the filter, remove all of the packaging on it.
3. Install the filter
3.1 Fit the NCCO Reactor, HEPA Filter and pre-filter in
sequence back to the appliance.
3.2 Do the same steps to the lower compartment to install the
filters.
3.3 Mount the back panel with both hands.
Attention:
Make sure filters are firmly and securely installed.
7
OPERATION GUIDE
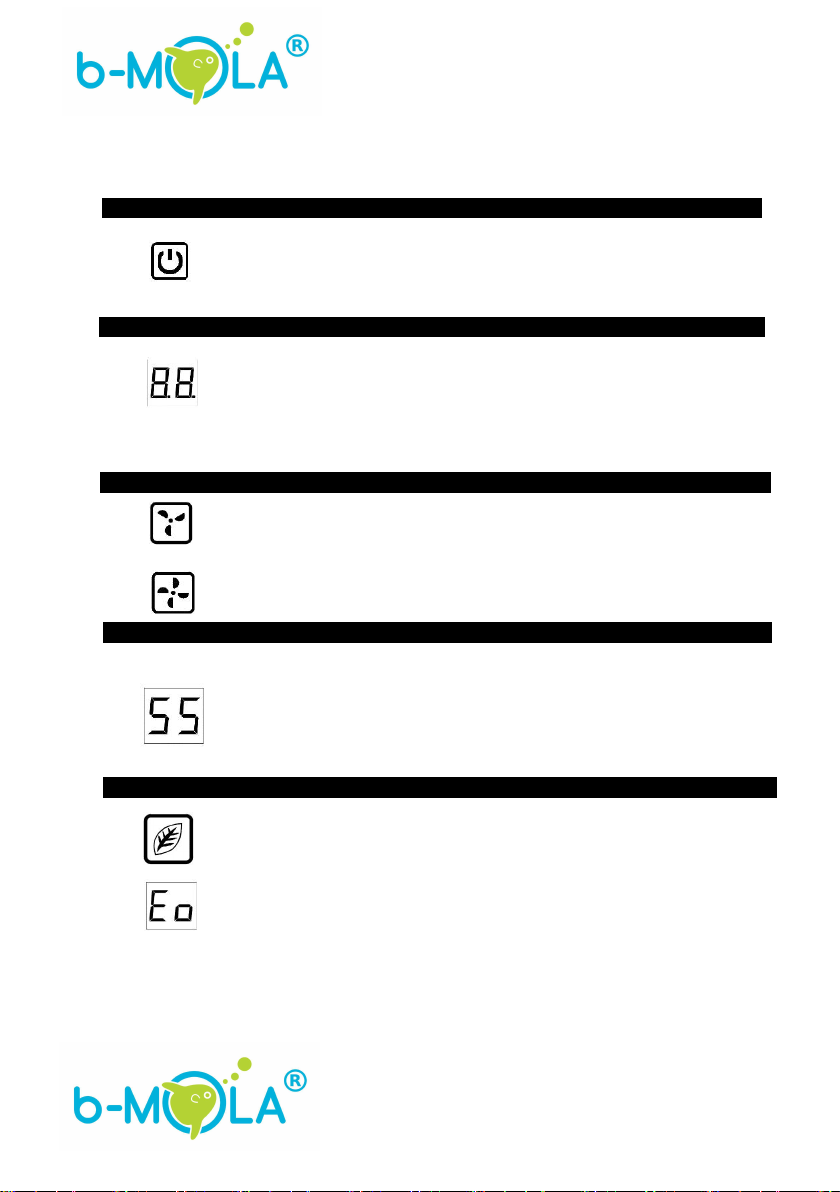
1. Power Button
2. Fan Speed Display
3. Fan Speed Control Button
4. Turbo Mode
5. ECO (Energy-Saving) Mode
Attention: The appliance is equipped with a special protection feature. It will stop operating
with indicating light off for 30mins. for every 8 hours’ non-stop operation. After that the
appliance will resume operating automatically. Meanwhile, appliance can be restarted by
pressing the Power on/off button.
The power button is used to turn on/off the product.
If you want to switch on/off the product, press the
power switch.
Display shows the current fan speed.
Fan speeds are ranged from 1 -10.
“01” represents the lowest fan speed, the higher display
number, the greater the fan speed.
It is recommended to turn on the energy-saving mode (ECO
mode) in sleep time.
"Eo" will be displayed on control panel display when it is
operated in ECO Mode.
Fan speed will automatically decrease and all indication
lights will be dimmed.
SS represents Turbo Mode.
Turbo mode can be used for highly polluted area.
Press this button to decelerate the fan speed
Press this button to accelerate the fan speed.

8
OPERATION INSTRUCTIONS
1. Power on / off
Power on: Press power button to turn on the appliance.
An alert tone will be on to signal that the machine is connected
to electricity.
Power off: Press the power button to turn the appliance off.
2. Select Fan Speed
Fan Speed up: Press the fan speed up button to increase the fan
speed.
Fan Speed down: Press the fan speed down button to lower the fan
speed.
.
3. Select Turbo mode
Press the fan speed up to 10, then press the Fan Speed Up and
Fan Speed Down buttons at the same time. The unit will switch
to turbo mode (SS).
This model is recommended to be used in highly polluted
environment.
To Turn off Turbo mode:
Press the Fan Speed Down button; or press the power button to
off and then restart the machine. The fan speed will be at “10”
after exit the “SS” mode.
4. Factory Default Setting and memory function
Factory Default setting: Machine will turn on at “03” fan speed
each time when it is connected to electricity socket.
Memory Function:
Machine will remain at the same fan speed as last time’s
operation, provided it stays connect to electricity socket.
Speed down
Speed up

9
5. ECO Mode
Press the rightmost button on control panel to turn on the energy-
saving mode, the display shows "Eo".
When entering this mode, machine will automatically switch to
a lower fan speed and all lights will be dimmed.
To Activate: Press the button “ECO” button positions on
the right-hand side of the control panel.
To Deactivate: Press the “ECO” button to deactivate and
return to Fan Speed mode.
This mode is recommended for sleep times.
6. Tips for Filter installation
When either the HEPA Filter or NCCO Reactor is installed improperly, machine will not
work with a “DiDi” sound beeping.
Solution: disconnect the machine from the electricity socket. Open the back panel to take
out all filters and re-install the filters.
After the installation is correct, the sound stops and the unit resumes operating.
10
FILTERS CARE AND REPLACEMENT
1. Filter lifetime may vary depends on environment, usage and location of the appliance.
2. To maintain optimal performance, only use recommended filters.
3. It is recommended to clean the pre-filter regularly.
4. Always disconnect appliance from the power supply before disassembling.
5. When the NCCO Reactor needs to be replaced, it is recommended to replace the HEPA
Filter at the same time.
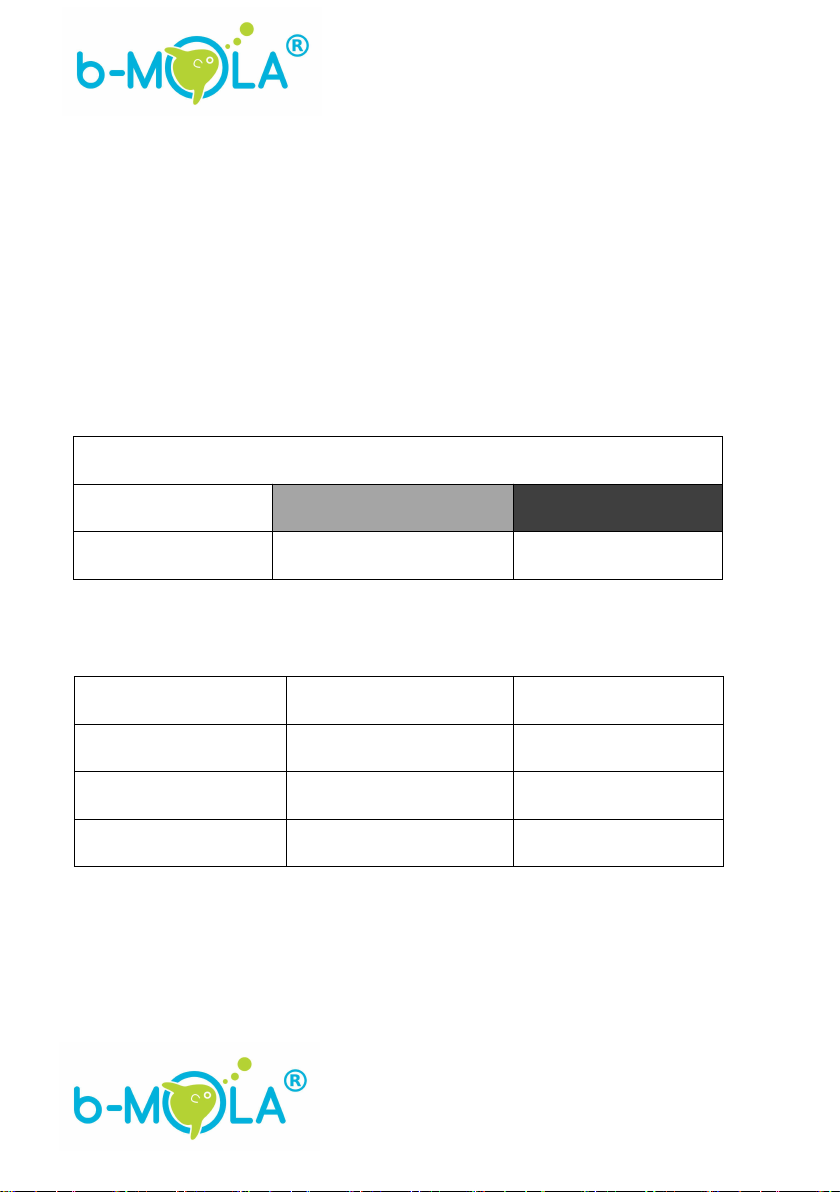
HEPA Filter Change Indicator:
Surface Color of HEPA Filter
No replacement needed
Replacement is recommended
Replacement is needed
Recommended cleaning and replacement cycle of filters:
* The recommended cleaning and replacement cycle of filters may vary depends on environment.
Filters
Period
Solution
Pre-Filter
/
Cleaning
HEPA Filter
Every 6 -18 Months *
Replacement
NCCO Reactor
Up To 12 Years *
Replacement
11
CLEANING AND MAINTENANCE
1. Always disconnect the appliance from the electricity socket before cleaning or
replacement of the filters.
2. Always clean the pre-filter to maintain the performance of the appliance.
3. Replace HEPA Filter regularly to maintain the performance of the appliance.
4. Do not wipe or clean the HEPA Filter or NCCO Reactor with water.
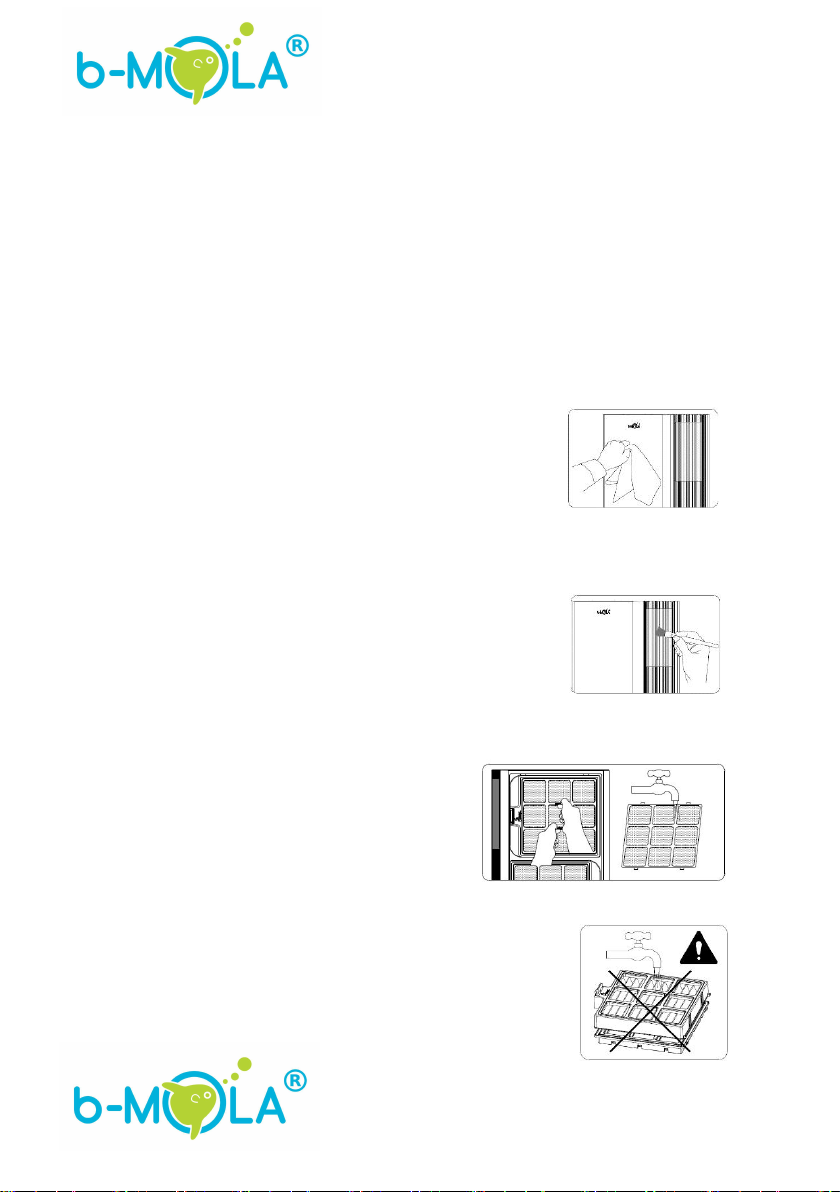
1. Clean external body
Wipe the unit with a piece of soft, dry cloth.
Tips: damp cloth can be used to clean the surface of
the appliance. Do not use abrasive materials.
2. Clean air inlet and outlet
Clean the air inlet and outlet with a soft brush or
vacuum cleaner.
3. Clean pre-filter
Pre-filter can be washed with water.
Dry it out before use.
Warning:
Do not rinse or soak HEPA Filter or NCCO Reactor
with water.

12
TROUBLE SHOOTING
Problems
Resolutions
The appliance does not operate
Check if the device has been plugged in.
Start up the device.
Appliance is “beeping” in sound and
does not operate.
Check if the Filters are installed correctly.
Reinstall all Filters
No air is blowing through air outlet.
Check if the power cord is connected and plugged properly.
Check if the appliance is connected to a power source.
The air quality is not yet improved
after a longtime operation.
When the appliance is used in a more polluted area, the treatment
will take a longer time. Use more units or use the appliance for
longer period if necessary.
The Filter may require cleaning and replacement.
Clean and replace the Filters.
The airflow from air outlet becomes
slow.
The dust-removing filter may be blocked.
Replace the filter (see section "maintenance and replace" of this
manual).
Make sure all packaging materials are removed.
The appliance makes an abnormal
noise.
Make sure all packaging materials are removed.
Make sure the air inlet and outlet are not blocked by external
objects.
Remove all adjacent objects that block the air inlet and outlet.
The device may fail.
Call the customer service center for advice or consult with a
qualified agent.
The device emits an unusual smell or
smog. (e.g. smoke, flame, or
burning)
Turn off the appliance and disconnect it from power source. Call
the customer service center immediately or contact with a
qualified agent.

13
PRODUCT SPECIFICATION
Power Supply (V/Hz)
AC110-240V/50-60Hz
Power Consumption
(W)
Mode
Low speed
16
High speed
35
strong wind
40
Air flow
(m3/hr)
Mode
Low speed
<80
High speed
230
strong wind
280
Noise level
(dB)
Mode
Low speed
38
High speed
53
strong wind
57
Applicable Room Size (m2)
40-60
Dimensions (length x width x height)
(MM)
300 (L) *210(W)*480(H)
Weight (kg)
7
Treatment System
stage 1
stage 2
stage 3
stage 4
Active Oxygen
Generator
Pre-filter
HEPA Filter
NCCO Reactor
Function
sterilization
Remove dust and
hair
Remove dust, hair and
airborne particles such
as allergens, pollen,
bacteria, viruses and
fungi.
Remove odors,
decompose and oxidize
harmful pollutants such
as formaldehyde and
VOCs.
Table of contents
Other b-mola Air Cleaner manuals

b-mola
b-mola BM10 User manual

b-mola
b-mola NCCO1701 User manual

b-mola
b-mola BM20 User manual

b-mola
b-mola BM50 User manual

b-mola
b-mola BM150 User manual

b-mola
b-mola BM300 User manual

b-mola
b-mola BM100 User manual

b-mola
b-mola BM50 User manual

b-mola
b-mola NCCO1804 User manual

b-mola
b-mola NCCO1802 User manual


Popular Air Cleaner manuals by other brands

Dyson
Dyson Pure Cool user guide

Philips
Philips 600i Series user manual

Bluezone
Bluezone Model 420 Installation, operation and service manual

Aprilaire
Aprilaire 2200 Safety and installation instructions

Medify Air
Medify Air MA-112 product manual

Bieffe
Bieffe OZONO BIEFFE PLUS BF360PL Use and maintenance manual


