Shizouka Seiki val6 daystar User manual

• ReadandthoroughlyunderstandthisOwner’sManualbeforeusingtheheater
forsafetyoperation.
• PleasekeepthisManualfortheuser’sneedandreference.
• Avantd’utilisercetappareildechauffageetpourdesraisonsdesécurité,
veuillezlireattentivementlecontenudecemanueletencomprendrelesens.
• Conservezcemanueldemanièreàpouvoirvousyreporterencasdebesoin.
• LeayentiendabienesteManualdelusuarioantesdeemplearelcalefactorpara
quepuedafuncionarconseguridad.
•
Conserveestemanualparaqueelusuariopuedaconsultarlocuandoseanecesa
rio.
• Leesdezehandleidingzorgvuldigdoorenzorgdatuallesgoedbegrijptzodatu
deverwarmingveiligzultkunnengebruiken.
• Bewaardezehandleidingzodatuerlaternogeensietsinopkuntzoeken.
Owner
’
s Manual
Manuel d
’
utilisation
Handleiding
Manual del usuario
EnglishFrançain EnglishFrançaisEspañol
Nederlands
Val6_Daystar_PH1_OM_Multi.indd 1 14/03/27 15:35

2
4-1. Daily Inspection ..........................10
4-2. Periodic Inspection .................... 11
5. How to replace the nozzle & fuse .... 11
6. How To Store the Heater ...................13
7. Troubleshooting ................................ 13
8. Specications ....................................14
9. Safety Labels .....................................15
1. Safety Information ...............................3
2. Names of Components .......................6
3. How to use ...........................................7
3-1. Preparation for the operation ......7
3-2. Operating Procedures ..................8
3-3. Use of the Heat Shielding Mat .....9
4. Inspection ............................................9
Contents
4-2. Inspection périodique ................24
5. Remplacement de la buse et
du fusible ...........................................24
6. Comment entreposer l’appareil
de chauffage ......................................26
7. Dépannage .........................................26
8. Caractéristiques techniques ............27
9. Étiquettes de sécurité .......................28
1. Consignes de sécurité ......................16
2. Nomenclature ....................................19
3. Utilisation ...........................................20
3-1. Préparatifs d’utilisation .............20
3-2. Mode de fonctionnement ...........21
3-3. Utilisation du tapis de
protection thermique.................. 23
4. Inspection ..........................................23
4-1. Inspection quotidienne ..............23
Table des matières
4-2. Periodieke inspectie ..................37
5.
Vervangen van het mondstuk
en de zekering
...................................... 37
6. Opslaan van de verwarming .............39
7. Problemen oplossen .........................39
8. Technische gegevens ....................... 40
9. Veiligheidslabels ............................... 41
Inhoud
1. Informatie aangaande de veiligheid 29
2. Namen van de onderdelen ................32
3. Gebruiksaanwijzing ...........................33
3-1. Voorbereidingen voor gebruik .. 33
3-2. Bedieningsprocedures ..............34
3-3.
Gebruiken van de hitteschildmat
....36
4. Inspectie .............................................36
4-1. Dagelijkse inspectie ...................36
4-1. Inspección diaria ........................49
4-2. Inspección periódica .................50
5.
Modo de reemplazo de la boquilla
y el fusible
............................................ 50
6. Cómo guardar el calefactor ..............52
7. Solución de problemas .....................52
8.Especicaciones ...............................53
9. Etiquetas de seguridad ....................54
1. Información de seguridad ................42
2.
Nomenclatura de los componentes
....45
3. Modo de utilización ...........................46
3-1.
Preparativos para la operación
.... 46
3-2.
Procedimientos de operación
...47
3-3. Empleo de la esterilla
termoaislante
...................................... 48
4. Inspección ..........................................48
Contenido
Val6_Daystar_PH1_OM_Multi.indd 2 14/03/27 15:35

English
3
Thank you for having bought our Infrared Oil Heater “VAL6”.
1Safety Information
◆ThisManualexplainseverycautionthatshouldbestrictlytaken,fortheproperandsafetyoperation.
Cautionisdividedinto3categoriesof Danger, Warning,and Caution.Pleasereadandunder-
standwellthedetailedmeaningsofeachcategory.
* Dependinguponthecircumstances,eventhecategoryof“CAUTION”canleadtograveresults.Cautionandrecom-
mendationlistedincategoryareequallyimportantforthesafetyoperation,sobesuretofollowwellall3categories.
Negligence of this indication “DANGER” and the improper operation can lead
to death, serious injury and/or major re.
Negligence of this indication “WARNING” and the improper operation may
likely result in death, serious injury, re and/or possible explosion.
Negligence of this indication “CAUTION” and the improper operation may re-
sult in serious injury and/or property damage.
DANGER
WARNING
CAUTION
■Following signs, used throughout this Manual, dene as follows:
Prohibited
(This indicates “actions” that are strictly forbidden.)
Mandatory
(This indicates “actions or instructions” that must be carried out.)
Caution
(This indicates “actions” that must require attention.)
WARNING
● ReadthisOwner’smanualcarefullyandcompletelybeforeassembling,operating,orservicingthisheater.Improperuseof
thisheatercancauseseriousinjuryordeathfromburns,re,explosion,electricalshock,andcarbonmonoxidepoisoning.
● Whenoperatingorservicingthisheater,pleasefollowallinstructionsdescribedinthisManual.
● Whenreplacingparts,useonlythegenuineparts.Pleasebenotedthatweshallnotbeheldresponsibleorliableforany
damageoraccidentthatresultsfromusinganyunapprovedornon-genuineparts.
● Weshallnotbeheldliableorresponsibleforanydamageoraccidentthatresultsfromdisobeyingornotproperlycarrying
outanyinstructionsinthisManual,orfromtheimpropermodicatoinoroperation.
1. Aswecannotpredicteverypossiblesituationofdangerwhileoperatingthisheater,thecontentsdescribedinthisManual
couldnotfullyforeseeawholerangeofpossibledangers.So,whenoperatingordoingdailyinspection(tothisheater),
pleasepayfullattentionnotonlytothecontentsofthisManualandtheLabelsontheheateritself,butalsotothoughtful
considerationtobedulypaidtothesafetyoperation.
2. Ifyouhaveanyquestionormoredetailedinformationtoknowabouttheheater,pleasecontactyourdealer.
3.
Ifanyirregularormissingpage(s)isfoundinthisManual,pleasecontactyourdealerandwewillexchangeitwithanewone.
4. PleasekeepasetofStandardPartssuppliedtogetherwiththeheater.
5. Theoperatoroftheheaterisresponsibleforwarninganyonewhoworksaroundtheheaterorcomesneartheheaterofthe
dangersoftheheaterandthesafetyprecautionsthatmusttherebybetakenpursuanttothisManual.
6. Theheatermustnotbeoperatedwherechildren,petsandotheranimalscouldcomeintocontactwithit.
Important Notice
•Therequirementsoflocalauthoritieshavingjurisdictionshallbefollowed.
•
The installation of the unit shall be in accordance with the regulations of the authorities having juris
diction.
Val6_Daystar_PH1_OM_Multi.indd 3 14/03/27 15:35

4
* Following signs mean the very important points for the safety operation, so please don’t fail to
read them well, before using.
For Safety Operation, Please Follow the Following
■Special attention to be paid.
DANGER
1Use of Gasoline
Prohibited Neverusegasoline,whichsurelycausesare.
2Also Following
Operation
Prohibited
Neverusetheheaterwherethinner,gasoline,liquidpropanegas,otherhighlyam-
mablevapors,etc.,arepresent,becausetheseleadtoexplosionorre.
3Ventilation
Required
Neverusetheheaterinbadlyventilatedareas,alsonevercontinueusingitinsuchcir-
cumstances.Insufcientsupplyofoxygencausesincompletecombustion,producing
carbonmonoxidewhichmayresultincarbonmonoxidetoxication.ProvidetheHeater
withfreshairalwayswheninuse.Carbonmonoxidepoisoningmayleadtodeath.
2
1
3
CAUTION
Toavoidare,pleasekeepallammablesmorethan2.5m(8.2ft.)awayfromthefront
oftheradiationdisk,andmorethan2m(6.56ft.)awayfromallsides(left/rightandtop/
rear)oftheheater.
Do not block the
heater
Toavoidare,neverplaceanyobjectwithinone(1)meter(3.28feet)from(thefront
of)theradiationdisk.
4Do not operate the
heater unattended
Donotoperatetheheateratunattendedsituationinordertoavoidunexpectedtrouble
orre.
Keep the ammables
away from the heater
5Be careful of temper-
ature of the oor
TheheaterisforuseonNonCombustibleFlooringunlesstheshieldingmat(available
as“optional”part)isused.
WARNING
1Keep aerosol bottles
away from the heater
Neverputthesealedcontainerslikeaerosolbottleswheretheyareexposedandheated
bytheheater,becausetheinnerpressureofaerosolbottles,heated,goestoburstand
hurtthehumanbody.
2Never use the heater
where ammable
dusts are present.
Neveroperatetheheaterwherehighlyammabledusts(ofwood,paper,textile,etc.)
arepresent.Dusts,aftersuckedandheatedbytheheater,willbeblownout“sparked”
andcauseare.
3Be careful of hot sur-
faces
Nevertouchthehotsurfacesaroundtheburner,whileburningorfor30minutesafter
switchedoff,toavoidaburn.Alsodonotmoveorservicetheheaterwhileitisoperat-
ingorhot.
5Modication of the
Heater Prohibited Nevermodifytheheaterbyanymeans,toavoidtroubleorre.
6Be Careful of Electri-
cal Shock
Toavoidelectricalshock,neverusetheheaterwhereexposedto rain, snow or high
humidity.Makesurethepowerplugisdisconnectedfromtheelectricaloutlet,before
startingdailyinspectionandmaintenance.
4Do not service the
heater while burning
Donot serviceorhandletheheaterwhileburning, inoperation,hotorplugged-into
avoidanyinjuryand/ortrouble.
Do not try to ignite
the heater more than
3 times in a row
Iftheheaterdoesnotignitethersttime,donottrytoignitemorethantwomoretimes
inarowthereafterbecausearemayresult.Iftheheaterdoesnotigniteafterthethird
attempt,stoptryingandconsultyourdealerpriortofurtheroperationoftheheater.
7Never use the heater
for any residential
application
Thisheaterisforindustrialuseonly.Neverusetheheaterforanyresidentialapplica-
tionatalltime.Wronguseofthisheatercanresultinpotentialdeath,seriousinjury,
reand/orpossibleexplosion.
Val6_Daystar_PH1_OM_Multi.indd 4 14/03/27 15:35

English
5
For Safety Operation, Please Follow the Following
CAUTION
10
11
Turn off while refueling
Alwaysmakesurethattheheateristurnedoffwhilerefueling,toavoidare.
Do not use the Heater
in high altitudes
Whentheheaterisusedinanaltitudehigherthan1000m(3000ft)abovethesealevel,
someadjustmentswillberequired.Pleasecontactyourdealerabouttheadjustments.
Theheater,ifnotdulyadjusted,mayleadtowrongburningorre.
7
6
8
Stop using the Heater
when anything ir-
regular is found
Whenwrongburning,smellorsmoke,etcisfoundduringtheoperation,pleasestop
immediatelytheoperationandcontactyourdealer.Ifyoucontinueusingtheheaterin
suchasituation,arelikelytakesplace.
16 Do not use the heater
in the following places
Topreventdisaster,injury,etc.,pleasedonotusetheheaterinthefollowingplaces:
•Onvibratingandtremblingoor.
•Onslantoor(nothorizontal).
•Instairs,emergencyexit,doorways,etc.
•Neartheunstablestacks/pilings-up.
•Inwindy,humid,dustyormetalparticlesoatingareas.
•Inareasdisturbingthemovesofpeople,etc.
12
Earth/Ground the
heater before operation
Pleaseconrmifornotagroundedpowercordisconnected.Tooperatethe heater
withoutpropergroundingmayresultinelectricalshock.
Use only the correct
voltage Onlyelectricalvoltageandfrequencyspeciedonthemodelplatemustbeused,to
avoidare,electricalshockand/ordamage.
15 Do not dispose of the
Heater illegally WhenyoudisposeoftheHeater,pleasedonotdisposeofitillegallyandconsultyour
localauthoritiesorspecialistsonhowtoproperlydisposeofit.
18 Owner’s Manual ReadandthoroughlyunderstandthisOwner’sManualbeforeusingtheheaterforsafety
operation.
PleasekeepthisManualforuser’sneedandreference.
17 Temperature in sur-
rounding area.
Makesurethattheheateroperatesattemperaturesbetween–20°and40°C(-4°and
104°F).Iftheheateroperatesatmorethan40°C(104°F),theheaterwilloverheatand
resultin re.Whenoperatingthe heaterintemperatureslessthan0°C (32°F), make
surewintergradefuelisused.
19 Do not use the fuel of
low quality Donotusethefueloflowqualitysuchasdiscardedoilorfuelmixedwithwater.
Do not move the
heater while burning
Donotmovetheheater,whileburningorinoperation,topreventarewhenitisover-
turned.
20 Be careful of moving
or storing the heater Whenheaterismovedorstored,itmustbeinalevelpositiontoavoidaleakageof
fuel.
14 Make sure the flame
is extinguished
Aftershuttingdowntheoperation,pleaseconrmthattheameiscompletelyextin-
guished,beforeyouleavetheplace.
13 Use gloves
Whencleaninguptheheater,pleaseusethegloves,toavoidanyinjurytohandorngers.
9Caution for switching
off the Heater.
Beforetaking theelectricplugofftheoutlet,please makesuretheoperating lampis
OFF.
21 Children or the hand-
icapped are not to
operate this heater
Thisheaterisnottobeoperatedbychildrenorphysicallyhandicappedor
personwithoutproperknowledgeandexperienceunlesstheyhavebeengiven
propersupervisionorinstruction.
22 Never look directly
straight into the ra-
diation disk
Whiletheheaterisinoperation,avoidlookingstraightintotheradiationdisk.
Itmaycauseeyeinjury.
Val6_Daystar_PH1_OM_Multi.indd 5 14/03/27 15:35

6
2Names of Components
◆Burner Section
◆Switch Section
!3 Filter Element
!4 Burner Section
!5 Insulating Board
!6
Overheat Prevention System
!7 Fuse
!8 Tip-over Switch
!9 Flame Monitor
@0 Fan Motor
@1 Switch Section
@2 Fuel Pump
@3 Preheater
(for 230V only)
qRadiation disk
wCasing
eHandle
rGuard
tBurner Cover
yBlower
uFuel Tank
iFuel Gauge
oFuel Tank Cap
!0 Suction Pipe
!1 Return Line
!2 Tank Inlet Filter
ON OFF
MISFIRE
@3 Operating Switch
Thisignitesorextinguishestheame.
(
Refer to pages 8.)
@4MisreLamp
Thislamplightswhentheameisextinguishedduetoabnor-
malcombustion,abnormaloverheating,earthquake,ormo-
tion.
Val6_Daystar_PH1_OM_Multi.indd 6 14/03/27 15:35

English
7
!6 Overheat Preven-
tion System
!7 Electrical System
Protection (Fuse)
!8 Tip-over Switch
!9 Flame Monitor
(Flame Eye)
3How To Use
1 Removethefuelcapandinsertahandy
suctionpumpintothefueltank.
2Watchthefuelgaugewhilerefueling.
Whenthegaugereachesthemaximum
level,stoprefueling.
3Tightenwellthefuelcap,andwipeoffany
spiltfuel.
■Refueling
• Alwaysmakesurethattheheateristurnedoffbeforerefueling.Firecanoccur.
• Makesuretheheaterispoweredwiththeelectricalvoltageandfrequencyspeciedon
specicationlabel.Notdoingsocanresultinre,electricalshockand/ordamage.
• Makesureagroundedpowercordisused.Operatingtheheaterwithoutaproper
groundmayresultinelectricalshock.
• Whendisconnectingthepowercord,alwayspullontheplugtounplugthecord.Do
notplaceexcessiveforceonthecordbybendingorpulling.Doingsomaydamagethe
cord,resultinginreorelectricalshock.
CAUTION
•Neverusehighlyammablefuellikegasoline,toavoidre.
DANGER
3-1. Preparation for the Operation
Observations
•
Makesurethatthetankinletlter(inthefueltank)isfreeofdirt/dusts,etc.Ifthelterislledupwithdirt/dusts,takeout
thelterandwashitwithkerosene.Donotpourbackintothefueltankthekeroseneusedforwashing,toavoidtroubles.
• Pleaseuse“kerosene”or“diesel”anddonotusepoorqualityorfoulkerosene,tohavenotroublesatall.
Power shut down
Automaticallyextinguishestheameshouldtheheateroverheat.
Operating condition:
Themisrelamplightsandiftheheaterisoperating,thefanwillcool
downtheheaterforabout5minutes(hereafterreferredtoaspostpurge).
Cutsoffpowertotheheatershouldanelectricalsurgepassthroughthecircuitcausedby
damagetotheheater,etc.
Operating condition:Thewholeoperationstops.
Automaticallyextinguishestheamewhenmotionoranimpactisdetectedduringoperation.
Operating condition:Themisfirelamplightsandthepostpurgesequence willrunfor
about5minutesiftheheaterisinoperation.
Automaticallyextinguishestheamewhenignitionfailureorabnormalcombustionisde-
tected.Iftheamemonitordetectsanyabnormalitiespriortoignition,itwillautomatically
extinguishtheame.
Operating condition:Themisrelamplightsandpostpurgesequencewillrunforabout5
minutes.
Whenthepowersupplyisrestoredafteritshutsdownduringoperationbecauseof
blackoutorotherreason,inordertoavoidaretheheatercannotrestartautomatically
eveniftheoperationswitchstillremains“ON”.
Val6_Daystar_PH1_OM_Multi.indd 7 14/03/27 15:35

8
■ Connecting the Power Supply
1
Makesurethattheoperatingswitchis“OFF”,
thenplugthepowerplugintoACpowerout
let.
3-2. Operating Procedures
■ Ignition Procedures
• Whensmell,smoke,wrongburning,etc.takesplace,stopimmediatelyoperationto
avoidare,andcontactyourdealer.
• Iftheheaterdoesnotignitewiththreeconsecutivetries,stoptryingmorethanthree(3)
times,toavoidare,andcontactyourdealer.
• Whenusingtheheater,becarefulsothattheoorsurface(infrontofit)maynotget
overheated.
• Donotoperatetheheater,whilefueltankisdirtyandfoul,topreventpoorignitionor
wrongburning.
CAUTION
1 Usethefuelgaugetocheckifthefuelis
sufcientlylledupinthetank.
2 Set “ON”theoperatingswitch,andthe
heaterwilligniteinabout5seconds.
OperatingSwitch“ON”
Observations
• Nottomisstheignition,pleasedonotleavetheheateruntilyouconrmthatitisproperlyburning.
ACOutlet
PowerPlug Connect
■ Shut-Down Operation
CAUTION • Aftertheoperationisshutdown,pleasemakesurethattheameiscompletelyextin-
guishedbeforeleavingtheplace.
Turn “OFF” theoperatingswitch,andthe
heateramewillbeextinguished,thenthe
fanmotorwill alsoautomaticallystopafter
aboutve(5)minutes.
If ignition fails, try again its proce-
dures as follows
●
Iftheheaterisusedforonlyashortperiodoftimeafterrefu-
eling,airinsideofthefuelpipemaycausetheametoicker
whentheheaterisshuttingdown.Thisisnotabnormal.
First,switchtheoperatingswitch“OFF”,
andtrytheignitionsequenceagain.
OperatingSwitch“OFF”
OperatingSwitch“OFF”
Observations
• TodisconnectthepowerplugfromtheACoutlet,pleasemakesurethatthefanmotorisstopped.
• Neverdisconnectthepowerplugwhiletheheaterisoperating,itwillcausenozzletobeclogged.
2
Makesureagroundedpowerpin orconnec-
tion is used.
Val6_Daystar_PH1_OM_Multi.indd 8 14/03/27 15:35

English
9
4Inspection
■ Connecting the Control Device
Observations
• Pleasedonotpourinthefueltankthefuelusedforcleaningthetankinletlter;afteryounishtoinspectinsidethe
fueltank,pleasedonotreturnbackintothefueltankfoulfueltakenoutofthetank.
• Beforestartinganyinspectionorservice,toavoidelectricshock,pleasemakesurethe
heaterisshutdownandthatthepowercordisdisconnected.
• Whencleaningtheheater,pleasewearglovestopreventpossibleinjury.
CAUTION
• Whentheheateriscontrolledbythethermostatoratimer,theheatercouldturnitselfonatanytime,thusextracare
mustbetakentoensurethattheheaterisnotaccidentallyturnedonwithoutsomeonenearbywhocanimmediatelyat-
tendtoanyproblemswhentheheaterisignited,operating,andcoolingoff.
CAUTION
Toavoidunexpectedreortrouble,NEVER
usethe heateroncombustibleooringun-
lesstheheat shielding mat,whichisavail-
ableasanoption,isused.
Heatshieldingmat
3-3. Use of the Heat Shielding Mat
To connect the thermostat
Takethecapoffandhookupthermostat
plug(Noneedtorewire)
Cap
Thermostat
Direct-couplingpin
Don’t forget to put the cap back unless the thermostat is connected to heater. Without the cap, heater won’t
operate at all with all circuit cut off. Therefore, there is the direct-coupling pin inside the cap and it must
be used.
Val6_Daystar_PH1_OM_Multi.indd 9 14/03/27 15:35

10
■ Inspecting the Tip-over switch
1 Whiletheheaterisoperating,graspthe
handleandshaketheheaterupanddown,
and from side to side.
2 Checkifthetip-overswitchhasautomati-
callyextinguishedtheame.
3
Ifthetip-overswitchdidnotactivate,shut
downtheheaterandcontactthedealerfrom
whomyoupurchasedtheheater.
4-1. Daily Inspection
■ Inspectionofthetankinletlter
1 Pleaseremovethefuelcapandcheckif
dirt/dustssticktothetankinletlter.
Kerosene
TankInletFilter
2 Ifthereareanydirt/dusts,removethelter
andwashitwithfuel.
■ Inspectionofthelteranddrainageofwaterfromthefueltank.
1 Removethesuctionpipefromthefuel
pumpandthefueltank.
Checkingthelterelement
2 Ifthelterisdirty,replaceitwithanewone.
3 Returnthesuctionpipetothefueltankand
rmlysecure.
3 Pleaserestorethetankinletlter,andtight-
enrmlythefuelcap.
Drainage of water from the fuel tank
1 Removethefuelcap,takeoutthetankinlet
lterand insertahandysuctionpump into
thetank.
2 Removeasmuchfuelaspossible(withthe
handysuctionpump).
3 Restorethetankinletlterandtightenrmly
thefuelcap.
4
Useacloth,etc.,towipeoffanykeroseneor
wateronthefueltank.
Filter
SuctionPipe
Pull off
Pullup
Val6_Daystar_PH1_OM_Multi.indd 10 14/03/27 15:35

English
11
5
■ Inspectionandcleaningoftheamemonitor
Theheatermustbechecked,ifusedfora
longtime.
Observations
• Whenremovingtheamemonitor,holditbyitsmainassembly;donotpulloutthecord.
1 Removethe burner coverandpulloutthe
amemonitor,andcheckwhetherornotits
lensisdirty/foul.
4-2. Periodic Inspection
2 Ifthelensisdirty/foul,pleasewipethesur-
faceofthelenswithasoftcloth,etc.untilit
becomes clear.
3 Restoretheflamemonitor,thenplease
surelyxwithscrewstheburnercover.
Flame Monitor
Lens
CottonSwab
Soft Cloth
Flame Monitor
■ Inspection of “dirt/dusts” on the main unit
1 Checkwhetherornotdirt/dustsareonand
around the heater.
2 Ifdustsarefound,pleaseremovethem
withavacuumcleanerorwipewithasoft
cloth,etc.
Pull out
WARNING • Neverservicetheheaterwhileitisburning,inoperation,hotorplugged-intoavoid
anyinjuryand/ortrouble.
• Beforestartinganyservicetoavoidelectricshock,pleasemakesuretheheaterisshut
downandthatthepowercordisdisconnected.
• Whenservicingtheheater,pleasewearglovestopreventpossibleinjury.
CAUTION
How to replace the nozzle & fuse
Pleaseaskthedealerfromwhomyou
purchasedthe heater to check the heater
onceeveryotherseason.
Val6_Daystar_PH1_OM_Multi.indd 11 14/03/27 15:35

12
■ Replacing a nozzle
1Unscrewtwoscrewsoftheburnercover
andtaketheburnercoveroff.
2 UnscrewthenutandremovetheSuction
Pipefromthefuelpump.
3 UnscrewthenutandremovetheReturn
Hosefromtheairventvalve.
Observations
• Becarefulnottotouchelectrodes
4 Disconnecttheredwireofoverheatprotec-
tionatthebackoftheburnerbase.
5 Unscrewthreenutsandpullouttheburner
unit.
6 Replacewithanewnozzlebyusingthe
providednozzlespanner.
7Tightenthenozzleusingthenozzlespan-
neruntilthenozzleisxed.
8 Puttheburnerunitbackwiththreenutsre-
moved.
9 Puttheredwireback.
10 Attachthereturnhosetotheairventvalve
andthesuctionpipetothefuelpumpwith
thenutsunscrewed.
11 Puttheburnercoverbackwithtwoscrews
removed.
■ Replacing a fuse
1 Unscrewtwoscrewsandtaketheburner
coveroff.
2 Replacewithanewfuseontheboard.
3 Puttheburnercoverbackwithtwoscrews
removed.
2
3
Fuse
4
Nozzle
NozzleSpanner
Val6_Daystar_PH1_OM_Multi.indd 12 14/03/27 15:35
English
13
6How to store the Heater
Whenyoustoretheheater,pleasedisconnectthepowerplugfromtheACoutlet andstoreitin-
doorswhereitislesshumid.
CAUTION • Whenyoustoretheheaterorholditunusedforalongtime,pleasemakesurethatthe
fueltankisempty,forpreventingaleakageoffuelandre.
Observations
• Donotstorethefueloversummermonthsforuseduringnextheaterseason.Usingoldfuelcoulddamegetheheater.
7Troubleshooting
■ When you face problems with your heater, please refer to this check-
list before consulting with your dealer.
Incasesatisfactoryresultsdonotresultbyreferringtothetable,oryouhaveproblemsnotdescribedin
thistable,pleasecontactyourdealer.Whileconsultingwithhim,pleasedescribetheproblemyouhave,
togetherwithmodelnameandserialnumberofyourheater.
(For nding the heater’s serial number, please refer to page 15.)
PleaseconnectthepowercordwithanACoutlet,
andcheckthepowersupply.
Replacefusewithanewone.(Please refer to page 12.)
Please confirm if “Flame Monitor” isexposedto
anytypeoflight(sunlightorelectriclamp,etc.),and
movetheheatertopreventtheradiationdiskfrom
detectinganytypeoflightdirectly.
Pleasepourfuelintothetank.
Pleasecleanupthetankandllitwithfresh/cleanfuel.
Checkthelterelementandreplaceitwithanewone.
Replacenozzlewithanewone.(Please refer to page 12.)
Pleasecleanupthefueltankandllitwithfresh/
newfuel.
PleasecleanuptheFlameMonitor.
(Please refer to page 11)
Pleasecheckthelterelementandreplaceitwitha
newone.
Phenomenon Possible Cause Remedy
The heater does not start.
(The lamp does not light
up.)
The heater does not start.
(The lamp is lit.)
The heater does not ignite.
The flame goes out dur-
ing the operation.
Powercordisnotconnectedwithan
ACoutlet.Powersupplyiscutoff.
Blownfuse
Safetydevicesareworking.
Nofuelinthefueltank.
Thereiswaterinthefueltank.
Fuellterelementisclogged.
Nozzleisclogged
Wrongorfoulfuelisused.
Flame monitor is dirty.
Fuellterelementisclogged.
If the following phenomenon takes place, it is usually not a sign of trouble. Please check
again before consulting with your dealer.
Because fuel is burning together with dusts, etc.This phenomenon will
disappearafterashortwhile.
Noiseiscausedbyexpansionorshrinkageoftheburnersectiondueto
temperature’supanddown.Thisisnotirregular.
Phenomenon Explanation
When used for the first time, smoke or
smell comes out of the heater.
At the time of ignition or shut-down of the
heater, noise comes from the burner section.
Val6_Daystar_PH1_OM_Multi.indd 13 14/03/27 15:35
14
8Specications
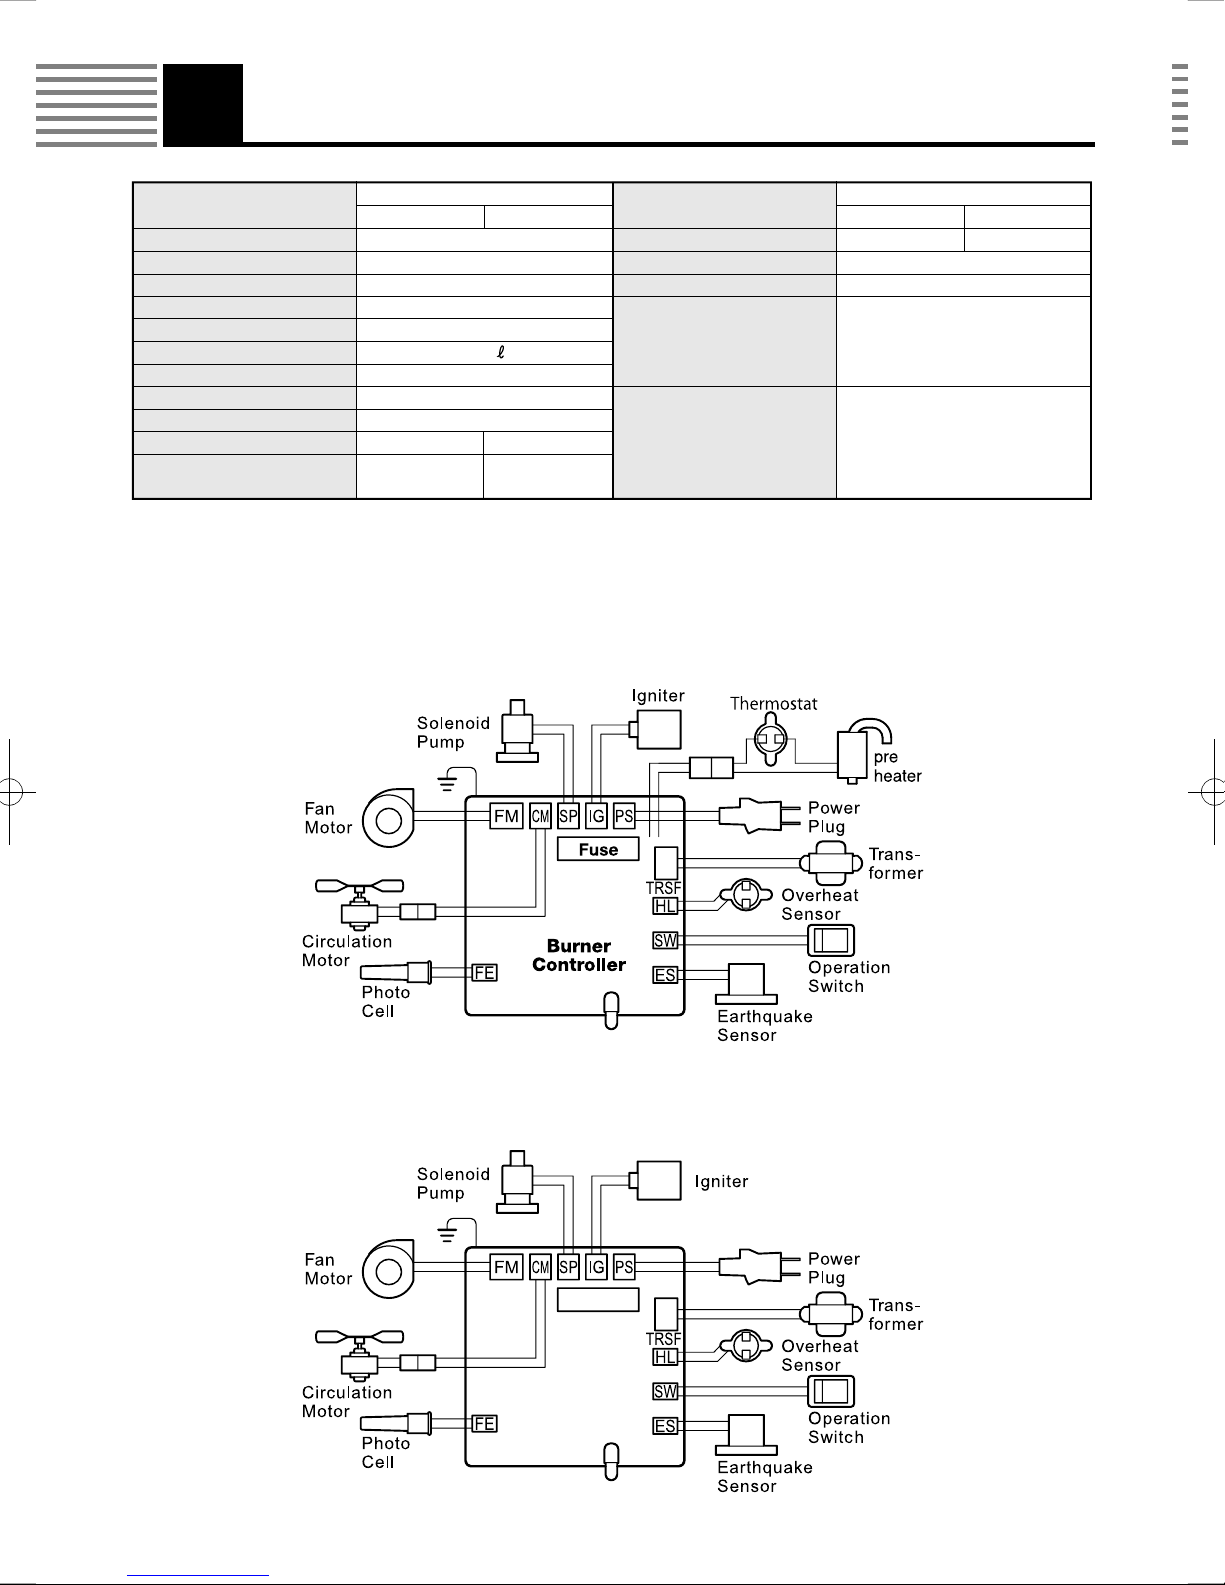
Wiring Diagram
Model Type
VAL6Daystar(PH1)
230V 110V
Model Type
VAL6Daystar(PH1)
230V 110V
Type Radiated/Direct-red
Ignition system Highintensitydischarge
Fuel Kerosene (Diesel)
Fuel consumption 1.25kg/h(1.5L/h)
Heat output 15kW(13000kcal/h)
Tank capacity 10
Continuous operating time 6 hours
Dimensions (mm) 593(H)x310(W)x600(D)
Weight (w/empty tank) 18kg
Power supply 230V50Hz 110V50Hz
Power consumption
130Wwithignitionspark 115Wwithignitionspark
105Wwithcombustion 95Wwithcombustion
Specicationsaresubjecttochangewithoutnotice.
Electric fuse 1.6 A 3.0 A
Operating noise level 60 dB (A)
Airow 3.0 m3/min
•Tip-overswitch
Safety system •Flamemonitor
•Electricalsystemprotection
•Overheatprevention
(Putinaplasticbag)
•Nozzlex1•Filterelementx1
Accessory •Nozzlewrenchx1
(Attachedtotheinsideoftheburnerwithtape)
•Fusex1
● for 230V
● for 110V
Burner
Controller
Fuse
Val6_Daystar_PH1_OM_Multi.indd 14 14/03/27 15:35

English
15
9Safety Labels
● Safetylabelsprovideimportantinformationforsafeuseoftheheater.So,pleasedonotremoveorsoilthem.
●
Ifanyofthelabelsisunreadableorremoved,pleaseaskyourdealerforanewoneandreplacewiththenewone.
130W
105W
Val6_Daystar_PH1_OM_Multi.indd 15 14/03/27 15:35

Val6_Daystar_PH1_OM_Multi.indd 55 14/03/27 15:35

PrintedinJapanVAL6PH1
Manufacturer
4-1 Yamana-cho, Fukuroi 437-0042 Japan
Tel +81-538-23-3990 Fax +81-538-23-3192
50319 − 201002 I
14004 C
USER REGISTRATION
PleaseenterthefollowingtemporaryID&Passwordandcompletetheuserregistrationformonour
website.Bycompletingyourregistration,youwillobtainyourownID&Password.
Thisallowsyoutodownloadtheowner'smanualand/orpartslistfromourwebsite.
Enregistrement de l'utilisateur
Veuillezentrerl’identifiantetlemotdepassetemporairessuivantsetremplirleformulaire
d’enregistrementdel’utilisateursurnotresiteWeb.EnFaisantcela,vouspourrezobtenirunidentiantet
unmotdepasserpersonnalisé.
Celavouspermettradetéléchargerlemoded’emploiet/oulalistedespiècesdétachéesàpartirdusiteWeb.
GEBRUIKERSREGISTRATIE
GebruiktualstublieftdevolgendecombinatievantijdelijkIDenwachtwoordomhetformuliervoorde
gebruikersregistratieoponzewebsiteintevullen.Doorderegistratieopdezemanieruittevoeren,kunt
uuweigenIDenwachtwoordkrijgen.
Opdezemanierkuntudandehandleidingofdeonderdelenlijstdownloadenvanonzewebsite.
REGISTRO DE USUARIO
Introduzcaelnombreylacontraseñadeidentificacióntemporalycompleteelformularioderegistro
deusuarioennuestrositioWeb.Despuésdehabercompletadoelregistro,obtendrásunombrey
contraseñadeidenticaciónpersonales.
Deestemodo,podrádescargarelmanualdeinstruccionesylalistadepiezasdesdenuestrositioWeb.
● ID: VAL6
● Password: shizuoka
● http://www.shizuoka-seiki.co.jp/eg.html
Val6_Daystar_PH1_OM_Multi.indd 56 14/03/27 15:35
Table of contents
Popular Heater manuals by other brands

izzy
izzy Mica IZ-9018 instruction manual

Winterwarm
Winterwarm WWFH20 instruction manual

stockli
stockli Fredy Dubach 8572.50 quick start guide

TPI
TPI 3480/RCH Series installation instructions

Vornado
Vornado DVTH owner's guide

Easy Radiant Works
Easy Radiant Works ED-40U Installation and operating instructions


