Shop+ T200sd User manual
Please read this UserManual carefully toensure proper useof this product andkeep
this manual for futurereference.
User Manual
of digital Set Top Box
T200sd
T200sd


Important Safety Instructions
Warning: Toreduce the risk ofelectric shock, do notremove the coveror back. There areno
user-serviceable parts inside. Refer servicing to qualifiedpersonnel.
Warning: To prevent fireor electric shock hazard, do not exposethe unit to rain or
moisture.
Do not expose theAdaptor and Digital Photo Frame towater (dripping orsplashing) and
no objects filled withliquids, such as vases,should be placed onthe unit.
Keep the product away from directsunlight and heat sourcesuch as radiatorsor stoves.
Do not block theventilation openings. Slots andopenings on the unitare provided for
ventilation. The openingsshould never be blocked by placing yourproduct on a cushion,
sofa or other similarsurface.
Do not place theproduct on unstablecart, stand, tripod, bracket or table.The unit may
fall, resulting in possibledamage or injury.
Only use the ACadapter included with product.Using any other adapterwill void your
warranty.
Unplug the power from the outlet whenthe unit is notin use.
Attention should bedrawn to theenvironmental aspects ofbattery disposal.
WARNNING: The battery(battery or batteriesor battery pack) shallnot be exposed to
excessive heat suchas sunshine, fire orthe like.
WARNNING: Excessivesound pressure fromearphones or headphones cancause hearing
loss.
WARNNING: Only useattachments/accessories specified providedby the manufacturer,
the product is suppliedby AC adapter, the AC adapteris used as disconnectdevice, the
disconnect device shall remainreadily operable.
Important SafetyInstructions
The symbol indicatesthat dangerous voltagesconstituting a risk ofelectric shock are
present within this unit.
The symbol indicatesthat there areimportant operating andmaintenance instructions
in the literatureaccompanying this unit.
This symbol indicatesthat this product incorporates double insulation between
hazardous mains voltageand user accessible parts.when servicing use only identical
replacement parts.
CAUTION:
When the apparatus was in electrostaticcircumstance, it maybe malfunction and need
to rese t by use r.
The USB memory stickshould be plug inthe unit directly.USB extension cable should
not be used toavoid failing ofdata transferringand interference caused.
This marking indicatesthat this product shouldnot be disposed withother household
wastes throughout theEU. Toprevent possible harmto the environmentor human
health from uncontrolledwaste disposal, recycleit responsibly to promote the
sustainable reuse ofmaterial resources. To return your used device, please usethe
return and collection systems or contactthe retailer wherethe product was purchased.
They can takethis product forenvironmental saferecycling.

Table ofContents
Content
Front and RearPanel ...............................................................................................1
Remote Control.......................................................................................................2
1. Connections........................................................................................................4
2. Quick Start Guide................................................................................................5
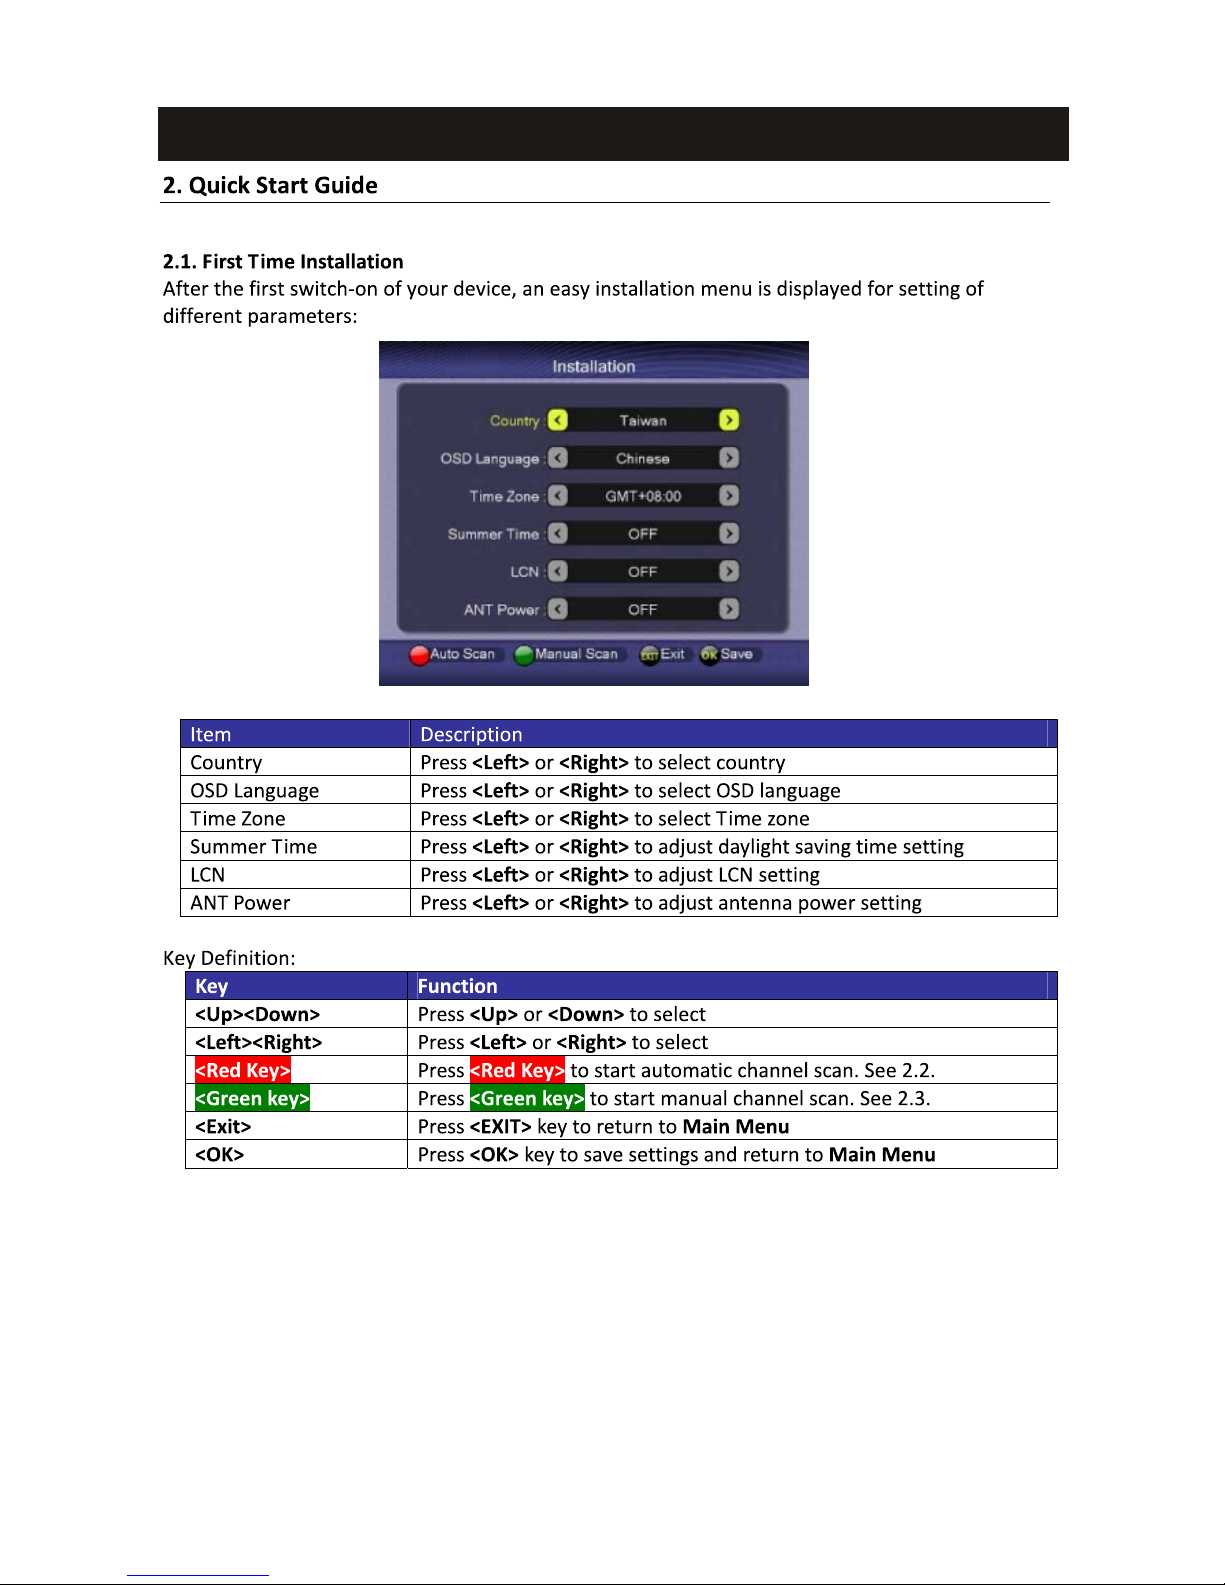
2.1. First Time Installation ........................................................................................5
2.2. Auto Scan ..........................................................................................................6
2.3. Manual Scan ......................................................................................................6
3. TV/Radio Operation.............................................................................................7
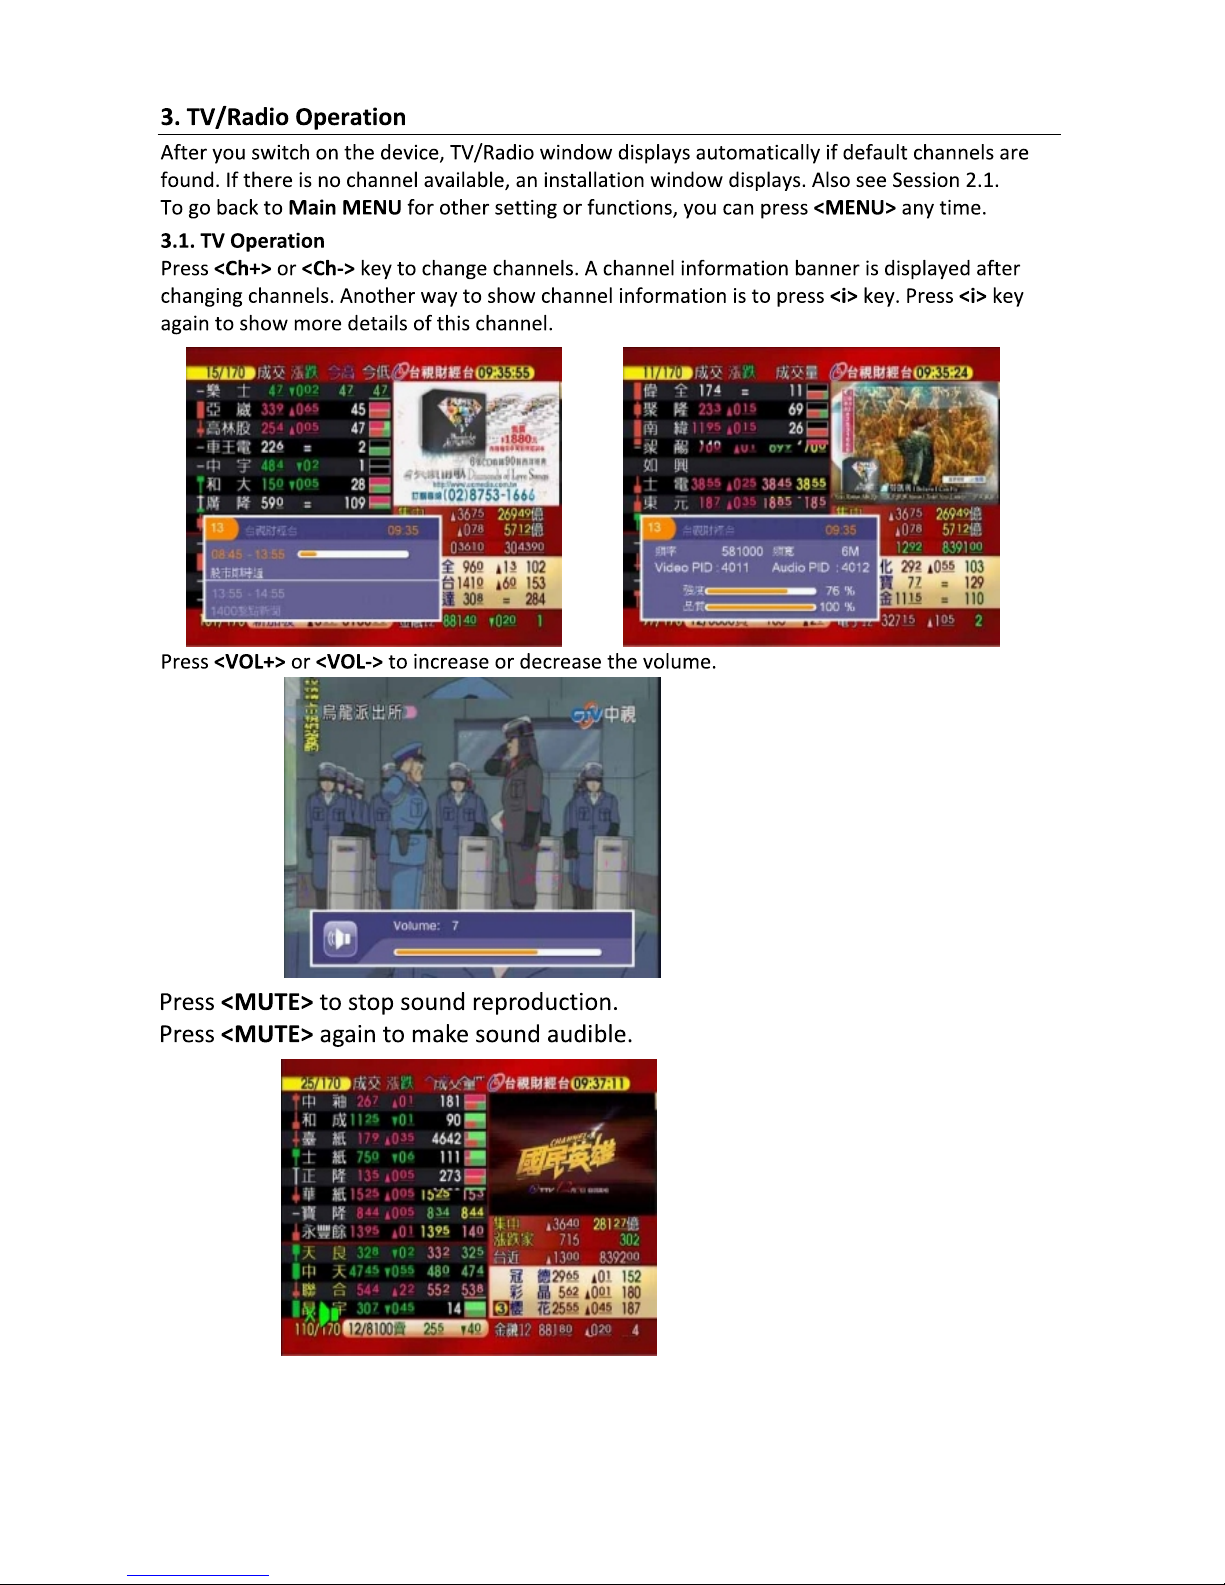
3.1. TV Operation .....................................................................................................7
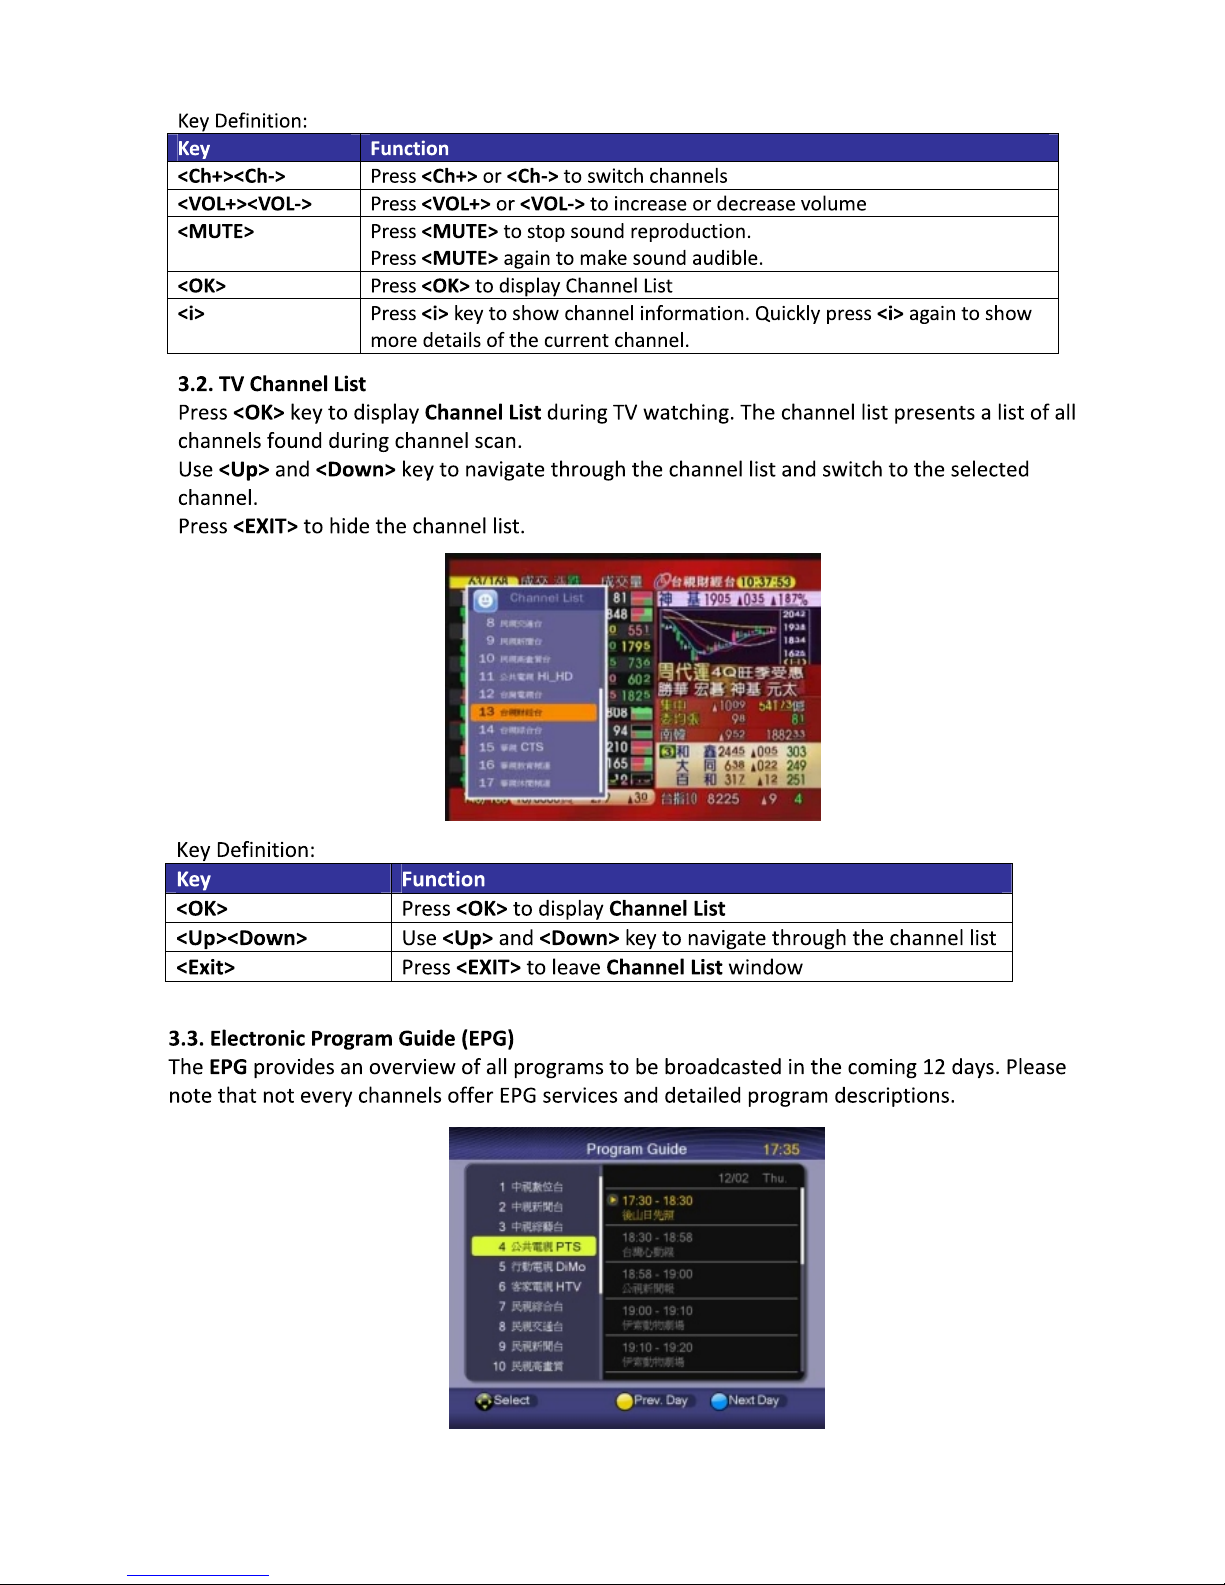
3.2. TV Channel List ................................................................................................8
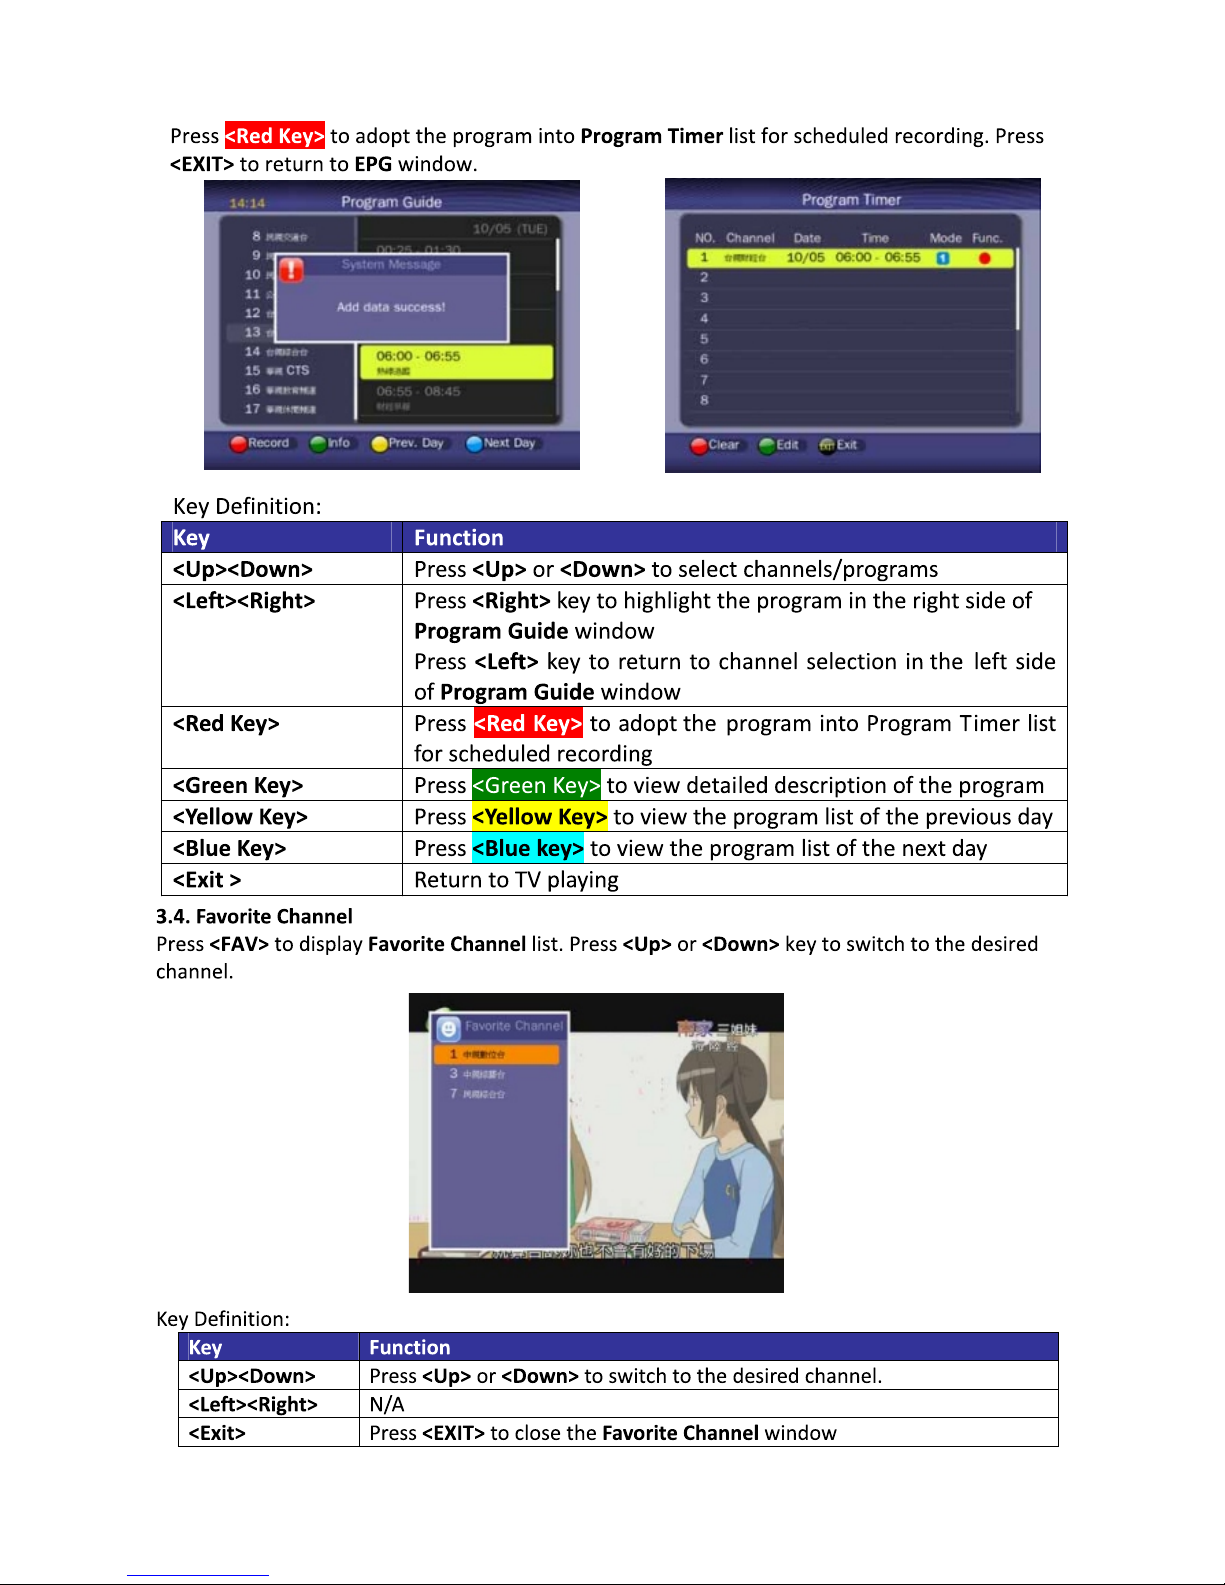
3.3. Electronic Program Guide (EPG) .......................................................................8
3.4. Favorite Channel ............................................................................................ 10
3.5. Time Shift .......................................................................................................11
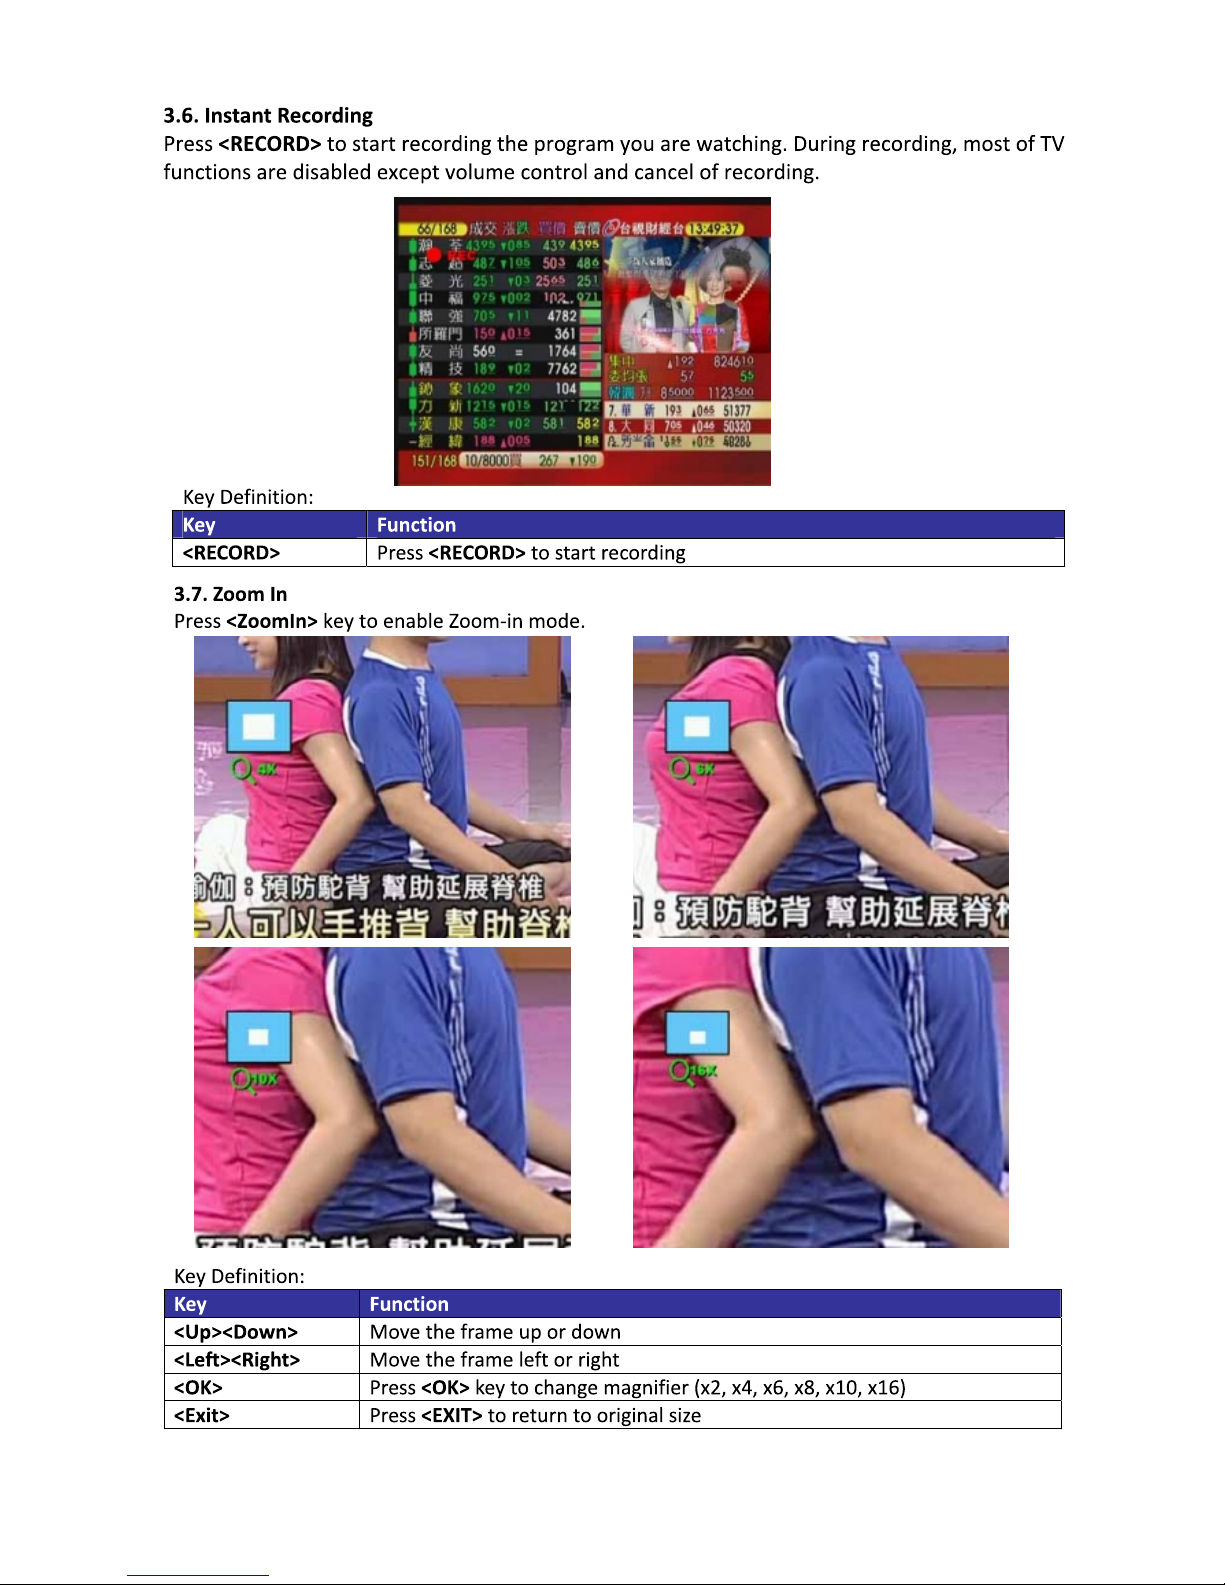
3.6. Instant Recording ............................................................................................12
3.7. Zoom In ..........................................................................................................12
3.8. Audio .............................................................................................................13
3.9. Subtitle/Teletext .............................................................................................13
3.10. Radio ............................................................................................................14
4. Multimedia and Miscellaneous Settings ..............................................................14
4.1. Main Menu......................................................................................................14
4.2. Channel Manager .............................................................................................15
4.3. Timer Manager ................................................................................................15
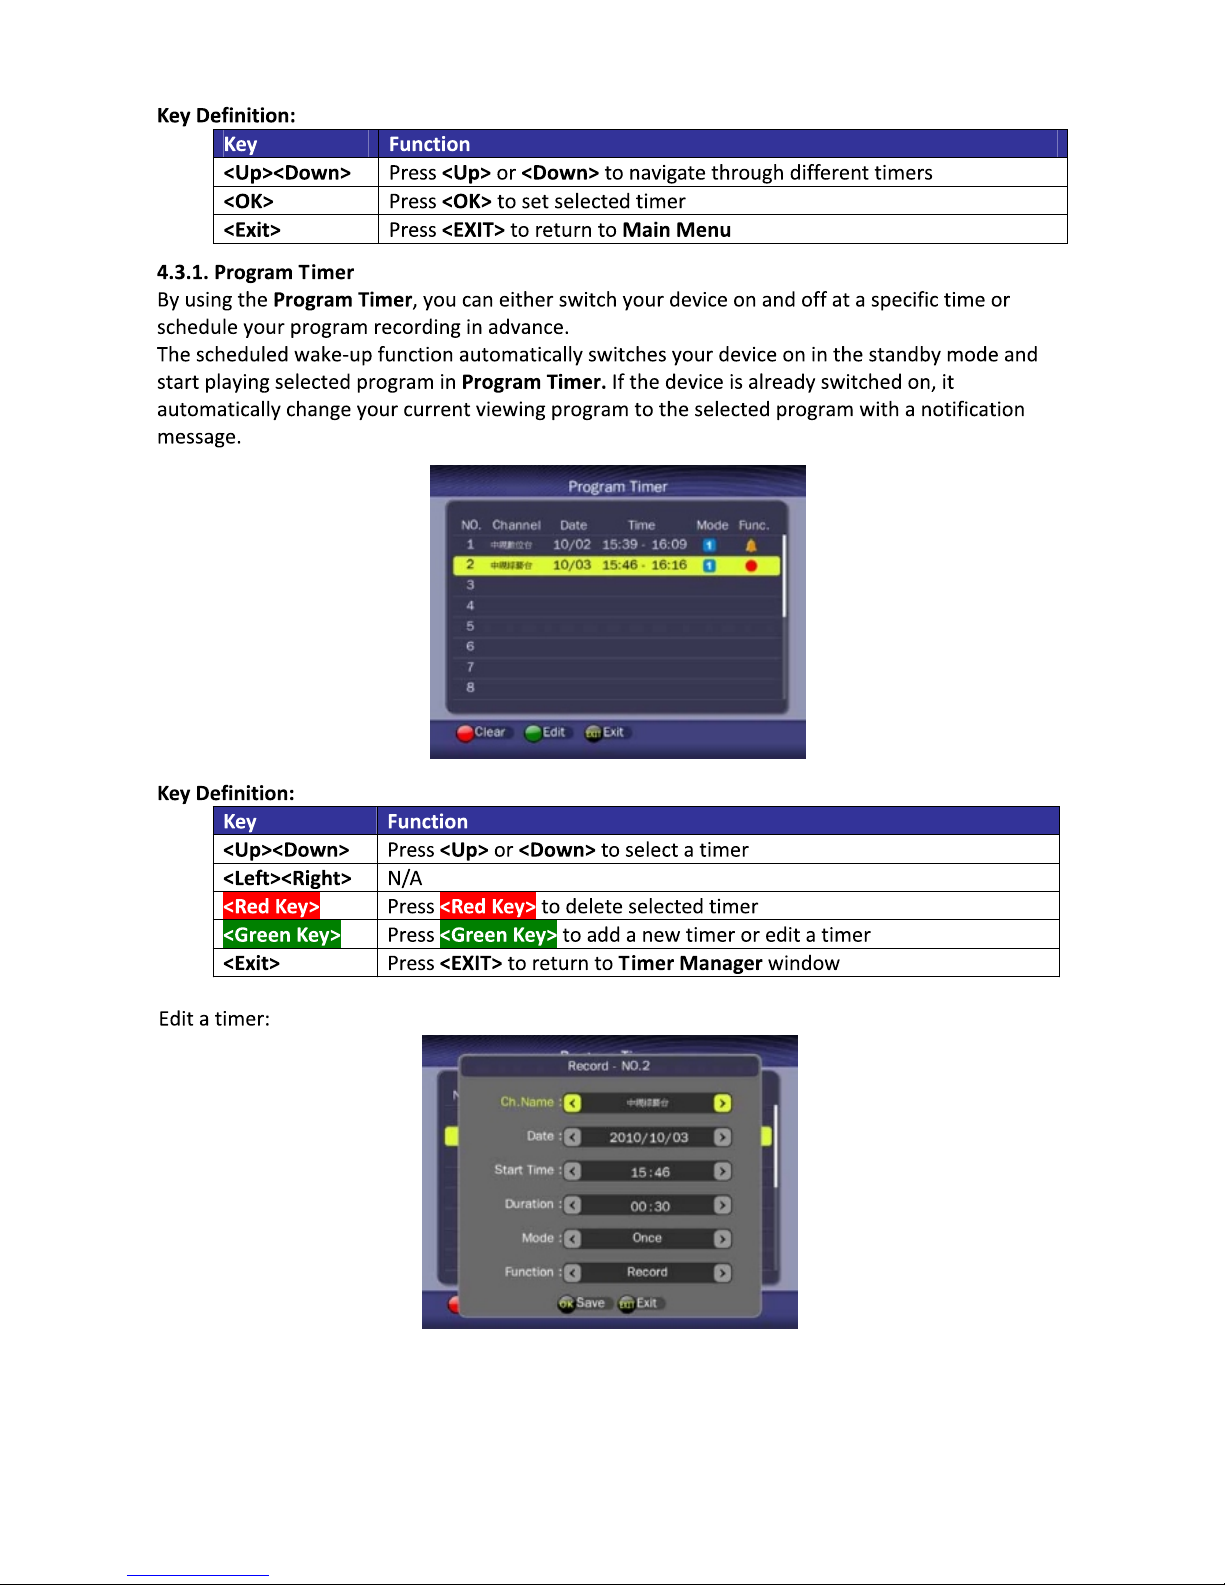
4.3.1. Program T imer .........................................................................................16
4.3.2. Sleep T imer..............................................................................................17
4.3.3. Auto Scan T imer........................................................................................17
4.4. Multimedia .....................................................................................................18
4.4.1. Music ......................................................................................................19
4.4.2. Photo ......................................................................................................20
4.4.3. Movie ......................................................................................................20
4.4.4. PVR .........................................................................................................21
4.5. Setting ............................................................................................................22
4.5.1. Display Setting..........................................................................................23
4.5.2. Language Setting ......................................................................................23
4.5.3. Recorder Setting.......................................................................................24
4.5.4. Parental Control .......................................................................................24
4.6. Tools ...............................................................................................................25
4.6.1. Storage Manager ......................................................................................26
4.6.2. Software Upgrade .....................................................................................26
4.6.3. Factory Reset ...........................................................................................27
4.6.4. Software Information ................................................................................28
Troubleshooting....................................................................................................29
Technical Specifications.........................................................................................30

Front and RearPanel
Front panel
Rear panel
1
1.STANDBY INDICATOR: Used to visually show power state of the set top box, the green LED will be
light if turned on the set top box and the red LED will be light if the set top box entered standby
mode.
2. REMOTE CONTROL SENSOR: Used to receive the signal from the remote control.
3. USB JACK(Optional): Used to connect to an external USB 2.0 device.
Note: Not all receivers have the USB Jack.
23
1
1. RF IN: This socket connects to your external aerial.
2. RF OUT: This socket will bypass the RF signal to either your TV or another video system.
3.COAXIAL: This socket connects to a coaxial socket on your surround sound system.
4. VCR SCART: This socket connects to either a DVD or other video system.
5. TV SCART: This socket connects to your TV.
6. DC IN 5V: Used to connect the 5V DC adapter.
1346
25

Remote Control
Remote Key Function:
1. MUTE:Used to turn the sound on oroff.
2. NUMBER KEYS:Used to select channel numbers orinput
numbers in menus.
3. RECALL: Used to switch between thelast two viewed channels.
4. INFO:Used to display informationabout the channel being
viewed or further information aboutthe program when in small
EPG screen.
5. SUBTITLE: Used to switch between different subtitles that are
broadcasted
6. EXIT:Used to return to the previousscreen or menu.
7. CH+: Used to move around the menuscreens or selecting the
channels in non-menu state.
8. VOL+:Used to move around the menuscreens or changing
the volume in non-menu state.
9. OK: Used to confirm a selection within amenu.
10. RECLIST:Used to show the recordedprograms list.
11. COLOR KEYS (RED/ GREEN/ YELLOW/ BLUE):Used to
operate different functions inTEXT screen or other menus.
12. STOP: Used to stop the current recording if exist or stop the
HDD playback back to DTV mode.
13.TV/RADIO:Used to switch between TVchannels and Radio
stations.
14. RECORD: Used to record the program manually, and select
the record duration ifpressed it again.
15. FAST FORWARD: Used to adjust the forwardspeed if in HDD
time shifting playback mode.
16. DTV/VCR:Used to switch between theVCR SCART input and
the DTV output mode.
17.STANDBY:Used to switch the set topbox to on or standby.
Note: SUBTITLE/TEXT/LANGUAGEmay not be available for all channels.
RED/GREEN/YELLOW/BLUE may has specifical function in different menus.
18. FAV:Used to switch access your favourite channels.
19. AUDIO:Used to set the sound output, the available settings Are STEREO,LEFT, RIGHT,
MONO.
20. MENU:Used to open the main menu window.
21. EPG: Used to display information aboutthe program being viewed and what'son next.
22. VOL-: Used to move around the menuscreens or changing the volume innon-menu state.
23. CH- :Used to move around the menuscreens or selecting the channels in non-menu state.
24. TEXT: Used to open teletext OSDdisplay if teletext available in the broad castestream.
25. PAUSE:Used to pause or playback theprogram being viewed .
26. FAST BACKWARD: Used to adjust the backward speed if in HDD time shifting playback mode.
2

Installing the Batteries
Remove the batterycover from theRemote Control andput 2xAAA size batteries inside the
compartment.
The diagram inside theBattery Compartment showsthe correct wayto install the batteries.
1.Open the cover 2.Install batteries 3.Closethe cover
Using the Remote Control
To usethe Remote Control,point it towardsthe front of theDigital Set Top Box. The Remote
Control has a range of up to7 metres fromthe Set Top Box at anangle of up to60 degrees.
The Remote Controlwill not operateif its path isblocked.
Sunlight or very brightlight will decrease thesensitivity of the Remote Control.
3

Connections
Caution: Make sure tocheck the voltage specification of the walloutlet is the samerating
with the receiver. Toprevent the risk ofelectric shock, do notopen the cover orthe back of
the receiver.
4
Note: Whenconnecting the receiverto otherequipm ent,e.g.,TV,VCR and am plifier,
makesure to referto relevantusermanualforinstru c tion.Also,m ake sure you
disconnectallthe equipm ents from the mains supply before the connection.
TV
TV Aerial
VCR
Amplificador Digital
Coaxial Cable Coaxial Adapter
1. Connections
Quick Start Guide
5

6
7
8

9
10

11
12

13

14

15
4.2. Channel Manager
Channel Manager is used to rearrange channel sequence, removechannels, lock channels
or set favoritechannels.
To rearrange channel sequence, press<Red Key>for selecting the desired channel. Use
<Up> or <Down> keys to movethe channel to whereyou want andpress <Right Key>to
confirm the new channelsequence.
Press <Green Key>to delete channel orundelete it.
Press <Yellow Key>to put the channelto your Favorite Channel List orpress again tocancel
the action.
<Up><Down> Select channel or move channel
<Right> confirm the new channelsequence
<Red Key> Move channel
<Green Key> Delete channel or undelete channel
<Blue Key> Lock the channel or unlock the channel
<Yellow Key> Set as favorite channel orcancel the setting
<Exit> Return to MainMenu
16
Table of contents


