Shuoqi GH-709 User manual

INSTALLATION MANUAL
GH-709
Please read all the instructions in the manual carefully before installing and using this
product, and keep this manual properly
EXERCISE BIKE

ENGLISH 1
ITALIANO 28
FRANÇAIS 19
DEUTSCHE 10
ESPAÑOL 37
POLSKIE 46

1
SPORYS TRAINING METHODS
According to effective muscle and metabolic slow motion
requirments, it should take at least 5 to 10 minutes to relax your
after strenuous exercise.Longer workouts can also help prevent
muscle soreness.
Efficient exercise can make the heart rate rise to 70%-80%.the
length of exercise time can be referred to the following datd:Warm up for 5-10 minutes be
1. Warm-up Exercise
2. Exercise duration
3. Slow movement
When using this product in daily life becomes regular
exercise,you will feel comfortable and happy and make
your body healthier.
Use this product according to your own situation to choose the
most appropriate process or stage.
Don’t exercise too much in case that you could harm yourself.
If use the product daily,you can use it for more than 10
minutes at a time
If use the product 2-3 times a week,you can use it for more
than 30 minutes at a time.
If use the products 1-2 times a week,you can use it for more
than 60 minutes at a time.

TABLE OF CONTENTS
SAFETY INSTRUCTION 3
INSTALLATION STEPS 6
PRODUCT OVERALL DIAGRAM 5
FEATURES 4
REPAIR GUIDE 9
2

SAFETY AND MAINTENANCE INSTRUCTIONS
3
1. Follow the steps of the assembly instructions.
2. Check before using for the first time and make sure that all
connecting components are tightly fitting and are in good condition
every 1-2 months.
3. Replace defective components immediately and/or keep them until
repairs, and can be replaced only with original parts.
4. Avoid using aggressive detergents when cleaning the bike.
5. Make sure that training starts only when the bike is correctly
assembled and all components are intact.
6. Be aware of the maximum positions of the adjustable parts to
which they can be adjusted.
7. The exercise bike is designed for adults. Please ensure that
children can only use it under the supervision of the adult
8.Don’t do anything dangerous when training.
9.Consult your physician and fitness professionals before
starting with any exercise program
10. Please check all knobs and screws carefully before starting for
your safety.
11. Be sure to put your foot into the foot cover while you are
training.
12. Don’t stop immediately when riding at a top speed. Use the
brakes.
Before you start training on your exercise bike, please
read the instruction carefully.

FEATURES
4
The rider can be adjusted for
comfortable and varied training
position. The adjustment knob is
convenient for users to adjust the
height of the seat cushion and armrest.
The flywheel with two-way transmission
can generate maximum power and create
a feeling of extreme speed.
Use belt drive to avoid the
noise and give users a
silent exercise experience.
It is suitable for users of
different body types to adjust
the position suitable for
riding up and down and front
and back.
The special design can adjust the
claws around the seat cushion,
allowing users to adjust to the most
suitable riding height
The multi-stage fine-tuning
knob allows users to adjust
the resistance at any time.
ARMREST
FLYWHEEL BELT
FINE ADJUSTMENT
KNOB
CUSHION CUSHION LIFT
SLIDE TUBE

PRODUCT OVERALL DIAGRAM
5
17
16
3
2
19
4
14
12
13
5
15
6
7
8
11
10
9
1
20
18
21. 22. 23. 24. 25. 26. 27.
Screw Accessories
21.M8 Carrriage Bolt x4 22.M8 Acorn Nut x4 23.M8 Washer x8 24.M8 Allen Bolt x2
25.M8 Lock Nut x2 26.Open Spanner 27.Allen Wrench
1. Adjustable knob 2. Bike Frame 3. Ball Pin 4. Flywheel
5. Crank 6. Plastic Cover 7.Ball Pin 8. Plum Bolt
9. Seat Riser 10. Seat Retainer 11.Saddle 12. Front Stabilizer
13. Rear Stabilizer 14. Pedals 15. Scroll Wheel 16. Handlebar
17.Monitor 18. Handlebar Riser 19. Bottle Holder 20. Frame Cover
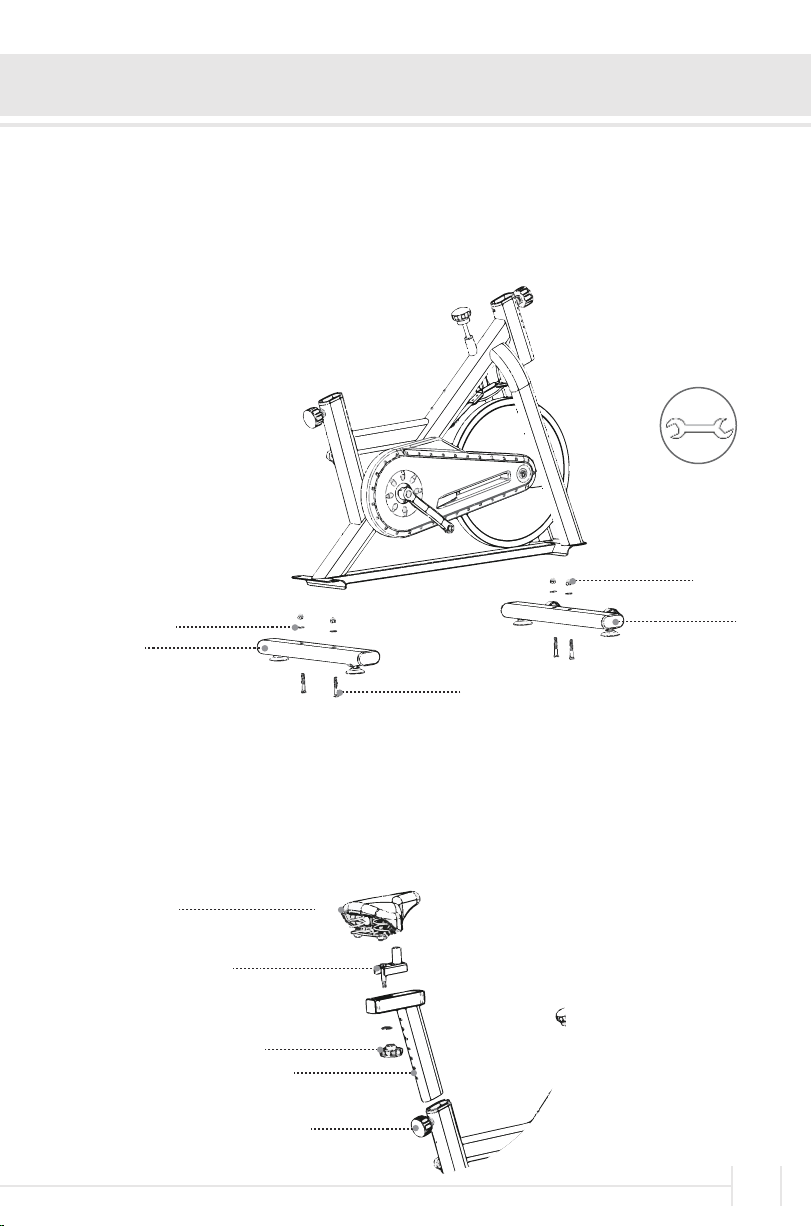
INSTALL THE FRAME
INSTALL THE CUSHION
INSTALLATION STEPS
6
Fasten the seat riser (9) on the frame with ball pin (7), then fasten the saddle(11)
to the seat riser with seat retainer (10). Tighten the screw on the seat with
washer and plum bolt (8) which pre- install into the seat retainer. The distance
between the front and back of the seat can be adjusted.
Fasten the front stabilizer (l2) on the frame with bolts (21) , washers (23)and
acorn nuts (22)with a open-end spanner (26); then fasten the rear stabilizer(13)
on the frame by the same way.
10
11
7
9
8
13 23
21
12
22
26

INSTALL HANDRAILS
INSTALL THE METER
INSTALLATION STEPS
7
Fasten the handlebar riser (l8) post in the frame (2) with ball pin (3), put the
handlebar (l6) on the handlebar riser. Fasten the handlebar with bolts
(24),washers (23) and lock nuts (25). Adjust the ball pin to the suitable place.
There is a sliding-groove on the back of monitor (17), when you install the
monitor, just slide the monitor to the monitor holder of handlebar. Then
connect then sensor line with the line of monitor.
2
3
25
16
18
24
23
17
Sensor connection

27
INSTALL PEDAL
INSTALL THE KETTLE
INSTALLATION STEPS
1. First take the thread of pedal L to direct vertically to crank L, then firmlyfix
the pedal marked L to the crank arm marked L in a anti- clockwisedirection
until tight.
2. Now take the thread of pedal R to direct vertically to crank R, then firmlyfix
the pedal marked R to the crank arm marked R in a clockwise directionuntil
tight.Remarks: failure to follow the above instructions could result in damage
to thecranks and pedals.
Screw out the screws fixed on the frame with a Allen wrench, place the bottle
holder (19) on the frame of the exercise bike, and tighten the screws with
Allenwrench (27).
19
8

MAINTENANCE AND TROUBLESHOOTING GUIDELINES
9
1. Cleaning and maintenance
Please wipe the sweat and dust on the bike surface with a soft cloth after
using in order to keep the product clean for the next time, don't use
abrasive product or solvent to avoid surface damage.
2. Exercise bike maintenance
Aroid direct sunlight, because the electric is easily damaged. Check all
the bolts every week and ensure this bike can be normally used. Keep the
spinning bike away from children and put it in a clean, dry environment.
3. Troubleshooting guide
A. Using the bike, based on the actual situation to adjust the scroll wheel
on the stabilizers until spinning bike becomes stable.
B. When the monitor doesn't show, please check the connection between
the electronic wire and the monitor. Check whether the battery is
installed.If the battery has no power, please replace a new one.
C. When there's a squeak, please check whether the bolts are loose and
make sure the screws are lock tightly.

10
SPPRTS TRAINING SMETHPDEN
Um Muskeln und Stoffwechsel effektiv zu kontrollieren,nach
anstrengenden Übungen es mindestens 5 bis 10 Minuten dauert, um
sich zu entspannen. Mehr Bewegung hilft auch, Muskelkater zu
verhindern.
Effektives Training kann das Herz um 70% -80% schneller schlagen
lassen. Die Länge der Trainingszeit kann sich auf die folgenden
Daten referenzieren:Vor jeder Übung 5-10 Minuten aufwärmen.
1. Aufwärmübungen
2. Übungszeit
3. Langsame Bewegung
Wenn Sie dieses Produkt im regelmäßige im Alltagsleben
verwenden, werden Sie sich wohl und glücklich fühlen und Ihr
Körper wird gesünder.
Verwenden Sie dieses Produkt entsprechend Ihrer eigenen
Situation und wählen Sie den geeignete Prozess oder Stufe.
Trainieren Sie nicht zu viel, um Ihren Körper zu schützen.
Wenn Sie täglich trainieren, könnten Sie es jeweils länger als
10 Minuten verwenden.
Wenn Sie es 2-3 Mal pro Woche trainieren, könnten Sie es
jeweils länger als 30 Minuten verwenden.
Wenn Sie es 1-2 Mal pro Woche trainieren, könnten Sie es
jeweils länger als 60 Minuten verwenden.

11
KATLOGO
SICHERHEITSHINWEISES 12
INSTALLATIONSSCHRITTE 15
DAS GESAMTBILD DES PRODUKTS 14
MERKMALE UND FUNKTIONEN 13
REPARATURANLEITUNG 18

12
SICHERHEITS-UND WARTUNGSHINWEISE
1. Befolgen Sie die Schritte der Montageanleitung sorgfältig.
2.Überprüfen Sie vor dem ersten Gebrauch und alle 1-2 Monate,
ob die Verbindung selemente fest installiert sind und der Zustand
korrekt ist.
Ersetzen Sie defekte Teile sofort oder stoppen Sie das Gerät bis
zur Reparatur. Verwenden Sie bei Reparaturen nur Originalteile.
3.Vermeiden Sie die Heimfitnessgeräten mit scharfe Reinigungsmittel
reinigen.
4.Stellen Sie sicher, dass Sie die Heimfitnessgeräten nach
ordnungsgemäßer Installation und Inspektion verwenden.
5.Für einstellbare Teile müssen Sie die maximale Position kennen, in
der sie eingestellt / festgezogen werden können.
6.Dieses Heimfitnessgerät ist für Erwachsene konzipiert. Bitte
stellen Sie sicher,dass Kinder nur unter Aufsicht eines Erwachsenen
verwenden dürfen.
7.Vermeiden Sie gefährliche Bewegungen beim Training.
8.Fragen Sie Ihren Arzt und Fitness-Experte, bevor Sie mit dem
Training beginnen.
9.Bitte überprüfen Sie alle Knöpfe und Schrauben sorgfältig, bevor
Sie beginnen, um Ihre Sicherheit zu gewährleisten.
10.Stellen Sie beim Training sicher, dass Sie Ihre Füße auf die Pedale
stellen. Wenn die Pedale mit der höchsten Geschwindigkeit drehen,
halten Sie nicht sofort an und betätigen Sie die Bremsen schnell, um
Unfälle zu vermeiden
Bitte lesen Sie die Anweisungen sorgfältig durch,
bevor Sie mit dem Befestiges Fahrrad trainieren.

13
Die Leute können sie für ein komfortables
und abwechslungsreiches Training
einstellen. Mit der Einstellknöpfe können
Benutzer die Höhe der Polster und der
Armlehnen bequem einstellen.
Das Schwungrad mit Zweiwegegetriebe
kann die größte Energie erzeugen und
man kann sich extrem schnell fühlen.
Die Verwendung dieses Band
kann der Lärm vermeiden und
dem Benutzer ein ruhige
Trainingsumgebung bieten.
Benutzer verschiedener
Körpert ypen können die
Position einstellen, die für das
Fahren nach oben und unten,
vorne und hinten geeignet ist.
La conception spéciale permet de
régler les griffes autour du coussin
du siège,ce qui permet aux
utilisateurs de s'adapter à la hauteur
de conduite la plus appropriée.
Mit dem mehrstufigen
Mikroeinstellknopf darf der
Benutzer den Widerstand
jederzeit nach dem Gebrauch
einstellen.
ARMLEHNEN
SCHWUNGRAD BAND
MIKROEINSTELLKNOPF
POLSTER HÖHENREGLER
MERKMALE

14
DAS GESAMTBILD DES PRODUKTS
17
16
3
2
19
4
14
12
13
5
15
6
7
8
11
10
9
1
20
18
21. 22. 23. 24. 25. 26. 27.
Zubehörteile
21.M8 Hackenschraube x4 22.M8 Mutter x4 23.M8 Dichtungen x8 24.M8 Sechskantschraube x2
25.M8 Kontermutter x2 26.Schraubenschlüssel 27.Innensechskantschlüssel
1. Einstellknopf 2. Rahmen 3. Feststellschraube 4. Schwundrad
5. Kurbelwelle 6. Plastikhülle 7. Einstellknopf 8. Dübel
9. Sitzheber 10.Sitzhalter 11.Sattel 12.Frontstabilisator
13.Hintertabilisator 14.Pedals 15.Rhönrad 16.Lenker
17.Monitor 18.Lenkerheber 19.Flaschenhalter 20.Schutzplatte

15
STRUKTUR INSTALLIEREN
POLSTER INSTALLIEREN
INSTALLATIONSSCHRITTE
Befestigen Sie den Sitzheber (9) mit die Feststellschraube(7), dann befestigen Sie
den Sattel(ll) mit einem Sitzhalter(l0).auf Sitzheber. Ziehen Sie die Schrauben
am Sitz mit Dichtungen und Dübel(8) an. Diese Schrauben werden automatisch
am Sitzhalter angebracht. Der Abstand zwischen Vorder- und Rückseite des
Sitzes kann eingestellt werden.
Befestigen Sie den Frontstabilisator(12)mit Schrauben(2l),Dichtungen(23) und
Muttern(22) mit einem Schraubenschlüssel(26);an den Rahmen dann befestigen
Sie den hinterstabilisator (l3) sur le cadre de la même manière.
10
11
7
9
8
13 23
21
12
22
26

16
LENKER INSTALLIEREN
MESSGERÄT INSTALLIEREN
INSTALLATIONSSCHRITTE
Befestigen Sie den Lenkerheber(l8) mit die Feststellschraube(2) an den Rahmen
(3),stellen den Lenker(l6) an den Lenkerheber. Befestigen den Lenker mit
Sechskantschrauben(24), Dichtungen(23) und Kontermutter(25).Stellen Sie die
Feststellschrauben an derrichtigen Stelle ein.
Auf der Rückseite des Monitors befindet sich ein Schiebeschlitz.(l7).Wenn Sie den
Monitor installieren, müssen Sie ihn nur auf die Monitorhalterung des Lenkers
schieben. Verbinden Sie dann die Sensorskabel und die Monitorskabel.
2
3
25
16
18
24
23
17
Sensor connection

17
27
PEDAL INSTALLIEREN
FLASCHENHALTER INSTALLIEREN
INSTALLATIONSSCHRITTE
1. Setzen Sie zuerst die Schraube am Pedal L senkrecht in die Kurbelwelle
L ein und befestigen Sie dann das Pedal L am Kurbelwelle L gegen den
Uhrzeigersinn, bis es festgezogen ist.
2. Richten Sie nun den Faden auf das Pedal R senkrecht zur Kurbel R und
befestigen Sie das Pedal R am Kurbelwelle im Uhrzeigersinn , bis es
festgezogen ist.
Lösen Sie mit einem Innensechskantschlüssel die befestigten Schraube
n am Rahmen, befestigen Sie den Flaschenhalter(l9)am Rahmen des
Fitness-Fahrrad und ziehen Sie die Schrauben mit einem Innensechska
ntschlüssel(27)fest.
19

18
WARTUNGS- UND FEHLERBEHEBUNGSHANDBUCH
1. Reinigung und Instandhaltung
Wischen Sie nach dem Gebrauch den Schweiß und den Staub auf das
Fahrrad ab, um sie beim nächsten Mal sauber zu halten. Wischen Sie
das Produkt nicht mit Schleifmitteln oder Lösungsmitteln ab, um
Oberflächenabrieb zu vermeiden.
2. Wartung des Fitness-Fahrrads
Vermeiden Sie es direktes Sonnenlicht, da es sonst leicht beschädigt
werden kann. Überprüfen Sie jede Woche alle Schrauben, um
sicherzustellen, dass das Fahrrad normal verwendet werden kann.
Halten Sie das Fahrrad von Kindern fern und bewahren Sie es in einer
sauberen, trockenen Umgebung auf.
3. Anleitung zur Fehlerbehebung
A.Passen Sie bei der Verwendung eines Fahrrads die Räder am
Stabilisator an die tatsächliche Situation an, bis das Fahrrad stabil ist.
B. Wenn der Monitor kein anzeigt , überprüfen Sie bitte zwischen dem
Draht und dem Monitor . Überprüfen Sie, ob der Akku eingelegt ist.
Wenn der Akku leer ist, ersetzen Sie einen neuen.
C. Überprüfen Sie bei einem Quietschen, ob die Schrauben locker sind,
und stellen Sie sicher, dass die Schrauben befestigen.
Table of contents
Languages:


