SI NANO ROLL 275 User manual

INSTALLERS: Please leave this manual with the owner.
WIREFREE - ZIGBEE
Nano Roll
Installation Instructions
Doc. # 400089


Table of Contents
PARTS LIST - NANO ROLL - 275 - WIREFREE � � � � � � � � � � � � � � � � � � � � � � � � � � � � � � � � � � � � � � � � � � � � � � � � � � � � � � � � � � � � � � � � � � � 2
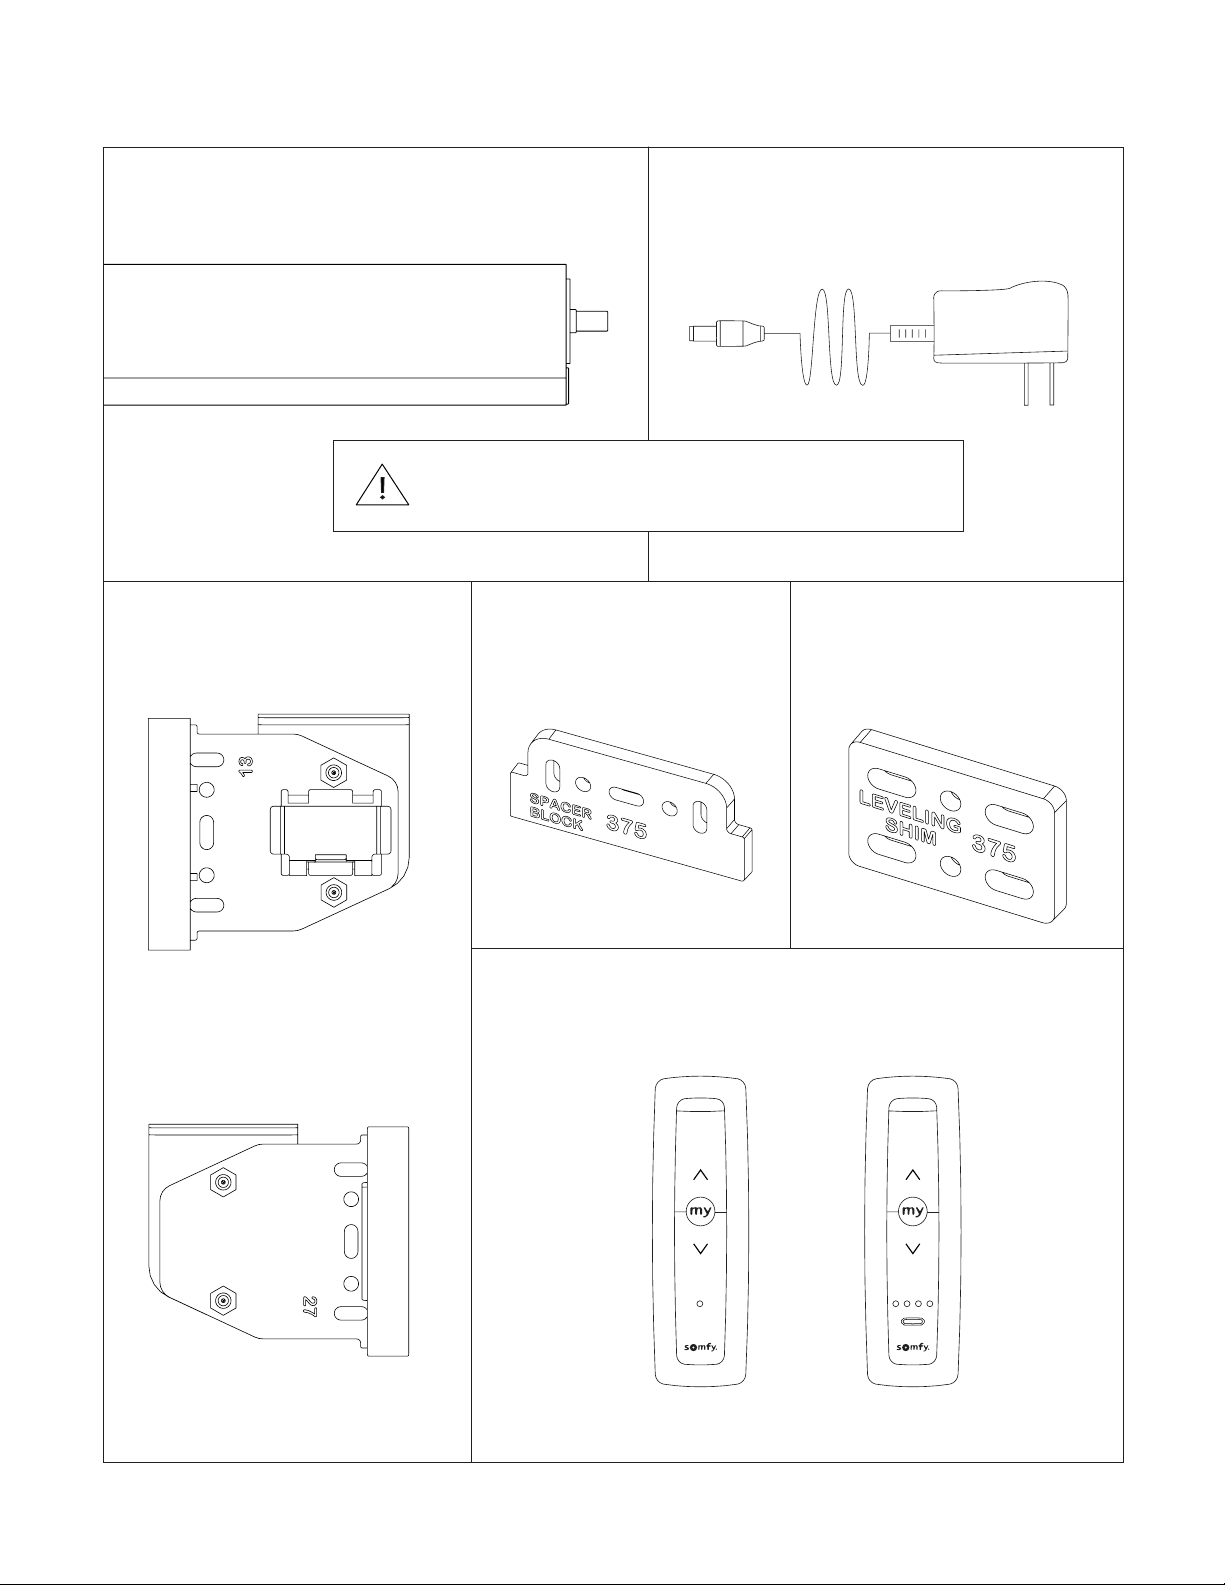
PARTS LIST - NANO ROLL - 375 - WIREFREE � � � � � � � � � � � � � � � � � � � � � � � � � � � � � � � � � � � � � � � � � � � � � � � � � � � � � � � � � � � � � � � � � � � 3
SPACER BLOCKS AND LEVELING SHIMS� � � � � � � � � � � � � � � � � � � � � � � � � � � � � � � � � � � � � � � � � � � � � � � � � � � � � � � � � � � � � � � � � � � � � � �4
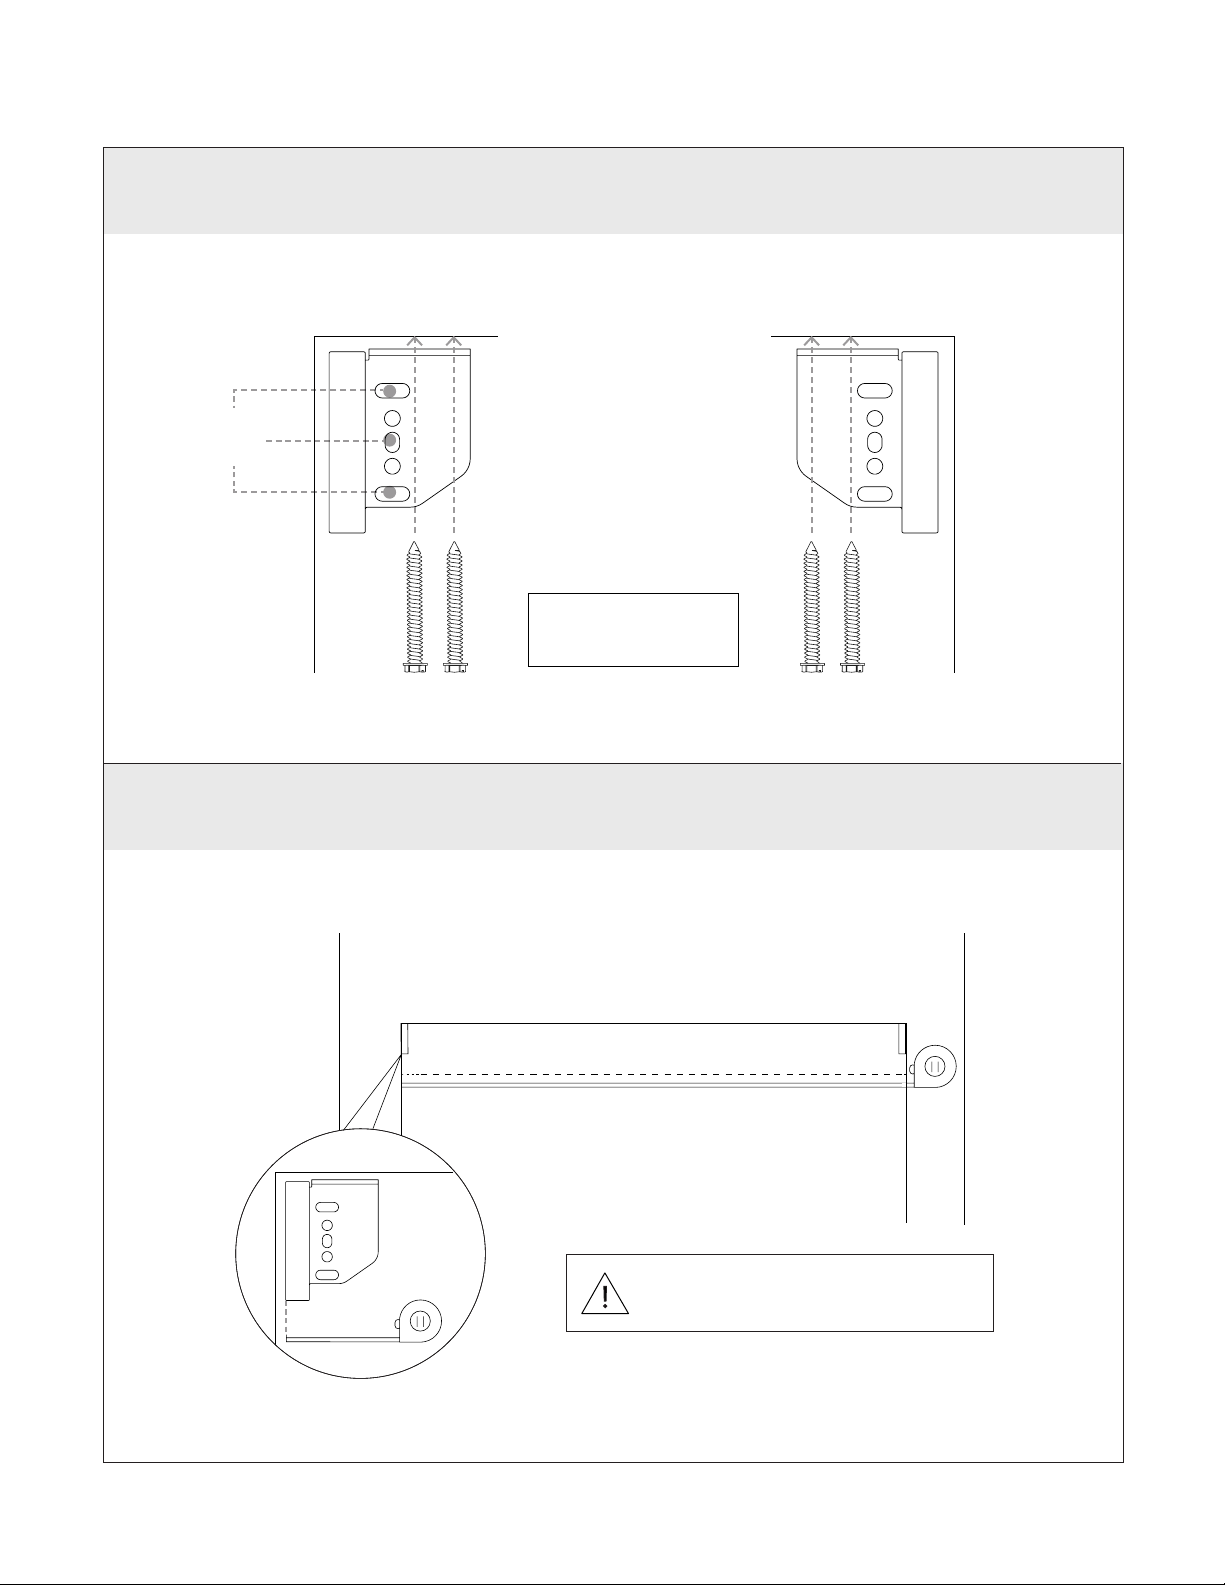
INSTALLATION - NANO ROLL - 275 - WIREFREE� � � � � � � � � � � � � � � � � � � � � � � � � � � � � � � � � � � � � � � � � � � � � � � � � � � � � � � � � � � � � 5 - 7
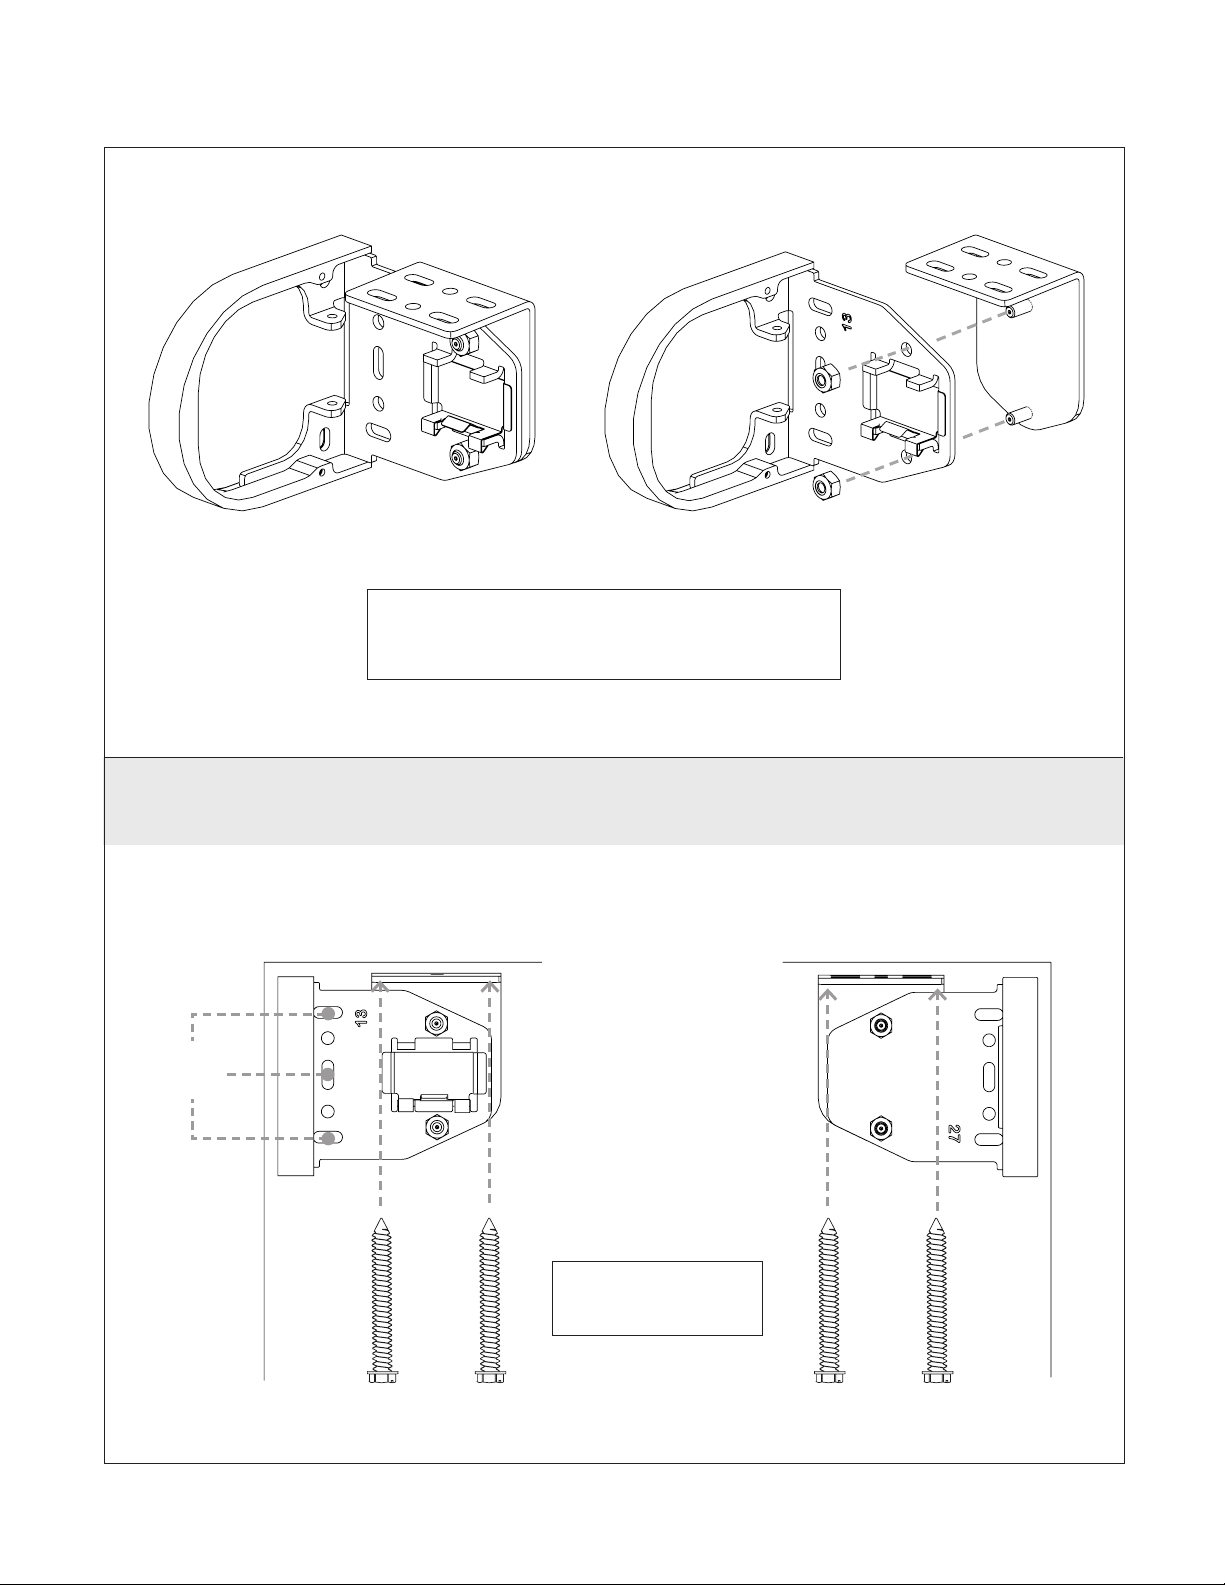
INSTALLATION - NANO ROLL - 375 - WIREFREE� � � � � � � � � � � � � � � � � � � � � � � � � � � � � � � � � � � � � � � � � � � � � � � � � � � � � � � � � � � � 8 - 13
PROGRAMMING ZIGBEE � � � � � � � � � � � � � � � � � � � � � � � � � � � � � � � � � � � � � � � � � � � � � � � � � � � � � � � � � � � � � � � � � � � � � � � � � � � � � � � � � � � � � 14
TROUBLESHOOTING ZIGBEE � � � � � � � � � � � � � � � � � � � � � � � � � � � � � � � � � � � � � � � � � � � � � � � � � � � � � � � � � � � � � � � � � � � � � � � � � � � � � � � � � 15

2
PARTS LIST - NANO ROLL - 275 - WIREFREE
Wall Brackets
Ceiling Brackets
ChargerShades (275 Roll)
Screws Included
(3 per Bracket)
Leveling Shims
(optional)
Spacer Blocks
(optional)
Parts List - Nano Roll - 275 - Wirefree
Please note all the QR CODES on your Shade motors.
See the last page on these instructions.
Situo Remotes
(Optional)
1 channel 4 channels

3
Wall Brackets (375)
Motor Side
Idler Side
PARTS LIST - NANO ROLL - 375 - WIREFREE
Spacer Blocks
(optional)
Charger
Shades (375 Roll)
Parts List - Nano Roll - 375 - Wirefree
Situo Remotes
(Optional)
1 channel 4 channels
Please note all the QR CODES on your Shade motors.
See the last page on these instructions.
Leveling Shims
(optional)

4
Spacer Blocks and Leveling Shims (Optional)
SPACER BLOCKS AND LEVELING SHIMS (OPTIONAL)
Spacer Blocks - used to clear an obstruction in the fabric path.
Leveling Shims - used if the window frame is out of level.
Connect to shade brackets before installation
Note: do not use more than 2 leveling shims per bracket.
Connect spacer blocks to shade brackets before installation
Note: Do not use more than 4 Spacer blocks per bracket.

5
INSTALLATION - NANO ROLL - 275 - WIREFREE
2. Measure the bracket to bracket width and verify it matches the ordered width. Adjust accordingly
1. Install the wall bracket / end cap assemblies with the supplied screws
Use 1/4” magnetic
driver (incl.)
for Ceiling Mount
Motor
side
Idler
side
for Wall
Mount
Installation - Nano Roll - 275 - Wirefree
Brackets must be level before the
shade is installed!

6
3. Remove the idler end cap with at bladed screw driver
4. Insert motor side completely.
NOTE: When installing, the shade should be
at the upper limit.
Installation - Nano Roll - 275 - Wirefree
INSTALLATION - NANO ROLL - 275 - WIREFREE

7
5. Then, while supporting motor side, put idler end cap over the idler and snap into place.
There will be an audible click.
Installation - Nano Roll - 275 - Wirefree
INSTALLATION - NANO ROLL - 275 - WIREFREE

8
NOTE: If mounting to a wall, remove the
ceiling ange from motor and idler brackets.
Installation - Nano Roll - 375 - Wirefree
INSTALLATION - NANO ROLL - 375 - WIREFREE
1. Install wall bracket/end cap assembly with the supplied screws
for Ceiling Mount
Motor
side Idler
side
for Wall
Mount
Use 5/16” magnetic
driver (incl.)

9
Installation - Nano Roll - 375 - Wirefree
INSTALLATION - NANO ROLL - 375 - WIREFREE
2. Measure bracket to bracket width and verify it matches the ordered width. Adjust accordingly.
Brackets must be level before the
shade is installed!

10
INSTALLATION - NANO ROLL - 375 - WIREFREE
3. Remove both end caps
Motor End cap
1/16” hex tool
Idler End cap
Installation - Nano Roll - 375 - Wirefree

11
Installation - Nano Roll - 375 - Wirefree
INSTALLATION - NANO ROLL - 375 - WIREFREE
4. Align and insert the motor side.
5. Make sure the motor head bracket is fully seated. Secure with cotter pin.
Antenna
Magnetic Connector

12
INSTALLATION - NANO ROLL - 375 - WIREFREE
Installation - Nano Roll - 375 - Wirefree
6. Put idler end cap over idler and snap into place.
There will be an audible click.

13
Installation - Nano Roll - 375 - Wirefree
INSTALLATION - NANO ROLL - 375 - WIREFREE
7. Install magnetic connector into end cap and fasten with 0.050” hex tool (incl.)
8. Install end cap and fasten with 0.125” hex tool (incl.). Route magnetic connector wire behind
cotter pin and away from fabric roll.
Magnet must be ush with end cap.
Cotter
pin
Magnet
wire
Tuck magnet wire behind cotter pin.

14
Programming - Zigbee
PROGRAMMING - ZIGBEE
The lower limit of every shade is preprogrammed to 1/2” from the bottom of the window. After
installing each shade, follow these steps to adjust the lower limit:
STEP 2 - Assign shades to groups :
All grouping of devices is completed within the TaHoma application:
1. Open the TaHoma application and navigate to the conguration tab.
2. Press the + symbol in the upper right corner.
3. Choose the Zigbee device type.
4. Select “Add Zigbee Group”.
5. Label the group.
6. Select the devices you would like to be included in this group.
STEP 3 - Pair devices or groups with a remote:
All pairing of devices and groups to remotes is completed within the TaHoma application. In
order to pair more than one shade to a channel, a group must be created rst.
1. Open the TaHoma application and navigate to the conguration tab.
2. Press the chain/link button next to the remote being congured.
3. Select the shade or group to pair from the list and deselect any other devices.
4. Quick press the programming button on the back of the remote and click OK in the application
to conrm.
NOTE: Each Zigbee Situo remote channel will be capable of pairing to a group containing up to 20 motors.
PROGRAMMING STEPS
(TaHoma/LinkPro Z must be plugged in and on the network)
Step 1: Fine tune lower limit.
Step 2: Assign shades to groups and remotes.
Step 3: Pair devices and groups with remotes.
STEP 1 - Fine tuning lower limit :
1. Click on the 3 dots in the lower right hand corner of the TaHoma app.
Note: You may see a pop-up warning window which could damage the shade.
2. In settings click on advanced settings.
3. Select the shade you want to set the limits to.
4. You only want to select and adjust the lower limit.
Note: Do not set upper limit or change rotation.
5. Press the down button in the app to move the shade to the Factory set lower limit.
6. Click Next.
7. Now make up or down adjustments to shade using the Up / Down increments. Each (button
press) adjustment can take a couple seconds, to execute. Once you are satised with the new
lower limit, press save Limit.

15
Troubleshooting - Zigbee
TROUBLESHOOTING - ZIGBEE Tech Support: 512.832.6939
For Zigbee
Technical Support: 512.832.6939 screeninnovations.com
Please use this QR Code
to access the updated
installation instructions
and related documents.
Problem Possible Cause Action to Take
TaHoma LED is Red. No internet
connectivity.
Check network connection to the internet, and ensure
the TaHoma is properly connected via ethernet or
Wi.
Shade won’t operate. Motor battery is low/
drained.
Check the battery level of a motor via the TaHoma
application. If the battery level is below 20%, the
charging cord can be plugged in and the shade will
operate while charging.
The remote battery
may be low.
Check that the green LED on the remote ashes when
a button is pressed. If the LED does not ash at all,
the remote may need a new CR2430 battery.

16
NOTES:
1.
2.
3.
4.
5.
6.
7.
8.
9.
10.
11.
12.
13.
14.
15.
16.
17.
18.
Pg 8
Notes

17
QR CODES
QR Codes
Please keep a note of all the Serial No.s on your shade motors. OR for larger shade orders,
refer to your Sales Order document for the list.
Room
Room
Shade 1
Shade 1
Shade 3
Shade 3
Shade 5
Shade 2
Shade 2
Shade 4
Shade 4
Shade 6

Screen Innovations
9715-B Burnet Rd, Suite 400 Austin, TX 78758
512.832.6939
www.screeninnovations.com
400089 v. 1.3 19 June 2020
This manual suits for next models
1
Table of contents
Other SI Indoor Furnishing manuals